
Amy Tangerine's Blog, page 21
April 16, 2018
Huffington Post UK!
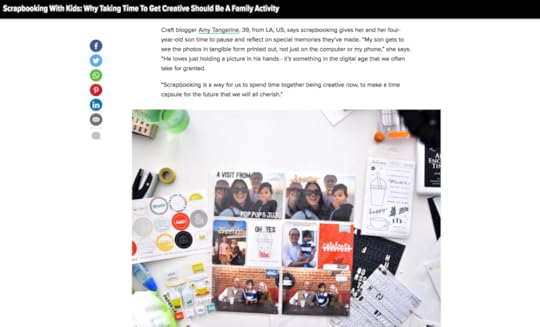
It was a pleasure being interviewed for this piece in the Huffington Post UK on Scrapbooking With Kids: Why Taking Time To Get Creative Should Be a Family Activity. They even used a photo from the Kids Art Binder post. Hope you enjoy the read!


April 10, 2018
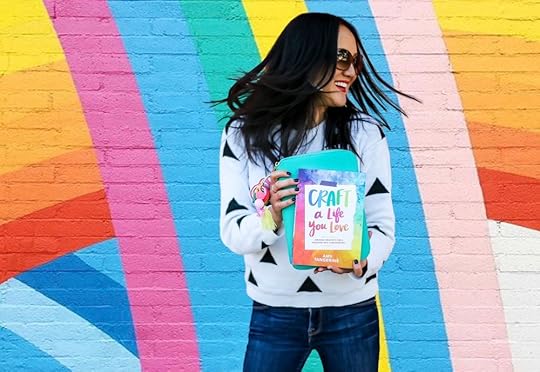
Craft a Life You Love is #1 New Release!
Ahhhh! You guys! My book launched today and is the #1 New Release in Creativity. So humbled and grateful for all of your amazing support. Thank you! We celebrated with a little event at the Pinterest Workshop. The amazing Zim Balloons created this wall to look like the cover. We gathered, played with watercolors and I can’t wait to share more of the Craft a Life You Love goodness
April 6, 2018
Altenew 4th Anniversary Blog Hop + Giveaway!
So excited to be a part of the Altenew blog hop in celebration of their 4th Anniversary! There are some amazing and fun prizes, so be sure to enter below.
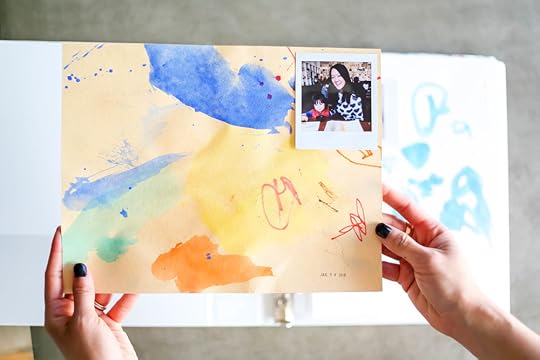
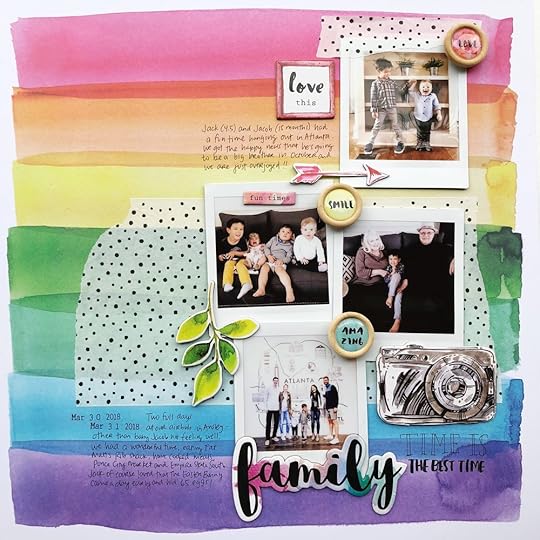
If you're coming from Raquel Bowman's blog and you've never been here before, welcome! I used some of the new products from Altenew to create a scrapbook page of our recent trip to Atlanta over Easter weekend. I used mostly elements from the Reflection and Our Family Scrapbook Collections.
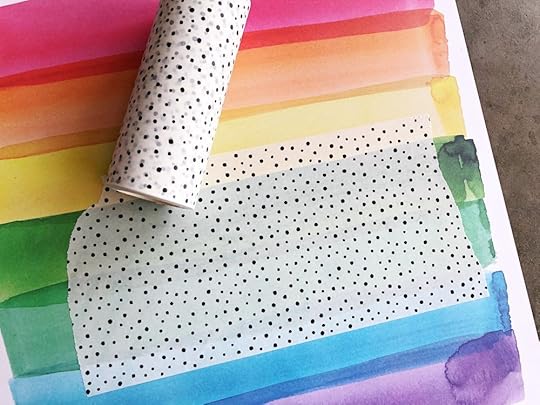
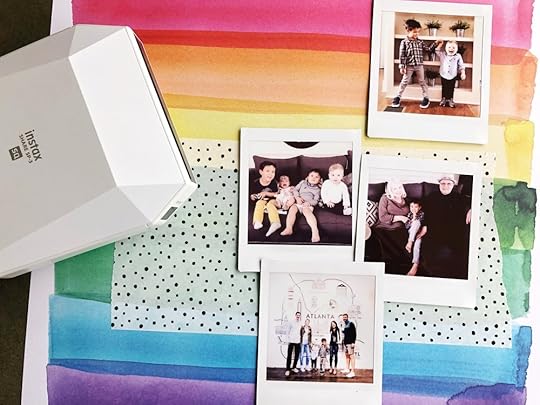
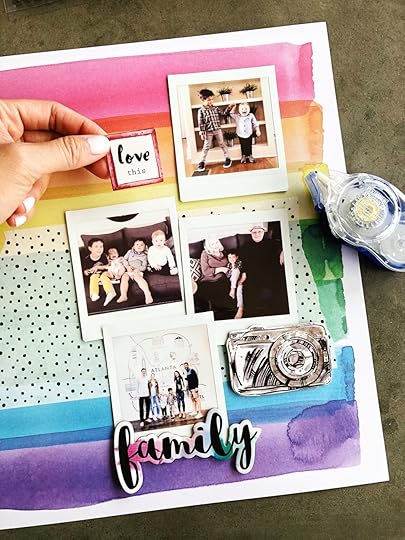
This beautiful watercolor rainbow 12x12 paper from the Reflection Scrapbook Collection grabbed my attention and I immediately had to put it to use. I chose some of my favorite photos from my phone and printed them out with the Instax Share SP-3. Still loving the dotted washi tape and feel the need to put it on all my paper projects these days.
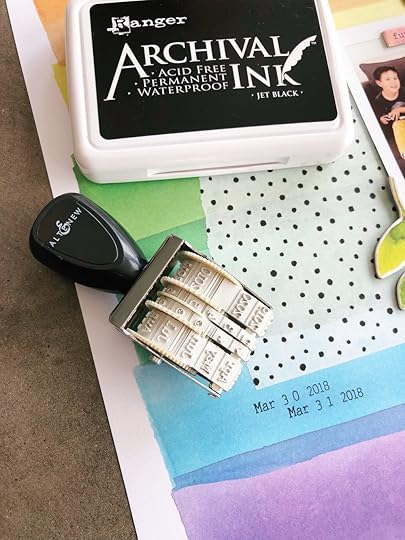
Loving this date stamp from the Reflection Scrapbook Collection. Finished it off with some journaling, and then it was complete.
Altenew is giving away a $50 gift certificate to 5 lucky winners and one Altenew Academy class to 5 lucky winners. There are also 13 awesome companies/crafty friends who are also offering prizes. I'm throwing in two signed copies of Craft a Life You Love! Be sure to leave comments by April 15th, 2018 at 11:59 PM EDT for a chance to win! 30 WINNERS will be chosen at random from the comments left on any of the blogs in the hop and will be announced on the Altenew blog on April 17th, 2018. GOOD LUCK!
Let me know in the comments what your favorite thing is about Spring!
March 27, 2018
Craft a Life You Love Is Available for Pre-Order!!
AHHH!! My head is spinning and heart is bursting. There are times in your life when so many of the pieces just seem to fall into place! I am so excited to say that I'm having one of those moments! As you all know a little over a year ago I self-published a long-time passion project... my creative, self-help guide & journal, “Craft a Life You Love”! I was pleasantly surprised and honored by the sweet and encouraging response I received! After all, the book was based on real experiences from my actual life. It was important for me to share how through the curation of art projects & creative ventures I continue to find happiness & flow. To see how well it resonated with all of you... touched me to my core!
Fast forward to 2018! In the last year I have had the privilege of getting my book picked up by Abrams! It's something I had no idea was even possible, but it turns out it is. If you want to hear more about that experience and process, I plan on making a video about it, so please feel free to leave any questions in the comments. We will be re-releasing Craft a Life You Love as an updated, expanded version with bonus material! That means more to love! Also, this 2.0 copy will be in the bright & shiny colors it was meant to be seen in. I really wanted to make sure that even if you bought the first version, you would find value in having the second!
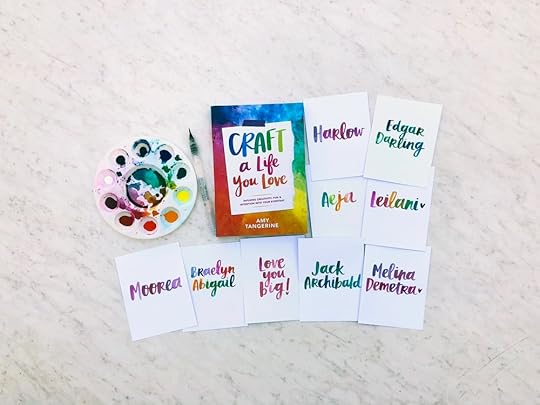
Though Craft a Life You Love doesn't get released until April 10, you may want to go ahead and pre-order it now as we have a super special gift we are offering! We thought long and hard about offering something really unique - and we think we came up with the best idea. You all have been loving my watercolor brush lettered quotes for some time now, and now you can have a custom one of your own! Choose someone's name, a favorite saying, or whatever you want! I will sign the back of it and you can have it framed for display, use it as a book mark or stick it into the book as a name plate!
Amazon | ABRAMS | Barnes & Noble | IndieBound | Books A Million | Indigo | Powell's
Pre-order by April 10th on Amazon (or any of the retailers listed above) & fill out this form to redeem your special gift! Thanks as always for your amazing support - it means the world. Please spread the word to friends. I know I may be scripting several hundred of these, but I think it will be so awesome for you all to have them in your hands. I hope you enjoy the custom watercolor piece as a token of my affection! Love you big!
March 21, 2018
Zinia's Typography Layout
Hello friends! It’s Zinia here and today I’m going to share with you a really fun idea that will help you use up your leftover thickers and word/phrase stickers.
I got really inspired by browsing through some typography and word art posters on pinterest and then I started thinking, wouldn’t it be fun to make a scrapbook layout using just words and letters? So I decided to give it a go.
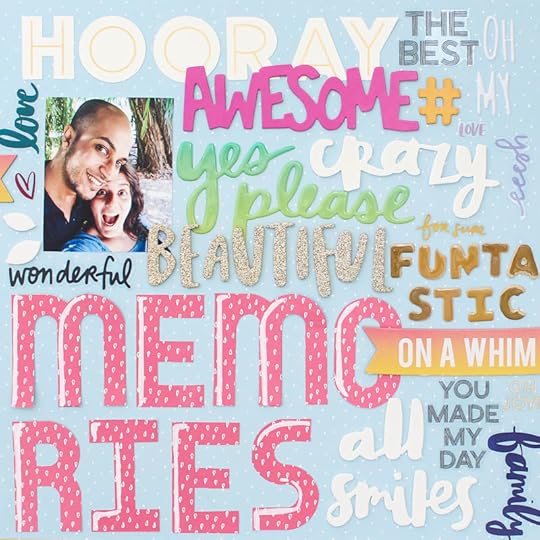
Now it can be difficult to fill a full 12x12 page just using thickers so I pulled out my WeR Memory Keepers Mini Alphabet punchboard and I cut a word using it to fill a big area of my page. You can totally skip that step or cut some big letters using your favorite dies or your electronic die-cutting machine instead.
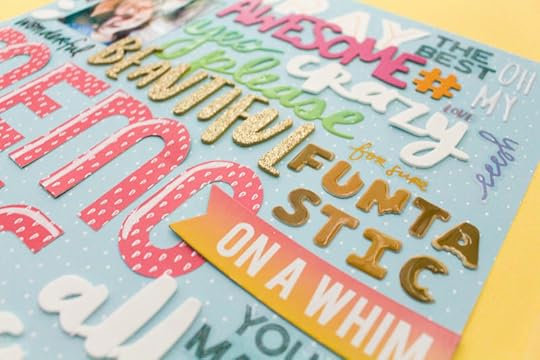
Going through my thickers stash, I was pleasantly surprised to see that all Amy’s collections can work together beautifully even though they are so different from each other. The letter and phrase stickers can connect with the colors and font families and create a delicate balance between them.
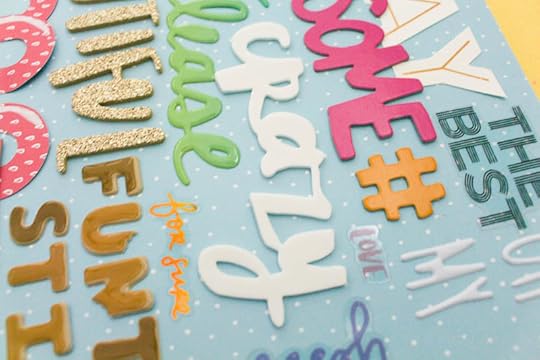
It's better to start placing the bigger words and elements first and then start filling the gaps with smaller stickers. You don’t need to stick to thickers, you can bring in any words from sticker books you have laying around.
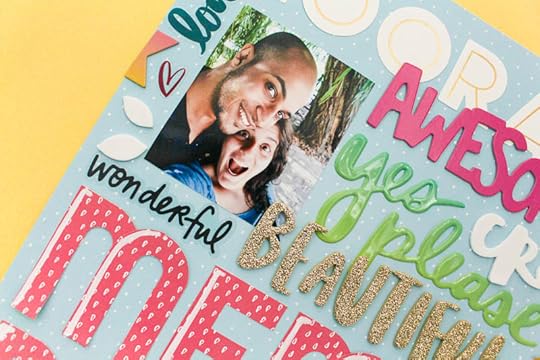
A good way to create balance between all the different colors and materials is to use more pieces from a specific color. For example, I added more white and pink elements on my layout compared to the other colors. If you are intimidated to go all out and mix many colors and fonts, you can try a more controlled version. You can focus on one color, or create an ombre transition from a color to another. If you are a minimalist, you’ll absolutely love this technique to create a white on white look.
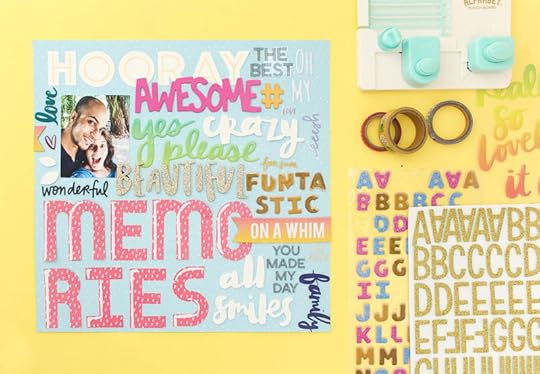
Just pull out your favorite supplies and any leftover thickers and word stickers you have in your collection and have fun creating a background using only words!
I really hope you will challenge yourself and try this out; you are going to love it.
Zinia
Abstract Inspiration Blog | Instagram | Twitter | Facebook
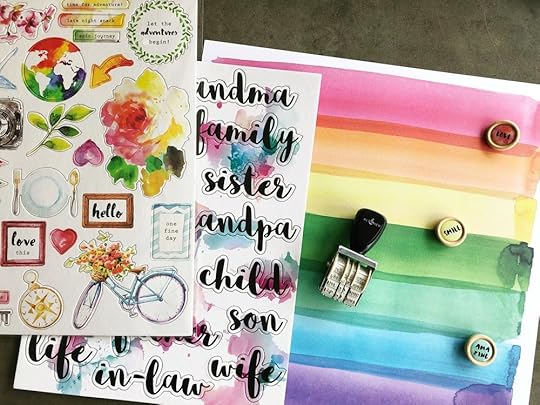
SUPPLY LIST: 345697 12x12 PATTERNED PAPER Shine Bright, 345696 12x12 PATTERNED PAPER Flower Power, 345713 THICKERS Let's Dance, 345720 STICKER BOOK, 345718 WATERCOLOR RESIST TAG, 378745 THICKERS Donut Worry, 378746 THICKERS LOL, 341886 THICKERS Memento White, 341887 THICKERS The Lucky Ones, 341884 STICKER BOOK, 376223 THICKERS Wild, WeR Memory Keepers Mini Alphabet Punch Board
Thanks for sharing this layout with us, Zinia! Other Design Team member posts can be found here. Shop Sunshine and Good Times at your local retailer or online at Scrapbook.com
March 16, 2018
Bullet Journal Weekly Before + After
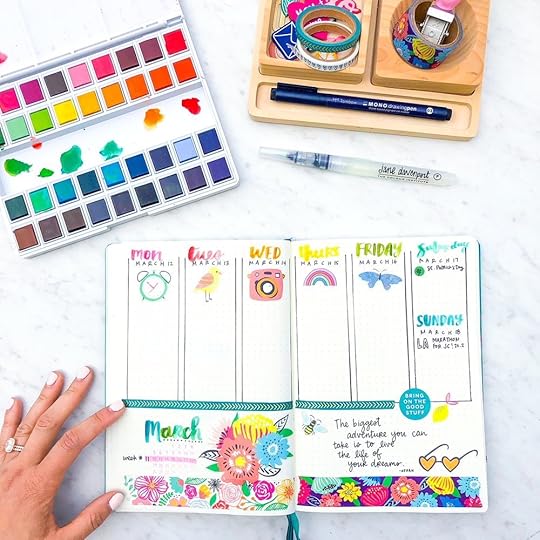
This is what my bullet journal looked like at the beginning of the week. The spread took a little too long to put together and I’m rethinking continuing with a bullet journal after this month is over. Just when I thought I was close to “planner peace”. Ha! My main motivation for moving onto another system is that I would ideally just like more time to create/decorate/journal instead of having to set it up every time.
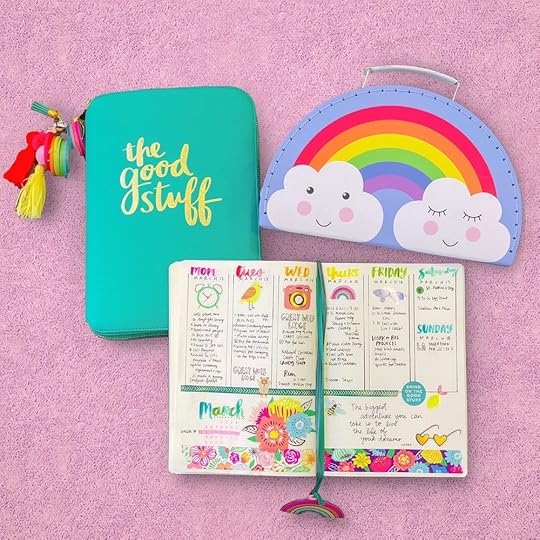
Although now that the week is nearly over, I am loving the way this looks. So who knows what I will actually do. When I was at PlannerCon, I bought the Hobonichi Cousin Spring edition (April start), so I am really excited to give that a go. We still have some planner pouches left - if you haven't gotten yours yet, I would highly recommend doing so soon! Also, how cute is the rainbow suitcase from Rabbit Ladders? What are your plans for the weekend?
March 13, 2018
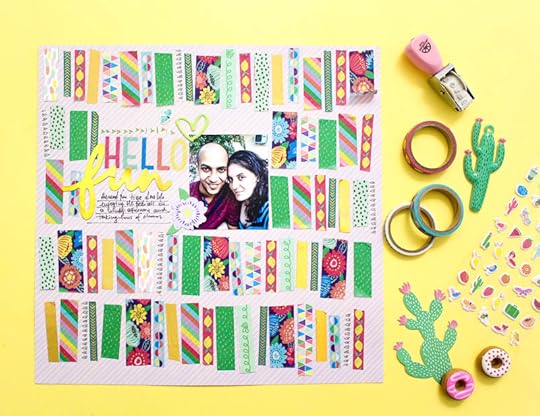
Zinia's Washi Strips Layout
Hello fangerines! It’s Zinia here and today I’m back with a really fun technique and a super easy scrapbook layout using Amy’s latest collection Sunshine & Good Times!
It’s a really amazing collection to play with and you should definitely take a look into it but if you don’t own any of these products yet fear not! It’s a technique-based design so you can basically recreate it with any collection and supplies you have on hand.
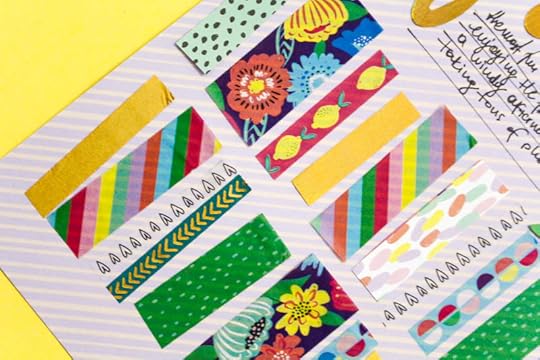
Our whole design is based on washi tape! Yes this is a great way to use up some rolls from your growing washi stash. Most of us have more washi tape than we can ever use so I’m always thrilled to find ideas and techniques to incorporate more of it in my projects.
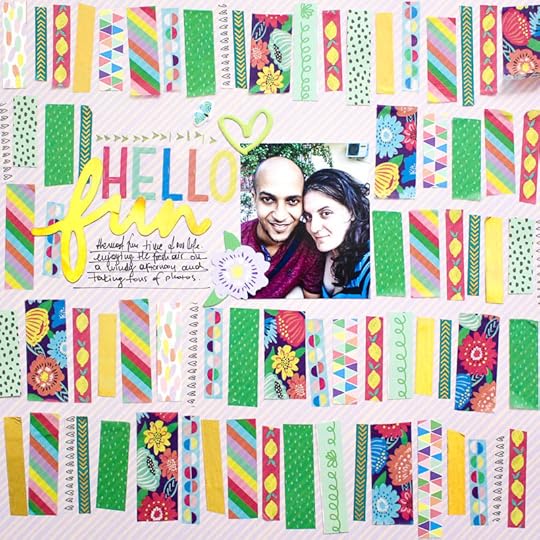
So let’s start by picking a few rolls of washi (I’m using the new washi tape pack from the Sunshine & Good Times collection) and start playing! By the way this technique works even better if you chose washi tapes in different widths.
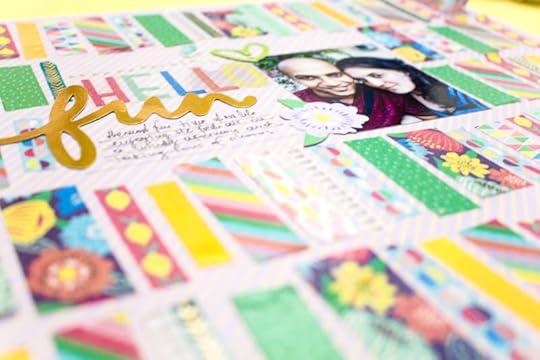
Creating this page is super easy and this is definitely a great project to make together with children. All you need to do is cut small pieces of washi tape and arrange them next to each other. Try to keep the length relatively similar but don’t try to be very precise and measure it, you want to have some organic variety between the strips.
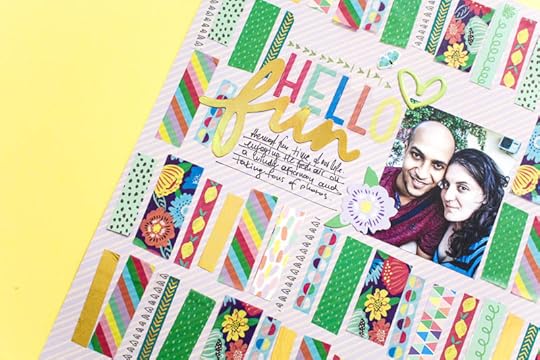
You can use as many different patterns as you like. If you feel that things are getting a bit more repetitive than you want you can always bring another roll of washi into the game. Alternatively you can use pieces of branding strips to break the repetition.
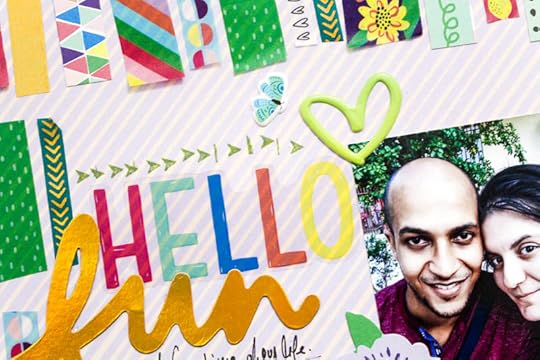
Don’t forget to leave a space for your photo, title and journaling. When I reached the middle of the page I stopped adding washi tape strips to make sure I save enough space for my other elements. I placed my photo and a few stickers & ephemera pieces to roughly calculate the space I need. Then I continued adding my washi strips till I filled the whole page.
Once the background was ready, I went back to my photo/title area to add some more details and finish off the page.

It’s such a fun design to create so get those washi baskets out and start! If you want a more structured look you can cut all the strips at the exact same length. On the other hand if you want it a little bit messier you can rip the washi strips instead of cutting them with your scissors for extra messy edges.
I really hope you got inspired and excited to use up your washi stash. Until next time, happy crafting!
Zinia
Abstract Inspiration Blog | Instagram | Twitter | Facebook
SUPPLY LIST: 345688 Boba Buddy, 345713 THICKERS Let's Dance, 345712 MINI PUFFY STICKERS, 345720 STICKER BOOK, 345709 EPHEMERA, 345710 WASHI TAPE, 345716 ROTARY ICON STAMP
Thanks so much for sharing this lovely layout, Zinia! Other Design Team member posts can be found here. Shop HUSTLE & HEART now! Check your local retailer and online at Simon Says Stamp and Scrapbook.com - Sunshine and Good Times is in stores now too - Scrapbook.com
March 7, 2018
Altenew in a Traveler's Notebook
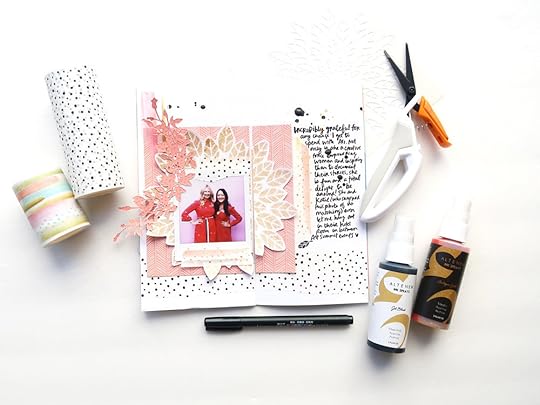
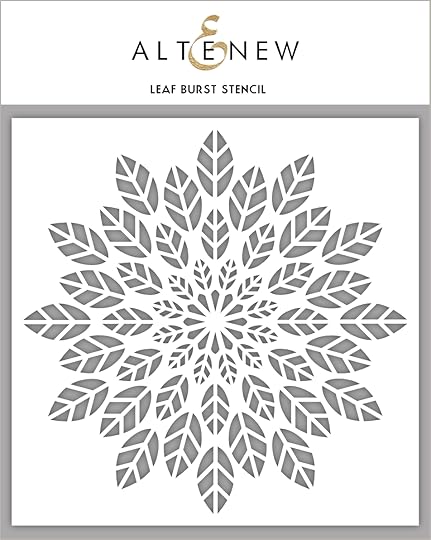
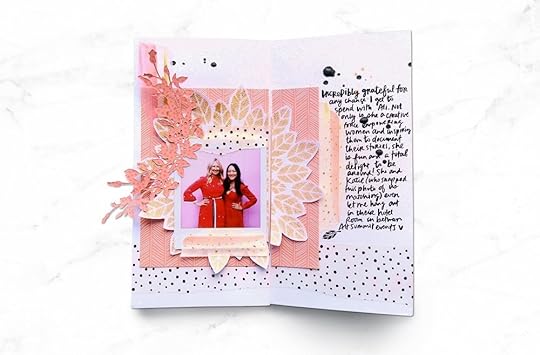
So excited to be a part of the Altenew blog hop in celebration of their March release! There's fun prizes plus a giveaway for a $30 gift certificate below, so be sure to enter. If you're coming from Debby Hughes' blog and you've never been here before, welcome! I used some of the new March release products from Altenew to create a spread in my traveler's notebook. What I love about this smaller format is that you can allot yourself a smaller amount of time and try new techniques, or just combine your favorites for a fun little spread. There are no rules, so I tried a few of my favorites and printed out a photo from my phone using the Instax Share SP-3. When I first laid my eyes on the dotted washi tape at Creativation (video here), I could hardly contain my excitement. I used the leaf burst stencil with the Antique Gold Ink Spray on white cardstock and then cut around the design using these scissors.
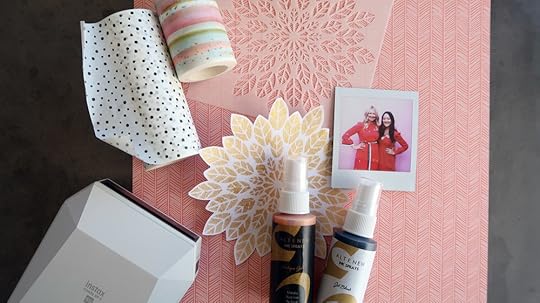
Then I began laying out the design to cover part of both pages.
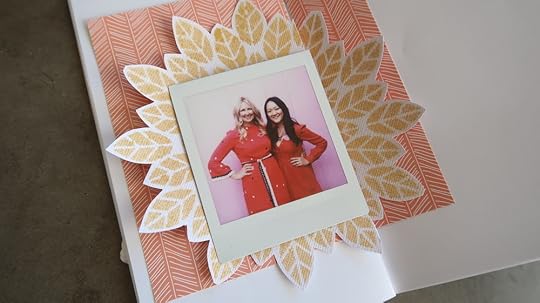
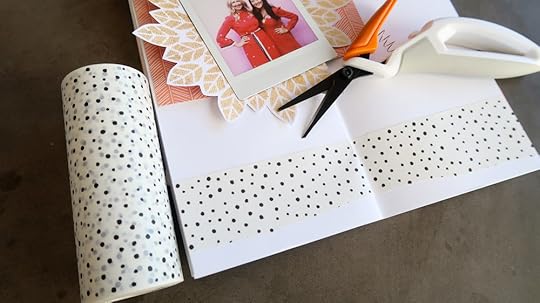
I added the Leafy Garland Die cut from paper from my latest collection, Sunshine and Good Times. For the washi tape, I just tore some of the pink and gold elements from the Watercolor Strokes roll. I finished off the journaling using a Tombow Fudenosuke pen.
Prizes: To celebrate this release, Altenew is giving away a $50 gift certificate to SIX lucky winners! Please leave a comment on the Altenew Card Blog and/or Altenew Scrapbook Blog by Wednesday, March 14th for a chance to win. Six winners will be announced on the Altenew blogs on 3/17/2018.
GIVEAWAY IS NOW CLOSED. THANKS TO ALL WHO ENTERED! A $30 Gift Certificate is also being given away here. Leave a comment and a winner will be chosen and announced on this post. CONGRATS TO KATHY R - You are the winner! We have given your email to Altenew, so look out for the GC soon!
Now hop on over to Lydia Evans' blog!
Altenew in a Traveler's Notebook + Giveaway
So excited to be a part of the Altenew blog hop in celebration of their March release! There's fun prizes plus a giveaway for a $30 gift certificate below, so be sure to enter. If you're coming from Debby Hughes' blog and you've never been here before, welcome! I used some of the new March release products from Altenew to create a spread in my traveler's notebook. What I love about this smaller format is that you can allot yourself a smaller amount of time and try new techniques, or just combine your favorites for a fun little spread. There are no rules, so I tried a few of my favorites and printed out a photo from my phone using the Instax Share SP-3. When I first laid my eyes on the dotted washi tape at Creativation (video here), I could hardly contain my excitement. I used the leaf burst stencil with the Antique Gold Ink Spray on white cardstock and then cut around the design using these scissors.
Then I began laying out the design to cover part of both pages.
I added the Leafy Garland Die cut from paper from my latest collection, Sunshine and Good Times. For the washi tape, I just tore some of the pink and gold elements from the Watercolor Strokes roll. I finished off the journaling using a Tombow Fudenosuke pen.
Prizes: To celebrate this release, Altenew is giving away a $50 gift certificate to SIX lucky winners! Please leave a comment on the Altenew Card Blog and/or Altenew Scrapbook Blog by Wednesday, March 14th for a chance to win. Six winners will be announced on the Altenew blogs on 3/17/2018.
GIVEAWAY: A $30 Gift Certificate is also being given away here. Leave a comment and a winner will be chosen and announced on this post on 3/14!
Now hop on over to Lydia Evans' blog!
March 6, 2018
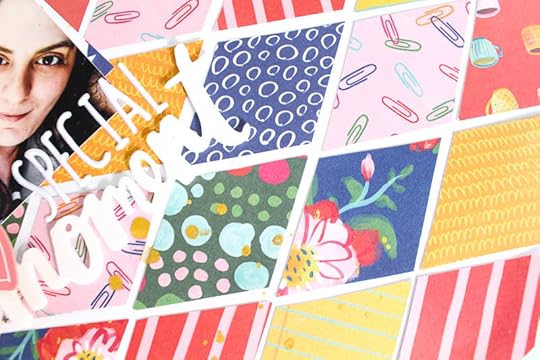
Zinia's Diamond Background Layout
Hello everyone! It’s Zinia here again and I’m back with another scrapbook layout using the gorgeous Hustle & Heart collection designed by Amy.
For this layout, I’m focusing on the background. I wanted to create my own pattern using a mix of designs from the 6x6” paper pad. I really enjoy using the 6x6” pad cause the patterns are scaled down and they look especially beautiful when they are cut down in small pieces.
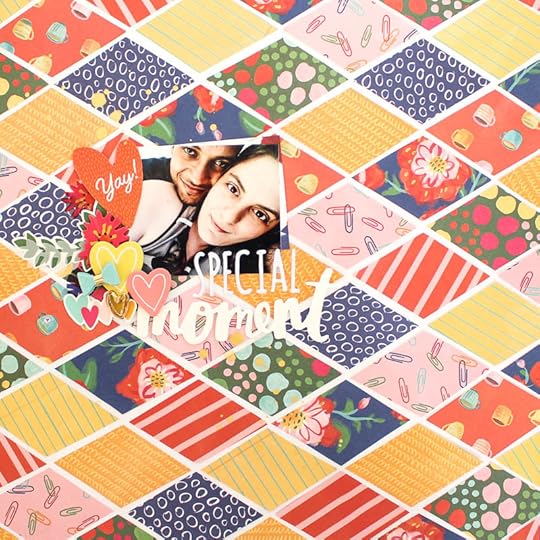
I started by cutting down a diamond piece in the size I wanted. I went a little bit random with the first piece but once I was happy with how it looked, I used it as a mask to cut the rest of the pieces in the exact same size and shape.
To do that, I traced the first diamond at the back side of my pattern papers and cut them out with my favorite scissors. You can use a trimmer if you want but I find scissors a bit faster. Plus, the shape is super simple and small that you can cut it easily with scissors without obvious imperfections.
When all the diamond pieces were cut, I started building my pattern. I used a ruler to make sure the first row was straight and then I just followed with the rest of the pieces without worrying about being very precise.
The pattern is fun and bold so even if there are small imperfections in the shape of the pieces or their placement, they won’t be really visible once you have everything stuck down.
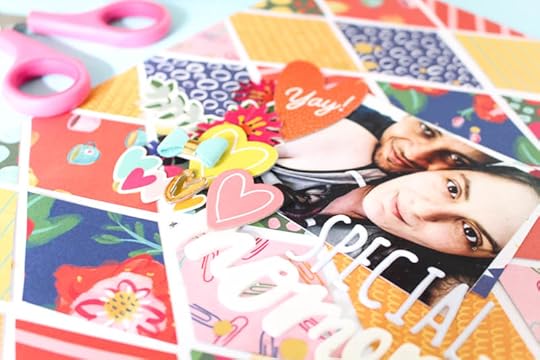
After filling the whole page with the diamond pieces, I started embellishing the layout. Since the background was really bold, I chose a few embellishments that will stand out without making the design look busy. Dimensional embellishments like the suede bows and the layered stickers will work great.

I was also really happy to see that the white thickers stood out beautifully against the colorful background so I used those for my title.
I finished the page with a few gold splatters just to add an extra touch of gold to the design.

I really hope you enjoyed this layout and you got inspired to use your Hustle & Heart supplies in fun and creative ways. Until next time, happy crafting!
Zinia
Abstract Inspiration Blog | Instagram | Twitter | Facebook
Thanks so much for sharing this layout with us, Zinia! Other Design Team member posts can be found here. Shop HUSTLE & HEART now on our shop site!
SUPPLY LIST: HUSTLE & HEART 6x6 PAD (341883), THICKERS Memento White (341886), THICKERS The Lucky Ones (341887), LAYERED PAPER STICKERS (341885), STICKER BOOK (341884), MINI FAUX SUEDE BOWS (341893), THICKERS LOL (378746)
Disclosure: Some of the links above are affiliate links. I receive a small percentage of sales at no cost to you. My creative partners and I really appreciate your continued support and every little bit helps me to bring you consistent content!
Amy Tangerine's Blog

- Amy Tangerine's profile
- 62 followers

