
Amy Tangerine's Blog, page 19
June 20, 2018
Hobonichi Marble Makeover
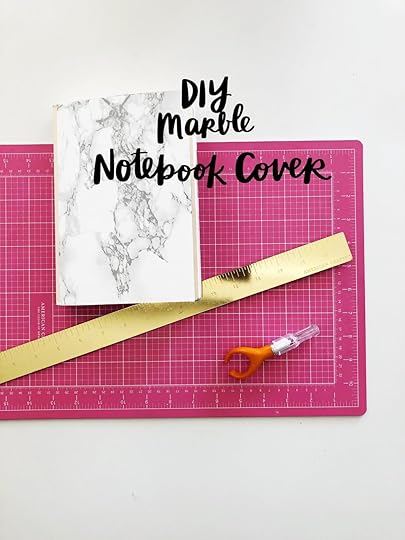
Hello Team Tangerine! As you can see below, my beloved Hobonichi is a little worn out. I’m not ready to let it go or get another one, so I’ve decided to give it a little makeover. This project requires very few supplies and the steps are simple and easy to manage. If you have a well-loved journal or planner in need of an upgrade, check out the steps below or watch the tutorial on YouTube!
What you’ll need:
Hobonichi or well-used notebook
*Clear tape or a paperweight
*Washi Tape (optional)
Step 1: Gather your supplies. Make sure you have everything you need and a clean, clear space with plenty of room to work. It helps if the area is well-lit, so you can see what you’re doing!
Step 2: Measure the cover of your Hobonichi and trace the outline on the contact paper. You will probably want to take a look at a large piece of the contact paper and line it up with a part of the pattern you like best. Make sure that you measure out two pieces of contact paper— one for the back and one for the front.
Step 3: Lay the contact paper out on the cutting mat. It may help to use a small piece of clear tape or even a paper weight to hold the contact paper down. Because it’s stored in a roll, it tries to roll back up and it can be hard to keep it flat! That’s what I found out during filming!
Step 4: Hold the paper taut and carefully use the ruler as a guide for your craft knife as you cut along the marks you made. Watch your fingers!
Step 5: Embrace your mistakes. Even though this is a simple project, chances are that something might not go the way you like. Don’t worry. Perfection is not required.
Step 6: Hold the contact paper against the Hobonichi and make sure it’s lined up the way you like. You may need to do some trimming, but it’s best to do that after you stick the paper on, that way you don’t cut away too much.
Step 7: This is the scary part, carefully peel away the lining of the contact paper and gently smooth it over your Hobonichi cover. It’s a good idea to do this slowly and to smooth from top down to the bottom in order to avoid air bubbles. A good tip is to use your ruler instead of your hands for a nice finish. You’ll do this to both sides of the journal. At this point, you may want to trim any edges that are too long or a bit ragged.
Step 8: Make it your own! I chose not to decorate any further, but you could easily add your favorite washi tape to the spine for a finished look!
So, what do you think about the final product? Will you give any of your favorite notebooks or journals a summery fresh makeover? Let me know in the comments below! And remember, it doesn’t have to be perfect to look great! Be sure to share your makeover results with me on social media too!


June 18, 2018
Join Me for a Free Webinar with Get Messy!
Join me in sharing your story
May 31, 2018
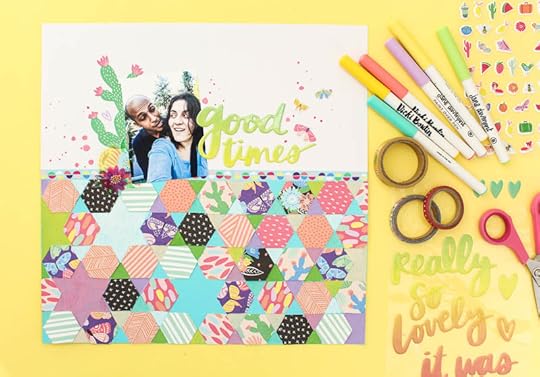
Zinia's Bold Hexagon Pattern
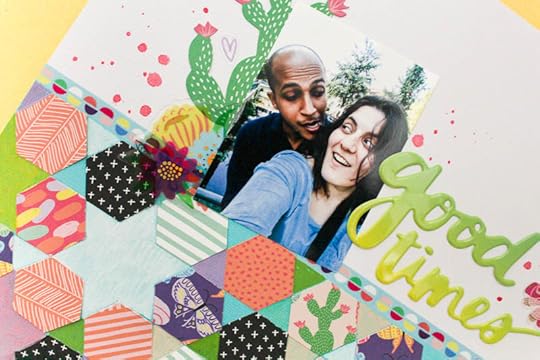
Hello crafty friends! It’s Zinia here and today I want to share with you a really fun technique to create a custom pattern for your projects. Although I’m using this on a scrapbook layout, you can adjust the size and use it in cards minibooks or any other type of craft.
I used some hexagon dies to cut my paper but if you don’t have dies you can use a punch, your electronic die-cutting machine or just fussy cut the shape. I used some of my favorite patterns from Amy’s latest collection Sunshine and Good Times and I made sure to grab a nice variety of patterns and colors.
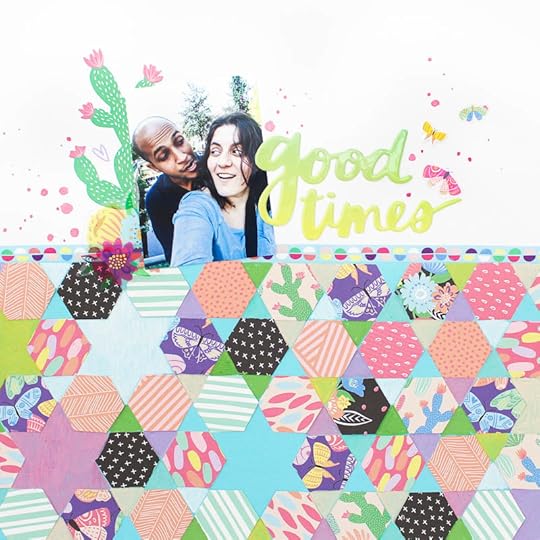
I decided to build my pattern on top of some colored cardstock. I pulled a beautiful sheet of turquoise and used it to cover approximately half of my background. I also used a strip of washi tape as a border to separate the white background from the turquoise pattern base.
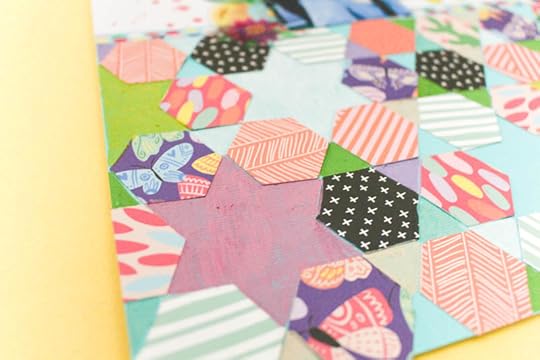
The next step is really fun and easy! Just grabbing the hexagons randomly and sticking them down to build a pattern. Instead of aligning their flat sides, I connected my neighboring hexagons at the corners. This way I created some small triangle gaps in between to let the turquoise pop.
If you skip one hexagon in this arrangement, you will create a star shape, so I used that to my advantage and intentionally created some stars. The create the perfect little spot for extra embellishments or just to add your journaling.
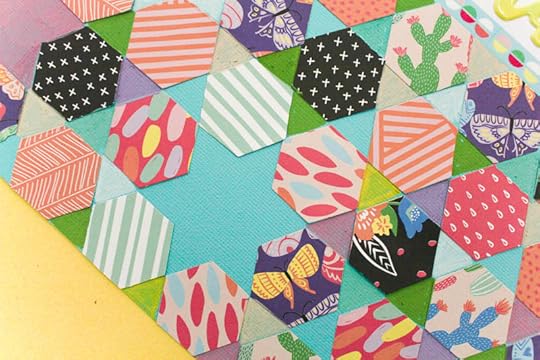
Once all the hexagons were stuck down, I decided that the whole piece had too much turquoise and it didn’t really look balanced. To fix that, I pulled my favorite American Crafts paint markers and I colored in some of the gaps with different colors.
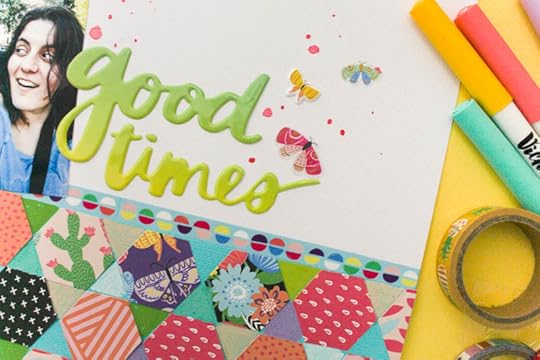
When the balance was restored and I was happy with my pattern piece, I moved to the top of the page and I started working on my photo and title. I tried to keep things relatively simple cause I didn’t want to steal the spotlight from my fancy hexagon pattern.
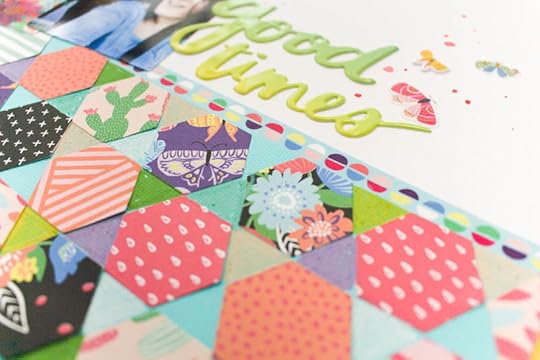
I used a few ephemera pieces to frame my photo and a few butterfly stickers flying away from my title. Then as a final touch I added a couple of pink splatters around.
I really hope you will give this technique a go and you will create some fun hexagon patterns with your favorite papers. Until next time, happy crafting.
Zinia
Blog | Instagram | Twitter | Facebook
SUPPLY LIST: 345685 12x12 PATTERNED PAPER Family Fun, 345686 12x12 PATTERNED PAPER Click Click, 345692 12x12 PATTERNED PAPER Let's Hug, 345694 12x12 PATTERNED PAPER Love You Bunches, 345698 12x12 PATTERNED PAPER Yesss Please, 345703 12x12 PATTERNED PAPER Flutter By, 345704 12x12 PATTERNED PAPER Turn the Corner, 345707 12x12 PATTERNED PAPER Bloom Big Time, 345713 THICKERS Let's Dance, 345712 MINI PUFFY STICKERS, 345720 STICKER BOOK, 345709 EPHEMERA, 345710 WASHI TAPE, American Crafts Paint Markers
Thanks for showing us how you created this fun layout, Zinia! Other Design Team member posts can be found here. Shop Sunshine and Good Times at your local retailer or online at Scrapbook.com
May 29, 2018
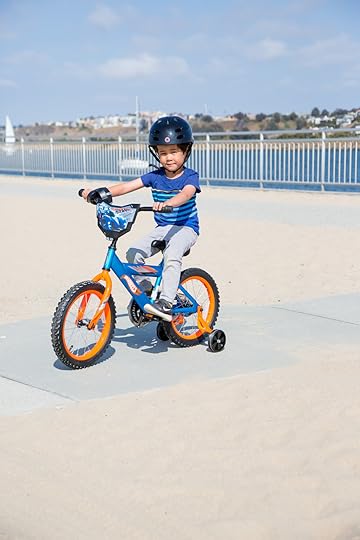
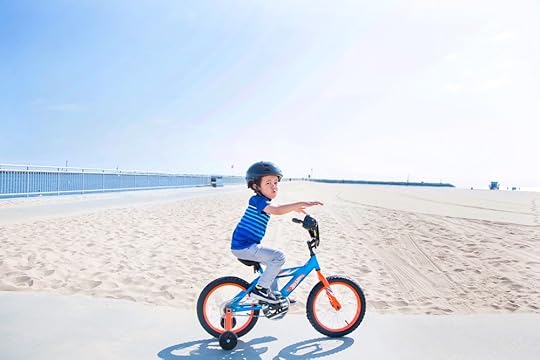
Racing to summer - Jack's brand new bike!
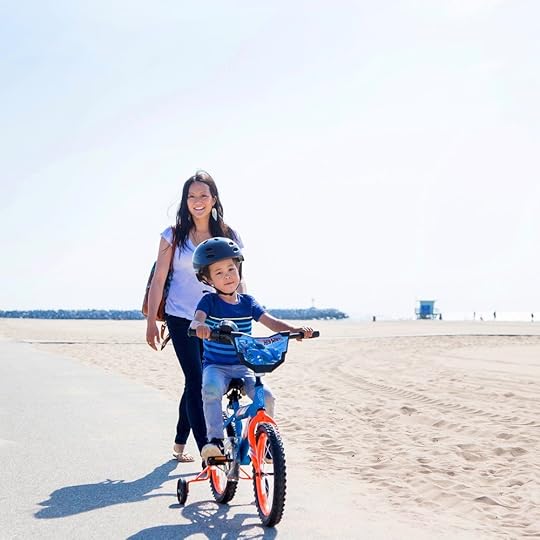
In honor of National Bike Month, my friends at Dynacraft sent Jack his very first bike! I remember my first bike and it was a red Schwinn that my parents said at the time was more expensive than a lot of the things they owned. I still have fond memories of riding my bike to so many places in Wilmette, IL and was so happy once I got the training wheels off when I was five. I felt similar joy when I got a new bike when Jack was a baby - these photos just melt me.
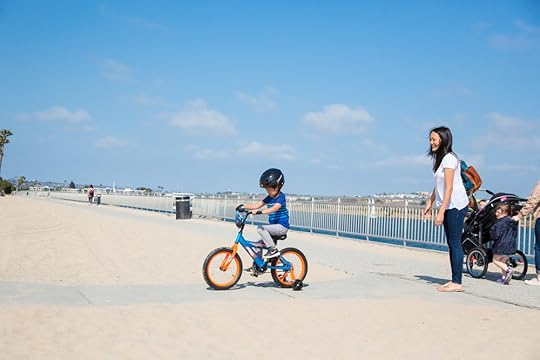
Jack got this awesome 16" Hot Wheels Bike with a special "Rev Grip" that makes it look, sound, and feel like a real motorbike! I wish I had captured Jack's reaction after it was put together because it was truly priceless. He now wants to take it for a spin every single day. The steel BMX frame and all-terrain tires help young riders race through all types of road conditions safely & smoothly, and make for hours of biking fun! We took it for a spin at the beach and I was so grateful to have Stephanie from Ographr in tow to capture the smiles.
The Ographr app makes it so easy to find and book affordable, professional, vetted photographers in a flash. It's been my go-to lately and it's been wonderful having such a great resource at my fingertips.
Thanks Dynacraft for the awesome 16" Hot Wheels Bike - we love it!
May 25, 2018
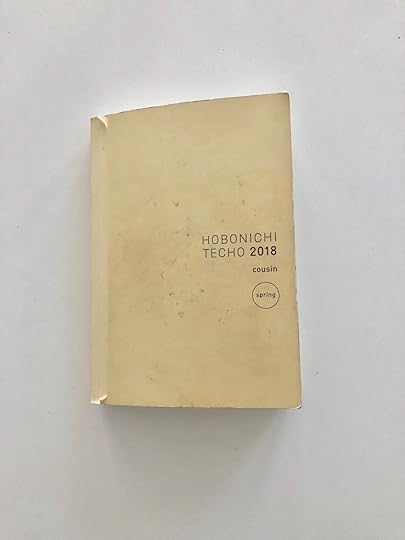
Hobonichi Techo Flip Through!
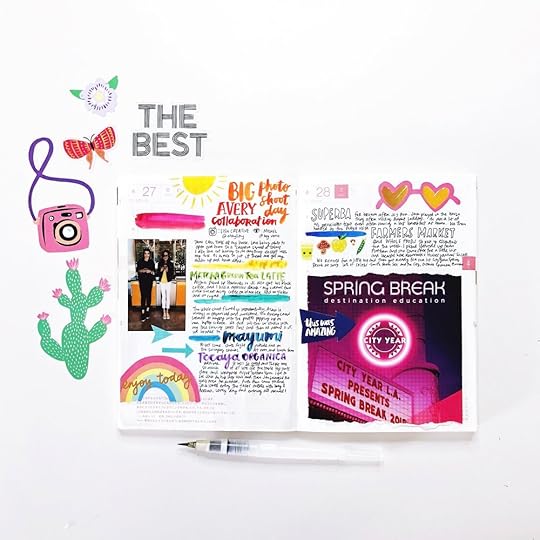
Recently, I've felt like I needed a change and while I love my bullet journal, I couldn't help thinking that it was taking too long to set up. So when I was at a Hobonichi class at PlannerCon in March, I totally caved and I’ve been loving it. I got the Hobonichi Techo Cousin 2018 Spring Edition in A5, which is same size as my bullet journal but the pages are already marked!
If you aren’t familiar with Hobonichi planners, they’re filled with Tomoe River Paper which is the most amazing paper. It’s like magic because it’s super thin and a bit transparent, but you can also use watercolors and markers with no bleed through.
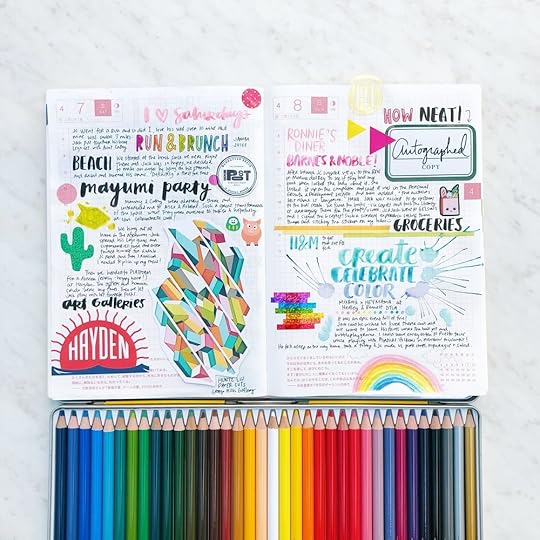
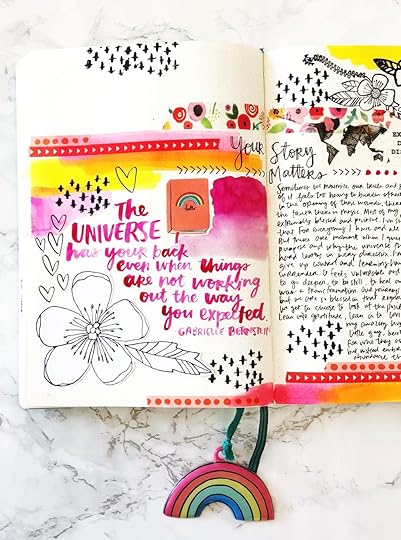
I’ve been having a really fun time stamping and pasting things into my Hobonichi. You can see that the most random things get included like the sticker to Jack's salmon sashimi from Whole Foods. If you've been following me for a while, you know I love to put in all kinds of random bits. This planner is exactly what I’ve been longing for - a place to secure all those loose items I tend to keep and let pile up for scrapbooking "one day". I use it to document my days by combining lots of different mediums and using a bunch of my supplies - win win!
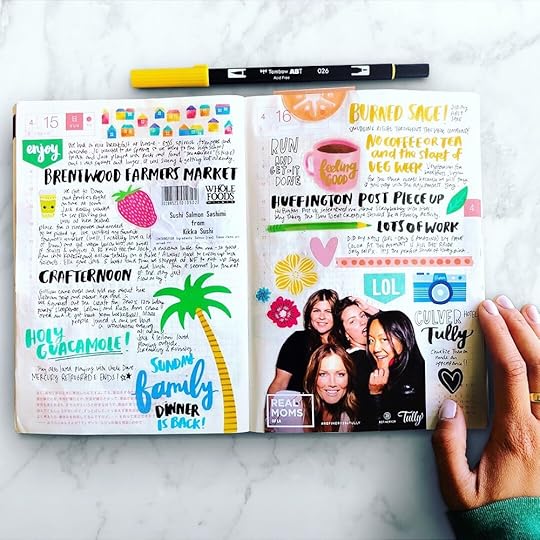
Watch this video to see me flip through my new planner and share some of the tips I’ve figured out along the way.
In the video, I also mentioned my sticker book and planner pouch in case you're interested in either!
Let me know if you have any tips for keeping a Hobonichi planner or suggestions for a cover you love - it doesn’t have to be an official one! I’m still looking for the right one.
Shop Sunshine and Good Times at your local retailer or on Scrapbook.com
May 24, 2018
Great Wolf Lodge + crafting with kids
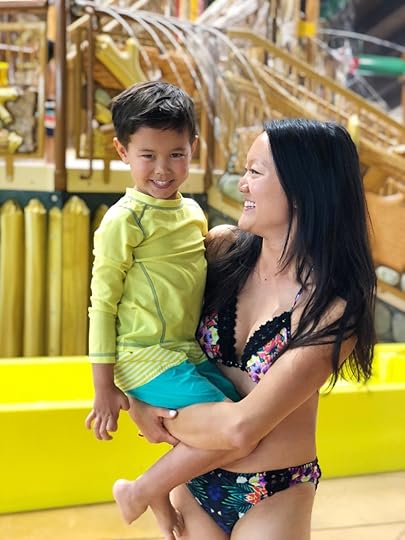
I was recently given the opportunity to pack up the family & spend some time at Great Wolf Lodge. It was our first trip there (and to any indoor waterpark), and wow, what an experience! Even from the very start of our stay, I was tremendously impressed. They are so high tech! Upon arrival, I got a warm text welcome from Brinley, our personal in-house assistant. How cool is that? We stayed in a family suite which was cute & cozy. It truly had the perfect cabin aesthetic with two queen sized beds and a pull out sofa.
As far as activities went - we had a non-stop blast! Our friends came along for the adventure. The kids loved experiencing the waterpark and taking brief breaks to munch on tasty nachos. My college friend Dana even convinced me to go down a giant waterslide which was all at once nerve wracking and oh so fun. It reminded me of being a teenager as we sat in one of those figure 8 rafts and coasted down the huge tube. After we dried off we got down & boogied at the bubble party. Guys, this kiddie celebration was too cute! They played popular pop tunes while the room filled up with bubbles. Another fun adventure was playing a mystical, interactive video game where Jack and I got to wave wands & make some magic of our very own! Apparently doing the entire course can take 8 hours, so it's a wonderful thing to do over the span of a couple days.
The meals there were delicious & extremely accommodating for those with specific dietary needs. The menu is marked accordingly so I was able to order gluten-free calamari & a gluten-free wedge salad with ease. For all of my meat eaters out there, I suggest ordering the steak. It was delicious!
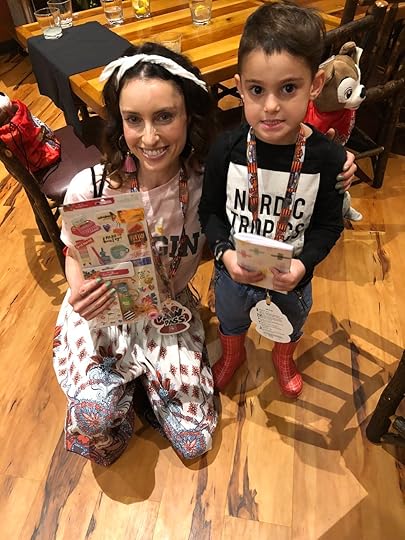
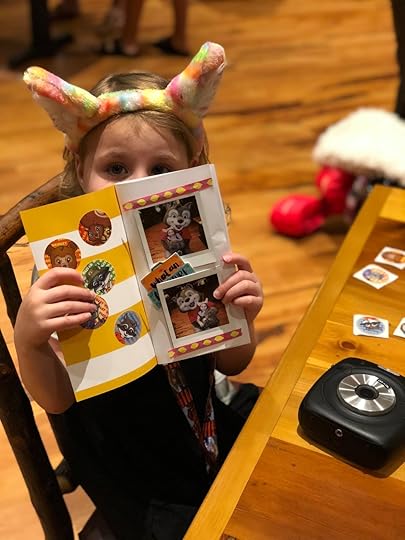
After putting ourselves into a little bit of a food coma, the kids got personalized leather bracelets from a kiosk downstairs. The stand had a machine that etched the kids' names on colorful cuffs. In addition to the stuffed animals they got to see get stuffed and dressed, these were perfect souvenirs!
The next day I got the opportunity to host a craft session for a bunch of great kiddos and parents! Each participant got a pre-made design kit to help them style their very own mini traveler's notebook. All of the children took an Instax picture using the SQ10 with Wiley - the adorable, furry Great Wolf Lodge mascot - which served as the centerpiece of their project! Everyone was so creative & colorful with their individual books. It truly was a fun craft.
We ended our trip with a visit to the candy store where we got some sweet parting gifts! While our stay at Great Wolf Lodge was quick, it definitely was a memory that will last a lifetime! If you have little ones or are just young at heart I highly recommend you stop by for your very own adventure!
Thanks to Great Wolf Lodge for hosting my family for the night in exchange for leading the workshop!
*****
Since May is National Water Safety Month, Aquatics Director at Great Wolf Lodge Southern California Wendy Rosales is sharing her top water safety tips, to spread awareness and educate families on the importance of staying safe around water.
Nationally recognized as a leader in water safety by Ellis & Associates, a renowned international organization focused on aquatic safety, Great Wolf Lodge has safely welcomed millions of families over the years to its resorts. Whether planning a family vacation this summer to the beach, lake or waterpark, families can prepare for fun-filled time in the splash zone with these top tips:
Never swim alone. Always use the buddy system and be sure the area is well supervised by lifeguards before you or other family members enter the water. Encourage your child to wear a life jacket. Many public pools and water parks provide life jackets for your use free of charge and it’s better to be on the safe side if your child is not a confident swimmer.Never assume someone else is watching your child. Even with lifeguards nearby, you have the responsibility for your child. The best way to keep your child safe is to play right alongside them.Stay hydrated. Swimming and playing takes a lot of energy, especially during the hot summer months. Drink plenty of water or sports drinks and rest in a cool location.Forget the Bling. Before heading to the beach, pool or water park, avoid swimsuits that have ties, grommets or decorations that could get caught on something during water activities.Skip the flip-flops. Look for sandals with a heel strap or a full-coverage slip-on water shoe that will stay in place both in and out of the water.Too much sun is no fun. Be sure to limit your exposure during peak hours of 12pm-3pm and reapply waterproof/sweat proof sunscreen every 80 minutes.Take a CPR course. Knowing these skills can be important in any environment. This is a skill we all can benefit from – on land and around water.Read all of the signs before going on a waterslide, pool or attraction. Make sure your child meets the posted requirements. If you have questions about an attraction, ask an employee at the facility.Plan ahead. As a family, decide on a meeting place to go to if anyone gets separated. Kids can take off in instant and crowded parks and beaches can make it difficult for little ones to find you. Choose an easy-to-spot location that can be easily found by all family members.If you see someone struggling in the water, call for help. Remember “Reach or Throw, Don’t Go!” Even professionally trained lifeguards don’t enter the water without having the proper flotation devices to keep themselves safe.May 23, 2018
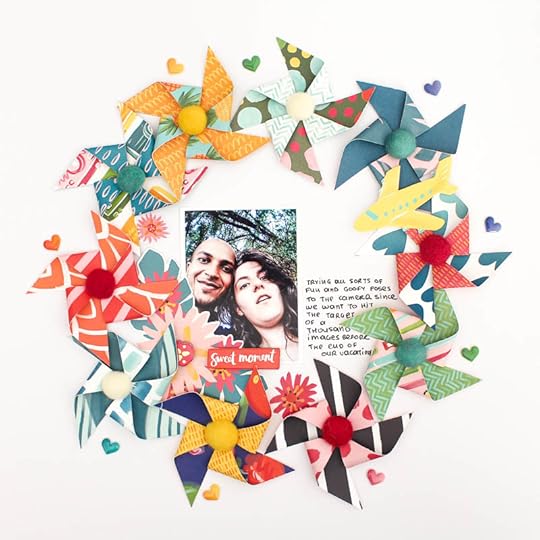
Zinia's Pinwheels Layout
Hello everyone! It’s Zinia here and today I’d like to share with you a really fun layout that’s perfect for using up your paper stash, making use of scraps or your 6x6 paper pads. For my page I used supplies from Amy’s Hustle & Heart collection but all of her beautiful lines can work for this design.
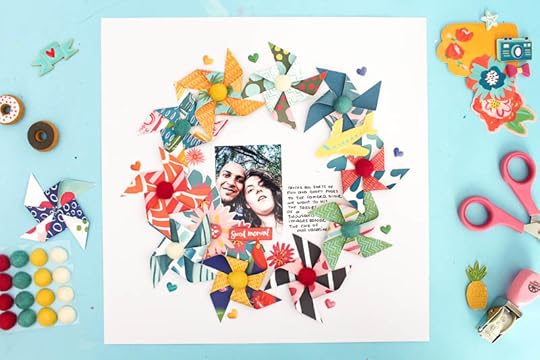
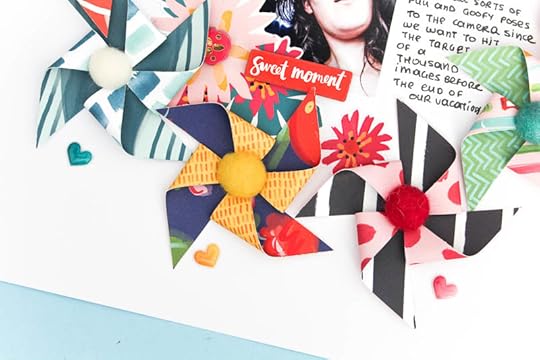
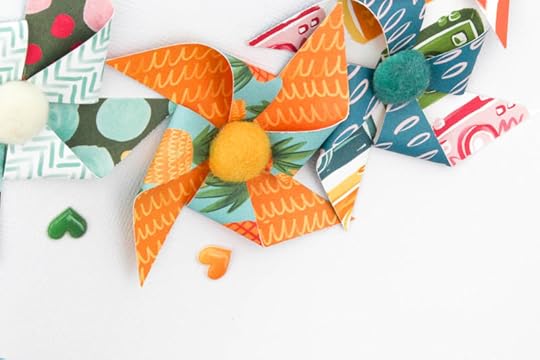
The whole layout is based on some adorable DIY pinwheel embellishments. They are super easy to make and you can go for any size you want depending on the paper pieces you have available. You can chose to make them all with the same size like I did on my layout but you can also play around with different sizes for more variety on your page.
To make the pinwheels just start with a square piece of pattern paper (I used 2.5x2.5” but you can go for any size you want). For optimal results use double sided pattern paper cause both sides will be equally visible.
You want to create diagonal cuts going from the corner of the square towards the middle without cutting all the way through the center. Do that for all four corners and you will end up with a piece cut down into four triangles that are attached in the middle.
Then you want to pull the right corner from each of those triangles and attach it in the middle of the square. Repeat that for all the triangular pieces and your pinwheel is ready.
To cover up the adhesive in the middle of the pinwheel you can add fun embellishments or stickers. The wool pom pom stickers from the Hustle & Heart collection are perfect for this job.
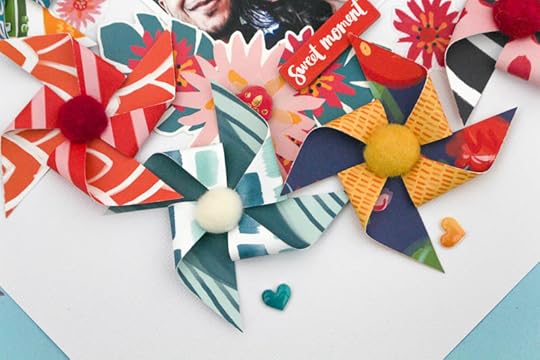
I arranged my pinwheels into a circular design trying to spread the colors around as evenly as possible. I also sprinkled the outer edge of my circle with puffy hearts in coordinating colors just to add some extra detail.
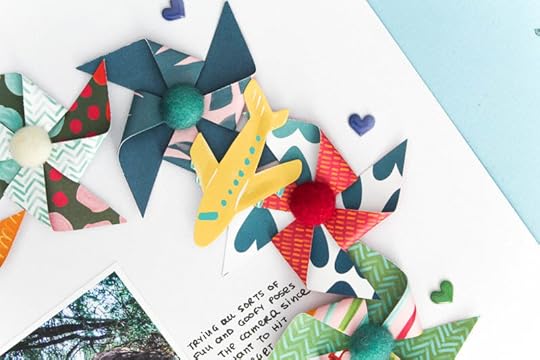
In the inner part of my design I added my photo and journaling along with a few stickers to help everything come together.
I really hope you got inspired by this page and you will make your own version of this pinwheel layout. Until next time, happy crafting.
Zinia
Blog | Instagram | Twitter | Facebook
PRODUCT LIST:
341858 Hustle & Heart 12x12 Paper - Love Wins, 340873 Hustle & Heart 12x12 Paper - Click Click, 340880 Hustle & Heart 12x12 Paper - Take Note, 340878 Hustle & Heart 12x12 Paper - Sweet Sensation, 340875 Hustle & Heart 12x12 Paper - Hello Sunrise , 341870 Hustle & Heart 12x12 Paper - Across The Waves, 341859 Hustle & Heart 12x12 Paper - Pleased to Meet You,341865 Hustle & Heart 12x12 Paper - Coming Up Roses, 341863 Hustle & Heart 12x12 Paper - The Right Path, 341864 Hustle & Heart 12x12 Paper - In Alignment, 341885 Hustle & Heart LAYERED PAPER STICKERS, 341884 Hustle & Heart STICKER BOOK, 341889 Hustle & Heart PUFFY HEARTS, 341892 Hustle & Heart WOOL POM POM STICKERS
Thanks for sharing this layout with us, Zinia! Other Design Team member posts can be found here. Shop Sunshine and Good Times at your local retailer or online at Scrapbook.com
May 19, 2018
Featured on Your Zen Mama
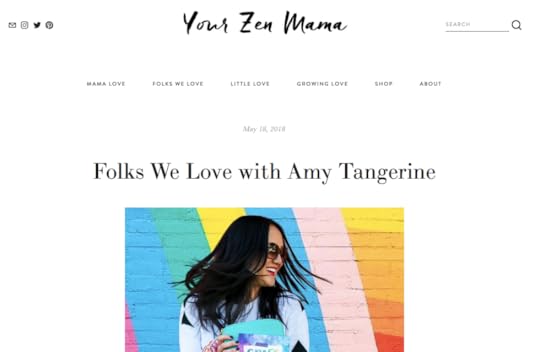
It was an honor to be interviewed by Your Zen Mama for their Folks We Love feature! I loved sharing my principle on how it's not so much about balance for me anymore, but really about harmony.
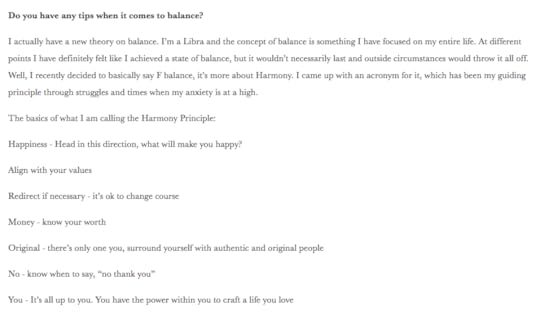
I was thinking of exploring this concept in further detail and shining a light on it even more. Let me know what you think!
May 16, 2018
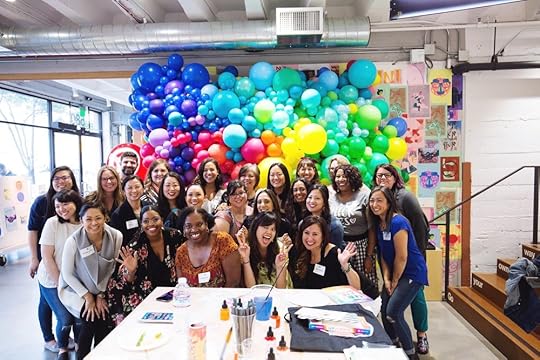
My Pinterest Book Release Event!
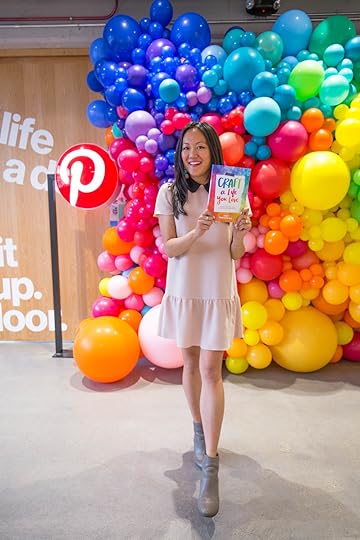
My book, Craft A Life You Love, is out now and I got to have my book release party at Pinterest Headquarters in San Francisco! (I got so many compliments on the dress - it's from Rent the Runway, I have been using the monthly Unlimited plan since my wedding!)
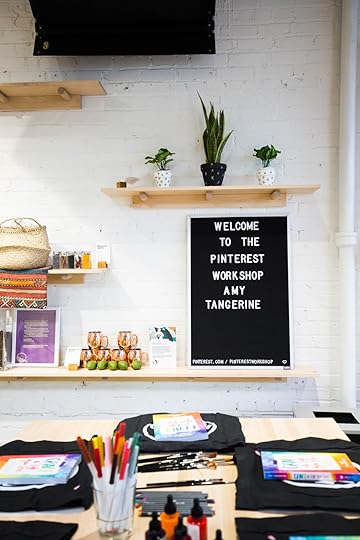
In a moment of pure serendipity, I ran into Tiffany from Pinterest at Alt Summit and mentioned to her that I would be in San Francisco for the day my book was set to be released. One thing led to another, and I ended up hosting my book release party in their Workshop collaborative space!
Pinterest opened the Workshop to bring a virtually-connected world into a physical space where they host events and classes with a creative theme in mind. I'm so glad that the stars aligned in the way that they did, because this ended up being the perfect place to host my event. They even featured me in their blog!
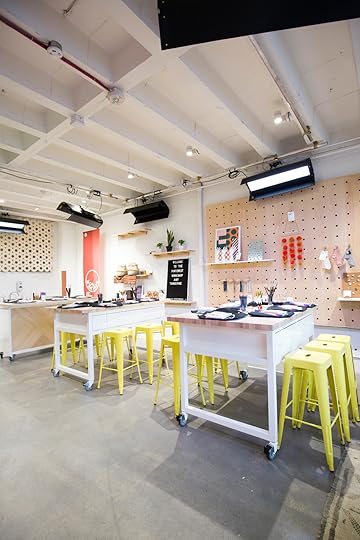

It was so fun to meet a bunch of you and play with watercolors together! I love that the people who support me are so creative and talented in such a wide variety of ways. Between the people, energy of the space, and the backdrop of colorful balloons made by the fantastic Zim Balloons, this was just the best book release party I could’ve asked for.
Here's my video from the trip, to give you a sense of what it was like!
You can now buy the colorful and updated edition of Craft A Life You Love on Amazon and elsewhere. I hope that it inspires you to create and make time for the things you love, no matter how busy you are!
All photos by LISH Creative
May 15, 2018
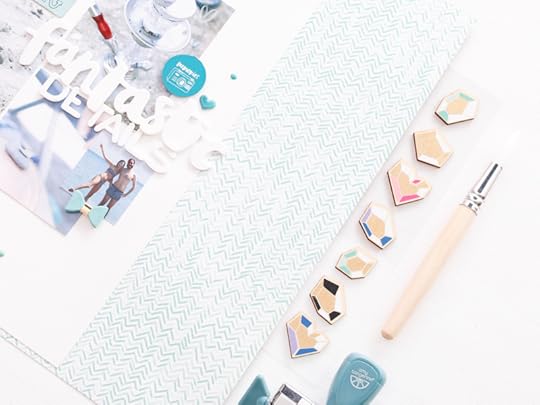
Violeta's Fantastic Details Layout
Hello! I am Violet Scrap and I want to show you a Layout I have created with some photographs of my recent holidays at the beach.

I have made a very easy Layout with elements from Amy Tangerine’s last collection, “Hustle & Heart”. I have worked using white and blue tones because they are perfect for my photographs of the beach.
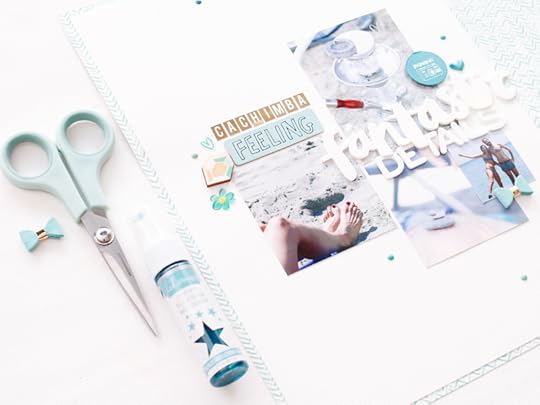
For this project, I have used as base of the layout a patterned paper called “The right path”, with colors white and blue from the “Huslte & Heart” collection and I have put on the left side a white cardstock paper of 8,5”x11.5” where I have made the composition of the project.
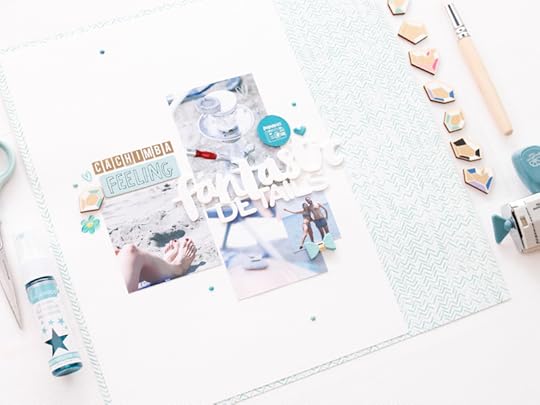
I have placed different photographs of different sized, all of them squared. Also, surrounding the pictures I have placed some decorative elements.
I have made the title with a white foam Word from the “Oh happy life” collection combining it with some letter from a Thickers pack, also in white color.
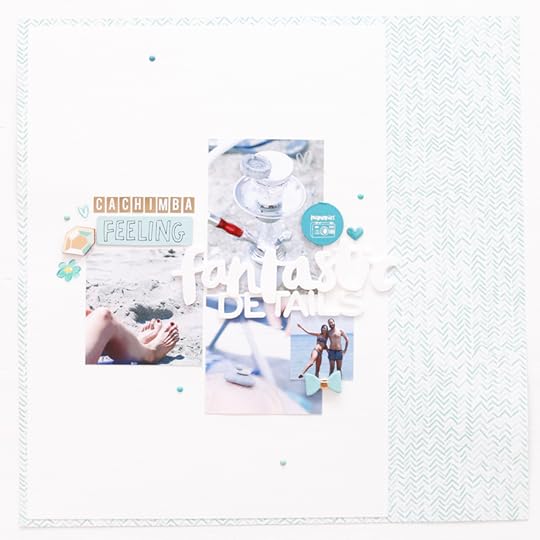
As decorative elements I have used a chipboard from the “On a whim” collection. I have also put some enamel dots in different tones of blue, and some transparent stickers from the “Hustle & Heart” collection.
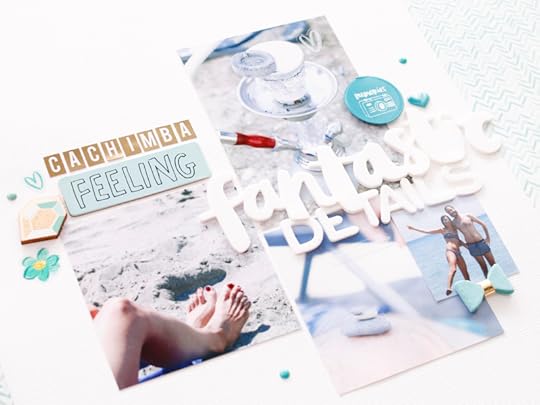
Also, I have used some blue elements, a museum pin, a wood veneer sticker in gold, white and blue, a faux suede bow and a heart shaped glossy puffy sticker.
I hope you like this project that you can create with pictures of a special day.
Violeta Scrap
Blog | Instagram | Twitter | Facebook | YouTube
Supplies: Hustle & Heart - 12x12 Double Sided Paper – The right path (341863), Oh happy life Collection - Thickers - Wild (376223), Hustle & Heart – Glossy puffy stickers (341889), Hustle & Heart – Faux suede bows (341893), Hustle & Heart – Museum pins (341894), Hustle & Heart – Wood veneer stickers (341892), Hustle & Heart – Sticker book (341884), On a whim - Thickers - LOL (378746)
Thanks for sharing this layout with us, Violeta! Other Design Team member posts can be found here. Shop Sunshine and Good Times at your local retailer or online at Scrapbook.com
Amy Tangerine's Blog

- Amy Tangerine's profile
- 62 followers

