
Amy Tangerine's Blog, page 17
August 14, 2018
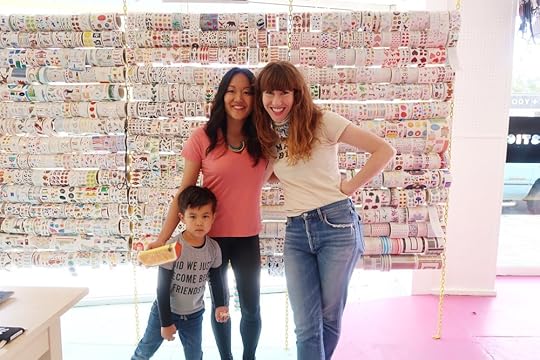
Zinia's Watercolor Flowers
Hello everyone, it’s Zinia here and today I’m back on the blog with another colorful layout using a combination of Amy’s collections.
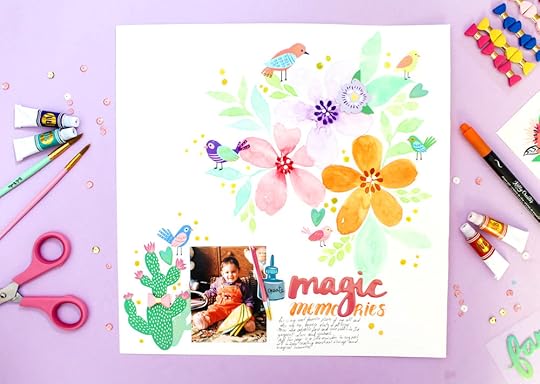
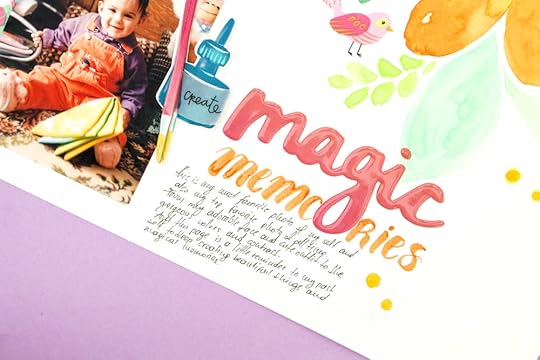
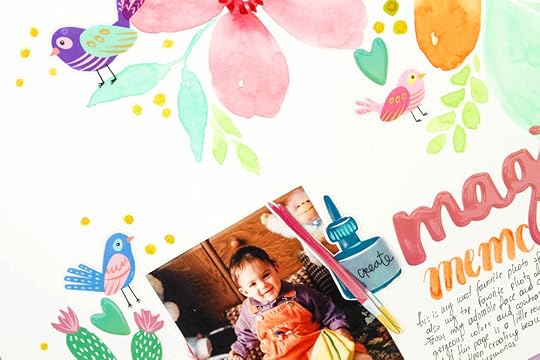
For this page I wanted to mostly focus on embellishments and build a colorful nature scene. I really wanted to use the adorable bird stickers from the Sunshine & Good Times collection sticker book so I decided to paint some flowers and leave on my background.
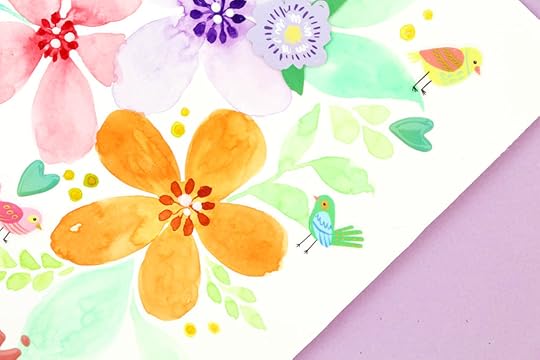
For that I used the Vicki Boutin watercolor tubes, mixing them together to create my own special colors. In some cases, I cheated a little and added a few drops of Jane Davenport Inkredicle inks to make sure I achieve the desired shade.
To embellish the layout, I used a mix of Hustle & Heart and Sunshine & Good Stuff products. I wanted to document my favorite photo of my childhood and the colors didn’t fully match with one single collection.
I also found the opportunity to use some pieces that I loved but couldn’t find the perfect project to use them on. For example, I really love the succulent images however I don’t document things that match that theme. Building a whimsical scene like this is definitely a great way to use up all the adorable images that you don’t know how to use.
I also used bottle of nuvo drops to add tiny yellow dots around the page and fill the empty spots. This way my floral painting looks much more interesting and complicated.

I really hope you enjoyed this page and you got inspired to create something beautiful with your favorite supplies. Until next time, happy crafting!
- Zinia
Blog | Instagram | Twitter | Facebook
Product List:
345713 THICKERS Let's Dance, 345720 STICKER BOOK, 345709 EPHEMERA, 341885 LAYERED PAPER STICKERS, 341893 MINI FAUX SUEDE BOWS, Kelly Creates Brush Pen, Vicki Boutin Watercolor Tubes.
Thanks for sharing this layout with us, Zinia! Other Design Team member posts can be found here. Shop Sunshine and Good Times at your local retailer or online at Scrapbook.com


August 10, 2018
Not One but TWO Video Collabs with Gorgeous GloZell!
What's better than doing an amazing DIY collaboration with GloZell? TWO collaborations with GloZell. We got together and I taught her two simple projects that she could create for her daughter or her daughter's friends. Keep reading if you want step-by-step instruction on how to make these cute and easy projects for your own kiddos!
Whether it's for one of the many kid birthday parties you attend or for your own wonderful child, it can be a lifesaver to have a DIY, affordable way to create a gift. That's where the project I first showed YouTube icon, GloZell comes in. I'm including all of the steps here, but if any of it is confusing, I recommend looking at the video, since the process can be a little tricky to explain in writing.
1. Pick out a piece of clothing. It can be a shirt or onesie or even a dress! Carefully trace a shape, name or anything else you want to have on the clothing out on the front. This is your cutting line.
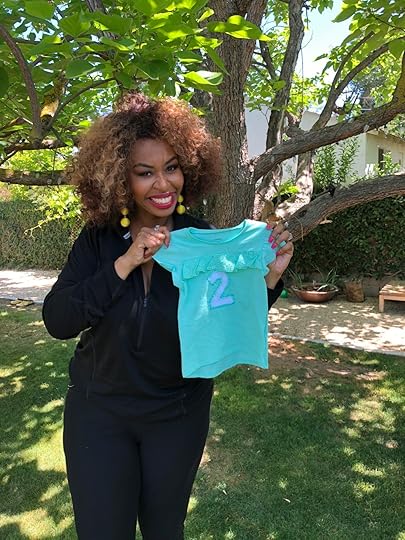
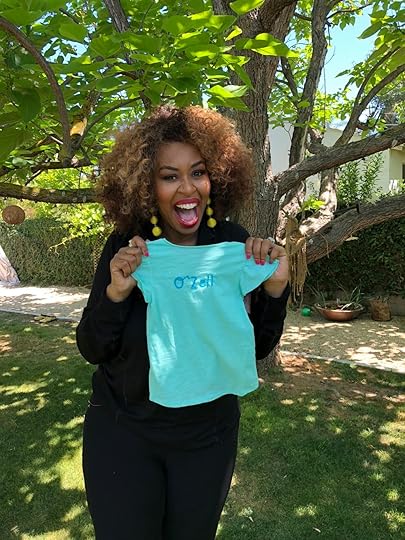
2. Pin a contrasting piece of fabric to the inside of the clothing. Make sure the contrasting fabric is much bigger than the shape you selected. Eventually this will be the fill of the shape. You can look at the shirt we made for GloZell's daughter, O'Zell. The blue fabric on the inside of the two is the piece of fabric you just pinned.
3. Stitch. Take a needle and floss (or some other type of thick thread) and carefully stitch around the lines you drew on the outside of the piece of clothing. Make sure your knot is on the inside and does not show! You want to stitch a fair distance away from your original tracing so that you can still clearly see the pen or pencil outline you made on your fabric. Once you've stitched all the way around your shape, make sure to tie a knot to finish off the stitch.
4. Cut! Now, carefully cut away the top layer of fabric, following along on your outline. Make sure not to cut all the way through both layers of fabric! This will allow your contrasting fabric to show clearly. Once you've finished with this, carefully cut away the extra parts of the contrasting fabric on the inside of the piece of clothing. Don't cut too close to the seam. Leave about a 1/4 inch of fabric around the stitching.
And voila! Just like that your amazing DIY project is done! GloZell was a little hesitant at first, but she handled the project like a pro! Stitching and sewing doesn't have to be complicated. This is a really great way to create something beautiful and completely unique.
BONUS: If you want to add another little personal touch, watch the full video to see how I taught GloZell to chainstitch a name on the back of the outfit!
How cute is that top? If you try out this method, be sure to let me know on social media! Now, on to Round 2!
Children are sources of so much amazing creativity. There are the cute little handprints, gigantic paint splotches, and of course, the tiny doodles on various scraps of construction paper. We all know these pieces of art and praise the little artists who created them. But in the back of our minds, looms the all-consuming question: what to do with these abundant and special creations. There’s only so much room on the fridge and no one wants to throw it all away. Never fear! For our second collaboration, I taught GloZell some of my favorite tips and tricks for keeping a “Baby Binder” in a brand new collab video. We used products from my collection with Avery. Of course, the whole experience was a blast and you should definitely check it out, but if you don’t have time, I’m highlighting three major tricks for keeping your mini-artist’s work in a safe place to preserve all the special moments forever and ever.
Use plastic sleeves. Let’s face it. Childhood is a messy time, especially when glue, glitter and paint are involved. A lot of your child’s creations have already been through a lot. The best way to protect them from the elements is in plastic sleeves. This also maximizes space. For pieces that are only one-sided, you can double-up two creations in one sleeve.
Try out date stamps. You may be wondering how to keep it all organized. Well, I like to organize mind chronologically. That way, you can keep track of how much your little creative has grown and changed over time. The best method I’ve used is a simple date stamp. It always looks nice and neat and that way, you don’t have to try to remember when something happened. Of course, you won’t be able to accurately date stamp every single thing. If that happens, use your best judgement and try to fit pieces in based on where they look best.
Make it fit. Some creations will be on tiny scraps of paper and some are on huge swathes of construction paper. Don’t sweat it! This is an opportunity to consolidate a bit. The smaller pieces can be glued or taped to an 8.5/11 piece of scrapbook paper. It looks so cute when it’s all assembled. For large pieces, you can always cut it down to size or cut it in half and create a spread with plastic sleeves. This is a great option if you feel as though every part of the artwork is too beautiful to throwaway.
If you'd like to give the Baby Binder a try, I'm including a list of some of the products we utilized in the video to make the binder beautiful and tidy. You can find my entire collection with Avery here on Amazon and be sure to use the promo code AVERYHEARTSAMY for 15% off:
· Avery® + Amy Tangerine® Designer Collection Durable View Fashion Binder retail for $7.99
· Avery® + Amy Tangerine® Designer Collection Big Tab™ Fashion Dividers retail for $4.49
One of the things I loved about this collaboration with GloZell was her suggestion of looking through the Baby Binder with her daughter and using the binder as a chance to bond. Clutter can be stressful and sometimes, there’s a temptation to let that emotion override the beautiful moments your child creates. The Baby Binder is a really good way to combine clean-up with quality time. In the long-run, it’s the memories that matter.
August 6, 2018
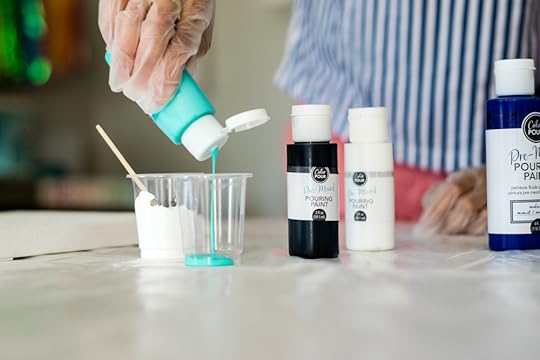
How to Create Color Pour Art
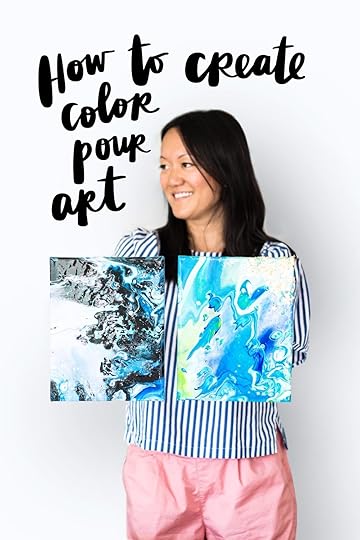
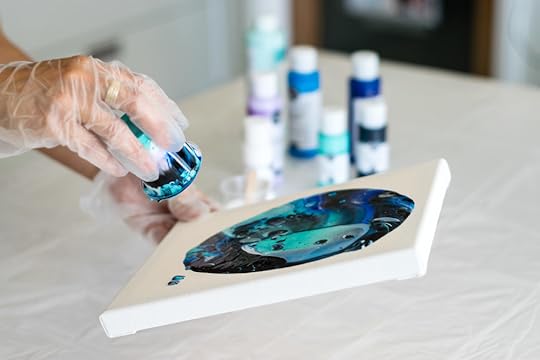
I decided to let loose creatively in the studio and try out American Crafts’ new Color Pour paint kits. Color pour art is an easy way to make canvases with a gorgeous marble effect. The great thing about it is that your childhood dream of combining all these various colors in a single cup of paint is finally coming true. It’s time to get a little messy! I thought after all the awesome comments about the paint pouring video I posted last year, I would give you a step-by-step guide on how to easily create color pour art.
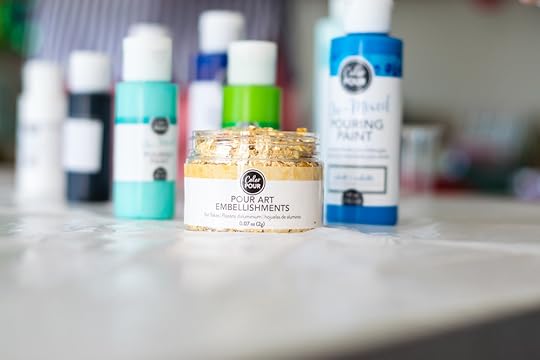
Set up your space. One of the best things about the Color Pour paint kits is that everything is in one convenient place. When I set out to try the products, one of the first questions I had was, “Will I need a drop cloth? What about gloves?” Luckily, American Crafts included both those necessities and more in the kit. Instead of worrying too much about set-up, I was able to concentrate on the color combos I wanted to try. Set up your space with everything you’ll need close by. Cover your surface with the drop cloth. Be sure to put on gloves! Set out paints, canvases, cups, popsicle sticks, and all the other supplies you’ll need. Make sure everything is in reaching distance; once you get started, you won’t want to have to get up and potentially spread paint everywhere.
Set up your drying area. This was one part I wished I’d planned out a little more thoroughly. Depending on how much paint you use, it can take anywhere from 12-24 hours for the artwork to dry. If you decide to let the paint drip down the sides of your canvas, it’s a good idea to use four cups turned upside down as a makeshift drying platform. Space them out so that the canvas can rest on all four evenly.
Mix in oils or other additives (optional). Adding the “Cell Magic” oil can create little bubbles in the paint, which makes amazing little shapes. Add a little of the oil to any or all of your paints in the little plastic cups provided. Mix the oil and paint with a popsicle stick. If you would also like to add glitter or metallic pigments, it’s the same process. The options are really endless.
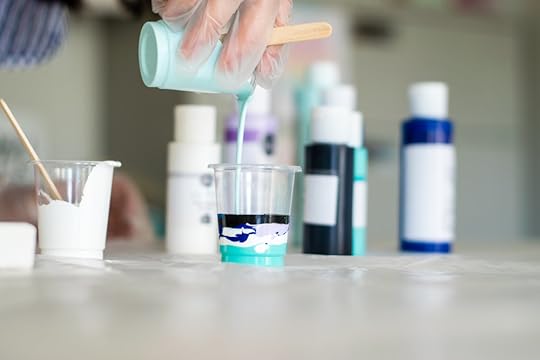
Now comes the fun part! Layer your paints in a single cup. I really encourage you not to overthink this step. There is no “wrong” way to combine colors. This is really about preference and style. If you don’t feel quite ready to pick out your own color combos, there’s good news. American Crafts made beautiful kits with pre-selected color palettes. If you decide to use one of those, the only real work you have to do is pour!
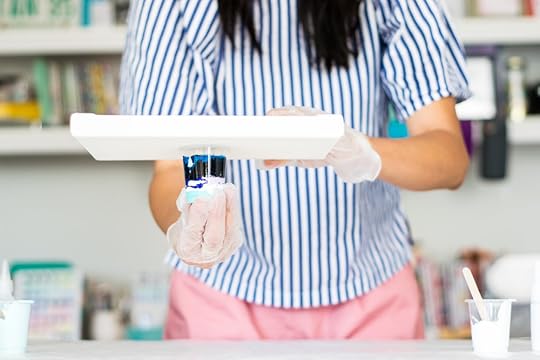
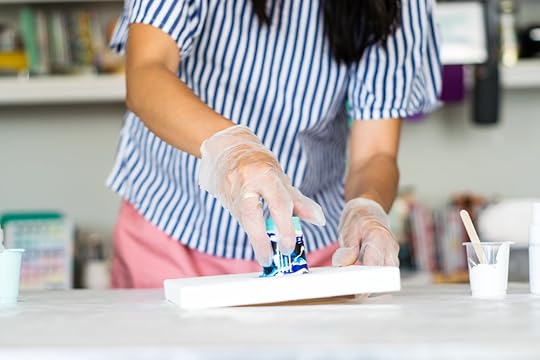
Get paint on the canvas! There are two ways I know of doing this. The first is to take your blank canvas and set the side you want to paint down directly on top of the cup. Using both hands, carefully hold the cup to the canvas and flip the cup and canvas over so that the cup is now upside-down on top of the canvas. The second is to simply pour your cup out onto the canvas.
Spread it out. You can choose to use the cup to spread it out a bit or you can set the cup aside and tilt the canvas. The trick to this is to really just let the paint flow the way you like it. On both canvases, I titled it until the paint ran up and over each edge.
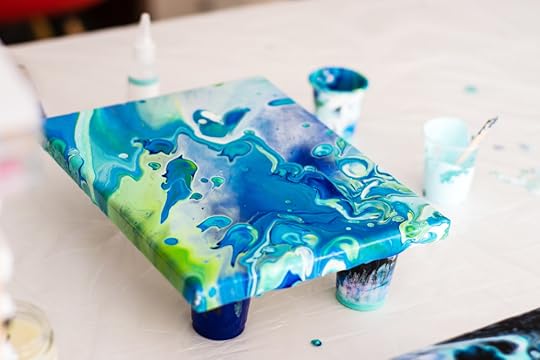
Add embellishments and allow it to dry. One canvas, I left as it was. On the other, I sprinkled glitter on the corner and added a little gold leaf. This added some dimension and texture to the piece.
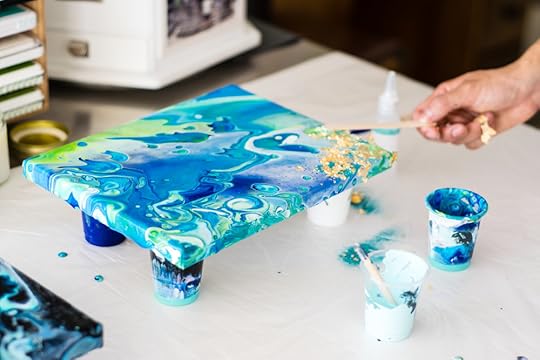
This process was a blast! I had so much fun experimenting with the paints and allowing the process to flow, instead of meticulously planning exactly how each piece would turn out. You can find more info about Color Pour in this blog post and look for it at your local Joann Stores. So, are you going to give color pour art a try? What color combinations are excited to experiment with? Let me know in the comments and be sure to share pictures of your beautiful creations.
Messy Maker sign handmade by Just Add Sunshine
August 3, 2018
Interview with Brush Magazine!
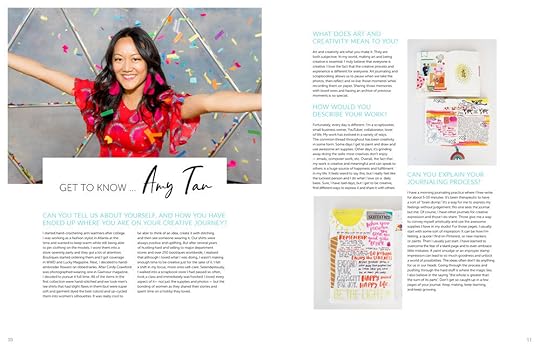
Recently, I had the incredible opportunity to be featured in a story for Brush Magazine. Brush is a great publication because it focuses on featuring artists from all over the world. It was so exciting to get to discuss Craft A Life You Love and how I started Amy Tangerine back in 2002. Of course, you should definitely read the full story, but in the meantime, take a look at three highlights from my chat with them.
How would I describe my work? Fortunately, every day is different. I’m a scrapbooker, small business owner, YouTuber, collaborator, lover of life. My work has evolved in a variety of ways. The common thread throughout has been creativity in some form. Some days I get to paint and draw and use awesome art supplies. Other days, it’s grinding away doing the tasks most creatives don’t enjoy— emails, computer work, etc. Overall, the fact that my work is creative and meaningful and can speak to others is a huge source of happiness and fulfillment in my life. It feels weird to say this, but I really feel like the luckiest person and I do what I love on a daily basis. Sure, I have bad days, but I get to be creative, find different ways to express it and share it with others.
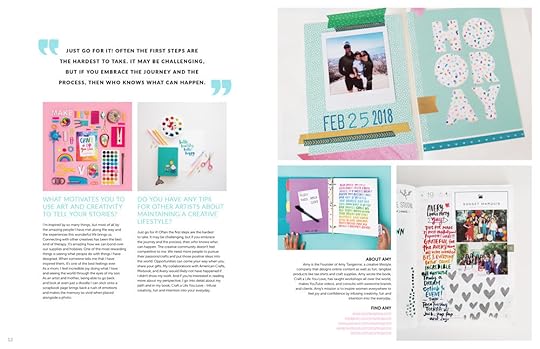
What advice do I have for aspiring artists? Just go for it! Often the first steps are the hardest to take. It may be challenging, but if you embrace the journey and the process, then who knows what can happen. The creative community doesn’t feel competitive to me. We need more people to pursue their passions/crafts and put those positive ideas into the world. Opportunities can come your way when you share your gifts. My collaborations with American Crafts, Mixbook, and Avery would likely not have happened if I didn’t show my work. And if you’re interested in reading more about my perspective, I go into detail about my path and in my book, Craft a Life You Love - Infuse creativity, fun and intention into your everyday.
What do art and creativity mean to me? Art and creativity are what you make it. They are both subjective. In my world, making art and being creative is essential. I truly believe that everyone is creative. I love the fact that the creative process and experience is different for everyone. Art journaling and scrapbooking allows us to pause when we take the photos, then reflect and relive those moments while recording them on paper. Sharing those memories with loved ones and having an archive of previous moments is so special.
For the full article (which is so gorgeous, I wish it was in actual print!), please go check out Brush Magazine to see my interview along with many other cool artists featured in this edition. What do art and creativity mean to you? Be sure to let me know in the comments.
August 1, 2018
31 Day Wellness Challenge
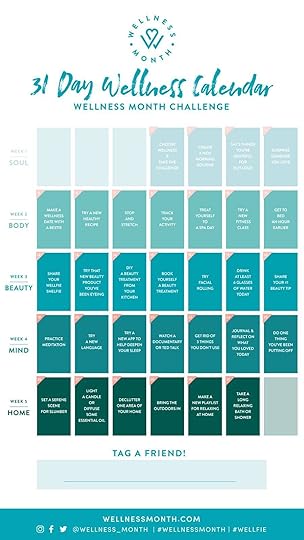
Time flies by so quickly! Can you believe it’s already August 1st?! This year is going to be over before we know it. This month, I’m trying something a little bit different. I've committed to a 31 Day Wellness Challenge and I invite you to experience it with me. My friend Alex Michael May let me know all about this awesome initiative and since I am all about self-care these days and allowing myself to indulge in it, the timing couldn't have been more perfect.
The Wellness Challenge is divided into 5 categories: soul, body, beauty, mind and home. There are small activities– one for each day – that coordinate with the week’s theme. I highly recommend bringing in an accountability buddy, someone who will also benefit from the challenge. I think it’s really important to remember that even though self-care is something super personal and specific, we need community and encouragement throughout our individual journeys.
While I am very excited to get started on this challenge, I am also focused on abandoning an attitude of perfection. This is going to be an awesome tool to help me frame my goals and priorities for the month. Some parts of the challenge may happen a day later, others a week early, and some not at all. The purpose of it is to promote a sense of happiness and well-being in my own life this month, not to necessarily check off every single box. Just remember, done is better than perfect! I would much rather complete this amazing challenge in a way that works for me than to not start it at all out of fear that I won’t finish "perfectly".
Well, are you planning to complete the 31 Day Wellness Challenge with me? What day is most exciting to you? Be sure to let me know in the comments!
July 31, 2018
Violeta's Scrap Friends Layout
Hello! I am Violeta Scrap and I want to show you how to make a layout using your favourite Amy Tangerine’s stamps.
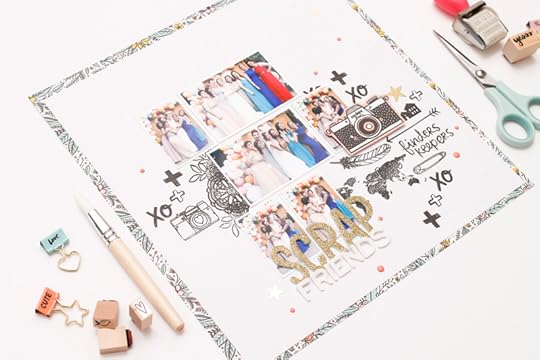
s the base of this layout I have used the paper “Bouquet” from the “Shine On” collection of Amy Tangerine. Over it I have placed a white basic cardstock.
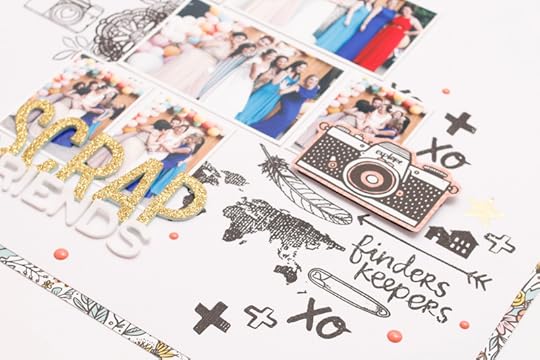
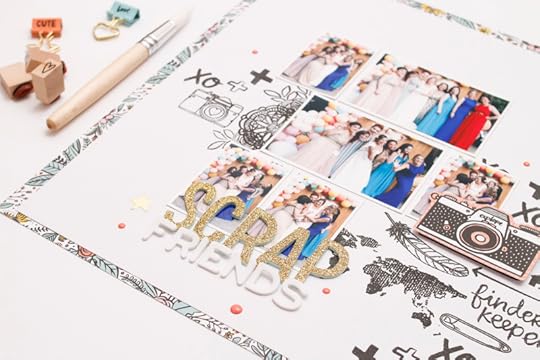
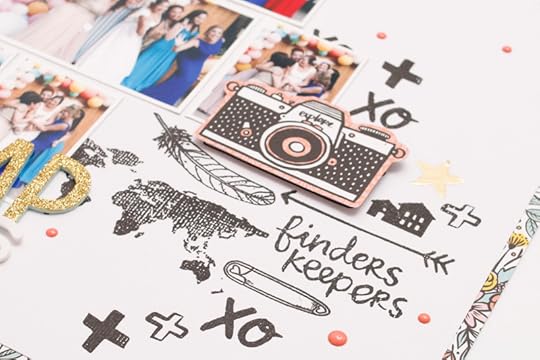
On the white basic cardstock, I have stamped in black different stamps of Amy Tanerine; a camera, a map, some houses… I have used the stamps from several Amy Tangerine’s collections. They are great!
Then, I have glued the different pictures, that they combine perfectly well with the colors of the base paper.
For the title of the Project, as in other layouts, I have combined a golden alphabet of the collection “Sunshine & Good Times” with a white alphabet.
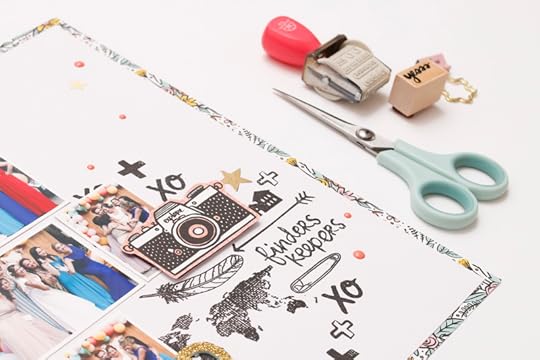
As the main decorative elements of this layout have been stamps, I have added just a couple of things more to decorate. I have placed a camera that I have cut from the paper “More of This” from the collection “Shine On” of Amy Tangerine. I have also added some stickers that are golden stars. And last, I have put some enamels in different sizes and they are coral color.
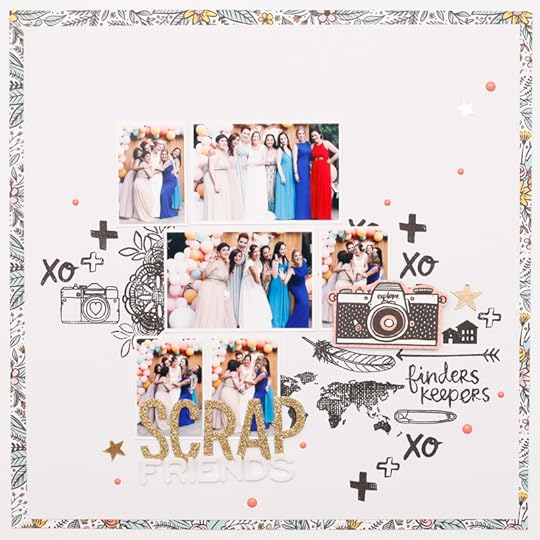
I hope that this layout can be useful for you at the time of using your stamps. I am pretty sure that if you combine different stamps you can make fantastic projects. Plus, you can use this technique to make a layout, a card or to decorate a mini album.
Violeta Scrap
Blog| Instagram| Twitter| Facebook| YouTube
Supplies: Shine On - 12x12 Double Sided Paper - Bouquet (348233), Shine On - 12x12 Double Sided Paper - More of This (348235), Sunshine & Good Times - Thickers - Shine On (345714)
Thanks so much for sharing this layout with us, Violeta! Other Design Team member posts can be found here. Shop ON A WHIM now! Check your local retailer and online at Simon Says Stamp and Scrapbook.com
Disclosure: Some of the links above are affiliate links. I receive a small percentage of sales at no cost to you. My creative partners and I really appreciate your continued support and every little bit helps me to bring you consistent content!
July 30, 2018
5 Super Simple Motivational Tips

How often do you tell yourself, “I’ll start tomorrow”? It’s so easy to put things off until the “right” time and place. The truth is, procrastination often doesn’t make things easier, and the present is a precious gift; it’s important to make the most of every moment. There’s no time like right now to get things going. Here are my 5 S’s:
Speak the truth. To get started you need to be honest with yourself about where you are. Through some self-reflection and soul searching, if you’re being truthful, the next steps in your journey will become clear.
Surrender to your process. Be willing to get a little messy. No one is going to have the same journey or the same challenges. Take inspiration from the outside world but don’t try and replicate someone else. Others might make it look easy on the outside, but you have no idea what might be happening under the surface.
Seek support. If we were all born knowing the answers, there wouldn’t be a journey at all. Find a mentor or teacher. Stay curious! Read inspiring books— any tool that affirms you for who you are and where you’re going will make the trip that much easier. After all, it never hurts to ask for help.
Show up. This is work that nobody can do for you. It takes persistence and courage to invest in yourself. Consistency is key. Just remember, this may not be easy but it will be worth the effort.
Share your gifts. Allow yourself to shine bright. Accept the praise from others and learn from criticisms. Putting yourself and your work out there might seem a little scary at first, but hiding them won’t make room for growth. This journey is a chance to flourish. Let it transform you!
What’s one thing you’ve set aside? Join me and let’s start off on the right foot together.
(In case you were wondering, my shoes are allbirds and they are super comfortable!)
July 24, 2018
Coolest Conversation Ever– Podcast Episode with Cathy Heller
Some conversations are life-changing. My talk with Cathy Heller from the Don’t Keep Your Day Job podcast was exactly that. Cathy’s podcast is about being in alignment with your true self, finding a way to do your life's work and taking your passion and making a profit. Since that’s what my company is all about, it’s not an understatement to say that she and I were an amazing match. We talked about so many incredible things: learning from failure, abandoning perfectionism, overcoming imposter syndrome…. The list could go on and on and on. Our time together just flew by. I was so excited and inspired by our conversation and I’m so happy it’s out in the world for everyone to hear. You can listen to the full episode here. There are all kinds of great highlights from the episode because Cathy is just so easy to talk to. In each of her episodes (one of my favorites is the one with Martha Beck) she sums it up at the end with 10 takeaways. I’ve decided to list five below. They are based on my own journey with starting my business in 2002 and writing my book:
Take a chance and go for it. What’s the worst that could happen? It’s so much better to take a chance on one of your passions then to soldier on in safety and never venture beyond your comfort zone.
It’s okay to hit pause. Take time to make something out of your memories. We live in a culture that emphasizes being busy all the time. It’s important to value stillness, calm, and self-reflection just as much as work ethic.
Have a strong vision for your end goal. It’s super important to know where you’re going and what you’d like to accomplish. Keeping your goal in mind helps you accomplish tasks— big and small.
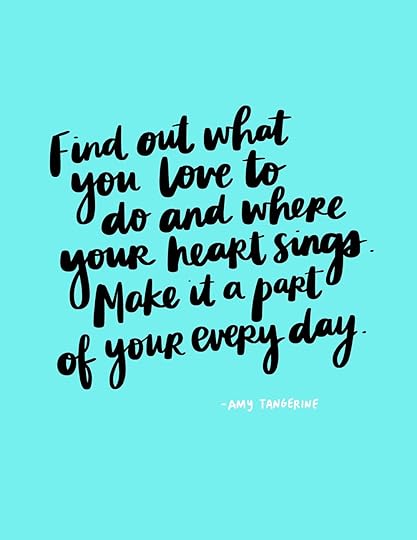
Find out where your heart sings. Make it a part of your every day. At one point in our conversation, I said, “Everybody has their own unique story to tell; everybody has their own unique journey and if we don’t share those gifts, then what good is it inside of you?” I truly believe that it is vital to spend your time doing things you love and sharing that passion and joy with others.
Give yourself permission to explore and share with the world. Great things never come from comfort zones. I told Cathy about my move to Los Angeles and how at age 25, within a week of arriving, the job I’d counted on was no longer available. After crying to my dad, he eventually told me, “You’re just lost in the right place.” And he was totally right! I had been pushed out of my comfort zone to accomplish bigger and better things, things I never would have attempted without a push.
There are way more incredible points from our conversation, so I really encourage you to listen to the episode if you have time. Cathy’s podcast is amazing and I relished the opportunity to sit down and talk to her. You can find Don't Keep Your Day Job on itunes and her website. Another amazing takeaway was that Cathy encouraged me to think about starting my own podcast. I really liked the idea and it was very cool to hear from an experienced podcaster. So, what do you think— would you listen to an Amy Tangerine podcast? Let me know in the comments below!
July 23, 2018
On the Road Again– Our Family RV Trip
It’s not like the wanderlust bug bit me or anything… okay so maybe it did. Recently, we had the opportunity to go on a little family RV trip up the California coast through a collaboration with Livestrong and GoRVing. As you can imagine, the experience was incredible. Hitting the road and taking some time away from LA felt amazing. And we had so many of the comforts of home in the RV. You can see how we packed for the trip in this video. I didn't even have to stop crafting as I brought a few things with me to make it fun and easy to document the trip as we went along. This time I didn't work on a traveler's notebook while on the trip, but of course I had to collect bits along the way. Jack had the best time picking up found beach items while in Morro Bay. I couldn't believe the amount of sand dollars he collected.
It was definitely an adventure. Along the way, we collected seashells, made breakfast tacos, and ran finally got the chance to go to Pipsticks to hang out with Mo! There were so many highlights from the entire trip, but I would have to say these videos are something we will cherish forever:
On Livestrong: These Colorful Breakfast Tacos Are Perfect for Summer Road Trips
On Hunker: At Home on the Road with Amy Tangerine
July 11, 2018
We Love KidBox!
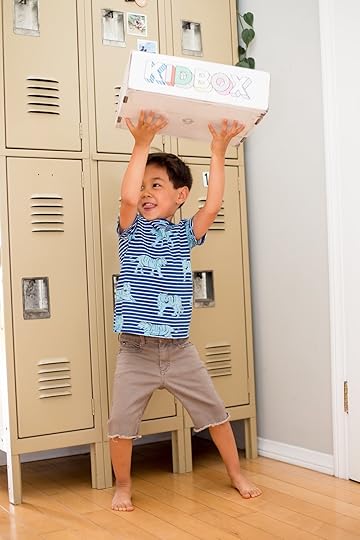
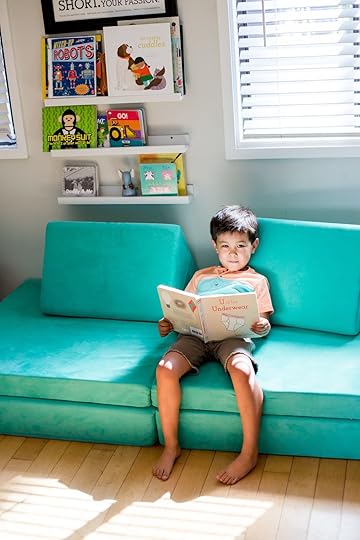
Getting boxes in the mail can make every day feel more like a holiday! It’s so exciting to unwrap the packaging and see what new, exciting thing is waiting for you, especially when you can color all over the box after you open it. KidBox is a clothing subscription service designed specifically for little ones like my Jack, who is really loving his summer freedom. Unlike other subscriptions, you only pay for what you keep! We end up keeping everything that comes in the box because not only is it the best value, but it also means Kidbox will clothe a child in need! How awesome is that? We have always tried to infuse the values of giving back in different ways, and this is such a wonderful way that even a four and half year old can understand.
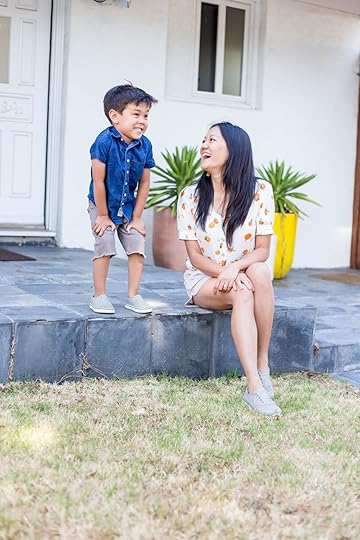
Now that he’s graduated from preschool, he spends his days going to swim lessons, visiting the park, and creating his own art projects. Occasionally, he even drops in to the studio to help sort markers in rainbow order or stage his own photos!
Unlike my growing boy, I don’t get summers off. Any type of time saver is actually a lifesaver! As many of you know, Kidbox sends us boxes with 7-8 items about 5 times per year. That might sound like a lot of math but it actually adds up to a ton of savings! Each box only costs $98.
This was our second box from Kidbox (read about the first one here) and as you can see, the new selections did not disappoint. You can order boxes for infants through size 14 and tailor clothing selections based on your child's preferences through a fun little online quiz. It's simple, fast, and easy. It frees me up to spend my downtime having fun with my son this summer.
DISCOUNT: To receive 20% off your first Kidbox order, use the code JACK20 at checkout. Happy shopping!
This post is in collaboration with Kidbox, all ideas and opinions are my own. As always, my creative partners and I appreciate the support.
Amy Tangerine's Blog

- Amy Tangerine's profile
- 62 followers

