
Kristina Seleshanko's Blog, page 17
March 30, 2020
Spring Cleaning Checklist: Hall & Storage (with free printable)
 As an Amazon Associate, I earn from qualifying purchases. All opinions are my own. Please see FCC disclosure for full information. Thank you for your support!
 I apologize for not getting up a spring cleaning post last week. I know that while some of us have put spring cleaning on hold due to a shortage of cleaning supplies, others are using this time to get your house in order. At any rate, this week is a great time to handle the hallways in your home, plus any storage areas like hall closets, laundry rooms, and so on.
Incidentally, some people have asked why I use Windex for almost everything. Answer: Because it's a great all-purpose cleaner! One of its main ingredients is ammonia, which not only disinfects but really cuts through grease and grime. But I try to avoid using pure ammonia because I loathe the smell. Feel free to substitute whatever cleaners you prefer!
The supplies I recommend for spring cleaning the hall and storage areas include:
* A vacuum
* A couple of dust cloths
* Paper or cloth towels
* Mr. Clean Magic Erasers
* Windex
* Q-tips
* Sponge
* Dawn dish soap
The Procedure:
To print out this checklist, click here.
* Remove any art from the walls; dust it and set it aside in another room.
* Remove any curtains and throw them in the wash.
* Remove any throw rugs; wash those that can be washed and shake out those that can't.
* Dust light fixtures. Wipe them down with Windex or remove the shades and wash them in the sink with a little Dawn soap. Replace any needed light bulbs.
* Dust the ceiling and walls. If necessary, mop them. (Click here for advice on mopping walls and ceilings.)
* Dust any blinds.
* Wipe down all light switches and outlets. (I use Windex and a cloth towel.)
* If there are windows in the hall, clean them, being sure to also clean the window tracks and frames. (I vacuum the tracks, then use Windex and Q-tips to get into the crevices.)
* If there are mirrors in the hall, clean both the mirrors and the frames.
* Dust and clean doors, door frames, and doorknobs. I like to use a Mr. Clean Magic Eraser for the doors and frames.
* Dust any furniture in the hall or storage areas, first removing everything stored in it. Use a slightly damp sponge to remove any real dirt.
* If there's anything stored that you don't actually use, donate it to charity. Throw away anything that's broken or useless. Put the contents of the cabinets back in place.
* If you have boot trays, take them outside and spray them with the hose. Clean them with a little Dawn dish soap, rinse, and allow to dry.
* If you have a coat rack or some other device for the storage of coats, umbrellas, and such, sort through everything that's in that area. Keep out only what's needed and being used. Place the other items in bedrooms or in storage.
* If you have appliances (like a washer and dryer) in the storage area, wipe down the outsides with Windex and a cloth. If needed, clean the interiors. Use a little Windex or watered down Dawn dish soap and some Q-tips to clean crevices. Be sure to clean out the lint trap in your dryer, including the yearly cleaning of the hose, if your manufacturer recommends it.
* If there is woodwork (like stair railings), dust them. If you use wood polish, apply it.
* Dust the floorboards. If they still appear dirty, wipe them down with a Mr. Clean Magic Eraser.
* Vacuum the floors. If the floors can be mopped, mop them. If you're cleaning the staircase, start at the top stair and work your way down. (This way any debris ends up on stairs you haven't yet cleaned.)
* Replace artwork on the walls. Re-hang the washed and dried curtains. Replace throw rugs. Replace dry boot trays.
Viola!


March 27, 2020
Quit Being Bored During Quarantine
 As an Amazon Associate, I earn from qualifying purchases. All opinions are my own. Please see FCC disclosure for full information. Thank you for your support!
 I know rural living - especially when you're homesteading - is different. I've lived in the heart of New York City and I've lived in the suburbs, too. But I admit to being surprised that during the COVID-19 pandemic so many people are lounging around on social media feeling bored and useless. Can I be completely transparent with you? Please don't bash me too hard, but I believe these feelings of boredom largely stem from a self-focused point of view. If we can turn that focus around, I think we'll all find our time in quarantine "shut down" much more pleasant. Here's how I think we can do it:
1. Seek First...
In Matthew 6:31-33, Jesus spoke about worry:
"Therefore do not be anxious, saying, ‘What shall we eat?’ or ‘What shall we drink?’ or ‘What shall we wear?’ For the Gentiles seek after all these things, and your heavenly Father knows that you need them all. But seek first the kingdom of God and his righteousness, and all these things will be added to you."One easy way to "seek first the kingdom of God" is to immerse yourself in God's Word. Make sure you're reading the Bible every day. Read different translations of the same chapters, for deeper understanding. (If you only own one version of the Bible, Bible Gateway is a good online resource for all the versions.) And while you're at it, deepen your prayer life - there's no more meaningful way to spend your time!
If reading the Bible is a new thing for you, now is the perfect time to see "what all the fuss is about." I recommend a Bible with a commentary - not to tell you what to think, but to provide historical context. I know that for myself, understanding the history and society of the people in the Bible gave me a much better understanding of God's Word. The commentary Bible I used was The Student Bible. But rather than delay while you wait to get your hands on that, check out free Bible commentaries online.
2. Help Others
 Courtesy National Cancer Institute.
Initially, it might seem you can't help others (outside of your immediate family) if you're confined to your home. But we're all allowed to go out for groceries and other basic supplies. Why not volunteer to go into town and shop for the elderly or for others who are high risk for serious complications if they catch COVID-19? Just use caution and don't pass along germs with those needed supplies: Wash your hands, wear gloves, disinfect the items you give, leave items on the doorstep and then step away until you're sure the person in need has removed the items from their porch, etc.
That said, the number one way we can help others is to STAY HOME and not spread germs. True unselfishness does not decide "God will take care of me" and then proceed to infect other people. My kids and I have been reading the book of Nehemiah, and we noticed that even while the Israelites were rebuilding the walls of Jerusalem under duress from surrounding communities, they proclaimed "our God will fight for us"...and worked with swords in their belts and lookouts everywhere. So, too, we can trust God yet take simple measures to protect others from this virus.
3. Sew A Little

I admit I feel a little pang of jealousy when I see folks in my sewing and quilting groups making all kinds of fun, frivolous projects during this shut down...but I personally just don't have the stomach to sew frivolous things when medical facilities in my area are asking for home-sewn masks and gowns. Why not call your local hospitals, doctor's offices, nursing homes, and any other local organizations you can think of and see what they might need? Just as we saw during WWI and WWII, a citizen "army" can accomplish a lot of good.
(P.S. Home sewn masks that follow the CDC's guidelines are being used in non-COVID-19 cases, to help preserve "the good stuff" for Coronavirus cases. If worse comes to worst, fabric masks can be worn over N95 masks to help extend their life. Studies show fabric masks are up to 50% effective... IF USED CORRECTLY.)
4. Teach Your Children Well
A lot of parents aren't sure what to do now that their school-aged kids are home all day. My best advice is to teach them life skills! Not only can this be a wonderful opportunity to connect with your children, but frankly, too many kids don't know the stuff they need to know in order to adult. Ideas include: household chores, cooking and baking, balancing a checkbook, reading a map, shopping skills (like how to find the best price or make a meal plan), time management, budgeting, reading a food nutrition label, manners and etiquette, checking and changing the oil in a vehicle, creating a resume, interviewing for a job, sewing on buttons and basic clothing mending skills, and starting a garden.
For additional ideas, see the "Chores for Kids" and "Homemaking 101" sections of this blog.
5. Start a Victory Garden

And while we're talking gardens, there is no better time to start one! During the world wars, Americans grew Victory Gardens designed to help the whole nation survive by feeding one family at a time (and helping their neighbors, too). Don't have a lot of room? Grow few things in pots on your porch! Start your garden today and give a little food security to your family and community.
For help, see the "Gardening 101" section.
6. Learn a New Skill
Are there things you wish you knew how to do? Now's the perfect time to learn to: cook from scratch, sew, knit, crochet, garden, woodwork, preserve food, forage for wild food and medicine, make cheese, make yogurt, learn to start a fire, compost, and so on.
Check out "Canning 101," "Canning & Preserving," "Cheesemaking," Making Yogurt, "Composting," "Foraging," and "Herbs."
Maybe the something you want to learn is not a hands-on activity; if that's the case, you can read some good books on the topic: Learn about a certain time in history, economics...whatever interests you.
Either way, once you learn...who can you teach?
7. Be Still
Something our society is terrible at is being still. Most people are used to rushing around here and there, keeping busy with daily tasks. Many people are not used to being alone with their thoughts. What if God gave us this moment in time to force us to be still and focus on the bigger picture? That bigger picture includes thinking more of others, thinking on eternity, and learning to trust God. "Be still, and know that I am God." (Psalm 46:10)
In short, friends, there is a whole lot more in quarantine than stream Netflix and play video games. Don't waste this precious, unique time you have. Use it to it's fullest advantage!
March 26, 2020
New Critters on the Homestead!
Well, amid all the craziness of the past couple of weeks, our homestead has grown a bit...which is a joy.
 Nearing sunset on our homestead.First, my husband brought home two rabbits. To be clear, these are pet rabbits. Did I mention my kids already have four pet rabbits? And now my husband has brought home two more. That's six pet rabbits. And did I mention that the doe is likely pregnant? And that the newbies are Flemish Giants, which get really big? Like 15 to 20 lbs. big. Like, as big as a dog big?
 Flemish rabbit vs. dog. Courtesy of Stamatisclan and Wikipedia Commons.When I asked why he brought them home, my husband said his friend had been given them, but his friend's wife wouldn't let him keep them. Hmmm...
 Fiona.The good news is, they are beautiful and sweet. And, to be fair, I've known for years that my husband wanted a Flemish giant rabbit. They are pretty neat and have an interesting history dating back to the 16th century. I think we've settled on the names Fido and Fiona.
 Fido.
Fido.
I've also known for a while that our next "big" critter addition would be sheep. In fact, in 2017, I posted something about why even small homesteads might want sheep. It's just taken a while for us to get prepped for them. (Trust me, there are always more ideas for the homestead than there is time, energy, and money!) Thankfully, our property already had some sheep fencing installed, so "all" we had to do (and by that, I mean all my husband had to do) was repair certain breaks in the fencing, add three livestock gates, and build a sheep shelter.
My husband has been so slammed with work on the homestead that when his dad recently asked him to repair his vehicle, my hubby made a barter: I'll fix your vehicle while you build us a sheep shed. I think the sheep shelter turned out beautifully - and except for some lumber, it was all made with upcycled materials, including an old truck bed liner we found on the property and pieces of the old metal roof from our canning kitchen. Redneck ingenuity, my friends! My dad-in-law did a fabulous job, and there's no way that shelter is going anywhere, even during a typhoon.
 Upcycled sheep shelter.
For a while now, we've known we wanted a few things from our sheep. Namely:
* They had to be excellent brush eaters. If they loved our invasive blackberry vines, all the better!
* They had to be low maintenance and hardy.
* And we preferred a hair breed, so we wouldn't have to shear them.
Then we met a neighbor who said she had Soay (pronounced "so - ay") sheep and needed to sell some. Perfect! Soay met all our criteria, and then some! They love brush and blackberry vines. They require hardly any maintenance and are hardy enough they don't require assistance when giving birth. They are also hair sheep who naturally shed their wool, so shearing isn't necessary. They also happen to be on the smaller side, which makes handling them easier (although ours, right now, are pretty flighty, fleet, and "wild"). Plus, they are so pretty and always look like they are smiling.
 Our Soay sheep.I'm loving the history of Soay sheep, too. They are a very, very old breed (just how old is a matter of opinion) named after the island of Soay in the St Kilda Archipelago, about 40 miles from the Western Isles of Scotland. ("Soay" is Norse for "sheep island.") In fact, Soay sheep still live wild in Scotland. (To give you an idea of how self-sufficient and rugged Soay sheep are, most domestic breeds cannot even begin to survive in the wild.)
 Shannon getting her bells put on.And so, we have Shaun (my kids named him after the cartoon "Shaun the Sheep") and Shannon. (Apparently, we like alliteration.) They are only about a year old and still have some growing to do. We are also trying to "tame" them a bit, since right now they are pretty distrustful of humans. They grew up on hay and grain (which is healthy and just fine), but they seem thrilled to have lots of fresh forage now.
We love hearing their bells tinkling in our "pasture." And one of these days, I'll take a video of them running...because they look more like gazel than sheep, my friends!
 Shaun and Shannon in their shelter.
 Nearing sunset on our homestead.First, my husband brought home two rabbits. To be clear, these are pet rabbits. Did I mention my kids already have four pet rabbits? And now my husband has brought home two more. That's six pet rabbits. And did I mention that the doe is likely pregnant? And that the newbies are Flemish Giants, which get really big? Like 15 to 20 lbs. big. Like, as big as a dog big?
 Flemish rabbit vs. dog. Courtesy of Stamatisclan and Wikipedia Commons.When I asked why he brought them home, my husband said his friend had been given them, but his friend's wife wouldn't let him keep them. Hmmm...
  Fiona.The good news is, they are beautiful and sweet. And, to be fair, I've known for years that my husband wanted a Flemish giant rabbit. They are pretty neat and have an interesting history dating back to the 16th century. I think we've settled on the names Fido and Fiona.
 Fido.
Fido.I've also known for a while that our next "big" critter addition would be sheep. In fact, in 2017, I posted something about why even small homesteads might want sheep. It's just taken a while for us to get prepped for them. (Trust me, there are always more ideas for the homestead than there is time, energy, and money!) Thankfully, our property already had some sheep fencing installed, so "all" we had to do (and by that, I mean all my husband had to do) was repair certain breaks in the fencing, add three livestock gates, and build a sheep shelter.
My husband has been so slammed with work on the homestead that when his dad recently asked him to repair his vehicle, my hubby made a barter: I'll fix your vehicle while you build us a sheep shed. I think the sheep shelter turned out beautifully - and except for some lumber, it was all made with upcycled materials, including an old truck bed liner we found on the property and pieces of the old metal roof from our canning kitchen. Redneck ingenuity, my friends! My dad-in-law did a fabulous job, and there's no way that shelter is going anywhere, even during a typhoon.
 Upcycled sheep shelter.
For a while now, we've known we wanted a few things from our sheep. Namely:
* They had to be excellent brush eaters. If they loved our invasive blackberry vines, all the better!
* They had to be low maintenance and hardy.
* And we preferred a hair breed, so we wouldn't have to shear them.
Then we met a neighbor who said she had Soay (pronounced "so - ay") sheep and needed to sell some. Perfect! Soay met all our criteria, and then some! They love brush and blackberry vines. They require hardly any maintenance and are hardy enough they don't require assistance when giving birth. They are also hair sheep who naturally shed their wool, so shearing isn't necessary. They also happen to be on the smaller side, which makes handling them easier (although ours, right now, are pretty flighty, fleet, and "wild"). Plus, they are so pretty and always look like they are smiling.
 Our Soay sheep.I'm loving the history of Soay sheep, too. They are a very, very old breed (just how old is a matter of opinion) named after the island of Soay in the St Kilda Archipelago, about 40 miles from the Western Isles of Scotland. ("Soay" is Norse for "sheep island.") In fact, Soay sheep still live wild in Scotland. (To give you an idea of how self-sufficient and rugged Soay sheep are, most domestic breeds cannot even begin to survive in the wild.)
 Shannon getting her bells put on.And so, we have Shaun (my kids named him after the cartoon "Shaun the Sheep") and Shannon. (Apparently, we like alliteration.) They are only about a year old and still have some growing to do. We are also trying to "tame" them a bit, since right now they are pretty distrustful of humans. They grew up on hay and grain (which is healthy and just fine), but they seem thrilled to have lots of fresh forage now.
We love hearing their bells tinkling in our "pasture." And one of these days, I'll take a video of them running...because they look more like gazel than sheep, my friends!
 Shaun and Shannon in their shelter.
March 24, 2020
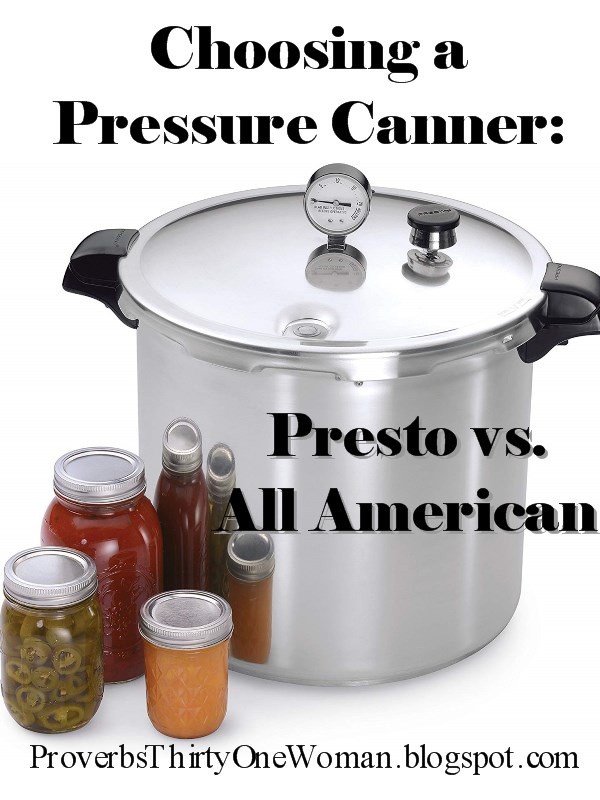
Choosing a Pressure Canner: Presto vs. All American (with Video)
 As an Amazon Associate, I earn from qualifying purchases. All opinions are my own. Please see FCC disclosure for full information. Thank you for your support!
 When you find yourself ready to take the plunge into pressure canning, you'll quickly discover there are two high-quality pressure canner brands out there: Presto and All American. While both types of pressure canners work very well, they are also quite different from each other. Which one should you choose?
First, a Word about Pressure Cookers
Before I begin discussing the pros and cons of Presto and All American pressure canners, it's important to note that it is not safe to pressure can food in a pressure cooker. That's right: Pressure cookers are not the same thing as pressure canners. I discuss this difference and why a pressure cooker isn't safe to can in (no matter what the manufacturer might claim), in this article, which I urge you to read.
Presto Pressure Canners
 Presto's 23-quart pressure canner.
A Presto 23-quart pressure canner was my first pressure canner, purchased approximately 14 years ago. It's served me extremely well and I still use it today. The reason I chose a Presto was mostly price. There's no doubt Presto is a lot cheaper than All American (but don't stop reading here; there are reasons Presto is less expensive). I was able to buy mine at a local store that periodically puts them on sale for a price very close to the price they sell for today on Amazon. (Currently, price on Amazon is about $77.)
I chose the 23-quart version of the canner because I wanted to maximize how many jars I could can at one time. By purchasing an extra rack to go inside the canner, I can do a double layer of pint jars. In other words, I can place the rack that the canner came with on the bottom of the pot, add 8 narrow mouth pint jars, place the additional rack on top of those jars, and then add another 8 jars on top of the second rack.
Presto pressure canners are made from aluminum that is sturdy enough not to warp, but still light to pick up. They rely on a sealing ring or gasket to function properly, much like the very popular Instant Pot (which, to be clear, is not safe to use for pressure canning). Periodically, you should rub a little olive oil on this gasket, to help keep it in good condition. It also needs replacing periodically...though not often. I think I've changed mine once in the entire life of my Presto. Still, it's important to have an extra gasket on hand because old ones go bad suddenly, and you don't want to be in the middle of canning and not have an extra on hand.
 Presto's dial gauge.
Prestos also rely upon a dial gauge to tell you how much pressure has built up in the canner. To can food safely, this gauge must be checked and calibrated every year by your local extension office. Because I didn't want that hassle, I purchased a rocker gauge (also called a pressure regulator) for my Presto. This allows me to ignore the dial gauge and use the pressure regulator to determine the pressure inside the canner. (You can read more about how this works here.)
All American Pressure Canners
 The most popular sizes in All American pressure canners.
All Americans are also made from aluminum, but of a heavier gauge. The entire build of an All American is top quality, making Prestos look and feel cheap in comparison. Some people find the extra heft of the canner off-putting, but as long as you set the canner on the stove and then fill it with water (and empty the water by scooping it up with a ladle or jar when you're done canning), it shouldn't be much of an issue. (It's also worth noting that the All American calls for considerably less water than a similarly-sized Presto.) If you can outside on a camping-style burner, you'll want to ensure it's heavy enough to handle an All American.
I chose a 25-quart All American in part because I like that capacity (19-pint jars, double stacked). The All American in this size comes with two racks, so you don't have to purchase a second one to safely double stack jars. Another reason this is a good size for most people is that it isn't too big to fit on a conventional stove. Some electric stovetops just can't handle the weight of a bigger All American, especially when loaded with jars.
 All American's use a metal-to-metal clamping system.
The reason I chose an All American as my second pressure canner was this: I don't have to worry about a gasket going bad. That's because All Americans use a metal-to-metal clamping system. It can make the canner look like some ancient, weird contraption, but it means that I never need to have an extra gasket on hand, which makes my canning more self-reliant. (Just as the Presto gasket needs occasional oiling, so does the metal rim of the All American. Otherwise, the lid may be difficult to open.)
In addition, All American pressure canners come with a pressure regulator; there's no worry about calibrating a dial gauge. (Like the rocker gauge for the Presto, the All American rocker gauge is suitable for 5, 10, and 15 psi. All Americans also come with a dial gauge.)
 All American's come with a "rocker gauge."
But the heavier aluminum, the extra rack, the no-gasket system, and in the in-place pressure regulator do mean a higher price tag. Currently, the 25-quart All American is about $299 on Amazon. I am a frugal person, and it took me a long time to come around to thinking that price was worth it. For at least a year, I looked for a used All American, but there just weren't any available in my area. (NOTE: If you do buy a used pressure canner, it's wise to take it to your extension office for a check-up to make sure it's safe to operate.) I also looked for sales; nope, none. So I saved my money and bit the bullet. To me, it was worth it in order to be a bit more self-reliant.
Watch My Video to see Details
Pros and Cons of Presto vs. All American
To summarize...
Presto Pros:
* Affordable
* Parts (including extra gaskets, racks, and rocker gauges) are readily available and reasonably priced
* Lightweight
* Works great
* Comes in two sizes: 16 and 23-quart
* Safe
* May be used as a water bath canner simply by not locking the lid
Presto Cons:
* Gasket requires periodic replacing
* Dial gauge requires yearly calibration
* Racks for double stacking are an additional purchase
* A rocker gauge is an additional purchase
* Not suitable for outdoor gas burners over 12,000 BTU’s
All American Pros:
* Will last at least your lifetime
* Parts are readily available and reasonably priced
* Basically maintenance free (just keep it clean)
* Works great
* No gasket to replace
* Dial gauge isn't necessary
* Rack for double stacking included
* Pressure regulator (rock gauge) included
* Comes in a wide variety of sizes: 10, 15, 21, 25, 30, 41-quart
* Most sizes work well with outdoor gas burners
* Safe
* May be used as a water bath canner simply by not clamping down the lid
All American Cons:
* Price is considerably more
* Heavier than Presto
* The largest sizes are not suitable for electric stoves and if you have cabinets over your stovetop, you'll want to measure to be sure you have enough clearance for the larger sizes
Either brand will serve you well; it's just a matter of what your priorities are!
March 23, 2020
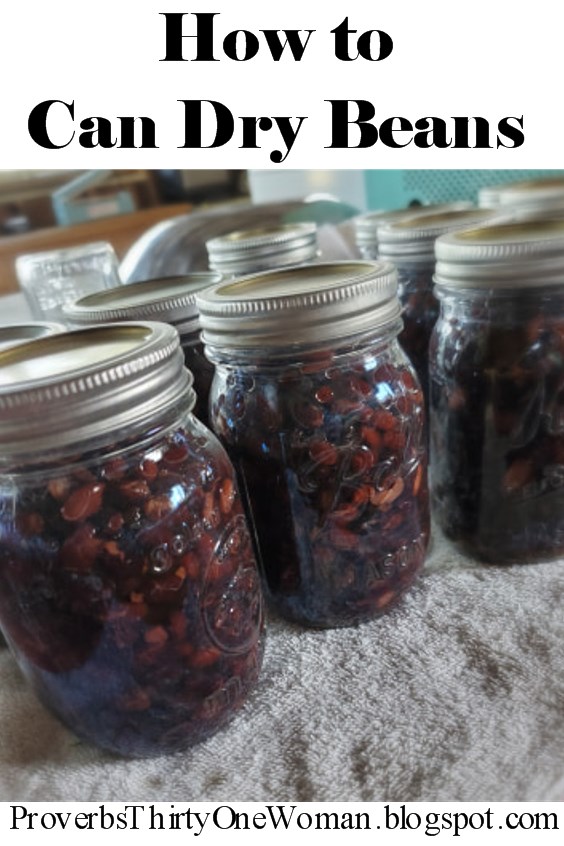
How (and Why) to Can Dry Beans
 As an Amazon Associate, I earn from qualifying purchases. All opinions are my own. Please see FCC disclosure for full information. Thank you for your support!
 Beans are a staple in many households and considered an excellent emergency food to have on hand in case of a natural disaster, loss of job, and so on. These days, I can't eat beans (because they spike my blood sugar badly), but I still have some on hand for my children to eat occasionally. But you may wonder why I bother to can our beans.
Personally, I avoid commercially canned beans because #1, dry beans are less expensive and #2, store-bought beans are less healthy due to high sodium levels and BPA exposure. Still, who doesn't love the convenience of grabbing already cooked beans off the pantry shelf? So home-canned beans it is! (Also, while dried beans last a long time, they do eventually lose their ability to rehydrate; canning our dried beans periodically prevents that.)
The basic method of pressure canning beans (yes, beans must be pressure canned) is the same no matter what type of bean you choose. The method also works great for dried peas (like you'd use in split pea soup). I find that I need about 10 lbs. of dry pinto beans to fill 12 quart jars, about 2 lbs. of dry black beans to fill 8 pint jars, and 4 lbs. of dry lima beans to fill 7 quart jars.
P.S. Some people like to can beans without soaking them overnight first. BUT this is not a tested safe method, so it opens you up to the possibility of food poisoning. Totally not worth the minimal time savings!
How to Can Dried Beans
1. Review the general instructions for pressure canning, if necessary.
2. The night before, pour dry beans into a large pot. Fill the pot with warm water and let the beans soak overnight.
3. The next day, drain the water from the pot. Pour the soaked beans back into the pot and refill the pot with fresh water. Boil the beans for 30 minutes.
4. In the meantime, prepare your jars, lids, and screwbands. Fill your pressure canner with water (according to the manufacturer's directions) and place canning jars inside it. Begin gently heating the water in the canner.
5. Fill a kettle or medium-sized pot with water and bring it to a boil.
6. While waiting for the water to boil, drain the beans. Cover them to keep them warm until the water has come to a full boil.
7. Once the water has come to a boil, remove one jar from the canner, pouring out any water from inside it. Using a ladle, fill the jar with hot beans; a funnel makes this job easier and keeps the jar rims cleaner. (I use this collapsable funnel and this ladle.) Leave 1-inch headspace.
 A funnel and ladle make filling jars easier.
 Leave one-inch headspace.
 These are lima beans.8. If desired, add salt: 1/2 teaspoon canning salt if the jar is pint-sized and 1 teaspoon salt if the jar is quart-sized.
 Adding salt is optional but recommended for better flavor.9. Using a ladle, cover the beans with boiling water, being sure to maintain 1-inch headspace. Use the handle of the plastic utensil to remove any air bubbles.
 Add boiling water but maintain the 1-inch headspace.10. Wipe the rim of the jar clean with a towel dipped in a little white vinegar. (This helps get any food particles off the jar that could lead to seal failures.) Place a lid and screw band on the jar and tighten the band until you just feel resistance. Using the jar lifter, place the jar back into the canner.
11. Repeat steps 7 - 10 until all the beans are used up or the pressure canner is full.
 Jars in the pressure canner.12. Process pint jars for 75 minutes and quart jars for 90 minutes.*
 Lima beans canned and ready for the pantry.
Fun Variations for Canned Beans
 Pinto beans.If you're canning pinto beans, you may add 1/2 a jalapeno (cut in half lengthwise and seeded - or not) to each jar. To make refried beans from the contents, simply pour everything from the jar (beans, pepper, and liquid) into a pan and reheat. Mash and add a little salsa, if desired. (Nope, refried beans truly are never refried!)
Molasses or Tomato Beans are a yummy, if a sweet treat.
Molasses Beans: Mix 4 cups water (or cooking liquid from the beans), 3 tablespoons dark molasses, 1 tablespoon vinegar, 2 teaspoons salt, and 3/4 teaspoon powdered dry mustard. Heat to boiling.
 Baked beans.Tomato Beans: Mix 1 quart tomato juice, 1 - 3 tablespoons sugar (optional), 1 - 2 teaspoons salt (optional), 1 tablespoon chopped onion, and 1/4 teaspoon each of ground cloves, allspice, mace, and cayenne pepper. Heat to boiling.
For either version, you may also add a 3/4-inch cube of pork, ham, or bacon to each jar, if desired. (Cut off all fat from the meat first.) Then fill each jar 3/4 full with beans and cover with the molasses or tomato sauce, leaving 1-inch headspace. Process pints for 65 minutes or quarts for 75 minutes.
Finally, don't forget baked beans. They are definitely a sweet treat, but fun now and then. Click here for full instructions.
* NOTE: If you live at a high altitude, read this important information about adjusting canning times.
A version of this post originally appeared on this blog in April of 2011.
March 20, 2020
God's Encouragement and COVID-19
 I've received emails and messages from some of you - which I love under all circumstances - but which have been focused on how some of you are feeling about current world events. I've certainly touched upon this issue on the blog, hoping to give you feelings of peace amid the craziness, but I thought today was a perfect day to send out some additional encouragement.
There is some encouraging news, if you look hard enough. (Like this article.) But if we pin our hopes on the world, we will always be disappointed. I am sure that most of you know that
God is still in control!
But sometimes we need some gentle reminders. Now is an ideal time to immerse yourself in the Word of God. Try using these quotes as a launchpad:
"For God has not given us a spirit of fear, but one of power, love, and sound judgment."
2 Timothy 1:7
"In peace I will lie down and sleep, for you alone, Lord, make me dwell in safety."
Psalm 4:8
"Do not be anxious about anything, but in every situation, by prayer and petition, with thanksgiving, present your requests to God. And the peace of God, which transcends all understanding, will guard your hearts and your minds in Christ Jesus."
Philippians 4: 6-7
"Humble yourselves, therefore, under God’s mighty hand, that he may lift you up in due time. Cast all your anxiety on him because he cares for you. Be alert and of sober mind. Your enemy the devil prowls around like a roaring lion looking for someone to devour. Resist him, standing firm in the faith, because you know that the family of believers throughout the world is undergoing the same kind of sufferings. And the God of all grace, who called you to his eternal glory in Christ, after you have suffered a little while, will himself restore you and make you strong, firm and steadfast."
1 Peter 5:6-10
"So do not fear, for I am with you;
do not be dismayed, for I am your God.
I will strengthen you and help you;
I will uphold you with my righteous right hand."
Isaiah 41:10
"Do not let your hearts be troubled. You believe in God; believe also in me."
John 14:1
"For I am convinced that neither death nor life, neither angels nor demons, neither the present nor the future, nor any powers, neither height nor depth, nor anything else in all creation, will be able to separate us from the love of God that is in Christ Jesus our Lord."
Romans 8:38
"Peace I leave with you; my peace I give you. I do not give to you as the world gives. Do not let your hearts be troubled and do not be afraid."
John 14:27
"I have told you these things, so that in me you may have peace. In this world you will have trouble. But take heart! I have overcome the world."
John 16:33
P.S. If these kids can do it, so can you! :)
Watch the latest video at foxnews.com
March 19, 2020
Spring Cleaning Checklist: The Bathroom (with free printable)
 As an Amazon Associate, I earn from qualifying purchases. All opinions are my own. Please see FCC disclosure for full information. Thank you for your support!
 We are living in historic times. I have actually stopped spring cleaning because cleaning supplies are extremely limited or non-existent in our stores, and I want to make sure I have enough on hand for everyday cleaning! BUT if things aren't quite so crazy where you are (and I sincerely pray they aren't), this week's spring cleaning chore is the bathroom. Here's how I do it.
Supplies I recommend for spring cleaning the bathroom include:
* A couple of dust cloths
* Mop
* Paper or cloth towels
* Windex
* Dawn dish soap
* Q-tips
* An old toothbrush (for scrubbing stubborn spots)
* Mr. Clean Magic Erasers
* Your favorite sink and shower/tub cleaner. (I use Borax.)
* Vacuum
The Procedure:
To print out this checklist, click here.
* Dust the ceiling, and mop it, if needed. (Click here for advice on mopping walls and ceilings.)
* Dust and wipe down vent covers. If needed, use Windex and some Q-tips to get into crevices.
* Dust fixtures. If needed, wipe them down with Windex or remove the shades and wash them in the sink with a little Dawn soap. Replace any needed light bulbs.
* Remove art from the walls, dust, and set aside in another room.
* Remove any curtains and throw them in the wash.
* Remove any throw rugs; wash those that can be washed and shake out those that can't.
* If your shower curtain is washing machine safe, remove it and wash it.
* Dust any blinds.
* Dust walls. If needed, mop the walls or touch them up with a Mr. Clean Magic Eraser. Don't forget to clean light switches and outlets.
* Clean mirrors and windows. Don't forget to clean the window tracks and frames. I like to use Windex and Q-tips to get into the crevices.
* Dust and clean doors and door frames. I like to use a Mr. Clean Magic Eraser for this. Don't forget to clean doorknobs!
* Wipe down all countertops. I use Windex and a cloth.
* Dust the exterior of all cabinets. If needed, use a little Windex and a cloth to get them really clean.
* Remove everything from inside the cabinets. If there's anything you don't use, donate it to charity. Throw away anything that's broken or useless.
* Wipe down the interior of all cabinets. Use a damp sponge or a little Windex and a cloth.
* Put the contents of the cabinets back in place.
* Remove everything from the shower and then scrub the shower down. (Click here for an easy homemade tub and shower cleaner.) If the shower curtain isn't machine washable, scrub it down, too. If you have a tub, scrub it down. (If there's mold on the grout, click here for an easy way to remedy the problem. If soap scum is built up, click here for an easy, natural way to remove it.)
* Empty the trash and wash the trash can outside, using a hose and a little Dawn dish soap.
* Clean the sink. (If you have hard water stains, click here for an easy way to remove them.)
* Clean the toilet; don't forget to clean around the base.
* Vacuum the floors, then mop.
* Replace artwork on dry walls. Re-hang the washed and dried curtains. Replace throw rugs.
You're done!
March 17, 2020
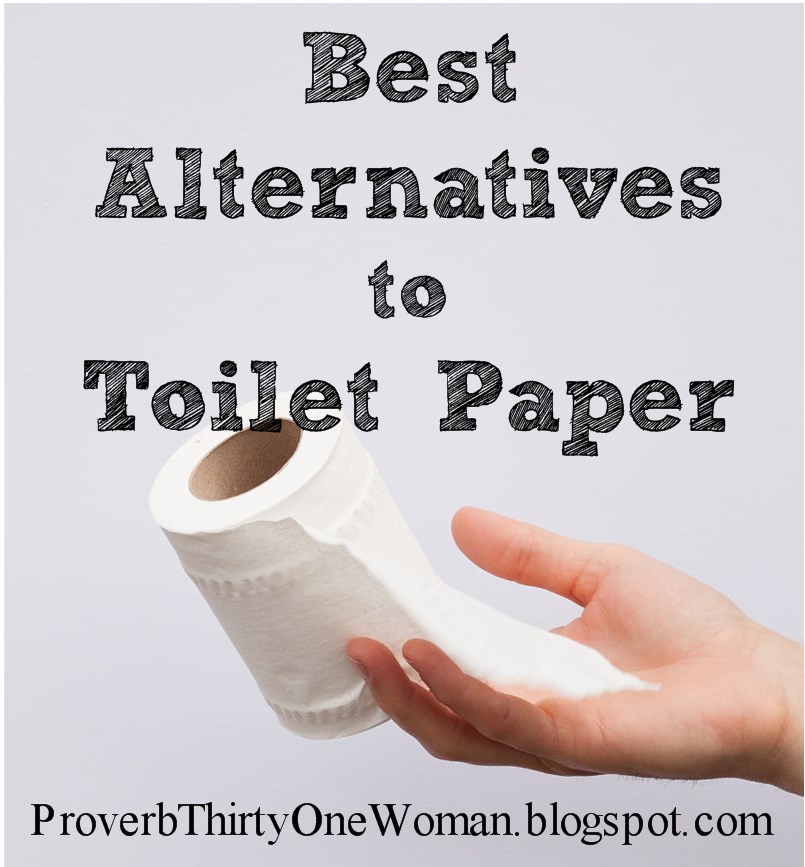
Best Alternatives to Toilet Paper
 As an Amazon Associate, I earn from qualifying purchases. All opinions are my own. Please see FCC disclosure for full information. Thank you for your support!
 We, my friends, are living in the midst of what history may call The Great Toilet Paper Debacle of 2020. I totally understand folks grabbing an extra 2 weeks supply of the stuff if they don't already have some extra on hand (but why don't they have extra on hand?). And I myself certainly would not relish having to do without toilet paper, BUT...
Toilet paper is NOT a necessity, friends!
Toilet paper wasn't even invented until the mid-19th century. What do ya'll think folks did before that? Well, I'm guessing most people don't know, given the way stores can't keep TP on the shelf.
So...have you thought about what you'd do if you couldn't buy toilet paper? I think you should. If nothing else, it will be an exercise in thankfulness.
Temporary Alternatives to Toilet Paper
Most people have at least some of the following items in their household and could use them in place of TP:
* Coffee filters
* Paper towels/disposable shop towels
* Facial tissues
* Baby wipes or makeup wipes (Ladies, I don't recommend makeup wipes for anything other than BMs.)
* Paper napkins
* Scrap paper
* Pages from catalogs, magazines, newspapers
BUT please note that none of these TP replacements should be flushed! Instead, keep a lined wastebasket by the toilet and dispose of the "tp" there. (I kid you not, The Guardian recently reported that sewer systems in the UK are becoming backed up because folks are flushing their alternative TP. Don't be like them.)
Still, if shortages continue, some of these items (like coffee filters and paper towels) will become difficult to replace, so consider more long-term solutions.
 Long Term Alternatives to Toilet Paper
There are two TP alternatives that work quite well for long term use in the modern household. One is a bidet. Up until recently, I thought bidets could only be large, separate toilet-like devices. Most of us don't have room for that in our bathrooms. But there are also bidet attachments that go on a regular toilet, like this or this. But these, too, are starting to sell out on Amazon and at home improvement stores, so if this is your plan, grab one now. (I recommend buying one that doesn't require electricity just so you're not left in an uncomfortable position should the power go out.)
The other alternative is something that folks today call "the family cloth." It's an unfortunate name, conjuring up all kinds of nastiness, in my opinion, but all it really refers to is the TP equivalent to cloth diapers. Just cut up some soft fabric (like cotton flannel, old t-shirts, or soft bathroom towels), hem them or finish the edges so they won't ravel when washed, and keep a stack near the toilet. Immediately before using, you may dampen a cloth with water, if desired, and after use, store it in a closed container, such as a coffee can, lidded bucket, diaper pail, or a wet bag. Some people like to put a little water with baking soda (or perhaps borax) in the container. Periodically, run the cloths through a hot wash, separate from other items, just like you would cloth diapers. (Learn more about "the family cloth" at Nourishing Simplicity.)
Historical Alternatives to Toilet Paper
We can learn so much from history, not the least of which is how easy we have it today! Aside from the infamous Sears catalog outhouse TP, here are some things humans have used for dirty bums in the past. They could come in handy should things get really tough:
* Large, soft leaves
* Moss
* Water (Most cultures use a cup or ladle to get the water into their hand, which they then use to clean their bum. Clearly this is only viable if you can wash your hands afterward.)
And here are a few more historical ways to clean your bum...but I do not recommend them unless you are very, very desperate!
* Sand or snow
* Shards of pottery or clay
* A sponge dipped in salt- or vinegar-water.
* Corn cobs or husks
* Stones (smooth and flat)
* Fur and fleece
* Fruit skins
* Shells
* Grass and hay
* Sticks
* Bare hands
March 13, 2020
Spring Cleaning Checklist: Living Room, Family Room, & Dining Room (with free printable)
 As an Amazon Associate, I earn from qualifying purchases. All opinions are my own. Please see FCC disclosure for full information. Thank you for your support!
This week's spring cleaning checklist covers three areas you may have in your home: Living room, family room, and dining room. If you're young and energetic and don't have littles running around, feel free to tackle them all in one day. But otherwise, don't feel bad if you spend several days on this task...I know I do! The only reason I've combined these rooms into one post is that their cleaning requirements are so similar.
As noted in the checklist for your kitchen, it's always best to start with the ceiling, move to the walls, then the furniture, then the floor. This saves time and sanity because any dust or debris that falls will not end up on something you've already cleaned.
For the living room, family room, and dining room, I recommend the following cleaning supplies:
A dust rag or two
A mop (if walls and ceilings need washing)
Dawn dish soap
Mr. Clean Magic Erasers
Vacuum
Windex
Q-tips
Wood polish or wax, if you use them
Cloth or paper towels
Procedure:
To print out this checklist, click here.
* Dust and, if needed, mop the ceiling. (See this post for ideas on how to mop a ceiling. Also check my post on popcorn ceilings.)
* Dust and clean all light fixtures and fans. I remove the glass from fixtures whenever possible and clean them in the kitchen sink, using Dawn dish soap. I do the same thing with fan blades. Don't forget to replace light bulbs, if needed.
* Remove all art from the walls. Dust and set aside in another room.
* Remove any curtains and put them in the wash.
* Remove any throw or area rugs. Wash those that are washable. Beat or vacuum those that aren't. Set aside in another room.
* Dust any blinds.
* Dust all doors and door frames. If needed, wash with a sponge and a small amount of Dawn soap. A Mr. Clean Magic Eraser works great, too.
* If you have a fireplace, vacuum the exterior bricks or stone, or dust the wood. Consider shop vac-ing the interior and having the chimney cleaned. If you have a wood stove that isn't currently in use, dust well, clean the glass, clean the hearth, and consider having the pipe cleaned. (I prefer to clean chimneys and pipes in the spring; otherwise, we're in a mad dash to get it done come fall. Please do NOT skip cleaning your chimney or stovepipe, since that can lead to a house fire.)
* Dust and, if needed, mop the walls. If the walls just need a little cleaning touch-up here and there (perhaps where children's hands frequent), I recommend using a Mr. Clean Magic Eraser. Don't forget to clean the light switches!
* Wash windows. Don't forget the casings and tracks. I use Windex and Q-tips for getting into the crevices of window tracks. (Windex has the added advantage of cleaning any mold or mildew that's appeared on window casings.)
* Dust and, if needed, wash the floorboards. I like to use a Mr. Clean Magic Eraser for this job.
* Dust all wood furniture. Polish or wax wood, if you like to do so.
* Clean the glass on any furniture with glass.
* Vacuum lampshades.
* Dust any miscellaneous items, like framed photos or lamp bases.
* If you have storage in the room, take everything out of the cabinet, basked, or closet and dust. If needed, wipe down with a sponge or some Windex and a towel. Sort through items, giving away what you don't use and throwing away what's useless. Return items to storage.
* Vacuum all upholstered furniture.
* Dust all electronics, including cords. Don't forget the remote controls, which could use sanitizing, too.
* Vacuum the floor. If your flooring can be mopped, mop it.
* Replace rugs and art, assuming walls and floors are dry.
Done!
March 9, 2020
How to Create a Deep Pantry
 As an Amazon Associate, I earn from qualifying purchases. All opinions are my own. Please see FCC disclosure for full information. Thank you for your support!
 I live in the heart of Coronavirus (Corvid-19) madness. It's been fascinating to see how people are reacting. Unfortunately, there's a lot of panic buying happening, and therefore it's impossible to buy bleach, hand sanitizer, Lysol, toilet paper, and many other common household and food items locally. At first, the majority of locals (at least publicly) mocked those panic buyers. "The Coronavirus doesn't include diarrhea!" many said in a local online group I belong to. "Why are these idiots buying up all the toilet paper?"
Now I'm starting to see more people realize the CDC recommends all citizens have two weeks of food and basic supplies on hand, in case they need to hunker down at home. (Actually, the federal government says this all year, every year, even when there's no looming pandemic - and yes, even during past administrations.) Now, many locals are saying, "I can't believe I'm doing this..." and filling their grocery carts up with whatever they can get their hands on.
Personally, I've been surprised that people don't have a little extra toilet paper on hand! But we live in an era where there are multiple grocery stores in most every town, not to mention big-box stores, health food stores, and so on. If we need it, we can just pick it up in a few moment's time, right? This is a very new way of thinking, though.
 Our grandparents knew that:
* You could lose your job, in which case a deep pantry will come in awfully handy.
* Money could get tight, in which case "shopping" in your pantry will save the day.
* There may be a natural disaster where you're stuck at home and the only food you have is what's in your pantry.
* Store shelves quickly and easily go bare for a wide variety of reasons
* The less often you go to the store, the less money you're likely to spend. (How many times have you gone to the grocery store for X and come home with other stuff, too?)
* Having a deep pantry saves you money in other ways, too. For example, you can stock up when things go on sale, you're not always running to the store so you save on fuel, and you're less likely to waste money eating out or getting take out. (Plus, homemade food is a lot better for your health!)
"But I Don't Have Room!"
When faced with the idea of having a few basic supplies on hand, many folks say, "I don't have room!" And it's true; if you live in a small apartment or house, you often don't have obvious storage space. But the truth is, there are easy ways to find unused space in your home.
Back when we lived in a 1950s house in the suburbs, we didn't have any pantry at all. However, there was a linen closet and a coat closet. At first, those closets were stuffed with stuff I rarely used. Eventually, I sorted through all that, put my linens in space saver bags, had my hubby add shelves to the coat closet, and used those closets as my pantry. (Most people probably don't need two closets for a pantry, but I was canning a year's worth of certain foods - like applesauce - each summer.)
Other ways to find space:
* Go through every drawer and cupboard and get rid of anything you no longer use. Donate what's still good and throw the rest away. Consider quantity, as well as usefulness. For example, do you really need three sets of "everyday" dishes? Probably not, and you'll have more cupboard space if you get rid of at least one set.
* Look under your bed. If there's nothing but dust bunnies there, consider buying Rubbermaid-style containers that fit under the bed; fill them with canned food or extra rolls of toilet paper.
 Courtesy Downtowngal and Wikipedia Commons.
* If you're fortunate enough to have a basement or garage, clean it up a bit, and place food either in plastic bins or on shelving units. Just be aware that boxed food isn't suitable for moist storage areas; jars or cans are best, though they may eventually rust. (But if you're using your pantry food, rust is rarely a problem.)
"But I Can't Afford It!"
Another common complaint is that buying "extra" food seems too expensive. However, there's no need to go out and buy everything at once (unless you're panicking due to current events). Instead, make yourself a budget for how much you'll spend on your deep pantry every time you go grocery shopping. I can be as little as a few dollars! Then, every time you shop, follow through and buy a few items you commonly use. It won't take very long to get a few week's supply on hand. And naturally, if you see something on sale, buy extra!
One very simple way to stock your pantry is to buy one extra every time you shop. For example, let's say you have a soup your family likes that is made with canned items like veggies and chicken or beef stock. Next time you buy ingredients for that soup, buy one can extra of every ingredient.
What to Add to Your Deep Pantry
What you choose to add to your pantry really depends on the likes and dislikes of your family. Just focus on things that are shelf-stable and that your family actually eats. (Having food in the freezer is great, too, but not very helpful if the power goes out for an extended period of time, as with some winter storms.)
Once upon a time, my pantry always had an extra canister of flour and sugar, dried beans and rice, an extra box of baking ingredients (like baking powder and soda), extra salt and pepper and other favorite spices, extra canisters of baby food, and so on. Today, the grains are mostly gone (my kids still eat some) and my pantry contains mostly home-canned fruit, veggies, and meat, as well as some store-bought items in those categories, plus bottles of condiments, and home-dried herbs. I also have a small supply of keto and diabetic-friendly freeze-dried food that I made at home with my Harvest Right freeze dryer. (Freeze-dried food is not a necessity - but it is nice to have some on hand for easy-peasy meals.)
Do make sure to think a little about your pantry in terms of serving meals. Random ingredients don't always easily go together, so try to plan out ingredients that make up some of your family's favorite dishes.
 Courtesy
 Joanna Alderson.
Maintaining Your Deep Pantry
You may wonder how you can keep track of your pantry if it's here and there all over the house. I admit, that can be tricky. If you must have food in various locations in the house, I recommend you group like items together. For example, put canned veggies in one spot and canned meats in another.
Also, it's really necessary to always put the oldest food up front and the newest food in the back of your cupboard. This way, you can eat up the older stuff first and not waste money by forgetting certain items are tucked away.
Once a year, it's smart to go through your pantry and check for items that should be consumed right away. Please do note that expiration dates are NOT the same as "best by" dates ! "Best by" means the food tastes best if eaten by a certain time. Expiration dates indicate the food is no longer safe to eat after a certain time. Canned foods don't have expiration dates; they only go bad if the seal has broken somehow. (After a year or so, canned foods - whether store-bought or home-canned - very slowly begin losing nutrients and flavor. For more on this topic, click here.)
Other Things to Consider
In addition to storing typical pantry items (food), it's smart to have some bottled water on hand (in case the power goes out or your city's water gets isn't safe to drink), in addition to a few basic toiletries (soap, toothpaste, deodorant, sanitary pads/tampons) and basic cleaning supplies (dish soap, vinegar, etc. Do not store bleach for more than 6 months, or it becomes diluted.)
Related Posts:


A version of this post originally appeared in October of 2009.


