
Laura Strutt's Blog, page 7
August 9, 2015
The Week That Was: Festival of Quilts 2015
What a phenomenal week! FOQ 2015 you were aces!
As y’all know I was hanging out on the Vilene stand – with textile superstar Kim Thittichai – sharing some techniques, trouble shooting, cooing over your shopping hauls and also eating ice cream. Lots of ice cream.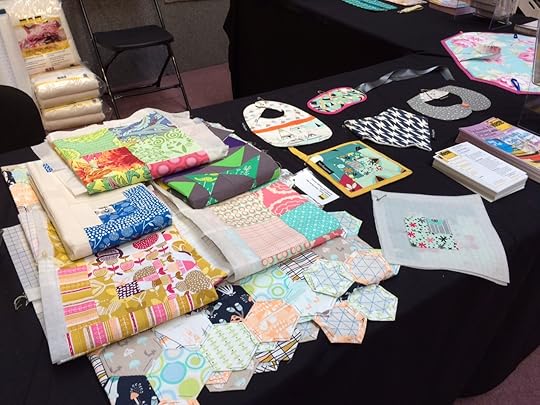
Did you know that Vilene has a super swanky new website? Well, here’s the thing! When it comes to adding interlinings, giving volume or structure to your makes or just shooting for that truly pro finish, then trying to find the perfect product can be something of a minefield. I mean even the greatest fabric stores are gonna be a little stumped when you ask for “that white stuff that makes things not so wibbly!” To make your stitching life easier, there are a heap of how-to guides and tutorials to lead you to greatness in your next make – so be sure to go check it out!
I also got to catch up with so many of my fave folks – and might have got a little [read: a lot] emotional over the sweetest gifts from my adorable chum Lou. While we only ever see each other at shows we spend a lot [read: borderline unhealthy amount of time] gushing about our sweet pups at home, crushing on fabrics, lusting after pens and inked and generally fan girling about all the things. Check out this breathtakingly stunning custom Laura doll – complete with a fancy change of frock and matching mary-janes – and this snuggle blanket for Waffle, who is way more burrito than dog, so I can’t wait to wrap him up! Pro Tip! If you want to make someone feel more loved than you can ever imagine, go get them a custom Lou Love This Doll. Or, you know, treat yo’self!
As usual the quilt exhibitions were wall-to-wall eye candy, and let me tell you it’s not too shabby to spend your whole working day eyeballing some awesome. This is just one of my faves, although I’m pretty sure that Luke’s exhibition was everyone’s fave.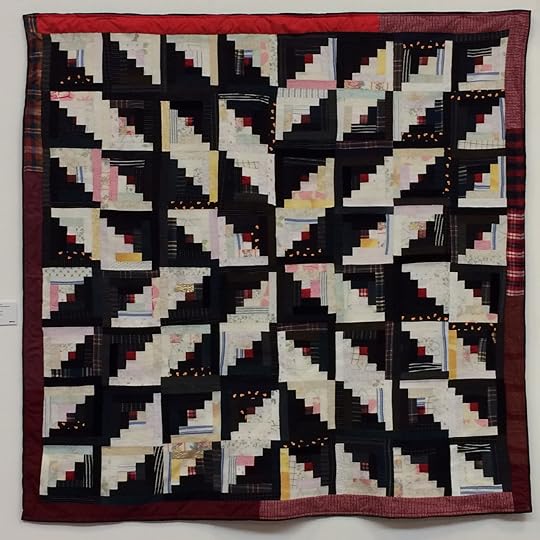 You know that it was an ace event when- even though you were working your little socks off – you come home all jazzed up ready to get making something – and for the first time in over year (yup! a whole year!) I don’t have a To Do List jammed packed with crochet and yarn crafts! So, who knows I might even be able to get my quilt on!
This week is set to be a cracker – I’m planning out my Friendship Bracelet workshop for the launch of Arm Candy at Foyles (and you know that I’m gonna be making goodie bags, because that is totally my jam!), working on some textiles surface designs and catching up on some much needed chill out time!
Hope y’all have a great week!
The post The Week That Was: Festival of Quilts 2015 appeared first on Made Peachy.


August 4, 2015
Pinterest: What The Did With Quilting Tutorials
Hello NEC, Birmingham – I am in you!
Today is the set up day for the start of the busy show season for me, and first off is The Festival of Quilts – there is literally so much variety and inspiration at this show is rekindles my passion for patchwork and quilting every time. I know that as soon as I see those incredible quilted works of art, the exhibitions and, let’s not forget, the fabric and haberdashery stands, I will want to devote much more time to this amazing craft!
To celebrate the fact that Festival of Quilts is literally right around the corner, I thought I would hunt out some of the most rad Quilting Tutorials on Pinterest to share with you!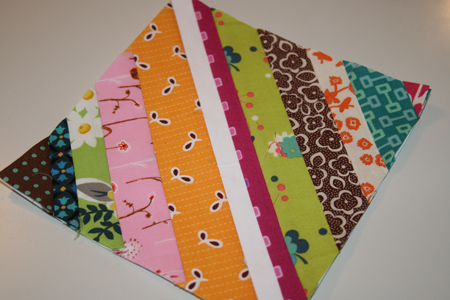 1 String Block Tutorial ⇒ Film in the Fridge
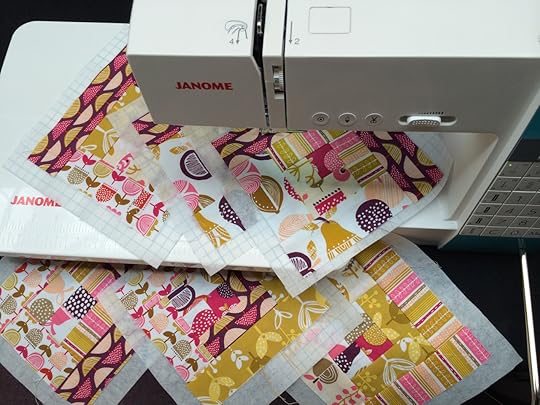
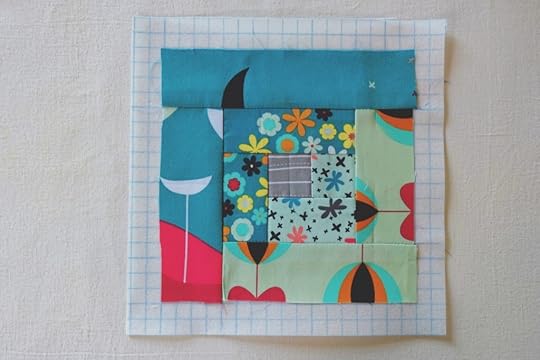 2 Log Cab Blocks with Vilene Quickscreen Square ⇒ Made Peachy Archives
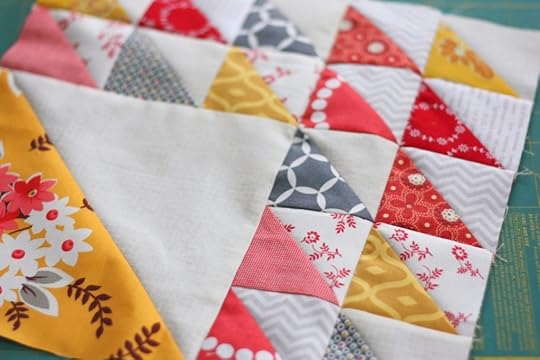 3 Half Square Triangle Shortcuts ⇒ Diary of a Quilter
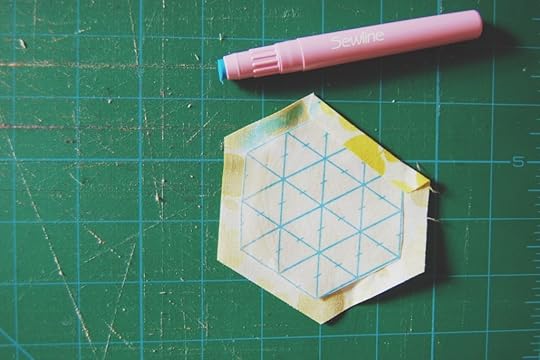 4 Hassle-Free Hexis ⇒ Made Peachy Archive
 5 Joining Quilt-As-You-Go-Blocks ⇒ Michelle Patterns
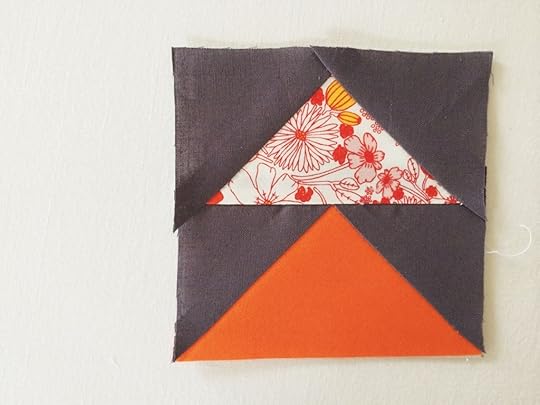 6 Easy Flying Geese Blocks ⇒ Made Peachy Archive
I don’t know about you, but that makes me want to get stuck into a new project and get stitching…looking for your next Must Make Quilt? This stunning Liberty Chevron Quilt with illustrated step-by-step instructions is much easier than you might think, so what are you waiting for?!

Ok…I know, I really must head off to get this show all set up and under way! Hope y’all have a fantastic day – be sure to check out what else I’m pinning right now!
The post Pinterest: What The Did With Quilting Tutorials appeared first on Made Peachy.
August 2, 2015
Festival of Quilts 2015
Friends! It is that time of year again!
One of my very favourite shows of the season is happening this weekend, the Festival of Quilts at the NEC Birmingham!
This year the show promises to be a real treat – there is plenty to see and do…and lots of shopping opportunities to be had (which is no bad thing, because who ever had enough fabric in their stash?!)
One of my very favourite aspects of the show is looking at all the exhibition entries – there is so much inspiration to be had simply from checking out all the amazing entries into each of the wonderful categories – I can’t wait to see them all.
 This year, if you’re heading to the show, you’ll be able to find me on the Vilene Stand M8 – where I’ll be on hand to talk about all things quilting, crafting and sewing related, and help you find the right Vilene products for you next make!
I can wait to catch up with everyone – I feel as though I have been on creative house arrest for the last couple of months while I have ben writing my book, so this is going to be a whole heap of fun! Not got your tickets yet? No drama, you can still order them online!
Are you coming along to the show? Be sure to swing in past and say Hi!
The post Festival of Quilts 2015 appeared first on Made Peachy.
July 28, 2015
Pinterest: What They Did With Bath Time Treats
How lush are these instant download bathroom printables, £11.83, by Two Moons And A Fry?
Right now we are slap-bang in the middle of refitting our bathroom. My world is currently floating between my dreams of roll top tubs and luxurious bubble baths, and my reality of grout and bathing in the kitchen sink. There is no end to the glamour of home renovations, there truly isn’t!
When I’m not slathering grout onto new tiles I’m stalking out fancy DIY indulgences for bath times, so here are just a few of my favourite DIY Bath Time Treats from Pinterest!
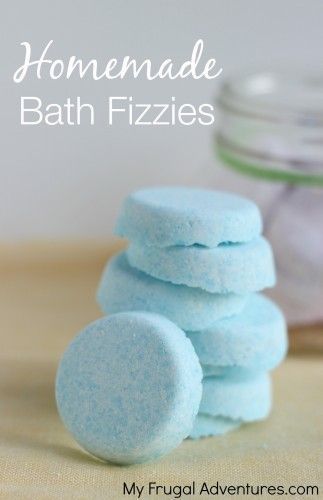 1 DIY Bath Fizzers ⇒ My Frugal Adventure
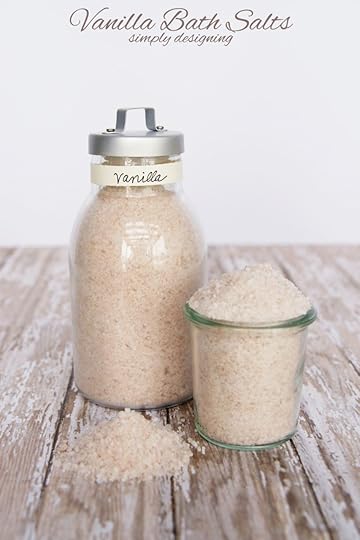
2 DIY Vanilla Bath Salts ⇒ Simply Designing
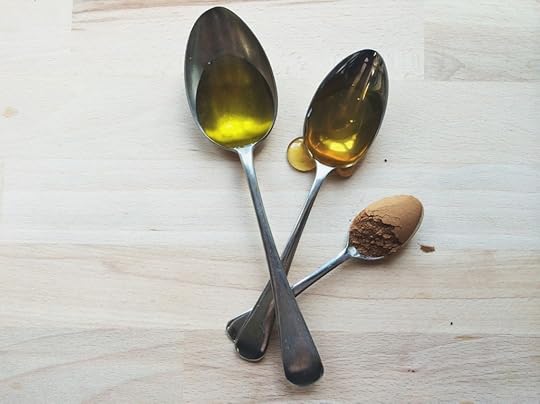 3 DIY Cinnamon, Honey & Olive Oil Hair Mask ⇒ Made Peachy Archives
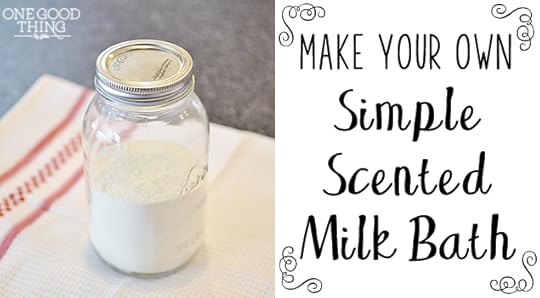 4 Homemade Milk Bath Soak ⇒ One Good Thing By Jillee
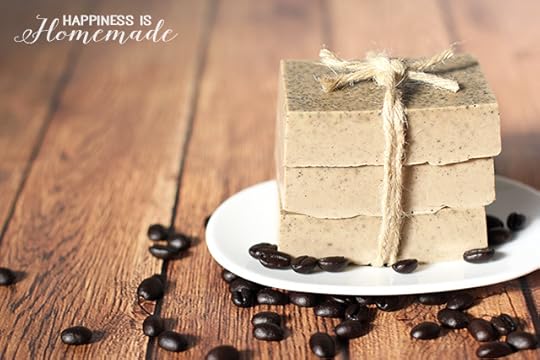 5 10 Minute Coffe & Milk Exfoliating Soap ⇒ Happiness is Homemade
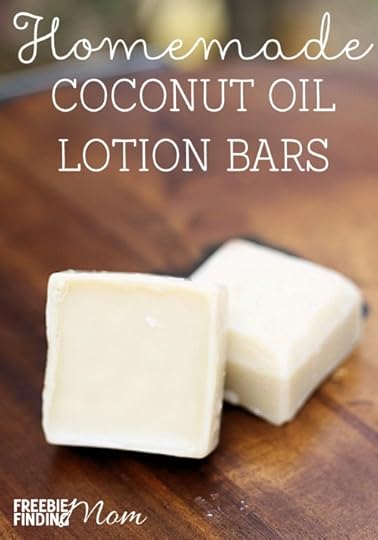 6 DIY Coconut Oil Lotion Bars ⇒ Freebie Finding Mom
It might be a little bit like torture hunting out these delicious bath time treats when the bathroom isn’t yet complete, but a gal has to dream, right?
 If your currently living through home renovations (or heading to any festivals or camping trips this summer!, this Dry Shampoo is sure to get you through!
Check out all the other creative goodies I’m pinning right now!
The post Pinterest: What They Did With Bath Time Treats appeared first on Made Peachy.
July 27, 2015
Arm Candy: Friendship Bracelet Workshop
Hey there friends! Hope y’all are having a great week! Things have been a little quiet around here, Ive been on house arrest for the last few weeks working super hard finishing up my latest crochet book – yup, that’s right, another book packed full of ace crochet designs! Thank you so much for all your patience with while I’ve been up to my eyeballs in yarns Ive had so many lovely messages, emails and tweets from y’all and let me tell you, that has been just the morale boost that a girl on a crochet deadline needs to get through the day…that and coffee!
Although it has been great to immerse myself in the designing process and spend my days crocheting (and binge watching Netflix, I wont lie!) it’s hard not to get cabin fever if the truth be told! I really love to get out and about and am looking forward to the upcoming events in the craft universe that are coming up in the next few months. But I wanted to share with you and exciting workshop that I will be hosting in Londontown this summer!
 To celebrate the launch of my new book, Arm Candy, I’ll be heading on down to Foyles at Charing Cross to teach a friendship bracelet workshop as part of their Children’s summer events! The workshop is on Friday 21st August 2015 11am – 12 Noon 107 Charing Cross Road and the ticket are £5 and are bookable online!
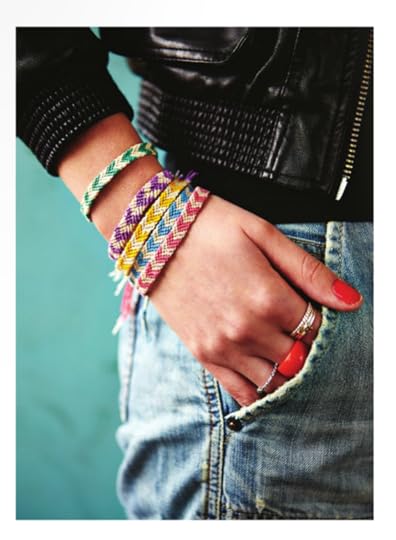 Friendship bracelets are so much fun to make and are the ideal craft for summer holidays – quick and easy-to-make, with just a few supplies that you can easily stow in your bag to work on wherever your summer holidays take you!
I can’t wait – so, why not come along to the workshop, we’ll have a blast, make bracelets…what could be a better way to kick off the summer holidays?!
Hope to see y’all there!
♥ – ♥ – ♥
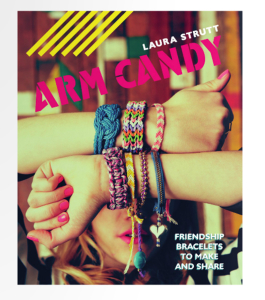
Arm Candy: Friendship Bracelets to Make and Share, £9.99, Pavilion Books , goes on sale on the 6 August 2015 – you can pre-order your copy now!
The post Arm Candy: Friendship Bracelet Workshop appeared first on Made Peachy.
July 15, 2015
Top Tips for Selecting Buttons for Finished Makes
Hey There Friends!
It might have all been a little quiet in these parts of late – its been a manic few weeks of working on the final deadline of my new crochet book, so every hour of the day have been packed with crocheting like a tiny machine!
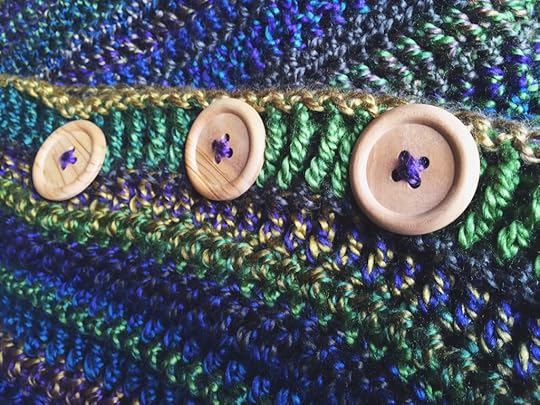
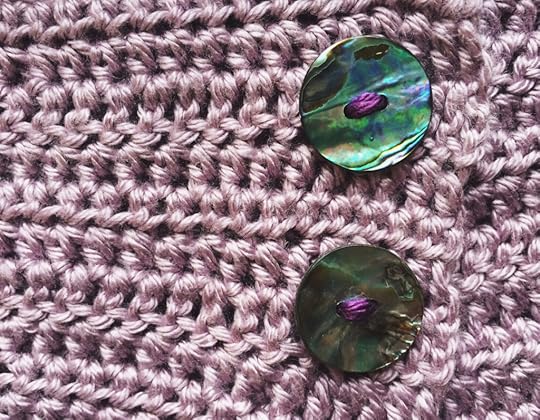
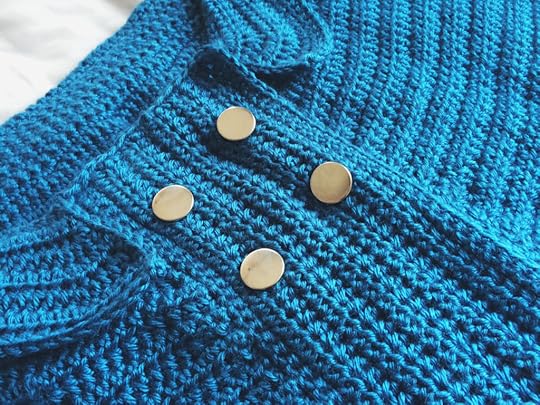
Working on these final stages of this huge project has got me thinking about the finishing stages of a project. When it comes to yarn crafts the importance of blocking both knits and crochet makes should never be overlooked. But, how about the finishing touches? Buttons and fastenings are often the final thing that we think about, all the ends are woven in, everything is blocked to its full glory and now its time to add the buttons.
Like many creative folks I am the proud owner of a huge stash of buttons and have realised that these small little fastenings can add a true wow factor to a finished make. In fact, your choice of buttons can completely change the finished appearance of the entire project, so when you think of it in those terms it can add a little bit of pressure to the process of selecting the fastenings. That being said, don’t let that overwhelm you, here are a few tips to help you on your way for selecting buttons for your finished makes.
 Size Matters
If you’ve been following a knitting or crochet pattern that includes buttons you will have a set sizing for the buttons as dictated in the buttonhole band on the pattern. The button you choose should be small enough to be able to pass though the buttonhole with ease – no stretching or straining on the fibres around the buttonhole – yet be large enough to sit neatly on the surface, for the most part obscuring the hole and holding the sections neatly in place.
Pro Tip! Unsure if the button you have selected is the right size – thread a length of yarn through the holes or shank on the buttons and hold on to these while passing the button through the hole, this will allow you to test whether the button is a good fit for your project.
 Complementary or Contrast
Colour is everything when it comes to projects and the finishing touches that you select. You have no doubt spent a long time selecting the exact fibre and colour of the yarn for your project and you will want to ensure that your buttons make the most of this selection. The style that you want to achieve with the finished make will often dictate the shade of button you would like to pick – do you want to make a feature of the buttons? Do you want the buttons to have a more subtle appearance? By selecting a button that is in a complementary colour or shade to match the yarn you will be playing down the fastenings, often creating a refined finish – this is great if you have worked a heavily detailed design and don’t want to detract from the work of the stitches. A bright contrasting colour is a great way to a a vibrant pop of colour – this is a great way to accessorise simple, classic designs, highlight the fastening or add a fun area of interest to the make. Try placing buttons of different shades and colours to the surface of your make to see the different effects and the different finished styles that they will create.
Novelty or Natural
Similarly to selecting a colour, deciding on whether you want to select a fun novelty button or a more natural design is something that will dictate the finished style of the piece. These choices are again down to personal taste and the finished results that you want to achieve, but it is worth considering the weight of the button. Buttons can be made from a wide range of materials from resin and plastic, to shell, wood, and metal, all of which will have different weights and this will have an effect on the garment that you are adding them to. Projects made in light weight yarns will require a lighter-weight buttons, as the more weighty varieties will weight down and stretch the lighter material of the stitches, while light weight buttons might not have enough substance to secure chunkier projects.
 Flat or Shank
While there are millions of different styles of buttons to choose from for your projects the majority of these are either flat buttons – which have small holes through the surface through which to stitch onto the fabric – or shank buttons – which are recognised by a small shank of metal or plastic on the back of the button with a whole through which to secure. As a general rule, shank buttons are commonly selected for makes created with chunky yarns as they allow the buttons to stand proud of the button band and sit securely onto the surface of the garment when fastened. That being said, a flat button can be converted by simply creating a thread shank at the back of the button when you secure it. You might even like to consider pearl shaped rounded buttons, where the hole to secure the fastening is drilled through the circle of the buttons, these are great for light weight knits and often adda sweet feminine finish to the appearance of garments.
Mix & Match
There is no reason why you have to select identical buttons for your makes. Adding a collection of buttons in a range of finishes, colours and styles is a great way to create a truly unique and eclectic finish. However, it is wise to select buttons that are a similar size and weight to ensure that they all sit on the finished piece in the same manner and keep to either all flat buttons or shank buttons to keep the finish consistent.
Buttons First
Just as there are days when we base our entire outfit selection on a single accessory or pair of shoes there are times when you might have found the most dreamy buttons and want to create something something simply to incorporate them – and that my friends is all good too! These principles for selecting the buttons for a finished garment can also be used in reverse, to help you select the yarns or pattern for your make, or inspire your own designs. If you are selecting a pattern to feature these showstopper buttons be sure to pay attention to the pattern instructions for the button bands, as you may want to increase or decrease the size of the buttonholes to accommodate the buttons.
Pro Tip! If you are altering a pattern to accommodate larger or smaller buttons you will need too increase or decrease the size of the buttons holes, remember to scale the button band section in proportion to the changes made for the buttonholes to achieve a neat finish on the completed garment.
Choosing the buttons for your finished makes is the most satisfying element of the finishing stages of making a project – how do you decide what buttons to add to your projects?
♥ – ♥ – ♥
Looking for buttons and fastening for your latest make? Or, simply want to add some stunning pieces to your button stash? Be sure to check out the wide range of fastenings over at Minerva Crafts!
The post Top Tips for Selecting Buttons for Finished Makes appeared first on Made Peachy.
June 26, 2015
Home Sweet Home: The Renovation Chronicles
For those folks that have been stopping in past this little place for a while and have been long time readers y’all will know that we are slowly but surely renovating our little home.
We live in a sweet Victorian terraced house that (sadly) had all of the lovely character and period features ripped out of it and we have been painstakingly trying to bring back the charm to our little abode with some TLC…and a lot of blood, sweat and tears.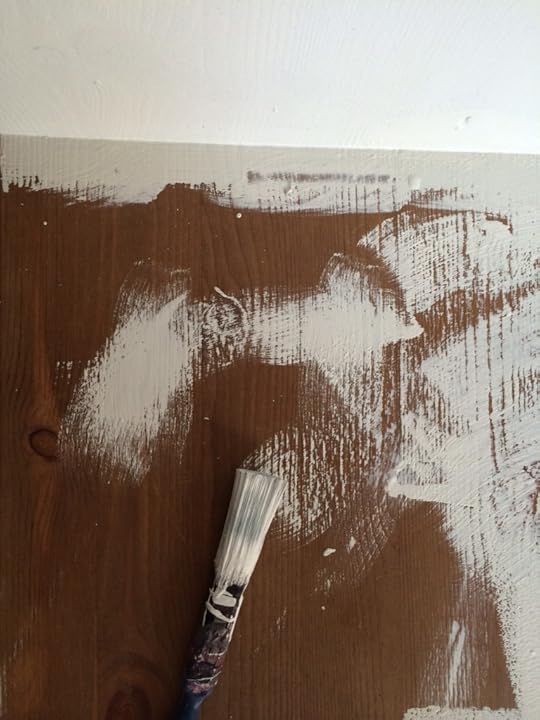 Taking on a renovation project is no small challenge – for a start it is nothing like how it seems in the movies. Fact! You will not be spending most of your time looking cute in an oversized man’s shirt, having fun paint fights with your fella and all of a sudden the whole place is glorious -more’s the pity! Within the first week of moving into our home I got the wake up call that this was a big job, and we were in it for the long haul.
That being said, as a couple we are the go-getter kind of folks, the not scared of hard graft and long days and so we set about planning the renovation project. Tasks were outlined, budgets were set and deadlines tentatively planned. This thing was GO! You’d be forgiven for thinking that this was a still from Breaking Bad – but this is actually hubs all decked out for some rather grim attic clearing!
But, you know what? Life gets in the way sometimes. There are commitments with family and friends – and, lets face it, who would rather be mixing up cement or ripping down wallpaper over hanging out with your nearest and dearest? There has also been a lot of hurdles – not to mention being made redundant (Twice…in two years…I know, its hard not to take that a little personally, right?) But, slow and steady wins the race!
In a dream world the place would be ship shape and we’d be sitting back enjoying the fruits of our labour. So, when that dream and reality seem like they are never going to become one and the same thing it is hard not to start feeling bogged down and lose momentum.
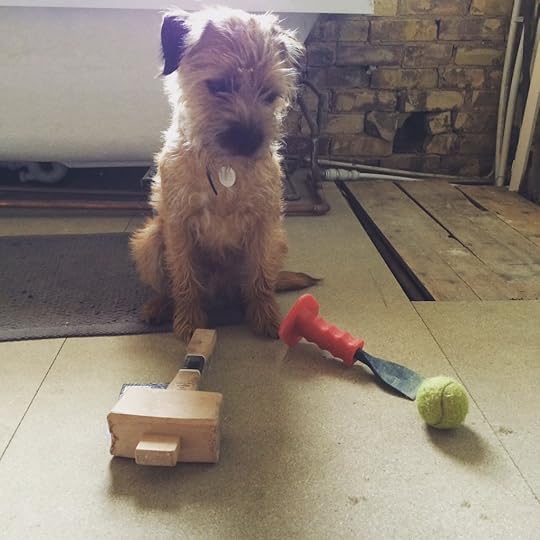 I hear you Waffle, sometimes it feels like life is all chores and DIY and not enough tennis ball!
So, how do you stay motivated whilst freshening up or renovating your home? Here are my Top 5 Tips for Keeping Motived While Renovating Your Home!
1 Keep Your Eyes on the Prize
Long projects are, as the name suggests, long. Most people embarking on a large project will break down the overall goal into a series of different elements – or steps – that lead to the final goal. The process of breaking down large goals into a series of smaller steps has long been praised for helping people achieve success with their project, no matter what it is. Create your own list, working room by room, marking out the individual elements that make up the over all goal for the project. Checking back over this list is great way to remind you what it is that all this hard work is for and helps you to see the bigger picture.
2 Be Informed
Knowledge is power but you simply can’t know everything about everything. There are so many different and varied jobs that make up a home renovations and it would be crazy to expect too become an overnight expert. Speak to friends, family and neighbours to build up an arsenal of reputable builders, plumbers, plasters and tradesmen so you have just the right back up when you need it. Grab a DIY book, there are so many books dedicated to home maintenance and renovations and having one on hand as a reference is a great way to build your knowledge, discover new skills and identify when exactly you might need to call on an expert!
3 Celebrate the Small Successes
When it feels like you are currently living in a building site or you feel as though staring at stripped down walls for one more day might send you over the edge be sure to remember what you have already achieved. Taking Before and After snaps are a surefire way to boost your spirits. So, when morale is at an all-time low look back over the pictures of that ugly concrete fireplace that is now a real talking point or that scrubby patch of wasteland that could barely be called a garden that is now a lush haven of plant life.
4 Plan Down Time
Home renovation burnout is a thing. Or, at least it should be. When you are working on a huge project, with lots and lots of different stages to work through to get to your goal is it almost impossible not to feel like you should be working every hour of the day. Break up the schedule with fun, relaxing things too – keep up with your hobbies, see your friends and families. Creating a set divide between work time and leisure time will help prevent you from getting the guilts about not working on your home and will allow you to make the most of your down time. It’s a lot easier to spend a whole weekend wearing a dust mask and wielding a sander knowing that the following weekend you will be chilling with your folks, taking a trip, or heading out to your fave restaurant.
5 Dream, Dream, Dream!
Never forget that it was your dreams that got you into this ‘mess’ in the first place! And while you’re surrounded by tools, boxes of tiles, cans of paint it can be hard to see how that dream is ever going to come to fruition. So, I say keep on fuelling that dream and don’t ever stop! Setting a wish list for future home goodies is a great motivator, because if getting your hands on the rug of your dreams (and, yes, thats a thing!) means spending four days straight sanding down wooden floors then suddenly the task is less of a chore and you’ll know the sooner this is is done the sooner you’ll get that rug of your dreams! Pinterest is great for collecting together all your ideas so why not create a wish list of your own dream additions for your home?
Here’s a little peak at a few of the fave home must-haves from my current wish list!
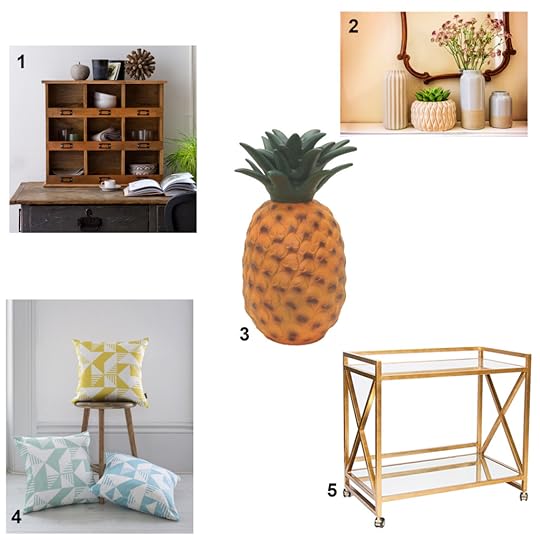 1 Storage Cubby Unit • £125 • Within
2 Anet Vase Collection from Broste Copenhagen • From £39 • The Scandinavian Shop
3 Pineapple Lamp • £65 • Maiden
4 Geo Pastel Cushions by Ellie Hyde • £40 • Graduate Collection
5 Georgia Bar Cart • £575 • Eco Chic
Yes – I know, a bar cart that is the equivalent of a mortgage payment may seem a little excessive, but this is wish list after all, so indulge me!
Are you working on a renovation project? Have you made it to the finish line? I’d love to hear how you kept your motivation going throughout!
♥ – ♥ – ♥
This post is part of the Freshen Up Your Home Series for Legal & General.
Find out more about the home contents services at Legal & General
The post Home Sweet Home: The Renovation Chronicles appeared first on Made Peachy.
June 25, 2015
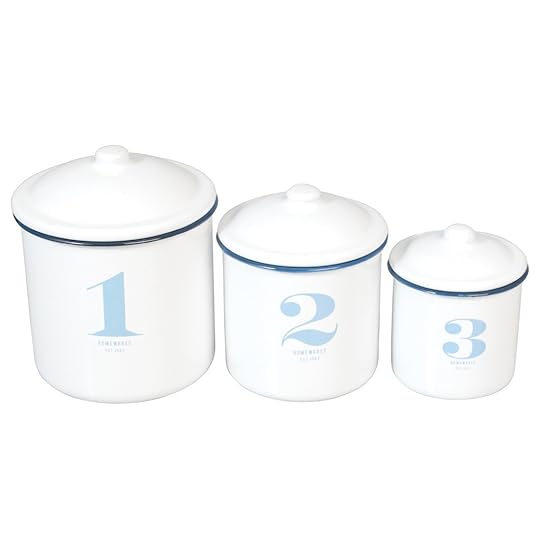
DotComGift Shop Homewares Giveaway Winner
Happy Friday Y’all!
The sun is shining, the weekend is in sight and today is the day to announce the winner of the DotComGiftShop Homewares Giveaway!
Congratulations
Pat Collingwood!
Be sure to email over your postal address so we can get this sweet set of storage containers out to you!
Thanks to all y’all that entered – I’m sorry that I can’t pick more winners, but be sure to check out the DotComGiftShop Summer Sale…seriously you guys, with up to 90% off you’re gonna feel like a real winner when you stock up on fun summertime treats!
Today the sun is shining and for the first time in almost as long as I can remember that i have no crochet work to do. Well, that isn’t actually correct – there is still plenty of crochet work to do, just there is no yarn to do the crochet with! So while I’m waiting for the next yarn delivery to arrive I’m going to spend some much needed time at the sewing machine working on a few fun projects! So, folks, what does your Friday have in store?
The post DotComGift Shop Homewares Giveaway Winner appeared first on Made Peachy.
June 24, 2015
DIY Air Dry Clay Wall Plaque
Air dry clay is ace! If you’ve get to get your hands on some and give this wonderful product a try then you really must! This soft easy-use clay can be sculpted, pressed and printed, to create a range of shape and designs – then you simply leave it to harden before going wild with decorations! Sounds like fun, am I right? Why not check out these inspirational ideas to kick start your new found love for air dry clay?
I really enjoyed making a sweet little trinket dish recently and thought I would share another mini make with y’all!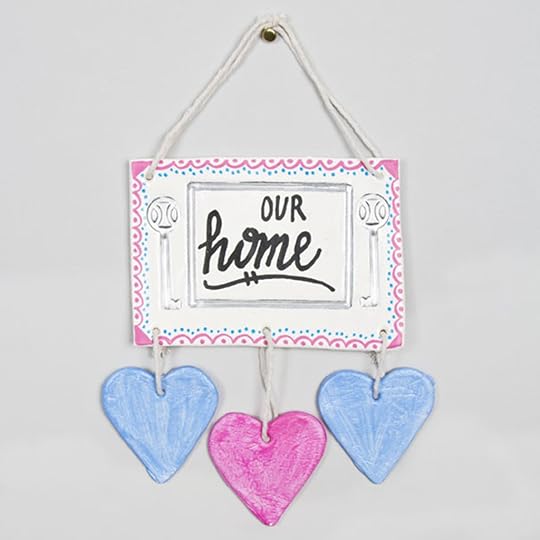 Create your own New Home Plaque with air dry clay and using different objects to create impressions and prints onto the surface. Check out the full step-ay-step project over on Baker Ross!
Happy Thursday Y’all!
The post DIY Air Dry Clay Wall Plaque appeared first on Made Peachy.
June 23, 2015
Pinterest: What They Did With Macramé
I’m all heart eyes for this stunning Macramé Woven Wall Hanging – just one of the awesome knotted designs by Kate And Feather!
Seems like I’m not the only fan of 70s crafting – yesterday’s Macramé Hanging Plant Pot Holders was a huge hit – so many of y’all remember seeing these around your home as kids, or had mamma that we big into macramé.
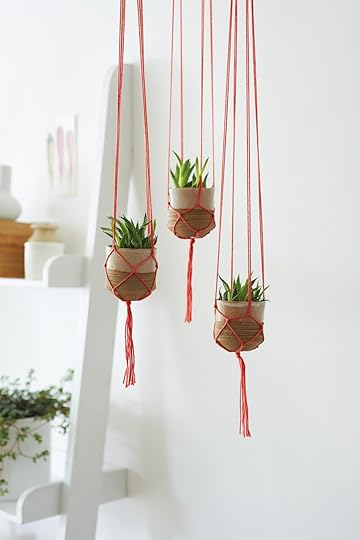 While I adore this cool craft, I don’t have a whole heap of knowledge of it so thought that it was high time I did some investigating and checked out the other ace makes that you can create with some string and a host of decorative knots.
I was blown away by the amount of ideas that the creative folks out there have had for this craft, so I thought I would share a few of my fave Macramé Crafting Ideas from Pinterest!
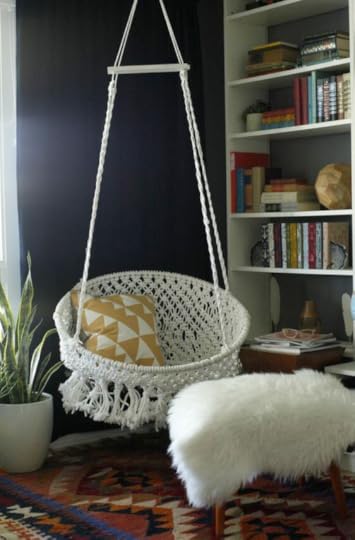 1 Macramé Hanging Chair ⇒ Classy Clutter
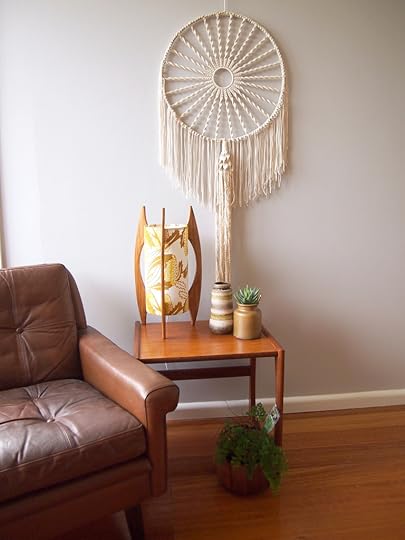 2 Macramé Dream Catcher ⇒ A Pair and a Spare
 3 Macramé Racerback Top ⇒ Trast To Couture
 4 Dip Dyed Macramé Necklace ⇒ I Love To Create
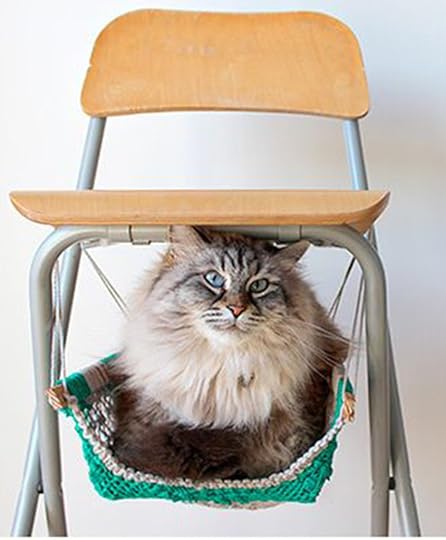 5 Macramé Cat Hammock ⇒ Katia
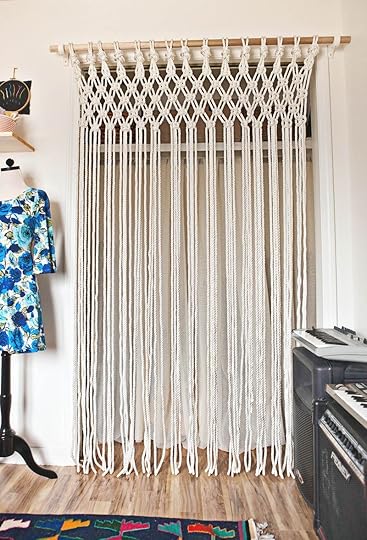 6 Macramé Curtain ⇒ A Beautiful Mess
I’m so in love with the cat hammock…wonder whether little Waffle would be interested in taking his afternoon nap in one of these? Feeling inspired – what would you love to make with macramé? – Check out all the other creative goodies I’m pinning right now!

The post Pinterest: What They Did With Macramé appeared first on Made Peachy.


