
Laura Strutt's Blog, page 5
September 24, 2015
Travels & Daydreams
Life has been busy here of late – and with the upcoming creative shows on my schedule the rest of this year is sure to be much of the same.
One of the best aspects of running your own creative business is that you are the master of your own destiny – to at least that is what I tell myself, when I feel as though no sooner than I am at home, than I am packing ready to hit the road again.
Getting to attend so many creative events throughout the year is one of the best aspects of my job – which otherwise (if I brutally honest!) would be spent at home in the studio, glued to the laptop or stuck to the sewing machine, whichout seeing or speaking to a real human all day! Travel has always been one of my passions in life – having been fortunate enough to be able to spend a glorious two years backpacking! Trust me, I know that everyone dreads it when a tale begins with, “while I was backpacking…” and I avoid being a travel bore at all costs. But, it is impossible not to reminisces about working on a pearl farm in Western Australia, pony trekking (and yak cuddling) in Mongolia, volunteering in an orphanage in Vietnam, hiking up glaciers in New Zealand and spending endless hours playing cards in draughty airports waiting on connecting flights.
Work travel is a very different type of adventure – in many cases it takes you to places that you might not have planned on visiting, seeing sights that you never imagined and meeting the most wonderful people. But, it is not a jolly holiday – although I frequently have to remind my folks and friends of this! Work travel is just that, work. It is hard sometimes knowing that your time is not your own, that you can wonder off and explore the city, take in the sights and hunt out the unique character of a place.
 This steady stream of travel that punctuates my work schedule has kept alive the travel bug inside me. I am forever looking back over my (millions!) of travel photos longing for the day when I might hang up my hat (a hand knit one, of course!) and hit the road again on a wonderful new adventure. I can’t be the only one that day dreams of retiring from work, grabbing my camera, and throwing a few essentials into a backpack and heading off into a world of adventures?
 There are so many places I’d love to visit, India, South America, Indonesia, I want to take boat rides and train journeys, I want to hike, ride bikes and drive Route 66. I want to swim with dolphins and trek through jungles. I want to shop at bazaars and eat local foods. I want to meet new people, learn about new cultures and, most importantly take a millions photographs!
 So, you’ll often find me gazing through my old travel photographs planning the world of adventures that lay ahead of me, after all that’s something pretty good to work towards!
Over the coming weeks I will be back on the road, check out these Diary Dates for upcoming events…
Knitting & Stitching, London, 7 – 11 October
Knitting & Stitching, Dublin, 12 – 15 November
Knitting & Stitching, Harrogate, 26 – 29 November
These events are set to be truly jam packed with shopping, inspiration and fun – tickets are still available online! Are you attending any of these shows? Be sure to come along and say Hi!
♥ – ♥ – ♥
This post is part of the Legal & General Retirement & Daydreams series.
The post Travels & Daydreams appeared first on Made Peachy.


September 22, 2015
Pinterest: What They Did With Amigurumi
Happy Wednesday Folks!
The weather here is rather gloomy and got me to thinking of spending some time clearing and organising my studio – having finished up a huge crochet project, you can’t seem to move around without starting an avalanche of small scrap balls of yarn.
Of course, part of the organising process means going on Pinterest to see exactly what you can make with a zillion mini balls of yarn. When it comes to small, satisfying projects that makes use of lots of scrap balls of leftover yarn nothing quite hits the spot like amigrumi!
I don’t know about you, but looking at these amazing creations really does brighten my day, so I thought that I would share some Awesome Amigurumi Makes from Pinterest!
 1 Rainbow Unicorn ⇒ AHookAmigurumi
 2 Cactus Pincushion ⇒ Piparapip
 3 Amigurumi Rain Drop Dude ⇒ Made Peachy Archive
 4 Nesting Matryoshka Dolls ⇒ Petals to Picots
 5 Cute Dolls ⇒ AmigurumiBB
 6 Ice Cream Cone ⇒ Crochet Cake Sachets
Are you an Amigurumi fanatic? These are just killer cute and I can’t even decide which I like the best! Thinking of making one of these cute creations – refresh your techniques with these Crochet Abbreviations!
I seem to be spending to much time procrastinating or Pincrastinating, so be sure to check out what else I’m pinning right now!
The post Pinterest: What They Did With Amigurumi appeared first on Made Peachy.
September 21, 2015
Meet The Multi Bag – Giveaway!
Hello Friends!
I’m back home after a wonderful time at this years Handmade Fair – I get to meet so many awesome folks, spend some time with a few of my very favourite humans, soak up heaps of inspirations and have an all time blast!
One of the things that y’all were super interested in on the Vilene stand this year was the all new Multi Bag kit, so, let’s talk about the Multi Bag!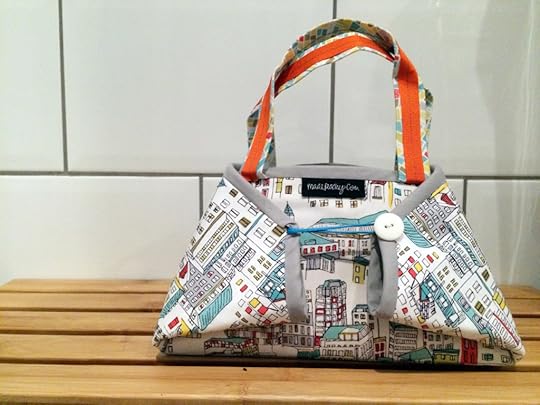 Many of you stitchers will have spotted ironing bags in your travels across the internet – these handy bags have a clever origami style construction that allows you to stash your travel iron, then can be quickly and easily unfolded to create a travel pressing pad or mini ironing board – suer neat, am I right?
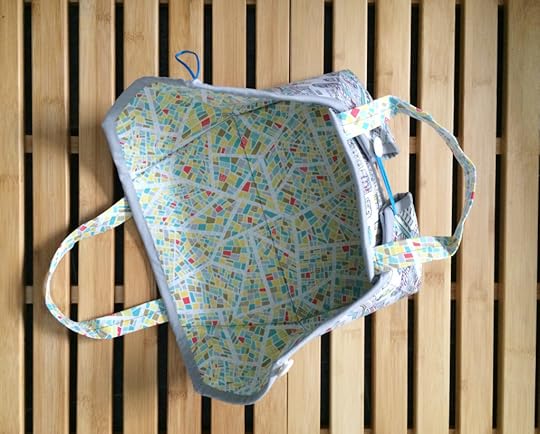 For many of us the process of making one of these clever designs is a little baffling – but trust me it is a lot easier than you might thing. Even more so with the help of this fancy new kit from Vilene – which contains the full instructions and pre-cut pieces of Decovil 1 and Thermolam.
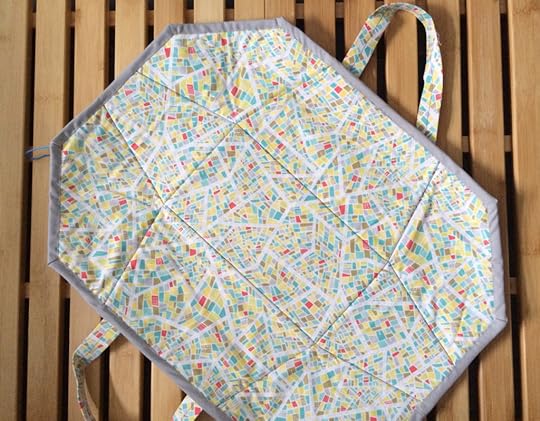 I know what your thinking! What are these fancy interlining that you speak of. Well, Decovil 1 is a fusible interfacing that is secured to the wrong side of your fabric with a heat activated adhesive, so you can easily apply it with your iron. It has a wonderful suede-like feeling and once bonded to your fabric will give it just the right amount of structure to hold the shape of the Multi Bag. Thermolam is a heat-insulated batting making it ideal for using inside ironing pads and pot holders! So the combination of these to ace products make this the perfect companion for your travel iron for holidays and workshops!
 The Multi Bag is surprisingly easy to put together using the ready-to-make kit all you need to supply is fabrics (this around two fat quarters of cotton for the main section of the bag – if you don’t have any selvedge in the fabric cuts!), some ribbon and trimmings and a length of binding tape. The pack comes with step-by-step illustrated images to help you along the way and requires only basic machine sewing skills – straight line stitching, top stitching and applying binding!
There is even a handy video you can watch to help you master this make at home -if you already have Decovil & Thermolam in your stash and are itching to get started, then why not download the instructions and get making right away?!
The Multi Bag can be used for so many different things – why not add a layer of Lamifix to the surface of the cottons before constructing to make a wipeable baby change mat? This bag can be used for toting your knitting or crochet projects and can be opened out to give you a neat and clean surface to work on with on the go projects. Take your pack-up lunch to work to make those unavoidable eating-at-your-desk a little more luxurious? Use it to pack up travel toys for the Littles for car or train journeys. Stow your straightening irons or curling wands to save scorching the surface of your vanity as they cool down. Serious you guys- the possibilities are endless!
Now friends! How would you feel about getting your hands on a kit of your own to make your own Multi Bag?
I have one Multi Bag kit ready to give away to a lucky Made Peachy reader!
So, how do you enter?
Easy! So that y’all get a fair whack at it, there are a number of ways you can enter this giveaway – and the best part is each one will be counted as 1 entry…so, do all three and you will be entered three times my friend!
1 Please leave a comment below sharing what you would stow in your Multi Bag
2 Share this post on Twitter, tagging @madepeachy and using the hashtag #MultiBagMadePeachy
3 Give the MadePeachy Facebook page a like, share the giveaway post and leave a comment on why you’d love to win!
Want a bonus entry? Then head over to the MadePeachy Instagram , follow and give the Multi Bag post a like & comment!
The giveaway is open to everyone – if you have a postal address, no matter where in the world, you can enter! Yay for international prizes! The winner will be pick at random and announced on the 29 September – Good Luck!
The post Meet The Multi Bag – Giveaway! appeared first on Made Peachy.
September 19, 2015
DIY Chevron Friendship Bands
Happy Saturday Friends!
We’re having a blast here at the Handmade Fair – a big thank you to all the rad folks that came along to the Chevron Bracelet Workshop in the Mollie Makes Tent this morning, so much fun!
For those of you that didn’t get the chance to come along, or aren’t at the show (or who were giggling a little too much at the workshop [I’m not naming names!!] and might like a refresher – I thought I would share this step-by-step guide for making your own DIY Chevron Friendship Bracelets!
Woven Friendship Bands are so much funk to make. before you know it you’ll have mastered this technique for making neat little woven knots and you’ll be whipping up a stack in all your favourite colour combinations!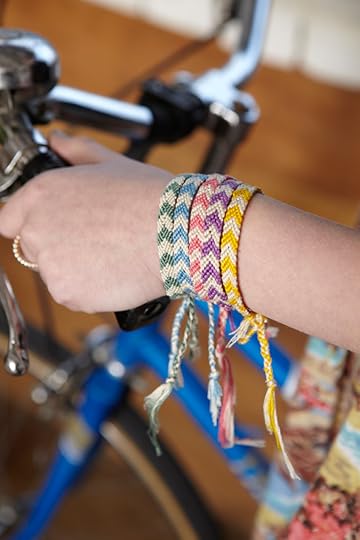 Use a series of small, simple knots to craft a colourful collection of woven bangles that till have you festival ready in no time!
Grab Your Supplies…
Embroidery threads (floss) in two colours
Scissors
Safety Pin or Washi Tape
Pro Tip!
Create wider bands or add in more colours by simply increasing the number of strands of embroidery thread you use, keeping to an even number.
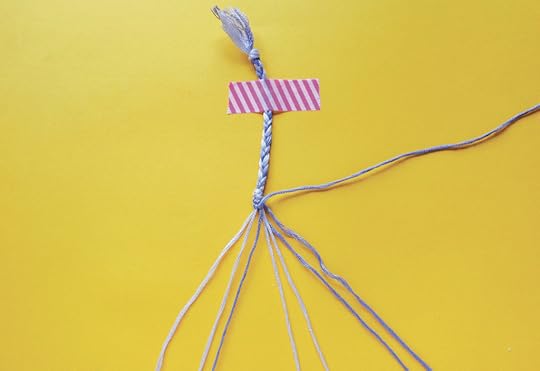
 1 You will need four embroidery thread lengths in colour A and four lengths in colour B. Trim the lengths to around 80 cm long. Knot the lengths together 10 cm from the end.
 2 Divide the short lengths above the knot into three sections: two with three strands and one with two strands, and braid from the knot to 2 cm from the end. Knot the threads together at the far end of the braid to secure. Insert a safety pin into the knot – or use a section of washi tape – and secure to a firm surface (you can use a cushion, ironing board or even the leg of your jeans).
 3 Spread the threads out and arrange them so that they are laying, from left to right, two colour A, four colour B and two colour A threads. Separate these threads to create two halves, each with two strands of thread A outermost and two of thread B innermost.
 4 To create the friendship band you’ll work lots of little knots. To make a knot, bring the first thread over the second, passing it under and bringing the end through the loop.
 5 Draw up closely to tighten the knot into position.
 6 Repeat step 4 to make a second knot with the same threads in the same way. These two knots count as one woven stitch on the bracelet. Begin the chevron. Take the threads on the far left and create one woven stitch (see steps 4, 5 and 6) on the thread to the right-hand side of it. Continuing with this thread, repeat to create another woven stitch on the next thread and then the thread following it. The initial thread will now lie at the centre of the strands.
 7 Complete the point of the chevron. Make a single woven stitch over the next three threads to end in the centre. Join the point of the chevron by working the two inner threads together with one woven stitch.
 8 Begin making the second half of the chevron. Return to the outermost thread on the left-hand side and repeat to create three woven stitches to reach the centre of the section. Then work three woven stitches from the right-hand side to meet at the centre and join the two centre threads with a single woven stitch. This will create the first V in the chevron pattern in thread colour A, with each one being made up of two lines of woven stitches meeting in the centre.
 9 Begin the second chevron. Take the threads on the far left and create one woven stitch (see steps 4 and 5) on the thread to the right-hand side of it. Continuing with this thread, repeat to create another woven stitch on the next thread and then the thread following it. The thread will now lie at the centre of the strands.
 10 Moving to the other side, begin making the second half of the chevron. Make a single woven stitch over the next three threads to end in the centre. Join the point of the chevron by working the two inner threads together with one woven stitch.
 11 Return to the outermost thread on the left-hand side and repeat to create three woven stitches to reach the centre of the section. Then work three woven stitches from the right-hand side to meet at the centre and join the two centre threads. This will create the next V in the chevron pattern with two lines of woven stitches in thread colour B.
 12 Continue working steps 6–11 to repeat the chevron pattern for the desired length. Tie a knot at the bottom of the bracelet to secure the woven design. Divide the thread into three sections – two with three strands and one with two strands and braid to 2 cm before the end. Tie in a knot at the bottom to secure and trim the ends neatly before tying to your wrist or gifting to a friend.
 Tah Dah! How ace is that? Now you can go forth and create your own custom designs – why not create wider bracelets, or work in stripes, or even add in more colours, or even go chic with a single shade of thread…the possibilities are endless!
♥ – ♥ – ♥

This is just one of the fun step-by-step bracelet designs from my new book Arm Candy, by Laura Strutt, £9.99, published by Pavilion, Model Photographs by Christina Wilson, Step Photography by Laura Strutt.
Hey US Chums – grab the US edition, here for $9.99, published by Barron’s!
The post DIY Chevron Friendship Bands appeared first on Made Peachy.
September 17, 2015
How to add a Hot Spot Accent
Happy Friday Friends!
Today is the start of the Handmade Fair and one of the fab things that I will be sharing over on the Vilene Stand W3 is creating motifs, decals and accents for fabrics using Hot Spots and transfer foils! So, how about a quick step-by-step guide to using Hot Spots!
What are Hot Spots? That is a very good questions! This is a fusible adhesive that is made up of a series of dots and is held in place on a carrier sheet. (Much like Bondaweb, although think dots of adhesive and not web of adhesive!)
 Grab your Supplies…
Cut a sheet of Hot Spots to your desired shape and design – you can cut the sheet by hand, with a die cutting machine or a laser cutter, these swallow motifs are laser cut.
A sheet of transfer foils
Baking parchment
Iron
Fabric or finished make to be decorated
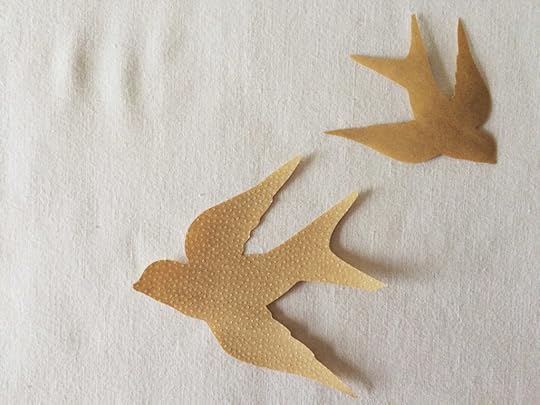 One side of the sheet of hot posts will feel rough, this is the tiny dots of adhesive, the other side is the backing sheet that will be removed once this has been applied.
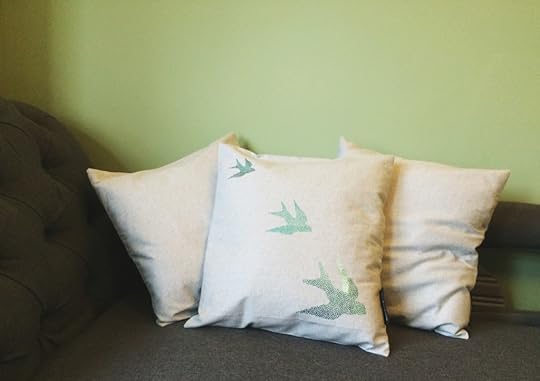
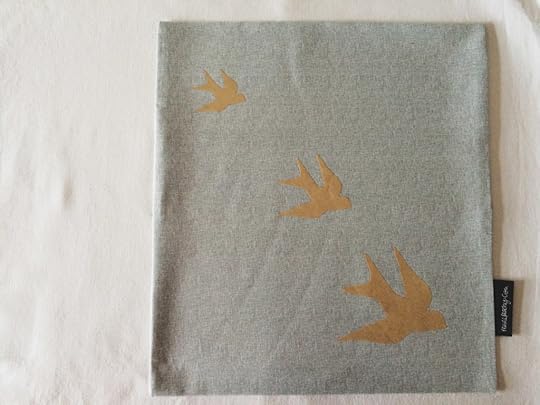 On to the surface of your finished make, here is a simple envelope cushion cover, place the Hot Spot motif with the glue (rough) side onto the right side of the fabric. You can move the design about until you are happy with the placement. When you are happy with the arrangement of the design, conver the motif with a piece of baking parchment – this protects both the iron and the fabric while the Hot Spots are applied. With the iron on a medium setting, press and hold the surface of the iron plate over the Hot Spot design to fuse it to the fabric. Hold in place for 10-15 seconds.
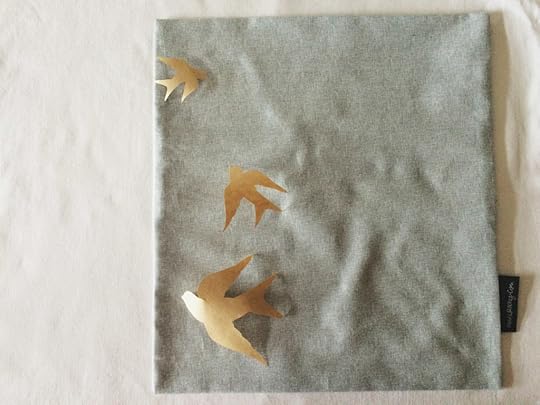 Set the work aside to cool fully – you can speed this process up if you take this from the ironing board and place it on a table. Once completely cooled you can lift off the baking parchment and then peal away the backing paper. This will leave the dots of adhesive on the surface of the fabric ready – depending on the coil our of the fabric (light colours are more tricky than dark ones!) you might not be abler o see the dots, but you will be able to feel them if you run your fingers over the surface.
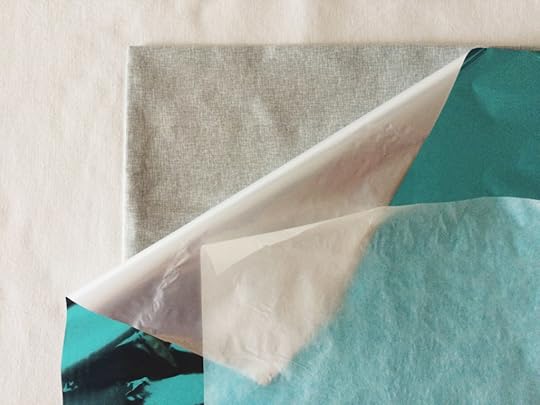 Applying the colour to Hot Spots is done with a sheet of transfer foil, this is placed on top of the applied Hot Spots with the colour side uppermost – it is very tempting to put the colour side face down on to the hot spots, but remember that these are being applied to the surface to the colour that you want on the surface needs to be uppermost. Cover the transfer foil with the sheet of baking parchment, this again allows you to hard heat to the Hot Spots and transfer foil without damaging the iron or fabric. With a medium setting, press and hold the iron in place to fuse the transfer foils to the surface of the Hot Spots.
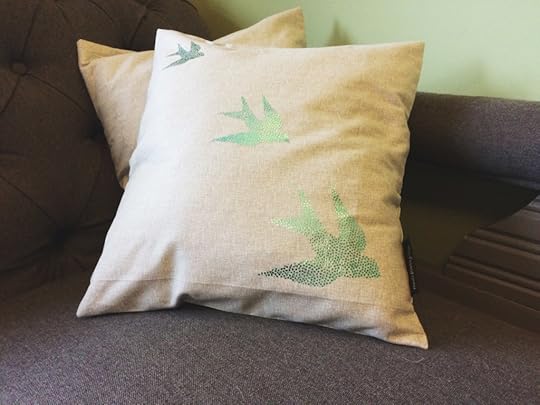 Place aside to cool fully. Once the backing parchment and the sheet of transfer foil can be removed and will reveal the dotted motif accented with the glittering colours of the transfer foils!
Tah Dah! The possibilities for adding striking accents to your makes are endless! Have you tried Hot Spots yet? What accents or motifs would you create?
The post How to add a Hot Spot Accent appeared first on Made Peachy.
September 15, 2015
Pinterest: What They Did With Salted Caramel
Who doesn’t love salted caramels? I mean seriously? Point out that person and I will simply tell them that they just aren’t doing snacking right!
This flavour combo is one of my all time favourites – I mean I even fell too deeply in love with the Yankee Candle Salted Caramel scent, so much so that it was burnt through in record time! This is the perfect balance of sugary goodness and moreish saltiness, let’s call it what it is, this flavour combination is everything. It’s everything!
As I’m certain I can’t be the only person that has this wild love affair with salty and sweet treats, I thought I would share some of my all time fave Salted Caramel Recipe Finds from Pinterest!
 1 Salted Caramel French Macarons ⇒ One Sweet Appetite
 2 Salted Caramel Hot Cocoa ⇒ Cooking Classy
 3 Salted Caramel Shooters ⇒ Made Peachy Archive
 4 Salted Caramel Brioche Doughnuts ⇒ Add More Butter
 5 Salted Caramel Apple Hand Pies ⇒ Just A Taste
 6 Salted Brown Sugar Truffles ⇒ Made Peachy Archive
That round-up really is a feast for the eyes, or should I say that is going straight to my thighs? Oh well, as a good friend once said, thick thighs save lives…or something like that.
As the seasons are starting to make a change, and I’m biding my time till I can pumpkin spice everything, not a day goes by without me hunting out new tasty recipes and food ideas. So, tell me what are your favourite recipes on Pinterest right now? Be sure to check out what else I’m pinning right now!
The post Pinterest: What They Did With Salted Caramel appeared first on Made Peachy.
September 14, 2015
Heading to The Handmade Fair 2015
This week is flying past in a flurry of packing and preparations and all hands are on deck (well, mine are, the dog is being less than helpful!) as I get ready to head over to the Handmade Fair at Hampton Court, from the 18-20th September. Kirstie Allsopp and her team of awesome creative ambassadors will be there all weekend long offering hands-on workshops, live craft-offs, interviews, demonstrations, make and takes, and all the shopping and fabulous food you could possibly want! And, yes Churros! This is one of the most eagerly anticipated events on the crafting calendar and, for me, is the start of, what I have loving come to know as, The Great Crafting Tour of the UK – where I head to London, Dublin and Harrogate with the Knitting & Stitching Shows throughout the last part of this year.
 I can’t wait to get down to Hampton Court, catch up with some of my favourite creative chums and also get to take a peek (and, more than likely) buy lots of wonderful new supplies…because, a gal can never have enough yarn/fabric/beads/books/buttons, am I right?!
 This year I will be over on the Vlieseline (formerly Vilene – have you checked out the new look website yet? It has lots of tips, techniques, projects and video tutorials to help take your stitching to the next level!) stand at W3 – sharing some new makes, talking techniques, helping with crafting queries and also giving you guys the chance to try your hand at some mini hexi patchwork too!
 Are you coming along to the show? You can book your tickets online and be sure to check out the jam-packed schedule of workshops with some of the finest crafts people in the land too!
 Speaking of workshops – I’m stoked to be giving a Cheveron Bracelet Workshop & book signing on Saturday morning in the Mollie Makes Tent for my Arm Candy Book It would be rad to see you there!
 Psst! Cant make it to the show? Don’t worry I’ll be sharing the how to guide for Chevron Friendship Bracelets right here this weekend to!
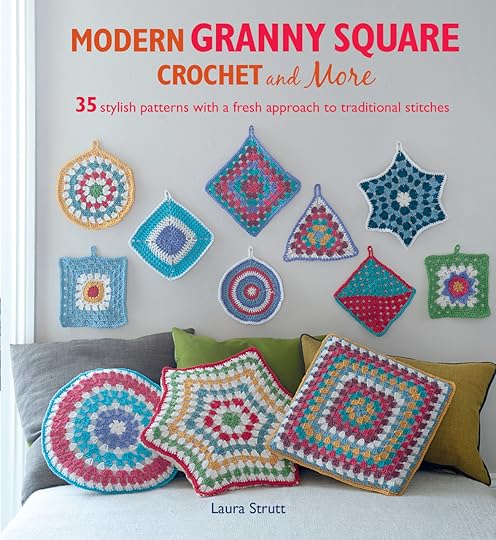
Not only that! CICO Books will also be at the event – Stand E73 -so if you’re aching to get busy with Crochet Granny Squares – be sure to head over there to get your hands on my new book Modern Crochet Granny Squares!
Craft for lyfe yo!
Phew! I’m worn out thinking about all the excitement heading my way this weekend! I really must get my bags packed – give me a shout if you are coming along to the show, and do stop by and say Hi!
♥ – ♥ – ♥
 Now, today is also a pretty special day in our home, today we are celebrating our third wedding anniversary. So, you can pretty much guarantee that for the rest of the day I will be mooning over our wedding photos and thinking back over all the amazing memories from our special day before heading out on a date with that amazing husband of mine!
Hope y’all have a great day!
The post Heading to The Handmade Fair 2015 appeared first on Made Peachy.
Heading to The Handmade Fair 2016
This week is flying past in a flurry of packing and preparations and all hands are on deck (well, mine are, the dog is being less than helpful!) as I get ready to head over to the Handmade Fair at Hampton Court, from the 18-20th September. Kirstie Allsopp and her team of awesome creative ambassadors will be there all weekend long offering hands-on workshops, live craft-offs, interviews, demonstrations, make and takes, and all the shopping and fabulous food you could possibly want! And, yes Churros!This is one of the most eagerly anticipated events on the crafting calendar and, for me, is the start of, what I have loving come to know as, The Great Crafting Tour of the UK – where I head to London, Dublin and Harrogate with the Knitting & Stitching Shows throughout the last part of this year.I can’t wait to get down to Hampton Court, catch up with some of my favourite creative chums and also get to take a peek (and, more than likely) buy lots of wonderful new supplies…because, a gal can never have enough yarn/fabric/beads/books/buttons, am I right?!
This year I will be over on the Vlieseline (formerly Vilene – have you checked out the new look website yet? It has lots of tips, techniques, projects and video tutorials to help take your stitching to the next level!) stand at W3 – sharing some new makes, talking techniques, helping with crafting queries and also giving you guys the chance to try your hand at some mini hexi patchwork too!Are you coming along to the show? You can book your tickets online and be sure to check out the jam-packed schedule of workshops with some of the finest crafts people in the land too!
Speaking of workshops – I’m stoked to be giving a Cheveron Bracelet Workshop & book signing on Saturday morning in the Mollie Makes Tent for my Arm Candy Book It would be rad to see you there!Psst! Cant make it to the show? Don’t worry I’ll be sharing the how to guide for Chevron Friendship Bracelets right here this weekend to!
Not only that! CICO Books will also be at the event – Stand E73 -so if you’re aching to get busy with Crochet Granny Squares – be sure to head over there to get your hands on my new book Modern Crochet Granny Squares!
Craft for lyfe yo!
Phew! I’m worn out thinking about all the excitement heading my way this weekend! I really must get my bags packed – give me a shout if you are coming along to the show, and do stop by and say Hi!
♥ – ♥ – ♥
Now, today is also a pretty special day in our home, today we are celebrating our third wedding anniversary. So, you can pretty much guarantee that for the rest of the day I will be mooning over our wedding photos and thinking back over all the amazing memories from our special day before heading out on a date with that amazing husband of mine!
Hope y’all have a great day!
The post Heading to The Handmade Fair 2016 appeared first on Made Peachy.
September 9, 2015
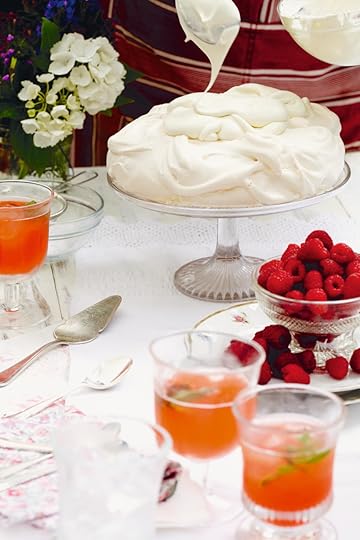
Rosewater Pavlova
I’m hearing rumours of an Indian Summer, and the sun has certainly been making a wonderful appearance for the last couple of days – so let’s hope that it sticks around! With the weekend in sight- and lots of plans for spending some quality time with sweet friends and our late summer neighbourhood get together, I’ve been searching out something tasty to make to share at these get togethers. What could be more perfect than a light and delicious Rosewater Pavlova?
 This is the dessert that everyone loves. Give a simple pavlova a twist by adding rosewater for a scented, perfumed quality – like a summer garden in bloom. You could also try flavouring creams and even meringues with lavender or orange-blossom water, too. If you can find candied rose petals, sprinkle them over the top to garnish. If you are taking this on a picnic, take the meringue, cream and raspberries in separate containers and assemble just before serving.
Ingredients…
4 egg whites
225 g golden caster sugar
1 teaspoon cornflour
1 teaspoon white wine vinegar
Topping
250 ml double cream
1 tablespoon rosewater
1 tablespoon caster sugar
350 g fresh raspberries
icing sugar, for dusting
a baking sheet lined with non-stick baking parchment
serves 6
Preheat the oven to 120°C (250°F) Gas ½.
 In a large mixing bowl, whisk the egg whites with an electric hand whisk until they just form stiff peaks. Gradually add the sugar, a couple of tablespoons at a time, whisking well between each addition. When all of the sugar is added, continue whisking for 3–4 minutes, or until the meringue is stiff and glossy and stands up in peaks, then whisk in the cornflour and vinegar.
Spoon the mixture onto the prepared baking sheet and use a palette knife to shape it into a circle about 20 cm/8 inches in diameter.
Bake in the preheated oven for 1½ hours, then turn the oven off, leave the door ajar and leave the meringue inside to cool completely (or leave them overnight).
When cool, remove the meringue from the oven and carefully peel it off the baking parchment. Place the meringue on a serving dish. Don’t worry too much if the meringue breaks a bit – there is plenty of topping to hide the cracks!
Put the cream in a mixing bowl and whisk until just thickening up. Add the rosewater and sugar and carry on whipping for a few more minutes until the cream is thick enough to spread. Spoon the cream onto the meringue, heap the fresh raspberries on top and dust with icing sugar.
♥ – ♥ – ♥

This scrummy recipe is by Tori Finch and is just one of the many delicious offerings from Flavours of Summer, £19.99, published by Ryland Peters & Small
The post Rosewater Pavlova appeared first on Made Peachy.
September 6, 2015
The Week That Was: Renovations, time to enjoy!
Things have been a little manic in recent weeks – we have been up to our eyeballs with a large scale renovation project. But, finally this time has come where we can finally say the job is finished, we can sit back and really enjoy all our hard work!
It has been a long [Read: extremely long] project and it is so goof to be at the end of it. Now that it is completed it is hard to remember that just a few short weeks ago our bathroom was stripped to the bare boards and nothing else (literally, nothing else!), that we were trying to stay positive about bathing in the kitchen stink and dreaming of the day when the job would be finished. Well, I’m happy to say that it is finally finished and to celebrate I thought I would share a few before and after photos, because who doesn’t like a Before and After show and tell, am I right?!
Before… This tired old bathroom was in a huge need of more than just a facelift! The bath was leaky, the shower wouldn’t maintain a decent temperature and the whole room was a pretty sorry state! It was really satisfying to be able to rip out all the ugly and get busy with plans for the brand new bathroom…but that is when the real work starts!
 Chipboard (gah!) wall paper was removed…and the blown plaster went with it! First stop the walls were repointed where needed and see where those new bricks are? That was a small window that allowed little light and even less privacy – all bricked up and ready for the new shower! The floorboards were repaired and replaced, and the plumber re-routed all the pipes and ‘backstage’ business! With the flooring down we were truly ready for business!
During…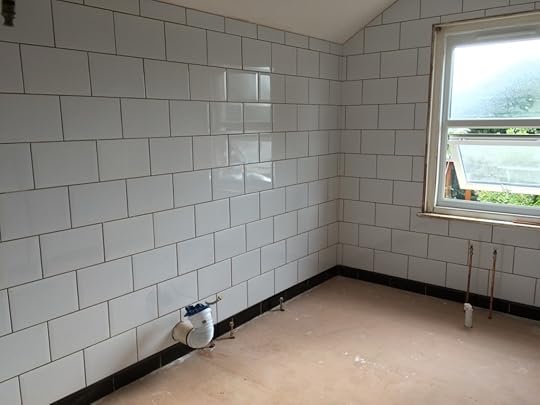 As is turns out, tiling a wonky old hose is not as straight forward as you might thing. There is a whole lot of maths, patience and endless cups of tea required to get you through! But, holy wow – do I ever love the white tiles and dark grouting!
 With the tiling done and the ceiling painted the flooring can be fitted! It’s really starting to feel like a real room again…you know a real room without a bath, sink, shower or toilet.
Time to get the plumber back to fit the bath, shower and (thankfully!) the toilet!
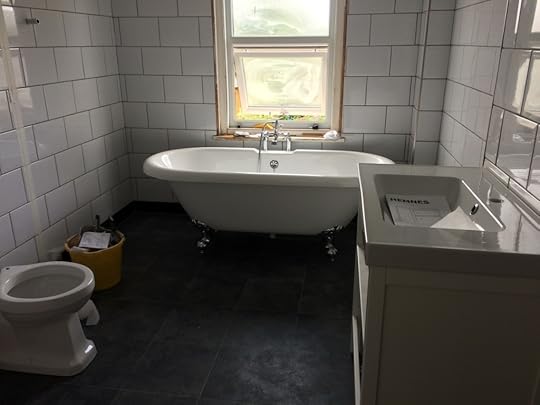
After…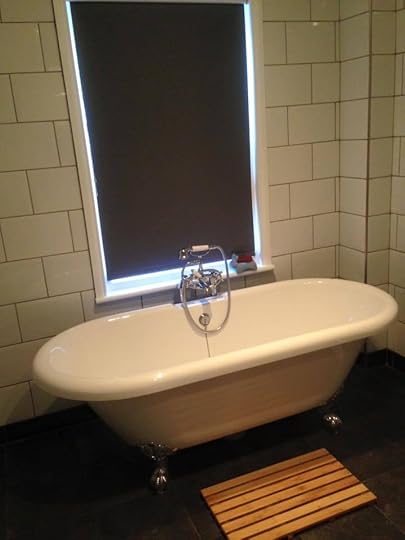 Friends! We finally have a fully working roll top tub – this alone has made all those days of bathing in the kitchen sink truly worthwhile!
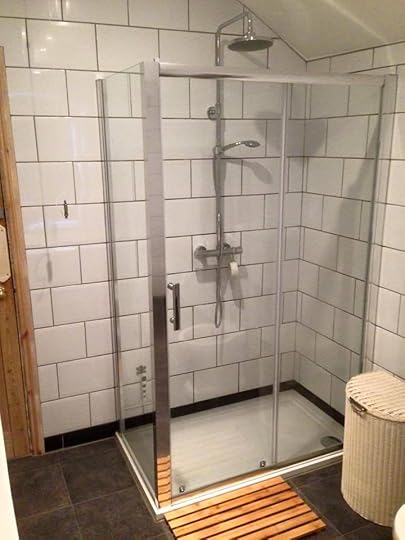
And, a working shower! Never again will I have to stand under a pitiful dribble, freezing cold trying to get a suitable temperature for the water. Nope, not me!

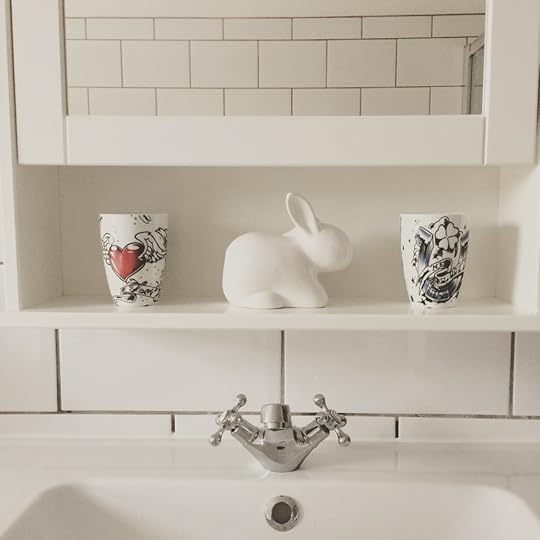
A feature sink with real life storage! I can’t actually remember the last time I was able to put things in their proper place in the bathroom – and now tidying and organising this room is by far my favourite things to do…well, right after taking a bubble bath, of course!
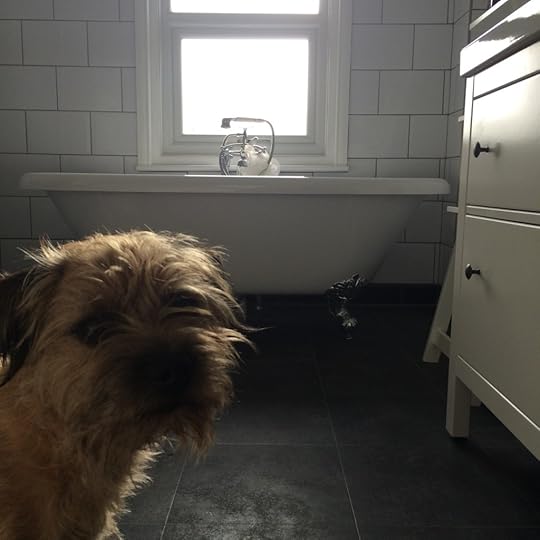
Ok, so Waffle might not look overly impressed in this picture, but trust me on this he much prefers being able to walk his own stinky self into the shower when dog bath day rolls round rather than having to be manhandled into the the old bathtub!
It’s all the little details that I think I love the most – aside from that roll top tub and a glorious spacious shower!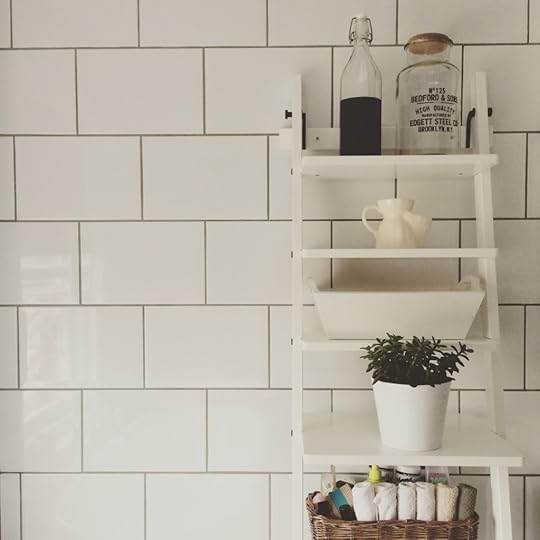
Renovating your home yourself – or with the very minimum of external support – is heavy going and has been something of a steep learning curve for us over here!
 Now the bathroom is completed, you will mostly find me relaxing in the tub (with this fuzzy little creeper!) dreaming about the next big project that we plan to undertake! Are you in the middle of home renovations? What is your top tip for surviving the busy project?
♥ – ♥ – ♥
This post is part of the DIY Towards Your Home Series for Legal & General.
Find out more about the home contents services at Legal & General
The post The Week That Was: Renovations, time to enjoy! appeared first on Made Peachy.


