
Laura Strutt's Blog, page 4
January 14, 2016
Modern Crochet Shawls Winner!
Happy Friday Folks!
The weekend is right around the corner – and I for one can’t wait! There is nothing better than long lazy winters weekends, hanging out with my fave folks and maybe finding a little time to get creative and maybe – just maybe – make a little something…or at the very least finish up a paperback or a box set (or two!)
 But, before the weekend rolls round, it is time to announce the winner of the giveaway for my new book – thank you all so much for your entries and your kind words about the launch of my new book!!
Congratulations…
Megan Lea
Please get in touch and send over your postal address so that we can get a copy sent out to you!
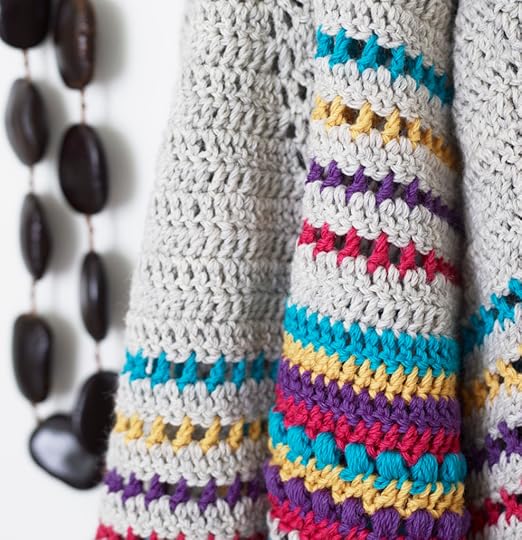
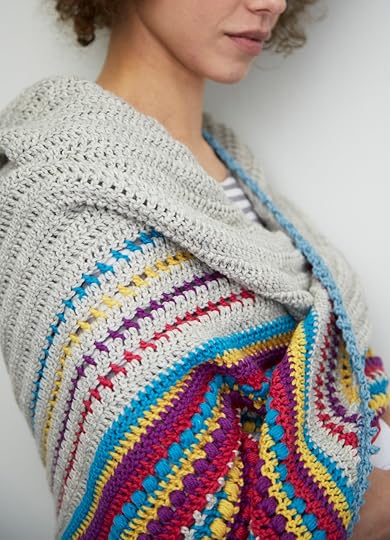
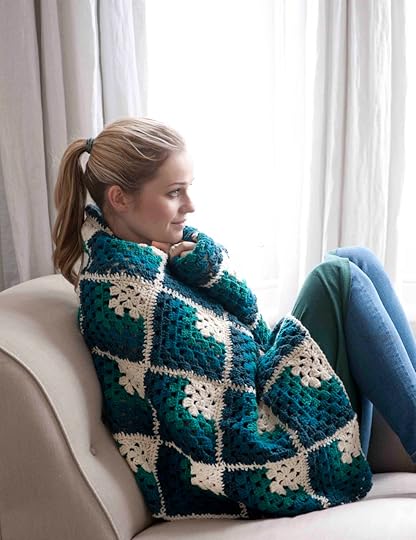
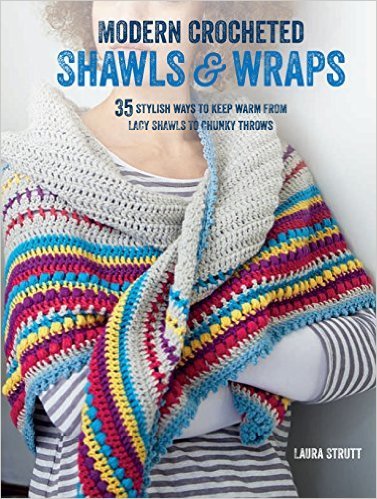
If you didn’t win this tine be sure to check out this FREE pattern from my new book, Modern Crocheted Shawls & Wraps by Laura Strutt, published by CICO Books (£12.99)
Photography by Emma Mitchell & Penny Wincer © CICO Books
Have an ace weekend y’all!
The post Modern Crochet Shawls Winner! appeared first on Made Peachy.


January 8, 2016
Modern Crochet Shawls & Wraps: Free Pattern!
Today is a very special day for me…today is the day that my new book hits the books shelves! You guys I’m more stoked than I can tell you!!
 To celebrate this super happy day for me…and also as we have all managed to make it through the first week back at work after the Christmas Holidays, I have one of my fave patterns from the book to share with you!
Stash-buster Stripes
Skill Rating: Intermediate
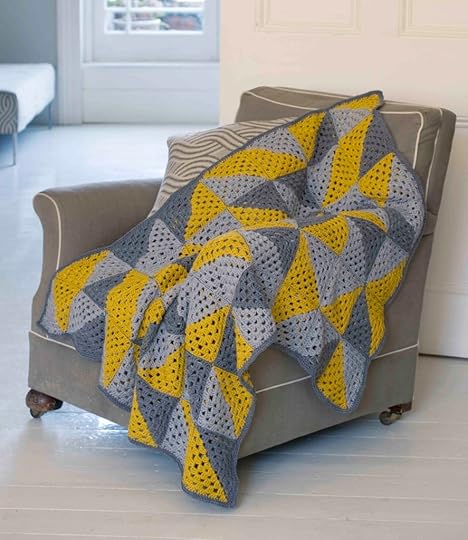
Create your own sampler shawl by using a variety of colours and a range of different stitches. This super-sized, top down design makes a fantastic statement piece for your wardrobe.

Materials
• Cascade 220 (100% Peruvian Highland wool; 200m/220yds per 100g/3óoz skein) aranweight yarn 3 x 100g (3½ oz) skeins in shade 8011 Aspen Heather (A)
1 x 100g (3½ oz) skein in shade 8907 Caribbean (B) 1 x 100g (3½ oz) skein in shade 9463B Gold (C) 1 x 100g (3½ oz) skein in shade 8911 Grape Jelly (D) 1 x 100g (3½ oz) skein in shade 7801 Rouge Red (E) 1 x 100g (3½ oz) skein in shade 8311 Mineral Blue (F)
• 5mm (US H/8) crochet hook
• Locking stitch marker
• Tapestry needle
Finished Measurements
90cm (35½ in) deep x 212cm (83½ in) wide
Tension
14 sts and 8 rows to measure 10cm (4in)
Special Stitches
Puff Stitch (PS): *Yarn round hook, pass through stitch, draw yarn through, keeping the yarn loops long; rep from * a further 5 times, yarn round hook again and draw through all loops on the hook, work 1ch to close the stitch.
 For the Shawl
Foundation: Using yarn A and 5mm (US H/8) hook, make a magic ring. Work 4ch (counts as 1tr and 1ch), *1tr, 1ch into ring; rep from * twice more, 1tr into ring. Draw up tightly to conceal the hole and create a small half-moon shape with 5 sts. Turn and continue in rows as follows:
Row 1: 4ch (counts as 1tr and 1ch throughout), 1tr in same st, 1tr in ch-sp, 1tr in next st, 1tr in ch-sp, 1ch, 1tr and place marker in the st to indicate centre spine, 1ch, 1tr in ch-sp, 1tr in next st, 1tr in ch-sp, [1tr, 1ch, 1tr] in last st (third ch of 4ch from previous row), turn. (11 sts)
Row 2: 4ch, 1tr in same st, 1tr in ch-sp, 1tr in each of next 4 sts, 1tr in ch-sp, 1ch, 1tr in marked st, move marker, 1ch, 1tr in ch-sp, 1tr in each of next 4 sts, 1tr in ch-sp, [1tr, 1ch, 1tr] in last st, turn. (17 sts)
Row 3: 4ch, 1tr in same st, 1tr in ch-sp, 1tr in each of next 7 sts, 1tr in ch-sp, 1ch, 1tr in marked st, move marker, 1ch, 1tr in ch-sp, 1tr in each of next 7 sts, 1tr in ch-sp, [1tr, 1ch, 1tr] in last st, turn. (23 sts)
Tip Use a locking stitch marker to keep track of the central “spine” stitch of this shawl by placing it in the 1tr as indicated in the pattern and move it up with each row as you work.
Row 4: 4ch, 1tr in same st, 1tr in ch-sp, 1tr in each of next 10 sts, 1tr in ch-sp, 1ch, 1tr in marked st, move marker, 1ch, 1tr in ch-sp, 1tr in each of next 10 sts, 1tr in ch-sp, [1tr, 1ch, 1tr] in last st, turn. (29 sts)
Row 5: 4ch, 1tr in same st, 1tr in ch-sp, 1tr in each st to marked st, 1tr in ch-sp, 1ch, 1tr in marked st, move marker, 1ch, 1tr in ch-sp, 1tr in each st to last st, 1tr in ch-sp, [1tr, 1ch, 1tr] in last st, turn. (35 sts)
Rows 6–34: Continue in pattern, working reps of Row 5 for a further 28 rows and increasing 6tr with each row (3tr in each half of shawl) as set. (33 rows worked in total – 203 sts)
Row 35: Change to yarn B, 4ch, 1tr in same st, 1tr in ch-sp, *miss 1 st, 1ch, 1tr in next st; rep from * to marked st, 1tr in ch-sp, 1ch, 1tr in marked st, move marker, 1ch, 1tr in ch-sp, **1tr in next st, miss 1 st, 1ch; rep from ** to last ch-sp, 1tr in ch-sp, [1tr, 1ch, 1tr] in last st, turn.
Row 36: Change to yarn A, 4ch, 1tr in same st, 1tr in ch-sp, 1tr in each st and ch-sp to marked st, 1ch, 1tr in marked st, move marker, 1ch, 1tr in each st and ch-sp to last ch-sp, 1tr in last ch-sp, [1tr, 1ch, 1tr] in last st, turn.
Row 37: Change to yarn C, work as Row 35.
Row 38: Change to yarn A, work as Row 36.
Row 39: Change to yarn D, work as Row 35.
Row 40: Change to yarn A, work as Row 36.
Row 41: Change to yarn E, work as Row 35.
Row 42: Change to yarn A, work as Row 36.
Row 43: Work as Row 5.
Row 44: Change to yarn B, work as Row 5.
Row 45: Change to yarn C, work as Row 5.
Row 46: Change to yarn D, work as Row 5.
Row 47: Change to yarn E, work as Row 5.
Row 48: Change to yarn B, 4ch, 1tr in same st, 1tr in ch-sp, *1PS in next st, 1ch, miss next st; rep from * to marked st, 1tr in ch-sp, 1ch, 1tr in marked st, move marker, 1ch, 1tr in ch-sp, *1ch, miss next st, 1PS in next st; rep from ** to last st, 1tr in ch-sp, [1tr, 1ch, 1tr] in last st, turn.
Row 49: Change to yarn C, 1tr in same st, 1tr in ch-sp, 1tr in each st and ch-sp to marked st, 1ch, 1tr in marked st, move marker, 1ch, 1tr in each st and ch-sp to last ch-sp, 1tr in last ch-sp, [1tr, 1ch, 1tr] in last st, turn.
Row 50: Change to yarn D, work as Row 48.
Row 51: Change to yarn E, work as Row 49.
Row 52: Change to yarn A, work as Row 35.
Row 53: Change to yarn B, work as Row 36.
Row 54: Change to yarn C, work as Row 48.
Row 55: Change to yarn D, work as Row 49.
Row 56: Change to yarn E, work as Row 48.
Row 57: Change to yarn A, work as Row 49.
For the Edging
The edging is worked in a continuous round along all sides of the shawl as follows:
Round 1: Change to yarn F, work 1ch (does not count as st), [1dc, 1ch, 1dc] in first st, 1dc in each st to marker, [1dc, 1ch, 1dc] in marked st, move marker, 1dc in each st to last st, [1dc, 1ch, 1dc] in last st, now continue working 2dc in each tr along upper edge, join with sl st in first st.
Round 2: *[3ch, sl st in third ch from hook (picot made), miss next st, 1dc in next st; rep from * around the entire shawl, join with a sl st in first st.
Fasten off.
Making Up & Finishing
Weave in all loose ends and block to measurements, paying close attention to the picot edging and gently pulling the points into shape.
Make it yours
This shawl is the perfect design for using up odd skeins of yarn in your stash, by working with a range of different colours in the lower section and even introducing your own favourite stitches to create a shawl that is unique to you.
This is just one of the designs from my new book,
Modern Crocheted Shawls & Wraps
by Laura Strutt, published by
CICO Books
(£12.99)Photography by Emma Mitchell & Penny Wincer © CICO Books
That’s not all…I have one copy of the book up for grabs!
How do you enter? Easy…
Simply leave a comment below sharing why you’d love to win – UK entrants only – Winner will, be announced on the 15 January 2016 – GOOD LUCK!
The post Modern Crochet Shawls & Wraps: Free Pattern! appeared first on Made Peachy.
November 26, 2015
Modern Granny Squares- Giveaway Winner!
Happy Friday y’all!
This week I’m on the road, at the last Knitting & Stitching show of the year in Harrogate – so things are pretty busy over here! It is great to have one last chance to catch up with some of my favourite creative folks, see some chums and meet lots of new people too! So if you are heading to the show be sure to swing in past the Vilene stand TG260 and say hi!
A huge thank you to everyone that ventured the giveaway to win a copy of my book Modern Granny Squares, now is the time to announce the winner!
 Congratulations!
Amy – be sure to check your emails and send over your postal address so that I can get the book sent out to you!
 Sorry that there can’t be more winners – I had such a blast making the projects for this book and I just know that you would love them…Over the coming weeks (when I’m back home from all these road trips!) I will share all of the makes over on Ravelry so you can see each of the projects from the book!
 Have a great Friday folks – if anyone needs me I will be over at the Knitting & Stitching Show, drinking gallons of delicious Yorkshire Tea & getting busy stitching up some jersey quilt blocks!
The post Modern Granny Squares- Giveaway Winner! appeared first on Made Peachy.
November 25, 2015
Crafting a Christmas Countdown
It all seems a little crazy to be even thinking of this, but Christmas is actually right around the corner! I swear wasn’t it only Valentine’s Day like a week ago?
The busier life gets the faster each year seems to whizz past, and I know that I’m never going to be able to slow time down but I can make an effort to live in the moment and really make the most of each day.
Christmas is undeniably rushing towards us a warp speed this year, and I feel wholly unprepared. I have not crafted any gorgeous hand lettered cards that I vowed to myself I would, I have not thought about the gifts for the Littles in our family, I have not picked out a funny festive outfit for Waffle. All in all I’m behind on this years preparations! That isn’t to say I’m being a Grinch about it all – Far from it! I love Christmas, can’t wait for all the heat togethers with family and friends and all the feasting and making merry. I just feel like I missed the memo that said just how soon Christmas actually is!
 One of my favourite things is the countdown and preparing for the celebrations and traditions. Each year I like to burn an Advent Candle to count down the days till Christmas.
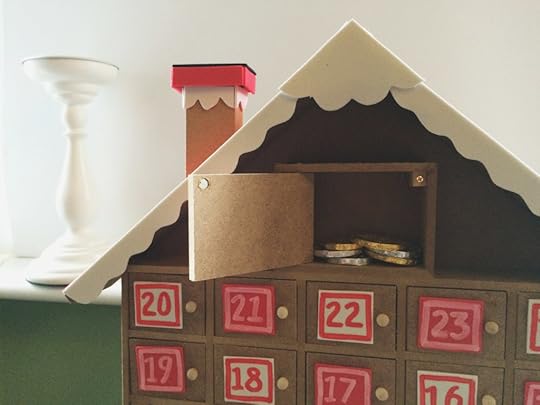
But, this year I decided that we’d start the tradition of using a real wooden house calendar too! I love these Wooden Advent Houses from Hobbycraft that you can decorate in any way you choose! These sweet chalet-style houses have 25 miniature doors behind which you can stash a whole host of sweet treats, mini gifts or even love notes – you know, if you’re super soppy!
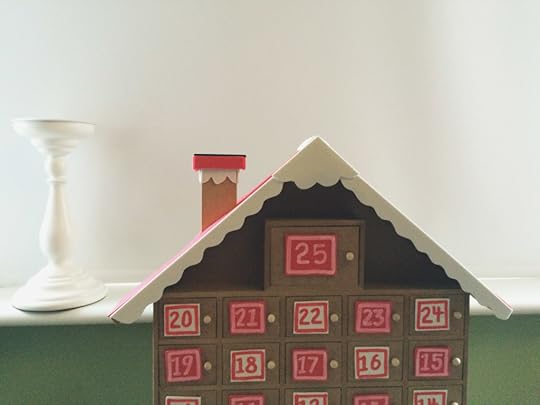 Because these Wooden advent houses are a complete blank canvas you can decorate them exactly as you choice – go wild with the glitter and mini pom poms, add candy canes or colourful buttons. Paint it, stamp it, add felts, buttons, beads and trimmings to make your own festive countdown calendar that you can keep for years to come!
 How do you like to mark the start of the festive season? Do you have an advent calendar or cancel – what are your countdown tradition?
The post Crafting a Christmas Countdown appeared first on Made Peachy.
November 19, 2015
Fab Fabrics: Design Your Own Fabrics with Zazzle
“I’ve got more than enough fabric, I really don’t need any more!” said no stitcher ever!
Like so many stitchers, I have a stash that is fit to bursting, but I can never really pass up a fat quarter of something that really sings out to me. After all, I’m going to be able to use it all up someday, am I right?
No matter how glorious your stash, no matter how many colours of the rainbow you have covered, no matter how many striking prints you have, there is always that time when you’re in the middle of a fabric pull for your next quilt, dress, home dec item and you find yourself thinking, “If only I had a something with a unicorn print/something in a mermaid tail green/something with leaf pattern that is not too big, not to small!”
 What if I told you that you can get that idea for you perfect print fabric right out of your head and straight on to some real life fabric? Yes! You designing your own fabric!
For us creative folks, there is something really appealing about having the control to design your own print fabric – and you can with the fabric design service from Zazzle and its a whole heap easier than you might think!
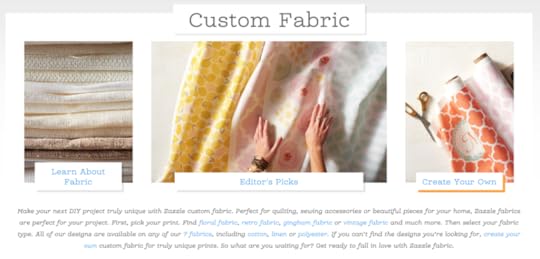 Seriously you guys, it really is as easy as 1, 2, 3!
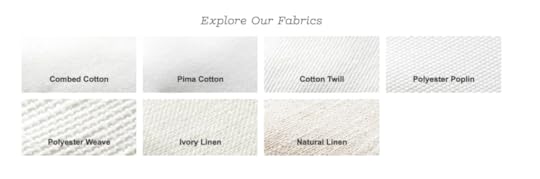 Select your fabric – there is a whole host of different materials to choose from, but one fret each of the qualities is filled explained in the introduction to the fabrics to help you select just the right one for your make!
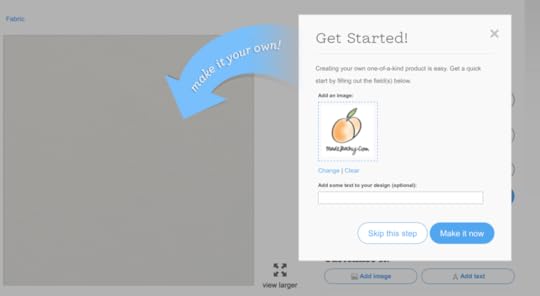 Upload your chosen image – this can be your a scan of your latest watercolour painting, a digital doodle, or a photograph, or whatever your heart desires!
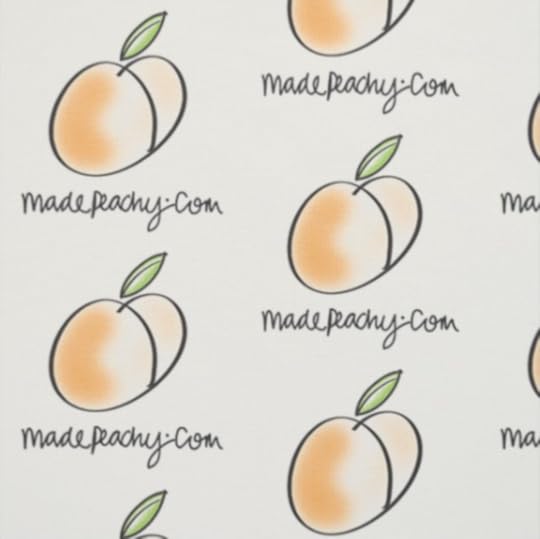 You can edit the added motif directly from the easy-to-use dashboard on the site – scale the design, change the orientation and even create different effects with the tiling and repetition on the motif!
 Experiment and customise your fabrics till you are happy with your design and then save your creation – not only can you order your very own fabrics to use in your next sewing projects – but you can also add your designs to the Zazzle store allowing other folks to buy your design! Discover more about setting up your very own store with the Zazzle Quick Start Guide!
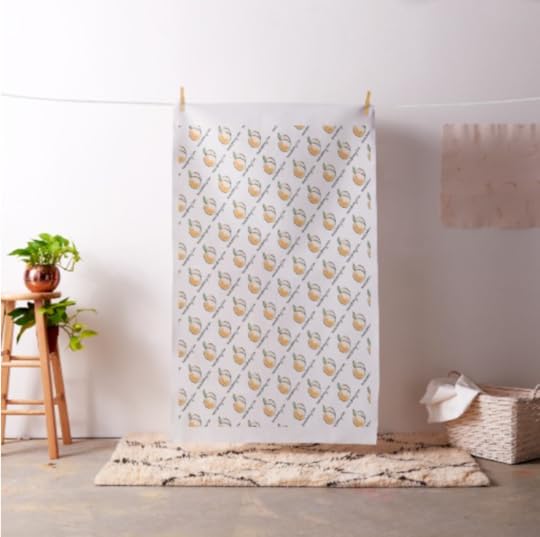
I’m seriously stoked with the selection of designs that arrived – it is magical to see the ideas that have been buzzing around in your brain right there on real life fabrics!
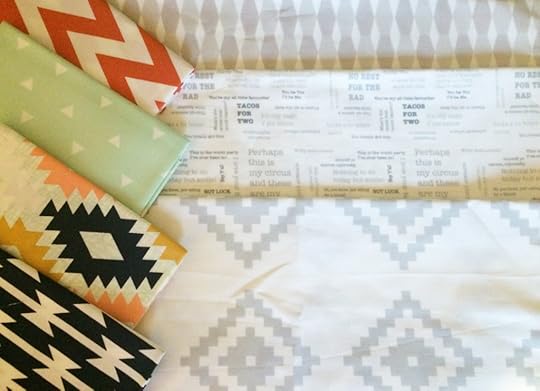 My stash is a wash of rainbow colours and I am always in need of low volume prints to really set of the designs, so I decided to make a collection of my very own to add into my projects! I can’t wait to get stitching!
So, tell me – what designs would you create on to your fabrics?!
The post Fab Fabrics: Design Your Own Fabrics with Zazzle appeared first on Made Peachy.
November 17, 2015
Pinterest: What They Did With Gift Tags
How adorable are these Woodland Character Gift Tags, £3 for set of 15 from Florrie And Boo
There is no denying that the season of giving is right around the corner! Every year I make a promise that I will handmade at least some element of the gifts that I give…uually my schedule means that I don’t have time to hand make gifts, so turning to online stores like Etsy, Folksy & Not On The High Street is a great way to give handmade, even if you aren’t making the items with your own fair hands.
Gift Wrapping is my jam! I love to choose a gift wrapping theme – yes, a gift wrapping theme is a thing! And, this is the perfect opportunity to add a personal tough to your makes! Creating your own gift tags is not only a fun creative fix but it adds the truly personal touch – so here is a round up of some ace DIY Gift Tags from Pinterest!
 1 Naughty & Nice Gift Tags Free Printables ⇒ Holley Maher
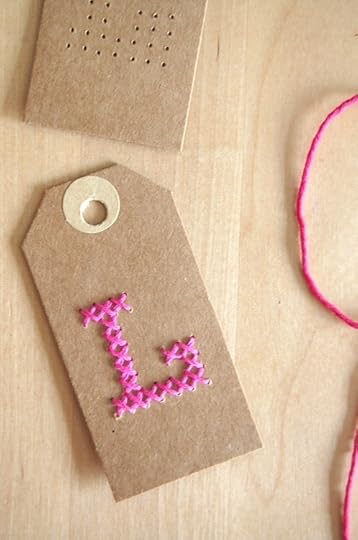 2 Cross Stitch Monogram Tags ⇒ About The Nice Things
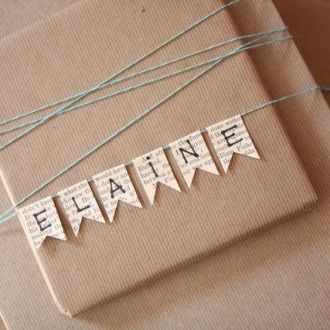 3 Bunting Name Gift Tag ⇒ Zavara Discover Design
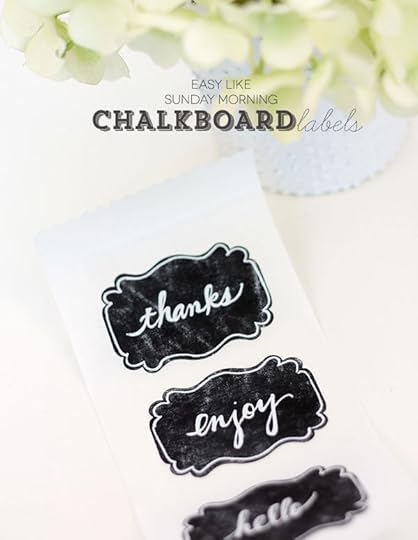 4 DIY Chalk Board Labels ⇒ Damask Love
 5 DIY Clothes Peg Gift Tags ⇒ Lauren Conrad
 6 Glitter Dipped Gift Tags ⇒ Thinking Closet
Hopefully this might help me to decide on a gift wrapping theme for this season…but, perhaps I might need to actually get gift shopping soon too! Have you started making your shopping & wish lists yet?
Be sure to check out the other festive treats that I’m pinning right now!
The post Pinterest: What They Did With Gift Tags appeared first on Made Peachy.
Coming Home & Catching Up
Hello Friends!
Seems as though life has been in one of this super busy phases where you can’t keep up with all the projects, plans and pastimes that your heart wants to. Sadly, when the workload mounts up this is the very first place that gets neglected – and I hate that more than I can tell you!
This little space has been my place to share my makes, projects, plans and creative musings and when I don’t get the time to stop in past and add a new post I really feel it. I have learnt so much in the short time since starting this site and running my own creative business – many of these lessons have been tough but all of them have been valuable and the one that I have learnt recently is that not making the time to do the things that you love – sharing things here – will wear you down!
 If you’ve spotted me over on my Instagram you’ll have seen me popping up at The Handmade Fair, Alexandra Palace and, last week, Dublin. So, this last month has seen this work-from-home (read: homebody) girl heading out to the some fun creative events. The very best thing about getting to work at these events is the people. Hands down – it is all about the people! I get to meet and talk to some amazing creative folks, share tips and talk to peeps about their makes and projects – seriously, there is nothing more inspiring than meeting with other makers! I also get to catching up with some of my favourite people that also run creative businesses! It is so fabulous to be part of a wonderful creative community!
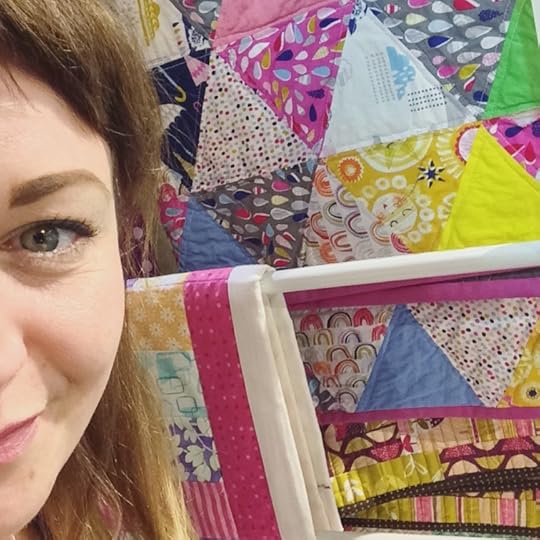
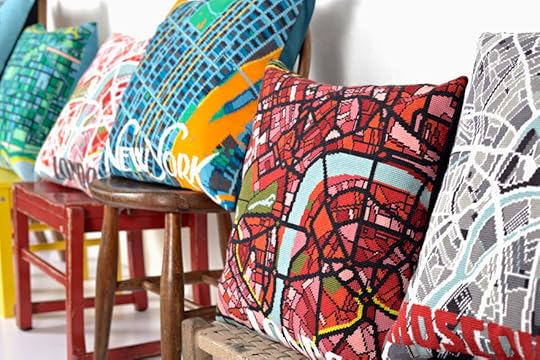 One of my favourite new friends that I have made during this years creative events is the supremely talented stitcher Hannah Bass – her contemporary tapestry designs and dreamy colour combo are literally to die for – Take a peek at her stunning map designs and I don’t doubt you’ll find at leaf one that really calls out to you!
So, aside from whizzing about to attend the Knitting & Stitching shows, what the heck have I been doing with all my time when I’ve not been sharing things here? I’ve been trying to find the answer to this and honestly it seems like I have been doing everything and nothing all at the same time!
 For the last few months I have been working on the final stages of my new crochet book – which I’m excited to say is available for pre-order over on Amazon!
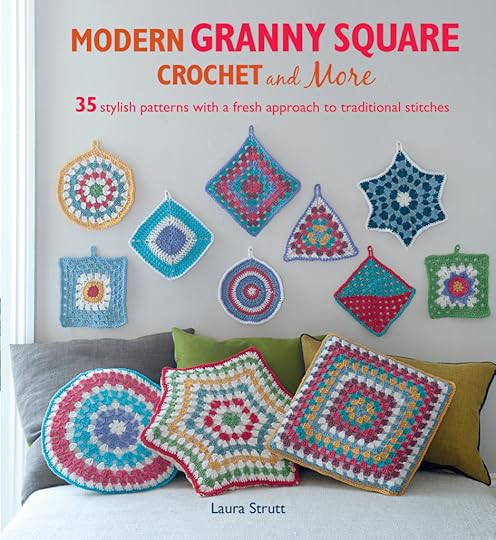 While I was finishing up this book, my other crochet book hit the shelves (yes, I know another book…it might delight you to hear that my husband now calls me Six Book Strutt – which might be the geekiest term of endearment known to man!) – Modern Granny Square Crochet is on sale now! I have been so busy with writing, making and heading to events that I don’t think that I have had the time to really take it in that this book is now on sale!
Who doesn’t love a Granny Square?!
To celebrate I have a copy of Modern Granny Square to give away to one lucky Made Peachy Reader! Fancy winning a copy? Here’s how you enter!
So that y’all get a fair whack at it, there are a number of ways you can enter this giveaway – and the best part is each one will be counted as 1 entry…so, do all three and you will be entered three times my friend!
1 Please leave a comment below sharing why you love Granny Squares!
2 Share this post on Twitter, tagging @madepeachy and using the hashtag #ModernGrannySquaresMadePeachy
3 Give the MadePeachy Facebook page a like, share the giveaway post and leave a comment on why you’d love to win!
Want a bonus entry? Then head over to the MadePeachy Instagram, follow and give the Giveaway post a like & comment!
The giveaway is open to everyone – if you have a postal address, no matter where in the world, you can enter! Yay for international prizes! The winner will be picked at random and announced on the 24 November – Good Luck!
The post Coming Home & Catching Up appeared first on Made Peachy.
October 13, 2015
Pinterest: What They Did With…Eco Bags
It seems that the whole world (well some of the UK media) has gone a little crazy over the fact that single use plastic shopping bags now incur a charge across the UK! For the most part, from my experience anyway, the majority of folks are totally down with this concept. After all, this step towards being more eco-responsible requires little more than forward planning on our part.
I for one have always been a fan of canvas and reusable bags for shopping, of course for the environmental aspects, but also because they look eleventy billion times better (is that a super vain thing to say?!) than hauling around a miss-mash of plastic shopping bags. Also, as a very short gal, standard carry handled plastic shopping bags just aren’t practical when they are loaded with books, groceries or other essentials – it’s probably something to do with being too close to the ground or centre of gravity, but its easier and more comfortable to carry laden bags on my shoulder or across by body. Whatever your reason for embracing this change, and we all really should, this is the perfect opportunity to create your own stylish reusable shopping bag!So, I thought that I would share some Awesome Eco Bag Designs from Pinterest!
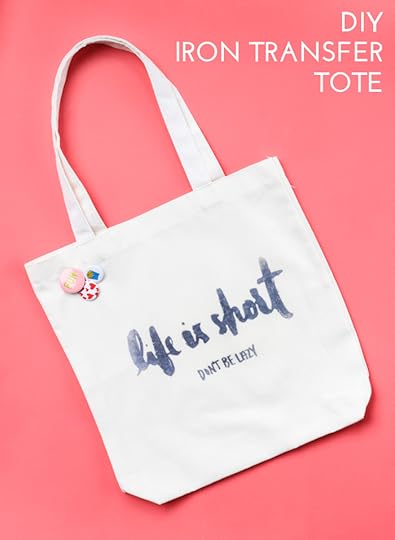 1 Iron Transfer Tote ⇒ The Crafted Life
 2 No-Sew T0-Shirt Tote ⇒ Mommypotamus
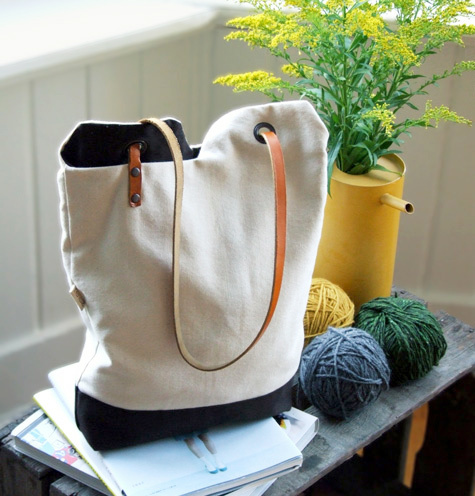
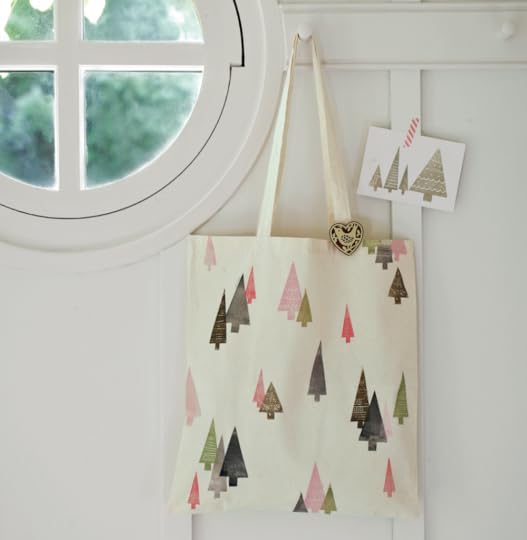 3 Nordic Forest Printed Tote ⇒ Made Peachy Archives
 4 Minimalist Canvas Tote ⇒ Design Sponge
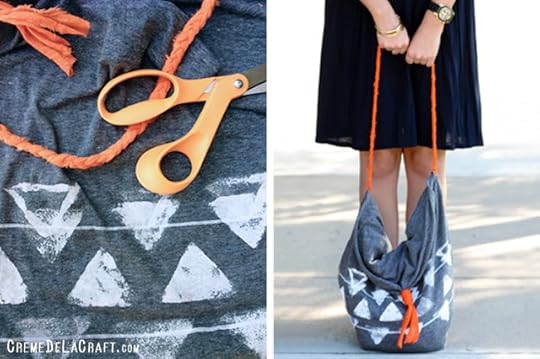 5 No-Sew Pillowcase Tote ⇒ Creme De La Craft
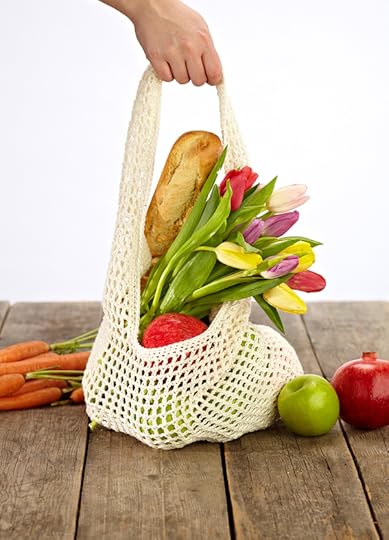 6 Crochet Market Shopper ⇒ Mollie Makes
Are you already an eco bag fanatic? What’s your favourite style of bag to take on shopping trips?
Be sure to check out I’m pinning right now!
The post Pinterest: What They Did With…Eco Bags appeared first on Made Peachy.
September 28, 2015
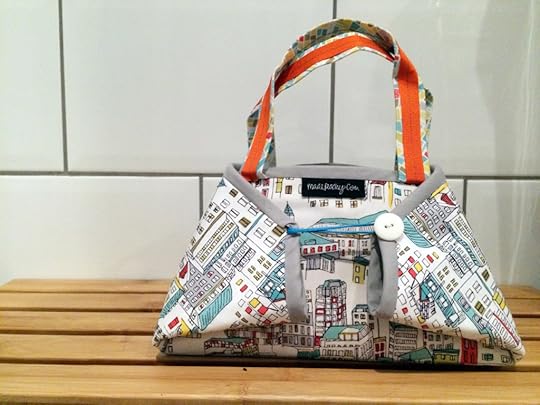
Multi Bag Giveaway Winner!
The time has come for the winner to be announced in the Multi Bag Giveaway – thank y’all so much for entering – here in the comments, over on Facebook, Twitter and Instagram – it has taken me an age to collect together all the entrants!
 One thing that is abundantly clear from all these entrants is that this bag really is multi purpose – I have loved reading your suggestions for what you can tote about in it from Pimms picnics and pet bunnies, to latest projects and on-the-go makes! This bag really is a rock star in the accessories world!
 So, without further delay – it is time to announce the winner picked at random, names in a hat style…
Congratulations!
Sarah L
Be sure to email over your postal address and we will get the multi bag sent out to you – so you might want to get rummaging in your stash to pick out the fabrics that you’re going to use for your very own multi bag!
 I’m sorry that y’all can’t be winners – I know you guys would love using this bag as much as you would making it! if you’re heading to the Knitting & Stitching show at Alexandra Palace next week be sure to stop by the Vilene stand at TGR3 to see the bag in action and find out more about how you can get your hands on this awesome ready-to-use kit!
Have a great day y’all!
The post Multi Bag Giveaway Winner! appeared first on Made Peachy.
September 24, 2015
DIY Bandana Baby Bib
It is just me or is stitching and knitting for babies and children one of the most satisfying creative pastimes? It might be that the projects are small scale so they offer that quick crafty fix. Or, that they are the perfect opportunity to try out a new technique on a bite-sized make.
Bandana bibs are a baby staple, perfect for feeding time, catching drool and, let’s face it, they just look so darned cute!
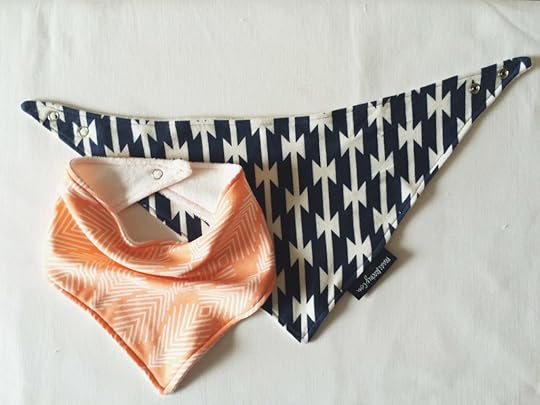 This step-by-step tutorial will show you hoe to make these soft and stylish bandana baby bibs at home, with no dramas. Many stitchers are put of by the prospect of sewing with stretch fabrics. While these fabrics alway spook and feel so appealing the stretchy nature can be the cause of lots of stress when trying to work seams and create projects and garments. This mini make is not only a great baby project, but it is a fab introduction to sewing with jersey – so let’s give it a go! Let’s make a Bandana Baby Bib!
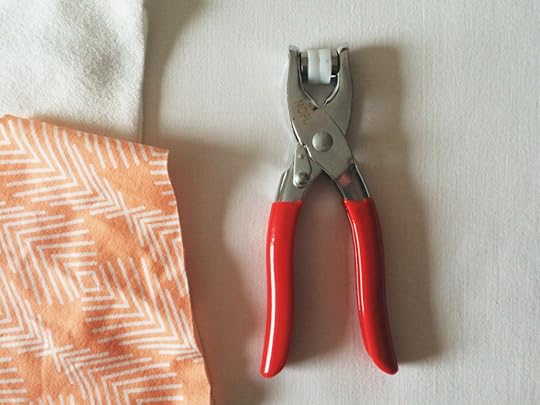 Grab your supplies…
Stretch Terry, 40cm square
Stretch Jersey, 40cm square
Fusible Interfacing
Snap Fasterners
Sewing machine with stretch stitch function and knits needle or Ball Point needle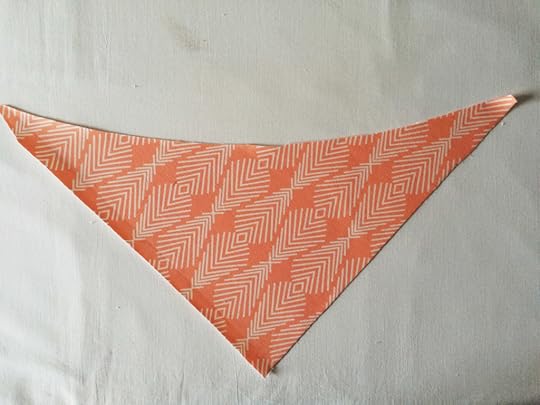 Following the manufacturers instructions, fuse the interlacing to the wrong side of the stretch jersey and cut the piece to a triangle measuring 34cm down the two sides.
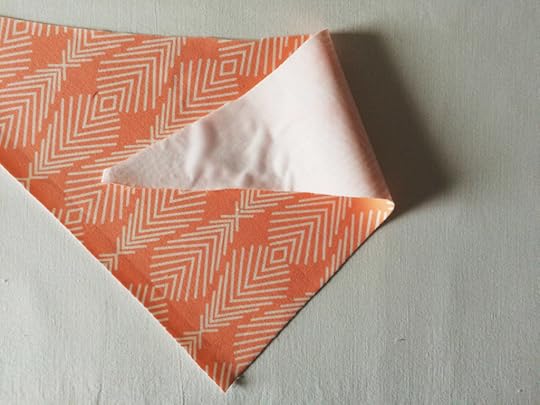 Carefully cut a small scoop in the upper section – this is the part that will sit around baby’s neck, so this makes sure it is super comfy!
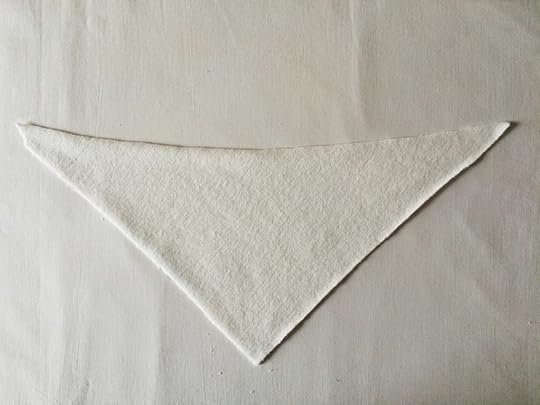 Cut an identical triangle shape from the piece of stretch terry, ensuring that the same smooth curve is cut into the upper neckline of the bib.
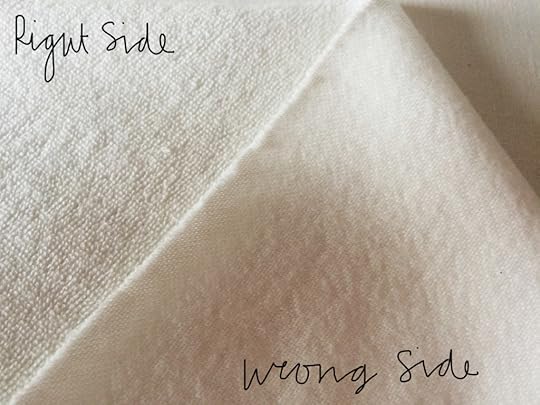 The bib is sewn together with the rights sides facing and then turned through to finish. Take a quick look at the stretch towel piece to identify the right and the wrong sides. The right side feature lots of very small, soft loops while the wrong side is made up of the distinctive V shapes of knit fabrics.
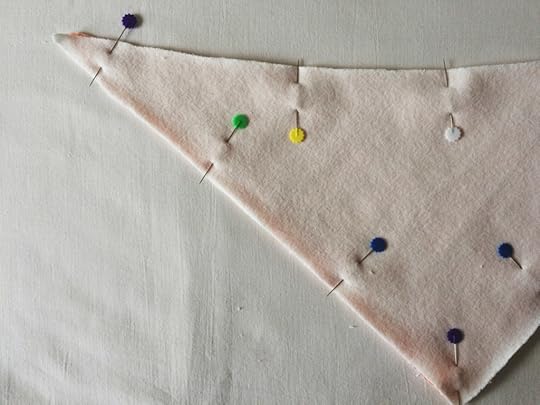 Place the two parts of the bib together with the right sides facing, and pin neatly in place to secure ready to stitch.
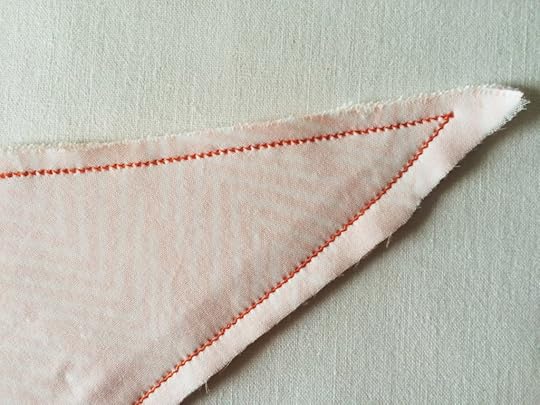 Select a stretch stitch on your machine – this setting slightly offsets the stitches as it works, this allows them to move freely with the stretch fabrics preventing them from snapping as the fabrics stretches. A ball point needle is the best option for sewing with jersey and knit fabrics with stretch, this needle has a specially designed tip that allows it to slip between the fibres of the knit fabric with out damaging them.
Work around the outer edge of the baby bib taking a 1cm seam allowance.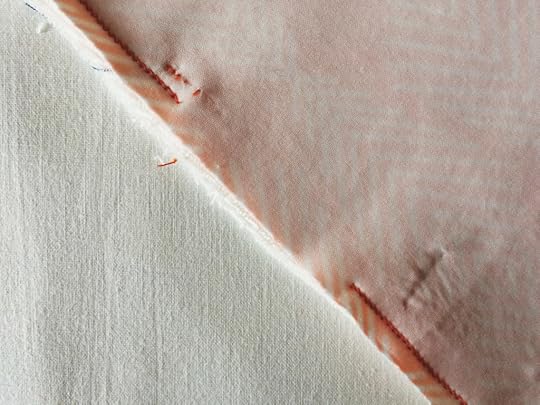 Along one of the straight edges, leave a small gap around 5cm wide to allow the bib to be turned through to the right side. Work a couple of back stitches at the start and end on the seam line to secure the stitches.
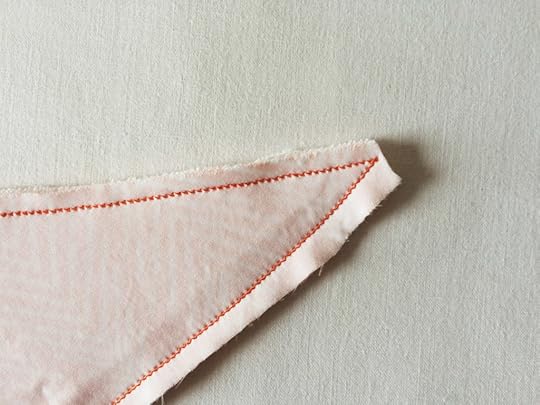 Once stitched, trim the tips from the corners of the bib. Removing this excess seam allowance will reduce the bulk and allow the points to be pushed out neatly and fully.
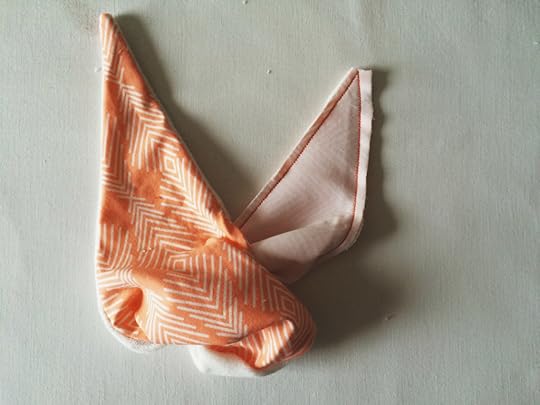 Through the small gap in the seam allowance, begin drawing the bib through to the right side – be careful not to damage or break the stitches at either side of the opening!
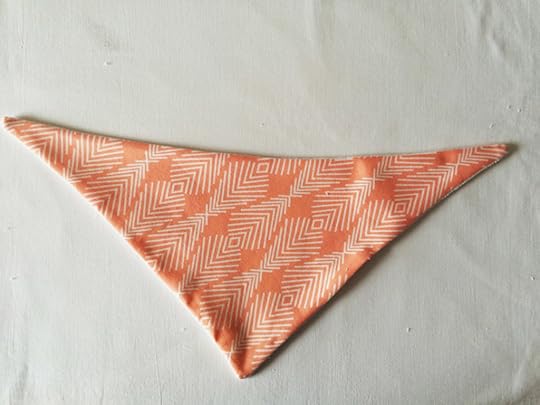 Once drawn through to the right side, use a knitting needle to ease out the points of the corners to for the neat triangle. Press the bib to neaten and fold the seam allowance along the opening in the seam to the inside of the bib and pin in place.
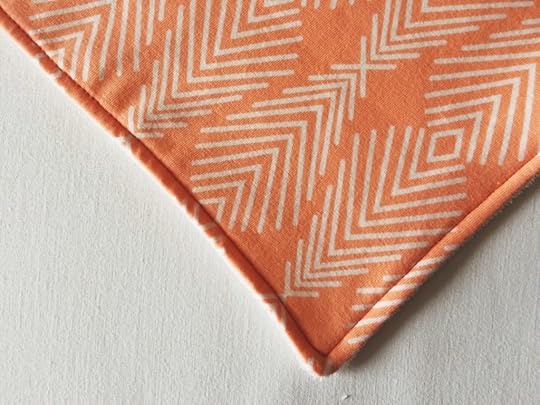 Switch to a straight stitch setting and work a neat line of top stitching carefully around the outer edge of the bib, pivoting neatly on the corners. If you ensure that the line of top stitching is positioned within the seam allowance it will seam the gap through which the bib was turned through – alternative, you can slip stitch this gap closed prior to adding the top stitching.
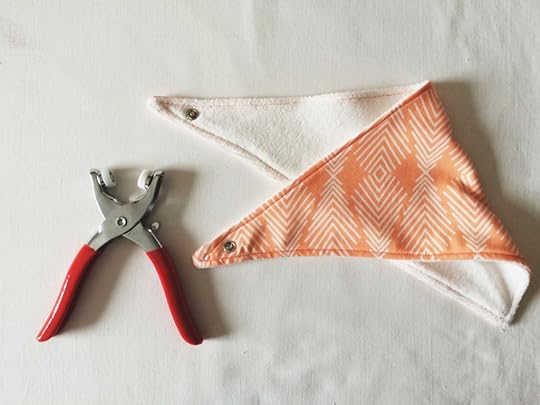 Apply the snap fasteners to the upper points of the bib – be careful to ensure that the corresponding parts are correctly aligned before affixing securely!
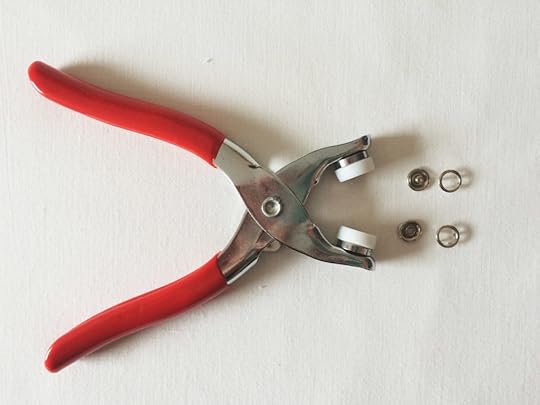 Snap fasterners come in many different shapes styles and sizes – I prefer to use the fasteners that are secured on with the pressure from specifically designed pilers – it gives a super pro finish, although stitch on fasteners will work just as well!Tah Dah! You’ll be amazed at how quick these super cute bandana bibs come together! And, I get a lot of compliments about these sewn in labels that I add to all my makes, I had these custom made with my own unique artwork, so curious minds will be pleased to know you can create your own at
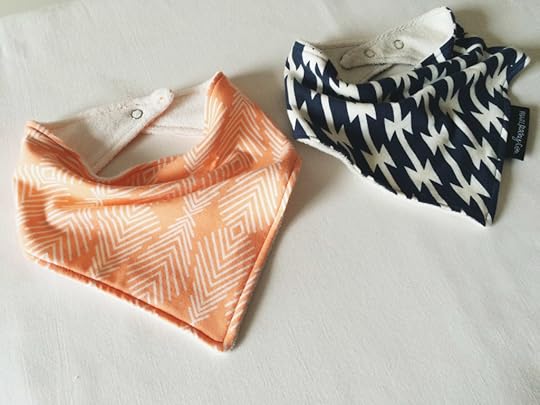
♥ – ♥ – ♥
Be sure to check out the new look Vlieseline website for full product lists, hints, tips, video tutorials and information on using interlinings and waddings in your makes!
The selection of stretch knits are just some of the glorious fabrics available from Art Gallery Fabrics
Stretch Terry is a fabulous backing for these bibs – it washes and wears well, is super soft against delicate skin and is highly absorbent…perfect for all that baby drool!! Check out the range of stretch terry – and much more besides at My Fabrics!
![]()
The post DIY Bandana Baby Bib appeared first on Made Peachy.


