
Laura Strutt's Blog, page 46
December 25, 2013
Art Gallery Fabrics Bundle Giveaway
Just when you thought that there weren’t any more gift to unwrap… This year I’ve been lucky enough to work with some of the most incredible fabrics. This winter holidays I’m spending some of my free time finishing up a gorgeous hand pieced hexagon quilt. This project has been rather a slow burner -no only because it is carefully stitched by hand, but also because it has been on a bit of a stitching tour of the country with me, joining me at the Knitting & Stitching shows in Alexandra Palace, Dublin and Harrogate. So, it’s no wonder that this holds a special place in my heart – that is one of my favourite things about those more commitment heavy projects, looking at the finished pieces takes you right back to the memories of the times that you were working on them – and here, these were very much happy times!
Because, it’s Christmas time and I want to share the love with you guys, I thought what better way a Boxing Day giveaway! This collection of 10 fat quarter fabrics from the Bari J Bijoux range are up for grabs to one lucky Made Peachy Reader! How do you enter? It’s as easy as 1, 2, 3…
1 Like the Made Peachy Facebook Page & share the Art Gallery Fabrics Bundle Giveaway
2 Follow Made Peachy on Twitter and RT the Art Gallery Fabrics Giveaway Tweet
3 Leave a comment below! Each of the above counts as one entry, do all three and you’re entered three times – sweet! This competition is open to everyone the whole world over – so, if you’ve got a postal address, and you’re feeling lucky, get entering!
The winner will be announced on the 2 January 2014 -Good Luck!
The post Art Gallery Fabrics Bundle Giveaway appeared first on Made Peachy.


It’s Christmas!
Happy Christmas Y’all!
There is nothing more beautiful that a home decked out in Christmas decorations, packed with excited children, two happy (although they have no clue what they are happy about) puppies and full of the delicious smells of a festive feast cooking! This Crochet Star Garland has to be my all time favourite decoration this Christmas…so much so, that I’m considering leaving it up the whole entire year round! This is the day that we’ve all been waiting for, preparing for and getting excited about for so long! One thing I’m particularly looking forward to is tucking into one [read: some] of these tiny wee single serve Christmas Cakes made by my lovely Mum…I think we can see where I got my passion for baking from!
[image error]It’s hard not to get a wee bit nostalgic and sentimental at Christmastime – all the family traditions, the making of new traditions and (here’s my favourite part) taking time out to relax and enjoy each others company!
This Christmas is a Christmas of firsts. Many of our chums will be celebrating Baby’s first Christmas – now, I’m pretty sure that it doesn’t get much more magical than that! This is our pup Waffle’s first Christmas too (not quite the same, but I’m making a massive fuss of him none the less!) – I’ll be completely honest with you. I don’t think that he ‘gets’ the whole thing. He gave a huge ‘paws up’ for the new chew toy and bags of treats…but, I don’t think that he was super impressed with the pup version of the Christmas sweater and mini antlers! You can be sure that while we are surrounded by some of our family, we shall be raising a glass to those dear to our hearts that we can’t share this special day with.
 This is also Made Peachy’s first Christmas! I can’t believe that six months ago I shared a tasty recipe for Salted Caramel Shooters…and have been sharing a little something every day since! Don’t worry, dear reader, I am not about to descend into a soppy mess (although, I could quite easily do so!) The last six months have been incredible, and I feel pretty blessed to have met so many amazing people, visited some incredible place, and have so many awesome experiences. But, most of all, I’m utterly thrilled that so many of you guys spend a few moments of your day, stopping over at Made Peachy! So, here’s where I say a huge Thank You (and, get a little choked up) and that I hope that Santa’s been good to y’all!
Oh! If you were thinking of gifting me with anything this year, you know what would be really sweet? Well, Made Peachy has been entered into the National UK Blog Awards 2014! and, if you’ve enjoyed reading Made Peachy for these last six months I would be truly stoked if you’d Vote for Made Peachy!
 Now, we really all must get back to our nearest and dearest and enjoy this amazing day…but, before I go, let’s have one more look at that sweet little Christmas puppy!
 Wishing you a wonderful Christmas!
The post It’s Christmas! appeared first on Made Peachy.
December 23, 2013
Easy-Make Eggnog
It seems to me that eggnog is something that you either love or loathe. A lot of folks are put off by the though of drinking raw eggs – and, yes, when you put it like that I have to confess that it’s not really all that appetising a concept. But, this recipe is made by heating and lightly cooking all the ingredients, so that raw egg thing is completely banished, just leaving that rich and creamy dairy flavours!
This recipe does contain eggs that are lightly cooked, so this is not one for young children, the elderly or pregnant women – sorry folks!
This Easy-Make Eggnog recipe creates three wonderful festive drinks – a virgin blend, a spiked variation and then, because who doesn’t need a festive kick to their coffee, a specialty coffee recipe! Delicious! Grab your supplies…
4 eggs
240ml milk
200ml cream
220g (7.5oz) white sugar
1/2 teaspoon vanilla extract
Two cinnamon sticks – or 1/4 teaspoon of ground cinnamon
1/4 teaspoon fresh ground nutmeg In a saucepan, combine the cream, milk, nutmeg, cinnamon stick and vanilla essence. Over a medium heat warm the milk through without bringing to the boil, stir occasionally to help the flavours to infuse.
 Separate the egg yokes from the egg whites and set the whites of the eggs aside. Add 2/3 of the sugar to the egg yokes and beat until the grains are fully dissolved and the egg is a light golden colour. Slowly blend the hot milk into the beaten egg yokes and return to the saucepan and heat through on a medium heat. This will cook the egg yokes and will take around 10 minutes, the mixture will thicken up slightly. Remove from the heat and allow to cool, cover and place in the fridge to chill.
  Add the remaining sugar to the egg whites and beat until it forms foamy white peaks, this is added to the chilled eggnog mix just before serving.
 To serve, stir in the foamy egg whites into the eggnog mix and add a generous dusting of fresh ground nutmeg for an intense festive flavour!
How about a spiked eggnog? Add a shot of rum to the glass and top with the eggnog mix, stir well with a cinnamon stick and serve with ground nutmeg.
Anyone for an Eggnog Latte? Creating a festive specialty coffee is easier than you think! Brew a double espress of your favourite coffee, add in three tablespoons of delicious eggnog mix and top with hot milk – a dash of nutmeg is the finishing touch!
 Of course, you don’t have to serve yours in a mason jar, but with all the dashing about and last minutes tasks on Christmas eve, a mason jar of eggnog latte is just te festive caffeine hit I need – plus this Cuppow travel lid, means that I can tote it about with me all morning and not end up leaving it somewhere to go cold! If you don’t already own a Cuppow travel lid, you might want to add one to your wish list!
 Now, I’m sure that 16oz of eggnog latte will keep me going until the big day! Enjoy!
The post Easy-Make Eggnog appeared first on Made Peachy.
December 22, 2013
Clementine and Sage Turkey with Madeira Gravy
Christmas is literally a couple of sleeps away. Yup, only two more sleeps and it’s the big day.
One of the things that I’m most looking forward to is sitting down with my family to a festive feast – there is literally nothing quite like it! This year we’re going to try out something a little fancy, so I thought I’d share this recipe for Clementine and Sage Turkey with Madeira Gravy – this will guarantee to wow your dinner guests on the big day!
This recipe takes around 30 minutes for preparation and the cooking time is around 3 hours 40minutes, plus resting time. This feats will serve eight people with some leftovers for those traditional after Christmas meals!
Grab your supplies…
5.4kg (12lb) free-range turkey (put the giblets for stock to one side, if you like )
3 firm clementines
20g pack fresh sage
100g (3½oz) butter, softened
500g (1lb 2oz) stuffing
3 celery sticks
3 carrots, halved lengthways
Salt and freshly ground black pepper
Fried clementine halves and stuffing balls to garnish (optional)
For the Madeira Gravy
25g (1oz) plain flour
125ml (4fl oz) Madeira wine
300ml (½ pint) chicken stock
1 tbsp runny honey or redcurrant jelly, if needed 1 Remove the turkey from the fridge 1 hour before you stuff it to let it come up to room temperature.
2 Preheat the oven to 190°C (170°C fan oven) mark 5. Finely grate the zest from the clementines into a medium bowl. Halve the zest-free clementines and put to one side. Next, add 2 tbsp thinly sliced sage leaves (put the rest of the bunch to one side) to the bowl with the butter and plenty of seasoning and mix well.
3 Put the turkey, breast side up, on a board. Use tweezers to pluck any feathers from the skin. Loosen the skin at the neck end and use your fingers to ease the skin away from the breast meat, until 9cm (3½in) is free. Spread most of the butter between the skin and meat. Put the remaining flavoured butter to one side.
4 Spoon the cold stuffing into the neck cavity, pushing it down between the skin and breast meat and taking care not to overfill. Neaten the shape. Turn the turkey over on to its breast, pull the neck flap down and over the stuffing and secure the neck skin with a skewer or cocktail sticks. Weigh the turkey and calculate the cooking time, allowing 30–35 minutes per 1kg (2¼lb).
5 Make a platform in a large roasting tin with celery sticks and carrot halves and sit the turkey on top. Put the clementine halves and the remaining sage (stalks and all) into the turkey cavity, then rub the remaining flavoured butter over the breast of the bird. Tie the legs together with string, season the bird all over and cover loosely with foil.
6 Roast for the calculated time, removing the foil for the last 45 minutes of cooking, and basting at least three times during cooking. If the skin is browning too quickly, cover with foil again.
7 To check if the turkey is cooked, pierce the thickest part of the thigh with a skewer – the juices should run clear. If there are any traces of pink in the juice, put the bird back into the oven and cook for 10 minutes, then check again in the same way. Alternatively, use a meat thermometer – the temperature needs to read 78°C when inserted into the thickest part of the breast.
8 When the turkey is cooked, tip the bird so that the juices run into the tin, then transfer the turkey to a board (put the roasting tin for the Madeira Gravy to one side). Cover loosely with foil and clean teatowels to help keep the heat in. Leave to rest in a warm place for at least 30 minutes or up to 1¼ hours.
9 To make the gravy, tilt the roasting tin and spoon off most of the fat (leaving the vegetables in the tin). Put the tin on the hob over a medium heat and add the flour. Cook, stirring well with a wooden spoon, for 1 minute. Gradually add the Madeira, scraping up all the sticky bits from the bottom of the tin, then leave to bubble for a few minutes. Next, stir in the stock and leave to simmer, stirring occasionally, for 5 minutes. Check the seasoning and add the honey or redcurrant jelly if needed. Strain into a warmed gravy jug, or into a clean pan to reheat when needed.
10 To serve, unwrap the turkey and transfer to a warmed serving plate. Remove the skewer or cocktail sticks and garnish with the fried clementine halves and stuffing balls, if you like. Serve with the gravy. Save yourself some time on Christmas Day
Prepare the turkey to the end of step 5 up to one day ahead. Chill (both the bird, and yourself!). Allow the stuffed turkey to come up to room temperature, then complete the recipe to serve.
So, what feast will you be serving up to the Christmas table this year?
♥ – ♥ – ♥

This fabulous Christmas recipe is from a collection of mouth-watering meals from Roast It published by Collins & Brown. Made Peachy readers can buy a copy of Roast It for only £3.50 including free UK p&p. Call 0844 576 8122 and quote reference CH1800.
The post Clementine and Sage Turkey with Madeira Gravy appeared first on Made Peachy.
December 21, 2013
Style Sunday: Adorable Aprons
I don’t know about you, but ever since watching the Christmas Special of the Great British Sewing Bee, I’ve been thinking (probably a little obsessively!) about aprons. Sandra had it totally right – a gal needs a pretty apron!
Over the Christmas holidays, I don’t doubt that there will be a lot of time spent in the kitchen – and I don’t say this grudgingly in the least. But, if you’re going to be wearing an apron then let’s make it a cute one – am I right? My love for quirky prints was satisfied when I spotted this too-cute-for-words mushroom print apron £22 from CathKidston!
 The Pattern
1707 Simplicity, size S-L, £5.65, SimplicityNewlook
These matching child and adult’s aprons have bias tape binding, straps and a cute patch pocket. Select designs with a straight hems and pockets.
The Fabrics
Mushroom Cotton, £20 per metre CathKidston
1 Norwegian Wood Scandi Mushroom, £12 per metre Fabric Rehab
2 Woodland Pals Mushroom Party Garden, £5.65 per yard Fabric.com
3 Cosmo Printed Oxford Woodland in Turquoise, £3.75 per quarter metre, SeamStar
4 Alexander Henry Mushroom City Orange, £5.50 per half metre, FabricInspirations
♥ – ♥ – ♥
Love this pinnie pattern? Then now’s the perfect chance to make your own! Made Peachy readers can buy the pattern at an exclusive 50% discount using the code PEACHY170714 – this offer runs from 22 December 2013 to 22 January 2014!
The post Style Sunday: Adorable Aprons appeared first on Made Peachy.
December 20, 2013
A Handmade Secret Santa
This year I’ll be celebrating my first Christmas since starting my own business – and let me tell you, the last six months have been a whole heap of fun (although, that’s probably a story for another time!) While I love that my day job is creative, exciting and different every day, I couldn’t help but think that I might feel as though I was missing out on the build up to Christmas that comes from a convention office-based day job.
So, when the wonderful EmmaBerry founder and host of the #CraftBlogClub suggested running a handmade Secret Santa I jumped at the chance to get involved. And, I’m so very glad that I did!
The whole concept of Secret Santa is right up my street, picking out a surprise present for someone – a person that you ordinarily wouldn’t buy for – and wrapping it up as an extra treat for them in the run up to the big day. It is often a bit of a challenge, you might not know the person very well, or you might be working with a small budget. This challenges to you be creative, to think hard about what you pick out for them, and to try to give them a happy surprise when they unwrap it.
The challenge behind the #CraftBlogClub was all of this and more! The gift was to be handmade – of course! I found making a little festive treat for someone is a whole heap of fun – trying to find out more about the things they like or their favourite crafts or styles. It is also the chance to really show off what you’re great at making.
Creating a gift that is so unique there is simply not another one like it. And, that is exactly what I discovered, to my utter delight, when I opened my wonderful Secret Santa gift! Unwrapping a unique and incredible package of handmade goodies (and sweets, but they’ve all gone now!) is a sure fire way to get into the Christmas spirit! This beautiful tree decoration will make a lovely addition to our tree – not only this year, but for the Christmases to come…now, that memory making right there people!
 Opening this one-of-a-kind artwork just took my breath away. I mean (and I’m trying to say this without bragging, honest!) how many folks will unwrap an original work of art this Christmas time? As a girl who’s never got ‘into her groove’ with drawing and painting, I am blown away by the talent and creativity that has gone into my gift. Wow! Just wow!
One of the things that I loved most about this Secret Santa was that it was the chance to be on the receiving end of a handmade package. As the person that is usually the giver of handmade gifts, it was amazing to experience the complete joy of wrapping a handmade gift – I kid you not, it makes you feel super special, I hope that this is how those receiving my handcrafted presents feel!
Now, there is only one thing left to do. And, that is to say a huge and heartfelt thank you to my Secret Santa Amanda Wright – wow, thank you, this is a real festive treasure!
♥ – ♥ – ♥
If you love handmade, adore creating and are more than a little bit addicted to Twitter – be sure to join in the fun Tuesdays 7-8pm GMT by following #CraftBlogClub -See you there in the New Year!
The post A Handmade Secret Santa appeared first on Made Peachy.
December 19, 2013
Free Printable Christmas Gift Tags
If there anything more frustrating than getting half way through a mountain of gift wrapping, only to realise that you’ve run out of gift tags? Panic not my friends! Armed with a few supplies – that you’ll likely have around the house – you can make your own with these Free Printable Christmas Gift Tags!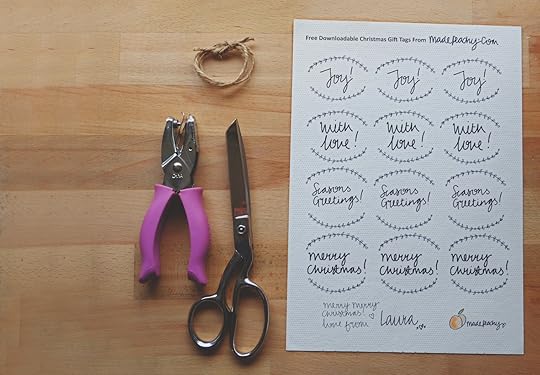 Grab your supplies…
Print out the Free Christmas Gift Tags – download free – on to a sheet of cream card, I love this fancy linen paper because, well, its fancy!
Scissors
Hole punch – a standard desk hole punch is just dandy, but I find that these hand-held craft punches make it super easy to position the holes
Twine or ribbon Carefully cut around the individual tags, trimming the curves for extra neatness.
 Use the hole punch to make the holes and thread through the twin or thin ribbon. Write your personal message onto the back of the gift tag.
 Secure on to your wrapped gift – Ta Dah! Simple and stylish! How about that hand printed gift wrap – pretty neat huh? And, you can make your own!
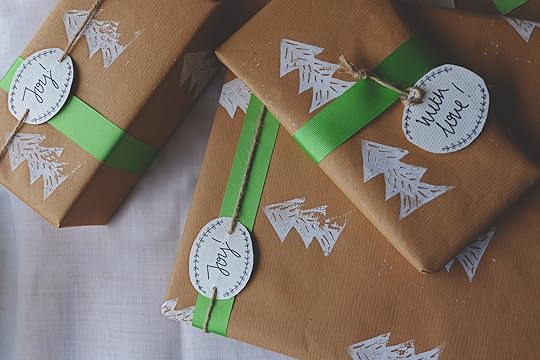 My favourite thing about these simple tags is that you can mix them up and create different looks, simply by adjusting placement of the punched holes – layer with ribbon, set to lay across a band of ribbon, or use one hole and add a hanging loop!
How will you use yours? Why not share a picture of your gift wrapping on Instagram? Tag your pics with #GiftWrappingMadePeachy - I’d love to see your finish wrapped gifts!
The post Free Printable Christmas Gift Tags appeared first on Made Peachy.
December 18, 2013
DIY Printed Christmas Gift Wrap
Wrapping Christmas gifts. You either love it or hate it! I much prefer the process of wrapping all the different gifts to fighting the crowds in the shops trying to grab those last minute items.
Wrapping gifts is one of my very favourite traditions of Christmas. I like to get all the presents together in a huge mountain, stick on a Christmas movie – I’m talking The Nightmare Before Christmas and The Grinch – donning a Santa hat (yes, I do really do that!) and supping mulled wine. Having these little traditions for gift wrapping takes it away from being a huge chore and turns it into some festive fun!
I love for our gifts to look as good on the outside as they are on the inside, and each year I look for new ways to wrap our gifts with a little unique touch. This year I decided that I’d make custom DIY Printed Christmas Gift Wrap – and you’ll be pleased to know, that its a lot easier than it sounds!
 Grab your supplies…
Small piece of printing lino
Lino cutting tool with a range of different cutting blades
White water soluble block printing paint
Small inking roller
Small wooden block & strong glue
Pencil
Plain gift paper – I used simple brown craft gift wrap Working in the centre of the piece of lino draw out the design for the printing stamp. The design will need to be worked in relief, the areas that are left uncut are the sections that will make the motif when printed – so it is wise to keep the design as simple as possible. Remember, the image will appear as a mirror image when it is printed – keep that in mind if your working on something really fancy or if you’re going to be adding words or messages! I picked out a Christmas tree, because it’s a lovely simple shape to cut and, well, its festive!
 Using a mid-sized pointed cutting blade, work around the pencil outlines to cut away the design. These cuts will need to be fairly deep, to allow the motif to stand proud, but be careful not to cut completely through the whole piece of lino – you can always work back over any cuts to make them deeper if needed.
While printing lino is fairly easy to cut through with the proper tools, always place the lino on a firm, flat surface, and work by pushing the tool away from you. It is tempting to hold the lino at the opposite end to where you are cutting, but keep your fingers out of the way of the direction of the cut – these tools are super sharp and no one wants to chop into their finger this close to Christmas! Switch to a wide flat cutting tool and work around the initial outlines to cut away the background of the motif. While this doesn’t need to be completely and perfectly smooth, this section needs to be cut away enough so that the ink wont come into contact with it. When finished the motif in the centre will stand proud of the remaining lino.
 A fine tipped blade is great for adding in any detail. I worked over to add some texture to my christmas tree motif – these little light strokes don’t need to be made very deep and a simple sweeping motion gives a lovely subtle detail to the design.
 Once the lino motif has been fully cut and any detail added, place it on top of the small wooden block and secure in place with the glue, and set aside to dry fully. The block makes it easier to hold and press the lino for neat and even printing onto the paper.
 Squeeze a small blob of printing paint onto palette – or small plate – and use the inking roller to cover with a thin layer of paint. Test on a small piece of paper to check that your happy with the design, and the amount of paint used – too little ink and the design will come out patchy, too much paint and the motif will smear while you print!
 Roll out your gift wrapping paper – I found that simple brown craft wrapping paper is a great background for these striking motifs, not only that, but the paint goes on really well, dries pretty fast and it’s a fantastic budget wrapping option!
Working on lengths, roll out a section of gift paper and begin stamping the design onto the paper. Press the stamp firmly and hold in place for a couple of seconds before carefully lifting directly upwards to avoid smudging the design. The motifs can be placed at random, in neat rows or as part of a fancy design. Just remember to consider the spacing between each motif – you don’t want the designs all squashed up, but at the same time, too much space might mean that really small gifts wont feature any of the motifs when wrapped!
I worked printing a whole roll of brown craft paper at a time, laying it over the dining table and working across in blocks, before sliding it across and starting on the next section. The paints take about 30-40minutes to fully dry. If you’re printing large sections at once, and you have the space, leave out over night to dry and finish the wrapping the next day! Now, working in long lengths at a time is a bit tricky – especially if you don’t have much space. Alternatively, you could work out each section of paper needed per gift and them print them each in turn. All that is left is to wrap your gifts! Now, how impressed will your nearest and dearest be when you tell them that the gift wrap this year is custom made this year!
I can’t get enough of unique handmade wrapping styles – What are your favourite handmade touches for adding to your gift wrapping? Share a picture of your fancy Christmas gift wrapping on Instagram? Tag your pics with #GiftWrappingMadePeachy – I’d love to see your finish wrapped gifts!
The post DIY Printed Christmas Gift Wrap appeared first on Made Peachy.
December 17, 2013
Christmas Gift Guide: The Littles Edition
How cute is this Baby’s First Christmas Card, £1.89 from WaterStreetDesigns?
Christmas is all about the children – ok and us big kids too. But, the magic of Christmas is just so much more enjoyable through the eyes of the little folks in our lives!
As we are part of a huge family (I count fourteen nieces and nephews to be a pretty epic sized tribe) and with many of our friends celebrating their babies first Christmas, I have found myself fully immersed in the joy of hunting our amazing toys, gifts and goodies for the Littles.
Here are just some of my favourites – both handmade and from the high street – in The Christmas Gift Guide: The Littles Edition! 1 3-in-1 trike to bike • £185 • WishboneDesignStudio
2 Daddy & Baby Matching Outfits • £24.83 • Zoeysattic
3 Nanuq The Fishing Eskimo • £15 • Clothkits
4 Wooden Phone Teether • £9.43 • 3PrincessesStore
5 Colour In Cardboard Playhouse • £20 • MyDollBoutique
6 Pantone Colours Baby Book • £6.99 • Amazon
7 Gingerbread Baby Shoes • £11.49 • Snugglefeet
8 Personalised Hand Painted Santa Treats Plate • £6 • Home-Spun Squiggle
9 Personalised Wooden Bowling Set • £18.23 • hcwoodcraft
Shopping for the Littles is by far the best part of Christmas – I’m coveting most of these tiny treats myself! Have you finished up your shopping yet? Remember to check out the Gift Guides for the Guys and the Girls for more inspiration!
The post Christmas Gift Guide: The Littles Edition appeared first on Made Peachy.
December 16, 2013
Five Minute Make: Christmas Card Star Garland
I don’t know about you, but we’ve got the the point where all the lovely Christmas cards that we’ve received are carefully arranged around ever surface of our home. The windowsills, the mantle piece, the sideboard – and do they ever look jolly. That is until I open a window or the pup makes a wild dash through the house and sends them all flying in a flurry of festive colours.
I seem to be spending more time picking up the cards and re-arranging them than I do anything else. So, I thought it was high time for a quick and crafty solution. This Christmas Card Star Garland is made with just three simple supplies that you’ll probably already have in your craft kit, and as they take less than five minutes to whip up, it’s a far quicker than replacing them every time Waffle goes on a puppy rampage through the house!
 Grab your supplies…
Self adhesive glitter foam sheet c/o BakerRoss
Length of natural twine
Mini craft pegs
Scissors Using the scissors, cut out some small star shapes. I like my stars to look a individual, but if you want a really uniform look, then flip the foam sheet so that the adhesive backing is facing upwards and sketch out the designs in pencil first. Cut the same number of stars as you have mini craft pegs.
 Remove the backing from an adhesive foam star and press onto the upper section of the mini craft peg to affix into position. Repeat until all the stars are secured onto the tops of the mini pegs.
I wished that I had cut our more foam and had more mini pegs, as they are a quick and cute addition to the Christmas tree too! Secure the length of twine on the wall, above the doors, around the mantlepiece – or wherever you want the cards – and use the pegs to hold the Christmas cards along the twine, washing line style!
Now, didn’t I tell you that was a quick and easy make? I love how this makes all the different cards come together and look like a complete festive decoration – in fact I can’t believe I didn’t think of it sooner! How do you display your Christmas cards?
The post Five Minute Make: Christmas Card Star Garland appeared first on Made Peachy.


