
Laura Strutt's Blog, page 44
January 16, 2014
Obesssed with…Unicorns
“Always be yourself, unless you can be a unicorn. Then always be a unicorn!” Now there’s a motto I can get behind! This amazing instant download cross stitch chart, £2.50, XStitchesBeCrazy is just about the best thing I’ve seen all week!
Once upon a time there was a fairy princess who loved unicorns…this is kinda true. I used to have a job working as a fairy and unicorns are pretty rad, so let’s go with it!
Fortunately for me. Unicorns are not – I repeat, not – make believe. Well, not on Etsy that’s for sure! As a girl who spends rather too long searching out beautiful unicorn goodies, I thought I would share some of my favourite handmade finds because I’m Obsessed with Unicorns!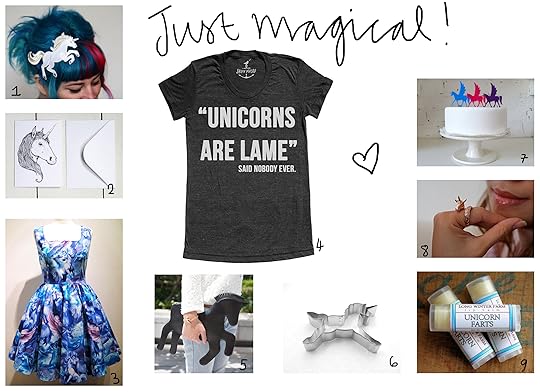 1 Unicorn Headband • £15 • JanineBasil
2 Unicorn Greeting Card • £3 • IsobelKho
3 Unicorn Pegasus Dress • £60 • Frockasaurus
4 “Unicorns Are Lame – said nobody ever” T-Shirt • £9.43 • Skipnwhistle
5 Unicorn Statement Clutch Bag • £32.68 • TheCuriousZoo
6 Unicorn Cookie Cutter • £1.41 • CookieCutterGuy
7 Unicorn Cake Toppers • £4 • MissSarahCake
8 Rose Gold Unicorn Ring • £88 • MONVATOOLondon
9 Unicorn Farts Lip Balm (thats pepermint and cotton candy scented, but you know that, right?!) • £2.51 • LongWinterSoapCo
Now, tell me that’s not just the spot of magic that you need to get you through your Friday!
Pssst! Love this round-up of my favourite handmade goodies? Check out my latest Handmade For You column in this months issue of Sewing World – on sale today!
The post Obesssed with…Unicorns appeared first on Made Peachy.


January 15, 2014
Creative Reading: Mollie Makes Feathered Friends
Some things are just so packed with cute I just can’t handle it. Just can’t handle it.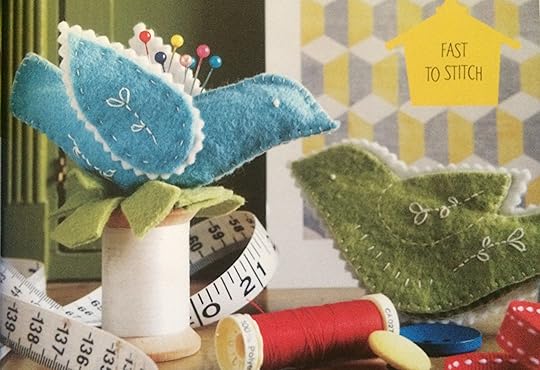 That is exactly how I feel about Mollie Makes Feathered Friends! This little hardbacked book is packed with sewing, knitting, papercraft, felting and crochet projects – all with an adorable bird theme.
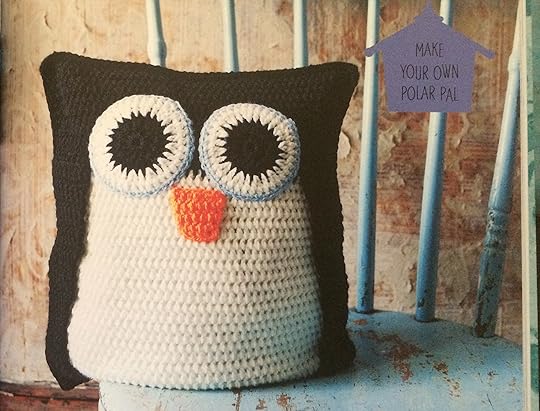 One of my very favourite things about this book is the variety of makes – it’s not just things for a new baby, or Christmas – these are gorgeous little treasures that you will want to make the entire year round. There is literally something for everyone (or, rather, I want to make everything!) from an owl motif Kindle cover and Love Birds mini tapestry, to a cockrel cafetiere cosy and a penguin pillow – see, like I said, something for everyone!
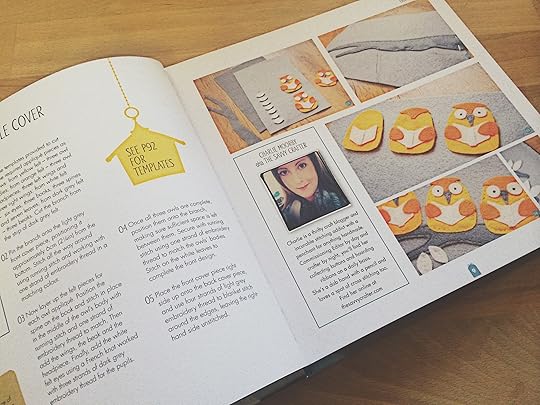 There are plenty of clear step-by-step photographs to guide you through the projects as well as six pages packed with getting started guides, template and motifs – so, you can get started on a new make right away.
As we have all come to expect from Mollie Makes, this book is breathtakingly beautiful. I’m talking ‘sit it on your coffee table in between makes’ beautiful! Not only that, each of the designers featured has a little biography included so you can discover where to find them online too – so, that’s your crafty stalking taken care of, how neat is that?!
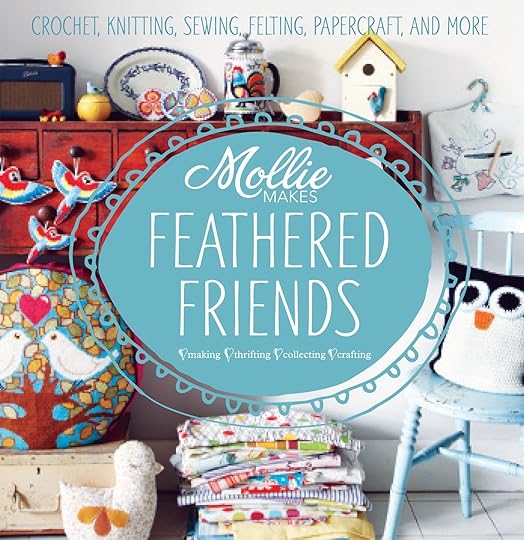
How about a cheeky little giveaway? I have one copy of this amazing book Mollie Makes Feathered Friends, £9.99, Collins & Brown, to give away to one lucky Made Peachy reader! How do you get in with the chance of winning? Easy! Just leave a comment below sharing why you’d love, love, love this book! International entries welcome – so, if you have a postal address you, my friend, can be in it to win it! Winners will be announced on 23 January – Good Luck!
The post Creative Reading: Mollie Makes Feathered Friends appeared first on Made Peachy.
January 14, 2014
Amigurumi Raindrop Dude
Every now and again I like to make something I’ve not done in a while. My current schedule is seeing me working on a lot of large scale, time-heavy makes…I’m talking quilts and knitted shawls…so, it there is nothing quite as satisfying as picking up a little project that you know you can start and finish in one or two little sittings.
Amigurumi has a special place in my heart. I mean, what’s not to love about these cute little crochet characters! With rain playing a huge part in the weather here recently; causing rivers to swell and burst their banks, fields and parks to transform into slippery, sludgy mud pits and generally making folks feel gloomy, the rainy weather is getting a heap of bad press right now. I decided to make a little Raindrop Dude, a cute little chap that might help us to forgive this crazy weather and have a little smile…even if it’s pouring outside!
So, what are you waiting for? Grab your yarn and hook and let’s crochet an Amigurumi Raindrop Dude!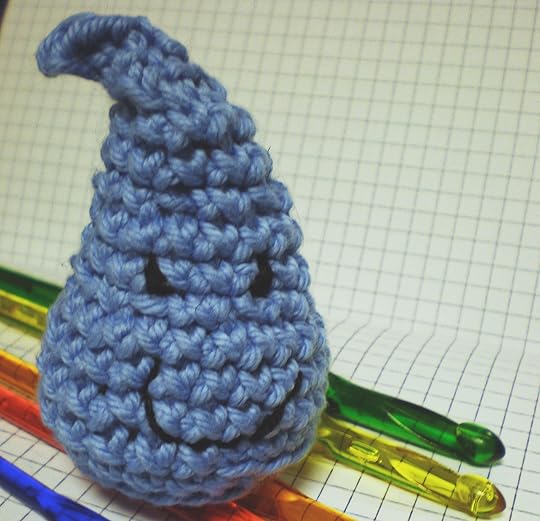 Grab your supplies…
Blue DK yarn
Crochet hook, 4- 4.5mm (to obtain a nice even tension)
Toy stuffing
Small scraps of black yarn or embroidery thread for features
Tapestry needle
Amigurumi projects are worked in the round – which is excellent as there is not seaming at the end when your finished, neat huh?- you might want to use a stitch marker or safety pin to mark out the start of each round to help you keep your place in the pattern.
This pattern uses standard Crochet Abbreviations
With yarn and hook, ch4, join to create a ring with a sl st into the 1st ch
Rnd 1: Work 1dc in each stitch. 4sts
Begin increasing
Rnd 2: Work 2dc in each stitch. 8sts
Rnd 3: Work 2dc in each stitch. 16sts
Rnd 4: *Work 1dc in 1st stitch, 2dc in next stitch. Repeat from * to end. 24sts
Rnd 5: * Work 1dc in first 2sts , 2dc in next stitch. Repeat from * to end. 32sts
Rnd 6: Woring into only the back part of the stitch, work 1dc in each stitch. 32sts - working through the back of the stitch only will give a slight edge to the circle and will mark out the base of the Raindrop
Rnd 7 & 8: Resume working through the whole stitch, work 1dc in each stitch. 32st
Begin decreasing
Rnd 9: *Work 1dc in next 6sts, dc2tog. Repeat from * to end. 28sts
Rnd 10: *Work 1dc in next 5sts, dc2tog. Repeat from * to end. 24sts
Rnd 11: *Work 1dc in next 4sts, dc2tog. Repeat from * to end. 21sts
Rnd 12: Work 1dc in each stitch. 21sts
Rnd 13: Work 1dc in next 6sts, dc2tog, 2dc, dc2tog, 2dc, dc2tog, 5dc. 18sts
Rnd 14: *Work 1dc in next 3sts, dc2tog. Repeat from * to last 3sts, 3dc. 15sts
Rnd 15: Work 1dc in each stitch. 15sts
Start stuffing – taking a pinch of toy stuffing at a time begin to padd out the shape of the raindrop. press the stuffing in to the bottom circle to create a sturdy flat base. Use the end of the crochet hook to push the stuffing into place, continue adding as you work to create a firm and solid shape.
Rnd 16: *Work 1dc in next 3sts, dc2tog. Repeat from * to end. 12sts
Rnd 17: *dc2tog. Repeat from * to end. 6sts.
Rnds 18 – 21: Work 1dc in each stitch. 6sts
Rnd 22: *dc2tog. Repeat from * to end. 3sts
Insert any final stuffing to the Raindrop before using a tapestry needle, thread the yarn through the last remaining stitches and draw up to fasten off.
**I’ve managed to give this guy a little bit of a menacing look – you might want yours to look a touch more cheerful than this chap!**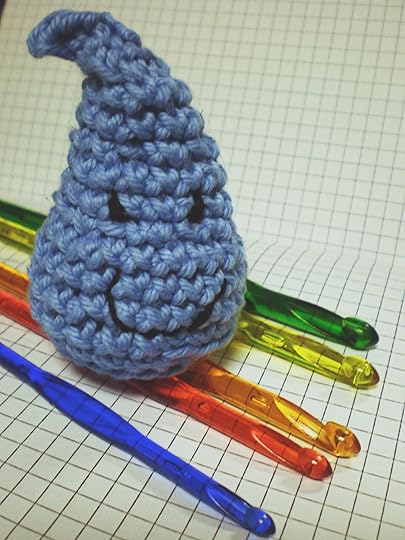
Your Raindrop Dude is ready to sit on the windowsill and make you smile that you’re not outside in the pouring rain!
One of my favourite things about amigurumi is that you can create cute little miniature 3D versions of almost anything you like, give it a little face and you have created your own cute character! Do you love to work on mini crochet projects – what little amigurumi characters and creatures have you made?
The post Amigurumi Raindrop Dude appeared first on Made Peachy.
January 13, 2014
Taking Photographs of Craft Projects For Your Blog or Online Store
This year, rather than setting resolutions I picked out a few things that I wanted to put more energy into – and coming in pretty high on that list was photography. To get that camera snap, snap, snapping! And, true to my word, I am spending more and more time behind the camera. It’s become part of my daily life, for work and for play. Even though we are only a couple of weeks into January, I’m really loving this new creative pursuit!
About eleventy billion years ago, armed with my Dad’s hand-me-down Fujica ST605 SLR I headed off to night school to learn a few tips about photography…basically I was a bit fed up with shooting off a whole roll of 35mm only to find that the photos were all underexposed, overexposed, blurry and just plain rubbish! I spent that entire summer wondering around in flared jeans, Chuck Taylors and band shirts snapping at everything in sight – before you start thinking that this makes me sound pretty cool, remember this was before the age of the Hipster so I’m pretty sure that I was just a dork – I had the time of my life, and managed to get some pretty great shots out of that mountain of film.
OK, so things have changed, the long lazy summer of being a teenager have sure gone, but so has shooting in film, with most of us working mainly with digital images on a daily basis. Last year I took a long overdue camera upgrade and signed up to a rad online photography class to get back up to speed and brush up on a few skills. And, boy am I ever glad I did that! Taking photographs is a lot of fun, and every shot you take you are able to learn a little bit more about photography – it doesn’t even feel like your practicing.
Attractive photography is becoming more important to people for so many different reasons – to be creative, to capture moments, to share experiences – in fact it is a must for all crafty folks, particularly if you share them on a blog or post them to your online store. Not only do you want to show your finished projects off in true style, but you might also want your reader to follow your ‘how to’ guide, buy the item from your online store or simply add it to their Pinterest board. It might seem like getting the perfect shot is a bit of a minefield, but by following these five simple rules, you will soon be on the road to success in no time.
Firstly, my friends, I’d like to introduce you to Lux - in her finest handknit alpaca dress - who will be my glamorous assistant!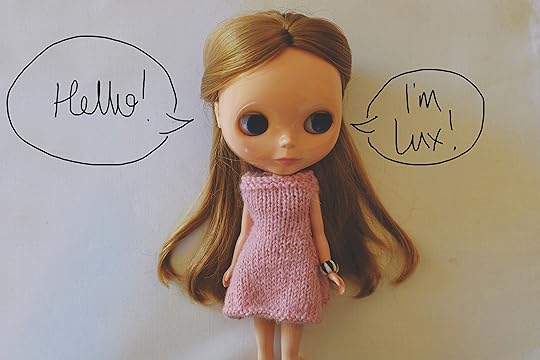 Now that we’re all acquainted, check out these Top Tips for Better Photography at Home!
Right Light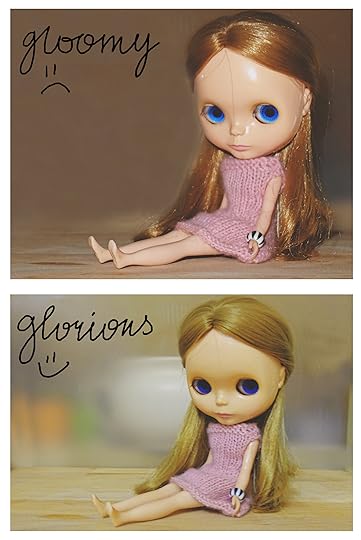
Lighting is one of the most important elements of photography. It is also one of the easiest things to get wrong. Professional photographers work with expensive lighting set up allowing them to have full control of the lighting in each of their shots. Replicating this at home doesn’t need to involve spending out on costly kits. Photographing in natural light is always a brilliant way to get great results. Aim to take your shots in the daytime, in a location where there is lots of natural light. Even if you complete your make in the evening, and are desperate to get your project on the blog, online or uploaded to your online store, avoid taking shots in the evenings or under electric lighting. Taking photographs in poor lighting will cause shadows and gloomy shots and you’ll notice the colours featured in your makes are dulled down. Many cameras have setting that you can adjust to accommodate overhead lights for evening photography, although you might still notice a yellowish wash to your shots. Where possible, selection your photography location based on the availability of good natural lighting, a clear counter top by a sunny kitchen window is a fantastic location and, if you are shooting multiple shots for the same post, try to take this photography consecutively, as this will help to create consistent lighting within the post.
Sharp Shots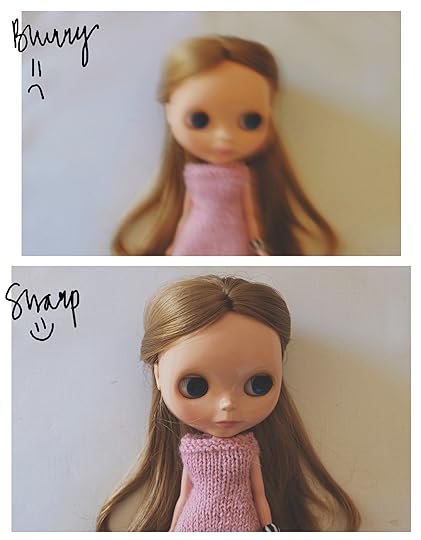 Blurred or out of focus shots are a big no-no. Getting to grips with your camera is a must. All cameras are different – you might be shooting with a fancy DSLR or even using a camera on your smart phone, but ensuring that the project is in sharp focus will instantly make a better picture. Familiarise yourself with the focus setting and try taking a few shots of your make, with a digital camera, check the image preview – are you happy that the main element of the make is in focus? If you can zoom in on the preview this will help you to pinpoint the area of focus and you can check that you are happy with it. Blurred shots can be easily reduced with the use of a tripod. If you are still experiencing some blur to the image, try using the self timer feature on your camera, if it has one, once you have composed and prepared your shot. This will effectively take the photograph ‘hands-free’ meaning that you wont be touching the camera and adding any additional shake as the shot is being captured.
Clear Composition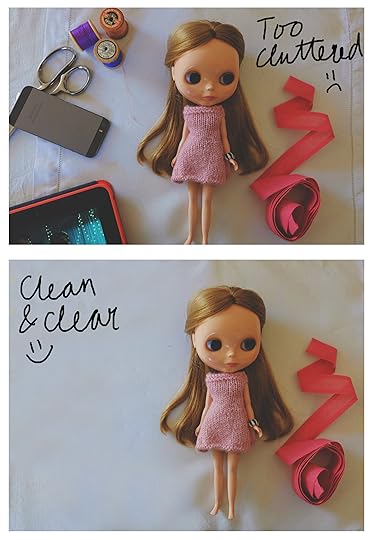 It can take years to master the art of styling the perfect shot. But, there are some basic rules that you can follow. Reduce clutter, remove any items that aren’t needed in the shot – no spare craft materials, your mug of coffee. That photobomb from your pet dog (yes, I’m looking at you Waffle) might seem cute but readers or shoppers can find this distracting – consider reshooting without this the distraction, you can always share in the pet photobomb shots somewhere else if you want to add a little personality to the shots! Consider the camera angle, some items look better when shot from above, others straight on, some look best with a Dutch Tilt (you know, that artistic positioning of the subject at a ‘jaunty’ angle.) Move around your project, looking at it though the camera viewfinder or on the camera screen, trying out different angles until you find one that suits the project best. Give your make enough room to breath – you can include some space around the shot, either keeping it even with the project centre stage, or off-set it to make use of some more dramatic negative space (like I’ve done here). Don’t be scared to crop in, but be careful to include all required elements, chopping off Lux’s toes here makes crop look unintentional and clumsy. If you are intending to take a range of shots of your finished make, work with a variety of shot styles, including ones that include the whole item and other that crop in really close on a single element – this is a great way to showcase any important detail or accents of the work.
Perfect Presentation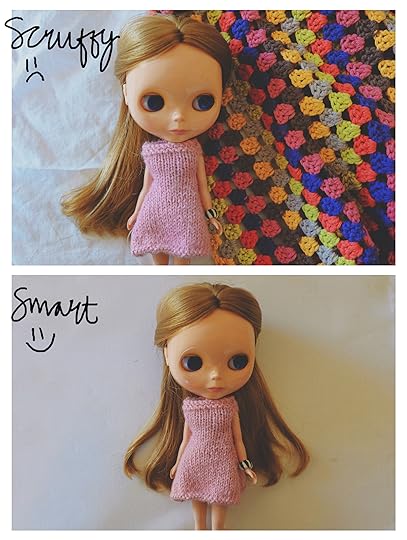 Similarly to composition, the way in which you present your project is key. Does it need ironing? Does the background fabric need ironing? Would it benefit from having any lint or fluff removed? Does it have smudges or finger smears that need to be taken care of? Where you shoot your projects is entirely up to you, but ensure that the surface is clean and – if it’s fabric – wrinkle free. Be aware of the colour or patterns on your surface, that wildy printed floral tablecloth might well be your pride and joy, but might create a distraction from the finished project if used in the shot. Try to pick neutral tones and plain surface for your backgrounds to allow your finished make to be really shown off in the shot. Aim to create a clear, smart background with your project positioned as you desire. Positioning props should always be the final stage of composing your shot, set out your make first and once you are happy with the position, composition, camera angle and lighting consider adding in any additional props. Work by moving your chosen props in and out of the frame at different positions to see the effects it creates. Remember, any props are simply an addition to the finished image, so you don’t need to include all of the item in the frame. Always remember, if a prop is distracting from you finished project, remove it!
Editing Shots While using editing software is a great tool in perfecting the finish, you should use it with caution. If you are photographing something to sell, making too many after-shot edits can be misleading. Rather than relying on editing software to finish your photograph, think of it as a final polishing tool – removing a speck of dust that you didn’t spot on your lens rather than removing a whole line of wonky stitches from the front of a bag. Your camera might have a date and time function, make sure that you remove this setting when photographing items for your blog or store, while this is a handy setting for some forms of photography, it does give things a ‘crime scene’ feeling! If you use your editing software to add your blog name or even a caption, keep the font size and style consistent throughout your shots, this will help to create a recognisable brand for your blog, store and photographs. While adding in coloured text is tempting, sticking to black for light shots and white for dark shots will instantly give a professional finish to your work.
Of course, learning photography takes time and lots of practice, I’m finding that I’m learning new things each time I shoot something new, having these handy tips make a quick and easy check list for taking rad shots at home – so next time you dig your camera our give it a go and run through five points and see how you get on!
Have you got a Photography Top Tip? be sure to share it below, I’m always ready to brush up on my skills!
Happy Snapping!
The post Taking Photographs of Craft Projects For Your Blog or Online Store appeared first on Made Peachy.
January 12, 2014
Sewing Terms Explained
Let’s talk stitching!
I’ve been spending a whole heap of time at the sewing machine lately – no real change there – but, it dawned on me that all the fancy terminology and words can, to some folks, sound rather confusing.
As with any specialist hobby, not only do you feel like you have a million new techniques and skills to learn and master, it feels like there is a whole new language to get you head around. At first all these terms and words can seem overwhelming, it feels like everyone is part of some special club and knows some kind of secret code and you’re just not part of the in-crowd. Well, my friends, here’s where that’s going to change. I decided it was high time I put together a list of some of the most commonly used sewing terms and share a little explanation of what they each mean, to help get you off to a flying start with your next stitching project!
Check out this handy guide to Sewing Terms Explained…
A
Acrylic Man-made fabric, with a rich dense texture.
Appliqué A technique where a fabric motif is secured to a second piece of fabrics with neat hand or machine stitching around the outer edges. (Also see Reverse Appliqué)
Armhole The area of a bodice that is cut away for the arm to fit through.
B
Back Stitch A straight hand stitch often used to outline designs, the stitches are worked back to the end of the previous one to create a solid line of stitches.
Basting This is the US term for Tacking and you’ll often see this appear in quilting projects – which has a strong tradition in the United States.
Bias The section that runs through the centre of the fabric at a 45 degree angle to the Warp and the Weft. Fabric cut in this manner will have more stretch.
Bias Tape Also know as Bias Binding, this is a strip of fabric cut across the bias and triple folded so that the raw edges are concealed towards the centre of the strip, this is frequently used in the finishing stages of projects.
Blanket Stitch A hand sewing techniques worked over the raw edges to secure them and prevent fraying, also used as a decorative feature.
Blind Hem Stitch A stitch used to discretely join the fabrics to form a hem, can be worked by hand or with a machine.
Bodkin A large eyed needle often used to draw elastic through casing.
Bobbin A small reel onto which thread is wound before inserting into the sewing machine, with the mechanism of the sewing machine this will create the bottom section of each machine stitch. Also a plastic, cardboard or wooden holder used for securing lengths of Embroidery Thread (Floss) when unwound from a Skein ready for stitching.
Bodice The upper section of a garment that covers the torso.
Buttonband The section on a garment on which a series of button fastenings are secured.
Buttonhole A small slit in fabric reinforced with stitches though which a button can be passed.
Buttonhole Stitch A series of strong knotted stitches worked around the edge to secure and reinforce the fabric – can be worked by hand or by selecting a specific setting on a sewing machine.
C
Calico A plain woven fabric, often uncoloured, frequently used to create Toiles.
Casing Two rows of stitching worked over a fold in fabric to create a tube through which elastic, for example, can be threaded, frequently used to create waistbands.
Centred Zip / Zipper A zip/ zipper fastening secured to the fabric within a seam, the sections of seam allowance fold over to hide the teeth of the zip.
Chain Stitch A decorative hand stitch where loops of thread are secured to the surface of the fabric along a stitching line.
Charm Pack A set of Pre-Cut Fabric squares frequently used in Patchwork & Quilting projects.
Chiffon A light-weight, often sheer fabric that is used in dressmaking.
Collar A smart addition to a neckline, reinforced with interfacing to give a tailored finish.
Colourfast The term given to a thread or fabric that has been treated so that the dye used will not bleed when washed.
Comforter A heavy, thick padded blanket, stitched together for extra warmth.
Concealed Zip / Zipper A zip / zipper fastener that is created so when it is inserted into the garment or project is nearly invisible from the right side.
Corduroy A fabric with nap that runs in rows of pile, commonly used for making clothing.
Cotton A natural fabric that is available in a wide range of colours and patterns, it is comfortable to wear against the skin and is used in a wide range of sewing projects.
Covered Buttons A special button blank is surrounded with a circle of fabric allowing you to create fastenings to suit your project.
Crease or Crease Line A mark made in the fabric by pressing with an iron, often used to aid the construction of a project.
Cross Stitch A decorative hand stitch created by two straight stitches intersecting to form a cross. This is also the name given to the needlework discipline that used these stitches in a range of colours to create colourful designs
Cutting Lays Illustrated diagrams provided with a dressmaker’s pattern to assist in the placement of the cut pattern pieces onto the fabrics for correct cutting.
Cutting Lines A series of different lines printed on patterns to indicate where each piece should be cut, multi-sized patterns will feature a range of different lines.
Cutting Mat Also know as a Self-Healing Mat, is used as a base on which to cut and trim fabrics with a rotary cutter, often marked with a grid to aid precision it prevents the surface below becoming damaged.
D
Dart A technique used to add shaping to fabrics by folding tow points together to meet at a point, stitched in place to create a triangle in the fabric, commonly featured in women’s garments.
Double Pointed Dart A variation on a Dart, this is used to add long sections of shaping to a garment, often seen on the back of a bodice around the waist. The fabric is folded to meet at to points, stitched to create a diamond shape in the fabric.
Drape A term used to describe the way that a fabric moves or behaves, used when assessing the suitability of a fabric of a project.
Dressfrom Also called a Dressmaker’s Dummy or a Mannequin, this is a torso shaped form that is used to assist in dressmaking.
Dressmaker’s Tissue Paper Thin tissue paper printed with a series of pattern pieces that are cut and used to create a garment. The light-weight paper is easy to cut and the fabric can be seen through it, aiding the positioning of each piece.
E
Embroidery A needlework discipline that used a combination of different hand stitches to create colourful designs.
Embroidery Machine A specialist sewing machine that features a wide range of embroidery stitches and motifs.
Embroidery Threads Often referred to as Embroidery Floss, this stranded cotton is used either as multiple strands or separated in to thinner strands to create colourful stitched designs.
F
Facing A term used to describe the placement of fabrics in relation to each other, for example with right sides facing, means to place the two fabrics so that the right sides are touching.
Facings A section of fabric stitched to lay on the inside of a garment to hide raw edges and make it more comfortable to wear.
Fat Quarter A cut of fabric that is a quarter of a metre that is taken against the width of the fabric to create a piece that is around 18inches by 22inches
Feed-dogs Small metal teeth that sit under the throat place of the machine and move to draw the fabric though the machine for sewing. Can be lowered for working Free Motion projects.
Felt A thick fabric that is available in a wide range of colours, the raw edges do not fray making it quick and easy to work with.
Finger Press Applying pressure with fingertips to create a temporary crease line in a project.
Flannel A soft warm fabric that is frequently used in creating bedding and blankets.
Foot Also called a Presser Foot, these small attachments are secured to the bottom of the needle clamp and lay flush with the fabric that is being stitched. There are a wide range of feet available, each designed for a specific task.
Foot Pedal The pressure-sensitive pedal that controls the sewing machine, greater pressure from your foot will result in faster sewing.
Free Motion A machine sewing technique where the Feed-dogs are lowered allowing the fabric to be guided through the machine in any direction.
French Knot A hand embroidery technique where the threads is looped in a manner to create a neat knot to sit on the surface of the fabric.
French Seam A seam that is worked on the right side then the wrong side of two pieces of fabric, to provide additional strength, often used when working with delicate fabrics.
G
Gathering A row of long straight hand or machine stitches that are left unfastened at one end so that the fabric can be drawn up along it to create gathers.
Grading Also called Pattern Grading, this is the scaling up or down of a dressmaker’s pattern to create different dress sizes.
Grain The line created by the threads that run the length of the fabric.
Grain Line A marking used on dressmaking pattern’s to indicate the position it needs to be placed on the fabric in relation to the fabric’s grain.
H
Haberdashery The name given to the range of sewing supplies, fabrics, threads and notions.
Handle A term to describe the way that a fabric feels and moves, used when accessing the suitability of a fabric for a project.
Heading Tape A woven strip that is secure to the top of curtains, the length is gathered up by pulling the cords woven through it to create the upper section of curtains.
Hand Wheel The wheel positioned at the right-hand side of the sewing machine that is used to manually raise and lower the needle.
Hem The treatment of the lower edge of a garment to hide the raw edges, ensure the correct length and finish the garment.
Hemming Stitch A discrete stitch, worked by hand or machine that is used to secure the lower section of a garment or project to create a neat hem.
Hemming Tape Fusible tape that is often used in the repair of dropped hems, can also be used for small Appliqué motifs.
Hook & Eye Fasteners Small metal fasteners that are secured to two sections of fabric, often above a zip, to complete the fastening.
I
In-Seam Pocket A neat pocket that is inserted along the side seam line of a garment, the soft fabric of the pocket lies flush to the body.
Interfacing & Interlining Applied to the wrong side of fabric to provide added strength and stability. Available in a wide range of weights, some are fused in place with a hot iron, others are stitched into position.
J
Jelly Roll A collection of Pre-Cut Fabrics commonly used in Patchwork & Quilting projects.
Jersey A stretchy knitted fabric that is often used to make clothing.
K
Knit Fabrics A style of fabric that is created by knitting the threads together on a machine, in a similar way to hand knitting, for example Jersey.
L
Lazy Daisy Also know as Detached Chain Stitch, this hand embroidery stitch features small loops of thread secured to the surface of the fabric, often to create floral motifs.
Lining A piece of fabric cut to sit on the inside of a garment to make it more comfortable and to help it hang well when worn.
Long Arm A specialist quilting machine, often used with a large frame, to assist in the quilting of large scale projects.
M
Magnetic Snaps Strong magnetic fasteners used to hold together two sections of fabric.
Mitre A treatment of the fabrics on corners, created by folding the sides of a project in together to create neat corners with a diagonal section towards the point where the two sides meet.
Multi-Size Pattern Dressmaker’s Patterns often come in a range of sizes, different style lines are used to represent the section to be cut for each size. A key is provided to identify the correct line for the size.
N
Nap The pile that is present on the right side of some fabrics that give it a luxurious feel, for example velvet.
Neckline The upper section of a garment that is cut away and sits around the neck, there are a wide range of different shapes, styles and finishes.
Needles Sharps that are used for sewing, available in a range of different styles for different application for both hand and machine sewing.
Needle Clamp The section of a sewing machine that holds the needle securely for stitching.
Needle Threader A small notion that features a loop of metal on a tag which is used to help thread a needle.
Needle Plate The metal section of the sewing machine that lies above the bobbin carrier, the needle passes through this to make the stitches. These often feature grid marking to aid placement of fabrics for sewing.
Notches The small markings on a dressmaker’s pattern that is used to help align two sections together during the construction.
Nylon Man-made fibre with a soft and smooth texture.
O
Oilcloth & Laminated Fabrics A fabric, typically Cotton, coated on the right sides with a water resistant plastic layer.
Overedge Stitch A machine stitch worked around the raw edges of a fabric to prevent the fabric from fraying.
Overlocker A specialist machine commonly used by dressmakers to finish and work seams, these machines can use a combination of two to four threads and feature a blade to slice the edge of a seam before sealing the cut edge with stitches.
P
Patch Pocket A style of pocket that sits on the right side of a garment.
Pinking Sheers Large fabric sheers with serrated blades that create a zig zag edging when cutting fabrics to prevent them from fraying.
Pleat Neat stitched in folds often used in skirts and dresses.
Plied The term given to two strands of thread twisted together to create a single thread.
Pre-Cut Fabrics A range of fabrics, usually cottons, that are sold in bundles cut to a set size ready-to-use in projects, these include Charm Packs and Jelly Rolls and are commonly used in quilting projects.
Press To smooth out or finish a section or project with an iron.
Q
Quilt A patchwork project made from the piecing together of a series of different sections of fabric, sandwiched with wadding and backing to make a finished item. Also the term used for stitching the layers of that will become the finished project together.
Quilt Blocks A section of stitched together fabrics to form a certain layout, a series of blocks are sewn together to make the Quilt Top for the finished project.
Quilt Top The colourful section that makes up the upper layer of a quilt.
Quilting Machine A specialist sewing machine designed for working on quilting projects.
R
Raglan A style of sleeve that is joined in to the bodice with long diagonal seams from the armhole to the neckline.
Raw Edge The cut edge of the fabric, on woven materials this is prone to fraying and can be treated with pinking sheers or stitches.
Reverse Appliqué A decorative technique where a motif is stitched on to the main fabric, the inner section is cut away to reveal a contrast fabric underneath (See also Appliqué).
Reverse Stitching Also called Back Tacking, this sewing machine function sets the machine to work in reverse back over the stitches that have just been worked, this is used to secure the threads.
Ribbon A colourful haberdashery item that is available in a wide range of finishes and colours.
Right Side The front of the fabric.
Rotary Cutter A tool with a disk shaped blade used for cutting fabrics, commonly used in quilting with a ruler and cutting mat.
Ruffle A small section of fabric gathered up and stitched on to a garment or project to add detail.
Running Stitch A long straight hand stitch that is commonly used for joining pieces together.
S
Satin A smooth luxurious fabric.
Satin Stitch A series of long hand stitches that are used to fill in sections of embroidery designs.
Seam The sections where two fabrics are joined together, there are a wide range of styles and techniques for creating seams.
Seam Allowance This section of fabric borders each piece that needs to be joined together during the construction. Maintaining an even seam allowance will create a neat finished item.
Seam Ripper A small tool with a point and a curved blade used to carefully remove unwanted stitches.
Seed Stitch A series of short straight hand embroidery stitches that are used to add detail to a needlework design.
Selvedge The woven or bound ends of the fabric, in some cases these are printed with the fabric’s care instructions.
Set-In A style of sleeve that is secure to the bodice by a single seam worked in a circle around the armhole and the shoulder.
Short & Long Stitch A mixture of long and short straight hand embroidery stitches that are used to add colour and shading to elements of an embroidery motif.
Silk A luxurious fabric often used in dressmaking.
Skein The term given to the wrapped bundle that embroidery threads are sold in.
Snap Fastenings Also called Poppers, these metal fasteners have two parts that are sewn onto the two section that need to be joined.
Stay Stitching A line of hand or machine stitching that is worked along the curve in a pattern piece to prevent it from becoming distorted or misshapen. This is often used when working necklines and is stitched within the seam allowance.
Stem Stitch A hand embroidery stitch where the stitches overlap part way along a sewing line to create a scrolling effect.
Stitch-In-The-Ditch A quilting terms that refers to quilting stitches that are made to sit directly into the section where two fabrics are joined.
Straight Stitch A machine stitch that creates neat and even straight stitches, used in the majority of sewing projects the length and the width can be adjusted to suit the fabric and project.
Stretch The term used when fabrics are very flexible, Two-Way Stretch refers to a fabric that can be drawn out from two opposite sides when pulled, Four-Way Stretch is the name given to a fabric that can be pulled and drawn out form all four sides.
Stretch Stitch A machine stitch that is designed to be uses with stretch knit fabrics, the threads are positioned to allow the stitches movement as the fabrics flexes to prevent snapping.
T
Tacking Also called Basting. Long loose hand stitches used to secure two section of fabric together during the construction process. These temporary stitches are often worked in a contrasting colour to make removing them easier.
Tailor’s Chalk A chalk that is used to add markers on to fabrics to aid construction of garments and projects. Available in a range of different colours which can be brushed away from the fabrics after use.
Tailor’s Knot A neat and secure knot tied onto the end of thread before hand stitching.
Tape Measure A flexible tool used for measuring, usually featuring both imperial and metric measurements.
Tension The balance of the two – spool and bobbin – threads that creates each machine stitch. Incorrect tension can cause puckering, bagging threads and even needle breakages.
Thimble A small notion that is worn over the tip of the finger to reduce any pain felt while pushing the needle through fabrics.
Threads Available in a wide range of colours and fibres, these are used for creating the stitches in a sewing project.
Thread Shank A section of long, wrapped stitches that are worked to secure a button to a garment.
Toile A mock version of a garment, often made in calico, allowing a dressmaker to perfect any adjustments before beginning work on the final project.
Top Stitching A line of neat straight stitches, often created with a machine, that are added as a decorative addition or to provide additional reinforcement to a seam.
Turn Through After a seam has been worked with the right sides of the fabric facing, the item needs to be turned so that the right sides are outermost.
U
Under Stitching A line of stitching used to secure the seam allowance to the inner section of fabric. This is often worked with a sewing machine and is not visible from the right side of the garment.
V
Velcro A brand of temporary fastening with two tapes featuring hooks and loops that can be pressed together and pulled apart.
Velvet A rich fabric with Nap or pile.
W
Wadding Also called Batting A padded layer made from either cotton or man-made materials that is used to add the slight bulk and warmth to a quilt.
Warp The threads that run vertically through the fabric.
Weft The threads running from left to right across the construction of the fabric. The best way to remember the orientation of the Warp and the Weft is to this that the Weft starts on the Left – neat huh?!
Without Nap A fabric that has a smooth surface, without any pile.
Woven Fabrics A style of fabric that is constructed on a loom with the threads being woven through a warp and a weft.
Wrong Side The back of the fabric, this will be on the inside or rear of a project or garment.
XYZ
Yo Yo Also known as a Suffolk Puff, this is a decorative addition created by gathering up the fabric in a circle to make a slightly padded disk.
Zig Zag Stitch A machine stitch which is made up from a series of straight stitches placed to create zig zags, with both decorative and functional properties.
Zip / Zipper A fastening that is commonly used in dressmaking, available in a range of colours and styles, a tab is pulled up to draw to sets of teeth together to seal the fastening.
Zip Foot A specialist machine foot that is used to aid the insertion of a zip fastener into a project.
♥ – ♥ – ♥
I have a huge soft spot for stitching, I hope that this guide to Essential Sewing Terms will be useful in your own love affair with stitching. If you’re looking for more hints and tips on Sewing, check out my book The Sewing Manual, £21.99 Haynes
The post Sewing Terms Explained appeared first on Made Peachy.
January 11, 2014
Style Sunday: Seven Simple Sweaters
With folks talking more and more about the Big Freeze that is on it’s way I can’t stop thinking in knitwear.
Sweaters are a wintertime essential, and while I love the striking patterned and Fair Isle designs on the high street, sometimes you just want something simple. Am I right?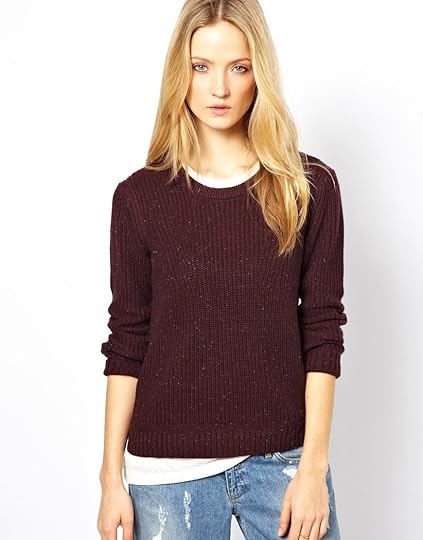 I decided to embark on the quest to find the perfect Simple Sweater. It wasn’t long before I stumbled across this beauty from ASOS – I mean, its not too chunky, not to lightweight, not too fussy. This is going to look great with jeans or even slipped on over a pretty dress (because the phrase Winter Wardrobe to me frequently means wearing a fave sundress with woollen tights, boots and a kick-ass sweater.) As much as I love this sweater, with a whopping £129.50 price tag, you know what…I’ll look into making my own.
Turns out there are heaps of stylish sweater patterns out there just calling out to be knitted up. Here are some of my favourite designs for simple sweaters…

The Patterns
1 Lightweight Pullover by Hannah Fettig £3.71
2 Margot by Linden Down- this pattern is available for free!
3 My Favorite Sweater by Fancy Tiger Crafts £3.74
4 Garance by Julie Hoover £4.67
5 Oatmeal Pullover by Jane Richmond £3.98
6 Ladies Classic Raglan Pullover by Jane Richmond £3.98
7 Blank Canvas by Ysolda Teague £5
I had initially set out on the quest to find the perfect simple sweater, yet somehow, I couldn’t stop at just one. Whoever said simple has to be boring? Not me, that’s for sure. I might not know which of these sweaters I should knit for myself and name it The One, but I am certain that there is something for everyone – so, which of these cool classics is your favourite?
The post Style Sunday: Seven Simple Sweaters appeared first on Made Peachy.
January 10, 2014
Time For A Little Treat: DotComGiftShop Giveaway!
The first full week of work and real life after the Christmas holidays is done. I don’t know about you, but I feel like there is some kind of achievement in that!
Virtually everyone I have spoken with has proclaimed that this was the longest week in forever!
I learnt a few things this week, the first being that working from home surrounded by the remains of the Christmas chocolates and treats means they got ‘finished up’ in record time this year. Secondly, with all the Christmas decs taken down, yet the evening still being long and dark, we need a little something to bring back the sparkle, are you with me?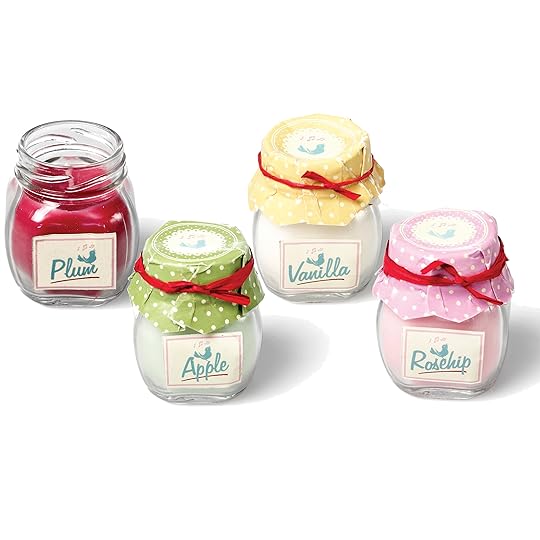 Well, here’s where things get rad! To celebrate getting through that first full week back to regular life, the awesome team at DotComGiftShop are gonna treat four lucky Made Peachy readers to sets of these cutest scented Homemade Jam Jar Scented Candles, worth over £15 each! Hows that for a sweet little reward? A little treat to say, “hey guys we made it to the weekend!”
I adore scented candles and these are certainly top of my must-have list! The fresh flavours of apple, rosehip, vanilla and plum are just divine and the cute pantry jar makes these idea for any room in your home!
So, what are you waiting for? Let’s get entering!!
All you have do do is leave comment below, tell me about your first week back to real-life after the holidays!
Want a bonus entry?! Head over to the Made Peachy Facebook page and give it a cheek little like!
Four lucky winners will bag themselves a set of the four assorted scented candles – this giveaway is for UK postal addresses only! Winners will be announced on 18 January – Good Luck!
ps: If you fancy being super sweet – I would totally love it if you’d Vote for Made Peachy! in the National UK Blog Awards 2014
The post Time For A Little Treat: DotComGiftShop Giveaway! appeared first on Made Peachy.
January 9, 2014
Creative Reading: The Knitter – Knitting Masterclass
When it comes to learning new knitting skills I find that the best way for me is through seeing the techniques in context. I mean, yes it’s great to know how to do stranded colourwork – how to hold the needles and how to balance the working and non-working yarns. Discovering how to read a colourwork chart, how to work with stranding and joining in new yarns. Mastering the art of slipping stitches to create magical colourful designs. Yes. Learning all those things are fantastic. It’s always great to add a couple more skills to your repertoire. But personally, I find that I can test knit swatch after swatch to try out a new technique, but I find that I only really, properly get to grips with a technique when I work it in context. I mean, there was a time when you couldn’t take a step in our home without coming across a spidery square of a test knitted lace swatch. Picking out the lacy stitches, learning how to follow the repeats, rip back mistakes, these were all pretty useful things to practice. But, I never really feel in love with lace knits until I took the plunge and, threw caution to the wind, and cast on a knitted lace shawl. I found that right away, seeing the techniques in the context of the finished piece made it instantly more satisfying, clarified the techniques and gave me a clearer understanding of how the whole ‘lace thing’ worked.
I’m a firm believer in learning new things, trying out something different and taking on a challenge, but I think that the best way for me to learn techniques is through checking out the principles and then getting stuck into relevant project. This is the main reason that I have fallen in love with The Knitter: Knitting Masterclass edited by Juliet Bernard So many knitters describe this as an essential for any knitting library and with the collection of 20 technique workshops and a series of 15 stunning patterns that put these skills into the stylish creative context that I crave, I have to agree. The clear step-by-step technique illustrations are second to none – which is great if your learning something new, or if you’re in the middle of a project and have been struck with some kind of skill-blackout and need clear reference guide to provide a quick visual reminder.
Even with the range of techniques including cable knitting, lace work, Fair Isle, shaping tutorials, steeking (not for the faint hearted!), kitchener stitch and adding stripes in the round – to name but a few – my very favourite thing about this book is the patterns and projects. As you would expect from The Knitter, these patterns are a joy to behold! This book is one to keep close to hand – I don’t doubt that I’ll be dipping into this over and over again, for a quick skill recap, or to find a fab project to make. In fact with this book around, I doubt there will be much knitting-block for me this year!
♥ – ♥ – ♥

The Knitter – Knitting Masterclass, £20, edited by Juliet Bernard is published by Collins & Brown – is packed with over20 technique workshops and 15 beautiful patterns.
Made Peachy readers can buy a copy of Knitting Masterclass (RRP £20) for only £16 including free UK p&p. Call 0844 576 8122 and quote offer code CH1804. Discount code is good until the 10 February 2014.
The post Creative Reading: The Knitter – Knitting Masterclass appeared first on Made Peachy.
January 8, 2014
Mexican Chicken Salad Recipe
Its been a super busy week. Starting back at work in the wake of Christmas & New Years has left me feeling like the weekend can’t come soon enough. There’s been a heap of writing to catch up on, commissions to work on, stitching, designs that need sketching, deadlines to finish up, and also chasing that dream of getting to the bottom on my apres-holiday inbox – ha!
I think I might have a chronic case of ‘not enough hours in the day’. For every items that I’ve checked off my To Do List this week another two items has found it’s way on there. I’m not the kind of girl to wish time away, but I’m most certainly looking forward to the weekend, and also to next week, when hopefully I’ll feel as though I have got back into the rhythm of daily life!
Its times like these when I just want something quick and easy for dinner. Something that tastes great, but isn’t going to have me stuck in the kitchen for hours. The recipe for Mexican Chicken Salad always hits the spot – its tasty, satisfying and is as easy as 1, 2, 3!
Grab your supplies…
2 skinless ready-cooked chicken breasts
2 fresh corn on the cobs, or 225g (8oz) corn kernels
125g (4oz) mature Cheddar, coarsely grated
25g (1oz) jalapeño peppers, chopped
400g can kidney beans, drained
and rinsed
½ red onion, very thinly sliced
¼–½ iceberg lettuce, thinly shredded, to taste
50g (2oz) soured cream
Juice of 1 lime
50g (2oz) corn tortilla chips, crushed
Salt and freshly ground black pepper 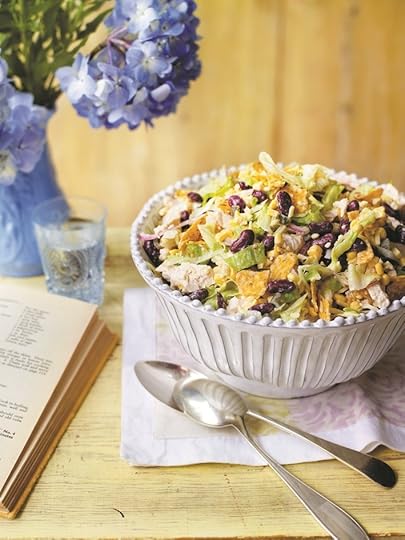 1 Rip or cut the chicken into bite-size pieces and put into a large mixing bowl. To slice the kernels off a corn cob, hold the cob upright (on its end) on a board and, using a large knife, shave off the kernels. Add to the chicken bowl and repeat with the other cob.
2 Stir the grated cheese, peppers, beans, onion, lettuce and some seasoning into the chicken bowl, adding as much lettuce as you like.
3 Put the soured cream and lime juice into a small bowl and stir together to make a dressing. Toss this through the salad and check the seasoning. Crunch the tortillas into the bowl, mix through and serve.
How is your first week back to ‘real life’ after the holidays? When you feel rushed off your feet, what simple suppers do you like to make and eat?
♥ – ♥ – ♥
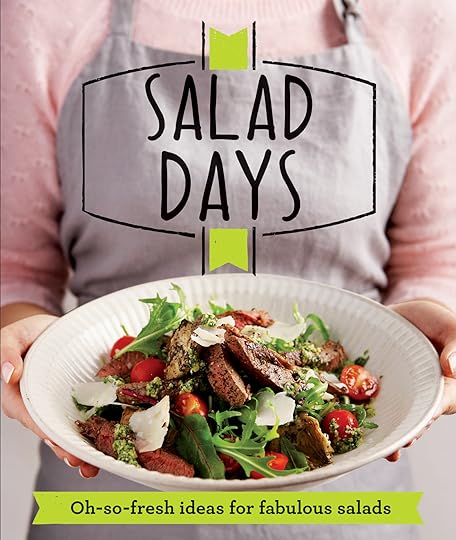
This Mexican Salad is just one of the tasty meal ideas from Salad Days published by Collins & Brown. Made Peachy readers can buy a copy of Salad Days for only £3.50 including free UK p&p. Call 0844 576 8122 and quote reference CH1801.
The post Mexican Chicken Salad Recipe appeared first on Made Peachy.
January 7, 2014
Your Handmade Wedding Bookazine – On Sale Now!
Despite being married for over a year now…I seem to still adore getting caught up in Wedding Fever!
I mean, why wouldn’t I? Weddings are beautiful, weddings are fun! They are pretty, romantic, unique times of love, love, love – and I adore them! While I’m counting down to the day my DIY Wedding Manual hits the book stores, I thought I’d share another exciting wedding project that I was stoked to be part of – you guys, how about a Handmade Wedding Bookazine?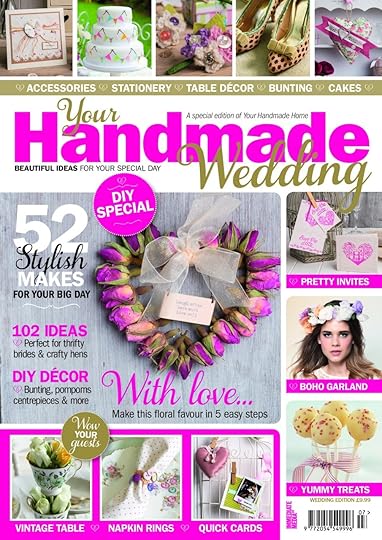 I mean this beautiful collection of projects is just the thing to get your wedding planning and making off to a fantastic and creative start! There is everything from personalised stationery and must-have accessories, to romantic decorations, delicious favours, stylish treats for the table and keepsake gifts!
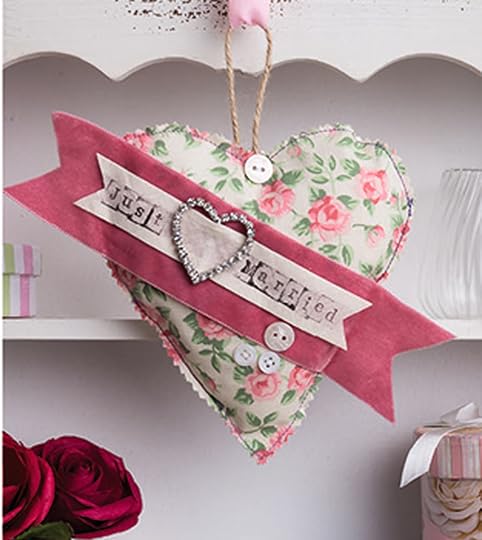 Working on wedding projects is a lot of fun, so I was delighted to be one if the designer/makers featured in this bookazine! You can even spot the decorative hanging heart and a set of crochet boutonnières I worked on featured on the cover!
 Your Handmade Wedding bookazine, published by ImmediateMediaCo, is not only beautiful but it is also jam-packed with heaps of ideas and step-by-step projects for a truly bespoke, handmade wedding day – what could be better?!
You can order your copy of Your Handmade Wedding for only £9.99 including FREE UK P&P (EUR – £11.99, ROW £12.99) – so what are you waiting for?!
The post Your Handmade Wedding Bookazine – On Sale Now! appeared first on Made Peachy.


