
Laura Strutt's Blog, page 43
January 29, 2014
Hard Working Hands: Mary Ellen’s Made By Hand – Tried & Tested
There are millions of things I love about the wintertime – long dark evenings for reading lots of books and enjoying a warming hot toddy – to name just a few. But sadly, there are two parts of my body that really struggle with this season. My hands and my feet do not love the wintertime!
From October through to March my feet are permanent ice blocks, and wearing hand knit socks is just about the only things that will take away the chill! My hands, now they are not much better! The cold weather, icy winds and rain on dog walks, and hours and hours of stitching, knitting, stitching, crocheting, stitching and typing leaves my skin sore and dry. There is no worse feeling than trying to work on a project when the skin on your hands is dry and cracked, the way it rubs against the fibres of the fabric or yarn is just about enough to turn my stomach. Gah!
 Yes, of course, I slather on hand creams, lotions and potions. But, more often than not I find that I have to wipe away the lotion pretty quickly after applying it, purely because it makes my hands slippy – I can’t hold the needle, the yarn is getting greasy or I’m worried about leaving a stain on the fabric, or gloopy blobs on pattern paper. So, these creams have been relegated to the nightstand, where they can do only good, and not harm any of my precious projects.
That doesn’t help when it comes to the working hours in the day! Until my friends, I received a sample of Mary Ellen’ s Made by Hand. This is more than a simple moisturiser, this is a Hand Therapy Gel – sounds fancy huh? But, what does that really mean? This light gel is designed to be quickly absorbed into the skin, to provide moisture and relief for sore tired hands – and most importantly, allow you to continue with your task. Mary Ellen’s Made By Hand, £9.90 c/o EQS UK
I decided to give this little bottle a test drive and see for myself how it handles.
The gel is light and a little seems to go a really long way, at first glance I thought that this was going to be like those hand sanitisers, that have a stingy feeling and a potent alcohol scent. Nope! No stings here – even when I applied it to hands that has suffered cuts and grazes from reckless rotary cutter antics. The gel almost melts into the skin and is absorbed in seconds, literally seconds.
There is no heavy, over-perfumed scent and my skin was left silky and not slippy, greasy or goopy. Made by Hand includes extracts of white willow bark which is a renowned natural remedy for the relief of pain and inflammation- ideal if you’ve been hand stitching for hours and your knuckles and joints are starting to get more than a little weary!
After a week of using it I have to say that my hands actually feel human again – my fingertips no longer feel like they are made of leather and the cracked skin on my knuckles is silky smooth! So, you know what people? I’m sold on this!
Made By Hand, RRP£9.90 for 175ml, for stockists visit EQS UK
Fancy trying it for yourself?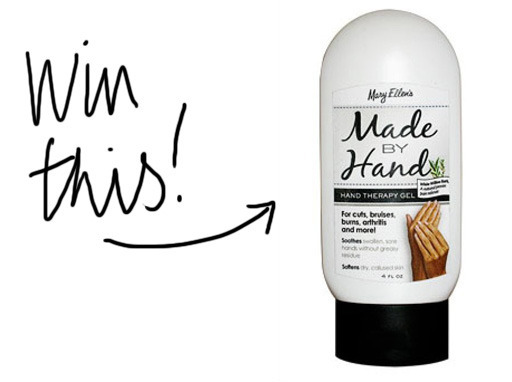
I have five bottles of Mary Ellen’s Made By Hand to giveaway to five Made Peachy readers! To enter, simply leave a comment below sharing what you’re currently working on and why your hands need a little treat! (UK entries only) Winners will be announced on 6 February – Good Luck!
The post Hard Working Hands: Mary Ellen’s Made By Hand – Tried & Tested appeared first on Made Peachy.


January 28, 2014
Sizzix: How To Die Cut Fabric
You remember that time I told you I got an awesome new gadget for my sewing room? Well, me and this handy machine have been pretty much inseparable lately! I mean, how many times have you been about to make something and realised that you need just shy of eleventy billion fabric shapes, and suddenly feel like you can face spending hours cutting and trimming only to discover that a hefty chunk of your yield is wonky or, worse still, slightly too small or too large despite all the maths and rulers in the world! The reason that I’ve been hanging out with the Sizzix Big Shot lately is because it makes pretty light work of snipping and cutting fabrics.
Getting to grips with a completely new gadget might be a little daunting at first, I mean I can’t be the only one who wonders if a gadget can really can’t be as simple and easy to use as folks make out, can I? But, my friends, here the rad part! Using the Sizzix Big Shot to cut and trim fabrics for quilts, accessories and a whole heap more stithcing projects is quick, easy and most importantly, extremely accurate!
With a fair few new stitching makes and projects underway in my studio making use of this super efficient Sizzix system, I thought that – first things first and all that – I’d share a Quick-Start Guide for How to Die Cut Fabrics With a Sizzix Big Shot Pro!
 Start by picking out the fabrics that you want to use and your chosen die – sweet, we can all do that! The Sizzix die has two very different faces – one is hard plastic and the other has a foam surface which houses the super-sharp cutting blades (so don’t go pressing or pushing your fingers on there too much!) The die is used with the blades positioned uppermost and the hard plastic base facing downwards. The fabric that I am using is a quilting cotton, because my stash indicates that I have something of a soft spot for it – although this can be used with a wide range of fabrics – the fabrics need no special treatment or preparation before cutting, unless like me you like to give everything a press before you begin!
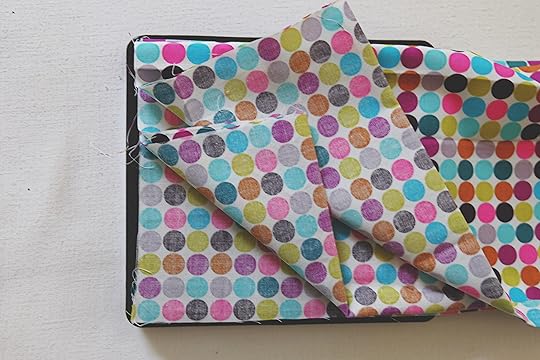 Begin to place the fabric onto the cutting surface. The die will safely cut through eight layers of fabric, so start by positioning the fabric over the die and then make a fold in the fabric at the opposite side of the die to bring the fabric back over. Aligning the folds on each side will help to get a really neat finish. Fold again in the exact same way, this will create four layers of fabric.
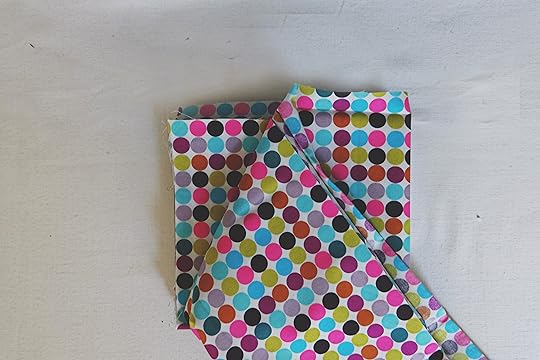 Ensuring the remaining length of fabric is following these neat folds, bring the fabric back over the die to create a second layer. There will now be eight layers of fabric neatly aligned on the cutting surface, smart huh?
Die cutting fabrics with a Sizzix Big Shot is a super efficient way to cut shapes due to the clever placement of the individual shapes on the cutting surface – but, you know what? It can’t do it entirely alone, you’re going to have to ensure that you position the fabrics so that there is little waste on the edges of the die and if you cut the shape from slapbang in the centre of the fabrics, chances are you’re going to end up with lots of bits to add to your scrap pile!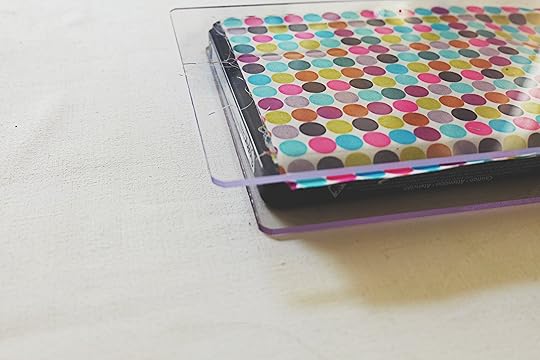 Place a Cutting Pad on top of the folded fabrics that are positioned on the die, allowing a slight overhang, and position the second Cutting Pad underneath and neatly squared up to the plastic base of the die. This sandwich of •Cutting Pad•Die•Folded Fabric•Cutting Pad• is now ready to put through the Sizzix Big Shot!
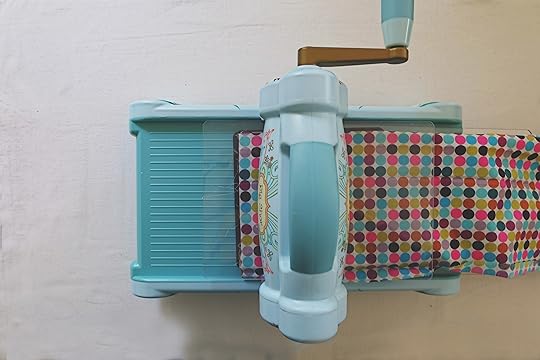 Position the die and fabric sandwich into the Sizzix Big Shot, apply a little pressure to push it fully into position and begin cranking the handle.
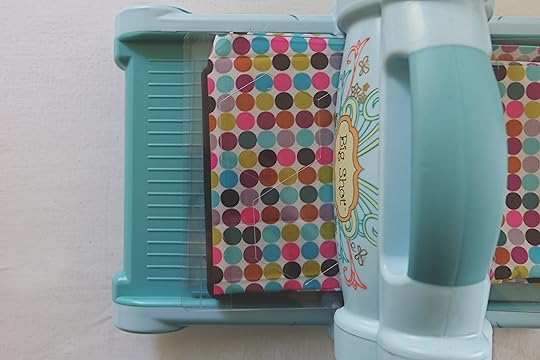 As you turn the handle the die and fabric sandwich will be fed through the machine, cutting the shapes neatly as you go. When the sandwich begins to emerge from the other side, the clear Cutting Pads reveal the crisp cut shapes – this my friends is where it all get’s pretty addictive – you’ll be wanting to crank out zillions of accurately cut fabric shapes just because it is so quick and easy!
 When the die and fabric sandwich has been fed completely through the machine it will disengage from the mechanism and can be easily lifted away. Now is the time to deconstruct the sandwich and reveal the shapes. There might be some static on the Cutting Pad, so slide it slowly from the top and begin to remove the shapes.
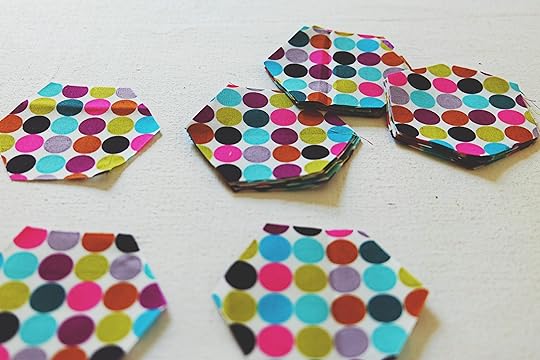 Tad Dah! Lookie -look at that awesome, and most importantly super-neat, bundle of fabric hexagons! By folding the fabric into eight layers, with a die that has four shape on it (as this one does) I was able to snip 32 hexagons as quick as a wink…and it’s not often that you can say that!
It probably won’t come as much of a surprise to you if I tell you that I’m already planning on making a whole heap of new hexi quilt projects! In fact, I have are a number of new projects underway that have made use of this awesome gadget, so stay tuned for more Sizzix projects!
Sizzix Big Shot, Dies & Accessories c/o Sizzix
The post Sizzix: How To Die Cut Fabric appeared first on Made Peachy.
January 27, 2014
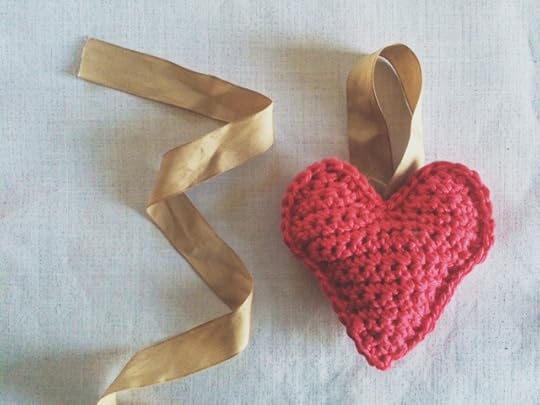
Guest Post: Crochet Valentine’s Hanging Heart
Valentine’s Day is just around the corner, and we all know that nothing says I love you quite as much as a handmade gift!
When the lovely folks over at Craft Candy – the destination to search for local creative events across the UK – asked if I’d like to rustle up something a little love-themed for Valentine’s Day, I jumped at the chance!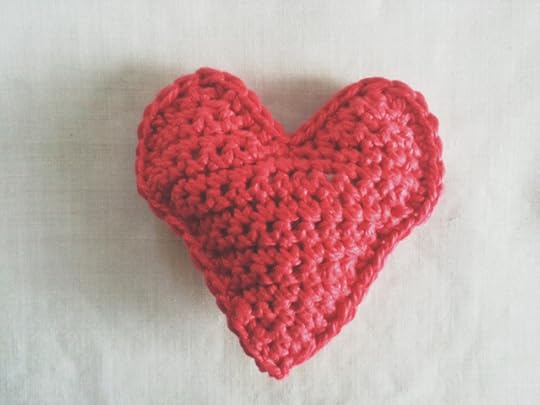 Crochet is fun, portable and super easy – you can check out the full step-by-step guide for making your very own crochet head over on to my tutorial on Craft Candy!
 If you’re looking to connect with other creative in you neighbourhood, want to share details of an event or are looking fr something to get involved with, then be sure to check out Craft Candy – you can even download the free app so you have all the creative info you could ever want, right at your fingertips! Go, check it out for yourself!
The post Guest Post: Crochet Valentine’s Hanging Heart appeared first on Made Peachy.
January 26, 2014
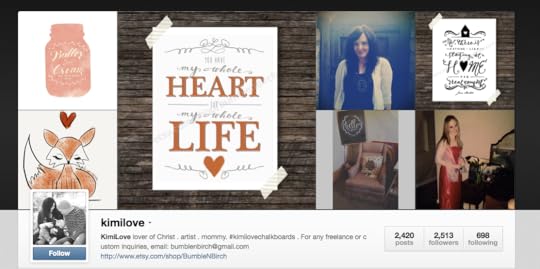
Guest Post: Kimi Avila
Every so now and then you chance upon something that really takes your breath away – for me, more often than not this is something handmade, carefully crafted and unique. That is exactly what happened when I stumbled across the wonderful Etsy Store
It wasn’t long before I ordered one of the stunning art prints for myself…well, as a gift for my husband on our first wedding anniversary. Our wedding itself was very much a handmade affair, so picking out something that was handcrafted was very important, and you know what? This print didn’t disappoint! If you’ve yet to head over to her store…then you really must! I mean, Valentines day is just around the corner…so, what are you waiting for?
Here’s a round up of my Bumble & Birch faves for Valentines day! Left to Right:
Custom Wedding Lyrics Heart £15.56 • Woodland Theme Love Never Fails £9.33 • I Love You To The Moon And Back £9.33
Etsy is one of my very favourite places to shop. It’s like a department store of awesome, I can’t actually think of a time where I didn’t find what I was looking for…more often, I usually find something better than I had ever dreamed of! Despite the stores owners of Etsy being scattered the world over, the community spirit is one thing that the store has got nailed! Communication with the sellers is a piece of cake, now not only did I get the perfect wedding anniversary gift that I was searching for (which looks rad on our photo wall!) I also got chatting to the creator of the store, Kimi, and now feel super blessed to call her my friend.
It’s an incredible feeling to find a kindred spirit, and it is always great to meet new folks, so Guest Posting today is the creator of Bumblenbirch, artist, illustrator and all round rad gal, friends, say hi to Kimi Avila!
♥ – ♥ – ♥
 Life long love
I have been a maker since as far back as I can remember. Growing up, people knew that if it was creative, I was all over it. Even as a small child, my birthday presents were cookbooks, kitchen gadgets, and art supplies. Interestingly enough, I didn’t take any art classes in school, but whenever I had a project that required craftiness, the teachers would save mine to use as examples for future students! Fast forward 10 years and here I have landed a job as an artist where I have been mentored by my co-worker Elicia Powell, an extremely talented graphic designer, taken classes in traditional sign painting, and am continuously learning and developing through trainings and just the experience of my daily projects. I have found a deep passion for letters; the way they look, the curves, the lines, the diversity…thus my love for handlettering and typography. Add all of that up, and that is where my
I create the things I love. Scripture I have on my heart, quotes that I need as daily reminders, illustrations of my favorite things. It is such a joy to know that I can share the word of God, inspiration, motivation, or just something lovely to fill other peoples homes. I know that for me, in my life…art is something that I need, and I am so humbled to know that I can meet that need for other people.
My most special piece of work is a painting of my Nonnie that hangs in a very special house that she bought for her four kids before she passed. This house sits in what used to be an Italian fishing village (where she was born and raised) in the delta here in California. My roots are there, my heritage. We spent every summer of our childhood there, just like my mom spent her childhood summers there; fishing and catching lizards and harvesting blackberries on the levy. I learned to drive there and we spent afternoons digging up artifacts from the early 1900s. The house of my great great grandparents, Luigi and Katie, is there. And, in the handful of houses that still stand in that ghost town, one of them will always belong to us, with Nonnie’s painting forever on the wall.
 Making it work
I work full-time outside of the home, but my ultimate goal is to be able to be a stay-at-home mom, work freelance and run Bumble & Birch, so I have become very dedicated and have been working hard to make that a reality for myself and my family. My working process and routine really depends on what I’m working on, how much time I have, and for what purpose the project is being made. At work, we are all about production and pumping things out fast, so I will usually sketch out a small thumbnail of my chalkboards and then crank them out really fast, and when designing I just rework things as I go. When I’m at home and working on my Etsy shop, the only time I have is in between house chores while my son Jude is napping…which will usually end up being about 5-6 hours a week. That being said, usually my prints that I sell could have taken up to a month to design! Now, for commissions, it is a different story all together! I take client work very seriously, I find ways to make the extra time -staying up late and waking up early- so that I can make sure to spend quality time as well as get my client their project to them as fast as possible. I love working on commissions! The challenge of creating a project that will make my client happy while also remaining true to myself is what it’s all about. I can do anything from branding and logos, to custom invitations, portraits, or quotes.
 I find inspiration in so many ways and at so many different times, that I really just have a ‘strike when the iron is hot’ outlook on my routine. I carry a sketchbook or take notes (on my iPhone or iPad) wherever I am. This way I won’t forget any ideas! From there, I will write out a list of words that describe what I am working on. For example, if I have the quote “Whistle while you work” I will break it down by word, and describe each word…whistle- song, sound, musical, whimsical, happy…Work- industrial, hard, heavy, 9 to 5, clock, and so on. Then, I’ll decide which words to use, and create a mood board with pictures that help to inspire the final project. From there- sketch, sketch, sketch. With paintings, I pull inspiration from life from photos, from experience, from imagination- then sketch, sketch sketch! When I’m happy with a layout, I just go for it, either painting it or scanning into my computer to digitize! After that, I display it somewhere I will see it daily, and I enjoy it!
Every project brings it’s own special challenges, but learning new things along the way is the best, and by doing commissions, I am giving myself the best gift, constant growth and evolution as an artist.
Kimi x
♥ – ♥ – ♥
 You can find Kimi’s work on sale at her Etsy store bumblenbirch view her dedicated Kimi Avila Illustration Facebook Page & check out @KimiLove Instagram feed to see more of her scrummy creations!
Despite a huge expanse of ocean between us, Kimi and I have had our heads together and have been working on something pretty hot-damn awesome…so, watch this space, my friends, watch this space!
The post Guest Post: Kimi Avila appeared first on Made Peachy.
January 23, 2014
Sizzix: Time to try something new!
If there is one thing I love more than getting busy making things, it’s gadgets! Nothing quite beats the feeling of getting your hands on a new and exciting tool or gadget that you know will fast become, not only your new favourite, but also your craft room staple!
I just about fell over myself when the postman dropped of a couple of huge packages this week – I mean, holy wow! A brand new Sizzix Big Shot and a whole heap of exciting dies to get stuck in with!
While many folks consider this a pretty costly piece of kit, or something solely for cardmakers and scrapbookers, I believe that there are a whole heap of modern crafts that can truly benefit from the neatness, accuracy and efficiency of die cutting. What’s more, the wide range of styles available through the collection of dies will make this a valuable addition to your craft stash! So, I’ll be trying my hand at quilting, papercraft, journaling, jewellery making and heaps more using the Sizzix Big Shot to see the exciting new creative journey this takes me on. I can’t wait!
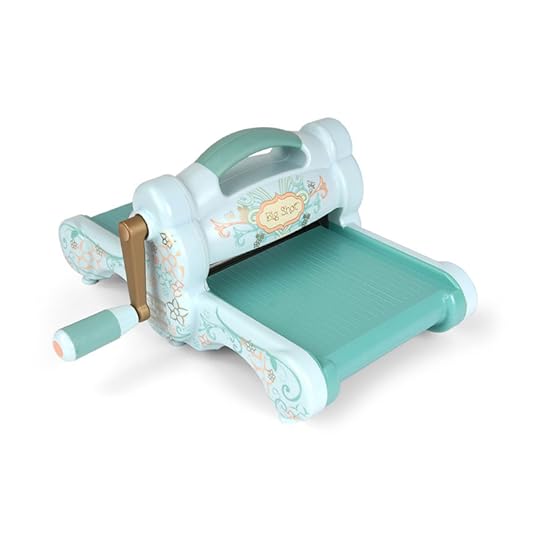 The Sizzix Big Shot Machine, RRP £94.99 c/o Sizzix
Ok, so the machine itself is cute, super cute – which, of course, isn’t essential, but I’m going to have my face right up close to it working on new makes it sure is a bonus! But, what gets me really excited is the sheer volume of dies available for the machines. I’m talking all the shapes that you can imagine…and probably a few more besides! Now, you’d be completely forgiven for looking at the ready-to-go block-shaped dies and think, what’s the fuss about? But believe me, as soon as you have the die if your hand there a lighbulb goes off and you’re already dreaming up new and exciting designs!
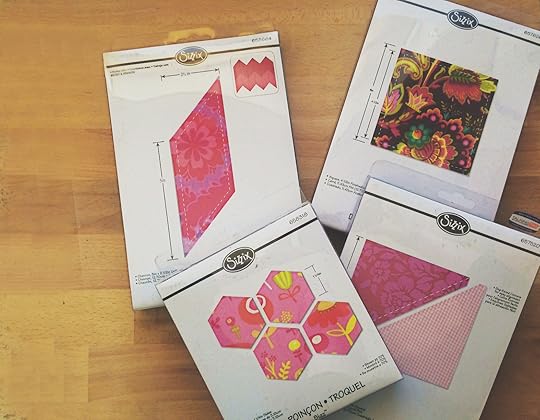 Sizzix Dies, starting from as low as RRP£5.99 the possibilities are endless. Actually endless!
My sketchbook has already become a mass of excited ideas, doodles and designs in the planning! I’ve picked out a heap of supplies ready to attack. All I can think about is getting stuck in! Snipping and trimming and cutting so many fabrics and materials and making, making, making!
Want to see some more rad inspiration?
There are a whole heap of mega designer/makers that already use the Sizzix machines and dies, creating some of the most wonderful and inspiring projects for quilters, papercrafters, scrapbookers, cardmakers and more! Check out these awesome bloggers that are already busy with Sizzix makes! That’s a pretty big list, am I right? If you can’t find yourself some inspiration there, then I can only guess you’re in some kind of creative slump and need to take a hike around the park and clear those cobwebs!
Do you have a Sizzix die cutting machine in your craft stash? What’s your favourite thing to make using it? I can’t wait to try out cutting fabrics, card, papers and anything that I can get my little hands on! In the coming weeks I’ll be sharing a whole heap of new and exciting makes, using the Sizzix Big Shot and a collection of rad dies! So, stay tuned! Also, just so we’re all clear…I wouldn’t go leaving anything too precious around me at the moment, as I’m likely to try die cutting it!
The post Sizzix: Time to try something new! appeared first on Made Peachy.
January 22, 2014
Mollie Makes Feathered Friends Winner Announcement!
Remember that super cute book Mollie Makes Feathered Friends we were chatting about last week? Well, now is the time to announce the winner!
I like to keep things a little random when I pick out the winners – so it’s the old school ‘names in a hat’ formula to find the winner.
So, hold on to your ‘hats’ folks…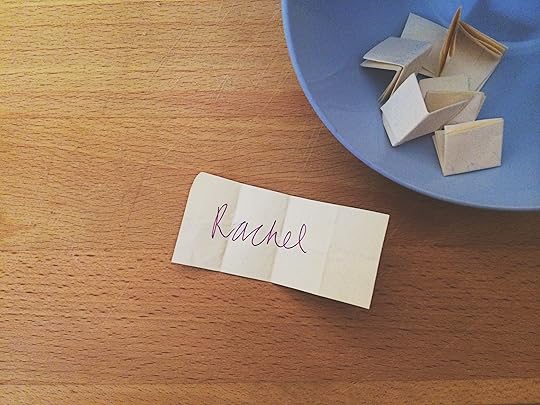
Congratulations Rachel!
Be sure to check your email and send over your postal address so that this adorable book can wing its way out to you!
Didn’t win this time? All is not lost, many of the designers featured in this fantastic book can be found online- with stores, blogs and website. So, for your viewing pleasure, here are a few links to some of the amazingly talented designers and makers featured in Mollie Makes Feathered Friends.
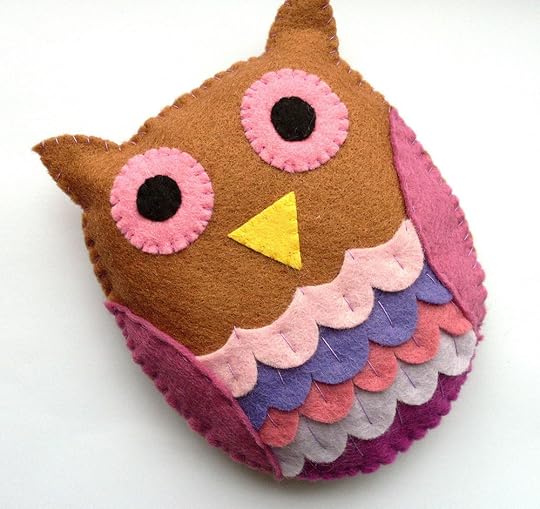 Felt Owl PDF Sewing Pattern, £3.50 Lupin Handmade
Laura Howard creates some of the most magical felt accessories and projects that you’re likely to find this side of the moon! You can read about her adventures with felt at BugsandFishes or shop her store LupinHandmade
Jenny Dixon is a journalist by trade but has an unstoppable passion for craft! You can read about her makes – and check out some free patterns on her blog JennysButtonJar
 Wall Hanging £95, Emily Peacock
Emily Peacock is perhaps one of my all time favourite stitching gurus! A supremely talented needlework designer and author, you can check out her site for a collection of to-die-for needlework and tapestry kits!
Eline Pellinkhof is a designer and author from the Netherlands, she has a real flare for combining a wide range of unusual materials including fabrics, vintage postcards and flowers, you can keep up with her creations on her designer’s journal – psst! you might want to use Google translate!
Happy reading you guys!
The post Mollie Makes Feathered Friends Winner Announcement! appeared first on Made Peachy.
January 21, 2014
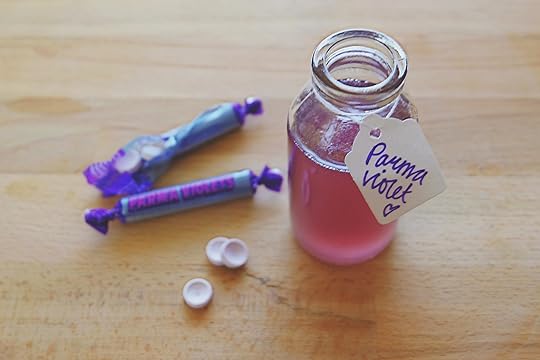
Parma Violets Flavour Syrup
When it comes to sweets, there is nothing quite as deliciously retro as a pack of Parma Violets!
You can imagine my delight when, on Christmas morning, I opened up my stocking to find the biggest stash of these scrummy sweets imaginable. While I’m happy to chomp my way through a pack straight up, just as they are, having so many I decided I wanted to try out a little something with them.
As you well know, I am a coffee fanatic – I adore flavour syrups and, let’s be honest here, you can use them in a whole heap of kitchen and bar creations, not just coffee. So, here is my sweet little recipe for Parma Violets Flavour Syrup! Grab your supplies…
You’re going to need around 6 packs of Parma Violets
Two tablespoons of sugar
Water
This makes one small jar of syrup, to increase the yield, always allow 6 packs of sweets per two tablespoons of sugar – I never said that this was a healthy recipe! Empty the packs of Parma Violets into a pestle and mortar and begin to grind up. You’re trying to make a light dusty powder – I guess this would work equally as well in a food processor, but that’s not nearly as much fun as bashing with a pestle!
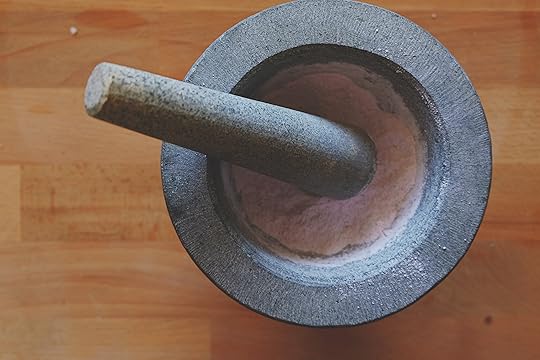 Continue to grind up the sweets until they are the consistency of icing sugar.
Into a saucepan add two tablespoons of sugar and crushed Parma Violets, mix with one and a half tablespoons of water and heat to create a sugar syrup. Continue heating and stiring the syrup until all the sugar and sweets have been combined. The syrup will have a light opaque lilac colour, if you want to go all out with your syrup, add in a dash of purple food colouring for a super rich and vibrant hue!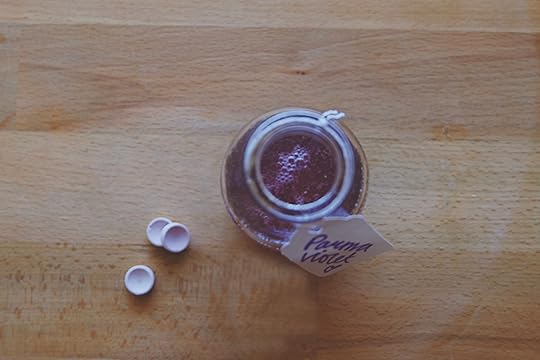 Allow the flavour syrup to cool before carefully decanting into a small bottle or jar, you can always strain the syrup as you decant to get rid of any little shards of sweets that might not have fully mixed in.
This is a sweet, lightly floral, heavy syrup, a little goes a long way – it would make the perfect drizzle for cakes and bakes, a glaze for cookies and it’s not too shabby in a beverages either! I’ve by no means exhausted the possibilities for using this perfumed syrup, but, here a a few quick Parma Violets beverages that taste mighty fine!
The Parma Violets Hot Chocolate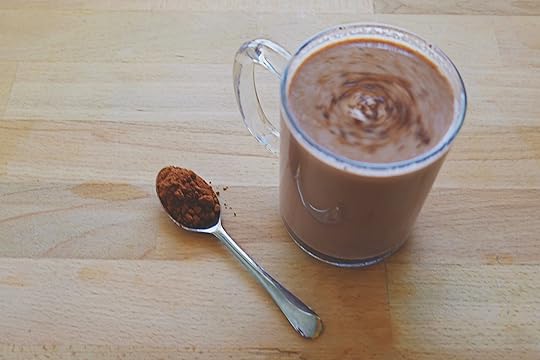 Mix in a teaspoon of your fave cocoa powder with a dash of hot milk, and stir into a thick paste. Add in a generous dash – around two teaspoonfuls – of Parma Violets Syrup and stir to mix together fully. To with steaming hot milk and enjoy!
The Parma Violets Latte
With Lavender Lattes quickly taking the coffee-loving land by storm, I thought I’d offer up my own floral and perfumed coffee creation! As with all flavour syrups for coffee, add in a dash of Parma Violets Syrup to a shot hot espresso before topping with hot steamed milk. The rich taste of the coffee can overpower subtle flavours like Parma Violet, around 2-3 teaspoons of syrup should be prefect for a hint of floral sweetness!
The Parma Violets Vodka Splash
Yup! I went ahead and named this cocktail myself – because that’s just what it is, Parma Violets, Vodka and a splash!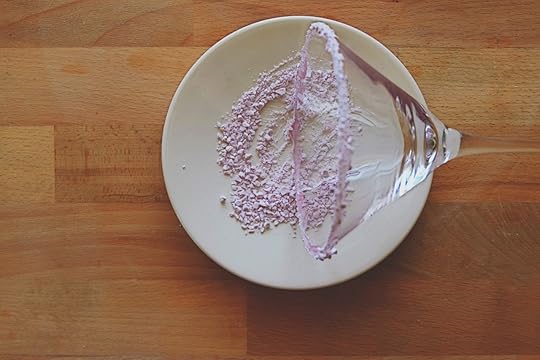 If you’re going to do something, then you might as well go wild, right? Drizzle some Parma Violets Syrup around the rim of a martini glass, before rolling in lightly crushed Parma Violets. You see where this is going, don’t you?! Set aside to allow the crushed sweets to bond with the rim of the glass.
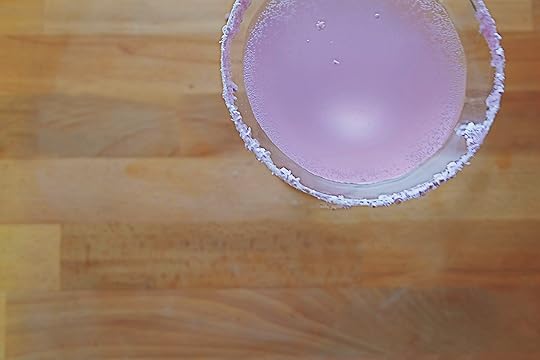 Into a cocktail shaker add shot of vodka, a teaspoon of Parma Violets Syrup, ice and top with soda water and mix until the syrup is fully combined. If you aren’t partial to the strong flavour of the vodka, double the amount of Parma Violets Syrup…just remember, the sweeter the drink is the harder it is to notice the alcohol, so it’s much easier to over indulge – but, y’all know that, right?
Strain and serve – yum!
 I’m certain that I’ll be having many more adventures with this delicious Parma Violets Syrup – I simply can’t get enough of it! So, let me know what you’d like to make with it!
In other Parma Violets related news, did you know if wash and condition your hair with Lush’s Daddy-O and follow up with American Cream your locks will not only look and feel amazing…but, and here’s the important part, you’ll actually smell of Parma Violets? Yup – you’re welcome! (Yup! I know that Daddy-O is recommended for blonds, to get rid of any brassy tones, but it works just grand on redheads too!) Enjoy!
The post Parma Violets Flavour Syrup appeared first on Made Peachy.
January 20, 2014
Spring Clean: Combating Creative Clutter
Do you ever get that feeling like you’re about to get swallowed up by an avalanche of craft materials? Do you feel as though your inspiration is being starved by a lack of oxygen caused by, well, just way too much stuff?
This is a problem that is all too real in our home at times.
As a girl who loves all the colours, adores all the prints and is crazy for all the different yarn fibres and weights, even I have to confess that sometimes less is actually more. It’s that whole ‘can’t see the wood for the trees’ feeling when you have a few moments in your day and you just want to get on and make something, yet, despite having all the ‘stuff’ you feel at a loss for where to begin.
Working as a designer I have a lot of stuff, a lot more than is probably healthy. Please note that I say that this is because of my job as a designer, not because I am a colossal creative hoarder. I also tell myself that due to my job it is inevitable that there will be more than one or two ‘works in progress’ on the go at any one time. That’s my story and I’m sticking to it you guys, sticking to it.
Yes, there is nothing more frustrating than getting part way through a project only to realise that you don’t have quite the right zip fastening or button to complete it. And, yes, it is great to have a selection of supplies to pick from when inspiration does strike – I’m not for a second saying that you should knit that dream sweater in a less than perfect yarn choice. Yet, at the same time, having too much stuff can also stifle the creativity. Whether you are faced with just to much choice when it comes from picking six fat quarters for a quilt top or (and this is taking it to extremes!) you actually can’t physically get to your sewing machine or knitting needle stash without having to wade through piles and stacks of fabrics, yarns, notions and, well, stuff.
Don’t worry! I’m not about to tell you that we should all hire a skip and toss all our beloved supplies. Not at all. I just wanted to share a few handy hints and tricks that I use for reducing the creative clutter, organising a creative stash and making the most of creative time – and creative space – no matter how limited they are.
Here are my Five Top Tips For Reducing Creative Clutter I like to start at the top of the list and work my way through each of the different steps, but you know what? You can pick them at random, work through them all simultaneously or only focus on one – it’s entirely up to you, but each tip will help you to clear out that clutter and get back to the all important task of being creative!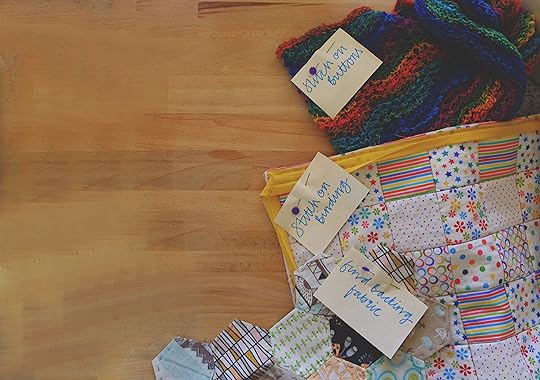 1 Collect together all those UFOs
Let’s be honest here. We probably have a couple [read: lots] of unfinished makes that are laying about the house – or stuffed into the back of a cupboard. Well, newsflash, these projects will remain UFOs until you dig them out and finish them. Now, it might be that you’re waiting to find just the right buttons to complete that gorgeous cabled cardigan, that crochet blanket needs around eleventy billion ends sewing in, or perhaps that quilt top is hanging out waiting for just the right backing fabric to jump up and make itself known. Of course, finishing up these projects will help to reduce the feeling of Creative Clutter, but (and I’m being realistic here) you aren’t going to get them all finished up in an evening, because, let’s face it, if that was the case they’d all be completed by now!
Set out each of your unfinished makes and pin onto each a small note of what you need to do to get this finished – pick out five buttons, find matching zip fastening, sew on binding - before wrapping up in a clean plastic bag ( I like to call this the To Be Continued bag) and stowing them all together in an easy-to-access place. Why bother with this when they are all tucked out of sight already? Well, by looking back over your half finished projects, identifying what each needs to be finished you might find, when you come to clear out the rest of your supplies, that you have just the right buttons, that perfect quilt backing fabric, in which case you can simply add it in to the ‘To Be Continued…” project bag. Then, when you have that quiet afternoon, with nothing to do, rather than starting yet another new make, you can check out your “To Be Continued…” bundle and pick out something that you can finish then and there – neat huh? 2 Scraps or Scrap
There is a really fine line between what is scrap and what should be kept for scraps. I mean, hording away all those off-cuts of fabrics are of course a touch of genius when you are hit with the sudden urge for making a scrappy quilt – but, are you just storing scrap? If you already have a Scraps Collection tip it out and take a look through. Be realistic – what is usable and what is scraping the barrel. If you have tonnes of teeny-weeny cuttings that, in all honesty, aren’t going to find their way to a glorious quilt, then it might be the time to ditch them. Work through fabric off cuts and place them into piles of Small – perfect for scrap quilts – Medium – great for mini makes, accessories and applique – and Large – by sorting them in rough size order, labeling and storing separately means that when you come to find and small accent fabric for a project you will be able to pick out just the right size without the distraction of hundreds of unsuitable pieces of material. This also applies to paper and craft products – are those off cuts of papers actually usable? Will that itty bitty ball of yarn be useful in a project? You can apply this Small, Medium & Large storage principle across a wide range of craft supplies on your stash. 3 Sort & Store
I’m certain that I won’t be alone in recalling my grandmother (and mums) button box – yup, I was that kid that would tip them out onto the carpet and then spend hours ‘sorting’ through all the pretty buttons. This is one of the wisest creative storage techniques of all time. It is simply collecting together all similar supplies and storing them together. All your buttons are stored in one place, zips and fastenings together, threads, notions and tools stashed in separate areas. I love to use large glass jars for storing, these help to keep the supplies clean and dust free, you can see at a glance what is in each one, and you know what, they look pretty on your shelf or bookcase too! While you’re in the process of grouping together all your supplies, you might even find those dream buttons for your gorgeous cabled cardigan – if so, tuck them away in your ‘To Be Continued…” project bag so it is all ready to go when you have a spare few minutes. While all your notions and habby items are strewn about in seemingly wild abandon, you can also see if you have duplicated items – are you really going to use four embroidery hoops that are the exact same size? Do you need two identical pairs of pinking shears? Set these items aside so you can sort through them later. Stow away all your supplies in your chosen storage jars, boxes or containers – label them if you fancy, to make them even easier to find in the heat of the creative moment! Now, anything else you come across during your de-clutter can be stored quickly and easily or, if it’s not required, can be tossed. 4 Gift, Donate & Toss
When having a clear out I like to work with a simple three option system for getting things out the door – which is crucial if you’re trying to reduce the clutter of your creative supplies. Things that I know are too small or scrappy, damaged or unusable are for the Toss Pile. You’ll be amazed at how many items end up in this pile. I mean, I know I’m not the only one who has kept hold of 5cm of pretty binding left over from making a quilt, just because it is pretty. Be realistic, what are you going to use it for? Why have you not already found a use for it? If you don’t have super great answers to these questions, add it to the Toss Pile.
Now, let’s not add to landfill any more than is necessary, let’s recycle where we can for fabrics, papers and cards and whatever else you can think of! Parting with stuff can feel tough, especially when the majority of your supplies you have piled up to get rid of to reduce that creative clutter are pretty, good quality and actually usable. These my friends, will become your Donate Pile. Check out your local charities – is there a knitting group that could benefit from a bag of lovely yarn? You’ll be amazed at how many fundraising groups there are that would be delighted to receive some free materials and supplies to help them raise money for a good cause!
Are you still with me? You’ve identified things that are just plain rubbish, things that you can offer to crafty charities or creative groups but if you’re anything like me, there will be one skein of yarn, one fat quarter of pretty print cotton, one Jelly Roll that you keep picking up again, feel like you can’t be parted from it. Somethings just feel too special to get rid of right? Well, not quite. If it really has to go, add it to a Gift Pile! Why not pick out one of your many surplus pairs of 5mm needles and team it with that beloved-but-don’t-have-a-real-use-for yarn and gift it to a friend that is always cooing over your hand knits and suggest that you teach her to knit? Do you have a friend that is an avid quilter? Why not gift them with the can’t-be-parted-from Jelly Roll – if you know you aren’t going to use it then pass it to someone who will – the best part about passing these over to friends is that you get to see the finished make, so you can still enjoy the materials further down the line, even if you couldn’t use them. Soon enough you’ll have found new homes for all the materials that you no longer have space or use for. 5 Finishing Touches
This is my all time favourite part of having a creative clear out – its a time when everything is cleared out, all the junk is gone and you can actually see what you have. Time to restock your shelves or storage units, arrange all your tools so there are where you need them. Move around the furniture, if the mood takes you, to get the perfect creative space – because, let’s face it, you’ve got a whole lot more space to move about in now! This is the time to give the sewing machine a once over, decide if it is due a service. Find the spare blade for your rotary cutter and refresh them, ready to use. Hunt out that crochet hook that you’ve lost so you can work on that granny square blanket you’ve been dreaming of for a while. Before long, you’ll find that all your tools and supplies are right where you need them. All in all this final step of getting your supplies, tools and projects right where you want them gives you the most amazing feeling of falling in love with all your makes all over again. You might not have thought about tapestry projects in ages, but I bet that the second you come across your tapestry frame and a bundles of colourful skeins of tapestry wools, you’ll want to get stitching right away!
We all get into a creative slump every now and again, and a cluttered or disorganised space can sometimes be part of the problem. Taking a couple of hours (or days, if your stash is really super out of control!) is a great way to get back on track, remind you of things you forgot you had, makes that are oh-so-nearly done and don’t be surprised in you plan 100 new projects while you’re doing it!
Now that I feel I have room to move again, I had better start making a dent in my Must Finish Pile, rapidly followed by to Must Make pile! DO you take time out to re-organize your craft supplies or your creative space? What are your tips for a successful – and stress-free – de-clutter?
The post Spring Clean: Combating Creative Clutter appeared first on Made Peachy.
January 19, 2014
Five Fave Creative Blogs
There is nothing I love more on a Monday morning than grabbing a huge jar (yest that is a serving size in this house) of coffee – and catch up with all my favourite blogs.
Monday mornings were made for this. I guarentee that starting your day like this will get you off to a flying start – I mean, what better way to get your creative juices flowing?
The list of great blogs that I follow seems to be getting longer and longer by the day – I love how many talented and creative folks are out there sharing the good stuff with us! That being said, I’m always, repeat, always on the look out for more! More awesome makes, more creative ideas, more stylish looks, more delicious eats…just more of all the really great stuff!
Here are my Fave Five Blogs in my Bloglovin feed at the moment… A Beautiful Mess
I doubt there are any creative folks out there that dont check in regularly with Elsie & Emma fabulously stylish world of makes, fashion and eats. It is usually my first port of call when I need a little pick me up!
Fave Recent Posts…
DIY Studded Tree Stump Side Table
Candy Crush Donut Holes
DIY Modern Metalic Candle Holder
 Tilly and the Buttons
Tilly is perhaps the stitching queen of the moment. I seem to be unable to get enough of her charms! Not only does she make the most delicious projects – but she also has a way of making you feel as though you can too…which is something I can really get behind!
Fave Recent Posts…
Sewing in a Shared Space
Sewing Space Makeover Inspiration
How to sew Japanese Sewing Patterns
 Creating Laura
Not only because she is my namesake and one of the lovely sponsors of Made Peachy – this blog is packed with incredible things to (as Laura herself puts it) make the world a prettier place!
Fave Recent Posts…
The Triplet Shawl – Arm Knitting Pattern
Knitting Pattern – New Year’s Eve Hair Pin
Sewing a Peter Pan Collar
 The Dainty Squid
The things that I adore about Kaylah could fill a book, a library of books in fact! With her super cute style and incredible photography (not to mention adorable pup!) this is the place to visit when you want to see something not only beautiful, but something a little out of the ordinary too! One of my very fave things is up nail art posts – just too awesome!
Fave Recent Posts…
Weekly Nail 19 Jan
Orange You Glad?
Weekly Nail 5 Jan
 Frugally Peachy
Now this is a very new addition to my blog feed – this newly launched blog is charting a frugal and fabulous year in the life of one of my dear blogger chums, Emma. The next 12 months look set to be filled with creative makes, budget-friendly ideas and more importantly bags and bags of style! This is definitely one to watch!
Fave Recent Post…
Frugal Resolutions
De-Fusing The Yarn Bomb
Frugal & Fabulous Gin Cocktail
Now that I’ve shared lots of lovely links for you to click through to and enjoy reading, no doubt distracting you from what you sould be doing, I hope that you’ll tell me what your fave blogs are for getting a delicious creative fix! Share your must-read blogs in the comments – I’d love to add a few more to my reading list. Also, did you know that you can follow Made Peachy on Bloglovin?
The post Five Fave Creative Blogs appeared first on Made Peachy.
January 17, 2014
DotComGiftShop Giveaway Winners!
Happy Saturday you guys!
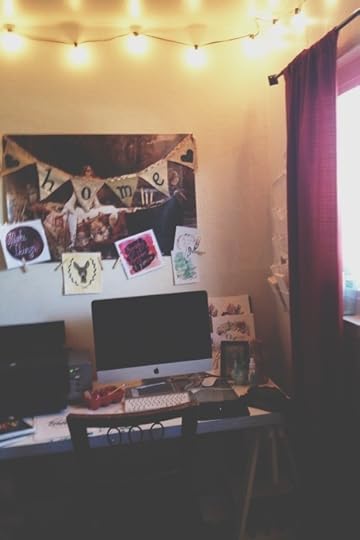
This weekend I am throwing myself head first into decluttering our home! I have bags primed ready to fill for the charity shop and the dusters at the ready – what could possibly go wrong…wait, don’t answer that! There is nothing quite like clearing away the clutter, getting the place spotless (or as near as damn it!) to remind you that home truly is where the heart is!
Speaking of home…remember that awesome giveaway from DotComGiftShop for a set of deliciously scented candles to add a little bit of magic to your home and make January a little bit sweeter? Well four lucky readers will soon be enjoying the super cute vintage style set!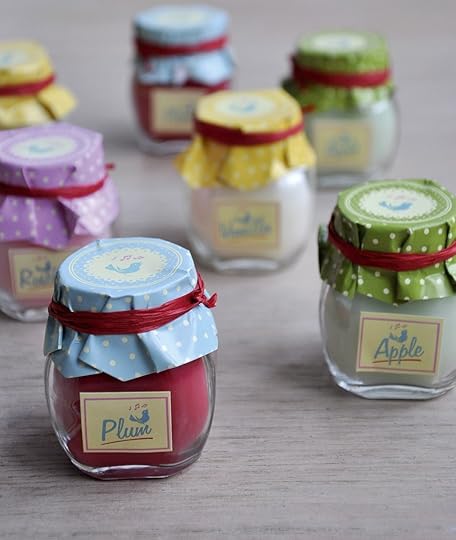 Without any further ado, the four lucky winners of the DotComGiftShop Jam Jar Scented Candles prize are…
1 Kirsty Mellish
2 Luan Pessall
3 anniemach
4 Vicky Bedford
Yay! Be sure to check your emails and send over your UK postal address so that these little beauties can get themselves out to you!
Now, if anyone needs me, I shall be cleaning out the closets, sorting though our old books and trying to find the lost half of my husband’s record collection…I swear it is around here some place!
So, what does your weekend hold in store?
The post DotComGiftShop Giveaway Winners! appeared first on Made Peachy.


