
Laura Strutt's Blog, page 42
February 8, 2014
Style Sunday: Valentine Knits
As Valentine’s day is just a few sleeps away you can’t seem to go five minutes without seeing a cute love heart motif – it’s everywhere! Cards, stationery, confectionery, clothing – everywhere!
I get that for some folks this is overkill. Personally, I love love, so I’m happy for hearts to be popping up all over the place! This Queen of Hearts Sweater, £24.75 from Forever21 is just the right balance of cute, funky and colour.
It also got me thinking about how well the love heart motif fits onto knitwear. It is such a simple motif that is sits perfectly on the knitted fabric, and can be used in so many smart ways to make some pretty striking designs – so, in light of the approaching Day of Love, I wanted to collect together a few of my most favourite Valentine Knits!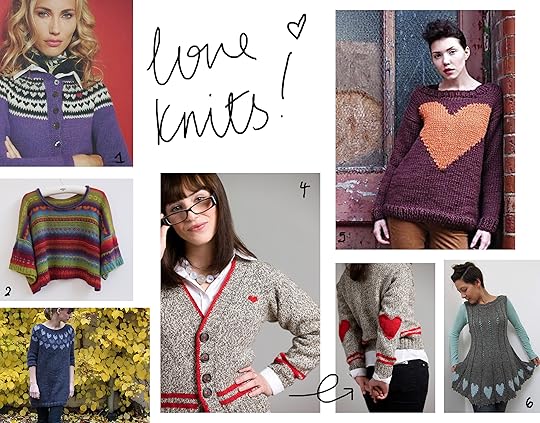 The Patterns
1 Heart Yoke Cardigan by Kate Gagnon Osborn, featured in Vogue Knitting 2009
2 Hearts & Flowers by Meg Foster, £4
3 I by Anna & Heidi Pickles, available for free
4 Heartdigan Cardigan by Katie Himmelberg, featured in Knitscene 2010
5 Heartbeat by Martin Storey, featured in Rowan Easy Winter Knits
6 Five by Louise Harding, featured in Queen of Hearts
How’s about that little lot? You feeling the love yet?!
The post Style Sunday: Valentine Knits appeared first on Made Peachy.


February 7, 2014
Get your creative fix with Craft Candy
So, it’s Saturday. The weekend. The work week is finally over and it’s time to kick back and enjoy some R&R. And, by R&R I clearly mean getting stuck into something creative and fun.
But, what are you going to do? Ever had that feeling where you know you want to do something creative, but you can’t quite work out what it is? Exploring a new town or city and would love to find the local fabric or craft store? Want to find out what workshops, craft markets and clubs are happening right now, right where you are? I think we can all answer Yup to those. So, how do you stay connected with our growing community of creative folks? Turns out you don’t need a crystal ball to find the answers, you can simply check out Craft Candy!
This purpose-built dedicated website is just what you need to seek out something good to do today! Visiting the website will let you search for classes, courses and events in a chosen area simply by checking out the events listings covering events from across the UK, including Wales, Scotland and Northern Ireland – plus once you’ve found what you’re looking for you can share it using the easy-peasy social media buttons, so you can tell all your friends too!
Now, here’s where things get a little more mega! Are you hosting a sewing bee? Do you run your local stitch’n'bitch? Are you planning to start a craft makers market? Getting the word out can be a slow and painful process…but not any more! The legends behind Craft Candy have literally thought of everything – you can also list your events, clubs and groups by simply registering for a free account and listing your event, for free. What’s more, all events that are listed are shared via the hugely followed craft Candy Social media accounts – that’s so pretty serious promotion for your event! In fact, if you don’t already follow CraftCandy on Twitter – you really must, how else are you going to keep up-to-date with what’s going on?
Before you scoot off and start searching for something rad to do this weekend, I have one last little treat to share with you…
Craft Candy also has a FREE app! Yup, my friends, you can use your super smartphone to search for craft markets, clubs, stores and workshops in your local area – or, with the magic of GPS you can find what is happening right where you are, whenever the creative bug hits! Download the CraftCandyApp for Free!
Go forth and find something awesome to do today!
The post Get your creative fix with Craft Candy appeared first on Made Peachy.
February 6, 2014
Handmade Valentine Gift Guide
If ever there is a perfect outfit for Valentine’s Day then my money is on the fact that it would include these Leather Heart Knee Leggings • £16.69 • ShopFlattery
You know what, lovebirds? Valentine’s Day is just around the corner – literally, we only have one more week before the Big Day!
Now, I don’t much go in for the standard issue dozen red roses and a box of supermarket chocs. I’m the kind of girl that prefers something with a little more thought, a little more wow – and by wow I don’t mean £££!. I’m talking about a quirky illustrated card, a homemade cake (my husband makes a mean Vicky Sponge!) and a spur of the moment adventure in the great outdoors.
So, this year, let’s not have another Hallmark holiday, let’s pick out something handmade or make something with our own fair hands to show our loved ones just how much we cherish them! I’ve been stalking out the best tokens of love over on Etsy, so check out my Valentine’s Day Gift Guide…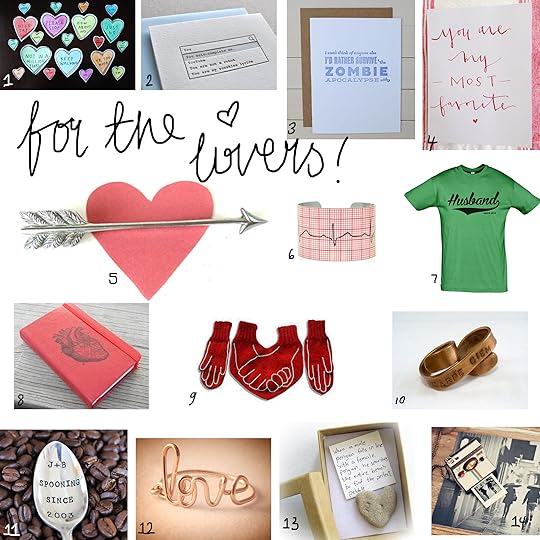 1 Reject Candy Hearts Card • £1.89 • theclassycat
2 You Auto-Complete Me Card • £3 .78 • Paperwheel
3 Letterpress Zombie Pick Up Line Card • £3.15 • fancyseeingyouhere
4 Hand Lettered You’re My Most Favourite Card • £2.52 • cbrannendesigns
ps if you’re gonna get you a vow tattoo this Valentine’s day, firstly be sure to think about that the whole way around, then check out this custom hand lettering tattoo design service from cbrannendesigns
5 Vintage Cupids Arrow Brooch • £12 • TheRareStitchUK
6 EKG Cuff • £15.70 • NeuronsNotIncluded
7 Husband T-Shirt • £8.52 • TeeShirts24
8 Anatomical Heart Sketch Book • £6.28 • CrimsonHollow
9 Dual Gloves • £18.89 • WarmPresents
10 Carpe Diem Two Finger Ring • £23.87 • MerCuriosJewelry
11 Spooning Since Spoon • £11.97 • JessicaNDesigns
12 Love Ring 14ct Rose Gold • £12.60 • GlitterBoxJewelry
13 Unique Heart Shapes Rock Valentine’s Message • £6.15 • MedBeachStones
14 Polaroid Locket Necklace • £22.05 • StrangelyYours Plus order before V-Day and get FREE photo personalisation worth $5!
Don’t you even try to tell me that little lot hasn’t made your heart sing out with joy! You may just as well admit it – you’re just as soppy as me, deep down.
While we’re on the subject of love and handmade, did you know that my new DIY Wedding Manual is on sale right now? (Sorry, I can’t resist the shout out!)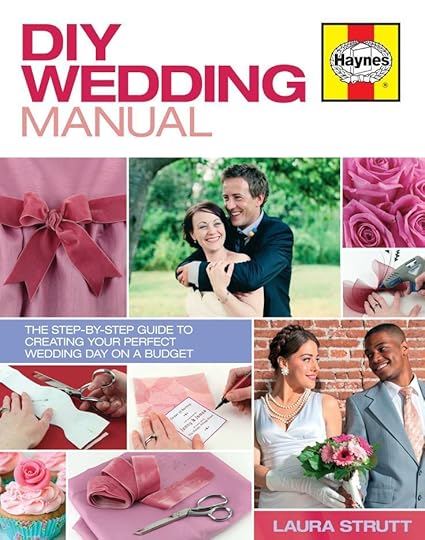 And, yes! That is a picture of me and my super cute husband on our wedding day, right there on the cover!
I thought you might like to take a little peek inside…it is jam-packed with lots of creative ideas for adding that unique touch to your Big Day…and, also might help you to keep the costs down too!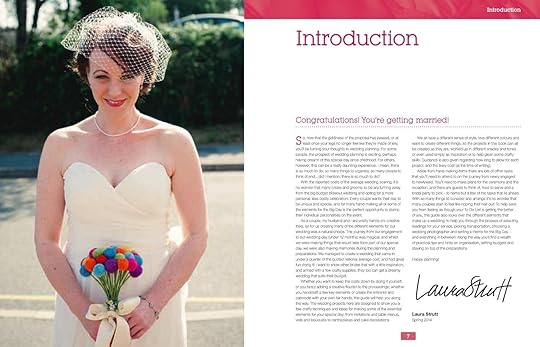
 Well, now I’m really and truly all full of love, if you’re planning on getting wed I’d be stoked if you’d check out The DIY Wedding Manual – be sure to visit the Book Shelf too! Already tied the knot? I’d love to hear your handmade wedding stories – leave a comment or, you’ve blogged about it, share the link!
Have a super Friday day lovebirds!
Not fee
The post Handmade Valentine Gift Guide appeared first on Made Peachy.
February 5, 2014
Mary Ellen’s Made By Hand Giveaway Winners!
Holy heck that last week just flew by!
In the last week since I posted the tried and tested on Mary Ellen’s Made By Hand the gel has become my every day staple! While I’ve been working on a colossal pile of commissions, I’ve been dabbing on a little blob of this awesome gel here and there and the difference is actually incredible. Would it be lame to say I feel like a new woman? Well, that’s exactly what it’s like. New hands -awesome…all I need for is for them to work a whole lot quicker, though this mountain of work!
As you know I do like to share the love, so it’s time to announce the winners of the Made By Hand giveaway…
1 Dee Weaver
2 Maureen Head
3 KateH
4 Sara
5 Phip Ward
Congrats you lucky ducks!
Be sure to check your email and send over your UK postal address so that we can get these sent out to you!
Now, if anyone needs me, you’ll find me at the sewing machine, stitching away like it’s my job! The To Make Pile is towering dangerously high on my work desk, today I have the task of catching up with a few (well, more like an insane amount!) of seams and get this bits and bobs finished up, pressed and out that door!
I’m not complaining, there are far, far worse ways to be spending a cold and rainy Thursday! What’s better it’s a rather mixed bag of makes, baby projects, accessories, even a couple of quilts, so there is no danger of me getting bored!
Plus, set up next to the sewing machine (cranked up to full volume!) is my Kindle, play out audiobooks – I’m pretty hooked on a zombie adventure series right now (I know, it’ll give me nightmares and I’ll have no-one to blame but myself!) So, all I need is an endless supply of Chai Tea Lattes and I think that this has the makings to be a pretty rad day!
Do you like to listen to music or audiobooks when your stitching – or even catch up on your fave TV shows – do share your latest while-sewing entertainments, I’m sure to run out of Zombie books before I finish up this pile of projects!
Whatever project your working on, have a great day, y’all!
The post Mary Ellen’s Made By Hand Giveaway Winners! appeared first on Made Peachy.
February 4, 2014
Crazy Patchwork Coasters
Cloth coasters are a pretty fun little project – they make great gifts, they are quick to stitch and you don’t need a huge amount of supplies, perfect right?!
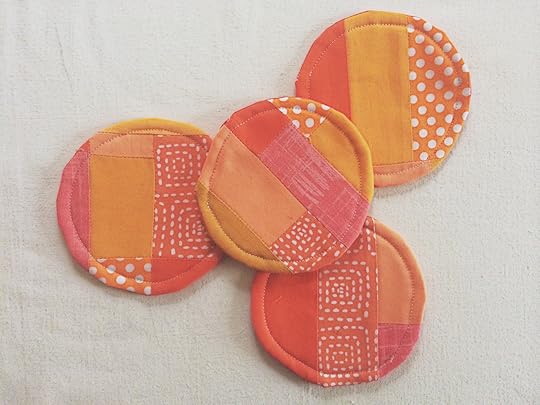 These little beauties are made by creating a crazy patchwork panel and then constructing the coasters – you can check out the full step-by-step guide over at the Sewing Directory!
Because the fabrics that I used to make these coasters are just so hot-damn lush it would a a crime not to share some of that love with you guys, am I right? I have one of these delicious bundles up for grabs for one lucky Made Peachy reader from awesome Justine at Simply Solids! I know, how cool is that?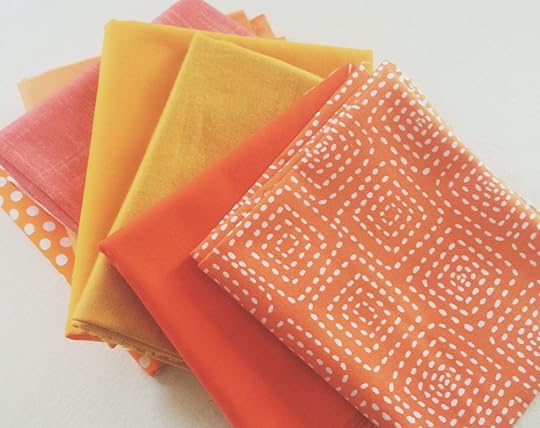 This tasty collection of seven colourful fat quarters is the February Stash Club Bundle from Simply Solids – and it could be all yours! So, want to be in with a chance of winning? Simple – leave a comment below sharing what you’d make with this bundle, retweet the giveaway or head over to Facebook and like & share the giveaway! This giveaway is for UK folks only (sorry!) the winner will be announced on the 12 February – Good Luck!
Looking for more coaster ideas?
Then, my darlings, I think that I might be able to help you out with that! How about these simple squares…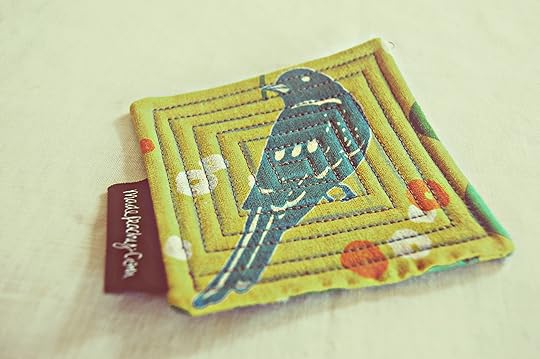 Or, even these retro-style hexi ones?
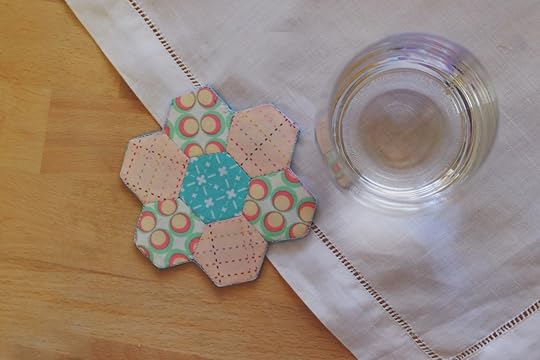 That should keep you stitching-busy for a little while!
The post Crazy Patchwork Coasters appeared first on Made Peachy.
February 3, 2014
Crochet Heart Garland
I’ve got love on the mind!
Ever since I shared the crochet hanging heart project I created for a guest post for CraftCandy last week I haven’t been able to shake off the desire to make crochet hearts!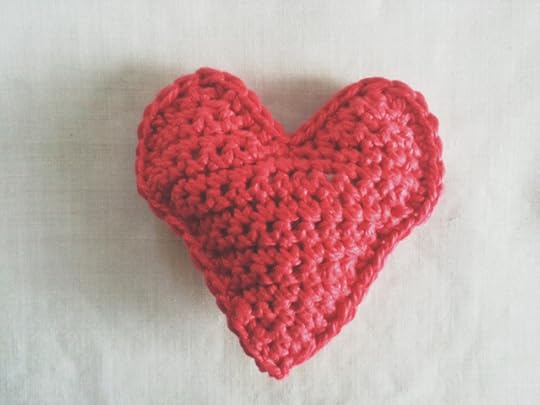 I decided to create another little make using these adorable hearts. I dearly loved the festive themed crochet star garland, so I thought, why not make a loveheart version? So, basically, that’s one pattern two Valentines makes – pretty rad, right? I adore this cute and colourful Crochet Heart Garland!
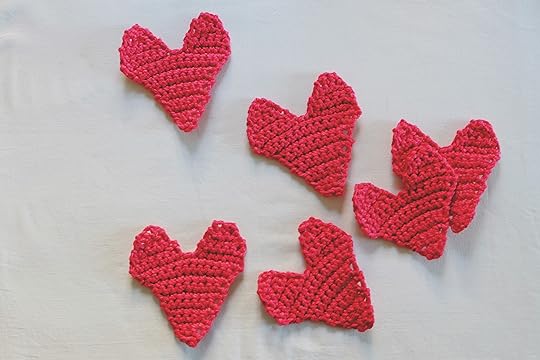 Using the Crochet Heart Pattern featured on CraftCandy create a number of crochet hearts – the more you make, the longer your garland will be…I know, that’s not rocket science, right?! Rather than joining pairs of hearts together, keep each one separate to use a single pennant. Weave in all the ends and press each heart neatly.
 With a contrasting coloured yarn, starting at the point, join in the yarn ad work around the outer edge of the heart with 1dc in each stitch. Continue until the entire heart has a contrast border, secure the yarn and fasten off. Weave in the ends and press.
{{Hey! Check out that rad yarny ampersand – neat…and completely unintentional…it’s not a secret love note that needs to be decoded…promise!}}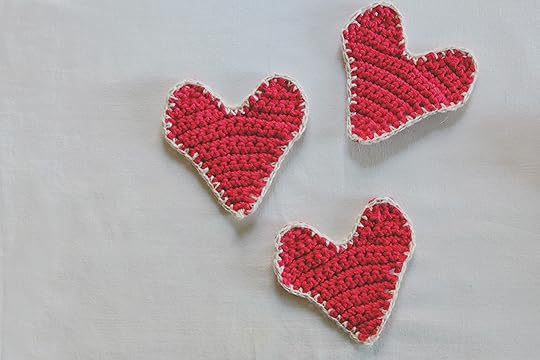 Work around each of the hearts until all the heart pennants have a neat contrast border.
 With the light coloured yarn, work a chain 20cm long – this will be one of the ties for hanging the garland. Join in the first heart by inserting the hook though the top of the border stitch and then making the chain. Repeat to join to three of the border stitches along the first upper section of the heart. Work ch12 to create a length of chain to reach the second upper part of the heart (without being too loose or too tight and distorting the heart pennant). Join in the second side of the heart to the chain by working through the upper three border stitches as before.
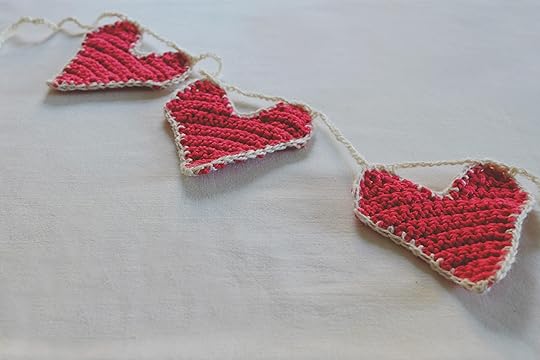 Work a 6cm chain before adding in the next heart, joining in the first upper side then the second in the same manner as joining in the first heart. Continue adding in each heart pennant, making a 6cm chain between each and finishing with a 20cm chain for the second tie.
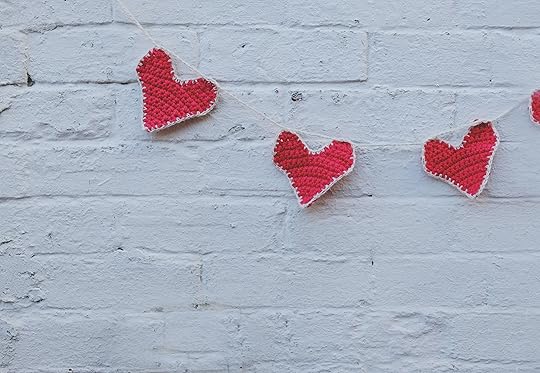 This bunting is so much fun to make, in fact making all the crochet hearts is pretty addictive, you’ll be amazed at how quickly this garland grows! Now, go forth and hang these love hearts around your little love nests in wild abandon!
What are you making for your Valentine this year?
The post Crochet Heart Garland appeared first on Made Peachy.
February 2, 2014
DIY Table Top Pressing Board
If there is one thing that your sewing room needs – besides a sewing machine – its a mini pressing board.
Now, I know you’re now going to think me an ironing obsessive, and if I’m honest with myself that is probably the case. But, one of the things that I have learnt about sewing is that pressing fabrics and seams can really and truly make a whole heap of difference to the finished makes. Not only will things look a lot sharper, but when the fabrics are smooth and wrinkle-free they fit together a whole lot better, making things much quicker in the long run.
Like most other folks, space is at something of a premium in my sewing studio – once the machine and overlocker are set out, threaded up and ready to go, there is little room for much else. Erecting the ironing board in the same room usually leaves me boxed into a corner -not much fun. Setting up the iron and board in the next room is usually the best option, but let’s be realistic, if your working on something that requires lots of little seams, like a patchwork quilt, are you honestly going to get up and walk to the next room to use the iron? I thought not. And, I’m pretty sure that are some kind of safety issues with leaving a hot iron unattended in the next room…especially if you have a pup (or Littles) roaming around. So, I decided to make a portable, mini ironing board, that will fit onto the workspace next to my machines – it is literally the best thing to happen to my sewing room since, well, I don’t know what! So, my friends, here is a step-by-step guide to making your own DIY Table Top Pressing Board…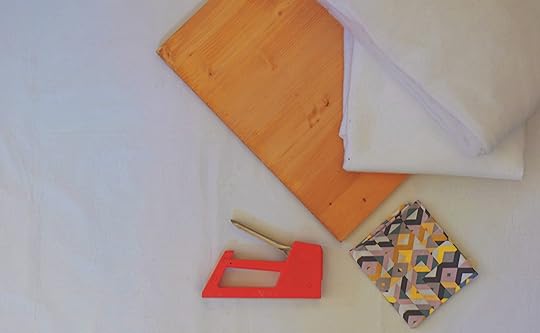 Grab your supplies…
A piece of wood measuring around 40cm square
High loft fleece wadding – like Vilene High Loft Volume Fleece 280
Synthetic insulating wadding – like Vilene Thermolam 272
Fabrics – two fat quarters will be plenty
Staple gun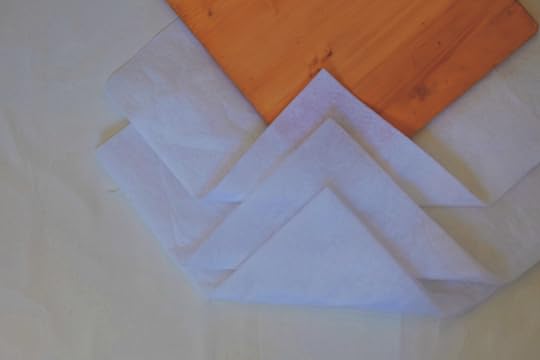 Cut a square of insulating wadding to 5cm larger than the wooden panel, then cut two sheets of the high loft fleece to the same measurements.
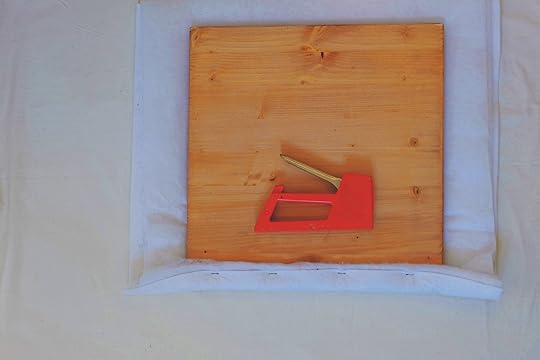 Lay out the square of the insulating wadding and position the two layers of high loft fleece on top of this, aligning all the edges. Position the wooden panel into the centre of the pile of waddings – once constructed the dense insulating fleece will be on the top. Starting on one edge pill the three layers of fleece and wadding over to the surface of the wood and use the staple gun to secure them in place. Once one side is complete, rotate the board and begin securing the opposite side, be sure to pull the layers of fleece taught to ensure a neat flat surface. Secure the two remaining side in turn using the exact same method, leaving the corners of the wadding unstapled.
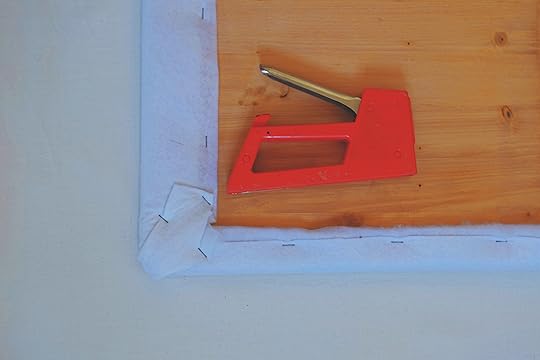 Once the wadding and fleece on all four sides has been stapled securely to the wood, neaten and secure the corners. Making the corners as neat and bulk-free as possible will help to give the pressing board a solid wobble-free surface to press fabrics on. Starting at the tip of the corner, carefully press the layers of the fleece and wadding flat over the corner and secure in place with a few staples. Repeat to create identical neat corners the whole way around the board.
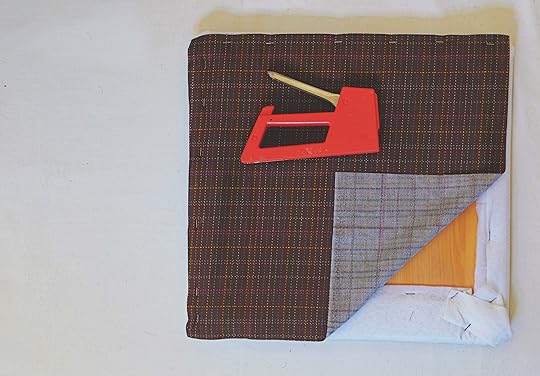 Trim one piece of fabric to 40cm square and position over the back of the board, to cover up the raw edges of the wadding and fleece. Work around using the staple gun to secure into place on all sides.
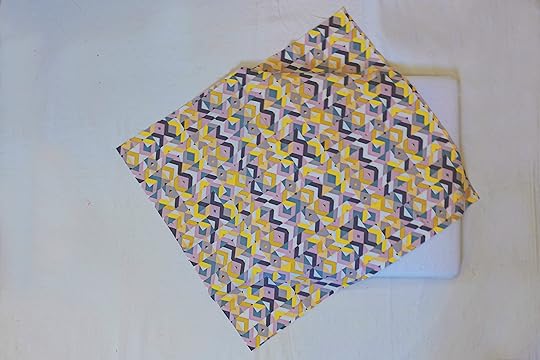 All that is left to do is to add the cover to the front of your pressing board – wonder why I said to get a piece of wood that is around 40cm square? Well, this is not only a great size to squeeze onto your work table next to your sewing machine, it is also the perfect size to allow you to create a cover with a fat quarter of fabric – now, if that’s not neat, I don’t know what is!
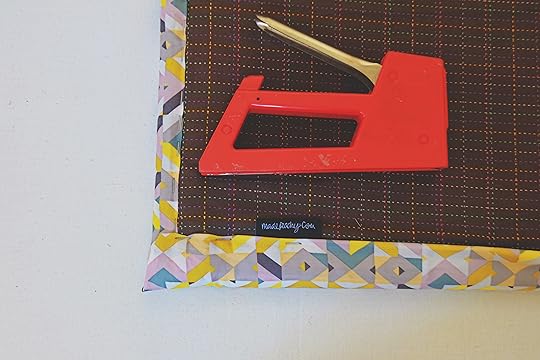 Place the fleece and wadding covered board onto the wrong side of the fat quarter, the fabric backed wood will be uppermost. Starting on one side begin bring the cover fabric around the board and fold the raw edges under by 1cm and secure into place. In the same way as securing the fleece and wadding, pull the fabric taut before securing and once one side is complete, secure the side that is directly opposite. Repeat to secure the fabrics on the two remaining side, tucking the raw edges under and pulling taut before securing. Once again leave the corners unsecured until the end and finish by neatly tucking the raw edges in and folding neat mitres into the corners before securing with staples.
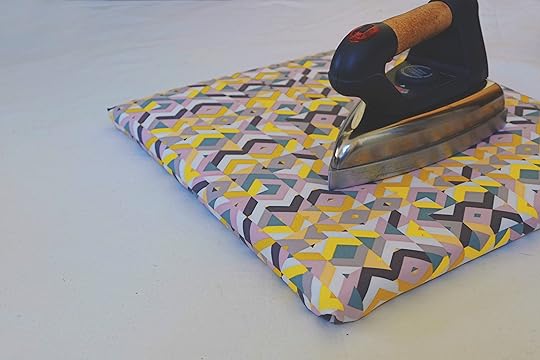 Tah Dah! Now you can position this with your iron next to your sewing machine and you can easily press all those seams without any fuss or bother! Unlike your real ironing board, this pressing board doesn’t have one of those neat rests on which to place your iron while it is hot but not in use. If you just leave your hot iron on the cotton cover of the pressing board while your working away at the sewing machine, this will scorch and ultimately burn the fabric and most like the board too…but let’s not find out! Stay safe by using a silicone iron rest to stow your iron when not in use – there are some pretty neat, cheap and colourful style out there which will help to keep you safe and burn-free!
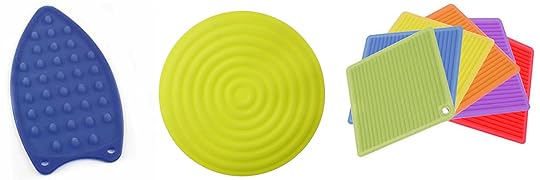
From Left to Right:
Blue Silicone Iron Rest • £2.60 Round Silicone Mat • £1.99 Deluxe Silicone Square Iron Pad • £8.99
Remember to check the temperature guidelines that come with silicone mats against the heat settings on your iron – safety first and all that!
I use this Table Top Pressing Board virtually every time I use my machine – it is so much easier than dragging out the bulky ironing board…in fact, my ironing board has seen a little too much battle action and is in despirate need of a new cover – so, I’ve even been using this on top of my ironing board when pressing small clothes & laundry items. And, because it’s small and fairly light-weight, it’s perfect to pack up to take to shows, workshops and sewing bees! In case you can’t tell, I love it – I hope that this will be a handy addition to your sewing rooms! Tell me, what is your most useful DIY addition to your sewing room?
The post DIY Table Top Pressing Board appeared first on Made Peachy.
February 1, 2014
Style Sunday: Wrap-Tastic
With a series of important and exciting events looming close on my schedule, I’ve been seeking out some suitable, smart work wear.
I’m not the kind of gal that can rock a business suit, so I find myself turning to the trusty wrap dress! It’s easy to wear, flattering in all the right places and not only does it look crisp enough for business meetings that require snappy dressing, it is versatile enough to switch in a few accessories to make the smooth transition from day to evening. Me, I’m sold on the Wrap Dress, so here are some of my favourites for making your own versions of this High Street staple! The Gemma Chain Print Wrap Dress sizes XS – XL • £65 • Banana Republic
The Patterns:
Burda B1787 Sizes 10 – 20, £5.85 SimplicityNewlook
The wraparound dress is a favorite classic, flattering designs with an elegant. Select design D for the simple straight neckline.
Burda B6946 Sizes 18 – 30, £5.85 SimplicityNewlook
This wrapped jersey design flatter the figure and truly feminine. Shape and side zip fastening assure a perfect fit. Select design A for the short sleeve version.
Isabella Oliver Wrap Dress sizes 6 – 16 • £95 • Asos
The Pattern
Burda B6957 sizes 8-20, £5.85 SimplicityNewlook
This maternity design wrap dress is light and feminine, with striking diagonal folds. The tie band conceals the seam. Select design A for the three quarter length seams.
So many great designs to choose from – which is your favourite?
The post Style Sunday: Wrap-Tastic appeared first on Made Peachy.
January 31, 2014
Quick Catch Up: Hello February
Well, you guys, we made it through the first month of the year, so how was it for you?
I don’t know about you, but I’m feeling a little bit in love with this year already. I’m an out and out stationery addict and this month is the one time of year where you feel completely justified to buy all those awesome stationery bits and bobs that your soul has been craving and know will help to keep you motivated and organised through the coming months. I’ve spent the last few weeks surrounded by notebooks, journals, calendars and day planners; working though my schedule, goals and ideas for the coming days, weeks and months. I’m like some kind of planning obsessive! What better way to get you feeling like you’re on the right path to reaching your goals, personal and professional?
While I’m on the subject of dates, and now that I’ve been busy filling in and updating all these different schedules I thought now might be a good time to share a little peek into my 2014 Diary! So, here are the dates of the events that I’ll be attending in the creative world this year…
2014 Diary Dates
16 – 18 February
Craft, Hobby & Stitch International (Trade Show) NEC, Birmingham
20 – 23 March
Sewing For Pleasure NEC Birmingham
3 – 5 April
Creative Stitches / Fashion, Embroidery & Stitch Excel, London
7 – 10 August
The Festival of Quilts NEC Birmingham
9 -12 October
The Knitting & Stitching Show Alexandra Palace, London
30 October – 2 November
The Knitting & Stitching Show RDS, Dublin
20 -23 November
The Knitting & Stitching Show HIC, Harrogate
psst! For those of you interested in catching up and learning a few stitching skills along the way, I’ll be hosting a series of Mini Workshops at Sewing For Pleasure this year – so, I’ve got my head down working on some super fun projects for you to try out, I can’t wait to show you what I’ve been working on…I’ll fill you in on all the details soon!
For those of you interested in coming along to any of these show and events I’ll be keeping you posted nearer the time with all the important details about the events, tickets and opening times. I’m really looking forward to seeing all you creative folks then!
I think it is pretty safe to say that I won’t be in any danger of feeling bored this year! There is just so much going on, so here’s a little round up of the things that have been happening over here at PeachyHQ this month!
On Made Peachy:
Crafts: Hexi Patchwork Coasters
Style: Meet Kimi Avila
Skills: How to Die Cut Fabrics – with a Sizzix Big Shot
Eats: Parma Violets Flavour Syrup
My Browser Besties:
1: BumblenBirch
3: Kerrie Mitchell Photography
My Blog Crushes:
1: Milomade
4: Semi Sweet
Hey Y’all! There is still time to enter the Made By Hand Giveaway entries close at midnight on the 5 Feb (GMT) and the winner will be announced on the 6 Feb – so get entering!
Remember those little goals that I said I was working on NY-Resolution-Style…well, I’ve been attaching the reading challenge with all that I’m worth…so, in order to keep me on track, I’ll be sharing the books that I’ve managed to read each month too!
My Months Reads: 1 The Virgin Suicides – Jeffrey Eugenides
You probably know the storyline of this book from the movie, but whether you loved or loathed the version on the silver screen this novel is worth a read purely for the exquisite prose of Jeffery Eugenides – utterly magical!
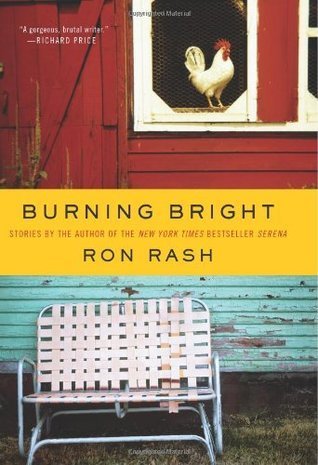 2 Burning Bright – Ron Rash
This is a fascinating collection of short stories based around themes of poverty, difficult life choices and trying situations. Some of the tales are stronger than other, but the great ones far outweigh the weaker ones.
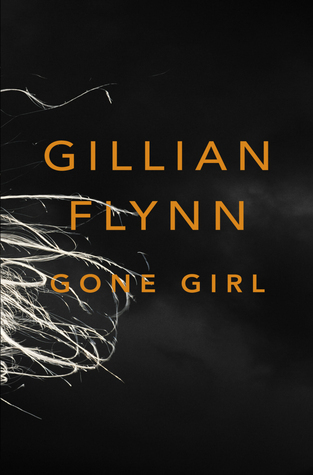 3 Gone Girl – Gillian Flynn
I wanted to get in and read this book before catching any spoilers, and with talk of a movie, I got in quick. With a clever narrative construction and flowing prose, this book is a real page turner…that’s all I’m gonna say. No spoilers here!
 4 Marilyn Monroe: Private & Confidential – Michelle Morgan
Can we ever really ‘know’ the life of a star like Marilyn Monroe? This factual account is far removed from sensational and gossip-style bios – a fascinating insight to her life, flaws and all!
You can check out my full reviews over on my Goodreads account!
So far I think that me and 2014 are going to get along just fine! Now, tell me, how’s 2014 treating you?
The post Quick Catch Up: Hello February appeared first on Made Peachy.
January 30, 2014
How to Make Log Cabin Blocks with Vilene Quickscreen Square
Sometimes in life there is an easier way to do something. I’m not saying that it’s a better way, just that it’s different and that it can offer up fantastic results and reduce that feeling of stress when things don’t go quite the way you want them to. Using Vilene Quickscreen square as a grid on which to form log cabin patchwork blocks is just one of those things!
When it comes to this classic quilting block is it so important that the seams are straight, that the angles where the fabrics meet at exact, being even just a few millimeters out on any of the seams can result in the whole block ending up wonky…which is going to make it tricky (and look a bit shabby) when you come to piece them all together.
I’m not trying to put you of making projects using Log Cabin blocks, far from it, I think they are one of the most striking patterns and can be worked in prints or solid shades to create some really striking modern designs. So, basically what I’m saying to you is let’s give it a go!
So, here’s my step-by-step guide for Making Log Cabin Blocks with Vilene Quickscreen Square…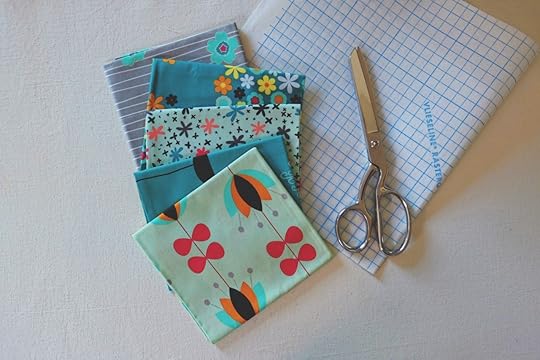 Grab your supplies…
You will need a selection of fabrics – I like to work with two light, two dark and a contrast for the centre.
Vilene Quickscreen Square
Scissors
Pins
Sewing machine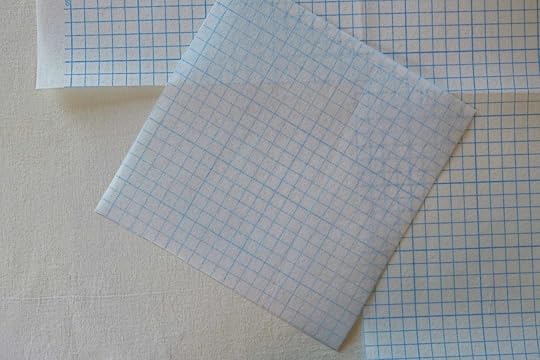 Begin by snipping out a square from the Vilene Quickscreen Square. The block I have made have two round and the finished block is 6.5in, so I began by cutting 8.25in block, which have leaft enough to use the grid to accurate add neat borders and shashing – you can make your blocks larger by scaling up, cutting a bigger piece of Vilene Quickscreen Square to work on and continue adding the fabrics as set out in this guide, until you reach your desired size.
Start out by cutting your fabrics into 2in strips.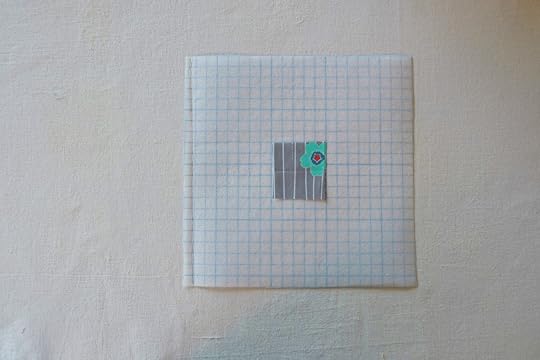 Working on the wrong side of the square of Vilene Quickscreen Square, so that the printed grid is on the underside, trim the fabric for the centre into a 2in square and position into the centre of the Vilene Quickscreen Square using the grid for accuracy. Even though the printed grid in facing away from the fabric, it is still clear enough to use to align the fabrics.
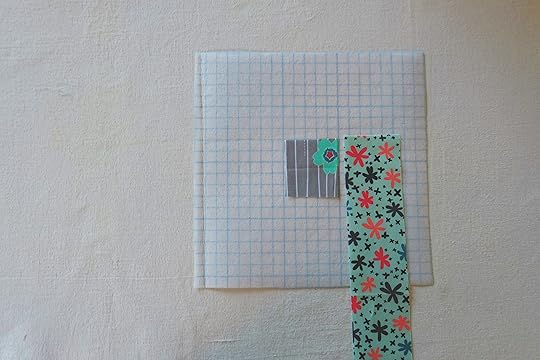 With the first of the light 2in strips of fabric, position along the right-hand side of the centre block. This is going to bne the first piece that is sewn into start the Log Cabin design.
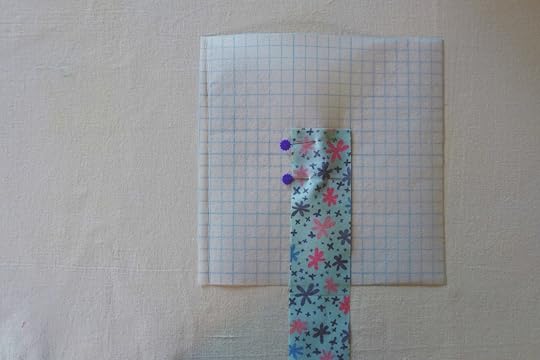 Align the strip onto the centre block, with the right sides of the fabrics facing and carefully pin into place.
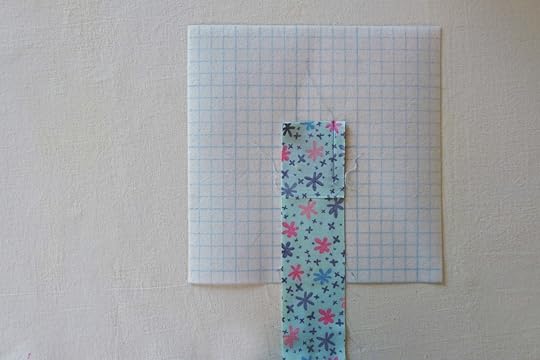 Turn the block over and working with the right side of the Vilene Quickscreen uppermost (so the printed grid is clear) join the two pieces together with a straight machine stitch, working along the markers for one grid box – 1cm square – from the edge of the fabrics, and finish the line of stitching at the end of the centre square.
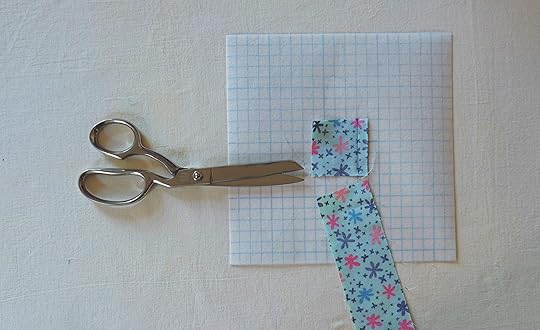 Using the scissors, carefully cut away the unstitched fabric at the base of the seam. Try to cut the strip as neat and even as possible – using the guide os the grid – as this makes adding in the next pieces of fabric easier.
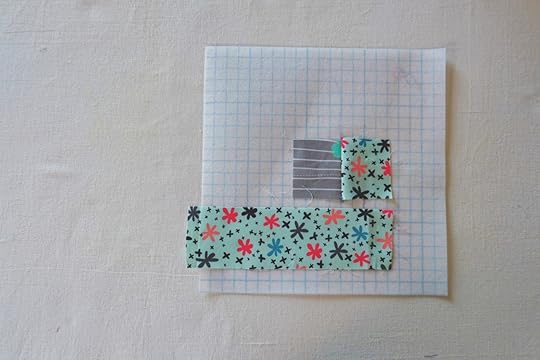 Turn the block to the right side, remove the pins and finger press the fabrics flat. The first piece has been neatly joined in. Place the remaining strip of the same light fabric below the two joined pieces, this is where the next seam will be made.
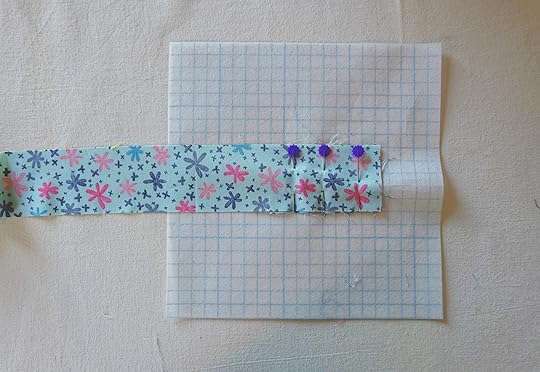 Place the strip over the two joined pieces, with the right sides facing and pin neatly in place.
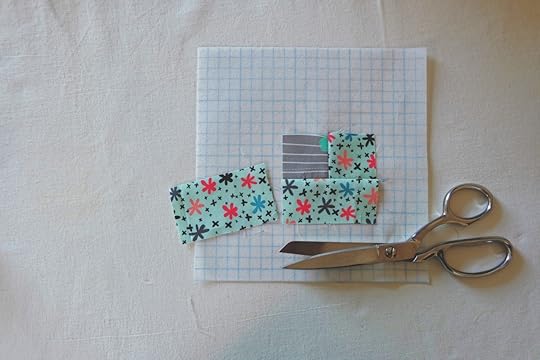 Again, working on the wrong side of the block, stitch the strip in place along the length of the previously joined pieces using a straight machine stitch and working along the grid lines one box in from the edge of the fabric.
Once stitched, turn to the right side, remove the pins cut away the excess fabric and press the pieces flat.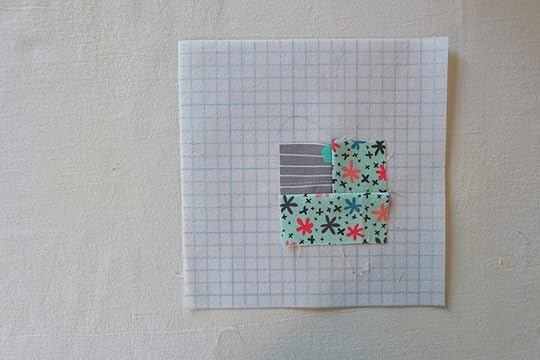 The first section has been complete! The remaining elements of the Log Cabin are worked in the same manner.
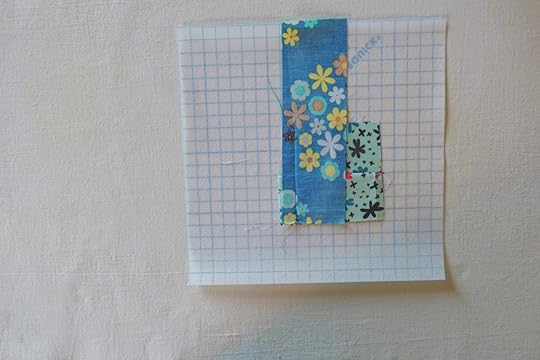 With the first of the dark fabric strips, position along the left hand side of the block and pin neatly in place. Working on the wrong side, join in along the length of the to previously joined strips using the grid as a guide, keeping the stitching one grid box from the edge of the fabric.
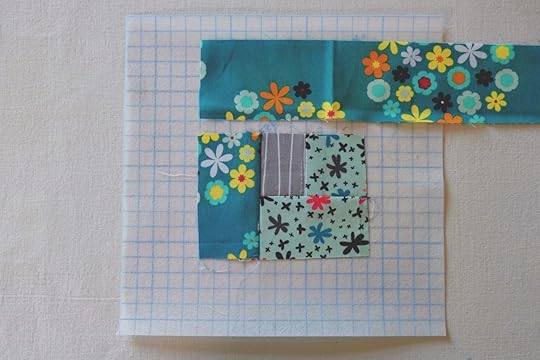 On the right side, cut away the excess of the strip and remove the pins and press open. Place the remaining strip of fabric along the upper section of the block, this will be the position of the next seam. Position this fabric, with right sides facing, over the joined strips and pin in position.
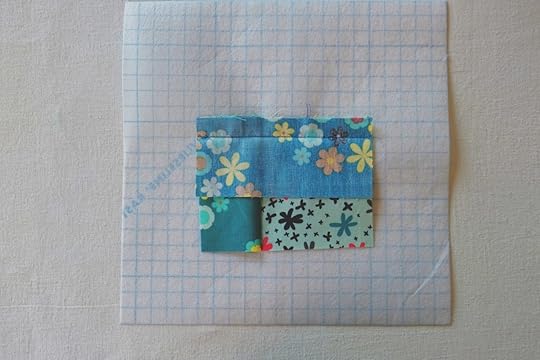 On the wrong side, stitch in place with a straight seam along the grid line. Always ensuring that you stitching on the first grid line in from the raw edges will ensure that all your seams throughout the block are even and neat.
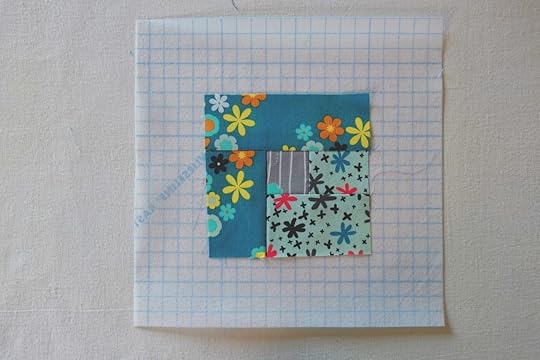 Once this section has been stitched the first round of the Log Cabin design is complete! Woop! From here on out, you’re going to be working in exactly the same manner to add in the remaining light, then dark strips of fabric.
 Next position, pin and stitch a strip from the second light fabric along the right and side of the block.
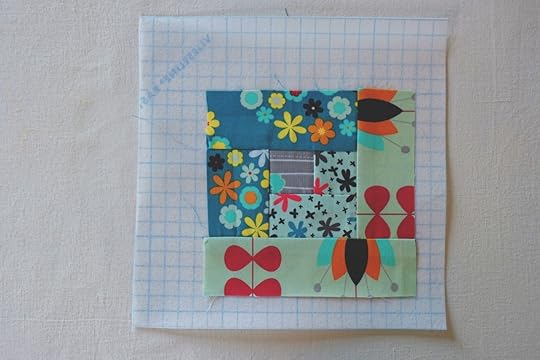 In the same manner, add in the second strip in this fabric along the lower edge of the block.
 Working up the left hand side, and using a strip of the second dark fabric, add in the next strip to the block.
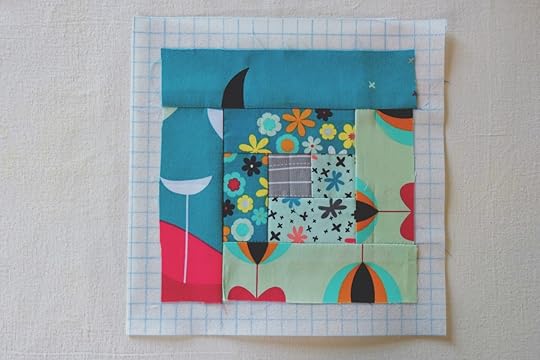 All that is left to do to complet the block is to add in the final dark strip in exactly the same way along the upper section of the block, flip it over to the right side, snip away the excess fabric, remove the pins, press and then bask in the glory of your Log Cabin block!
Now, how neat is that? And, I mean neat in both senses of the word! Because you are working with the grids all the stitching lines are super straight and the different pieces all match up neatly at the corners – no wonk here! You can work either clockwise or anti-clockwise around from the centre square, the principle for joining in the pieces will be exactly the same, just remember which direction you are working if you want to have all the blocks appear the same!
This is my go-to way to make super quick log cabin blocks, that I know will all come together neatly into a finished project. Now, if anyone needs me I’ll be transforming this pile of blocks into a mini quilt.
The post How to Make Log Cabin Blocks with Vilene Quickscreen Square appeared first on Made Peachy.


