
Laura Strutt's Blog, page 38
March 20, 2014
Handmade Gift Guide: Mother’s Day
Nothing is going to beat this High Five Mum Card, £3.75, RockTheCustard
You know that it’s Mother’s day this month, right? Sunday the 30 March to be precise. But, y’all knew that and are totally sorted with showing the love to the Mama’s out there, right? Well, whether you have this year’s mother’s day nailed or not, I thought I’d share some of my Etsy favourites in this Handmade Gift Guide for Mother’s Day!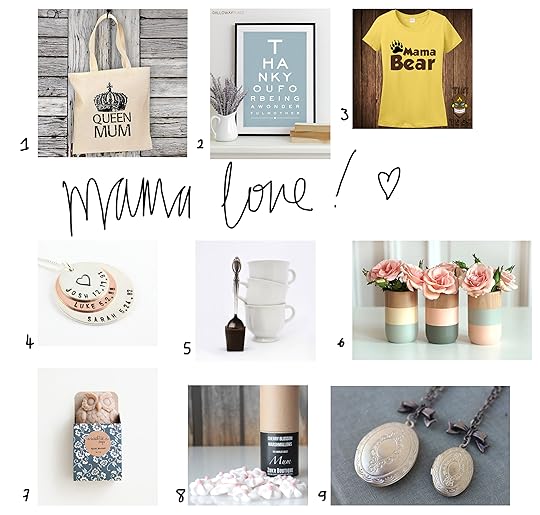 1 Queen Mum Tote Bag • £10.57 • HenhouseOriginals
2 Wonderful Mother Art Print • £12.43 • DallowayPlace
3 Mama Bear T-Shirt • £9.32 • TikiTee
4 The Silver Diva • £24.48 • The Silver Diva
5 Personalised Silver Spoon Hot Chocolate • £23 • TheTicketKitchen
6 Painted Woden Vases • £27.95 set of three • ShadeonShape
7 Chai & Vanilla Soap • £5.62 • SeventhTreeSoaps
8 Cherry Blossom Marshmallows • £4.95 • ZukrBoutique
9 Mum & Daughter Locket set • £26.11 • BellaHopeLockets
I’m pretty sure there is something ion that merry lot that will be a great gift for the mama’s in your life!
♥ – ♥ – ♥
Want to see some more of my handmade favourties? Be sure to check out my new look Creative Clippings column in the April issue of Sewing World – on sale now!
The post Handmade Gift Guide: Mother’s Day appeared first on Made Peachy.


March 19, 2014
What is Vilene? A Quick-Start Guide
Today is the first day that I will be hosting The Vilene Sewing Club workshops over at Sewing For Pleasure – these FREE workshops are based on a first come, first serve basis – so, you guys are going to have to get in quick>> be sure to check out my workshop schedule!
I can’t tall you how stoked I am to be running these workshops. Not only is this a fantastic opportunity meet lots and lots of awesome folks. It has been a great opportunity to work not only with Vilene, but also some of the finest brands out there – I’m particularly blown away by the awesome print cottons from Art Gallery Fabrics that I have been using for these projects…and, if I can still genuinely say that I am besotted with the selection of prints that I have chosen to work with for these projects, after pressing, cutting and preparing over 160 individual kits for this event alone, then it must be good – right?!
I know when I say Vilene to people that it usually gains one of two reactions – the first is a total blank, no clue whatsoever to what I am talking about. And, the other is usually a conversation that runs a little something like this…
Me: “…So, I demonstrate the different uses of the products in the Vilene range…”
You: “Ah! Yes! The Vilene – I use that!”
Me: “Oh Neat! Which products do you use?”
You: “Vilene…”
Me: “Great – which products are you favourites?”
You: “Vilene..?!”
Ok so that just sounds like I had a conversation with myself and made no sense at all, right? Well, you’d be surprised at how many times I have this conversation. I mean, the brand name – Vilene – seems to be something that y’all are more than familiar with, but the Vilene products you use might vary dramatically if you’re a quilter or if you’re a dressmaker.
Think of it this way…
Waiter: “…So, I can offer you a wide selection of specials on the menu tonight ”
You: “Ah! Yes! The Food – I’d like that!”
Waiter: “Oh Neat! Which food would you like?”
You: “The Food…”
Waiter: “Great – which foods are you favourites?”
You: “The Food…?!”
Can you see where I’m going with this? No doubt you will know - or will have heard of – Vilene as a brand, a popular brand in the sewing sector. Depending on what you type of projects you like to work on you might use a Vilene product as an interfacing for dressmaking, you might select a Vilene product for quilting or you might be picking out a Vilene product to add some substance or structure to your latest make.
With so many folks just refer to the specific product that they use – knowing which exact Vilene item they are referring to is a little tricky! So, how about a Quick Start Guide To The Vilene Range - to help you find the right product for your next project?
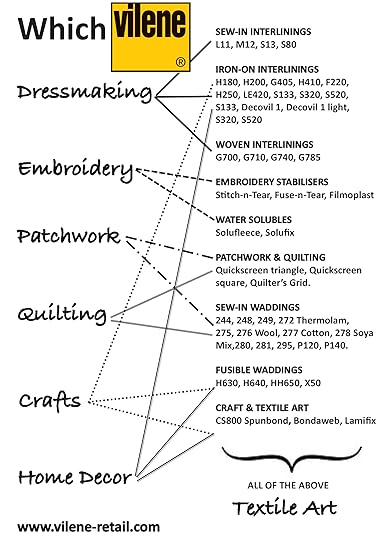
This handy chart will help you to identify the correct Vilene product for the next project that you plan to make.
As I spend such a long time working with different products in the Vilene range, I thought that it might be a rad idea to put together up a selection of Vilene Tutorials…so, if you’re looking for some information or are wanting a new project featuring something in the range – Just search “Vilene” in the side bar to view the relevant posts, if you can’t find the answer to your Vilene related question or you you have a question about using a Vilene Project – just leave a comment below…if I don’t know the answer, I’d be more than happy to try to find out!
The post What is Vilene? A Quick-Start Guide appeared first on Made Peachy.
March 18, 2014
Guest Post: DIY & Stress-Free Boho Weddings
Friends! I have made it safely to Birmingham – which is going to be my home from home for the next few days while I’m at the Sewing For Pleasure show - which starts tomorrow!!
So, today I’ll spending a fair few hours decorating our space at The Vilene Sewing Club, setting out the sewing machines and getting all the last minute preparations taken care of. The car is full to bursting with boxes of supplies, projects, fabrics, buttons, goodie bags – you name it, I think I’ve probably got it!
For the last few days, I feel as though I have been working non-stop trying to get all the different elements for the workshops ready in time. Now, don’t get me wrong, having a job that means that you can legitimately spend your day making stuff is fantastic. But, you know what, sometimes when that is your job, you will be working all hours, often creating high volumes of this stuff, and all in time to meet a deadline. All in all it is hard not to find yourself with your shoulders raised up so high that they are touching your ears, that your surrounded by a thousand things in various stages of completion and feeling just about ready to sob.
Of course it gets like that sometimes, it wouldn’t be called ‘work’ if it was super easy it would be called ‘a walk in the park’ or ‘a piece of cake’ or something like that, right? But, staying sane, when your making and creating to deadlines is a bit tricky – trust me, there are a few folk that will sympathise with you when you’re wailing, “But, I just need to get all one billion squares cut/forty thousand buttons stitches on/12 million miles of bunting finished!”
When creating gets stressful I like to keep lists, lots of lists – having things noted down, so that you don’t need to feel as though you have to hold everything inside your overflowing brain is a huge relief. Plus, there is nothing quite as satisfying as being able to check things off the list – am I right?!
Getting ready for a large event, working on a large deadline, is quite a lot like preparing for a DIY Wedding. I mean, you are making lots of the same things over and over, you want everything to be your very best and you got to have it all done by a certain date – yup, it’s hard not to feel the pressure is on! If you are dreaming of a DIY wedding day, you might want to check out my Guest Post on preparing for a DIY Wedding - without the stress – over on Boho Weddings!
And, if any of you other friends are on a deadline this week, have a project to finish up, or have a To Do List fit to bursting, I wish you the best of luck – get some coffee, get some fresh air and get stuck in! You can do this! (team talk over!)
If you need me, I’ll be giving my guns a bit of a workout, unloading the car and getting the Sewing Club all beautiful, ready and set up!
The post Guest Post: DIY & Stress-Free Boho Weddings appeared first on Made Peachy.
The Great British Sewing Bee: Sew Your Own Wardrobe Winners!
You guys! I have been blown away by the amount of entries for this giveaway in the comments below, over on Twitter and on the Made Peachy Facebook page. It has taken me so long to collect together all the entries and to add them into the pot to draw out the winner. But, you’ll be pleased to hear, the time has come to finally announce the winner!
 CONGRATULATIONS TO…
Shona Johnstone
Jodie Gould
Hettie
Please email over your UK postal addresses and we can get this copies on their merry way to you!
 What I would love is to be able to give all you guys who entered a copy of this rad book, then tell you to grab your sewing machines and come on over and we’ll have ourselves a Sewing Bee party. Sadly, that’s not going to happen, not least because I don’t have enough space in my home for all y’all…never mind enough plug sockets to fire up all those sewing machine! But, I hope you’ll appreciate the sentiment.
 But, if you didn’t win this time, why not take up this Special Discount Offer to get your own copy today? Readers of Made Peachy can buy The Great British Sewing Bee: Sew Your Own Wardrobe at the special price of £20 (normally £25), with free UK p&p. To order call 01256 302699 quoting reference 9ZO.
Now, if you’re heading to the Sewing For Pleasure show at the NEC this week – be sure to swing in past The Vilene Sewing Club and say Hello!
The post The Great British Sewing Bee: Sew Your Own Wardrobe Winners! appeared first on Made Peachy.
March 16, 2014
Guest Post: Happy Birthday Craft Candy
You guys! Craft Candy are celebrating their birthday!
If you haven’t had the chance to go check out their site lately, you really must! Craft Candy is the one-stop-shop for creative folks looking to connect with, well, other creative folks!
If you’re looking for workshops, craft markets and clubs that are happening where you are, right now, then swing over to see what is going in your ‘hood! Now you can stay connected with our growing community of creative folks simply by checking out Craft Candy!
This purpose-built dedicated website is just what you need to seek out something good to do today! Visiting the website will let you search for classes, courses and events in a chosen area simply by checking out the events listings covering events from across the UK, including Wales, Scotland and Northern Ireland – plus once you’ve found what you’re looking for you can share it using the easy-peasy social media buttons, so you can tell all your friends too!
You can also use Craft Candy to recruit more creative enthusiasts to your Knitting Club, your sewing bee or give your craft market a shout out. Listing your event over on Craft Candy will take the pain out of getting the word out to right people – all you have to do is register for a free account and you can start listing your event for free – neat, huh?!
In fact, if you don’t already follow CraftCandy on Twitter – you really should, it’s a great way to keep you finger on that creative pulse!
And…there’s more…Craft Candy also has a FREE app! Download this handy tool to your smartphone and you will be able to search for craft markets, clubs, stores and workshops in your local area – or, with the magic of GPS you can find what is happening exactly where you!
Download the CraftCandyApp for Free!
As you can see, I’m pretty enamoured with this super handy crafty tool – so, to celebrate a whole year of connecting craft people, I wanted to wish them a very happy birthday with this quick and cute paper doilie bunting project!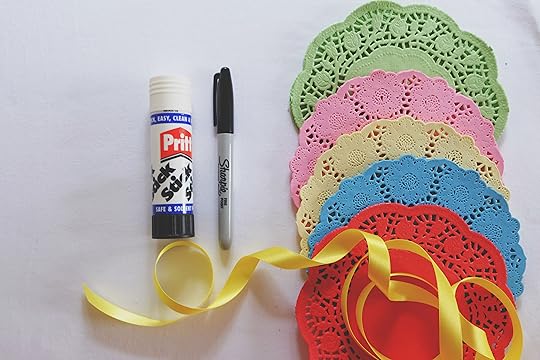 Bunting is one of my favourite party additions, whatever the occasion. But you might not have enough time to dig out the sewing machine and whizz up a couple of metres of fancy pennants. No worries, grab just a pack of colourful paper doilies and few simple supplies, you can make something a little fancy in no time at all!
 Head over to Craft Candy to check out my gust post sharing this super-quick paper doilie project!
And, be sure to with them a very Happy Birthday too!
The post Guest Post: Happy Birthday Craft Candy appeared first on Made Peachy.
March 14, 2014
Sewing For Pleasure Workshops: The Vilene Sewing Club
Happy Saturday folks!
Right now, I find myself underneath a mountain of fabrics. That, my friends is no exaggeration either! I’m spending the weekend cutting, prepping and packing for the exciting new Vilene Sewing Club Mini Workshops that I will be hosting at Sewing for Pleasure next weekend!
Over the past few weeks I’ve been working on some fun mini make designs, drafting patterns and searching out some of the finest fabrics and supplies. These workshops will help you to learn (or polish up on) a few essential sewing techniques, and you’ll finish up with a cute little project to take home too!
Not only will you be able to try out a few technique, these mini makes will also help to demonstrate some of the products in the extensive Vilene range, and help you to find the right products to take your makes to the next level!
These workshops are completely free (the best price there is, right?!) and will be running throughout the days of the event – the places for the workshops are limited but, they are bookable on the day of the event, on a first come, first served basis…so, you’re going to have to get in quick!
Whilst I’m up to my little eyeballs cutting, pressing and preparing, I thought I’d share a quick peek at the projects you can make with me at The Vilene Sewing Club and the timetable of the workshops throughout the event!
The Vilene Sewing Club Workshops, Sewing For Pleasure
20-23 March, NEC Birmingham
10.30 PETER PAN COLLAR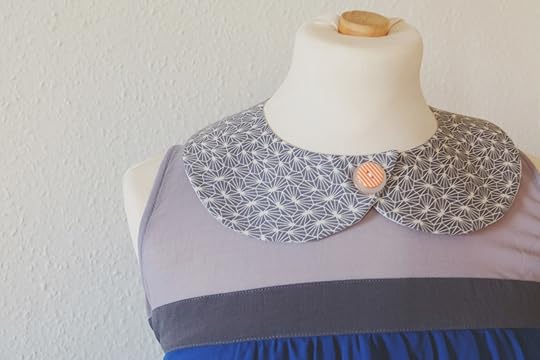 Create your own stylish removable Peter Pan Collar in a duo of designer prints.
Skills You’ll Master: working curved seams, neatening and clipping seams, turning through, slip stitch, adding double faced buttons, applying a snap fastener.
11.45 THE EVERYDAY PURSE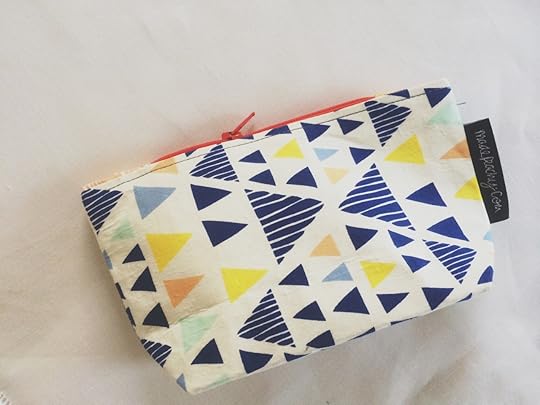 Discover how to make a simple and stylish purse with many unique customisation options.
Skills You’ll Master: creating neat box corners, neatening seams, applying a fastening/zip.
13.00 THE EASY BABY BIB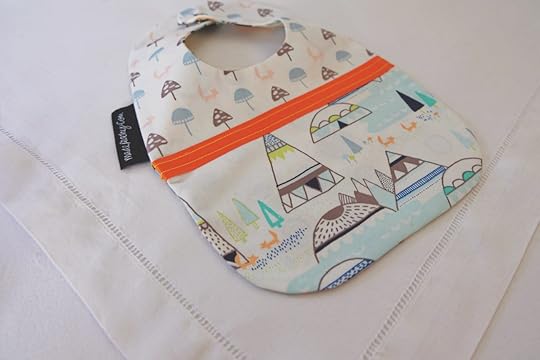 Create a reversible baby bib using a combination of stunning contemporary prints.
Skills You’ll Master: piecing contrast panels, working curved seams, neatening and clipping seams, slip stitch, top stitching, applying a snap fastener.
14.15 LOG CABIN POT HOLDER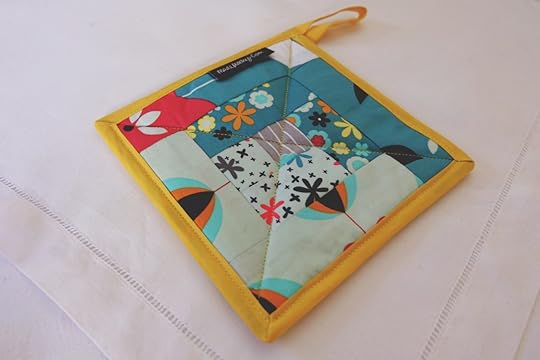 Add a modern twist to a kitchen classic with a fun blend of designer print cottons.
Skills You’ll Master: log cabin piecing – using Vilene Quickscreen Square, layering elements for quilting, adding simple quilting, applying binding to finish raw edges
15.30 SLEEP MASK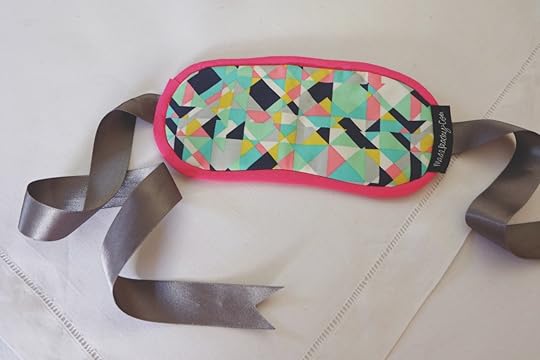 Relax in style with a custom eye mask created in a duo of striking printed cottons, contrast piping and teamed with an elegant ribbon tie.
Skills You’ll Master: creating and inserting piping into a seam, securing ribbon ties, working curved seams, clipping and slipstitch.
♥ – ♥ – ♥
If you’re heading to the Sewing for Pleasure show at the NEC, Birmingham next week do pop in past the The Vilene Sewing Club and come say Hi!
Not got your tickets yet? Not a problem – you can buy them online right now!
Ok, so if anyone needs me, I’ll be cutting, pressing and packing my way out from under this mind-blowingly huge pile of stitching supplies!
Have a rad Saturday Y’all!
The post Sewing For Pleasure Workshops: The Vilene Sewing Club appeared first on Made Peachy.
March 13, 2014
How to apply Vilene Lamifix
So, today I want to talk about Lamifix.
Ok, if you guys haven’t met before, let me introduce y’all. Vilene Lamifix is a fusible film that can be applied to the surface of a fabrics to give it a wonderful water-resistant surface. This can be used in a whole heap of projects from bags, fabric bowls, table set, book covers – or any of a million projects that you might dream up. Lamifix is available in two different finishes – a gloss and a mat – each offering a different look to your finished makes. While Lamifix is water-resistant it isn’t wise to put it in the wash, instead finished makes can be cleaned with a damp cloth.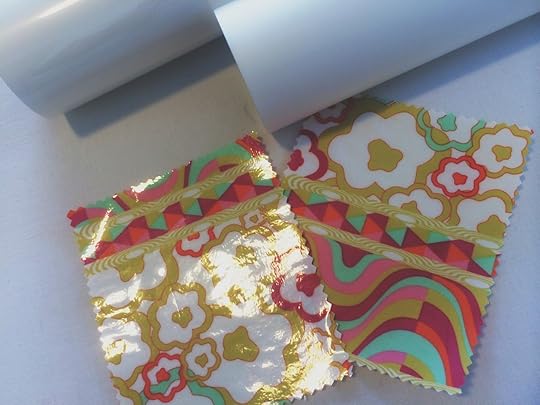 The upper roll is Vilene Lamifix Gloss and the lower one Vilene Lamifix Matt.
The swatch to the left features Vilene Lamifix Gloss, while the swatch on the right is showcasing Vilene Lamifix Matt.
The great thing about Lamifix is that this film is fusible using the heat from the iron, so you don’t need to hunt out anything fancy to secure it to your chosen fabric. Stop right there. I know what your thinking! Isn’t putting a hot iron onto a sheet of film going to end up in some kind of burt, stinking mess on the bottom of the iron? Yup! You got it in one! The iron can’t come into direct contact with the surface of the Lamifix, or else you’re going to end up with grubby mess on your hands! There is a secret to getting this fused, so here is my step-by-step guide for How To Apply Vilene Lamifix!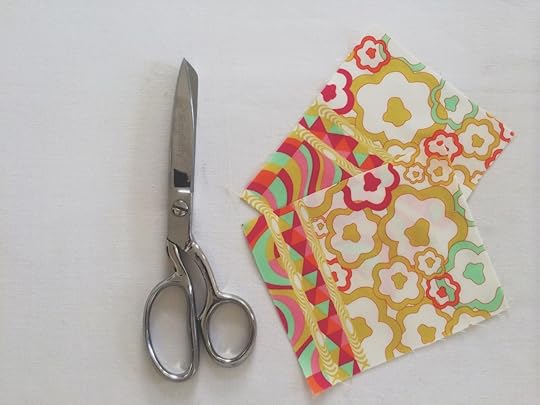
Begin with a piece of fabric cut down to your chosen size. You will be working with a single sheet of Vilene Lamifix, which needs to be cut slightly larger than the fabric, so allow a 1-2cm border around the raw edges. Place the fabric right side up and press flat – because, let’s face it, there is no point adding a fancy finish if the fabrics is a huge mess of wrinkles! Once the fabric has cooled place the sheet of Lamifix on top so that the adhesive side is in contact with the fabric. You can identify the adhesive side as the side that is the least smooth, whether it is gloss or mat – plus, this will the side that is innermost when it is on the roll to help avoid confusion. Once the Lamifix is in position, place a sheet of baking parchment or a piece of cotton over the top - it is this layer that allows the heat to bond the adhesive, but prevents the surface from melting and burning – I know, neat huh?!
 With the iron on a medium heat setting, begin to work over the surface slowly and steadily, allowing the heat to activate the adhesive.
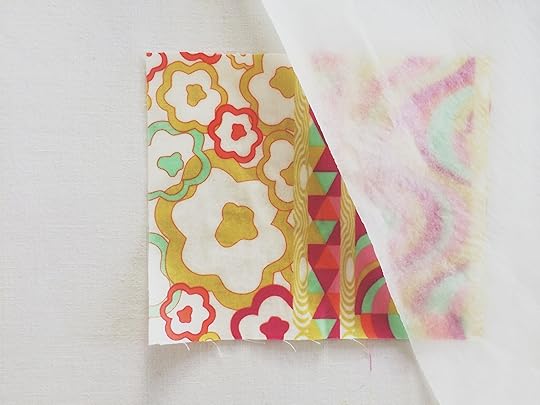 Remove the baking parchment to reveal the Lamifix film fused to the surface. Allow to cool for a couple of seconds (because, trust me on this, Lamifix get’s pretty hot when you’re applying. With your fingertips work around the edge of the fabric release any of the border that has attached to the ironing board. Trim away the excess Lamifix.
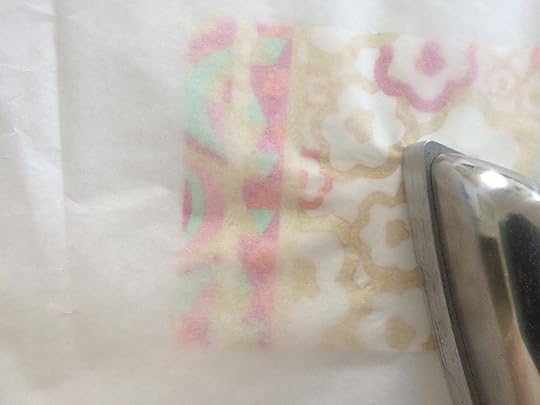 After the excess has been removed, recover the Lamifix covered fabric with the baking parchment and press again with the iron on a medium heat. This will help to smooth out the fabrics and ensure that the adhesive has been fully bonded to the surface of the fabric. Work slowly allowing the plate of the iron to make contact with the entire surface of the fabric.
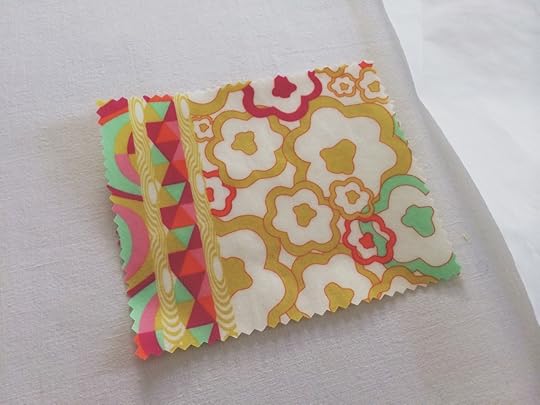 Once the surface has been fully press for a second time, remove the baking parchment and allow the Lamifix coated fabric to cool for up to 30 minutes – not only will this save you from burning your fingertips (like I said, this does get pretty hot!) but, it will allow the adhesives to create a strong bond with the fabrics.
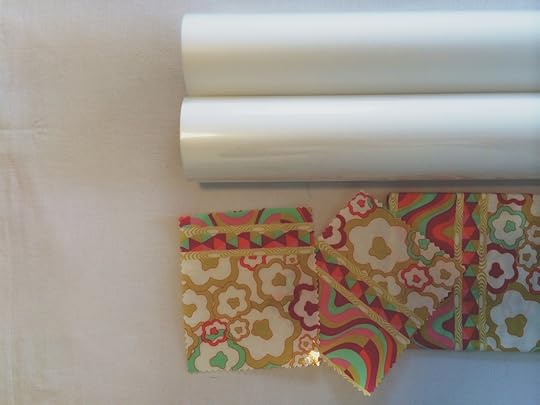 Because the only difference between the Lamifix Gloss and the Lamifix Mat is the surface finish that it will give to your finished project, you can apply them in exactly the same way!
Take my word for it, once you start experimenting with this fusible film you’ll be amazed at how many of your makes you want to include it in!
Looking for a project to give Lamifix a try?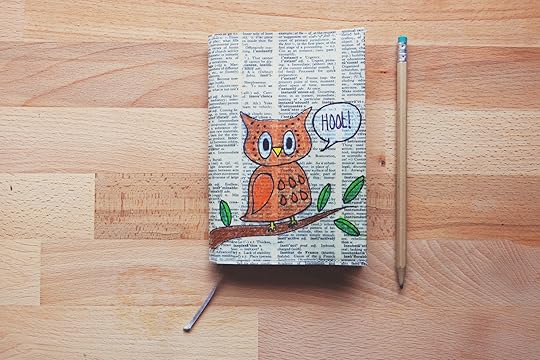 How about this Custom Notebook Cover?
So, friends, go forth and add a fab finish to your makes – what project do you think you’ll add Lamifix to first?
♥-♥-♥
For more information on Lamifix and the Vilene Range visit Vilene or contact crafts@stockistenquiries.co.uk to find your local stockist.
The post How to apply Vilene Lamifix appeared first on Made Peachy.
March 12, 2014
Easy Fabric Motif Statement Necklace
Time is at a premium for me right now. I mean more so than usual. But, just because I have to keep my head down and get through a heap of deadlines and commissions doesn’t mean that I don’t want to treat myself to a quick little creative fix.
I love working from what’s in my stash, looking for things that can be teamed together to make a whole new project. You don’t have to rummage too far into my fabric haul to realise that I am a sucker for a bold statement print. I’m even know to keep the smallest off-cuts from larger makes just to keep hold of the pretty motifs. Armed with a few basic jewellery and stitching supplies you can make this Easy Fabric Motif Statement Necklace in an afternoon!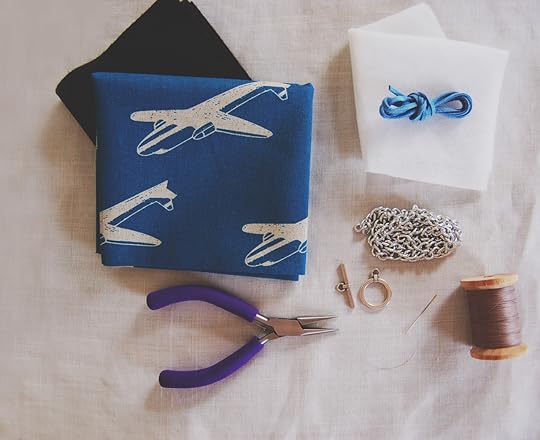 Grab your supplies…
Pick a piece of print cotton with a large motif
Small piece of felt
Small piece of Vilene fusible wadding
Fabric sheers
Jewellery chain
Jewellery fasteners
Jewellery pilers
Needle and thread
Small length of leather thong (optional)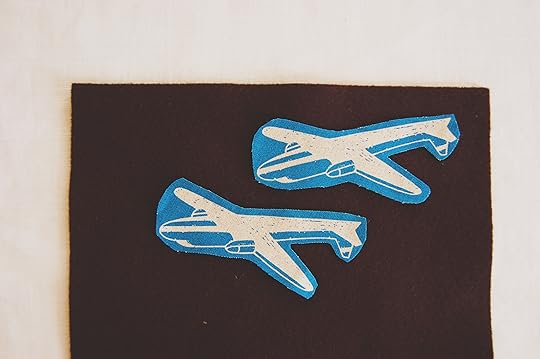 Using the fabric sheers cut out the one or two of the large printed motifs, trim roughly around the shape leaving a small border around the design. You can pick one large design, or a number of smaller motifs and layer them together to create your design, as I have done here.
 The necklace is created in layers, with the felt on the bottom, fusible fleece, then the print cotton on the top.
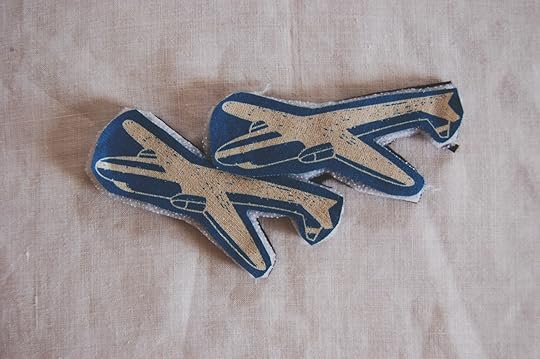 Time the three layers to match the cut out of the fabric motif and fuse the cotton and the wadding using a hot iron.
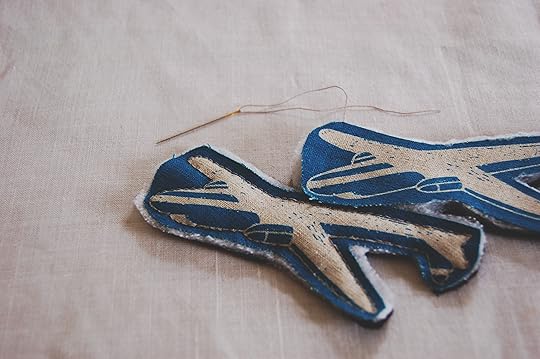 Using a needle and thread, work around the design in small neat back stitches. Working around the outline of the motif give this necklace a slight volume that adds to the drama!
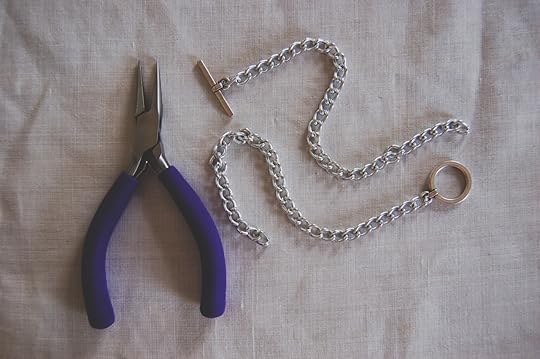 With the jewellery pilers, ease apart one of the links in the centre of the chain to create two equal lengths of chain. Use the jewellery pilers to secure the jewellery fasteners onto one end of each of the lengths.
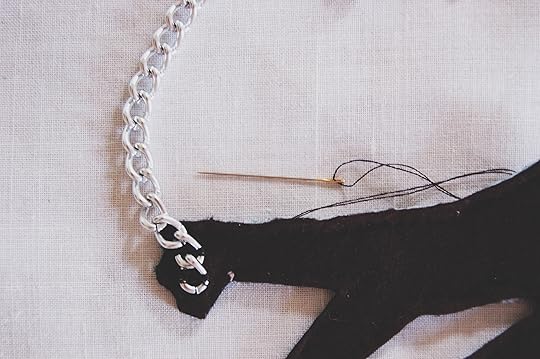 Working on the felt backed, wrong side, of the fabric motif, position the two chain ends to they sit at either end of the design. If you’re fabric motif is an unusual shape (like this one!) use a safety pin to hold in position so that you can try it on, this means that you can get the position of the chain just right before you secure it in place. Once you’re happy with the way that the necklace sits, use the needle and thread and work a few stitching into the two or three links on either side to secure in to place.
  I tied a small bow with the leather thong through a couple of link of the chain on one side because, well, what the heck! One fabric motif statement necklace dray to wear in no time!
Go take a look though your fabric stash, I bet you have something really pretty tucked away in there that will make a rad necklace!
The post Easy Fabric Motif Statement Necklace appeared first on Made Peachy.
March 11, 2014
Sharing the Love: Shout Outs!
Happy Wednesday Friends!
The last few weeks I have been overwhelmed by the support and response to my new book – and, as people have been so kind to me, I thought that I would give a couple of Share the Love Shout Outs!
These here are some of the most wonderful folks, so why not take some time to go check them out!
 The amazing Ella who blogs over at Hello Wonderful - now this is a lifestyle blog that you need to be adding to you blog reader – has fast become one of my favourite folks on the old internet. Seriously, this is one smart, savvy, funny and endlessly kind lady! When I started this little place last summer, Ella was super supportive and enthusiastic from the very get-go, not only did she share a bucket load of wisdom – blog related and otherwise – she inspired me with her A-Team style motivation! I think that outside of my family and (in-real-life) friends, Ella was one of the folks that was most eagerly anticipating the arrival of my new book, not only that, she got her hands on a copy and shared her thoughts on it too! To get a complement from a friend is a pretty rad feeling, but when that friend is also someone that you respect and admire in this cosy world of blogging, well, that is double joy!
♥ – ♥ – ♥
I first met Kerrie when we were making arrangements for our wedding back in 2012, even though we had a super small budget for our wedding, we both knew that having a collection of photographs to hold our memories was a top priority for us. I spent an age searching high and low for a photographer that would suit our personal style, some one creative, contemporary and, most of all, fun. Kerrie was the first on the list of wedding photographers that we met with and, let’s put it this way, after seeing her portfolio of previous wedding couples it was love at first sight and we cancelled all the appointments with the other photographers! I’m beyond thankful for meeting such a tremendously talented photographer, not only did she do a stirling work with our collection of wedding photographs, but she also let me include many of them in The DIY Wedding Manual. Already hitched? No intention of getting wed? You know what, Kerrie also offer’s boudoir and family photography too – now, go take a look and don’t tell me you’re not tempted!
Don’t Miss Out!
Want to know something else cool about Kerrie? She’s running a fun giveaway for the DIY Wedding Manual over on her Instagram – if you follow her you’ll not only get to see some stunning sneak peeks of her photography, but you will also get so see snaps of her adorable pup Tagg!
♥ – ♥ – ♥
Over the last few week I’ve been working on some guest posts, now this is a fantastic opportunity to meet lots of new people and it is a lot of fun…but, you know what it, can also be a little daunting too. I mean, in the ‘safety’ of your own little internet space, you feel comfortable, you know what you’re doing. But, when you work on a gust post for someone else’s blog (particularly if it is a blog that you have been a long time fan of and hugely admire!) you can get all kinds of nervous, you can find yourself writing and re-writing the post over and over again, fretting and worrying over every little thing!
Laura Howard was just the sweetest to include my guest post on Bugs and Fishes - and despite the fact that I was more than just a little star struck – she quickly put me at my ease and made me and my little guest post feel super welcome on her awesome site.
But, wait! There’s more!
Laura is holding a giveaway for five copies of The DIY Wedding Manual - get in quick, this giveaway closes at 10pm tonight!
♥ – ♥ – ♥
Life gets pretty busy sometimes, but not too busy to be thankful for the awesome folks that cross our paths! So, tell me, who’s been your little ray of sunshine lately?
The post Sharing the Love: Shout Outs! appeared first on Made Peachy.
March 10, 2014
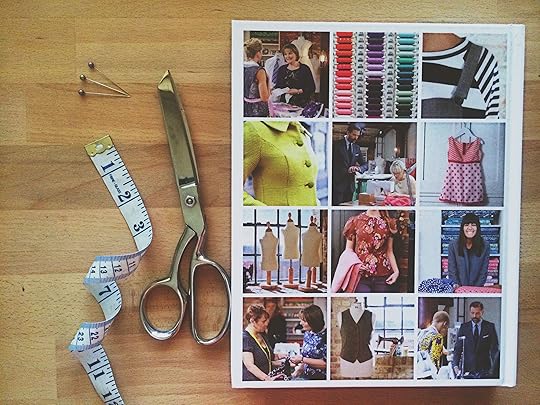
Creative Reading: The Great British Sewing Bee – Sew Your Own Wardrobe
I’m a sucker for a good book. And, by a good book I mean something that is inspiring, interesting and great to look at. When the latest title in the series from phenomenally popular TV show The Great British Sewing Bee, presented by Claudia Winkleman and judged by Patrick Grant and May Martin, landed on my desk I knew right away that this was going to be a good book!
In fact, I’m going to stop right there. The Great British Sewing Bee: Sew Your Own Wardrobe isn’t just a good book, this is so much more than that. This is a garment sewing mega package! Alongside the book there are five full sized pattern sheets, in sizes 8 – 18, for the garments featured in the book.I’m going to go right ahead and take it as read that y’all are watching the new season of The Great British Sewing Bee with the same levels of excitement that I am. This book is a great follow on if you already own the first book in the series, and it’s brilliant if you are following the TV shows, in fact, even if you don’t (are you insane?!) this is a stylish sewing book with fabulous, wearable garments that you will return to again and again!
 What’s my very favourite thing about this book? Yes, it is cover-to-cover packed with practical and clear advice. Yes, there are lots of clear illustrations and beautiful photographs. Yes, it has a whole heap of full sized patterns to use. But, you know what? The thing that makes me love this book the most is that are the garments designs are all clothes that I want to wear. Actually want to wear! I’m talking wardrobe essentials – pencil skirt, short skirt, halter top, shift dress, tea dress, wrap dress, easy T-shirt, vintage coat…and that’s not even the half of it! There is also some classic pieces for the menfolks – trousers, waistcoat and shirt designs – and the Littles – teddy bear pram suit, baby dress and knickers set and cool dungarees.
The fashion-led designs, teamed with the stitching masterclasses through out the book, is exactly what makes most of us want to go to the effort of learning to make our own clothing in the first place.
 The only downside is that this book has arrived on my desk at perhaps the busiest time in my work schedule so far this year. I daren’t spend too long looking though it, thinking about fabrics, and dreaming about a whole new wardrobe for the summer, or I just won’t get a single scrap of work done. (Probably shouldn’t blame a book for my lack of self control in this matter, but there you go!)
♥ – ♥ – ♥
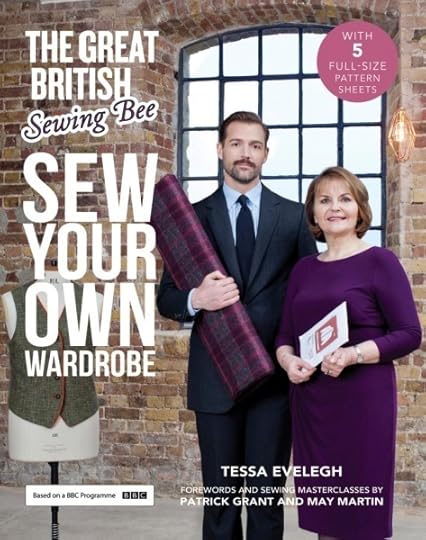
Now, I know what you’re probably thinking, she’s just going on about this amazing new book she’s got her little mitts on, but what’s in it for us? Well, I’m glad that you asked – I have three copies of The Great British Sewing Bee: Sew Your Own Wardrobe, £25, Quadrille, up for grabs for three luck Made Peachy readers! See, I’m sharing the love with you guys right there!
So, how do you enter?
Easy! So that y’all get a fair whack at it, there are a number of ways you can enter this giveaway – and the best part is each one will be counted as 1 entry…so, do all three and you will be entered three times my friend!
1 Please leave a comment below sharing why you want to sew your own wardrobe
2 Share this post on Twitter, tagging @madepeachy and using the hashtag #GBSBMadePeachy
3 Give the MadePeachy Facebook page a like, share the giveaway post and leave a comment on why you’d love to win!
The giveaway is for those with UK postal addresses only (sorry international chums!) The winner will be pick at random and announced on the 18 March - Good Luck!
The post Creative Reading: The Great British Sewing Bee – Sew Your Own Wardrobe appeared first on Made Peachy.


