
Laura Strutt's Blog, page 35
April 19, 2014
Sunday Style: Must-Have Midi Skirt
This classic cut linen Midi Skirt with pocket and tie waist detail is a sure fire win for the spring, £28, ASOS
This Easter break for us, is one packed to the rafters with home renovations and DIY projects. There are lots of little tasks that we have been meaning to get too for ages, but as you all know, life sometimes gets in the way. So, this long weekend break is the perfect time for us to get busy, get building and get painting. While I’m going to be living in my dungarees for the foreseeable, I can’t help but dream about getting back into pretty clothes.
This spring I have my sights set on the midi skirt. It is the perfect length for the is-it-warm-enough weather where it’s blissful in the sunshine, but still quite chilly in the shade. I adore the acid bright of this yellow linen and have set out on a quest to find the perfect waist-tie pattern and team it with some bold linen fabrics – so check out this Style Sunday: The Must-Have Midi…
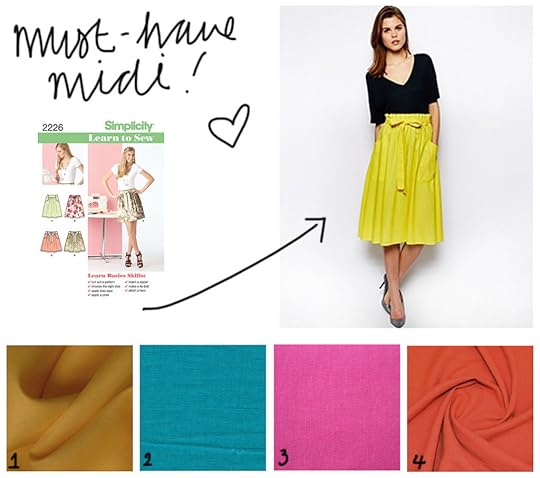
The Pattern
Simplicity 2226, sizes 6-18 SimplicityNewLook
From the Learn to Sew pattern collection this pack contains a range of simple and stylish skirts. Select Design D for the flared design with the pocket and tie-waist details.
The Fabrics
1 Yellow Linen • £11.75 per metre • DittoFabrics
2 Turquoise Blue Linen • £12.80 • StoneFabrics
3 Pink Bio Linen • £19.80 per metre • DragonflyFabrics
4 Blades Aurora Linen • £7.99 per metre • Calicolaine
I wish that I could spend this Sunday stitching and making something beautiful, stopping only to eat more Easter egg chocolate. But, I have a mountain of DIY projects that need my attention and let’s face it those stairs are going to sand and paint themselves (I know this to be true, as they haven’t magically done them by themselves yet!) so it is probably a good thing that my sewing machine is still in the shop for it’s service, or I’d be sneaking off to get work up one (or three!) of these delicious midi skirts!
Have a wonderful Easter friends!
The post Sunday Style: Must-Have Midi Skirt appeared first on Made Peachy.


Sewline Pens Epic Giveaway Winner!
Happy Saturday Y’all!
Holy wow! Thank you all for getting behind the Sewline Giveaway last week- I’m so stoked with all the entries…here, over on Facebook, Twitter and Instagram. The response has been completely mind-blowing – and by ‘mind-blowing’ I mean that it has taken me hours to sort through all the entries and to get them all added into the hat to pull out the Winner!
Congratualtions….
 Katy
KatyDo check your email and get in touch with your postal address so that I can get this amazing set of Sewline pens out to you!
Now, when I was drawing out the winner from the hat – the ‘hat’ in this case was a vintage cocktail shaker glass – the volume of entries totally blew my mind (I think I may have already said that). So, I have worked a little bit of magic and have three (very) mini runner up prizes to share. So, hold on to your hats the Three Bonus Runner Up are…
 Congratulations!
1 Frances
2 Rosanneduk
3 Sara SewLittletosay
Do email over your postal address so I can get a Sewline Styla Pen out to you as a Bonus Mini Prize!
 If you want to find out more about the amazing range of Sewline pens c/o EQS – check out my Tried & Tested on this entire collection!
The post Sewline Pens Epic Giveaway Winner! appeared first on Made Peachy.
April 17, 2014
Obsessed with…Bunnies
Jackalope on a Bike T-shirt, £12.22, MissionThread
Ok…I’ll confess. It’s more the mystical Jackalope that has captured my heart. In fact is there anything better than seeing this ‘fearsome critter’ on a bicycle? Yup! That is going to be the most awesome thing that you see today.
But, because it is Easter and because we all know I’m a sucker for the cute out there, it will come as no surprise that I have been collecting together a round-up of my fave rabbit-themed handmade goodies – and yes, I sneaked a little Jackalope in there – because right now, I’m Obsessed With…Bunnies!
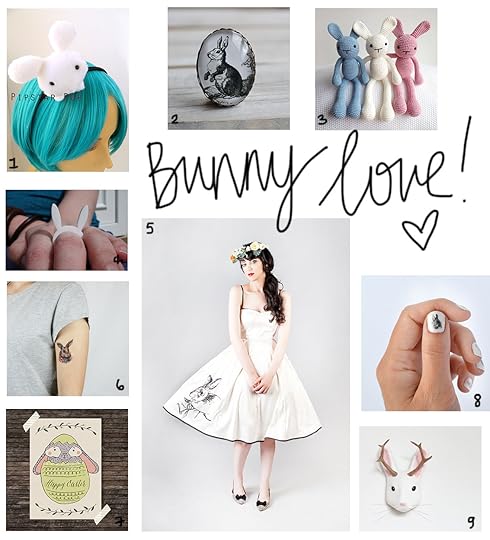 1 Bunny Plushie Headband • £5.50 • PipStarPop
2 Vintage Illustration Cameo Brooch • £9.86 • SilkPurseSowsEar
3 Crochet Bunny Plushie • £25.36 • MarigurumiShop
4 Fionna Adventure Time Rabbit Ear Ring • £4 • FireTheLaser
5 Ivory Satin Rabbit Print Tea Dress • £119.17 • Julbyjuliagasin
6 Rabbit & Floral Wreath Temporary Tattoo • £3.67 • PepperInk
7 Bunny Easter Postcard • £2.44 instant download • BumbleNBirch
8 Rabbit Nail Art Decals • £8 for a set of 40 • HelloHarriet
9 Paper Mache Jackalope • £39.11 • Macheanimal
Hey – whaddya know…a whole bunny round-up without a single trashy Playboy Bunny in sight, that wins the whole of the internet, right?
♥ – ♥ – ♥
Want to see some more of my handmade favourties? Be sure to check out my new look Creative Clippings column in the May issue of Sewing World – on sale now!
Plus…in this issue I share sweet little peek into my sewing studio and Little Waffle’s photo is there too *proud Puppy Mamma Moment*
The post Obsessed with…Bunnies appeared first on Made Peachy.
April 16, 2014
Easter Egg Hunt Printables
Easter is just around the corner – whatever your plans are for the weekend, why not use these Free Easter Egg Hunt Printables for a fun Easter Egg hunt? It has probably been too many years for me to count since I last had an Easter Egg Hunt – and boy do I miss it! So, this year I decided that it’s not just for the Littles! Now, armed with an abundance of chocolate eggs and these cute Easter Egg Hunt I’m ready to set a trail of fun around the garden…so who’s with me?
 Righty, folks – go grab your chocolate eggs, download these Free Easter Egg Hunt Printables and have yourselves a wonderful Easter!
The post Easter Egg Hunt Printables appeared first on Made Peachy.
April 15, 2014
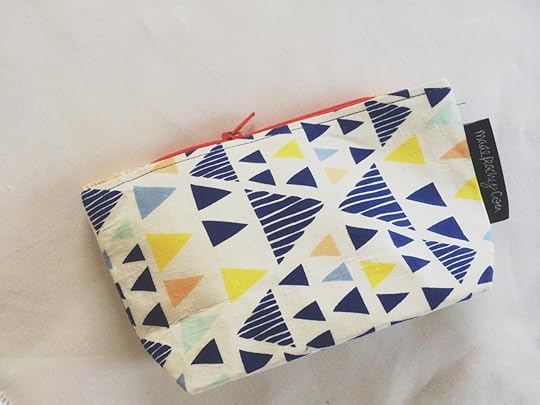
The Vilene Sewing Club: Everyday Purse
Discover how to make a simple and stylish purse with many unique customisation options. Skills you’ll master…creating neat box corners, neatening seams, applying a zip fastening.
Grab your supplies…
Print cotton, two complementary designs
Vilene Decovil 1 Light
15cm Zip
Dressmaking Scissors
Pinking Sheers
Sewing Machine
Iron
Pressing Cloth
Let’s make an Everyday Purse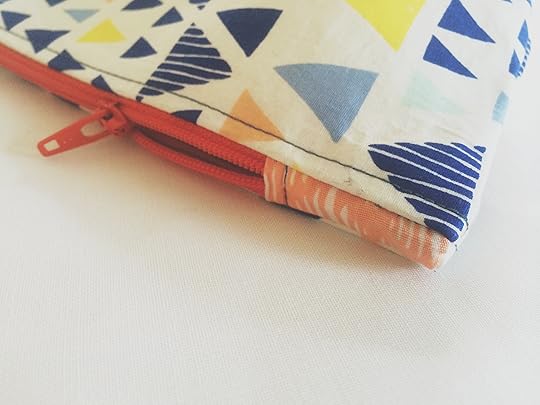 Step 1
From one piece of print cotton cut two strips that measure 5cm by 11.5cm – these will become the end tabs for the zip fastening. From the second print cotton cut two pieces measuring 14cm by 20cm for the main part of the purse. Cut two pieces of Vilene Decovil 1 Light measuring 14cm by 20cm, this will give the purse structure.
Step 2
Working on one of the zip end tab strips at a time, fold the strip in half aligning the raw edges on the two shorter ends and press. Fold the raw edges at each end under by 5mm towards the wrong side and press in place. Repeat to create the second zip end tab.
Step 3
Position the end of the zip so that it sits centrally inside the folded end tab and pin in place. Repeat to position the remaining zip end tab to the other end of the zip. Adjust to ensure that the tabs are neat and even, that the zip is straight and that the entire length of the zip and the end tabs measure 20cm. With a straight machine stitch, woking 5mm from the folded edge of the zip end tab secure the tab to the zip. Be sure to stitch slowly and neatly as this will be visible on the finished purse, and remove the pins as you work so as not to damage the needle – also be aware of any metal parts if they are present on the zip as stitching through these will break the needle. Repeat to secure the second zip end tab to the other end of the zip.
Step 4
Ensuring the pieces of the main fabric of the purse is press neatly, and place flat with the wrong side uppermost. Position the Vilene Decovil 1 Light on top of the fabric so that the adhesive (shiny) side is facing the wrong side of the cotton. Cover with a slightly damp pressing cloth and secure in place by pressing on a low/medium heat. Once secured, set aside for up to 30 minutes to allow the adhesive to cool and fully bond.
Step 5
Working with one piece of stabilised cotton at a time, place right side up on a flat surface. Position the tip face down onto the upper edge of the cotton, aligning the raw edge of the fabric with the edge of the zip. The zip ends tabs will extend slightly further than the cotton. Pin into position, and open the zip half way.
Step 6
Using the zip foot, work along the length of the zig to secure it into position. The zip foot allows the stitches to be worked neatly and closely along the length of the zip. Before reaching the zip tab, stop the machine with the needle in the down position and raise the presser foot. Carefully draw the zip tab back past the foot to close the zip, this prevents the bulky zip tab from getting in the way while stitching. Lower the presser foot and continue stitching to secure the entire length.
Step 7
Open out and finger press the seam allowance back towards the main fabric of the purse and pin in place. Re-open the zip part way, with a straight machine work along the main fabric with a line of neat top stitching to secure the seam allowance away from the zip fastening. Using the zip foot allowing the stitching to be placed neatly along the length of the purse close to the seam. Before reaching the zip tab, stop the machine with the needle in the down position and raise the presser foot. Carefully draw the zip tab back past the foot to close the zip to prevent it from interfering with the zip tab.
Step 8
Secure the second piece of print cotton to the zip, by placing the fabric right side uppermost and aligning the outer edge of the zip along the raw edge. The two cotton panels will now be placed with the right sides facing and the side seams will be aligned. Pin into position. In the same manner, secure the zip to the purse working with a straight machine stitch and using a zip foot. Ensure that the zip tab is repositioned during stitching to prevent it from interfering with the stitching line. Once secured, open the purse out and finger press the seam allowance back towards the main fabric and secure in place with neat top stitching.
Step 9
Open the zip fully and keep open for the remaining steps of the project. Place the two side of the purse together with the right sides facing. Ensure that the raw edges along the side and the lower edges are aligned, and the under side of the zip fastening runs along the top of the purse. Pin in place. Returning to a standard presser foot, work with a straight machine stitch and take a 1cm seam allowance to join the two pieces of the purse together. Begin at one upper edge, stitch to the corner, stop the machine with the needle in the lowered position and pivot to align the machine to work the lower seam. Stop and pivot the machine in the same manner for the second side before continuing up the second seam.
Step 10
Using pinking sheers, trim down the seam allowance to secure and prevent fraying. Work around the purse to finger press the seams open. Working on one corner at a time, draw out the sides of the purse to bring the side seam and the lower edge seam together. Move the fabrics around until the two seams are positioned directly on top of each other. Pressing the seams flat together make a 5cm line directly across the corner, this will become the stitching line for the box corners. With the remaining fabric for the purse pushed out of the way, pin together to keep the seams aligned. With a straight machine stitch, work along the marked line to secure the box corner in place. Snip the excess fabric from the corner and trim with pinking sheers to neaten the are edges. Repeat to create a box corner on the second side.
Step 11
Through the open zip, begin to turn the purse through to the right side. Start by pressing the two zip end tabs to the right side to neatly reveal them on the surface, before drawing the remaining fabric through. Push out the box corners firmly to finish.
Made Peachy Tip
When working with a zip foot look carefully at the way in which you affix this to the machine. The foot can be positioned so that the needle will come down either one side or the other side of the foot section, this allows the needle to position the stitches as close to the teeth on the zip as possible. To check the foot is on correctly, there should be no part of the foot between the needle and the teeth of the zip, if there is simply reaffix to alter the needle placement.
 Download the printer-friendly version!
♥ – ♥ – ♥
 The Vilene Sewing Club In Association With…
All of the delicious fabrics for these makes are from the stunning range of designer prints from Art Gallery Fabrics – take a look over the range, I guarantee you won’t be disappointed!

The ribbons and trimmings for these projects were supplied by Berisfords, who offer a range of ribbons for sewing and decorative projects in a host of colours styles and finishes. Priced from 70p per meter and available from fabric and sewing stores. For more information visit www.berisfords-ribbons.co.uk or call 01453 883581

The buttons and fasteners for these projects are from Hemline, who provide a vast range of products for all aspects of sewing and crafting which are available nationwide from sewing and craft suppliers. For more information contact groves@stockistenquiries.co.uk or call 01453 883581
♥ – ♥ – ♥
I hope that you enjoy making your own Everyday Purse – you know, if you get in a knot you can always drop me an email with Everyday Purse Help in the subject line!
This workshop project is for your personal use only, be cool you guys- you know the score, if you’re interested in scheduling a workshops or have any enquiries about the usage of this workshop material just give me a shout!
Watch this space - the next in the The Vilene Sewing Club Series will be posted next Wednesday!
The post The Vilene Sewing Club: Everyday Purse appeared first on Made Peachy.
April 14, 2014
How to Clean Tarnished Vintage Silverwear
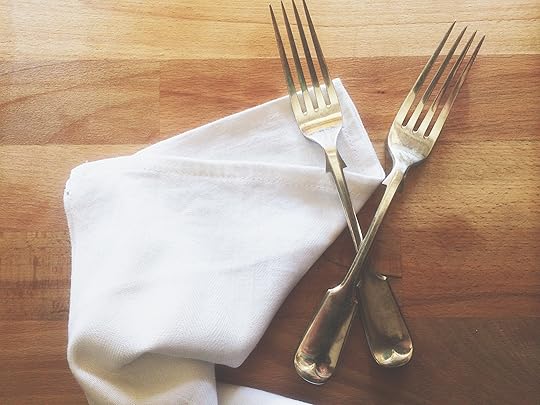
The weekend was one of my very favourite kinds of weekends. We spent time with family, we took an epic hike with the children and the dogs – is there anything more fun that over excited puppies and children in the fresh air of the great outdoors? Also, we got to spend some time wondering around some trash and treasure stores.
One of the things that we have been gradually piecing together is a vintage cutlery collection. Slowly and surely we have been bringing together a beautiful medley of mix’n'match silverwear – hunting out pieces on our travels, so that one day (hopefully) very soon we will have a lovely complete vintage place settings.
Any fans of vintage cutlery out there will know that when you can snap it up at a bargain price it is quite often grubby and tarnished – and cleaning it to it’s former glory isn’t as hard as you might think.
 After much research, and much trial and error. I think I have found a hassle-free way to spruce up that cutlery – check out this DIY guide for How to Clean Tarnished Silverwear.
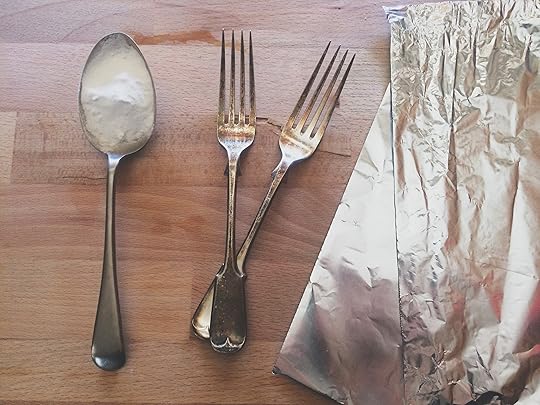 Grab your supplies…
Your collection of new-to-you cutlery
A large flat dish – to ask as a cleaning bath
A couple of sheets of kitchen foil
Baking soda
Boiling water
Wooden spoon
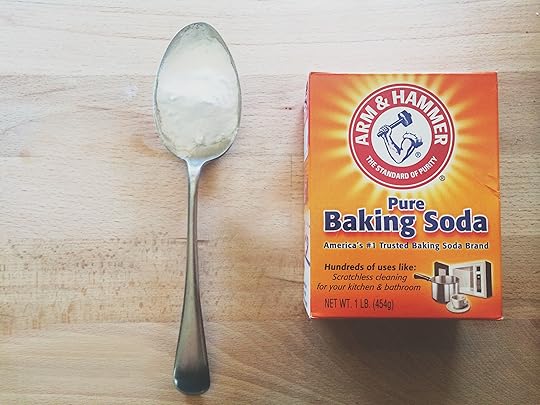 The amount of baking soda will very much depend on the amount of silverwear that you need to clean – I found that it was more effective to work on smaller batches of items at a time, this gives each piece enough space to really benefit from the cleaning action. As a basic rule, you are looking for a ratio of five cups of water to one heaped tablespoon of baking soda.
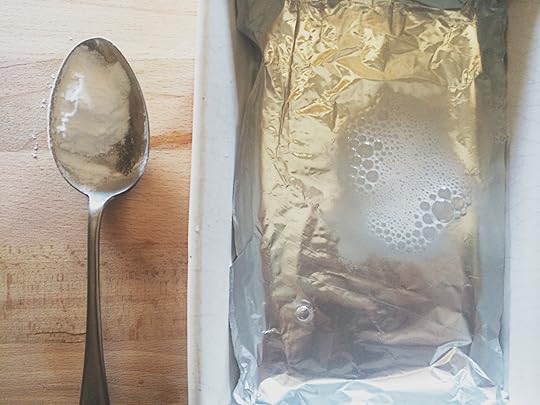 Place a sheet of kitchen foil into the bottom of the flat dish, add in the tablespoon of baking soda and cover with boiling water – you will need enough water to ensure that the cutlery is fully submerged. The baking soda will begin to fizz up – you might want to open a window about now, this is where things get a little stinky as the reaction here creates an almighty sulphuric stench!
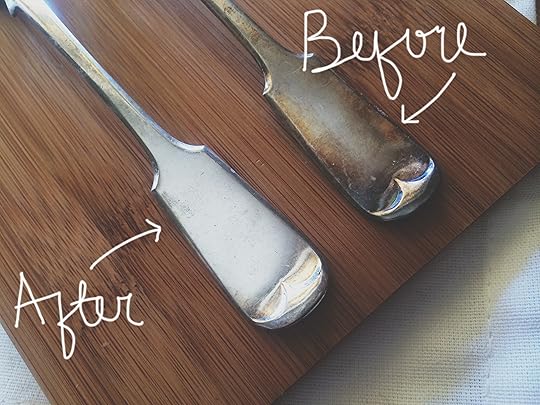
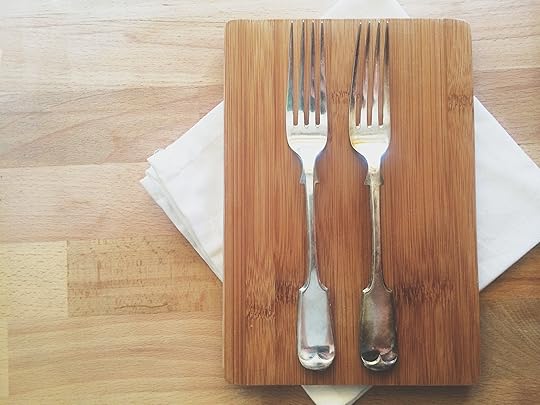
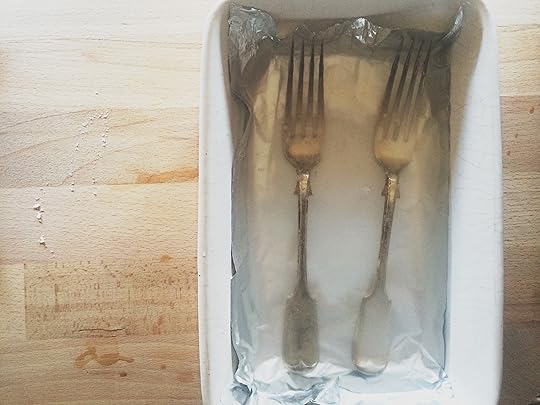 Place the cutlery into the cleaning bath and top up the water if needed to make sure that all of the cutlery is completely submerged. The cleaning action will start to happen right away! If the pieces are only lightly tarnished, you might find that 30 seconds in the bubbling cleaning bath is enough and the marks are fading right before your eyes! Here the fork on the right is already looking pretty sparkling compared to the more tarnished fork on the left!
 If the cutlery is still tarnished, place a second sheet on top of the cutlery, this will help the cleaning action to work on both the upper and lower surfaces at once. As the water in the cleaning bath will still be very hot, use a wooden spoon to gently agitate the mix to help remove the stubborn stains.
 The cutlery shouldn’t need to be in the cleaning bath for longer than a couple of minutes. Carefully remove the top layer of foil and fish out the cutlery – you might want to use kitchen tongs or mitts as the water will still be pretty hot! Wash the cutlery in warm, soapy water and use a soft cloth to dry and lightly buff to a glorious glistening finish!
 In only a couple of (albeit stinky) minutes vintage cutlery is restored to its former glory.
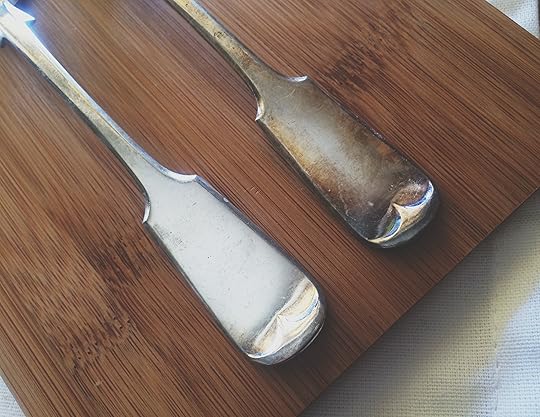 Ta Dah! Glistening silverwear, ready-to-use and wow your dinner guests!
The post How to Clean Tarnished Vintage Silverwear appeared first on Made Peachy.
April 13, 2014
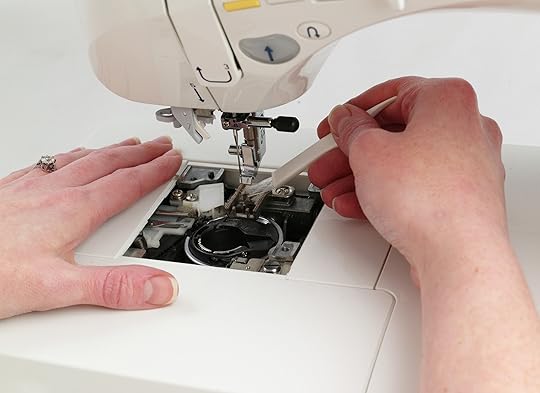
Servicing Your Sewing Machine
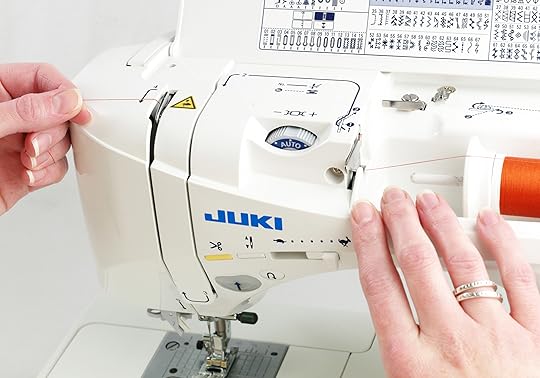
When it comes to sewing machines, the saying treat them mean keep them keen definitely does not apply!
This last week I have felt like I have lost my right hand – a little dramatic you think? Well, no! My sewing machine is off to my local sewing and repairs store for is regular service. I’m going to come clean right now and confess that this is a service is overdue. And, by overdue I mean that I should have sent it in at the end of last year. But, you know what? Life got in the way. Work got in the way. But, because I’m not bad to the bone, I did book it in for it’s regular service just as soon as my schedule would allow.
Ok, I know what you’re thinking…if you don’t use your machine as much you don’t need to get it serviced as often. Well, that’s not entirely true. Here’s the thing, the way you use your machine and the types of projects that you make will have an affect on the machine itself, and can determine how frequently you need to get your little beaut in for a check up. Let’s break this down a little…
The Once-in-a-While Stitcher you are the guys that dig out your machine a few times a year to make Christmas gifts, costumes for the school play, clothing alterations. You should be looking at getting your machine services at least once every four years, to keep things running as they should, particularly if your machine is stowed away in the garage or attic where it might be getting cold and damp.
The Hobby Stitcher sewing is one of your many creative pastimes, some weeks you might be knitting obsessively, the next week you might be creating cards compulsively. Sewing is a hobby that you return to up every couple of months. If your a hobby stitchers aim to have your machine looked over every three years to ensure that when you do dig it out, it is working like a dream!
The Every-Day-is-a-Sewing Day Stitcher you use your machine every day, without fail. You will work on something every single day. For you seeing is a way of life, whether is it making up curtains for your sister-in-law, whizzing up some cute scatter cushions for the couch or making a baby quilt for a new arrival, you like know that your sewing machine is never too far away! If your machine is at your fingertips most days you need to be getting it checked in for it’s service every two to three years - perhaps schedule this in during a family holiday, when you wing miss it quite as much!
The Quilt Stitcher you need to be checking your machine every couple of years – because while quilts are soft and snuggly they are also monsters for making fluff and lint, which can clog up the innards of your machine. You’d never think that these lovely projects are one of the hardest on your machine -keeping up-to-date with servicing will mean that there will be no effect on the quality of the finish on your quilts.
The Brutal Stitcher you are a stitcher who is often in a rush, or you like to push yourself and experiment with new and exciting projects. You have lost count of how many times you have snapped a needle, or nearly stitched through a zip fastening this month. I hate to break it to you, but, even if you’d ordinarily class yourself as a Hobby Stitcher, the harder you are on your machine, the more frequently you will need to get it serviced, because while breaking a needle is annoying, this can also have an impact on the inner workings of the sewing machine too! If your machine sounds like it’s unhappy, it might be wise to get it checked in!
The Pro you are churning out high volumes of makes, day in-day out. Your machine will only get a rest on Christmas – if it’s lucky! High machine usage is going to make regular annual servicing a necessity – after all you don’t want to miss out on important commissions and projects, because your machine isn’t holding tension like it should. I know, finding a spot on the calendar when you can get your machine booked in can be a little tricky, but imagine how things would feel if your machine – perish the thought – simply stopped working altogether! You are the stitchers that might want to invest in a second model – not only can you share the workload between the two, but you can schedule each of it’s service without affecting your production and workload. Just call me Laura The Two Sewing Machine Enabler!
 Ahhh…you have a second-hand or New To You machine, you think that this does’t apply to you. Let me tell you a little story about a gorgeous vintage mint green Singer that my lovely husband (then boyfriend, seriously, any man that turn up at your door with a beautiful vintage sewing machine is after your heart!) rescued from certain landfill to gift to me for happy stitching times. Sadly, in my excitement to get started, I just jumped in – both hands, both feet – and instead of a wonderful project the things caught fire! OK – so there weren’t actual flames gushing forth from the little machine, but the motor started smoking and BANG – she was no more. See, it pays to get old or second-hand machine looked at too!
We love our sewing machines, am I right? For many of us these are one of the biggest purchases that we make towards our hobby – that’s ignoring the every-growing stash of fabrics – so it is important to take care of it!
 Here are five things that you can do today to give you machine a little TLC – you guys…unplug that machine before you get busy with a little home maintenance – let’t not get any nasty shocks!
1 Clean over
Using a clean, lint free cloth, wipe over the surfaces of the machine. Steer well clear of polishes and cleaning products – these are just going to clog up and damage your machine.
2 Clean the thread route
With the small brush that should be in the accessories section of your machine, work along the threads route – from where the spool sits is, right down to the needle. By following the route the thread takes as you thread up the machine, you will be able to remove any fluff and lint build up.
3 Clean the Feed Dogs
Removing the needle plate will give you access to the bobbin and the housing, you can remove these and you can use the mini brush to sweep away the build up of lint and fluff.
4 Add sewing machine oil
Some machines need to have their moving parts oiled to keep them in tip top condition. Check in your hand book whether your specific model require a little oil to the workings – only use sewing machine oil as this clear light oil is designed specifically for this job…if in doubt, check at your local sewing machine store.
5 Replace the needle
One thing that we are probably all guilty of is not refreshing the needle quite as often as we should. Try to remember to select the right need for the job as this not only makes the projects easier, but also make the work easier for the machine too. A fresh sharp needle is a great way to start any new project!
Tell me…honestly people…when was the last time that you had your machine serviced?
The post Servicing Your Sewing Machine appeared first on Made Peachy.
April 12, 2014
Style Sunday: The Tie Dye T-shirt
If you’re an equal opportunities colour lover then Tie Dye is the fashion trend for you!
The High Street is awash right now with these bright, louder-than-life designs – what a fun way to welcome in the spring weather! This simple Tie Dye Shirt, £25 UrbanOutfitters is making me dream of long lazy summer days, denim shorts and sandals. Someone please tell me that it’s going to be sandal weather again real soon!
You know that you can make your own Tie Dye garments and accessories with just a few crafty supplies, right? Check out today’s Style Sunday: The Tie Dye T-shirt moodboard to give your inner hippie some inspiration!
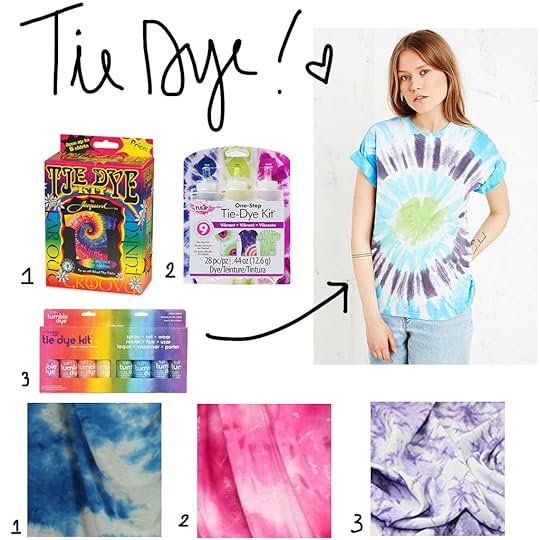 The Kits:
1 Jacquard Tie Dye Kit • £14.26 • FredAldous
2 Tulip One-Step Tie Dye Kit • £6.12 • SmarmyClothing
3 Tumble Dye Spray Kits • £19.99 • RainbowSilks
The Ready-To-Use Fabrics:
1 Blue Tie Dye Jersey • £4 per metre • SkyFabrics
2 Purple The Die Jersey • £5.99 per metre • MinervaCrafts
3 Pink Tie Dye Stretch • £4.99 per metre • TissuFabrics
If you’re like me you will now want to tie dye everything in sight. But, here’s a little warning, less is almost certainly more when it comes to tie dye and fashion, just remember that. Also, y’all are going to have to take responsibility for the clean ups…I don’t want to be having to make a tour cleaning up dye stands from all y’alls homes!
The post Style Sunday: The Tie Dye T-shirt appeared first on Made Peachy.
April 11, 2014
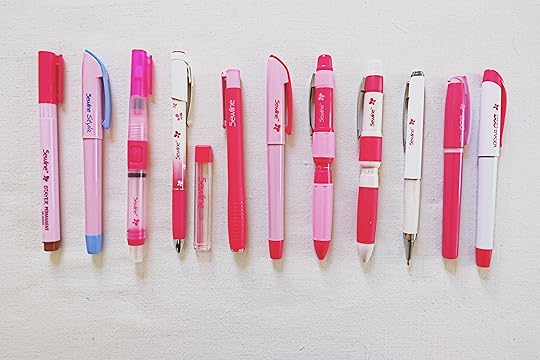
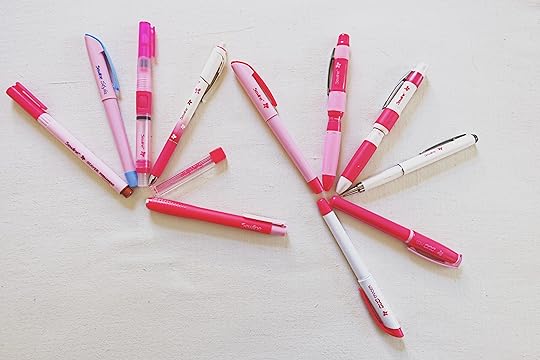
Sewline Pens: Epic Giveaway
I love stationery. Pens, notepads, letter sets – anything that is both pretty and functional.
I love sewing. Making clothes, making quilts, pottering about stitching seams and adding finishing flourishes.
Imagine what happens when your two worlds collide. Because, that is exactly how I felt when this awesome set of Sewline pens landed on my desk! I mean, super cute pens that are designed specifically for stitching and sewing – what on earth could be better than that?!
 Sewline Pens c/o EQS
When it comes to sewing (which for me usually comes with deadlines!) I need to have things that I can rely on – a machine that I know and can trust. Fabrics that I know will not only look stunning, but will wash, wear and weather well. And, notions that are not only right on hand, but do just the job that they are set out to do.
So, having a full set of these amazing Sewline pens, will ensure that I have just the right tool for the job – no matter what project I’m working on. And, anyone that has been working on a project and thought, “you know what, I don’t know where my water soluble marker is – I’m just going to go ahead and use this regular, writing pencil…I mean what’s the worst that can happen?” will know that the worst that can happen is that you have to start over, because you and made some kind of damn awful mess of your fabrics and no amount of washing or cursing is getting it out! I have since learnt from my mistakes (and I say mistakes plural, because it seem I have a thick skull sometimes!) and now make sure that I pick out the right marker pen for the job – ‘cos ain’t no one got time for that nonsense!
I first came across the Sewline products last summer, and after falling in love with the Glue Stick pen for speeding up my Hexi Patchwork – I knew I was onto a winner!
Friends, check out this awesome collection from Sewline that I have Tried & Tested for y’all…
From Left to Right:
STAYER Permanent Ink Marker, £3.99
This fibre point marker has a super-fine 0.5mm tip for precise and permanent marks – available in Black or Brown – low odour ad wash resistant.
Why you need this…it’s great for adding your signature to your projects and for adding names onto to name tapes.
STYLA Fine fabric Marker, £6.99
This ceramic rolling ball glides easily over fabrics and with a 0.8mm point is ideas for precision marking – water erasable this is a sewing staple.
Why you need this…whether you are marking out pattern adjustments on a garment or are designing embroidery motifs, this lets you make accurate and exact marks that are easily removable with water.
AQUA ERASER, £11.50
This handy pen with a fibre tip is used for removing the lines and marks of water erasable pens and pencils
Why you need this…The precision tip and the soft grip allows you to accurately adjust the flow of water to remove just the lines and marks that you want – ideal for correcting mistakes when marking!
FABRIC PENCIL, £9.99
This refillable mechanical pencil allows you to mark out neatly and accurately – with colourful ceramic lead that can be clearly seen on fabrics.
Why you need this…the mechanical pencil action means that there is no messy sharpening required, the lead can be retracted to prevent breakage and makes this the perfect on-the-go sewing companion.
FABRIC PENCIL ERASER, £3.25
This is a pen-shaped polymer eraser and is ideal for removing the markings made from ceramic lead pencils.
Why you need this…the push-button action allows you to release the eraser as needed – and retract for storage, so that it doesn’t get grubby in your sewing bag! This is the perfect companion to the Fabric Pencil.
AIR ERASABLE PEN, £3.99
This marker pen has a ceramic roller for smooth distribution of ink onto the fabrics. The purple ink self-erases within a couple of days.
Why you need this…this pen will allow you to write, mark and draw neatly and with precision, and the lines will fade out without the need for fussing with water!
TRIO MULTI FUNCTION MARKER COLOUR (PINK) & TRIO MULTI FUNCTION MARKER (WHITE), £12.99
These are a three-in-one tool that offers the choice of white lead for dark fabrics, black lead for light fabrics and a roller for marking out creases or tracing. The Colour option replaces the Tracer tip with a Pink pencil. Complete with an eraser to remove the pencil lines when complete.
Why you need this…the duo of light and dark leads makes this a great option when making marking on projects where the fabrics or prints vary between light and dark – you can simply switch the lead and continue marking- so you design will always be prominent!
TRACER, £7.99
This pen-shaped tracer offers a 1.6mm roller ball tip allowing smooth continuous creases and non-ink markings on your projects
Why you need this…The hang-pen shape makes marking out curves a breeze!
DUO MARKERS, £6.99
This set of pens allows you to mark with one and erase with the other. The marker pen creates neat clean lines with ink that will not bleed on the surface of the fabrics, and the eraser pen can be used to remove the ink with ease once completed.
Why you need this…This combo allows you to mark and remove the lines with ease – the bevelled tip on the eraser allows you to use the large surface for removing large section of markings or just the narrow tip for correcting mistakes.
Fancy getting your hands on a complete set worth over £80?
Then today is your lucky day! I have one full set of these awesome Sewline Pens – worth over £80 – c/o EQS to give away to one lucky Made Peachy Reader!
So, how do you enter?
Easy! So that y’all get a fair whack at it, there are a number of ways you can enter this giveaway – and the best part is each one will be counted as 1 entry…so, do all three and you will be entered three times my friend!
1 Please leave a comment below sharing why you want to get your mitts on this awesome serf of Sewline pens
2 Share this post on Twitter, tagging @madepeachy and using the hashtag #SewlineMadePeachy
3 Give the MadePeachy Facebook page a like, share the giveaway post and leave a comment on why you’d love to win!
Want a bonus entry? Then head over to the MadePeachy Instagram , follow and give the Sewline post a like & comment!
The giveaway is open to everyone – if you have a postal address, no matter where in the world, you can enter! Yay for international prizes! The winner will be pick at random and announced on the 19 April - Good Luck!
The post Sewline Pens: Epic Giveaway appeared first on Made Peachy.
April 10, 2014
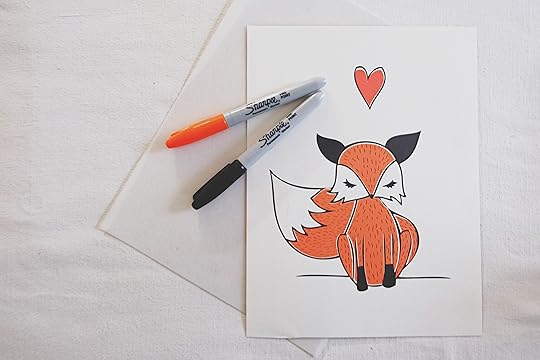
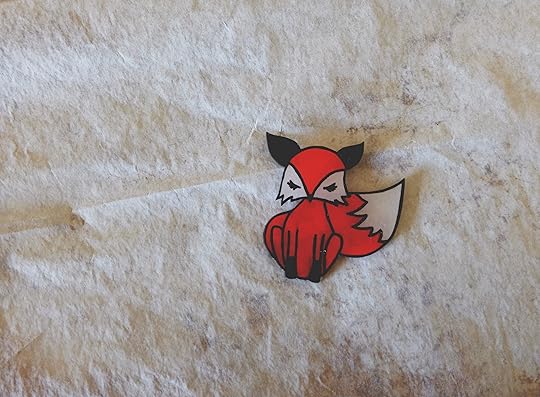
DIY Shrink Plastic Fox Brooch
Hey you guys! Do you remember that cute little Fox Printable exclusively designed by Kimi from Bumble&Birch? Well, when I fell for him, I fell pretty hard. In fact, I’ve been thinking about him quite a lot and decided that it was time to make something new with him!
So, I decided to transform him into a DIY Shrink Plastic Brooch so that I can wear close to my heart!
 Grab your supplies…
A print out of little Foxy from the exclusive download
Sheet of shrink plastic
Sharpie Markers
Pencil – if you want to be super neat!
Small sharp scissors
Strong glue
Brooch back
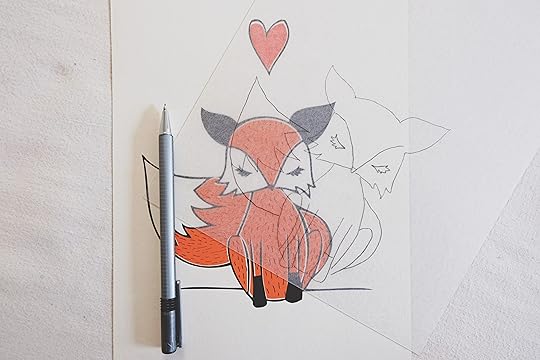 Place the sheet of shrink plastic on top of the Foxy print out – you will need to make sure that the side that you are drawing on is the slightly rougher of the two. With a pencil, trace over the Foxy design onto the sheet of shrink plastic.
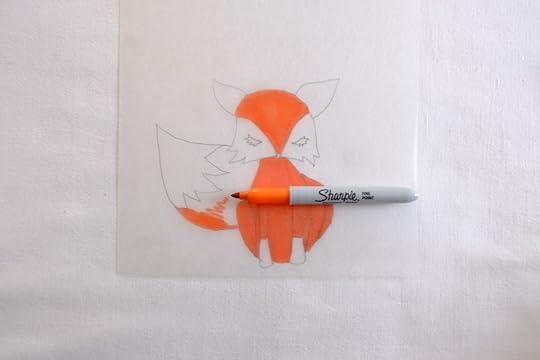 Once you’ve sketched the outline, begin with the orange Sharpie, and start to add the colour to the fox.
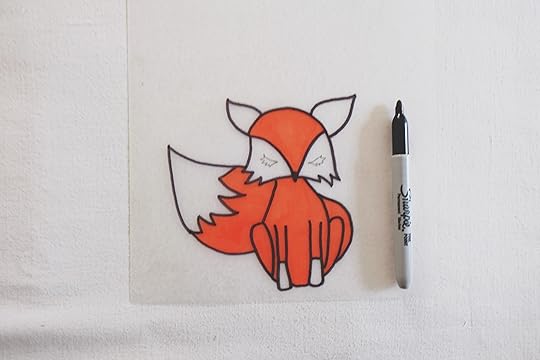 Then, with the black Sharpie, work around the motif adding in the neat outlines.
 Finally, add in the block black colour and the details.
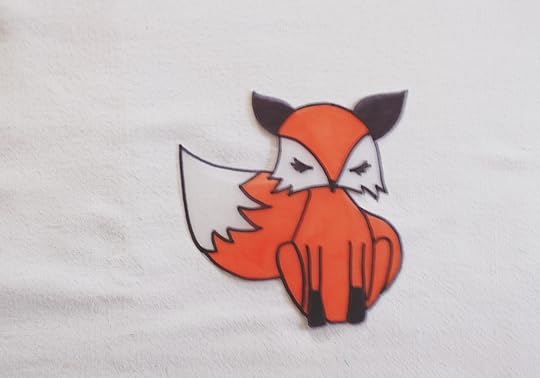 With a pair of small sharp scissors, work around the design carefully to cut motif from the sheet of shrink plastic. Place the little guy onto a backing sheet – inked side facing down – and put in the oven (I went without a fan assisted setting on this one) and back on 175C for 2-3 minutes.
 You’re going to need to keep an eye on him while he’s baking – for one, 3 minutes in not a long time and for two, all ovens are going to be slightly different! You’ll notice the shrink plastic curl up – don’t freak, this is part of the shrinking process – then it will smooth out and lay flat. Once the design is flat again, and all shrunk down to size – it will be time to take it out of the oven. This is going to be hot, hot, HOT when you take it out so resist the urge to poke it until it is fully cooled!
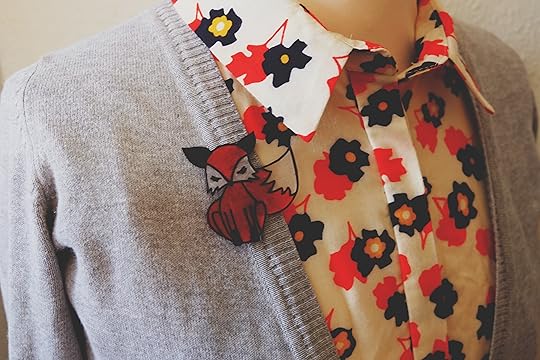 All you need to do, is secure the brooch back on to the back of the fox (that’s the slightly rougher of the two sides) with a small blob of strong glue and he is ready to wear…right up close to your heart, just like I said!
Love this little guy? Then check out these other fun creative ideas!
The post DIY Shrink Plastic Fox Brooch appeared first on Made Peachy.


