
Laura Strutt's Blog, page 33
May 9, 2014
Quilts UK: Malvern
Guess who is hitting the wide open road again next week? Why, yes! It’s me! This time I will be packing up all my quilts and quilting know-how and heading off to the Quilts UK Show at The Three Counties Showground in Malvern.
This dedicated quilting show runs from Thursday 15 to Sunday 18 May promises to be wall-to-wall inspiration for quilters, stitchers and general fabricaholics.
 I’ve been excited about heading to this show for weeks now, so it probably won’t come as much of a surprise that my bags are already packed and waiting by the door. That is actually true, they are by the door, ready for me to hit the road.
Alongside textile artist supremo, Kim Thittichai (who is literally just back from teaching in Austraila & New Zealand!) I shall be showcasing a range of Vilene products that are just perfect for quilts and patchwork projects, demonstrating a few handy techniques, offering up advice and helping out with all-round sewing and textiles questions! I know, exciting huh?
What’s more, I get to visit Malvern – which I’ve never done before! It is so exciting to get out and about and see new places and meet new people. Seems to me as though my working life is very much in extremes – some days I barely leave the sewing machine, let alone the house and other days I’m whizzing all over the country and hanging out with lots of rad stitching folks.
So, if you’re heading to the show be sure to stop in past the Vilene Stand Number 233 and come and say Hello!
The post Quilts UK: Malvern appeared first on Made Peachy.


May 8, 2014
DIY Printed Nordic Forest Lampshade
This lampshade design is inspired by the misty Scandinavian conifer forests of Norway and Sweden, where the trees gradually fade into the sky. I love the magical way the trees light up when it is turned on.
 Grab your supplies…
Pencil
Safeprint foam sheets
Masking tape
Cutting mat
Craft knife
Metal ruler
Double-sided tape
Two Perspex blocks large enough to take 4 trees each
Flexible tape measure
Drum lampshade in chosen size and colour (a pale shade works best)
Sheet of A1 150gsm card
Beige, pink and brown printing inks
Palette knife
Glass plate
Roller
Damp cloth
Baren or rolling pin
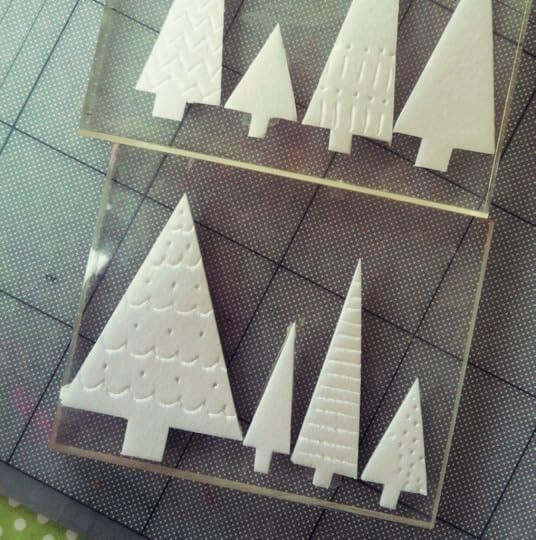 To prepare the printing blocks
Using the templates and following the instructions below, prepare two Perspex blocks with four trees on each. Copy the template onto white paper. Using masking tape, stick the template to a similar size piece of foam. Then tape them both to your cutting mat to stop the Lazy Lino moving around, which makes it easier to cut fiddly bits.
Using the craft knife (and ruler if necessary), cut away the excess Lazy Lino. If your shape has curved sides, it’s easier to cut it away in sections than doing it all at once. Remove the tree from the excess Lazy Lino. Use a pencil to mark the tree with decorations. You don’t have to press hard to get an indentation.
Repeat these steps with the rest of the pieces that you need for your project.
Place strips of double-sided tape over the back of the tree. It doesn’t have to be completely covered, but make sure all the important areas, including narrow parts, are taped. (If you are using a foam sheet with a sticky back, you can bypass this step.)
Remove the backing from the tape (or Lazy Lino) and place the tree onto a suitably sized Perspex block.
To prepare the card for the lampshade
Using the flexible tape measure, check the circumference and height of the lampshade. Cut out a rectangle of card to these dimensions but add 2cm all around. Lay the rectangle of card horizontally on a flat surface.
 To print on the lampshade
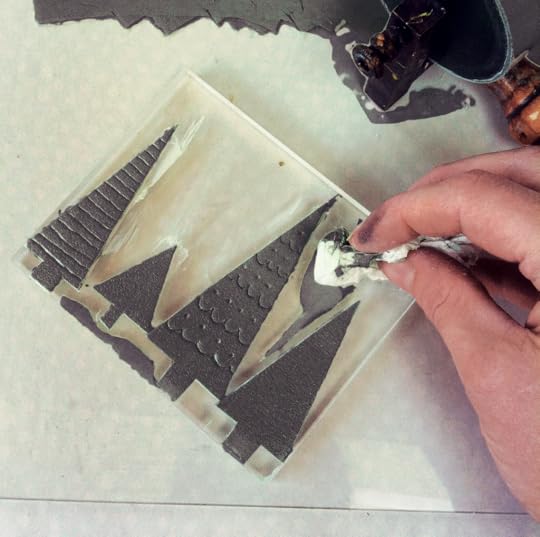
Mix up some beige ink on the glass plate and roll it out to a fine consistency. Ink up the two tree blocks and wipe away any excess ink with a damp cloth.
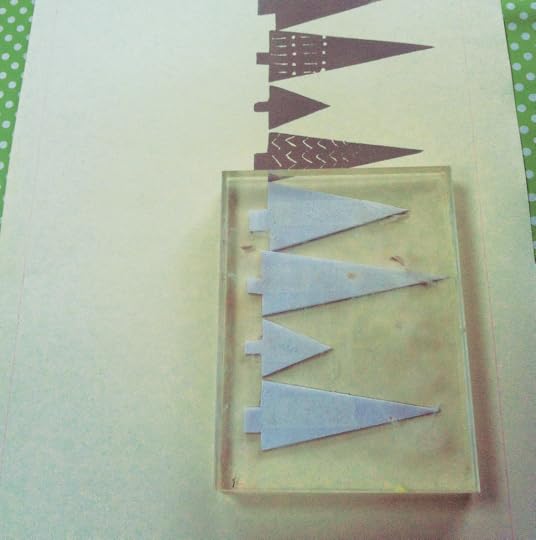 Begin printing at the top left of the card so the tips of the trees are about 5mm from the top. Print the first row of trees alternating the two blocks in a random pattern.
When this first row is finished, clean up the blocks with a damp cloth or cleaning wipe and pat dry.
Mix up the pink ink and roll out a thin layer. Ink up the blocks as before and print the next row of trees so they overlap the first by one third. Stagger the trees so that they sit in a different position to the first row. Again alternate the two blocks.
Clean up the blocks. Mix up the brown printing ink and print the final row as before. Allow to dry.
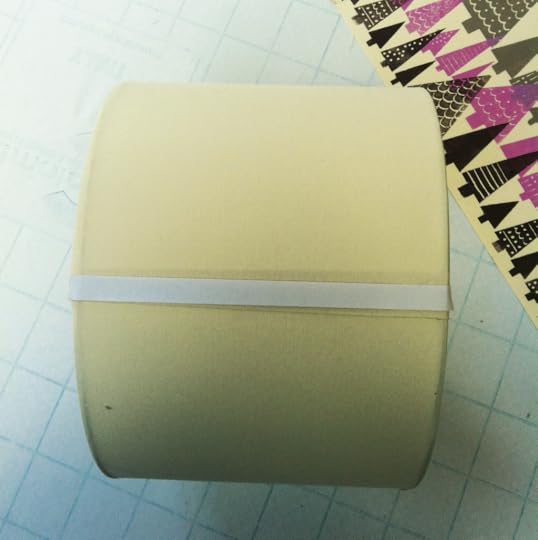 Using a craft knife and metal ruler, neatly trim the rectangle, removing the excess card. Take a strip of double-sided tape and run it along the vertical join of the lampshade from top to bottom. When the ink is dry, turn the card over and run a strip of tape along the short side on the right-hand side.
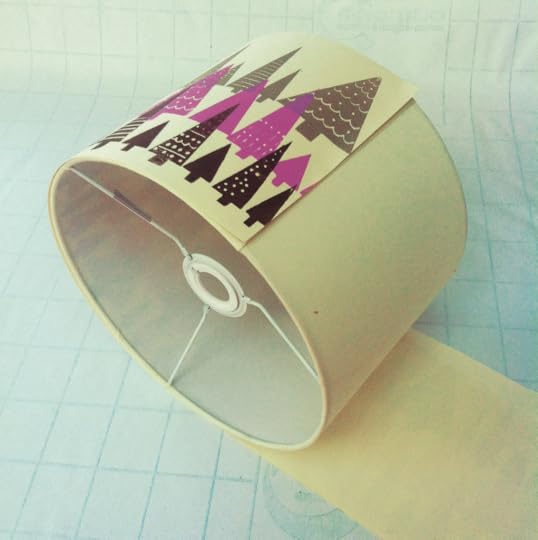 Remove the protective strip from the tape on the lampshade and the card. Place the shade in the middle of the card (making sure the trees are the right way up for your shade). Lift up the left-hand side of the card rolling it around the shade and fix the end to the tape on the shade.
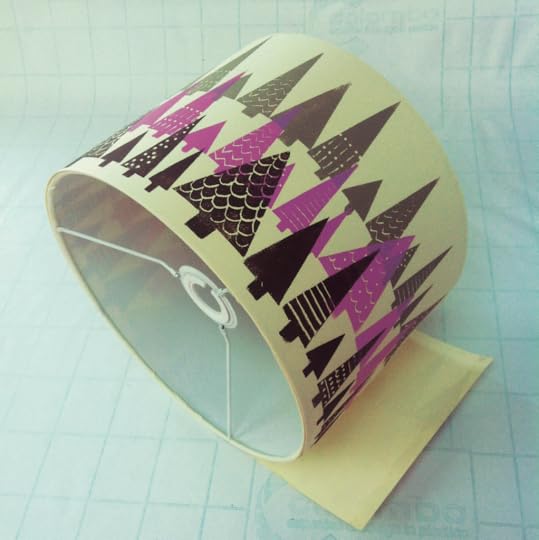 Roll the other side of the card around the shade, keeping the card tight to the lampshade. Fix it in place using the tape on the card. Place the completed shade onto your chosen lampbase and switch on.
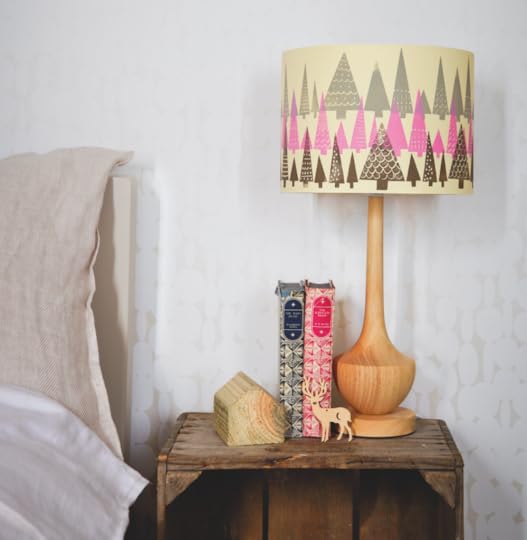
Love this Nordic Forest motif? Why not add it to another project and made a Nordic Forest Bag too?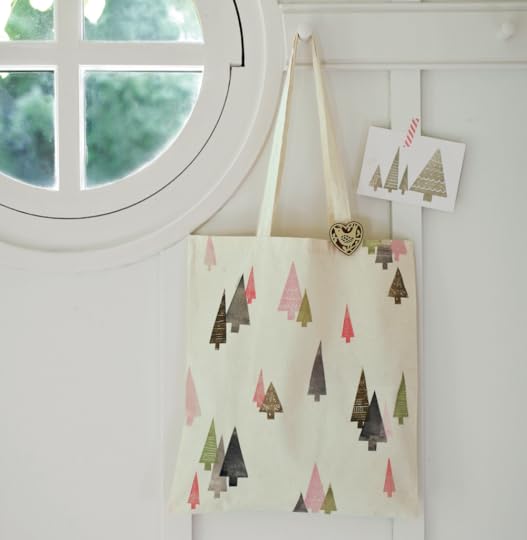 The trees on this bag are the same ones as those used on the lampshade. Instead of putting four trees on a Perspex block at one time, stick each one on an individual block. The bag in these pictures uses seven of the different designs of tree.
Lay the bag out on a flat surface and tape it down. Then mix up a light pink ink and print one tree randomly three or four times over the bag. Next mix up a dark grey and repeat with the second tree.
Repeat with a light grey, an olive, a pale olive and a bright pink colour, building up little copses of trees over the bag.
Leave the bag to dry overnight. You know what? Why stop at lampshades and tote bags? This striking motif would look awesome on greeting cards, notebooks, gift wrap and, well, pretty much anything that will stay still long enough to be printed! What will you add this rad motif to?
♥ – ♥ – ♥
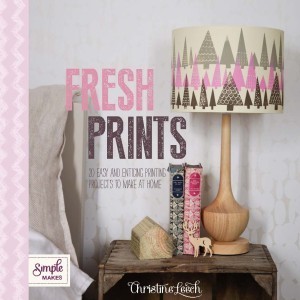 This nordic printed lampshade is just one of the many creative DIY printing ideas form Christine Leech’s new book Fresh Prints, £12.99, Quadrille – be sure to pick up a copy for lots more ideas and inspiration!
The post DIY Printed Nordic Forest Lampshade appeared first on Made Peachy.
May 7, 2014
Guest Post: Fiona McIntosh of Tessuti Designs
You don’t have to be a genius to work out that textiles and fabrics are super important over here at PeachyHQ. They are so much part of what I do and what I love on a daily basis, so when I find something that makes me stop and take a breath, then I just know it is something really special.
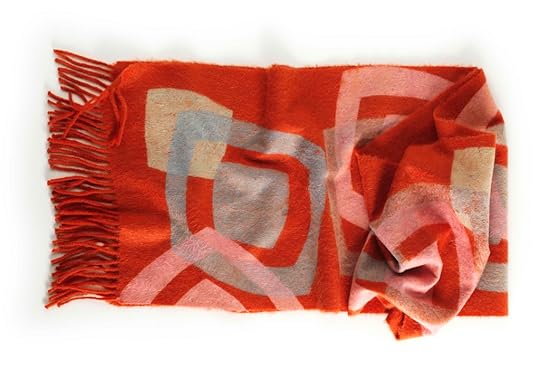
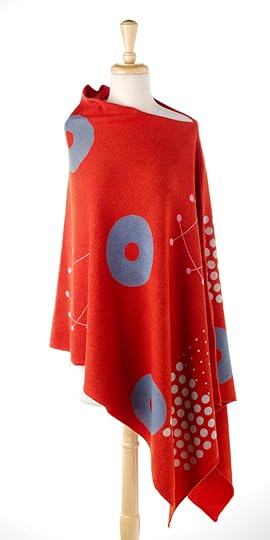
The collection of vintage-inspired textiles from designer Fiona Mcintosh of Tessuti Designs, showcased in both London and New York, really does take your breath away. Here are just some of my very favourite pieces…
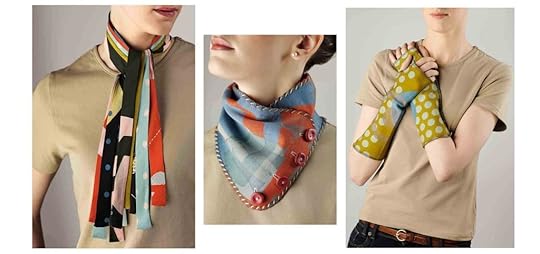 From Left to Right: Silk Ribbon • Button Muffler • Armwarmers
Graduate from Heroit Watt (formerly Scotland College of Textiles) Fiona McIntosh talks about being a hands on creative in today’s guest post!
♥ – ♥ – ♥
 I studied textile design at the Scottish College of Textiles ( now known as Heriot Watt- Borders Campus ) in the picturesque Scottish Borders. I graduated in 1984 and a year later set up my business Tessuti. I produce a range of hand dyed and hand printed fashion accessories using cashmere, wool/lycra, silk and lambswool.
 My prints are inspired by my love of imagery and colours from the 1950s and 1960s. My sketchbook is vital to me – from initial doodles and scribbles I usually go straight to producing the artwork, making up screens for printing and sampling onto fabric so it’s a very ‘hands on’ process. It’s challenging and exciting to see if new designs work in terms of scale and colours and its ‘s rewarding actually seeing the end results made up into scarves and the other products I produce.
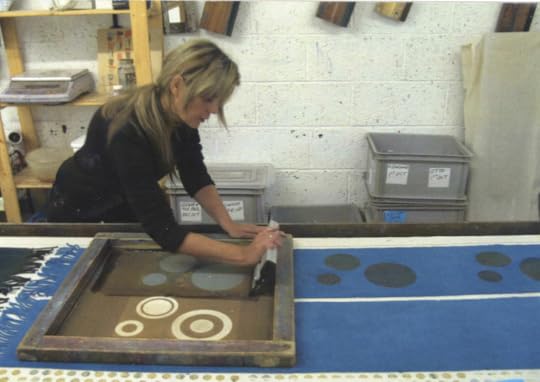
The whole process is done by hand – from initially dyeing the fabric in a huge boiler, pinning out the fabric on my 7 metre print table, screen printing using the ‘discharge’ method and steaming the fabric to produce rich colours whist retaining the original soft handle of the fabric.
 Textile design and printing is a very satisfying discipline, producing almost instant results and it’s a fantastic feeling seeing someone wear one of my accessories. I wish to carry on designing and producing and exhibiting my work both nationally and internationally and collaborating with other designers who may wish to use my prints.
♥ – ♥ – ♥
You can see more of Fiona’s amazing textiles on her website
If you’re anything like me and you fall in love with something, you really fall head over heels in love with it – then this is for you!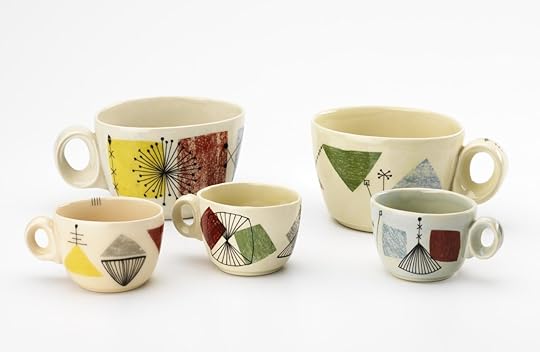 With support from Creative Scotland, Fiona has designed limited edition slip cast earthenware cups using her vintage inspired prints. Are these not just to die for gorgeous?
The post Guest Post: Fiona McIntosh of Tessuti Designs appeared first on Made Peachy.
May 6, 2014
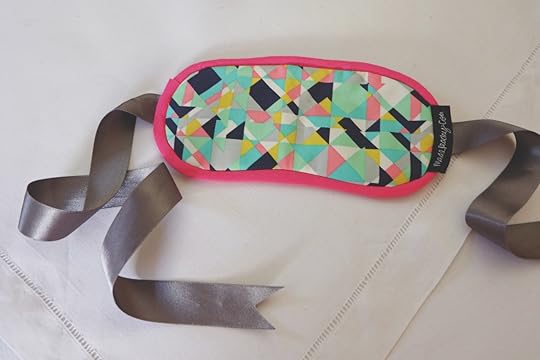
The Vilene Sewing Club: Sleep Eye Mask
Relax in style with a custom eye mask created in a duo of striking printed cottons, contrast piping and teamed with an elegant ribbon tie.
Skills you’ll master…creating and inserting piping into a seam, securing ribbon ties, working curved seams, clipping and slip stitch.
Grab your supplies…
Print cotton, two complementary designs
Vilene H640 Volume Fleece
5mm wide cord
Bias Binding
Ribbon
Dressmaking Scissors
Sewing Machine
Needle and thread
Iron
Pressing Cloth
Use this pattern piece to cut the fabrics and the Vilene H640 Volume Fleece
Let’s make a Sleep Eye Mask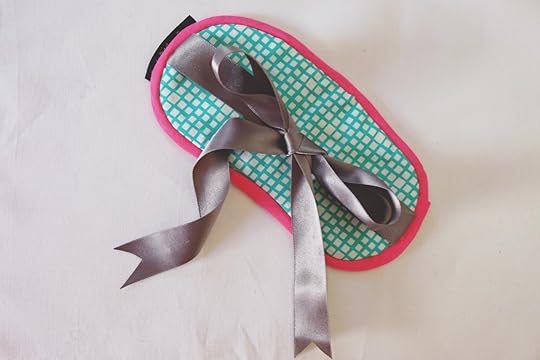 Step 1
Place the pattern piece onto a piece of print cotton aligning the grain line on the pattern with the grain of the fabric and pin in place. Cut one piece from the print cotton using the dressmaking scissors. Repeat to cut one piece from the remaining print cotton and one piece from the Vilene H640 Volume Fleece
Step 2
Cut a strip of binding 6cm longer than the outer measurements of the eye mask and press open. Trim a piece of cord 2 cm longer than the binding. Place the cord in the centre of the binding and bring the binding over the cord and align the raw edges. Pin in place. With a zip foot and a straight machine stitch, begin working along the length of the binding to secure the cord inside the tube of binding. Using a zip foot will allow the sewing machine to place the stitches up close to the binding.
Step 3
Place one piece of cotton down with the wrong side uppermost and position the Vilene H640 Volume Fleece on top, ensuring that the adhesive side is facing the wrong side of the cotton. Cover over with a slightly damp pressing cloth and press to secure in place by pressing on a low/medium heat. Allow to cool for up to 30 minutes to allow the adhesive to fully bond.
Step 4
With the Vilene H640 Volume Fleece backed piece placed right side uppermost, position the piping around the edge with the raw edges aligned. The cord covered section will sit towards the centre of the project, pin in place. Trim away the excess cord from where the two ends meet. Trim away one section of the binding in line with the cord. Make a small fold in the remaining length of binding to turn the raw edges under and re position this so this section site beneath the trimmed section.
Step 5
Work around the binding cutting small V shapes into help to ease the binding around the curves and shaping of the project. With a zip foot attached to the machine, select a straight machine stitch and work around the edge of the mask to secure the bias tape into position. The zip foot will allow the machine to place the stitches close to the piping.
Step 6
Cut a length of ribbon long enough to tie around your head to secure the mask, fold the ribbon and cut in half to create the two ribbon ties. Position one ribbon tie onto the side of the eye mask piece, laying it on top of the piping and aligning the raw edges. Pin in place. Repeat to position and pin the second piece of ribbon. Fold the lengths of ribbon in towards the centre of the mask and pin in place to hold them away from the stitching line when creating the seam.
Step 7
Place the remaining piece of print cotton on top of the project, with the right sides facing and aligning the raw edges. Pin in place. With the zip foot still attached, select a straight machine stitch and begin sewing to join the two piece together. Work slowly using the zip foot to position the stitches as close to the piping as possible. Start on the upper edge and work around the curves, leave 5cm of the seam unstitched to allow for turning through.
Step 8
Work around the outer edge cutting small V shapes into the seam allowance to help create a neater finish when turned though. Draw through to the right side through the gap in the seam, being careful to avoid the pins securing the ribbon. Remove the pin securing the ribbon and press neatly, ensuring the the seam allowance along the gap in the seam is press inside. With a needle and thread work along the opening to join the gap with neat hand slip stitches. Trim the ribbon ends into neat swallow tails to finish.
Made Peachy Tip
When working with a zip foot look carefully at the way in which you affix this to the machine. The foot can be positioned so that the needle will come down either one side or the other side of the foot section, this allows the needle to position the stitches close to cord when creating piping. To check the foot is on correctly, there should be no part of the foot between the needle and the piping, if there is simply reaffix into alter the needle placement.
 Download the printer-friendly version!
Adding piping is just one way to fancy up your seams – why not try out these cute ideas for seams too?
♥ – ♥ – ♥
 The Vilene Sewing Club In Association With…

All of the delicious fabrics for these makes are from the stunning range of designer prints from Art Gallery Fabrics – take a look over the range, I guarantee you won’t be disappointed!

The ribbons and trimmings for these projects were supplied by Berisfords, who offer a range of ribbons for sewing and decorative projects in a host of colours styles and finishes. Priced from 70p per meter and available from fabric and sewing stores. For more information visit www.berisfords-ribbons.co.uk or call 01453 883581

The buttons and fasteners for these projects are from Hemline, who provide a vast range of products for all aspects of sewing and crafting which are available nationwide from sewing and craft suppliers. For more information contact groves@stockistenquiries.co.uk or call 01453 883581
♥ – ♥ – ♥
I hope that you enjoy making your own Sleep Eye Mask – you know, if you get in a knot you can always drop me an email with Sleep Eye Mask Help in the subject line!
This workshop project is for your personal use only, be cool you guys- you know the score, if your interested in scheduling a workshops or have any enquiries about the usage of this workshop material just give me a shout!
The post The Vilene Sewing Club: Sleep Eye Mask appeared first on Made Peachy.
May 5, 2014
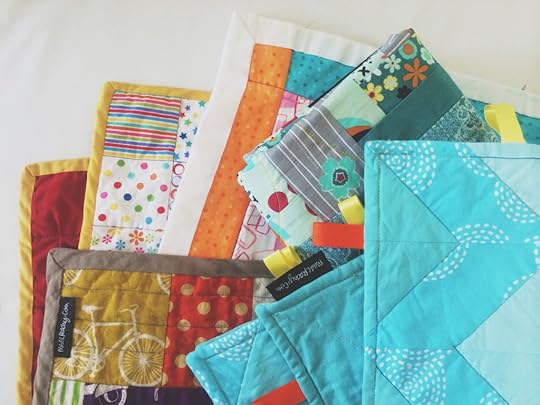
Guest Post: Mini Chevron Taggie Quilt
Ah! Baby quilts – is there anything in the world more cute and more satisfying to make? I think not! These little beauties are great for trying out new techniques, for brining through that ever-growing stash and, more importantly, make rad gifts for the Littles! 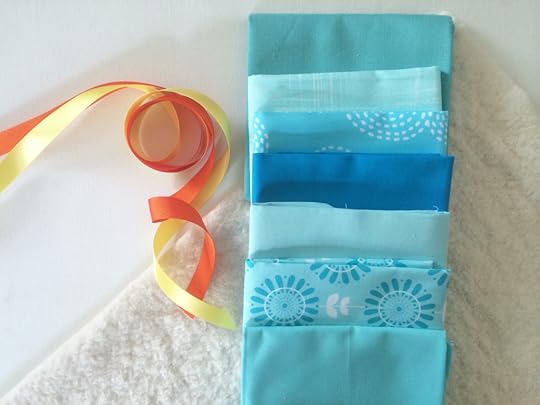 Chevrons are never off my radar right now. I want to add them into every single thing I make. And, I mean every single thing. So, when I got the latest bundle of fab fabrics from SimplySolids, there was little doubt in my mind that these would end up as a chevron-something! There is just something about the neat shapes that make up the chevron motif that makes my heart feel happy. They are organised, regular, modern and look great in every single colour. I love the collections of aqua in this StashClub Bundle from Simple Soids – its fresh, cool and with the addition of some super bright colour-popping ribbon details makes this great for boys and girls.
 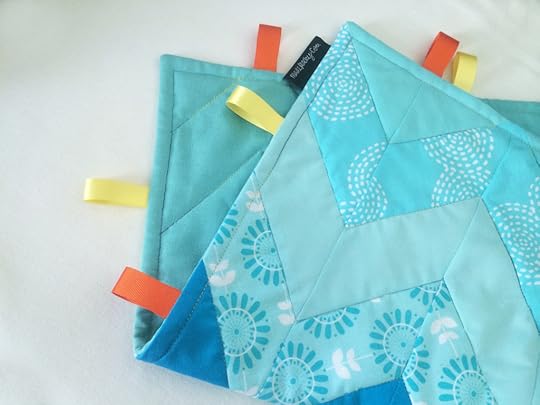 The addition of little ribbon tags isn’t anywhere nearly as tricky as it you might think, and transforms a little cuddle quilt into a tactile comforter that Littles will want to tote about with them wherever they go – and as a person who regularly hand makes gifts for Littles, this is by far the greatest compliment that you can get!
 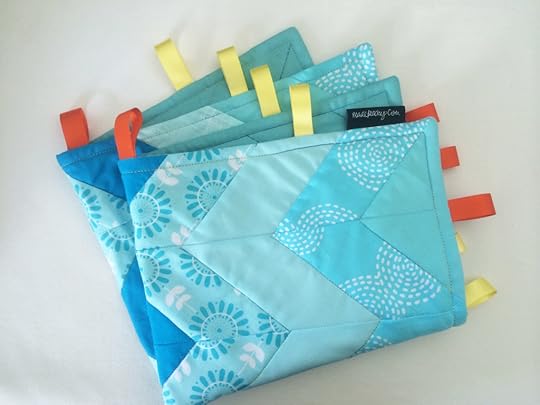 If you want to get your hands on this Free Step-By-Step Project, be sure to check out my guest post over at the Sewing Directory! I’m crushing on quilting pretty hard right now as I prepare for the upcoming Quilts UK Show in Malvern – so, I’m currently surrounded by so many little quilts, in various stages of completion. There is a bit of an incentive to get these finished up as soon as possible – not only because the show is looming, but also because there is a sweet wee pup that seems to think that every quilt that is created in this house is automatically his.
 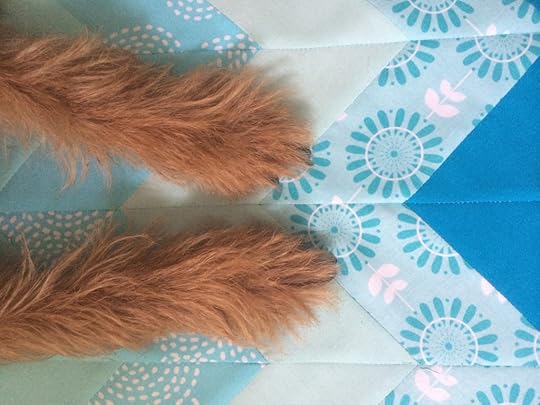 I tell myself that when he gets involved while I’m pinning or basting that he is lending me a helping paw…I think it might be more accurate to say that he is actually staking his claim! Does anyone else have this problem with their pets getting involved with their makes?!
The post Guest Post: Mini Chevron Taggie Quilt appeared first on Made Peachy.
May 4, 2014
Knitting Smitten Winners Announcement!
Hello Monday! Hello Holiday Monday! What can be better than a holiday on a Monday? Well, winning a copy of an amazing knitting book might be right up there!
To celebrate the new release of Jessica Biscoe’s new book Knitting Smitten, £12.99, Quadrille three lucky Made Peachy readers are going to get their hands on a copy!
CONGRATULATIONS!
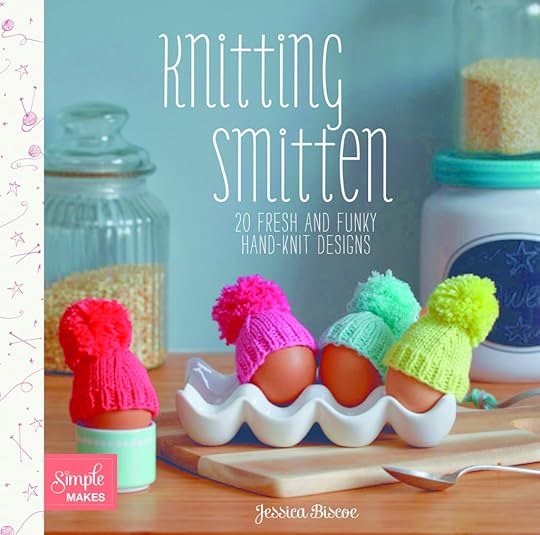 Jess
Jess
Julie
Diana Newton-Edwards
Be sure to check your email and send over your UK postal address so that this awesome new book can find its way to you!
I’m always sorry that there can’t be more winners – if you didn’t win this time, you know that you can knit up one of Jessica’s amazing designs today, for free, right now – don’t you? Fans of geometric, this one is for you!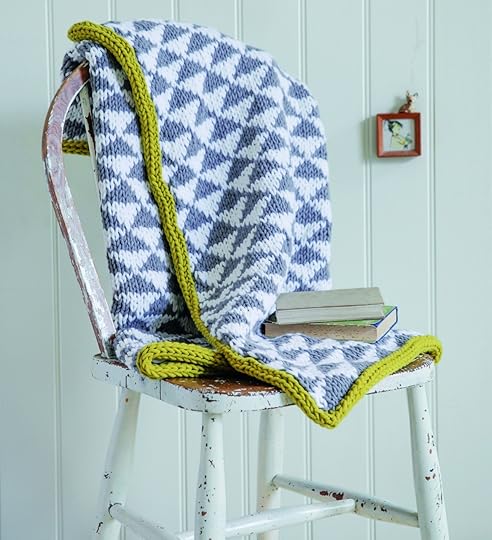 Knit your own Triangle Motif Throw with stunning I Cord Edging today! Enjoy!
The post Knitting Smitten Winners Announcement! appeared first on Made Peachy.
May 3, 2014
Style Sunday: The Skater Dress
The sun is shining – it really is, and it is a bank holiday weekend! That can only mean one thing…BBQ and skater dresses. Ok. So that is two things, but either way – that’s just perfect!
Skater dresses are one of the prettiest early summer dresses around. I particularly love this Nishe Pinapple Print Skater Dress, £60, ASOS – I mean the super simple lines of this dress make for the perfect blank canvas for having some big time fun with fancy prints. So, Check out today’s moodboard with Style Sunday: The Skater Dress!
 The Pattern
Simplicity 6262, sizes 10-22 SimplicityNewLook
This full skirted dress can be made with a variety of different necklines – you can even fancy it up with a lace overlay or a ribbon belt. Select Design D for the simple skater dress style.
The Fabrics
1 Sailor Dream Jersey • £4 per metre • MyFabrics
2 Desert Island Opal Jersey • £8.90 per metre • PlushAddict
3 Ladybug Print Jersey • £13.80 per metre • StoneFabrics
4 Liberty Tana Robin Jersey • £7.50 per half metre • RayStitch
5 Anchors Aweigh • £6.95 per metre • Croftmill
All I want to do now is stitch dresses…but, with a long list of other sewing commissions to work on (with deadlines looming!) I’ll be sat at the sewing machine for most of the day working on different makes. It’s not dressmaking, but it stitching on a lovely lazy Sunday – so, I’ll take it!
The post Style Sunday: The Skater Dress appeared first on Made Peachy.
May 2, 2014
Very Inspiring Blogger Award: 7 Super Facts!
So, this week something pretty awesome happened! The sweet Katie who blogs over at KatieGetsCrafts nominated me for the rad Very Inspiring Blog Award! I know, neat, huh?
Why is this so rad? Let me tell you. Made Peachy started last summer, life was very different back then, we had some very dark days to deal with. In amongst it all I found myself in the very tricky spot of being made redundant - and with a new pup to feed, a new husband to cherish and a roof to keep over our heads this all made for feeling pretty lost and hopeless. As anyone who has been lost a job will tell you, there is not only the burden and stress of the day-to-day and financial stuff that weighs heavy on your heart, there is a colossal emotional impact. I mean, just the word itself redundant, gah, no longer needed, surplice to requirements, unnecessary, unwanted, superfluous…I could go on, but I think y’all get the picture.
What does a grown-ass woman do when faced with these challenges? Well, aside from crying a river of tears and befriending a bottle of gin, she thinks on her feet. She decided what she wants and she goes for it. Chasing dreams is nothing short of terrifying, which is why I have probably never before thrown caution to the wind, quit the day job that wasn’t really satisfying me and go find my own path in the world. But, when life throws caution to the wind for you, it’s the hand in the small of your back giving you that little shove to take that scary first step.
Despite being very close to my heart, Made Peachy is actually just a small part of my working life. I write, I design, I make & I teach. Day-to-day my working life is a pretty mixed bag, but the one thing that holds it all together is inspiration. Finding inspiration to write and design, being inspired by fabrics, threads, yarns and all manner of delightful supplies, finding inspiration in other creative souls and inspiring others to make by sharing skills.
I have found myself surrounded by some of the most wonderfully talented creative folks – which is just about the most motivating and inspiring position a gal can find herself in. So, to say that I am blown away by Katie’s nomination is something of an understatement! Hang on. I’m feeling inspired and motivated after receiving a nomination from lovely Katie for being a Very Inspiring Blogger. So, I’m inspired about being inspiring…what the? That’s some form of blogging inspiration inception right there!
7 Super Facts!
Part of the nomination is to share some insights into the person behind the blog…so, I thought that I would share some lesser know facts about me!
1 Airline Spoons
These rather ill-gotten gains are little mementos of the many flights I have taken and hold so many wonderful memories of adventures in the far corners of the world. I adore how each one is a different shape and style, I love that they each have the airlines branding stamped on them. I am besotted with them and use them each and every day! If you can say you love a mismatched set of spoons and not sound like a total crackpot, then I love these airline spoons!
2 Professional Fairy
Despite my mum’s instance, this former job is not listed on my CV. Whilst studying at college I worked part-time in a Fairy Shop, you know, a shop that sells all things fairy. My official job title was Fairy. FACT. Aside from sprinkling the shop floor with Fairy Dust each morning (and vacuuming it up each evening), serving customers, gift wrapping and creating shop displays, one of my duties was to dress like a Fairy (which clearly means an old meringue-esque wedding frock, crown and wings) and host fairy themed birthday parties for Littles. Yup, professional fairy.
3 Scuba-Doo
Despite not getting the chance to do it very regularly – I love to scuba dive. I learnt many years ago in the crystal clear seas of Rarotonga whilst I was travelling through the Cook Islands. As a fully certified card carrying PADI Advanced Diver I have had underwater adventures in the Cook Islands, Fiji, Malaysia, Vietnam, Australia, Thailand and the Maldives. Despite telling myself that I am technically a mermaid, I am petrified of night diving…the one and only time I have ever (and will ever) dive in the sea at night I sobbed my heart out the whole entire time I was underwater.
4
5
6 Eagle V’s Shark
Hands down, this is my favourite film of all time.
7
There are two bloggers that are an endless surce of inspiration to me and they are
Knitted Bliss
Ella Wheeler
Now, both of these bloggers have been nothing short of stirling support ever since Made Peachy launched last summer, but that is not why I nominate them. These women are rad for many reasons – they are both extremely talented writers (super important for a blogger, right?!), they are intelligent, they are creative, they are original and they are real.
So, do youselves a favour and check out their wonderful blogs – if you haven’t already, bookmark their sites or add them to your blog reader, trust me, you won’t regret it! For those stalky – stalky types you can also find them on
instagra too!
Anyway, there are a few rules about being nominated for the Very Inspiring Blogger Award so be sure to check them out…
1 Thank the person who nominated you and provide a link to their blog.
2 Nominate other bloggers and let them know. Provide a link in your post.
3 Write 7 facts about yourself.
4 Display the Very Inspiring Blog badge on your blog post and blog.
The post Very Inspiring Blogger Award: 7 Super Facts! appeared first on Made Peachy.
May 1, 2014
How to Knit an I Cord
When it comes to knitting sometimes the most simple things can be the most stylish. And, friends, for me the I Cord is just that. Knit in lightweight yarns for a slinky and delicate touch, or pick out a chunky yarn and make a real statement – just like Jessica Biscoe did when she created this beautiful Triangle Motif Knitted Throw, now tell me that isn’t perfect…you just can’t!
The I Cord is one of this things that until you start knitting it sounds a little bit mind boggling. I mean its a complete cable created of consecutive stitches, worked on straight needles, without a seam. Withcraft? Black magic? Nope. It’s surprisingly simple – check out this How to Guide for Knitting I Cord...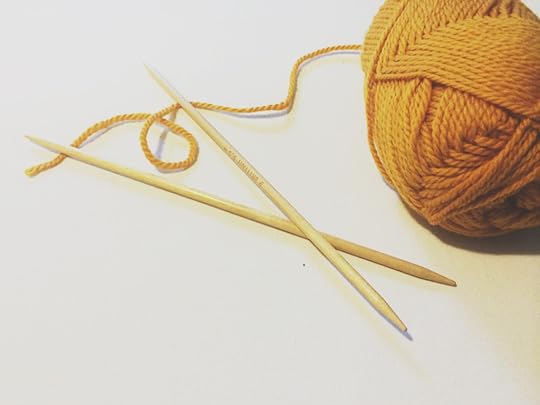 Grab your supplies…
You will need a ball of yarn in your chosen colour and weight – it’s not rocket science, the chunkier the yarn the chunkier the cord.
A pair of double pointed needles – pick the right size for your yarn as suggested on the yarn ball band!
Tapestry needle – for finishing those loose ends!
This How To Guide uses Standard Knitting Abbreviations!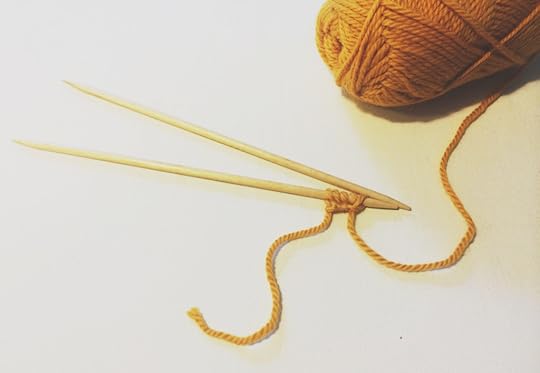 Begin by casting on your desired number of stitches – again the more stitches the larger the cord, with light weight yarns you will need to keep the stitch count fairly low in order to create a tight rope of knitting. It’s common to work with between 3 and 6 stitches – here I’ve cast on 5sts.
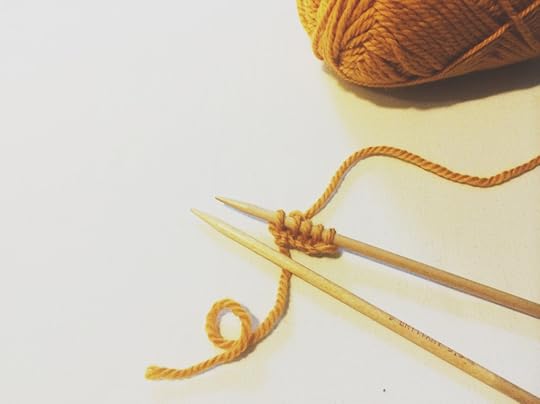 Knit all the stitches to the end of the (very short!) row.
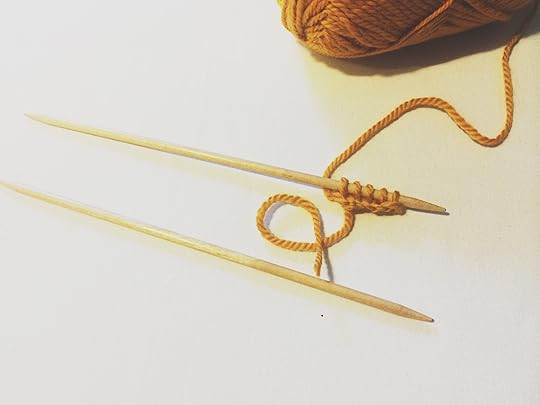 Now, don’t turn the work around – this will create just a straight knitted strip – instead, slide the stitches to the other end of the needle. See – this is why you’re using double pointed needles!
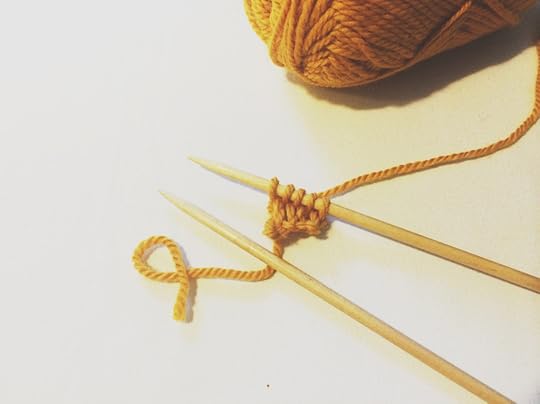 Now, knit those stitches! When you insert the needle into the first stitch to be knitted, you’ll see that the yarn is drawn across from the other side, it is this that pulls the knitting together at each side of the (very short) row and creates a cord. Give the yarn a little tug when creating that very first stitch on each new row, this helps to bring the cord in neatly and tightly. And, guess what? Slide that completed row to the other end of the needle and repeat!
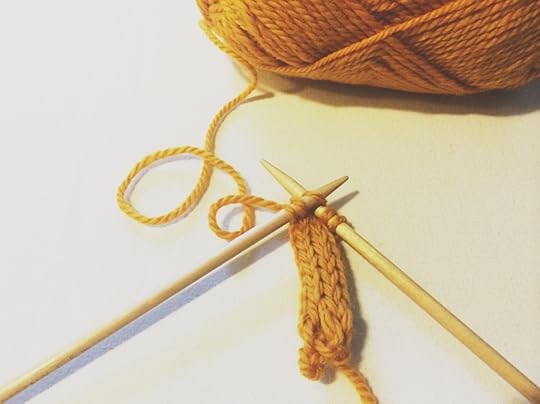 Continue working back and forth on these stitches, always sliding the work to the opposite end of the knitting needle at the end of each row.
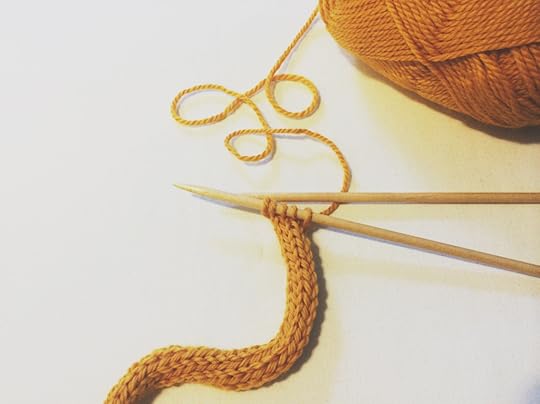 Before you know it you’ll be getting into a nice little rhythm, knitting a mini row, sliding to the other end of the needle and knitting the next row – also, this neat little knitting technique grows pretty fast too, which is super satisfying! When you’ve knitted the length that you want, simply cast off and weave in those loose ends – Tah Dah!
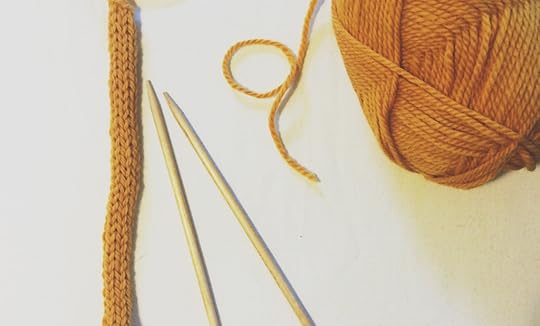 Knitted I Cords are so simple and so stylish, they can be looped and stitched into flowers, woven and braided into jewellery or worked into edging and finishing garments – what will you use your I Cord for?
The post How to Knit an I Cord appeared first on Made Peachy.
April 30, 2014
Quick Catch Up: Hello May
Yay for May! I’m sure that is a saying – if it’s not then is damn well should be! Things are looking pretty exciting this month – not least because it is my birthday pretty soon!
April has been filled with all of my favourite things – stitching, reading, hiking in the great outdoors, catching up with family and friends and even our first camping trip of the year. A camping trip that included getting lost on a midnight hike back to our tents from the beach, for an hour in drizzly fog and waking up to complete wash out – but maybe the less said about that the better! We even managed to take some time out over the Easter break to get stuck into some long overdue renovation tasks - I can’t wait to get these finished up and share some of our DIY projects!
At the start of April I was over that the Creative Stitches Show at Excel, teaching workshop in the Vilene Sewing Club – if you didn’t get the chance to come along, or the workshop you wanted was already booked up, be sure to check out the Vilene Workshop Series to get the instructions, templates, patterns and how-to notes from the workshops to make a Peter Pan Collar, Everyday Purse, Easy Baby Bib, Log Cabin Pot Holder & Sleep Eye Mask!
I’m also stoked to be a part of the hottest new sewing magazine Love Sewing - when launched this month. There is something pretty special about seeing your designs in print and I’m chuffed to have been part of the contributors of the very first issue – you know that there is an awesome free gift if you take out a subscription, right?
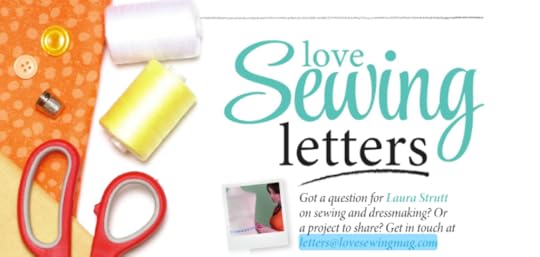 I’m also pretty blown away to be on the Letters team for Love Sewing – so if you have a sewing, quilting, dressmaking or general stitching question – why not send your question in to me at letters@lovesewingmag.com!
For the most of April (well, it feels like that anyway) my sewing machine has been in the shop for it regular service. It has been a pretty alien experience to not have my sewing machine about – well, they do say, you don’t know what you’ve got till it’s gone (and that really is a saying!) So I’m currently binge sewing to make up for our time apart. Which is a good thing, my head is filled up with quilting projects, featuring some amazing new fabrics from Art Gallery Fabrics for the next show…which I’ll be packing up my bags for pretty soon!
Here’s where the next few months will be taking me… 2014 Diary Dates
15 – 18 May Quilt UK Three Counties Showground, Malvern
7 – 10 August The Festival of Quilts NEC Birmingham
9 – 12 October The Knitting & Stitching Show Alexandra Palace, London
30 October – 2 November The Knitting & Stitching Show RDS, Dublin
20 – 23 November The Knitting & Stitching Show HIC, Harrogate
Despite all the busy times, soggy camping trips and DIY projects, there has been quite a lot of excitement happening over here at Peachy HQ too…
 Crafts:
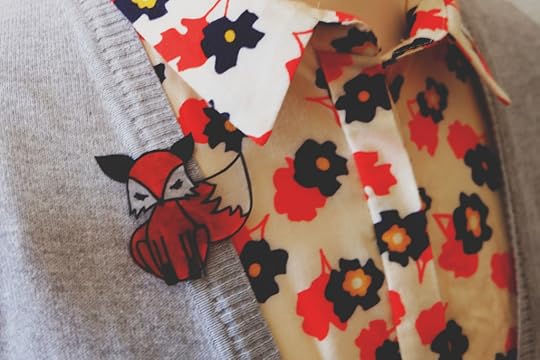
Shrink Plastic Fox Brooch
Crafts:
Shrink Plastic Fox Brooch
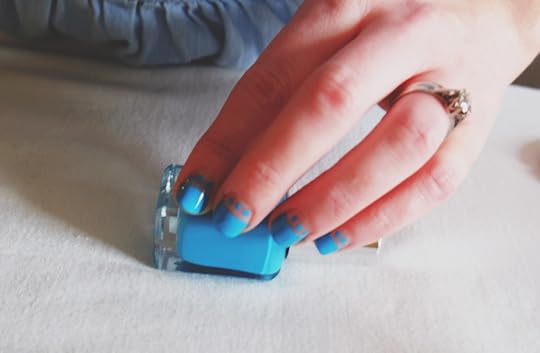 Style: DIY Colour Block & Dots Nail Art
 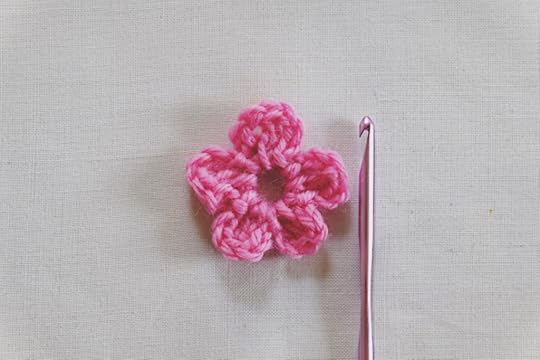 Skills: How to Crochet A Mini Flower
 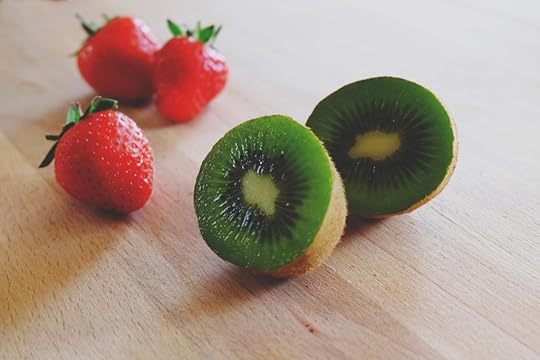 Eats: Strawberry & Kiwi Coconut Water Cooler My Browser Besties:
1: Violet’s Buds 2: Sensationail 3: Sewing World Magazine- Inspired To Make 4: Sizzix
My Blog Crushes: 1: JessicaJoy 2: NeedlesPinsAndBakingTins 3: HotTextiles 4: LadyFaceBlog
 For those of you that love to try out new techniques - have you seen the latest issue of Sewing World magazine? I had such a blast working on the Hand Embroidery Special in this issue – there are lots of amazing projects to try out, plus essential guide for getting started…I can’t wait to show you the Special Projects that I’ve been working on for the next issue of Sewing World - Watch This Space!
My Months Reads:
There’s not been much in the way of down time this April , but I somehow always manage to sneak in a spot of reading…usually when I promise myself an early night to catch up on sleep, only to stay up till the wee small hours racing through the latest novel! 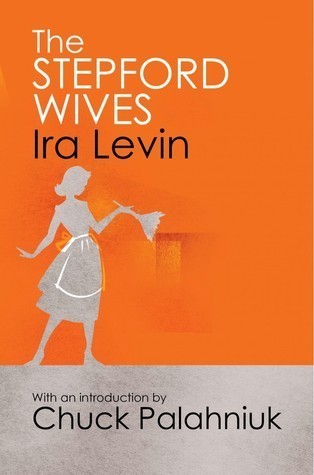 16 Stepford Wives - Ira levin This book is rather a chilling read – whilst this is not directly a horror book, there are lots of issues and scenarios that are hinted and suggested at, leaving quite a bit to your imagination ( which for me always gives a book a more scary tone, and one that stays with you!). The ending was not quite what I had expected, and seemed a little lacking in punch (without adding any spoilers) but worthwhile read nonetheless!
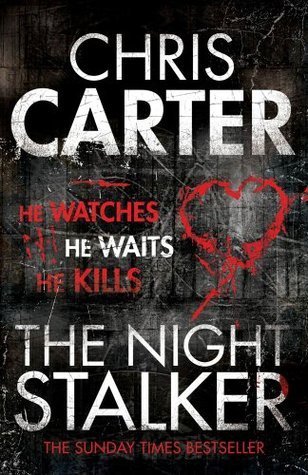 17 The Night Stalker – Chris Carter This book is a brutal, gruesome and quick-paced thriller -packed with lots of twists and turns and each chapter is carefully crafted into a cliffhanger – compelling you to read more to find out what happens next. As a fan of pulse raising thrillers, I will certainly seek out more of Chris Carter’s Books!
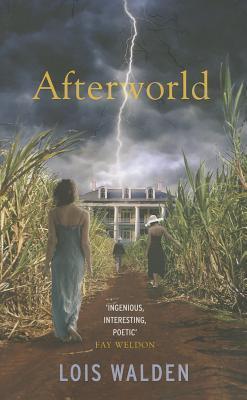 18 Afterworld - Lois Walden This is a multi-generational story with lots of eccentric characters – very original, some of the characters are narrating from after their death. This book wobbles between benign very clever and being too clever! I am drawn to stories from the Deep South – the colourful characters, vivid landscapes and poetic turn of phrase – set in Louisiana and populated with generations of a highly dysfunctional family, this book certainly made for a fascinating read.
If you’re also something of a bookworm, you can check out the other books I have been reading this year - January Reads, February Reads, March Reads, You can check out my full reviews over on my Goodreads account!
Now, friends, tell me what you’re looking forward to this month?
The post Quick Catch Up: Hello May appeared first on Made Peachy.


