
Laura Strutt's Blog, page 36
April 9, 2014
UK Coffee Week: My Favourite Recipe Round Up
You Guys! UK Coffee Week – a whole week where we can put our love of coffee to good use! With the support of coffee drinkers the UK over, Project Waterfall which is in partnership with WaterAid is able to help improve the access to safe water to the countries that grow coffee.
Now, there are plenty of ways that you can support this fab cause… Donating is just one way – head over to UK Coffee Week to find out more about the events and ways you can show your support!
I thought I’d share some of my favourite coffee recipes for you to try out!
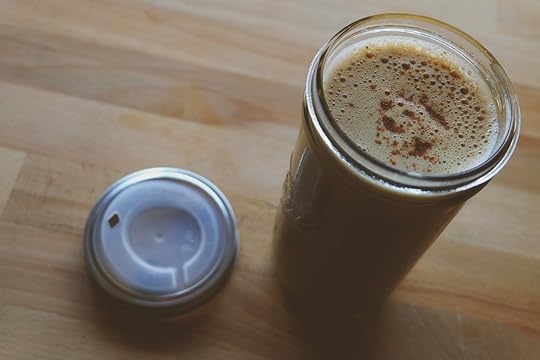
Now, this here is the beverage that proves that good things come to those who wait! I know that the thought of getting the beans ground and all the fixings together for your morning coffee right before you go to bed is probably going to make you feel a bit freaky. But, trust me on this – you will be glad in the morning when there is a delicious brew just waiting for you!
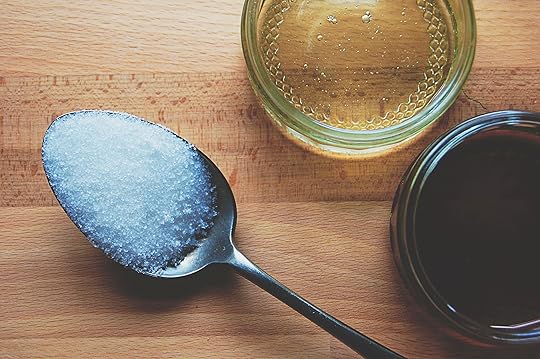
Flavour coffees are delicious – and I know that I will never tire of trying out new flavour combos – the basis to most of this scrum my additions is a simple sugar syrup. So, get this recipe down and you can start making up your own tasty flavour concoctions!

OK, now most coffee drinkers will think of this as a wintertime favourite, but these blend of warming spices are great at any time of year – seriously when you master this tasty blend you won’t want to wait till the cold weather to enjoy it!
As I have already stated my case for not believing in the seasonality of coffee beverages, why not try an Egg Nog Latte? Yes this truly is a Christmas time tipple – but, with its rich custard-y (yup, thats a word) favours is makes the perfect choice when your having that “should I go with a coffee or a dessert after dinner” moment – it is the best of both worlds!

Candy lovers everywhere – this one is for you! Adding these retro sweeties to a simple syrup makes a fragrant and delicious sweet addition to your coffee !
 If that hasn’t got you in the mood to get your beans out – coffee beans people, coffee beans – then nothing will.
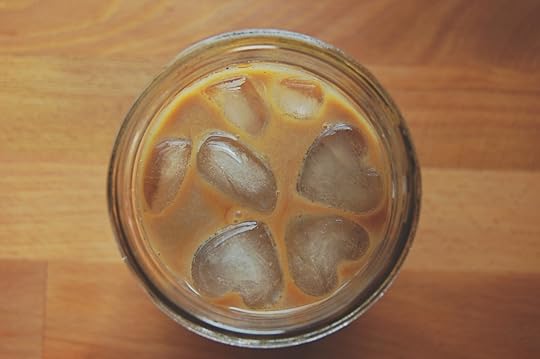
Me, I’m going to be drinking this delicious and intense ice coffee made with cold brew coffee ice cubes delicious!
Tell me, what’s your all time fave coffee beverage?
The post UK Coffee Week: My Favourite Recipe Round Up appeared first on Made Peachy.


April 8, 2014
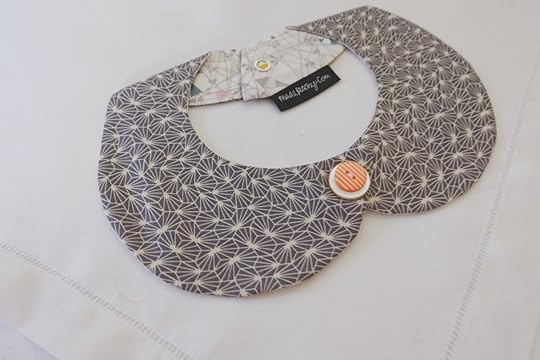
The Vilene Sewing Club: Peter Pan Collar
Create your own stylish removable Peter Pan Collar in a duo of designer prints. Skills you’ll master…working curved seams, neatening and clipping seams, turning through, slip stitch, adding double faced buttons, applying a snap fastener.
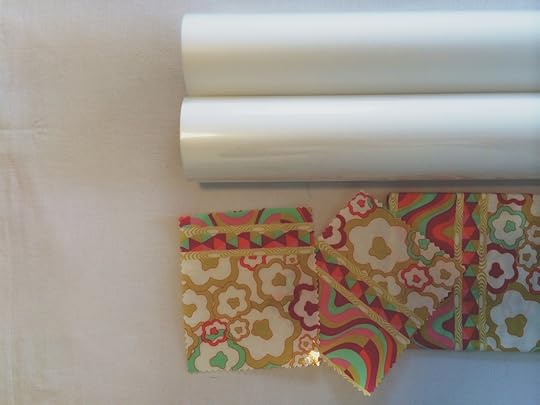
Grab your supplies…
Print cotton, two complementary designs
Vilene G405 medium-weight white fusible interfacing
Two buttons
Snap fastening
Dressmaking Scissors
Needle & Thread
Sewing Machine
Iron
Let’s make a Peter Pan Collar!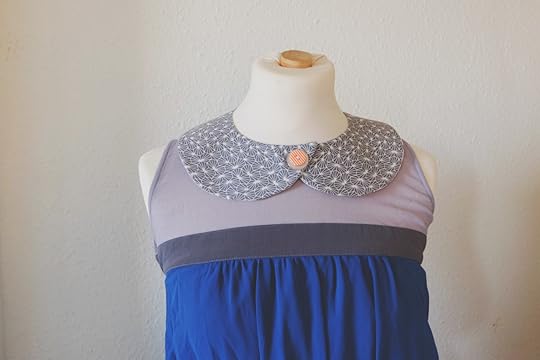 Use the pattern piece to cut the fabrics and the Vilene G405 medium-weight white fusible interfacing
Step 1
Fold one piece of the print cotton in half and position the pattern piece onto the fabric aligning the grain line on the pattern piece with the grain line in the fabric and pin into position.
Working on a steady flat surface, use the dressmaking scissors to cut out the collar piece from the fabric. Remove the pins and reveal two collar pieces that are a mirror image of each other. Repeat to cut two more collar shapes from the second print cotton, and a further pair from the Vilene G405 medium-weight white fusible interfacing.
Step 2
With the iron set to a medium heat position one of the cotton collar pieces right side down, and lay the Vilene G405 medium-weight white fusible interfacing on top. Ensure that the adhesive side is in contact with the wrong side of the fabric. Use the iron to bond the Vilene G405 medium-weight white fusible interfacing into place until the whole section is secured. Repeat to bond the other piece of interfacing onto the other collar piece in the same fabric.
Step 3
Work the collar in two pairs. Begin by position one interfaced collar piece with a collar piece in the second print, with the right sides facing. Pin the two sections together. With a straight machine stitch, begin at the upper edge of the collar to join the two pieces together taking a scant 6mm (1/4 inch) seam allowance. At the upper straight edge, work the corners by stopping the machine with the needle in the down position and pivoting to align the machine for the next line of stitching.
Step 4
Continue working around the lower curve of the collar and up the side section of the piece. When working the last side of the collar, be sure to leave a small, 5cm, gap in the line of stitching – through which to turn the collar through neatly.
Step 5
To create a neater finish, trim away the seam allowance on the upper corners of the collar piece. Work around the seams of the curved sections of the collar making small V shaped cuts, by clipping the seam in this manner the fabrics will lay neatly on the finished piece. Draw the collar to the right side through the opening left in the seam. Use the tip of a knitting needle to ease out the corners fully if needed. Press the collar flat, ensuring the the seam allowance along the gap in the seam is pressed inside. With a needle and thread work along the opening to join the gap with neat hand slip stitches. Repeat to create the second half of the collar in the same manner.
Step 6
Using the markings on the pattern piece to mark out the position of the snap fastener onto the back neck section of the collar. Secure one side in place before securing the corresponding half to the second snap.
Step 7
Over lap the front sections of the collar and pin in place. Use the pattern piece to mark out the position of the button onto both sides of the collar. Thread the needle and bring it through the collar to the position of the button, take the needle through first button hole and back down the second hole, draw the thread through leaving a small loop of thread between the button and the collar fabric. Working on the other side of the collar, position the button and take the needle through the first hold and back down through the second, again leaving a small loop of thread.
Step 8
When the needle tip returns to the side of the first button, draw the needle through, but don’t allow it to pass through the hole in the button. Wrap the thread once around the loop before passing it through the button holes and back down to the second side. Repeat to wrap the thread loop on the second side. This create a thread shank between the buttons and the fabric on each side.
Step 9
Continue working in this manner, drawing the needle though the fabric, wrapping the shank, and then passing through the button until the buttons on each side are secure. To fasten off, draw the needle through to the surface of the fabric and move the button to the side on it’s shank and discretely fasten off.
Made Peachy Tip
When sewing around curves, look at the place where the fabric are aligned on the needle plate of the sewing machine, by carefully keeping this raw edge of fabric aligned with this point on the machine, you will be able to stitch a neat curve.
 Download the printer-friendly version!
♥ – ♥ – ♥
 The Vilene Sewing Club In Association With…
All of the delicious fabrics for these makes are from the stunning range of designer prints from Art Gallery Fabrics – take a look over the range, I guarantee you won’t be disappointed!

The ribbons and trimmings for these projects were supplied by Berisfords, who offer a range of ribbons for sewing and decorative projects in a host of colours styles and finishes. Priced from 70p per meter and available from fabric and sewing stores. For more information visit www.berisfords-ribbons.co.uk or call 01453 883581

The buttons and fasteners for these projects are from Hemline, who provide a vast range of products for all aspects of sewing and crafting which are available nationwide from sewing and craft suppliers. For more information contact groves@stockistenquiries.co.uk or call 01453 883581
♥ – ♥ – ♥
I hope that you enjoy making your own Peter Pan Collar – you know, if you get in a knot you can always drop me an email with Peter Pan Collar Help in the subject line!
This workshop project is for your personal use only, be cool you guys- you know the score, if you’re interested in scheduling a workshop or have any enquiries about the usage of this workshop material just give me a shout!
Watch this space – the next in the The Vilene Sewing Club Series will be posted next Wednesday!
The post The Vilene Sewing Club: Peter Pan Collar appeared first on Made Peachy.
April 7, 2014
Guest Post: How to Find a Vintage Dress Sewing Pattern
Is there anything more beautiful than a vintage frock? How about a vintage frock made by your own fair hands?
Vintage sewing patterns are just as desirable, if not more so, than the ready-to-wear frocks themselves – so, how do you get your hands on one? Who better to share some wisdom on the hunt for a fabulous vintage dress sewing pattern than someone who is surrounded by stunning vintage pieces all day, every day?
Nick, is part of the passionate team at Mela Mela Vintage who love pretty much all things vintage. Mela Mela has a huge stock (most of which is in storage) including fabulous original vintage dresses, handbags, accessories and are more than happy to help in your search for that special something. In today’s guest post, Nick shares his Top Tips for Finding a Fabulous Vintage Dress Sewing Pattern!
♥ – ♥ – ♥
With fashion trends constantly changing and the general public less interested in making their own clothing; it can be hard to find original vintage dress patterns. As the years go by the likelihood of finding classic patterns slowly diminishes; as they are destroyed or snapped-up by collectors.
Fear not though, as whether you want to make a dress which is unique or just completely love anything vintage; here are my Top Tips on how to find those fabulous vintage dress patterns!
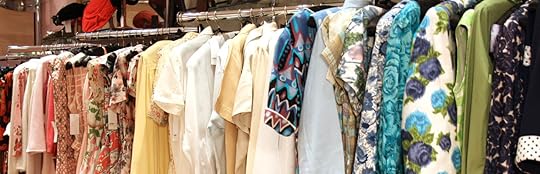
Look in vintage shops
 Image
MelaMela
Image
MelaMela
This may seem like the obvious place to shop for vintage patterns, but as patterns are usually sold in fabric shops, hunting around vintage shops is great as you may come across some rare vintage gems. Try checking any posters or ask about upcoming events or if the shop owner knows of anywhere that sells vintage patterns. They will probably be the best ones to know. This also applies to charity shops although it will be harder, why not pop in every time you go past one!
Visit car boot sales
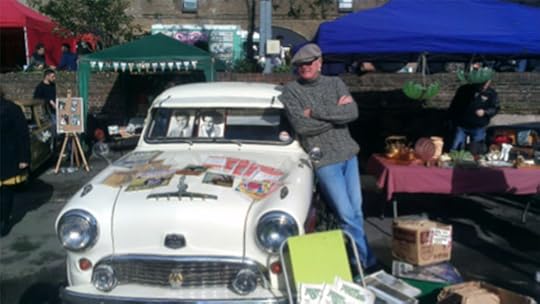
Car boot sales are a great way of finding patterns which someone may have had and is trying to sell. You can also tell if a stall/stand has a vintage feel as other items for sell will be vintage. This is a great way to find patterns which may never normally have been found; as the older generation may have kept these patterns and not viewed them as vintage (or valuable), you just need to keep a look out for them. It’s a good idea to look out for what car boot sales are on in your area, as there may be a ‘classic’ car boot sale which would have more of what you are looking for rather than just a ‘junk’ car boot sale. Either way, the only way to find a good bargain is to root around.
Check out antique fairs
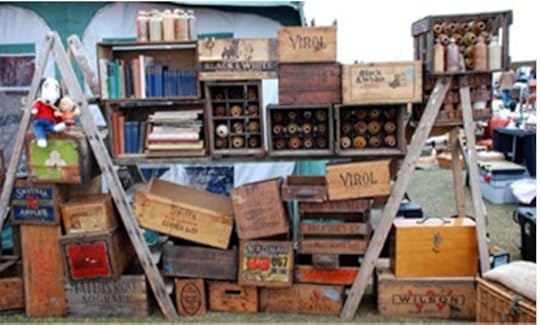
Antique fairs other than vintage shops & online shops, are one of the best places to find those fabulous vintage patterns. There is usually a large selection to choose from if you can handle the massive amounts of walking and rummaging. Antique fairs are usually an inexpensive way of acquiring patterns as most vendors will haggle and the vintage shops haven’t had a chance to add their mark-up yet. There are also a few websites which list the nearest Antique fair near you. Make sure you have a budget in mind of what you want to spend though!
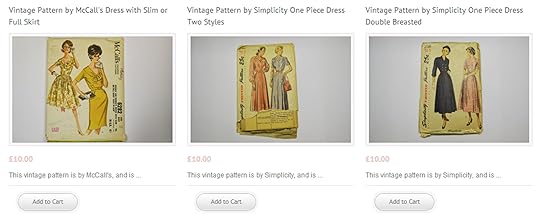
Search online
 Image
MelaMela
Image
MelaMela
Almost everything you could need or want is now accessible via the internet and that includes vintage patterns. There are quite a few online vintage shops which sell different patterns. A good tip is; if you find a store you like, why not sign up to their mailing list or email them asking to know when new ones come in? As well as online shops, there are many vintage fashion bloggers which have bought hundreds of patterns over the years and want to sell, so watch out for blog sales! You can find these patterns on ebay and Etsy too, although if you are looking for a particular pattern it’s best to search for the era or name of style which will give you exact websites. If you know the make this will help a lot.
Overall, the key to finding the patterns you want is searching as they aren’t readily available but you can guarantee once you find that pattern, you won’t be disappointed!
♥ – ♥ – ♥
Mela Mela Vintage is a local vintage clothing and jewellery store located on Teddington High Street, just a few minutes from Richmond & Kingston Upon Thames.
The post Guest Post: How to Find a Vintage Dress Sewing Pattern appeared first on Made Peachy.
April 6, 2014
National Sewing Awards 2015
Hello Monday, you came around all too quickly!
After a week of whizzing about at The Vilene Sewing Club I feel as though I could do with another Sunday – and by that I mean a whole day to nap and chill out. But, this baby quilt I’m working on isn’t going to hand quilt itself (more’s the pity!) So, while I have a day of catching up on neglected projects, cleaning out my disgraceful inbox, sorting through post and generally trying to remember which way up I am supposed to be – I thought I’d share something a little exciting with y’all!
During the Sewing For Pleasure show at the NEC and Creative Stitches at ExCel a fantastic new sewing competition was launched! If you’re anything like me, then the prospect of a new challenge is just about the most exciting thing there is – and what could be better than a sewing related competition?
The all new National Sewing Awards 2015 is your chance to showcase your stitching talents, throw your unique style into the spotlight and be in with the chance of scooping up some seriously awesome prizes!
When I say awesome prizes, that is no exaggeration – here’s what you could win…
 1st Prize
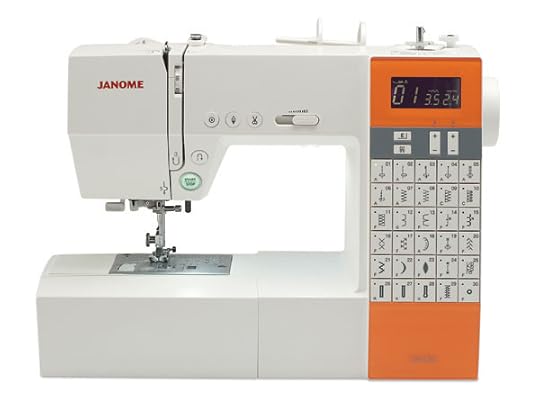
A Janome DKS30 sewing machine worth £500 and goodies to the value of £500
2nd Prize
Hamper packed with haberdashery goodies worth £300
3rd Prize
Hamper packed with haberdashery goodies worth £200
Plus there will also be two Highly Commended prizes
With each winner receiving hamper prizes worth £50
The competition is open to all stitchers and the shortlisted designs will be showcased at the Sewing For Pleasure Show at the NEC next year! The closing date for entires on the 15th October 2014 in time for the judging of the projects by a panel of sewing experts during November and the 15 Finalists will be announced in December! So, what are you waiting for? Download your entry form, read through all the rules & conditions of entry and let’s get stitching!
In association with…

The post National Sewing Awards 2015 appeared first on Made Peachy.
April 5, 2014
Style Sunday: Denim Dungarees
I think that dungarees are one of those garments that you either love or you loath.
I love them. Yes, I will concede that they might not always be the most flattering of garments, but they are one of my all time favourites! Every time they swing back into mainstream fashion and start popping up in High Street stores, my heart gives a little jump for joy.
These Native Rose Tapestry Denim Dungarees, £75, Urban Outfitters are just lush – I adore that laid back sumer styling, that makes me long for lazy days in the sun and balmy evenings! Getting the right fit for your body shape is one of the most important things to consider when getting a pair of dungarees, I mean you want to be stepping out looking stylish, rather than like a sack of spuds! This got me to thinking…Why not sew them myself? I mean this is the very best way to get a bespoke – and flattering fit – so, if like me you love this quirky garment you’ll love this Style Sunday: Denim Dungarees moodboard!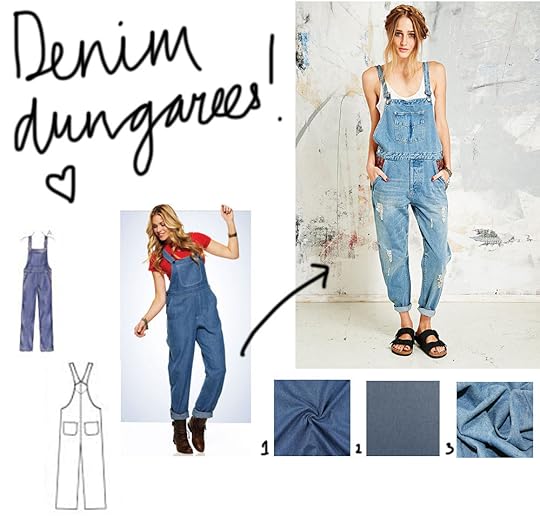 The Pattern
Kwik Sew 3897, sizes XS -XL, £8.99 SewDirect
These dungarees have fake fly, double bib with patch pocket, front side pockets, shoulder straps with buckles, side openings with button closures, back patch pockets, and topstitching detail. Select design A for the full length variation.
The Fabrics
1 Pure Denim, £10.99 per metre MyFabrics
2 Chambray Light Blue Denim, £8.50 per metre IWantFabric
3 Light Blue Denim, £8 per metre EmpressMills
Ok so that is the fabrics & pattern sorted, all I really need is for someone to tell me that I’m not alone in my love for denim dungarees – who’s with me on this?
The post Style Sunday: Denim Dungarees appeared first on Made Peachy.
April 4, 2014
Hello…I’m Laura
Today is my last day hosting at the Vilene Sewing Club workshops at the Creative Stitches Show at ExCel. Over the last few days, weeks in fact as well, with the Vilene Sewing Club at the Sewing for Pleasure Show at the NEC, I have had the fantastic opportunity of meeting awesome creative folks, and I have been meeting y’all by the truck load!
I have been completely blown away by the positive vibes from y’all. I mean, you guys are rad! You guys are enthusiastic about stitching, about learning new things and about getting involved with something a little creative and fun. Basically, you are my kinda people!
Whist the shows have been a total blast – time has not been a friend of mine. The packed out schedule of workshops – starting at 10.30 and running pretty much back-to-back until the show closes – have left me with little time for some of the finer things in life. And, by finer things I mean chatting, shopping and getting to know some you guys a little better!
During the shows, I was asked a lot of questions – and I’m not just talking about the mid-workshop “what seam allowance am I using, again?” kind of questions. Lots of you were asking me things like, “What is Made Peachy?”, “Where do you teach classes?”, “So, what is is that you actually do?” – some of you smart cookies suggested that I add a little post to share about who I am and what I do…so, here it is!
Hello…I’m Laura!
I am am a journalist and writer by trade and a designer/maker by obsession – before leaving to work freelance I worked as the Editor of Craft Business, the UK’s leading Trade Magazine for the Craft Sector, as the Deputy Editor on the launch team for Let’s Knit magazine then working as the launch Editor of Sew.
Whilst my day jobs on the magazines gave me more than enough opportunity to indulge my creative passions daily basis, I also spent a great deal of my free time working on knitting and crochet designs that wetre features in many popular craft magazines, including Crafts Beautiful, Let’s Get Crafting and (not forgetting) Let’s Knit – some of my designs even make it to the cover!
If you’re a bit of a knitting fanatic – you can find me on Ravelry too!
So, what is it that you actually do?
Sometimes in life you want to take on a new challenge, and for me that meant looking at working freelance, being my own boss, stretching my creativity, trying out new things. Life takes some pretty weird twists and turns, and last summer I found myself in the position to really and truly venture out on my own!
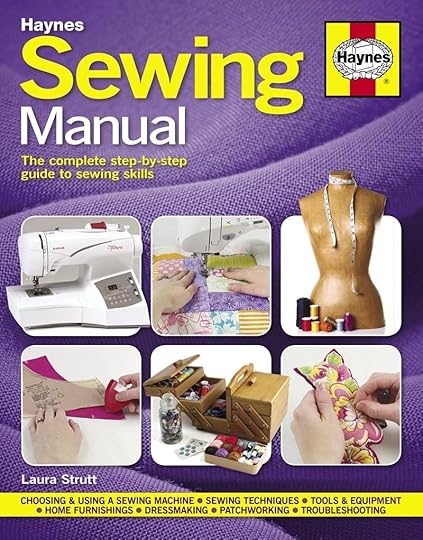 In the first few months of embracing a freelance life, I wrote the Sewing Manual and then, just as I was wrapping that up, Haynes asked me to work on a second book, the DIY Wedding Manual.
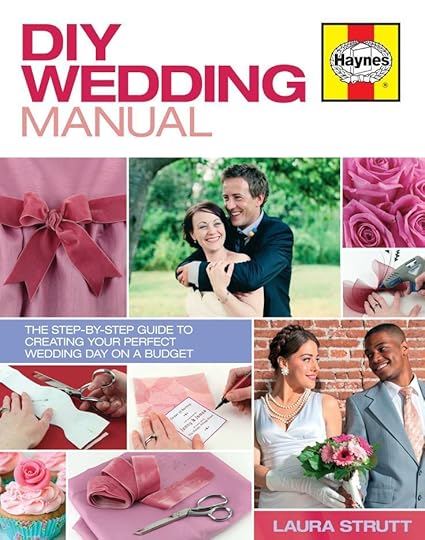
Well, at present my schedule is pretty busy – I spend most of my working day writing for magazines, websites and creative publications. When I’m not writing, I can usually be found in my little studio space designing and making projects, working on commissions, shooting product or styled photographs. I work on a variety of creative projects for a number of companies in the craft sector; one of these roles is as a Creative Consultant for Vilene – this means that I attend a number of the consumer craft and stitching shows throughout the year, and around the country, demonstrating the wide range of different applications for Vilene products.
Do you teach sewing, knitting or craft classes?
At present offering regular classes is a little tricky, but I do have plans in the very near future to team up with a creative space in the South East to do just that – teach regular classes, workshops and drop in Makers Sessions…I’ll be announcing all the details here, just as soon as I can.
In the meantime, I do teach workshops at sewing and craft shops around the country whilst I’m on my merry little journey of shows and events – if you’re interested in attending a workshop, or want to schedule a workshop at your craft store – drop me an email & we can chat about dates!
So, what is Made Peachy?
Made Peachy is my little place to share, document and just out-and-out enjoy the creative things that I find in my daily life. Here you will find free projects, how-to guides, ideas and inspiration – Made Peachy is where you will find me each and every day, adding something new – a project to make, a technique to try or something handmade that I just really and truly adore! Made Peachy has been live since July 2013 and I have been sharing something new each and every day…yup, if you’re new around here, there is plenty for you to catch up on! Why not check out the Archive to see some of the older posts, or you can check out the Gallery to see the selection of free projects, recipes and how-to guides!
So, folks, that’s a little bit about me – you can find out more over on the About & FAQ pages!
One of the things I loved the most about the shows is how many of you were able to share photos of your latest projects I can’t even begin to tell you how happy it makes me feel when you are telling me about the latest makes that you’re working on and you say, “I have a photo here if you want to see?” Yes! Yes my friends – I *love* to see what other folks are stitching – this is part of the reason that I do what I do! If you have photos of your makes that you want to share – and remember, I always *always* love to see them – you can post them on the Made Peachy Facebook page for me to see, email them over to me, share them on Twitter or you can tag me on Instagram! Keep them pics coming folks – I can’t get enough!
Finally, I want to say a huge Thank You to everyone that came along to take part in the Vilene Sewing Club workshops – without all you rad folks, we wouldn’t have had anywhere near the amount of fun!
If you weren’t able to come along, or the workshop that you wanted to take was booked up, then you still be part of the fun! Over the next few weeks I will be sharing all the how to guides for the workshops – so you’ll be able to get the step-by-step instructions, the pattern templates and all the essential info for making the projects at home…while we won’t be able to recreate the awesome workshops vibe in your home sewing room, I can say that I’ll be available via email for you to share your finished makes, or to ask for any extra help if you get in a little pickle! Sweet, right? So, watch this space or find these in the coming weeks by searching Vilene Sewing Club Projects in the search box on the side bar!
♥ – ♥ – ♥
Find your nearest Vilene stockiest by contacting crafts@stockistenquiries.co.uk
The Vilene Sewing Club In Association With…
All of the delicious fabrics for these makes are from the stunning range of designer prints from Art Gallery Fabrics – take a look over the range, I guarantee you won’t be disappointed!
The ribbons and trimmings for these projects were supplied by Berisfords, who offer a range of ribbons for sewing and decorative projects in a host of colours styles and finishes. Priced from 70p per meter and available from fabric and sewing stores. For more information visit www.berisfords-ribbons.co.uk or call 01453 883581
The buttons and fasteners for these projects are from Hemline, who provide a vast range of products for all aspects of sewing and crafting which are available nationwide from sewing and craft suppliers. For more information contact groves@stockistenquiries.co.uk or call 01453 883581
Thank you to DotComGiftShop for the fab additions to the Vilene Sewing Club Goodie Bags!
The post Hello…I’m Laura appeared first on Made Peachy.
April 3, 2014
Fave Free Printable Day Planner Inserts
I’m crushing so hard on this fabric cover binder, £30.95 from WoodlandFarmCottage
One thing that I have learnt whilst spending so much time away from home, is that staying on top of all the things is crucial for keeping your sanity.
My day planner is something that is never far from my side – this hold the key to my very existence. Well, yes I am enjoying the drama of that statement. But, this is where I note down everything. All my deadlines, dates for events, commissions and the important things in life – like upcoming holidays (yup! it’s booked in and I can’t wait!), birthdays and fun times with friends and family.
This is what I use to keep a grip on my sanity when the world feels as though it is whizzing past at warp speed. Recently I have found that while there are great inserts available for day planners at stationery stores, often they aren’t exactly what you need, and you have to find ways to make them work. That’s when I discovered the whole help of creative folks that have designed handy, cute and colourful printable inserts to make organising your day planner – and your life – that little bit more awesome!
Here are some of my favourite Free Printables Day Planner Inserts for staying on top of daily life. 1 2014 Day Planner Printables • TheMacAndCheeseChronicles
2 Blog Weekly Planner • AndCute
3 Project Planner • TrendAddictions
4 Meal Planner Printable • EverydayEnchanting
5 Monthly Budget Printable • DespicablePink
I adore these printables – not only are they stunning to look at, but you can print out the styles you need in the quantities you want, so you can customise your day planner to suit your life – how rad is that?
Combine these with a selection of Free Printable To Do Lists and I think that is me pretty much ready to take on the world…of course, as a compulsive list maker, I’m always no the look out for new printables that might make my life a little more organised – or cute – so, what are your favourite types of printables?
The post Fave Free Printable Day Planner Inserts appeared first on Made Peachy.
April 2, 2014
How to crochet little flowers
It’s been ages since I have picked up a crochet hook, I know that I have a blanket on the go and really mustn’t start any thing big until that is finished…so how about a quick little make? I love making these crochet flowers – they are small, sweet and can be whipped up in no time.
These make great additions to granny square blankets, they can be added on to bags or accessories – you can even make them into corsages and jewellery, these little blooms look great whatever you do with them. So, if you’ve got five minutes (because, seriously, that is how long it’s going to take to learn to make one of these little beauts!) check out this step-by-step guide and discover How to crochet a mini bloom
Grab your supplies…
Crochet hook
Yarn
Tapestry needle
The beauty of this is that you can work with any size hook and yarn- the heavier weight the yarn you use the bigger and more solid the flower will be – and more light-weight yarns will make smaller more dainty blooms!
This guide uses standard UK Crochet Abbreviations!
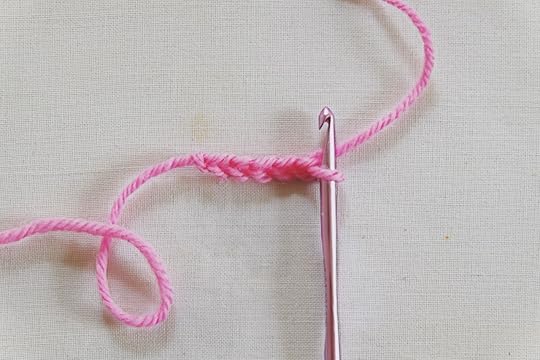 With the yarn and hook, work a chain of five stitches
 Insert the hook into the first stitch on the chain and join with a slip stitch to make a ring.
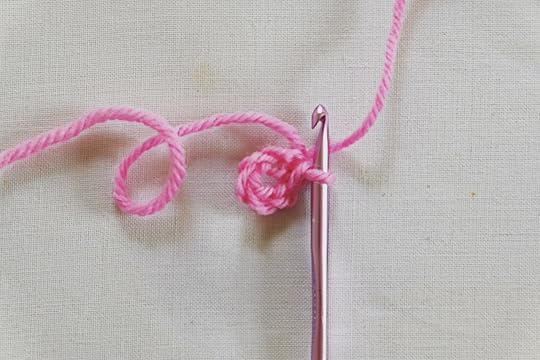
 **Chain three stitches.
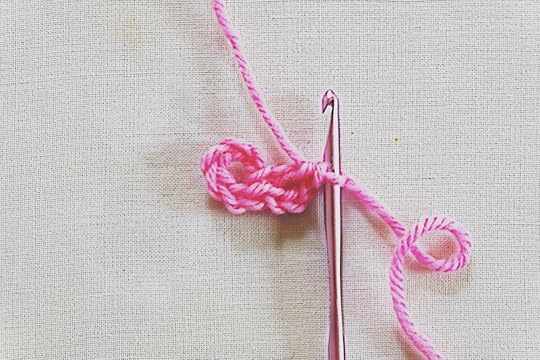 Work a treble stitch into the ring.
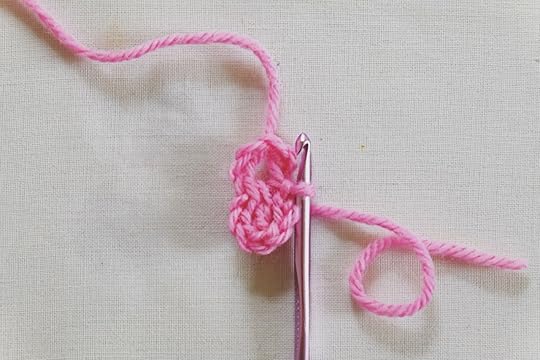 Chain three stitches and then join to the ring with a slip stitch.**
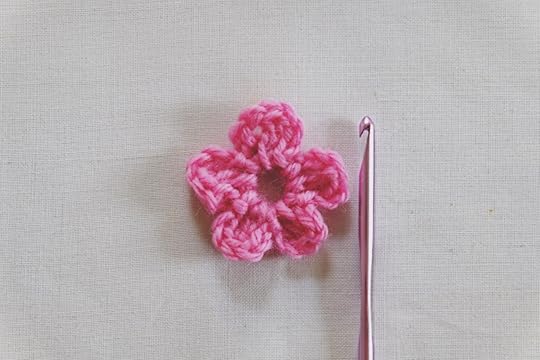 Now, all you have to do is repeat from** to ** for create five petals in total around the ring. Then fasten off the yarn and weave in the loose ends.
These little blooms are surprisingly quick and satisfying to make, don’t be surprised if you find that you make lots and lots if these little beauties!
The post How to crochet little flowers appeared first on Made Peachy.
April 1, 2014
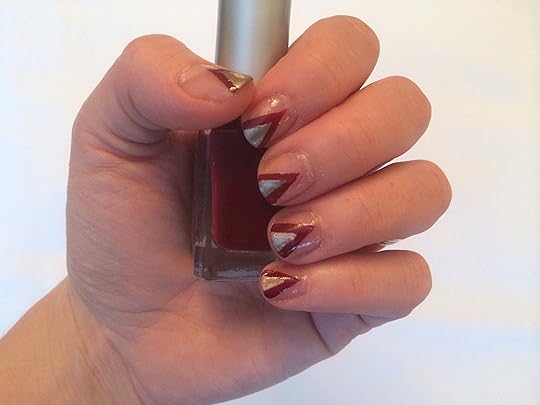
DIY Colour Block & Dots Nail Art
When you make stuff you spend an abnormal about of time looking at your hands.
I don’t have very elegant hands and I don’t have the time, cash-money or inclination to spend ages in a nail bar to get cool new looks. Besides, I seem to be pretty hard my little hands, so funding a regular manicure seems a little bit wasteful.
So, instead I often find myself dreaming of colourful nail art designs that I can do at home. As I am about to hit the road to head to the Creative Stitches Show, I thought I’d take a little Me Time and create some fun nail art for the event. So, if you fancy adding a fun, spring time mani to your look, here’s my step-by-step to the DIY Colour Block & Dots Nail Art!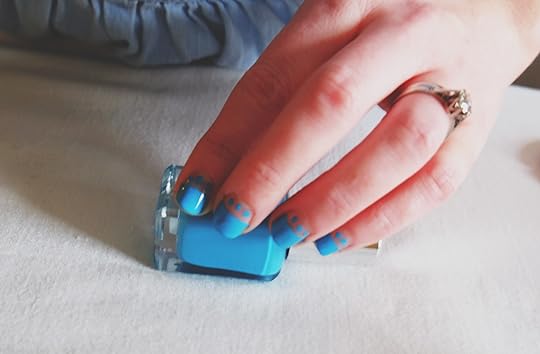 I love the look of the crisp block of colour mixed in with the super cute mini dots. I guess you could mix this up and work with a couple of different colours, or only use as on an accent nail. But, either way, this is quick and easy to do with just a few handy supplies!
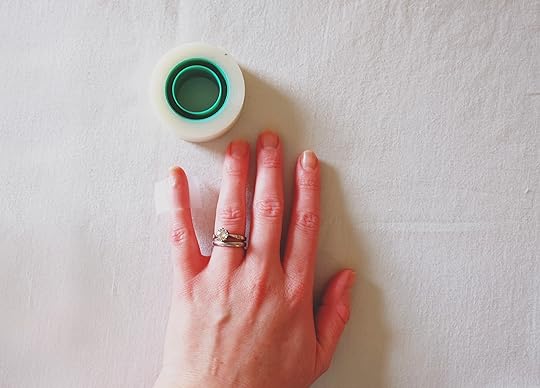 Grab your supplies…
Nail paint in your fave (of the moment) colour
Magic or Scotch Tape
Bobby pin (or, if you have the fancy nail art tools, be my best and use them instead, fancy pants!)
Something to use as a palette – an old cosmetics tin lid is pretty great!
Top coat
Use the Magic or Scotch tape to mask off the lower third of your nail – just like in the Duo Point Mani.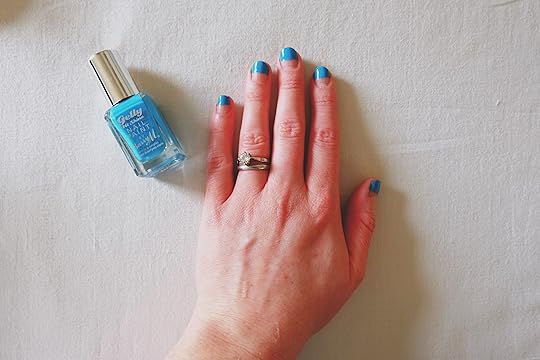 Use your fave shade nail paint to add the colour to just the tip, so that the top two thirds are painted. Leave to dry for a couple of moments and carefully peel away. This will leave a super crisp – wobble-free line – perfecto!
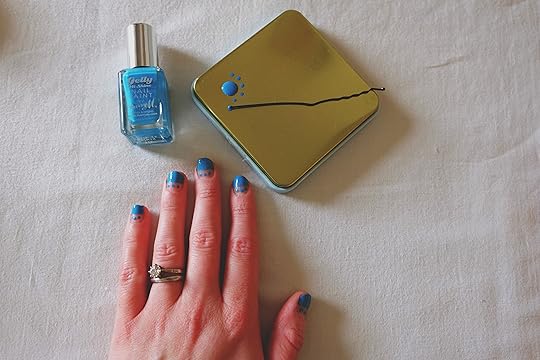 Remember that time I told you how I use a bobby pin as a nail art tool? Well, go right ahead and decant some of the nail paint to the palette, using the tip of the bobby pin to add three small dots below the line of the block of colour.
Because the tip of the bobby pin lets you make regular neat dots, you’ll find it pretty easy no matter whether your adding them to your left or your right hand.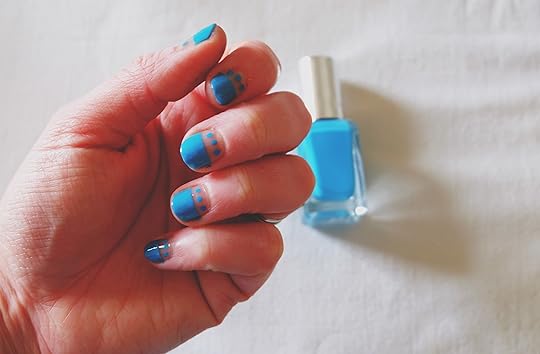 Once all the nail polish has dried – I mean fully dried, don’t rush this or you’ll end up smudging all those pretty neat dots – finish with a lush lacquer of gloss. before you know it your manicure is finished, complete with super crisp colour blocks and itty bitty dots…Tah Dah!
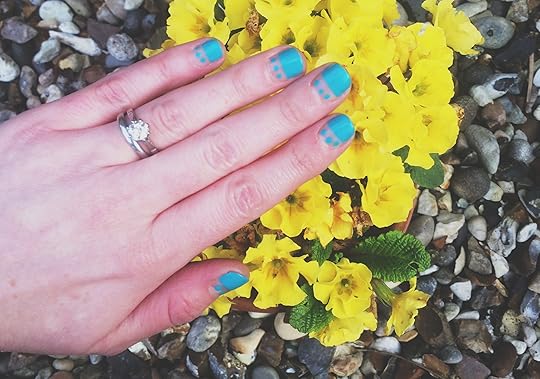 If ever there was a fun spring-time many – then this my friends is it! And, it is so quick and easy to create, I can’t to try out different colour combos!
 I can’t get enough of this gorgeous Barry M Nail Gelly Effects in Guava – what colour will you pick this spring?
The post DIY Colour Block & Dots Nail Art appeared first on Made Peachy.
March 31, 2014
Quick Catch Up: Hello April
Oh March! You have been nothing if not exciting! This month has been packed with new experiences, new challenges and some sneaky secret projects. It’s been a lot of fun. It’s been a lot of work. And, did I mention it’s been a lot of hard work.
There has never been a dull moment, that’s for sure! I have spent a heap of time preparing for The Vilene Sewing Club at Sewing For Pleasure Show at the NEC and a whole heap more preparing for the Creative Stitches Show at ExCel later this week!
Also, I’ve been adding a few more dates to the diary for this year – well, what can I say – I’m having a total blast meeting so many rad people and getting to make stuff in a whole heap of exciting places. So, check out the events that I’ll be heading to over the next few months!
2014 Diary Dates
3 – 5 April
Creative Stitches / Fashion, Embroidery & Stitch Excel, London
15 – 18 May
Quilt UK Three Counties Showground, Malvern
7 – 10 August
The Festival of Quilts NEC Birmingham
9 -12 October
The Knitting & Stitching Show Alexandra Palace, London
30 October – 2 November
The Knitting & Stitching Show RDS, Dublin
20 -23 November
The Knitting & Stitching Show HIC, Harrogate
While it’s been a bit of whirlwind, things have still be happening here at PeachyHQ, here are some of my faves from this month… On Made Peachy:
 Crafts: DIY Statement Motif Necklace
 Style: Duo Point Nail Art
 Skills: How to Apply Vilene Lamifix
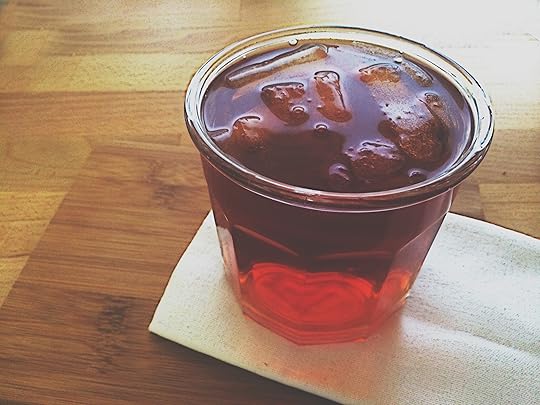 Eats: Creme Caramel Rooibos Iced Tea
My Browser Besties:
1: LibsElliot
2: MabGraves
3: Eisley
4: BlockDesign
My Blog Crushes:
1: LadyFaceBlog
2: TinyPainter
3: HeyLoveDesigns
4: OneSheepishGirl
At the start of the month, there will little time for anything but work. I had to tuck myself away and work, work, work to get through a heap of deadlines and workshop preparations. Aside from having to mis out on fun times with friends and family (which always sucks!) I missed taking the time out to relax with a good book. Fortunately, this all work, no reading phase didn’t last, and I was back with my nose in a book (well, face pressed to my Kindle) in no time. In fact, I had originally challenged myself to read 24 books in 2014, but after being invited to a book reading challenge with some bookworm friends, I have upped that to (a staggering) 52! I know, 52 books in a year! I better get stuck in to some reads. So, to check in on the progress, following on from books 1-4 I read in January, and books 5 -9 in February, March has been a good month for my inner nerd! Time away in hotels while on the road means that you can’t get caught up in everyday chores, when you’re finished working for the day, you’re finished working for the day. And, if you want to curl up with a mug of hot tea and a book and read the night away – well, that’s just what you should do…in fact that’s just what I did!
My Months Reads: 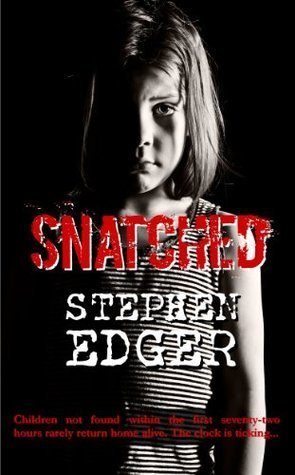 10 Snatched – Stephen Edger Running like a modern day whodunnit this book was a real page turner (although, I may have had my suspicions about the culprit fairly early on!) The characters were well considered and, where appropriate likeable and believable. There were a number of parts to the plot that turned my stomach, perhaps not an ideal read for everyone due to the subject matter. Stephen Edger is a new author to me, so I’ll be interested to check out his other works.
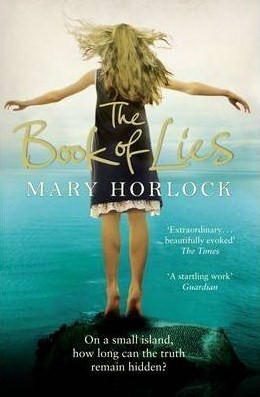 11 The Book of Lies – Mary Horlock The book starts with the main character’s confession of murder making it instantly gripping. The narration swatches between teen Caz and items from her late father’s notes on the German Occupation and about his brother’s time in a German Concentration Camp. Having very little prior knowledge about the history of Guernsey this book was very enlightening. But, the main character was far from likeable, and sometimes the switching between times hampered the pace of the book.
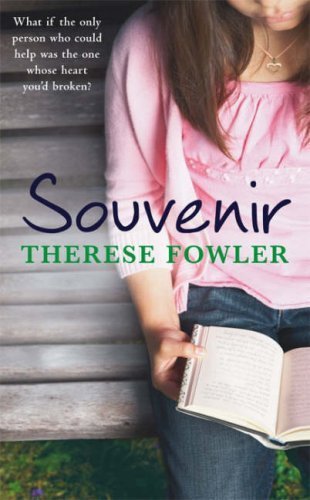 12 Souvenir– Therese Fowler A story about the lasting impact of choices, of soul mates and of tragedy. Without spoilers, this is the story of how a woman is faced with a shocking discovery about her life and begins looking over the choices she made – for the good of her family over following her heart. There is more to this than a simple love story about the rediscovery of a first real love, there are issues about loyalty, family dynamics and the wake that is left behind a persons actions. Fans of Jodi Picoult would be sure to enjoy this!
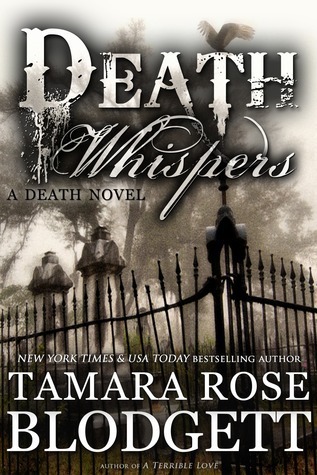 13 Death Whisperer – Tamara Rose Blodgett This book turned out to be a lot more than I had thought it would be – as a result of government arranged course of drugs, the main character Caleb, begins to show paranormal powers. Caleb is a Cadaver Manipulator -which take this book away from The Walking Dead Style of zombie book I was expecting – there isn’t the terror factor with them, allowing the author to explore different angles in the plot. This book follows Caleb and his group of (some paranormally gifted, other mundane) teen friends as they try to hide Caleb’s rare powers from those that wish him harm! I’ll confess that some of the teen-speak was a little wearing on me, but over all the pace and plot won out!
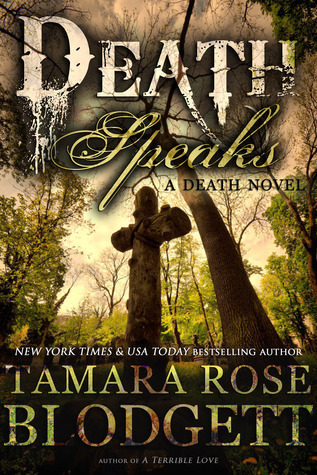
14 Death Speaks – Tamara Rose Blodgett
The second book in the series follows on and Caleb and his friends are now in High School – and the pace of the book changes as a serial killer is brought into the plot. As a Cadaver Manipulator and able to communicate with the dead Caleb is quickly recruited to assist the police in finding the killer. A game of cat and mouse follows as the killer quickly catches on to Caleb’s involvement with the police and things begin to get a bit dangerous. The fuse with the rival gang is heating up and helped to distract from the romantic elements of Caleb and Jade (a bit too teen here for me at times!)
 15
Death Inception
– Tamara Rose Blodgett
This very short read is the third book in the Death Series – however, the book acts as a prequel to the events of the main character, the brain pulse technology and the paranormal powers of Caleb. At first I wasn’t sure if there was much need for a prequel, having already suspended my disbelief enough to accept the plot of the story. But, I was surprised about the insights that this gave – particularly into Clyde the zombie! Although I was confused at first at the addition of a prequel, this short book reads very quickly and has left me interested in checking out the remainder in the series.
15
Death Inception
– Tamara Rose Blodgett
This very short read is the third book in the Death Series – however, the book acts as a prequel to the events of the main character, the brain pulse technology and the paranormal powers of Caleb. At first I wasn’t sure if there was much need for a prequel, having already suspended my disbelief enough to accept the plot of the story. But, I was surprised about the insights that this gave – particularly into Clyde the zombie! Although I was confused at first at the addition of a prequel, this short book reads very quickly and has left me interested in checking out the remainder in the series.You can check out my full reviews over on my Goodreads account! Now tell me, how was March for all Y’all?
The post Quick Catch Up: Hello April appeared first on Made Peachy.


