
Laura Strutt's Blog, page 32
May 19, 2014
Love At First Stitch Giveaway Winners!
Turns out y’all love Tilly just as much as I do! Thank you all for getting behind the Love At First Stitch Giveaway last week- I am blown away by all the entries. Well, not really, because this book is amazing, why would you not want it?! But, I am taken aback by how many entries I’ve had to work through to get into the hat to draw the winners.
Thank you all for entering here, over on the Facebook, Twitter and Instagram I sure have had my work cut out going through them all!
Well, now is the time to announce the winners…
 CONGRATULATIONS…
1 GILL FORRESTER
2 VICKI COLEMAN
3 ANNA
Please check your emails you guys and send over you UK postal address to that we can get this amazing prize sent out to you!
Didn’t win? Well, I’d honestly say that if you grab a copy of this new book by Tilly Walnes, you’ll soon be stepping out in the most glamorous, handmade wardrobe, so this is a win in itself, right?!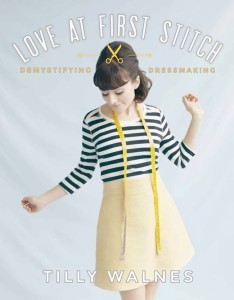
Love At First Stitch by Tilly Walnes, £20, Quadrille is available right now!
The post Love At First Stitch Giveaway Winners! appeared first on Made Peachy.


May 18, 2014
Sewing World Children’s Makes Special!
Hey! Happy Monday y’all! If you need something cute to get your week of to a brilliant start, then this might be just what you need! This trio of lush little lads are sporting adorable handmade bow ties – these lush little lads are my nephews sporting the adorable handmade bow ties that I made for all the Littles that attended our Handmade Wedding! 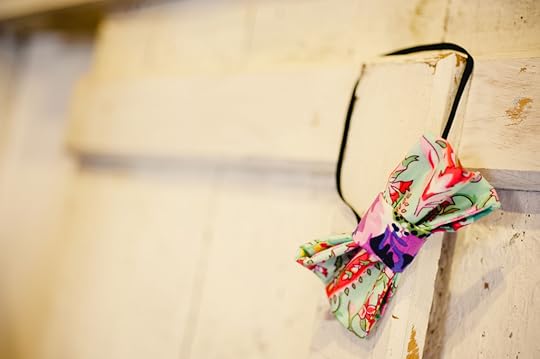 That’s not all, I worked up some cute mini bunting necklaces for the Little ladies too!
 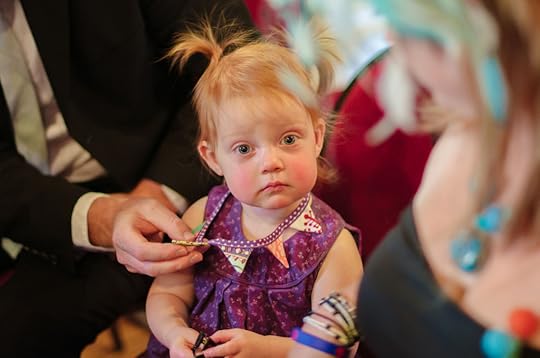 And, before you say it – yes – you can size these up and wear them yourself!
 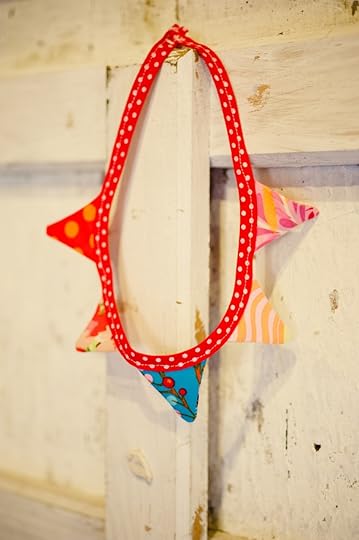 If you love these adorable mini makes – then be sure to check out the latest issue of Sewing World magazine – where I share the how-to guides for these fun little accessories for Littles. I had such a blast working on this special Children’s Makes in the June issue of Sewing World Magazine – there are projects, mini makes, stitch-in-an afternoon garments, interviews favourite patterns and much, much more – have you seen the latest issue yet? Grab your copy and let me know what you think!
 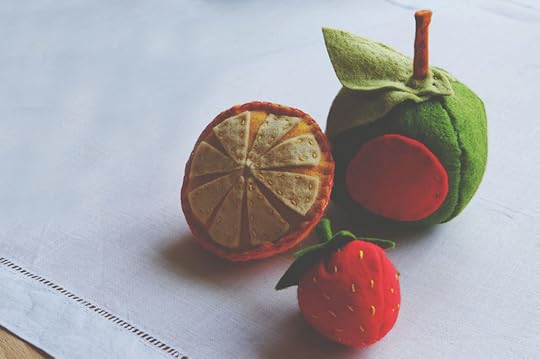 Don’t forget – you can download my free bonus project to make a sweet felt fruit set too! I can’t help but think back to our wedding when I see my sweet little nephews wearing their bow ties – yup! Ultra soppy going on over here right now! But, while I’m talking about weddings…
  If you’re planning a wedding and want to get your handmade groove on, I’d be stoked if you’d check out DIY Wedding Manual, £18.99, Haynes – there are lots of how-to guides, projects to make, fun things do and practical wedding day advice!
ps: The utterly gorgeous photography for this projects – and from our wedding day - is down to the endless talents of photographer Kerrie Mitchell!
The post Sewing World Children’s Makes Special! appeared first on Made Peachy.
May 17, 2014
Style Sunday: The Shorty Sweater
When the weather can’t quite make up it’s mind, it’s time to grab some spring time knitwear.
Cropped styles are cute and bang on trend right now, with short sleeves these little knits are perfect for dressing up, or dressing down. I adore this loose-knit short top with short sleeves £12.99 H&M
The best thing about these smaller knits is that they can be worked up pretty fast – so you can go from on-the-needles to on-you-body in next to no time – perfect during this changeable springtimes weather. Check out today’s Style Sunday: The Shorty Sweater for my fave cropped knit design!
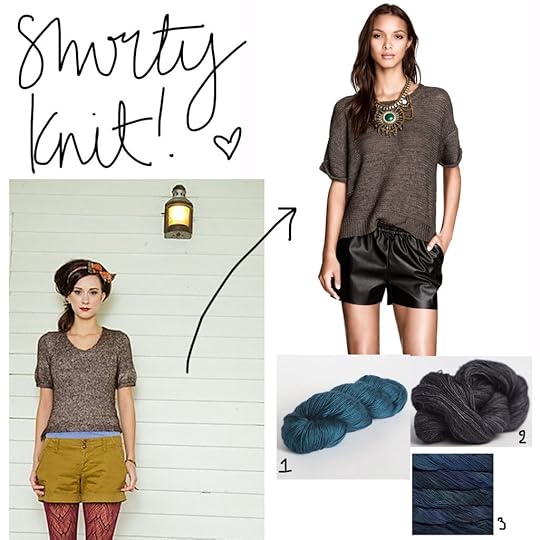 The Pattern
Hester Pullover, designed by Amy Herzog published in Knitscene Spring 2012
This vintage-inspired T-shirt shape knit has a cropped length, short sleeves and optional button details. A stylish feminine design that is great for smart or casual looks.
Available in the Knitscene digital edition is available for £4.80
The Yarns
Madeline Tosh Sport in Charcoal
Malibrigo Sock in Azules
Knipicks Fingering Weight in Azurite
Spring time knits are just so lovely – what is your favourite pattern for the season?
The post Style Sunday: The Shorty Sweater appeared first on Made Peachy.
May 16, 2014
The Handmade Fair
I know I’m actually already away from home, and that September is such a long, long way away…but when you have great news, you just got to share it, right?
 I am so stoked to be a part of Kirstie Allsopp‘s Handmade Fair at Hampton Court Palace in September!
Have y’all seen the line up? There is so much happening at this event, from workshops and the Super Theatre, to mass makes an Etsy Business School and shopping, shopping, shopping! Oh, yes…and little me too! I’ll be demo-ing some awesome fun new projects, teaching some pretty cool techniques with Vilene and generally having the time of my life!
 Also…while I’m gushing about exciting plans, I’m working on a very special (rather slow burning) project at the moment. I know, I know, is there anything more irritating than someone who says, “I’ve got something really rad to tell you…but I can’t tell you yet!” Nope, I thought not. So, sorry for that. But, I am able to tell you that I’ll be sharing more about this exciting new project in the run up to The Handmade Fair. Wow – talk about a teaser trailer!
So, what exciting things have you got planned for your Saturday?
The post The Handmade Fair appeared first on Made Peachy.
May 15, 2014
Obsessed with…Nautical
I think I need this Octopus Print • £15.82 • NauticalNell looking down on me whilst I’m supping a large measure of Kraken and swearing like a sailor!
Nautical is the style that never really goes too far off the radar. That make me pretty happy – from clothing to homewares, artwork to jewellery – there is nothing that a little bit of seafaring styling can’t make a little bit more exciting!
Here are some of my handmade Nautical Favourites…
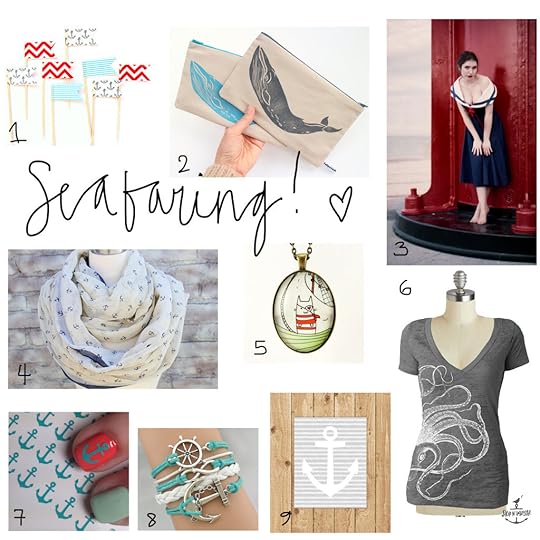 1 Nautical Cupcake Toppers • £3.90 for set of 12 • Pelemele
2 Ocean Whale Pouch • £15 • TalentedApple
3 Pin-Up navy Dress • £90.60 • RetroSpectiveFashion
4 Anchor Print Infinity Scarf • £7.88 • aCutee
5 Pirate Cat Pendent • £21.90 • CellsDividing
6 Kraken T-Shirt • £13.38 • Skipnwhistle
7 Anchor Nail Decals • £3.04 • StickMeNails
8 Infinity, Anchor, Rudder Bracelet • £3.64 • FourSeasonFair
9 Anchor Print Wall Art • £3.04 instant download • BlueLavenderPrints
Ahoy Matey! If that little round-up doesn’t make you want to head over to Etsy and get your shop-on than I don’t know what will!
♥ – ♥ – ♥
Want to see some more of my handmade favourties? Be sure to check out my new look Creative Clippings column in the June issue of Sewing World – on sale now!
The post Obsessed with…Nautical appeared first on Made Peachy.
May 14, 2014
DIY Whimsy Floral Crown
One sunshine afternoon and I’m all like, Helloooo Summer!
I’m sure that we should have made some plans for the summer – other than to build a BBQ in the garden, but somehow we’ve not managed to get round to it just yet. I keep telling myself that there is still time to plan out a brilliant summertime adventure – please tell me that there is! So, while my working life is roaring along at an all-time epic pace, I catch myself daydreaming about the luscious warm days and glorious balmy evenings. I’m pretty sure that there will be more than a few summertime makes popping up over the next few months.
As festival season is right around the corner – and with the promise of some sunshine too, why not go all whimsy and make your own DIY Floral Crown?
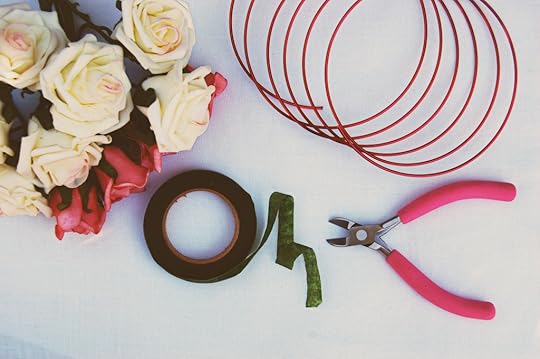 Grab your supplies…
Foam flowers – these Blush Pink and White roses are from Hobbycraft
Medium gauge craft wire - try to hunt out something nice and pliable like this - you’ll need a length 2.5 times the circumference of your head.
Florist tape
Jewellery pliers
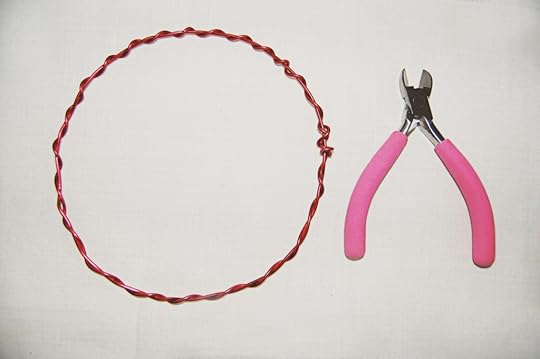 Start out with a the length of wire – the colour really doesn’t matter, its going to be all covered up anyways – and create a circle that sits neatly on the top of your head. Decide where you want the finished crown to sit and work from there – either right down over your forehead, or slightly smaller to perch on the top of your head. Twist the remaining length of wire around the circle and secure the ends by wrapping around a couple of times. Use the jewellery pilers to press any sharp or pointy ends of wire out of the way so they won’t prickle you when you wear it.
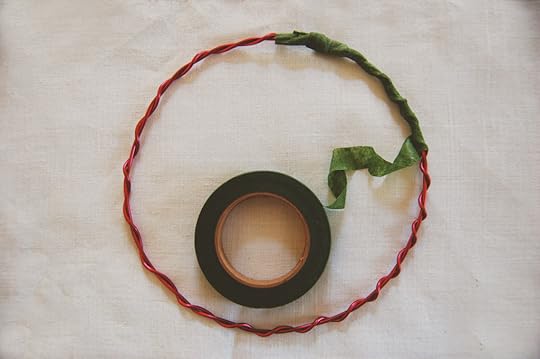 Florist tape is so freaking amazing – it is self-adhesive so you don’t need to worry about any extra glue to get all messy with! Place the end of the tape over the twisted join in the wire circle and wrap a couple of times to secure the end. Begin working around the wire circle of the crown wrapping neatly. try to hold the tape a a slight tension, this will help it to bond neatly to itself without any baggy sections. Continue wrapping, overlapping the tape slightly each time, until the whole crown is covered. Top fasten off, simple tear the tape and press the ends back on to itself to secure it – see, amazing, right?
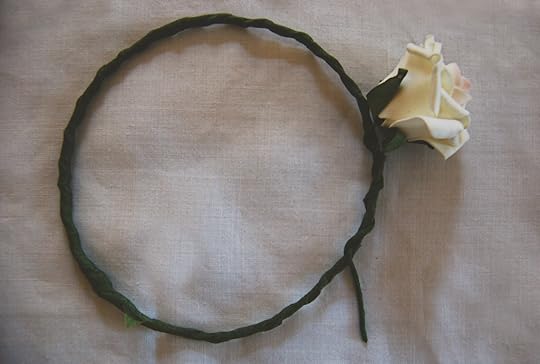 Taking each flower in turn begin wrapping the wire stems around the wrapped crown to secure into place. Position the bloom against the crown, with the flower in the desired position, and wrap the stems tightly around the wire. Use the pliers to press in any sharp ends as you work.
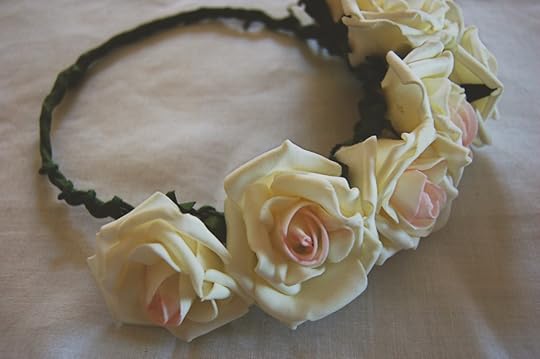 Begin with the centre bloom and add each one in turn on alternate sides to create the design. Twist the stems of the flowers on the right towards the right-hand side and the stems of the flowers on the left to the left-hand side – this will help reduce any bulk and will make the crown more comfortable to wear. You can continue adding flowers the entire way round, or simply stop at a half-crown if you want a more subtle style (if subtle style can be used to describe a whimsy floral crown!). Add in accent colours, or mix up the shades of the blooms as you work.
 Tah Dah! One whimsy floral crown, ready for the summertime!
Now, where’s that sunshine?
The post DIY Whimsy Floral Crown appeared first on Made Peachy.
May 13, 2014
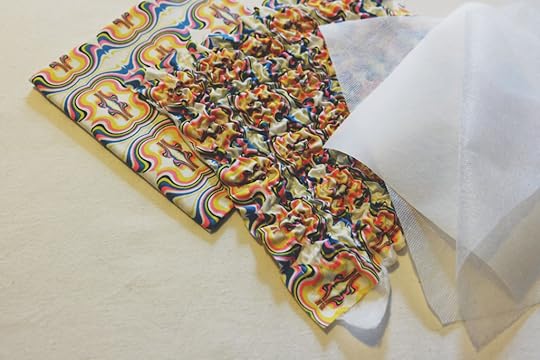
How to Crash Fabrics
Let’s talk texture people.
When it comes to fabrics there are lots of different things that we look for when we pick out a piece for a project – the colour, the feel, the drape, the fibres and, of course, the texture. But, what if I told you you can quickly and easily create incredible texture to your fabrics with just a few simple supplies?
I’m not crazy, this is crashing fabrics – a process that looks much like shirred fabrics – but with more staying power. This is great way to add accent panels to quilts, handbags, you can even use it in accessories and dressmaking projects. So, here’s How to Crash Fabric!
 Grab your supplies…
Piece of cotton
Piece of Vilene Solufleece
Two pieces of Vilene Bondaweb
Sewing machine
Steam Iron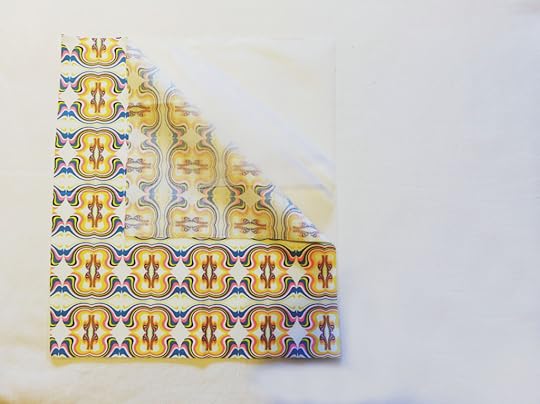 Layer the fabrics – it is the way in which the fabrics are sandwiched together that helps to create the crashed effect. Place the two pieces of Bondaweb on top of the Solufleece, finally place the cotton to top, with the right side uppermost.
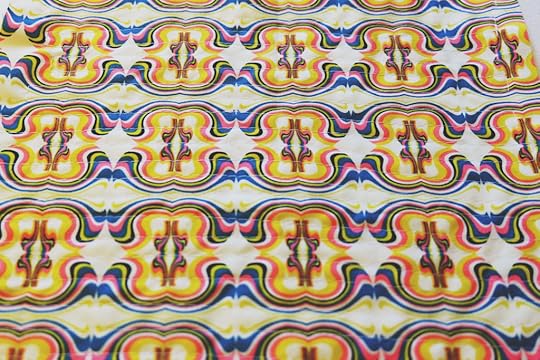 Stitch the layers together, it is these stitches that hold the fabrics in position, so when they begin to crash they are drawn up around the stitches. No stitches – you’ll end up with a weird, shrunk mess that probably won’t be good for very much. You can pick the stitch design you want, straight lines like this, spaced out as you choose, the closer the lines the more regular the crashing effect will appear.
 Once the fabrics are stitched transfer to an ironing board and turn the iron on with a full steam setting. To crash the fabric, you will need to hover the iron about 1cm from the surface of the stitched layers of fabric and allow the steam to penetrate through the fibres.
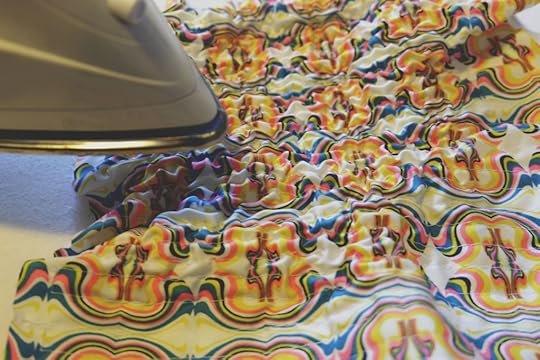 Now, here comes the science (I’ve always wanted to say that!) OK, so the heat and moisture from the steam begin to react with the Solufleece, which is water soluble, and begins to reduce in size, drawing it up around the stitches. The fabric will be crashing right before your eyes! The surface will wrinkle and crinkle and the swatch will skink in size to create the crashed fabric.
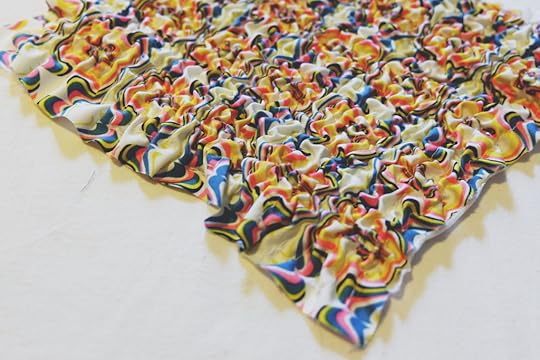 So, why the two sheets of Bondaweb? Well, this is what helps to lock the crashed fabrics into place, this is what maintains the texture. Neat huh?
The more that you apply steam to the stitched fabric layers the more they will crash up and reduce in size, very the amount of steam to alter the effect.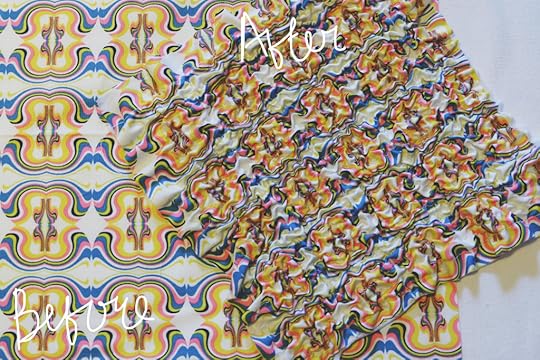 If you want to include crashed fabrics into your next project, be sure to run a test with your chosen fabrics and stitching style, so you will know how much you can crash the fabrics and still have a large enough piece to use in your make.
Why not try…
I’ve worked this tutorial using beautiful printed cotton from the collection at Art Gallery Fabrics – the effects will vary depending on the fabrics you use, heavier weight fabrics with become chunkier and more dense, while whispy fabrics will end up frothy – experiment for yourself and let me know how you get on!
You can even vary your stitching – sew in straight lines, like I’ve done here, or work in zig zags or free motion stitching and see what effects you can create!
To find out more about the range of Vilene products or contact crafts@stockistenquiries.co.uk to find your local stockist.
The post How to Crash Fabrics appeared first on Made Peachy.
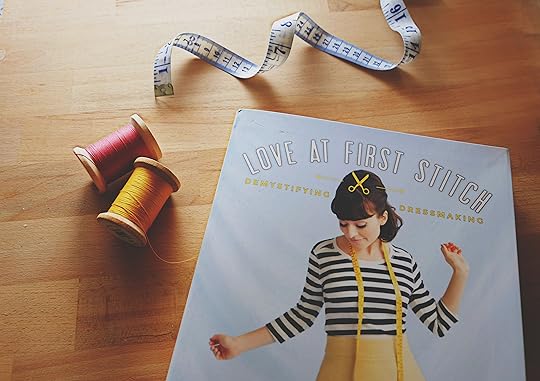
May 12, 2014
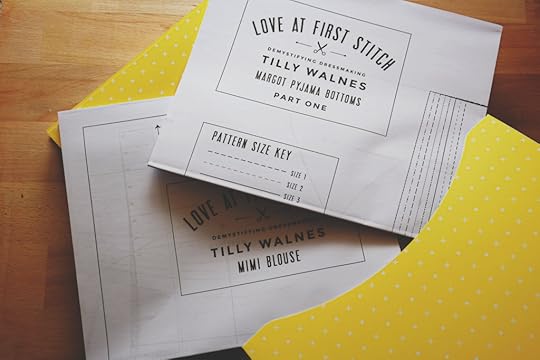
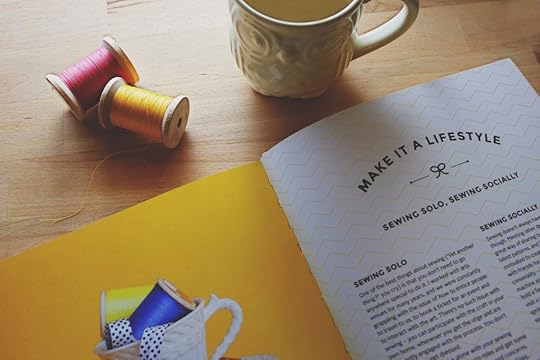
Creative Reading: Love at First Stitch
I’ve always said if you’re going to fangirl you must make sure that the lady you are idolising is tip-top, one of the best. I swear, I’ve always said that.
There is one lady out there that I can, hand-on-heart, say that is so, so worthy of us fan-girling over. And, when I say to you Tilly Walnes I know right away y’all will agree!
Tilly, who bewitched us on Series 1 of The Great British Sewing Bee, fell in love with sewing and dressmaking with her very first stitch, and it is this love that is driving her passion for making dressmaking more accessible and appealing to everyone that knows the feeling of stepping out in gorgeous clothing.
Tilly has been creating modern designs that demystify dressmaking for those interested in creating their very own garments - be sure to check out her pattern store, if for some wild reason you don’t already own the Miette skirt pattern!
This month marks the launch of her very first sewing book – a book that I promise will release the inner fashion designer in you.
As readers of Tilly’s blog will know, she has a wonderful way of putting you at your ease – this is also true of her book. There is not assumption that you already have years of dressmaking skills tucked neatly under your hand-stitched belt. But, at the same time, there is no dumbing down. Just a friend, happily showing you just what you are capable of with a little bit of encouragement and guidance. Which is by far the greatest way to kern something new!
 Tilly her self is probably at the top of most of our Style Icon lists – and I’m talking handmade style or otherwise – so, you will not be disappointed by the collection of designs within her book. The are seven designs to create using the patterns included in the book, but that’s not all, each of them comes with variations, so you can customise them to suit your own unique style, body shape and general whims.
My very favourite things about this book is that you learn techniques (many of which you might have avoided because they sound, well, too tricky or technical) while you work on a project. There aren’t long practical lessons to start out, you get stuck in right away sewing your own garments. And, before you know it Tilly has captivated you with a design, guided you through the steps and, as if by magic, you’ve not only got a finished garment to show for your time but you will also have a whole array of new dressmaking skills, mastered through doing. It’s a win, win!
 While this book is set out to welcome and reassure the novice stitchers into the world of making your own clothes, those that have been stitching up their own clothing for years will also find this a pretty awesome addition to their creative library. Not only are there amazing patterns to choose from, but there is also a wealth of handy and practical tips that everyone can benefit from – like sewing as a social activity and finding time in a busy schedule to stitch.
I am besotted with this book for it’s glorious photographs, delicious modern designs and the ‘learn as you sew’ philosophy that lies at the heart of it. I’m besotted with Tilly. More than ever. This book, my dressmaking chums, is a must!
Now, here’s a little treat…and I know you’re going to love, love, love it!I have three copies of Tilly’s amazing new book, Love at First Stitch to be won by three lucky Made Peachy readers!
It is standard issue giveaway entry folks – with three ways, to get your name in the pot…
1 Please leave a comment below sharing why you want to get your mitts on this incredible book for unleashing your own inner fashionista!
2 Share this post on Twitter, tagging @madepeachy and using the hashtag #MadePeachyLoveAtFirstStitch
3 Give the MadePeachy Facebook page a like, share the giveaway post and leave a comment on why you’d love to win!
Want a bonus entry? Then head over to the MadePeachy Instagram , follow and give the LoveAtFirstStitch post a like & comment!
Each of the above counts as one separate entry, yup my friends, if you do all three you’ll be entered into the draw three times! This giveaway is for entrants with a UK postal address only (sorry international Tilly fans!). The winners will be announced on the 20 May - Good Luck!
Tilly Walnes’ new book Love At First Stitch, £20, Quadrille, is available right now!
The post Creative Reading: Love at First Stitch appeared first on Made Peachy.
May 11, 2014
DIY Fun Felt Fruit
I’ve been working on a fun few makes in recent weeks – most have had me sat at the sewing machine, whizzing up seams and quilts and accessories. But, there have been some that have taken me away from the sewing machine (and if I’m honest, on to the couch!) from knitting and hand stitching, to crochet and embroidery, it’s been a wonderful few weeks of all kinds of crafts.
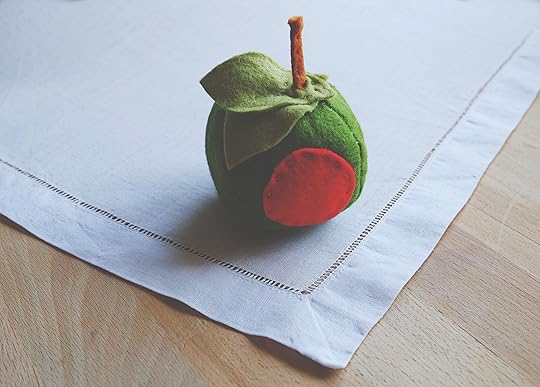 Now, I can finally start to share some of the things that I have been working on (there will be more to follow…so, watch this space!) First up, check out this Felt Fruit Plushie Set!
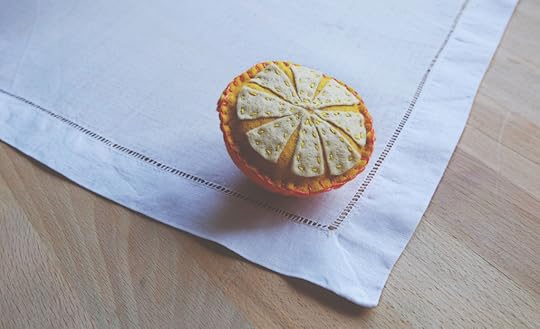 Whether it is a cute little curio for your dining room or a mini play set for the Littles, this fun little felt fruit play set is a super quick and easy DIY project that can be make this afternoon!
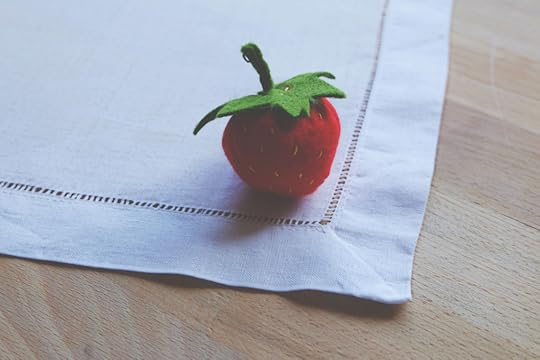 I love working with felt, it is so bright and colourful which gives the makes a glorious and fun finish. And, because it is so easy to cut – and doesn’t fray – it is the perfect material for making a range of beautiful toys, accessories, purses and, pretty much anything you fancy!
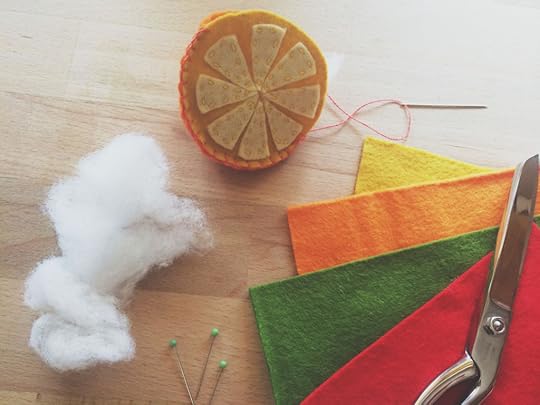 This cute collection of felt foods were made using the wonderful range of felts from BloomingFelt – a boutique that will be sure to satisfy your cravings for all things felt and in every colour of the rainbow!Be sure to swing over to InspiredToMake to get the making up instructions and templates to create your own DIY Fun Felt Fruit Set!
The post DIY Fun Felt Fruit appeared first on Made Peachy.
May 10, 2014
Style Sunday: The Casual Pinafore Dress
There are very few garments that you will remember from your childhood that you would still choose to wear today…and I’m not talking about some grown-ass woman trying to look like a small child. Nope friends, I’m talking about the pinafore. This is one of garments that seems to just get better with age. It can be smart and sassy for work with precise tailoring, or it can be functional for day-today with lots of roomy pockets, or it can be super comfy and slouchy – I love it in all it’s forms. This cute and casual take on the pinafore dress, £60 from ASOS really caught my eye- I mean, if this isn’t a wardrobe staple, then I’m not really sure what is! Want to know how to make your own casual pinafore? Check out today’s Style Sunday: The Casual Pinafore Dress! 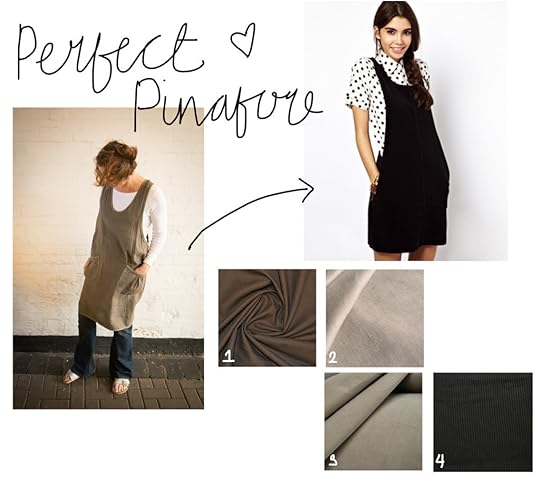 The Pattern
The Beatrice Dress, sizes XS – XL, SewMeSomething
This relaxed dress is modern and flattering in it’s cut. The simple loose fit styling makes it both easy to make and easy to wear – just perfect for a casual pinafore dress!
The Fabrics
1 Dark Chocolate Linen, £7.99 per metre CalicoLaine
2 Summer Stone Linen, £6.50 per metre, ClothSpot
3 Biege Baby Cord, £5.25 per metre, CroftMill
4 Black Corduroy, £7.50 per metre, Textile Express
Also, is it just me, or are you crushing hard over the styling of the Beatrice Dress over jeans? Isn’t that just perfect for this is-it-summer-yet weather!
The post Style Sunday: The Casual Pinafore Dress appeared first on Made Peachy.


