
Laura Strutt's Blog, page 40
February 27, 2014
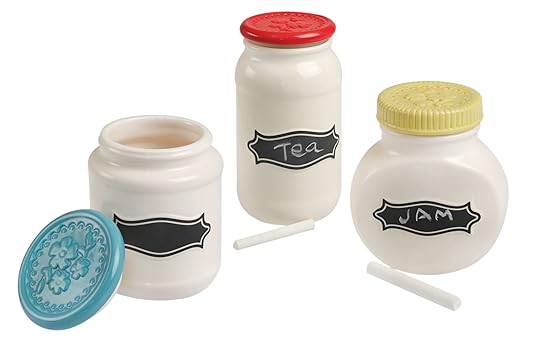
DotComGiftShop Mason Jars Giveaway
This week has been a monster mammoth week over here at PeachyHQ…there have been deadlines, commissions, new deadlines, new commissions, workshop preparations and all round super epic busy. But, it’s been a blast! The very best thing about being busy and having to work at warp speed is the fact that you get to the weekend that much faster!
I’m not even sure if I know what the weekend has in store yet! What are you guys up to? Anyone planning a Spring Clean? Thankfully, now that all my home chores are up-to-date after last weekends power session, I have two whole days to do, well, whatever I like. I’m guessing that there will be books, coffee, long hikes with the dog, spending some time with my hubs and something tasty to eat – which, let’s face it, is all the fixings for a fantastic weekend right there!
 If there is one thing I love more than a Friday, it’s a good old fashioned Mason Jar – yes…it is possible to like an object more than a day of the week!
Do you fancy getting your weekend started in true style? How about getting yourself entered into this giveaway to win a set of 6 awesome ceramic Mason Jars with a rad chalkboard tab to customise as you wish from DotComGiftShop worth over £30?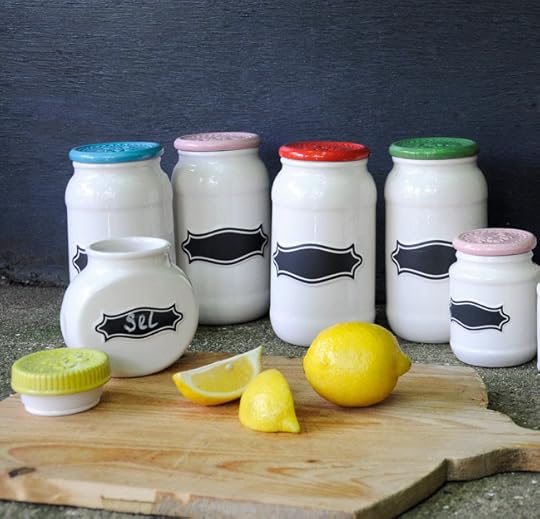 To give everyone a chance, there are a number of ways you can enter this giveaway – and the best part is each one will be counted as 1 entry…so, do all three and you have three entries into the hat my friend!
1 Please leave a comment below sharing what goodies you’d stash in these rad mason jars
2 Share this post on Twitter, tagging @madepeachy and using the hashtag #MasonJarGiveaway
3 Give the MadePeachy Facebook page a like and leave a comment on the Mason Jar Giveaway
The giveaway is for those with UK postal addresses only (sorry international chums!) The winner will be pick at random and announced on the 7 March Good Luck!
The post DotComGiftShop Mason Jars Giveaway appeared first on Made Peachy.


February 26, 2014
The 5K Wedding: The UK Edition
Hello lovebirds! For those of you that have been following the mini series I’ve been sharing about holding a fabulous wedding on a small budget, here is another installment for you!
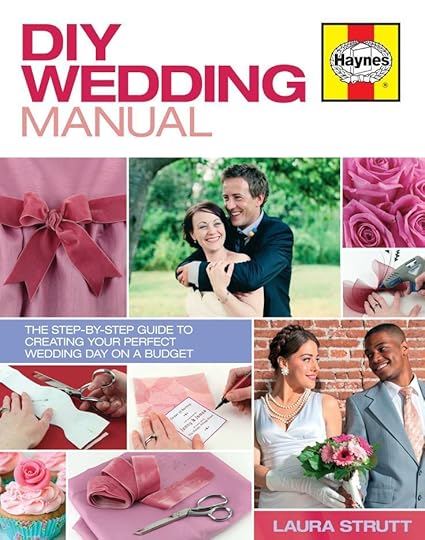 As I’m sure that you all know, this month my new book The DIY Wedding Manual, £18.99, Haynes went on sale – it’s been getting quite a lot of media attention in terms of the concept of holding a day-to-remember wedding on a small budget.
I will be guest posting on a couple of blogs talking about weddings and all things DIY and budget over the next few weeks – fret not, I’ll shall keep you posted when these go live. In the meantime, here is a bit of an insight into our wedding and how we worked our budget in The 5K Wedding: The UK Edition.
All costs in £
Wedding Photography: Kerrie Mitchell
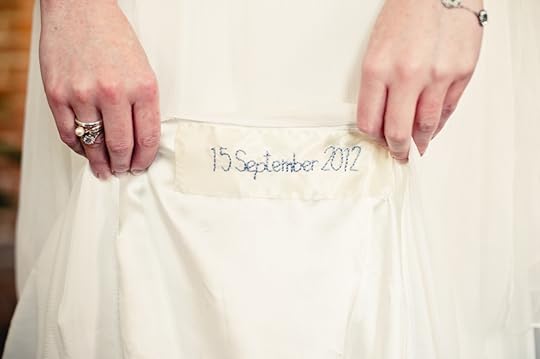 We got engaged in October 2011 and we’re married in September 2012. From the get go, knew that we wanted to have a brilliant day, but that we didn’t want to spend £20k to do so. Now, you may have already read the bride’s stories in the £5k Wedding Series US Edition and Canadian Edition…and right now, I’m going to confess that these ladies did a far better job than I did. My wedding didn’t come in under budget like these savvy brides, in fact my wedding came in at slightly over the set budget.
 While I’m in a confessing mood, I couldn’t help but think while I was writing this that I could, you know, just leave a couple of things off – I mean, if I didn’t tell you about the Thank You gifts we bought the wedding party or the vintage tea set that we snapped up, the designer wedding shoes, then our wedding would have come in at the set £5k right down to the penny. But, where would be the value in that, right? Yes, so this wedding is slightly over the budget, but I wanted to share this very honest breakdown so demonstrate how I worked as best I could with these figures.
 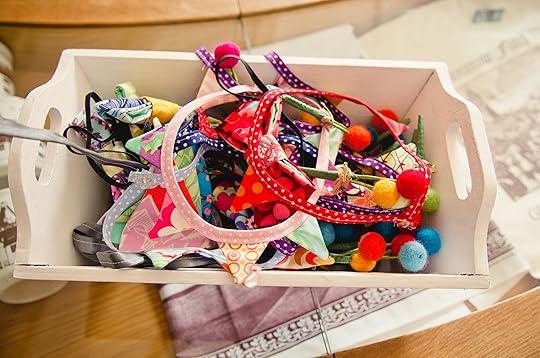 There are number of these elements associated with weddings that are listed below where I have managed to include for £0 – these are often elements that would usually be listed with costs upwards of £100, taking a creative approach to keeping things manageable. One of the things that really helped to keep the costs down was taking advantage of a very (un)healthy crafty stash! As I had a wild medley of fabrics, ribbons, trims, papers, wools and felts right there at my disposal I decided that I would make use of them. Like many crafters, I have been known to buy a single metre of fabric just because I like the print – this has resulted in a hole bundle of fabrics in a crazy wealth of prints, as nothing instantly matched to create a typical ‘wedding colour theme’ we quickly abandoned this tradition of having a couple of set shades for the day and decided to go all out with a bold and brilliant rainbow of colours shades and prints. Using my craft stash was a definite cash saver, for those that don’t have this crafty hording condition that I have, I would estimate that the cost of the stash that I used might amount to around £200. But, this philosophy of using stuff that you already have is a great way to save money in general. I mean, if you collect quirky vases why not dust them down and use them as part of your wedding decor? It’s personal, unique, you already love it because you own it and you wont be spending money on something generic to add into your celebrations.
So, without any further ado, here’s the nuts and bolts of our DIY wedding, honest cost, slight over spending and all…
The Budget Breakdown
Wedding ceremony location: The Maltings, Great Dumnow £700 for up to 70 guests for the ceremony and reception- we selected a heritage building, not only did this have the gorgeous look and feel that we wanted in a wedding venue, but the fees charged are used to preserve and maintain the site for future generations.
Registrar fees: £350
Reception venue/Food & Drink: £1650 Catering is one of the biggest expenses – we opted for canapes served in the venue’s courtyard after the ceremony and followed with a tea party for the main sit down lunch and offered hot bowls of mac’n'cheese and chicken stew for a late supper – as we had a large number of children attending the wedding, these were charged at a discounted rate, allowing our money to go a little further.
Bar Drinks: £250 We bulk bought a selection of wine, bubbles and soft drinks to be served through the event taking full advantage of stocking up a wholesaler.
Vintage Tea Set £120.00 We managed to win an auction for a mix and match set of vintage crockery, tea cups and saucers, side plates, cake stands, tea pots…the works – this meant that the buffet style lunch (which was the cheapest catered option) would be all that more fancy set out as a tea party…we initially planned to re-sell this set after the wedding, but somehow I don’t think I can part with it!
Dress: £182 This might have been the biggest score of the whole wedding. I had fallen in love with a designer dress sold in an American wedding boutique, unfortunately this had an extremely high price tag, so I set about looking for a high street alternative that was more fitting to my budget. Whilst searching for an alternative I kept an eye on preowned dresses for sale on US wedding sites and here’s where the stars aligned for me. A bride-to-be bought the dress only to find that she liked another one better and has happy to sell at rock bottom prices in the run up to her own wedding day. The dress had never been worn, not yet altered and she was happy to sell internationally. £50 of the cost of the dress was to cover the international shipping, customs and Escrow (a third party payment protection service) and as the dress was very simple in style, the alterations were charged at £12 to make adjustments to the hem line – priced as though it were a standard dress, not a wedding dress.
Veil: £15 – I made my veil and a matching hair accessory for the evening reception using a couple of hair combs, a small piece of Russian veiling and a couple of vintage-style swallow brooches from Etsy.
Wedding jewellery: £0 The jewellery I wore was a combination of a bracelet and earring set that I had been gifted for my birthday and saved for the occasion and some precious vintage pieces – a pearl necklace from my Mum, a pearl ring that had belonged to my Gran and a couple of small silver love note rings that my lovely husband had given to me, one on my 30th birthday and the other when the popped the question!
Wedding Shoes: £55 Like most brides I wanted some really special designer shoes for my wedding day and after spending a lot of time watching auctions, I was able to snap up the Vivienne Westwood Melissa Anglomania in pearl with a red heart- genuine, unworn and fully boxed!
The Groom & Best Man’s get up: £400 – £160 for each suit with shirts and ties bought from a high street store and £80 – taking advantage of the best man’s discount card at the local skate shop – for trainers for them both (yup! My guy wore bumpers on his wedding day!) The best part about this is both the suits and the kick can (and have been) worn again since the wedding day, which is pretty rad!
Transportation: £0 We deliberately opted out of having wedding cars and the expense that goes along with it. We selected a wedding venue that was within walking distance. The groom and best man traveled to the ceremony by their preferred mode of transport – their BMX bikes and I walked to the venue with my Dad…which is the very best way to beat those pre-walk-down-the-aisle nerves! We asked a friend with a lovely fancy car to be on stand-by for the day should the weather turn a little grim, luckily our wedding day was the sunniest day of that whole summer!
Flowers & Decorations: £0 We decided against flowers, and decided to decorate the venue with lashings and lashings of bunting. The historic venue had lots of exposed beams and we simple decorated this will miles of bunting I made from my stash, £0. We borrowed a collection of strings of mini fairy lights from my brother-in-law and his wife, who got married the year before to add in a little sparkle to the venue in for the evening reception.
Bouquet & Buttonholes: £20 As we had opted to forgo flowers I decied to make needle felted balls – about eleventy billion of them- from my stash of needle felted wool tops £0. I bought a collection of supplies from the local florist wholesaler – wire, florist tape, buttonhole pins. As we had a small guest list, rather than simply offering the bridal party buttonholes, I decided to make them for the everyone…great idea, all the guests loved them and were able to keep them after as a memento, but it took an awful lot of work and resulted in lots of little stab wounds to my hands!
Guest place names & favors: £50 We went to a wholesale store and stocked up on an excessive amount of sweets, we bought a multi-pack of mini preserve jars and filled these with sweets, adding left-over fabric from the bunting to the top and hand stamping each guests make to each to pass as favours and guest place cards at the tea party. We ended up having so many sweets left over (I suck at maths!) that we decided to decant them into every beautiful mason and candy jar that we could find (my husband’s grandfather ran a sweet shop, so there were some treasures in the attic!) and filled these to have as a candy buffet in the evening!
Invitations & wedding day stationery: £30 with a subscription for 12months from DownloadAndPrint, a bulk pack of carstock and ink cartridge we were able to make our own Save The Date Cards, Invitations, Order of Service, Table Menus and the thank you cards following the day.
Wedding rings: £350 Shopping online at Etsy allowed us to pick out fabulous rings that suited our budget and also our style – bride’s skinny platinum ring £200, groom’s titanium and rosewood ring £150
Music & reception entertainment: £20 The venue offered a guided tour of the on-site museum, and we decided to offer this to our guests as a way to entertain them whilst we were having our wedding photographs taken, £20. The music for the ceremony, reception and evening was all selected from my husband super extensive record collection and saved down onto a series of playlists to run through out the day, £0.
Wedding cake: £0 My sister is an extremely talented baker and offered to make our cake for our wedding day – and let me tell you, with a husband with a nut allergy it was looking pretty tricky for local cake makers to fully guarantee that any cake they supplied would be nut free due the kitchens in which they make them…I didn’t fancy a trip to A&E on our wedding day. So my sister – who’s eldest son also has a nut allergy – offered to make our two tier Red Velvet Wedding cake I knew it would be just delicious! This my friends was a total show stopper – one of my very favourite parts of the day!
Cake Decorations: £0 Red velvet cakes are pretty striking so we wanted to keep the decorations simple, so I made a series of needle felted balls, to match the bouquet, and a single needle felted heart and secure these to cake pop sticks – my sister added these to the cake on the morning of the wedding.
Wedding photographer: £900- here’s where we cheated…maybe just a little! We selected the lowest price of wedding package from our favourite wedding photographer, who, fortunately for us, allows couples to upgrade the package that they have selected when they have seen the photographs after the wedding day by paying the additional costs – we used some of the money gifted to us for our wedding to take advantage of this offer as these photographs were simply too good to pass up!
The little extras…
Thank You Gifts We spend £20 at the local garden centre picking our some gorgeous succulents to gift to our bridal party as thank you gifts on the day.
Children’s gifts £3 for necklace fasteners, Bunting Necklaces for the girls £0 mini bow ties for the boys – while the adult guests had buttonholes we wanted the children to have something a little more fun from the day, I decided to make a few quick little treats just for these little folks!
Guest Book £16 I wanted to have something a little different for our guest book, so bought a couple of pre-cut fabric charm packs in solid rainbow colours and a couple of permanent fabric markers and asked guests to write their messages to us on the squares, to be stitched into a memory quilt.
Total Wedding Spend: £5131.00
As you can clearly see here, I went over budget, yup I was over the 5k mark by £131 – for the nerds amongst us, that’s just under 3% over the set budget. Now, for us having a reasonably priced wedding was important, very important, and the £5k mark was what we had deemed acceptable. Yes, there were things that I probably didn’t need – like the vintage tea set, the rediculous amount of sweet for favours and the candy buffet. But, I wanted to be honest in this breakdown. Did I fail? Well, in the sense that we over spent by £131 then yes, I guess I kind of did. But, still with the total for the event coming in at £5131 and we had the most wonderful day, much of which was achieved with hard (very hard) creative graft, hours of making, it’s probably the most happy failure of my life and I would do it all again in a heart beat…including needle felting eleventy billion balls and stitching up mile upon mile of bunting!
Each and every wedding is different, we each have different skills and resources to draw on to find creative ways to keep the costs of our special day where we want them to be. What works for one bride, wont work for another, but I hope that this will help to share some creative ways to get your dream wedding to a budget that suits you…or, in my case £131 over that budget!
The post The 5K Wedding: The UK Edition appeared first on Made Peachy.
February 25, 2014
Finished Project: Batik Art Quilt
I don’t often share the projects that I work on for commissions, but in this case I thought that I would make an exception!
For the last week I have been working away on an art quilt to showcase a new collection of batik print cottons – it’s a lot of fun to be given a huge bundle of fabrics and to be told to go to town and make it look as great as you can!
One thing I love about taking on commission work is that the choices of fabrics or design are often led by someone else. Not that I don’t enjoy the process of creating a design brief, working up some sketches, picking out fabrics and planning a design, but it does open up my eyes things that I might not have previously considered to chosen to work on.
Art quilts are something that have fascinated me for a long time. There is something magical about the finished piece – some tell a story, some are graphic, while others look like a paintings rendered in fabrics. For me the precision of quilting – the careful selection of fabrics, the creation of the blocks and the piecing together of a repeated pattern – is a very satisfying process. Each small cut and then each small seam gradually comes together, little by little to create a finished piece that, at first, seemed like a huge undertaking.
I have been toying with the idea of working on a quilt that was a little more artistic and a little less, well, formulaic, and this was just the perfect opportunity for me to get stuck in.
With a huge stash of batik prints, in every colour under the sun, I was instantly struck by the wide range of colours, the way the batik prints helped to blend the shades together. As any girl who received a huge hamper of fabrics in the post would do, I quickly began pulling them out and looking through each and every piece, it wasn’t long before I was sat on the floor surrounded by a sea of glorious colours.
Sounds like bliss, right? Well, actually it was rather daunting, if I’m going to be honest about things. I mean, there was just so many colours, so many! It is hard to shake my instant desire to begin sorting them out into neat little bundles, to assign each shade, colour and design into sections to be added into neat little repeated blocks. But, I wanted to do something a little different. I wanted to try something a little more artistic with this selection of fabrics. So, I headed for my Quilter Utility Belt (not literally) and grabbed my colour wheel.
[image error]This handy little colourwheel £3.25, CottonPatch is a great addition to your sewing and quilting supplies, I find that I refer to this neat little colour guide frequently when I am selecting different colours of fabrics for quilting – not to mention, yarns when knitting and threads when working on embroidery, in fact, I bet that this would come in super handy for a number of different creative projects. This simple little tool helps when selecting colours, and explains primary, secondary, intermediate and harmonies in colour – pretty rad when you’re looking for something to team with your new all time fave shade!
When I started spinning through the colour wheel hoping for inspiration to strike, I realised that it had already – it was staring me in the face! This stunning rainbow of colours would be just perfect to create a circular blend of colours – much in the same way as the colours appear on a colour wheel!
I began setting out the fabrics in to piles based on colours – deep purples fading to light lilacs, ruby red blending to blush pinks, fir greens washing into teal and jade, petrol blues lightening to cornflower and a bundle of natural light, bright creams and whites.
I think it is safe to say that just working thorough the fabrics I realised that I was falling in love!
Unlike most of the quilts I work on, where each block is carefully mapped out and it placement planned, I simple calculated the number of the squares required for the block. Then, off I went cutting 400 4in squares. While I wanted this to be a far more organic process, I decided that I wanted to work the quilt in quarters – after all, the piecing together of the squares would need to follow the structure of construction of a standard quilt to achieve a neat and precise finish.
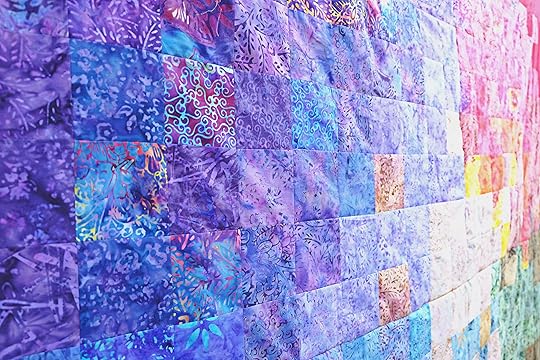 I began to set out the fabrics for each quarter, positioning the darker shades in one corner and fading though to light creams and white fabrics at the centre.
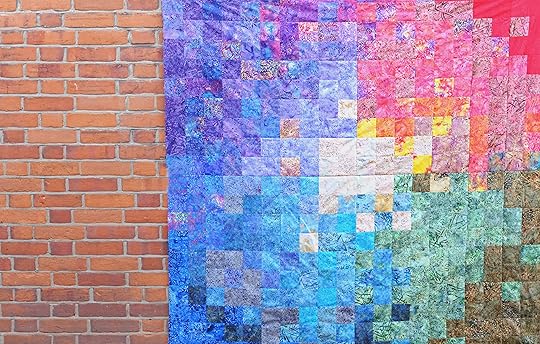 Now, that the quilt top is finished it is all packed up and shipped out to it’s new home. I have to say, I’m pretty sad about saying goodbye to this one. Working on something out of my usual style, trying something completely different and new to me, has pushed me to think differently about fabrics and colours, about the presentation and construction.
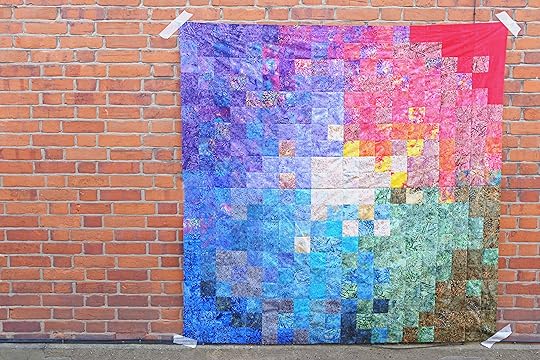 While I’m happy that this little beauty is now going off into the world on a new adventure, I’m sure going to miss having this glorious fabric rainbow about the place…even thought at 70 x 70 inches it was a way too big for little old me to hold up for a photograph and I had to enlist the help of my husband and a roll of tape to be able to capture it in all it’s glory! As they say, parting is such sweet sorrow, thank you Colour Wheel Quilt for taking me on this awesome (and colourful) journey!
The post Finished Project: Batik Art Quilt appeared first on Made Peachy.
February 24, 2014
How to get started with Zentangle
I’m no artist. I’d love to be able to pick up a sketch pad and be able to create fab pencil portraits, or work up a watercolour landscape, and while I really enjoy the process the results are, well, not the best. I guess with some creative disciplines when we feel that we don’t have a talent for them we are kind of put off from trying them, but trying them is the one way that we’ll ever be able to boost our skills.
As I said, I’m no artist, but what I am, my friends, is a doodler. For ever page in my notebook that is filled with lists there is a page dedicated to little flowers, lovehearts, stars, chevrons, hexi motifs…you name it, I doodle it! Turns out that with a little bit of thought this fun penmanship can become a striking piece of art! You guys, I’ve discovered Zentangle, and I can’t get enough of it!
Zentangle is an artwork that I can truly get behind. Not heard of this amazing style of doodle-artwork, then you need to check it out! There are some completely amazing Zentangle artists out there, but essentially this is an easy artfrom that I’m pretty sure anyone can master! The basic principle is that you are creating a design or image featuring a series of repeated shapes, usually housed with an some form of simple structure – see, a series of repeated shapes, it’s like all those years of doodling were actually practice and training for Zentangle!
I don’t know about you, but when faced with a blank sheet in a sketch book I sometimes get ‘stage fright’. I don’t quite know where to start, where to place my first marks – which is a pretty weird feeling for a girl who has no problems slicing straight into pretty fabrics or casting on with a brand new yarn, just to see what I can make. So, I thought I’d share my simple method for getting started with Zengtangle!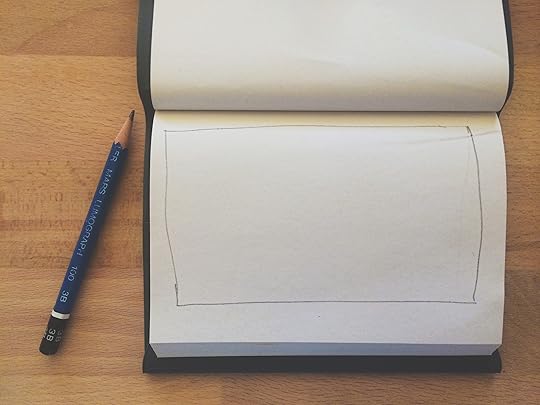 Grab your supplies…
Here’s the best part – you really don’t need heaps of supplies – a notebook or sketch pad, a pencil and a fine line marker (these are usually black, but if you want to grab a handful of colours, go right ahead!)
Get over that blank page stage fright right away, with a pencil draw out a large box on your page, this will be the frame in which you’ll work – see now that’s not too daunting, is it?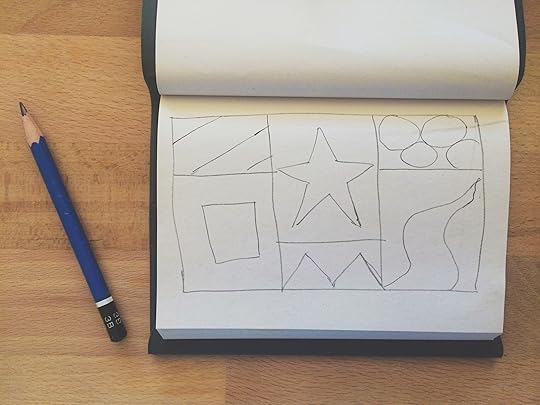 Section the box into a number of different areas, using pencil. Into each box add a series of shapes, these can be as simple as you like – stars, circles, grid lines, boxes, anything that takes your fancy. These will provide the outline for different sections with which you will fill with repeated patterns.
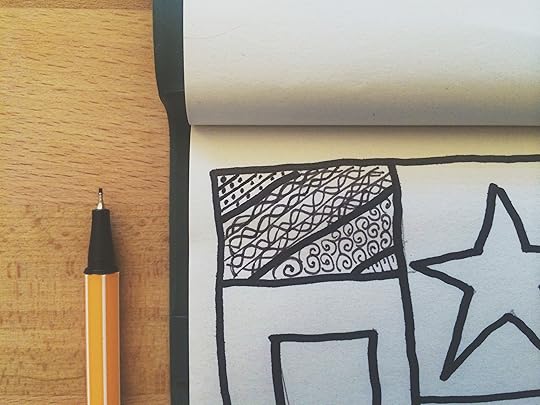 Switch from the pencil to the marker pen and begin working in one section at a time, drawing (doodling!) repeated shapes to fill the section. Once that section in filled, move on to the next section and pick a different repeated pattern and begin to fill that section. You can work over the outline of the grid in a marker pen, as I have done here to make the sections more prominent, or you can simple use the fine line marker to work over the lines.
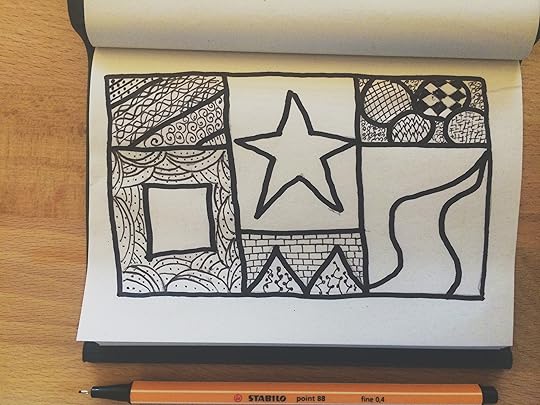 Continue working across the grid filling in each of the sections with different repeated patterns. I’m pretty sure that by this stage the fascination will have truly taken hold! Because you are working in small repeated designs you’ll find that there are a seemingly endless possibilities for the doodle-drawing that you can use in each section.
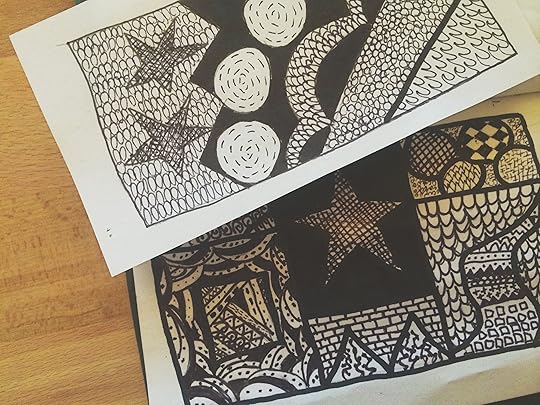 Before you know it you’ll be filling pages in your sketchbook with a whole host of exciting and dramatic designs – now it doesn’t get much more satisfying than that!
The process of creating a Zentangle is very organic, you don’t need to set out with a vision for the finished piece in mind before you begin – which is great for someone like me who can sit staring at a blank sheet for a lifetime thinking over and over, ‘but, what can I draw?’ With Zentangle the answer to that question is anything – now that’s a pretty empowering creative feeling!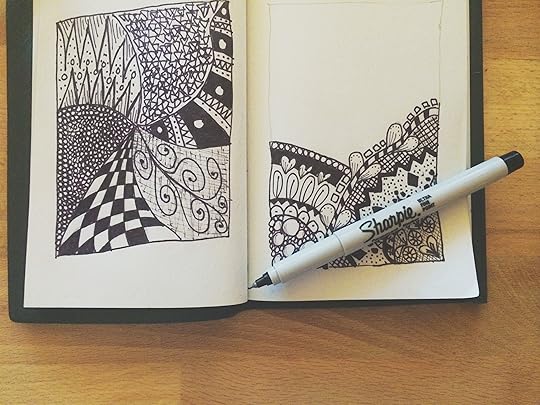 The more I Zentangle the more I learn about shape and space, about organic and geometric patterns, about negative space and perspective – lessons in art that I never thought for a second I would get a grip on without the aid of a talented tutor. And, here I am learning it all by myself…whilst doodling!
I’ll go right ahead and let you know that this is a truly addictive creative pastime! You never feel as though you can go wrong – yet you’ll learn little lessons with each one, get new ideas and discover new techniques for creating striking effects while, well, doodling! As soon as you finish one design, you’ll want to get started on the next – which is great for a compulsive doodler like me! So, if you’re on the other end of a phone call with me, chances are that this is what I”ll be doing at the same time!
Are you a doodler by nature – do you Zentangle?
The post How to get started with Zentangle appeared first on Made Peachy.
February 23, 2014
DIY Dotty Mani
After a weekend of house chores of epic proportions I’m feeling pretty worn out, it’s amazing how much pushing a vacuum around can really wear you out! After being elbow deep in oven scrubbing and cleaning, it’s nice to feel a little bit girly again.
So, in an effort to feel a feminine and fun again, I decided to share this quick and easy tutorial for DIY Dotty Manicure!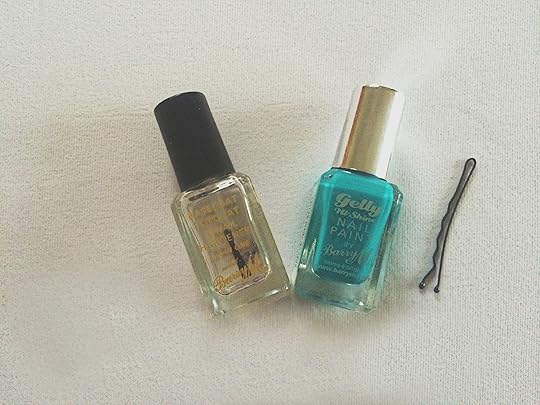 Grab your supplies…
Your going to need a top & base coat – I like to use this Barry M All in One, it does a pretty rad job!
Your chosen nail colours – the more colours of nail polish you use the more colours of dots you’ll have…but, I don’t need to tell you that!
A bobby pin – of course, if you have proper nail art tools, that’s grand, but if not, a bobby pin is an awesome (and cheep) substitute!
You’ll need something to use a a palette to work from – I just a little lid from a cosmetics tin, but anything that has a wipe clean surface will be just as good.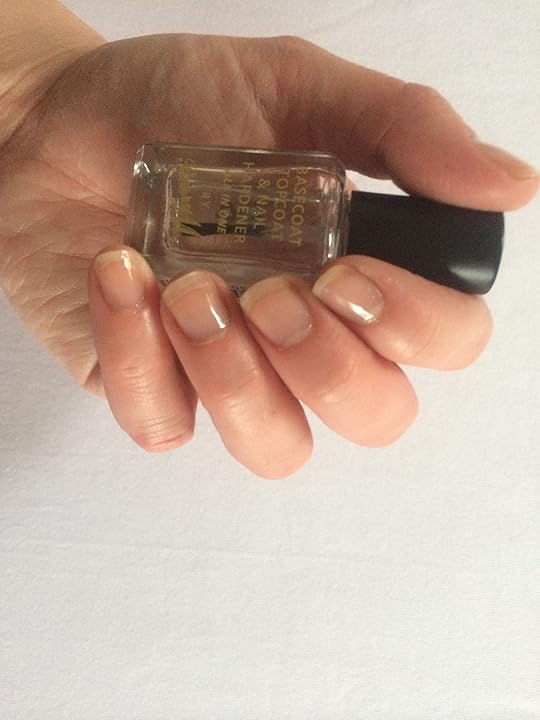 Shape your nails and apply the base coat and allow to dry fully.
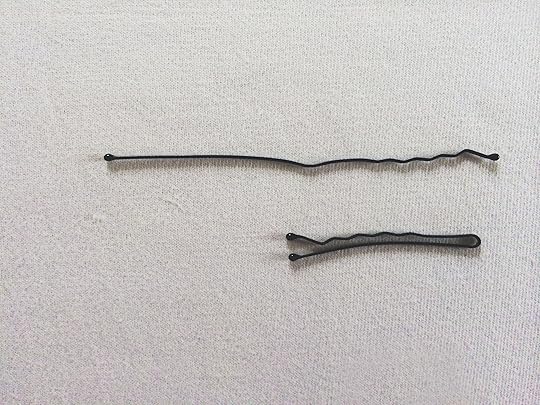 Bend the bobby pin to open it out – it doesn’t need to be perfectly straight, just straight enough to be able to hold it easily and use that little bobble of plastic on the end as the dotting tool. Once you’ve separated the two ends, pressing it down on the surface of a table will straighten it out enough to use.
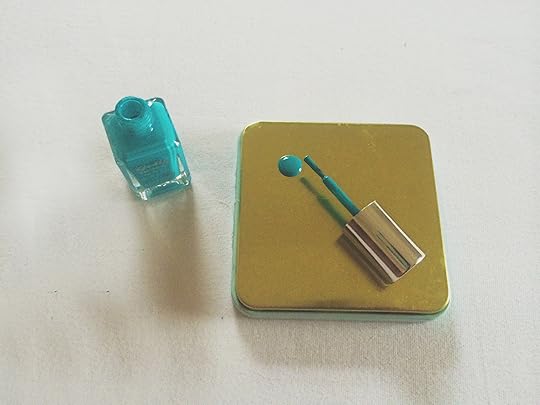 Decant some of the nail colour onto the surface of the palette – using the brush to add a few large drops, you’ll need enough to be able to dip and coat the tip of the bobby pin, but not so much that the whole surface is covered and wasting your nail colour.
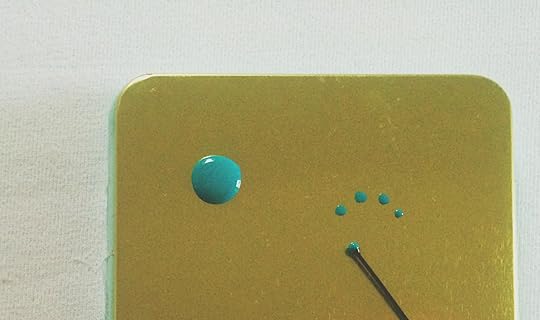 Holding the opened out bobby pin like a pencil, dip into the blob of nail colour to fully coat the little bobble of plastic on the end. Practice making little dots of colour onto the surface of the palette until you can make neat little dots. You’ll quickly find out how much polish you’ll need to cover the surface and how to make the little dabbing motions to get the little dots – the little bobble of the bobby pin will give you perfect uniform dots, every time!
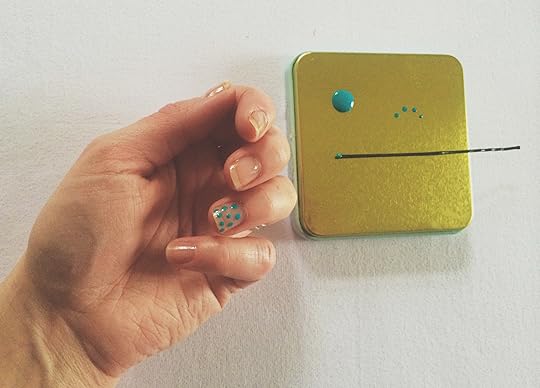 Once you’ve got your dotting technique down – getting just the right amount of polish and the right dabbing technique to create neat tiny dots of polish on the surface of the palette – begin to decorate your nails in turn. Work the dots in random patterns, making sure that they don’t touch or merge with each other. Allow the dots to dry for a few minutes before moving onto the next nail to avoid smudging the dots of polish.
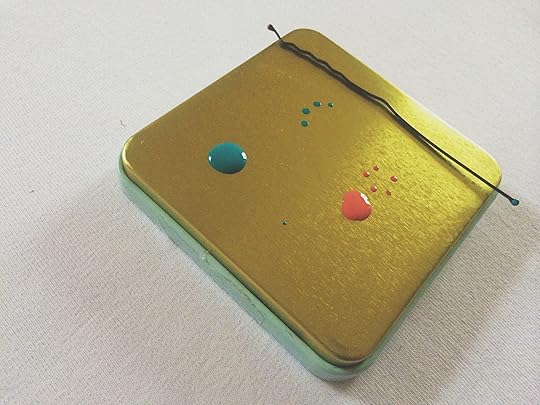 If you want to add in any additional colours, simple add another bob of nail colour onto the surface of the palette – you can practice making a few small dots to check you’ve got your groove with this new shade and that you like the colour combo and then add it to your nails in exactly the same way.
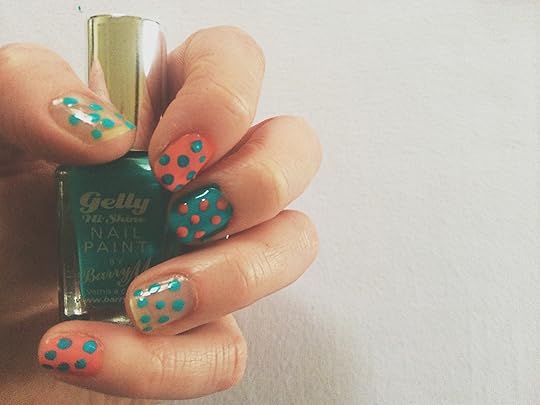 I’m a huge fan of mix and match manis – so, I like to add in colour blocks and dots to get a fun look. Teaming super bright and old colours give a really strong statement look. Once the dots have fully dried, apply a generous top coat to finish the manicure to give it some staying power and lasting shine!
You can clean off the palette and the bobby pin using a wad of cotton wool and nail polish remover, so that you ca use it again for your next manicure – be sure that you remove any of your new mani by accident in the process though!
I’m crushing so hard on this turquoise and coral combo – way to make me feel like spring is on the way! What colour dots will you add to your next mani?
The post DIY Dotty Mani appeared first on Made Peachy.
February 22, 2014
Style Sunday: The Infinity Dress
This has to be one of my favourite dresses of all time, having first found The Infinity Style Dress a few years ago, I checked out a number of different how-to guides before settling on this amazing online tutorial from SewLikeMyMom as my total favourite!
Having working it up in a couple of different colourways I thought that it was about time I looked about for some new shades to pick out for making another versions any parties and events that might be coming along this year. While searching about for hot colours for this season’s dresses, I was super happy to find that the infinity dress is popping up in bridal and special occasion stores the whole world over – how rad it that?! I totally love the collection over at TwoBirdsBridesmaid, with dresses starting from £215.
Yes, these frocks are fabulous for decking out a tribe of bridesmaids – each can tie and style her own dress to suit her unique look – but, it is also a great way to get through a season of parties and events on a budget! Now, no one likes to be that gal who has to wear the same dress to each and every wedding she is invited to. Well, this dress means that you don’t need to – I mean you can simply make up your own and tie it in a whole host of different ways to get the look that you want for each and every event, then all you need to do is pick out a few new accessories to give the gown a whole fresh look- now if that isn’t a whole lot of budget brilliance, then I don’t know what is! Whats more, for those that prefer to make garments from patterns rather than following a tutorial – this Style Sunday: The Infinity Dress is gonna be right up your street! The Pattern
Mccall’s M6353, sizes 6 – 14 £8.97
This multi-wear dress is an easy pullover design with a close-fitting bodice and flared skirt, band with elastic casing at upper edge. Raw edges, wrong side of fabric will show – guides for styling the dress are included!
The Fabrics
1 Rich Mauve Jersey • £5.99 per metre • Ditto Fabrics
2 Chocolate Bamboo Stretch Jersey • £15 per metre • Ray Stitch
3 Red viscose Jersey • £18 per metre • MacCulloch&Wallis
4 Mocca Stretch Jersey • £4.99 per metre • TissuFabrics
Here’s another cheeky little fashion tip - when it comes to packing your bags for your summer holidays, or even your honeymoon, space in the suitcase is always at a premium, but, working up a couple of these in a more causal style jersey print – perhaps one cut short and another full-length – will give you endless styling options for days on end…plus lots of space in the case for filling with duty free!
I don’t think that I’ll be happy until I have a whole wardrobe of these dresses, in every length, colour, print and pattern – and, you know what, I’m completely fine with that! What colour and style do you like best?
The post Style Sunday: The Infinity Dress appeared first on Made Peachy.
February 21, 2014
Project Spring Clean
I know, you’re probably going to want to throw a brick at my head when I tell you that I’m really excited to get stuck into some proper spring cleaning! No, I’m not going insane. And, no, I don’t get excited about the prospect of scrubbing out the oven. Actually, quite the opposite, like most regular folks. No, what I am excited about is the results – you know that feeling when all the clutter is gone, and with it all the stress you didn’t realise that you were under is just, well, lifted? That! That is what I’m excited about! an
Working from home and working as a designer, means I have the most incredible about of creative stuff. While on the surface that sounds pretty rad – and yes, it really is. But, without careful management this beast can quickly get out of control. This year I have been making it my mission – there has been daily re-shuffles to find the best working system and weekly de-clutters – and you know what, after just a couple of weeks this is really starting to pay off. Not only does the place look more like a home again rather than an office, studio and general fabric and yarn fest, it has also made it a whole lot easier to get down to work. So it’s no longer can’t see the fabric for the unfinished quilts, there is a system there and, man do I love a good system!
Now that the decks are all cleared, it’s time to get down to a proper spring clean. So for me, this weekend is all about dusting, scrubbing, vacuuming (yes – the old vacuum blew up last week and the new one has arrived – this is more exciting for me than it really should be!). Even though our home is pretty small, the prospect is rather daunting.
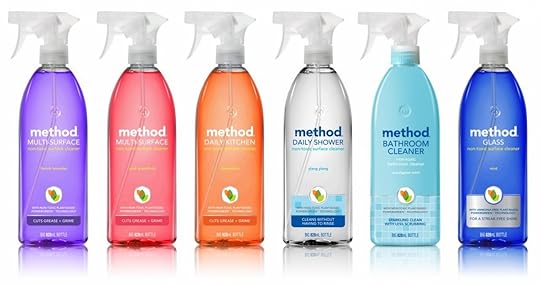 Powergreen Cleaning Range from £3 c/o Method
But, those super rad folks at Method sure know how to make life a little bit easier – I can’t get enough of there cleaning range. Yes is smells ace, yes it works like a charm and no it’s not packed with nasties – what could be better than that? The very best thing about these fresh smelling products, is that if your lining up a weekend of epic cleaning, you wont find yourself having to retreat away from stinking fumes – instead it fills the air with burst of yumminess!
I’m not sure how you plan on getting though this epic chore this year – but, to make it fun, and to stay on top of it, I have devised a little plan of action – Let’s call it the Spring Clean Weekend Power Plan (because, well, why not!) I work on a top-to-bottom approach – I guess the logic here is that you shouldn’t end up mopped into a corner, or flicking dust and grime back onto something you’ve just cleaned. I’m going with a room-by-room plan of attack, because that way, once you step out of a room and shut the door, you know it’s all done, done, done! No one want to spend an eternity doing cores, so I figured that arranging the tasks into two days work means that you can accomplish this in just one weekend – ok we all got different size homes, and some of these tasks are longer, think of it this way start and end with the blue blocks, the orange blocks are the most labour intensive areas, and the green are a little easier to deal with. So, it doesn’t really matter what order you work through the check list, but to keep it manageable for me, I worked on one orange task and two green tasks a day and the remaining orange task – the bedrooms, which are multiple rooms are split between the two days! Now, tell me that’s not a spring cleaning plan you can get behind!
I don’t know about you, but I’m a list kinda gal – yup, if it’s written on a list, complete with check boxes, then in my world it gets done. So, to make life a little bit easier (and who doesn’t love that!) here the Spring Clean Weekend Power Plan as a free printable! You’re welcome!
 So, friends, who’s with me? Who’s up for beating the Spring Clean this weekend?
The post Project Spring Clean appeared first on Made Peachy.
DIY Doggie Cupcake & Cake Pops
I know, two posts in one day – but, today is Waffle’s first birthday and I just couldn’t let this moment go past uncelebrated. And, how does any girl celebrate her fur baby’s very important first birthday? With cakes of course!
I have spent the last week searching out doggie recipes – I’m talking foods that are safe for hounds to eat and make up into a cake that is going to look cute. So, armed with a list of pup safe foods, I’ve gone to work making up some doggie party treats – this recipe can be used to make Doggie Cupcakes or Doggie Cake Pops - don’t look at me like that, Waffle is a wonderdog and deserves the best birthday treats!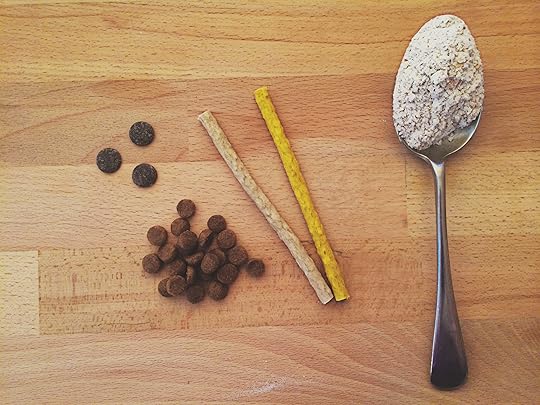 Grab your supplies…
3 tablespoons of wholemeal flour
1/4 teaspoon of baking powder
1 heaped tablespoon of organic peanut butter
1 egg
1 tablespoon of vegetable oil
Handful of kibble biscuits
1-4 tablespoons fresh water (or chicken stock)
Doggie choco treats – not regular chocolate folks!
Assortment of treats to decorate
A word to the wise…this recipe contains nuts (peanut butter), so if you have a nut allergy (like my husband) stay well away from these little treats, we don’t want any trips over to A&E!
This will make up to 6 cupcakes or 12 cake pops – or a combination of the two!
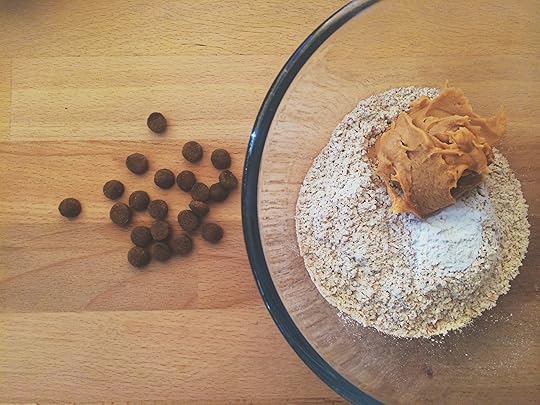 Into a mixing bowl measure out the flour, baking powder and peanut butter, egg and oil and begin to blend together. Add in the cold water (or chicken stock, if you’re using that) a spoonful at a time to loosen up the cake batter.
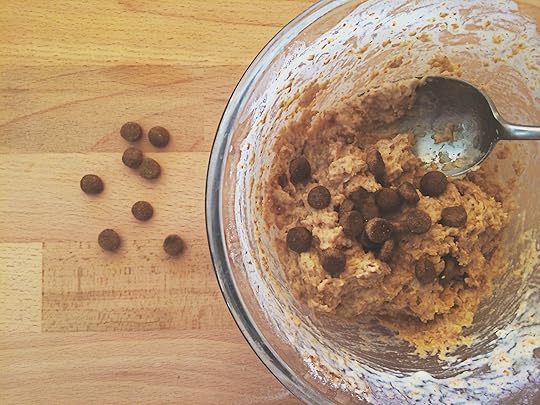 Once combined into a thick but still spoonable consistency, add in a handful off kibble biscuits and mix through.
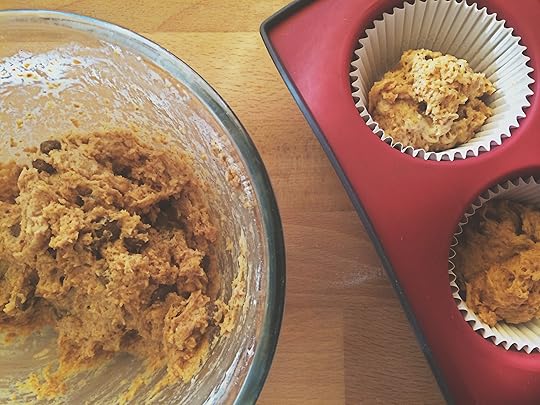 Spoon into a muffin pan lined with paper cases (remember you’re gonna have to remove these before you feed these to your dog as I’ll bet my life on it that he’ll try to scoff the paper too!)
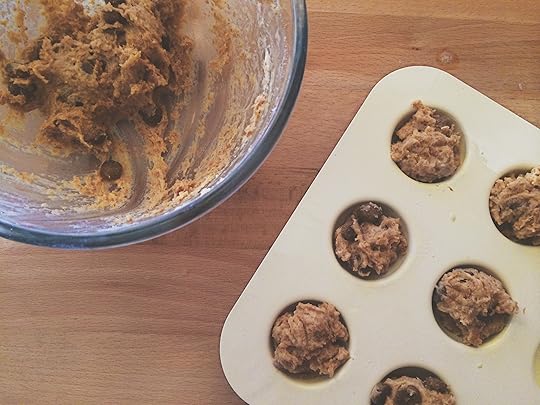 Or, spoon out into a cake pop pan – I like to use a small spritz of cake release spray, just to make sure that these come away easily.
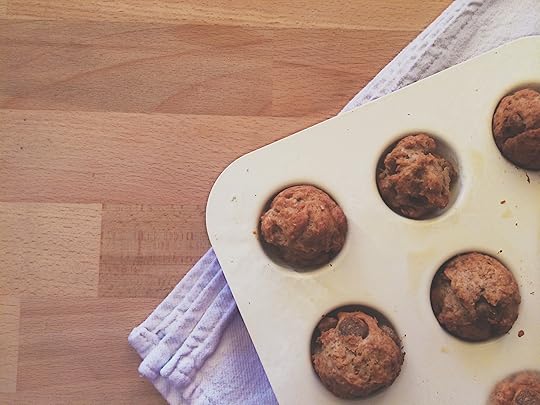 Bake in a pre-heated oven at 180C or (160C for fan assisted) for 20 minutes, checking regularly – the smaller the cakes the quicker they cook! Remove from the oven and allow to cool for 5 minutes before removing from the baking pans to transfer to a rack for cooling.
While the cakes are cooling it’s time to get busy with the decorating. In a bowl over hot water, to create a bain marie, melt a handful of doggie chocolate drops – this is going to be your dog safe icing!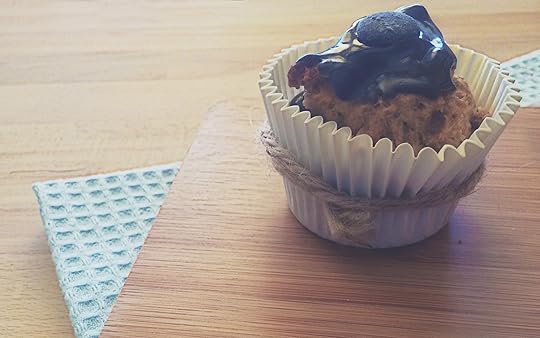 Spread the melted doggie chocolate over the top of the cupcakes and decorate with a selection of doggie treats.
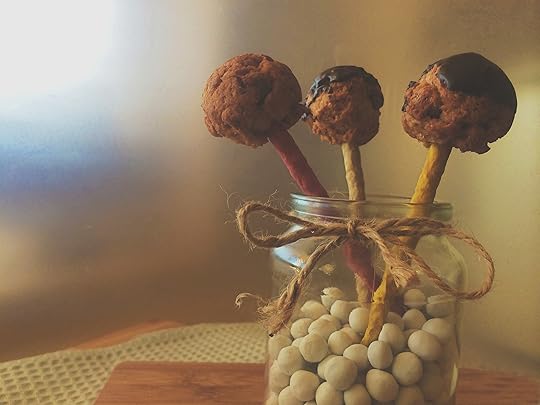 Roll the cake balls in the melted chocolate to coat them and allow to cool before pushing a doggie stick treat into the ball to make the cake pop!
Wait for these to fully cool before giving them to your pup…and remember, they are treats, so as much as he’d love to, don’t let him snaffle them all down at once, there is nothing worse than a cake-related tummy ache on your birthday!
Happy Birthday little Waffle, now let’s eat cake!
The post DIY Doggie Cupcake & Cake Pops appeared first on Made Peachy.
February 20, 2014
Obsessed with…Teeth
Vampire Teeth Silicone Molds • £2.65 • Mold House Yup – there is no hiding my love for TrueBlood – the books, the show, the audiobooks – true obssessive!
I know what you’re thinking, teeth?! Isn’t that a bit odd? Well, I think not! Whether they are cute motifs, striking artworks or even statement jewellery, I think that teeth are cool, creepy cool – yes, but cool all the same!
Don’t believe me? Then check out this selection of awesome handmade teeth goodies I’ve found over at Etsy – so I think it’s safe to say, I’m Obsessed with…teeth!
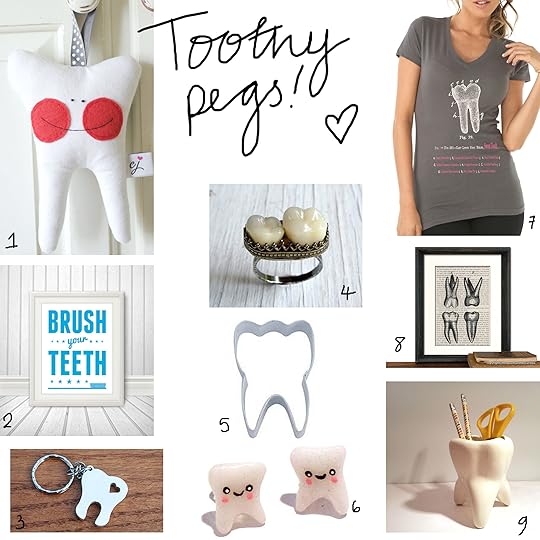 1 Tooth Fairy Pillow • £12.33 • Chloejanehandmade
2 Bush Your Teeth Bathroom Print • £9.86 • BentonParkPrints
3 Sweet Tooth Key Chain • £9.25 • TheDuoStudio
4 Momento Mori Teeth Ring • £88.40 • AustinModern
5 Tooth Cookie Cutter • £1.25 • KitchenCraft
6 Sparkle Tooth Studs • £5.55 • Komodokat
7 Vintage-style Sweet Tooth T-Shirt • £14.80 • ToTheMoonAndBack
8 Molar Art Print • £9.22 • QuaintandCurious
9 Ceramic Tooth Planter Pot • £11.10 • HelloSweetie
I bet you can’t tell me that there isn’t at least something there that make your heart flutter!
♥ – ♥ – ♥
Want to see some more of my handmade favourties? Be sure to check out my new look Creative Clippings column in the March issue of Sewing World – on sale now!
The post Obsessed with…Teeth appeared first on Made Peachy.
February 19, 2014
The 5K DIY Wedding: The Canadian Edition
Hello friends! Wedding fever isn’t going anywhere – which is great, because we all love love!
There is no denying that money is going to play a huge role in wedding planning, because that is a fact of life. But, my wonderful friend Julie Crawford, has a different take on the concept of ‘budget weddings’ – which as a definition, as she explains, has rather gloomy connotations but rather focuses on creating an ‘affordable wedding’. This is more than semantics, this is a happy philosophy that is a great way to achieve a fabulous wedding day, but is a brilliant way to start new life as a married couple!
I’m super delighted to bring to you the second part in The 5K Wedding Series and this time we’re heading over to Toronto, Canada for the Canadian Edition!
All costs are listed in CAN$
 Julie Crawford is a blogger, knitwear designer and lives in Toronto, Canada.
Our wedding budget was $5000, and we ended up spending $$5091, which is pretty darn close! I hate the term ‘budget wedding’, but we decided to have a more affordable one for the usual practical reasons – we wanted to buy a home in the near future, spending crazy amounts of money on a single party seems kind of reckless. But, also because Guy (my now husband) is British, and we were applying for his permanent residency here in Toronto, Canada. In Canada, if you apply for a permanent residency after marriage, the person applying can’t work while they are in the review process, which meant my husband couldn’t work for a year. Knowing that we were going into our first year of marriage on my salary alone meant that we were happy to be frugal, because it meant we would be together!
I had an evening ceremony – 7pm to 1am – on a Friday night, and had an open bar and hors d’oeuvres – rather than a sit down dinner. We got engaged on Christmas Day, and got married March 6th – that’s only two and a half months for the wedding planning. And honestly, I think it was the best choice- having a shorter engagement meant that decisions had to be made quickly, and it helped keep things on budget- after all, I couldn’t spend 8-12 months mentally blowing it up in my head into The Biggest Event of All Time, so it’s easier to be sane and keep perspective- after all, it’s just one day.
 There were 54 people (including myself and my new husband), and it was held in downtown Toronto. Our families and friends were all amazingly supportive. So many people gave up portions of their weekends in the weeks leading up to the wedding to help make things, and the gift of their time felt so incredibly loving, it just underlined how right it all felt. Vendors, on the other hand, were a lot less enthusiastic, but that makes sense – the smaller the budget, the less money they get paid. Calling around to locations and caterers gave me a wide level of responses, most of which were along the lines of ‘you can’t get married in a city this expensive for $5000, it can’t be done.’ Well, the joke’s on them.
The most important part of a wedding is, for me, that it’s fun and you show your friends and family a good time, in whatever way that is fun for you. We chose to focus on a few main things – we decided to skip the dinner, and do passed hors d’oeuvres instead, which had the biggest impact on our budget. We made sure everyone coming knew in advance, so that they didn’t turn up expecting an eight course meal with a midnight buffet, like I’ve seen at some weddings. Having an open bar was important to us, so we made sure to provide that- we had a selection of beer and wine available to our guests for free for the duration of the night. A wedding is the party celebrates your love, but it’s the marriage that is the real gift and the real event.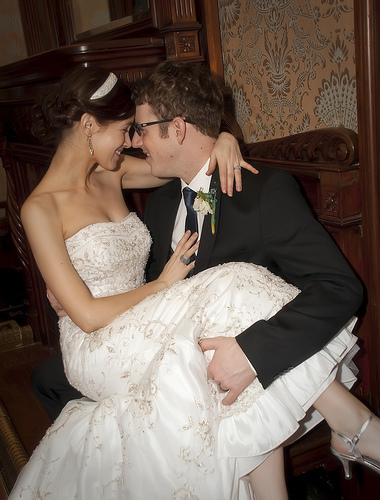 The Budget Breakdown
Venue: $577.50 I made a lot of inquiries into different spaces, and in end I chose a historical trust building that was so beautiful, it required very little decoration. I added tea lights and flowers, that’s it. We got married in March, which is unpredictable weather-wise, and had the ceremony and party all in the same space. We got married on a Friday evening, because it was a lot cheaper then. We got married nearly five years ago, and I’m told the same venue is not quite as cheap as it was then, but before I found this space I was thinking of having it at an independent art gallery (independent is the key word there), since they often have great rental rates and are pretty accommodating about loads of decorations.
Dress: $600.00 Through the whole process, I told myself that it was ‘just a dress’, and focused mainly on the silhouette that I wanted (mermaid), and didn’t obsess over whether it was lace, taffeta, or whatever (wedding dresses are almost always entirely polyester, anyway- seriously, read the tag). I searched OnceWed and PreownedWeddingDresses, which have hundreds and hundreds of dresses. Let’s face it- you know someone only wore it once and had it dry cleaned, so it’s going to be in incredible shape. I did the alterations myself with the help of a friend. Another friend helped me sew white crystal and pearl beads onto a bit of white ribbon (75 cents!) for a wedding headband, and it turned out beautifully. My shoes are silver shoes I got at a discount shoe chain for $40. I’ll definitely be wearing my fab silver shoes again- and I won’t have to pay more money to have them dyed!
Catering: $2180.47 Here is where I spent the most time agonizing, and the most money, hands down. The biggest piece of advice I can offer on this subject is to check and see if your venue allows you to choose your own caterer, or if you have to choose from a tiny selection of ones that they work with. The site manager was up front with me about having to use one of their caterers, but I had no idea what that really meant. And I had no idea that the caterers would be so outrageously overpriced- and it was just hors d’ouevres! In the end, we got a great caterer that was not really on the list, (both the site and I did some compromising) and everything worked out in the end. People are still telling me that the food was fabulous, and I really love the fact that a resutarant did the catering. This means that any time we want, we can go to the restaurant and eat the same or similar food, and remember that night all over again. I know where I’m having dinner on my anniversary!!
Bar: $547.00 We had an open bar at the wedding, and decided to serve only wine and beer, but have a selection. I bought 14 bottles of assorted red, 14 bottles of assorted white, and five cases of beer for the 54 guests. The beer was from Sleemans, which has multipacks of different kinds of beer, which gave the guests options. I did run out of red wine, though- fortunately we have great friends who keep bottles of wine in their trunk for emergencies, and one of our friends graciously brought in three more bottles of red. So really, this is a note to have awesome friends who keep wine in their cars!
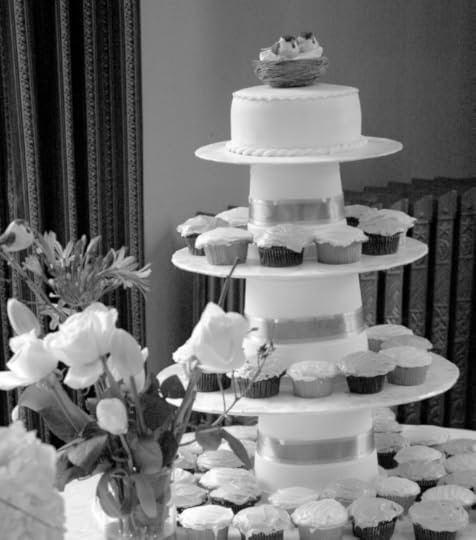
Cake: $31.00 Let’s face it- hardly any of your cake gets eaten, no matter how delicious or terrible it is. I don’t know why, but it’s true. So you can understand why I’d be reluctant to spend $300 or more on something that is going to get thrown out. My maids of honour and I chose instead to make cupcakes ourselves. And we built a great cupcake stand, from cutout cardboard boxes that we covered in a nice vinyl gift wrap, and used white pots between the layers - AllThingsCupcake helped us figure out some of the details. Another friend revealed that her parents owned a bakery (start asking all your friends what their parents do for a living), and produced a perfect tiny wedding cake for our top tier, so that we had a cake to cut, and something to put our little bird topper on (which we made, of course!!).
Favours: $10 I saved up my club points from Shoppers (like a Boots reward card in the UK) and got all the stuff I needed for my wedding favours for free with the rewards. I made little chocolate bird bests (melted chocolate, shredded wheat and coconut) and put blue and pink Cadbury mini eggs in it with a thank you note. The only costs were the plastic bags to put them in, everything else was reward points.
Invitations: $131 (including stationary, envelopes, and postage) Yet another great friend designed our wedding invitations, and another friend had access to a high quality colour print through her work, and we just supplied the card stock for the printing. We bought envelopes, and got them in the mail!
Wedding Rings: $450 My ring cost $400, and was custom made at a small independent jewelry store that also custom made my engagement ring (a white gold and diamond one, not my fabulous knitted one). I consider this to be on area we really saved- if you go to a major jewelry chain, the mark up is huge. A smaller place was able to give us great service, handmade design, and really reasonable prices. We bought G’s ring off Ebay. I love that he’s so low key like that. He loves that he could, if he wanted, “chop down trees with it, because it’s Titanium!”
Flowers: $187.00 My wedding party (two maids of honour, and the bride and groom!) went to some local flowershops the morning of our wedding and bought what we needed. I deliberately didn’t have a set flower in mind, so that I wouldn’t end up making an emotional decision to get overpriced flowers- I opted for whatever looked good, fit the scheme, and was well priced. We brought them to my kitchen and put together our bouquets and all the center pieces. Both my maids of honour each carried a single stunning hydrangea bloom- it was perfect!
Five Tips for a Fabulous 5K Wedding from Julie
1 Be flexible. Remind yourself that this is a party you are throwing to celebrate your marriage and your commitment to each other. This day does not define who you are.
2 Cash in Gift Cards. Do you have a gift card, credit note, or any kind of voucher for something free? Excellent. Now, find a way that it can cover the cost for something for your wedding.
3 Be different. Who says you have to serve a sit down dinner? Any married gal will tell you that feeding the guests costs a fortune. If you are tight on funds, I really recommend the evening cocktail party approach- I ordered only savoury hors d’oevres, and had family and friends bring some baked goods to round out the sweet element. Plus there were loads of cupcakes!
4 DIY everything. We did our own flowers, our own bouquets, the centerpeices, the cake stand, the cupcakes, the alterations, my headband, to name just a few! People will say that you are adding to your stress. To this I say that starting out your live together deeply in debt for your wedding is far more stressful. Not to mention that a stress-free wedding is impossible, no matter how much money you spend.
5 iPod your dance list and get a friend to push the play button. We did up three separate play lists- one for the wedding ceremony filler, cocktail music, and the dance playlist. We rented some speakers and a microphone for $42, and that was that.
I’m not the first person to ever try to have wedding on an affordable budget, and I wont be the last!
Some blogs that were really helpful in keeping me sane and full of good ideas were: A Practical Wedding , 2000 Dollar Budget Wedding & The Broke Ass Bride
♥ – ♥ – ♥
You can find out more about Julie’s fabulous wedding and keep up-to-date with her stunning creative projects over on her blog , KnittedBliss. You’ll also be able to find her on Instagram, Twitter, Facebook and Ravelry!
♥ – ♥ – ♥
Looking for more creative (and cost-savvy!) wedding ideas – be sure to check out The 5K Wedding: US Edition… or you can grab a copy of my DIY Wedding Manual published by Haynes.
The post The 5K DIY Wedding: The Canadian Edition appeared first on Made Peachy.


