
Laura Strutt's Blog, page 3
September 14, 2016
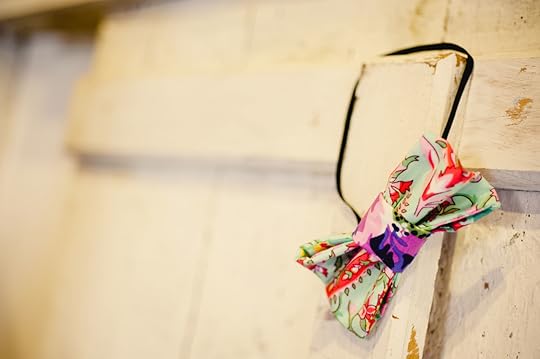
Quick & Cute Fabric Bow Ties
Happy 15th September!
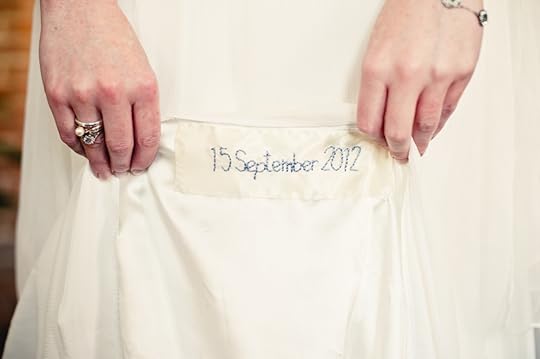 Today is our fourth wedding anniversary, I can’t even tell you how fast those years have flown by! Like most brides will tell you, our wedding day was the best day ever.
THE. BEST. DAY. EVER!
Our wedding was small budget day, but jam packed with our very favourite people and full of lots of lovely handmade bits and bobs. Still, four years on, thinking of teaselled moments from that day will have my heart skipping a beat and give me one of those face-achingly big grins. One of those memories is seeing three of my beloved nephews, dressed in their smart get-ups wearing colourful bow ties I made for them.

Before we begin, we need to talk about how off-the-charts cute my three nephews are, am I right?!
Ok, so these wee guys have grown up so much since this photograph was taken and the incredible little guys that they have become makes my heart pop with pride, but I love looking at this photo and remembering how itty bitty they were!
These little bow ties are so quick and easy to make, using remnants of striking prints, the simple elastic band makes them easy and comfortable for children to wear. They make the perfect additional for weddings, parties, fancy dress, World Book Day…or, any other occasion where the Little just wanna look super dapper! Here’s how to make your own DIY Fabric Bow Tie
 Grab your supplies…
Fabric remnants in two contrasting prints
Light-weight fusible interfacing
5mm wide elastic, 35cm
Cut the fabrics
From one of the print cotton cut a piece of fabric 15cm by 30cm. Cut a piece of fusible interfacing to 15cm by 30cm. From the remaining print cotton cut a piece of fabric 7cm x 10cm.
Fuse and stitch the fabrics
Following the manufactures instructions fuse the interfacing onto the wrong side of the larger piece of print cotton. Fold the large piece of cotton with right sides facing and join the two long edges with a straight machine stitch taking a 1cm seam allowance. Repeat to stitch the smaller strip in the same manner.
Stitch the strips into loops
Turn the fabric strip through to the right side and press the seam centrally along the back of the strip. Fold the strip in half with the centred seam outermost and align the two raw edges and stitch with a straight machine stitch taking a 1cm seam allowance to create a loop. Repeat with the smaller strip.
Turn though and press
Working on each stitched loop in turn. Trim the seam allowance neatly along the join in the loop and press open. Turn the loop through so that the centred seam and the join are innermost, position the join in the centre and neatly press in half.
Construct the bow tie
Starting at one folded side, make a concertina fold in the larger piece, and feed it though the smaller loop so that the smaller section sits in the centre of the bow tie. Arrange the folds to neaten the bow tie before feeding the length of elastic through the smaller loop at the back. Overlap the elastic by 2cm and hand stitch securely to join. Add a couple of hand stitches through the two sections of the bow tie to secure.
Let’s just look at my nephews one more time…because…OH…MY…HEART!!!
These bow ties were just one of the handmade elements that we included in our wedding day!
If you’re interested in finding out a little more about our low budget, DIY, handmade wedding – you can read about it here & here!
 And, because it is our anniversary, indulge me while I get super soppy and wish my rad husband, a super happy anniversary!

♥ – ♥ – ♥
Photography: Kerrie Mitchell
The post Quick & Cute Fabric Bow Ties appeared first on Made Peachy.


September 12, 2016
Knitted Baby Blankets – Giveaway & Free Pattern!
I’m so stoked to to let you know that my new book 35 Knitted Baby Blankets – is on sale now!
I have been looking foreword to sharing this new book with y’all for what feels like forever – it almost feels like a lifetime ago that I was working on this book!
I have been totally blown away by the response to this book – having only gone on sale on the 6th September, it is already listed in the Top 10 Knitting Books on Amazon UK!
I cent even begin to tell you how utterly happy that makes me – thank you, knitting friends!
 Knitting for babies has to be top of the list of universal feel good makes – I mean they are always so cute and adorable, they are well received as gifts, we usually work them in the most scrumptious yarns we can lay our hands on, and they usually work up pretty quick – which is super satisfying! I had the very best time designing and knitting these baby blankets for this new book – I wanted to make a collection of makes that I would want to make and gift to the Littles of nearest and dearest, and I really hope that these projects will become something that you make, either for your own little one or to gift to this that you love!
As a little treat for you guys, and by way of a wee thank you for all your support – both of this blog and my books – I wanted to share with you one of my very favourite patterns from the book!
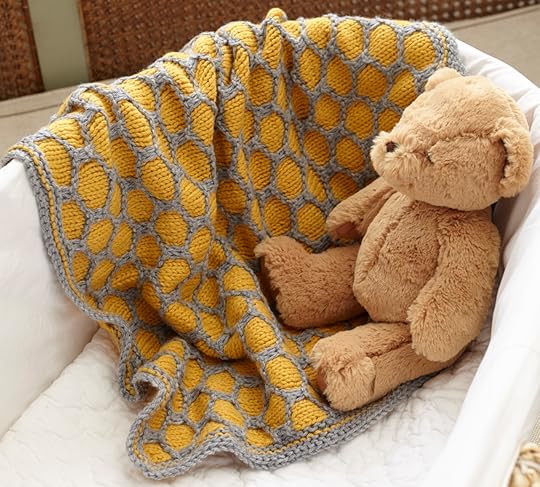
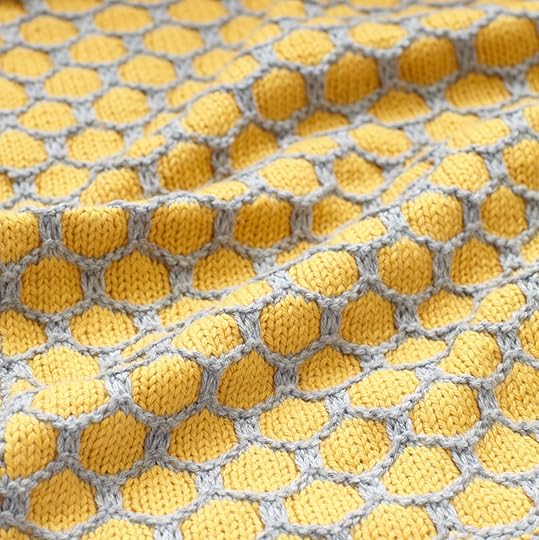
Honeycomb Afghan
This clever design uses slip stitches to create an afghan that looks multi-dimensional, and worked in yellow and grey yarns it grows into a sweet honeycomb motif.
Materials
•Berroco Vintage worsted (aran) weight yarn (52% acrylic/40% wool/8% nylon; 207yds/ 198m per 3½ oz/100g ball) 1 ball of shade 5106 Smoke (A), 2 balls of shade 5121 Sunny (B)
• US 8 (5mm) knitting needles
• Tapestry needle
Finished Measurements
19¼ in (49cm) x 21½ in (55cm)
Gauge (Tension)
16 sts x 24 rows to measure 4in (10cm) over stockinette (stocking) stitch on US 8 (5mm) needles after blocking
Pattern Notes
Ensure that all slip stitches are slipped purlwise to maintain a consistent finish on the afghan after blocking.
For the Afghan
Using Yarn A and US 8 (5mm) needles, cast on 84 sts.
Rows 1–2: Knit.
Row 3: Change to Yarn B. Knit.
Rows 4–5: Change to Yarn A. Knit.
Row 6 (RS): Change to Yarn B. K1, sl next 2 sts purlwise, *k6, sl next 2 sts purlwise; rep from * to last st, k1.
Row 7 (WS): P1, sl next 2 sts purlwise, *p6, sl next 2 sts purlwise; rep from * to last st, p1.
Row 8: K1, sl next 2 sts purlwise, *k6, sl next 2 sts purlwise; rep from * to last st, k1.
Rows 9–10: Rep Rows 7–8.
Row 11: Rep Row 7.
Rows 12–13: Change to Yarn A. Knit.
Row 14: Change to Yarn B. K5, sl next 2 sts purlwise, *k6, sl next 2 sts purlwise; rep from * to last 5 sts, k5.
Row 15: P5, sl next 2 sts purlwise, *p6, sl next 2 sts purlwise; rep from * to last 5 sts, p5.
Rows 16–19: Rep Rows 14–15 twice.
Rows 20–21: Change to Yarn A. Knit.
Rep Rows 6–21 a further 9 times.
Next row: Change to Yarn B. Knit.
Next 2 rows: Change to Yarn A, knit.
Bind (cast) off.
 For the Border
With RS facing, working down each side of the afghan in turn at the row ends, using Yarn A and US 8 (5mm) needles, pick up and k80 sts along the side of the afghan.
Rows 1–2: Knit.
Row 3: Change to Yarn B. Knit.
Rows 4–5: Change to Yarn A. Knit.
Bind (cast) off.
Rep to add a border to the second side.
Making Up and Finishing
Using the yarn tail, sew the corners of the border together to make neat miters.
Weave in all loose ends and block to measurements.
Tip
No need to cut the yarns as you fi nish each row; loosely carry the unused yarn at the side of the work by catching it under the working yarn as you make the first stitch, this will ensure that the yarns are always in the correct place as you work through the pattern repeats.
Happy Knitting!
Fancy one last treat?
I have three copies of my new book 35 Knitted Baby Blankets to giveaway to Made Peachy Readers, here’s how you can enter…
So, that y’all get a fair whack at it, there are a number of ways you can enter this giveaway – and the best part is each one will be counted as 1 entry…so, do all three and you will be entered three times my friend!
1 Please leave a comment below sharing what you love about knitting for babies
2 Share this post on Twitter, tagging @madepeachy and using the hashtag #MadePeachyKnitBabyBlankets
3 Give the MadePeachy Facebook page a like, share the giveaway post and leave a comment on why you’d love to win!
Want a bonus entry? Then head over to the MadePeachy Instagram , follow and give the Knitted Baby Blankets Giveaway post a like & comment!
The giveaway is open to UK residents only (sorry international chums!) The winner will be pick at random from the entries and announced on the 20 September – Good Luck!
♥ – ♥ – ♥
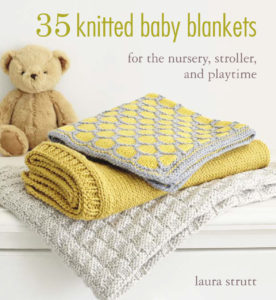
This pattern is a free extract taken from 35 Knitted Baby Blankets by Laura Strutt, published by CICO Books (£12.99) Photography by Holly Jolliffe © CICO Books
The post Knitted Baby Blankets – Giveaway & Free Pattern! appeared first on Made Peachy.
July 25, 2016
DIY Embroidery Hoop Storage Wall Hanging
Getting organised is nearly always a top priority for us all as life seems to get busier and busier – especially when it comes to our crafting studios! More often than not, we are limited to the space that we have, and often the time that we can spend on our favourite creative pastimes is limited – so, the last thing we want to be doing is spending time hunting out the tape measure or looking for those scissors…again!
Here is a fun and creative solution to organise some of your essential crafting supplies – with a fun, make-in-an-afternoon project!
 This pretty wall hanging has neat little storage pockets that allows you to stow those important crafting essential, all within reach and with out taking up valuable space on your workstation – how great is that?
 Crafted from a few simple supplies – which you’ll probably already have in your stash – this wall hanging is secured into an embroidery frame to you can adore your wall with your love of all things stitched!
Be sure to check out the full step-by-step project over on The Sewing Directory!
The post DIY Embroidery Hoop Storage Wall Hanging appeared first on Made Peachy.
July 20, 2016
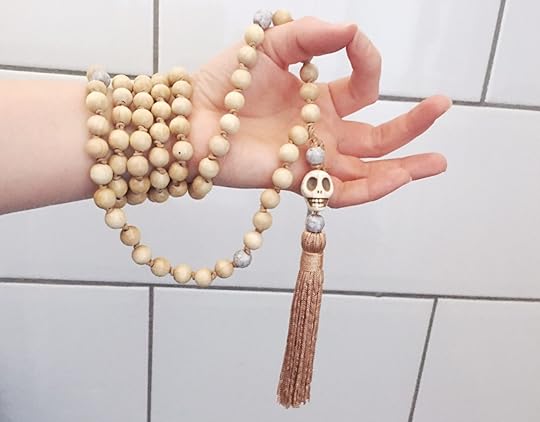
DIY Meditation Mala Beads
Greeting friends!
One thing that this little place has been in short supply of while I have been so busy has been DIY craft projects. Recently, on the advice of my super yoga instructor, I have been working on a little personal meditation, and – let me tell you – this is a real game changer! Taking a small amount of time out to refocus and re-centre yourself is just the tonic for busy, busy times!
 The benefits of meditation are widely discussed, and yet sill its something that we overlook in out daily life…if you’re interested in finding out more about meditation then I highly recommend checking this short and sweet video & feature from Tibetan Buddhist master Mingyur Rinpoche!
One of the things recommend for both long time fans and newbies of meditation are meditation beads – or mala beads, these are designed to give the body something to focus on during meditation sessions. So what better project for me to share after such a long break than a step-by-step guide to make your own DIY Meditation Mala Beads
Anatomy of the Mala Beads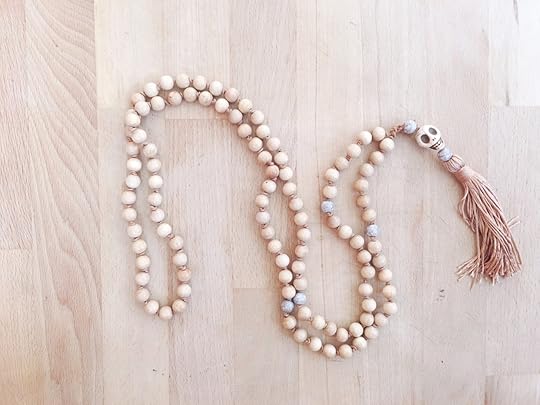
Mala beads come in a range of styles and designs, essentially they are a string of 108 beads – there are lots of spiritual reasons for the number and configuration of these beads. Commonly the design is worked with marker beads positioned at bead 7, bead 21, bead 88 and bead 102, these feel different as you move the beads through your hands and bring you back to your meditation. The beads are finished with a focal bead – a guru bead – which will symbolise the end of the meditation and completed with a tassel rooted in the symbolism enlightenment, connection and consciousness.
All very lovely and soul satisfying concepts and they are also stunning to wear around your neck or wrapped around your wrist.
So, lets make us some Mala Beads!
 Grab your supplies…
Beads – you will need a total of 108 beads – with four contrasting beads for the marker beads
Length of cord
Large focal – guru- bead, or large bead teamed with additional small beads
Tassel
Embroidery needle
 Begin by drawing out a length of cord and make a small overhand knot at least 10cm from the end. Thread on the first bead.
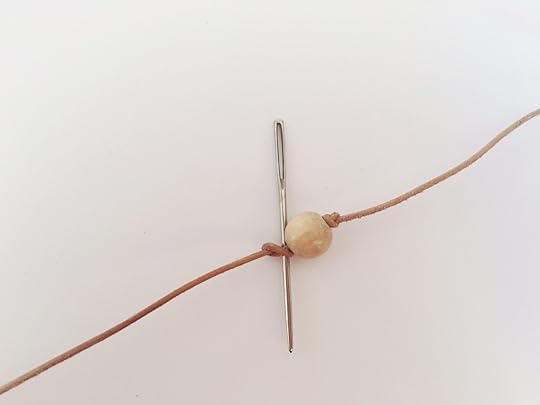 Create another overhand knot and slide it right down to the base of the bead to secure it into position – the tip of a needle in the centre of the knot can help you to ease it snuggly against the bead.
 String on a further 5 beads, working a knot between each and add a contrast, marker, bead for the 7th bead. Working knots between the beads will hold the beads securely and it also means if the cord ever snaps, all of the beads wont fall from the cord – which is the last thing you would want if your meditating in a yoga class!
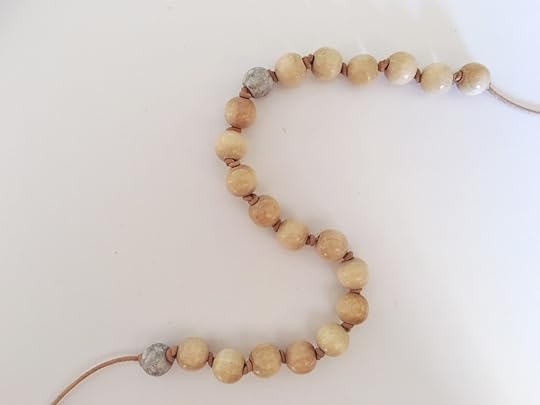 Continue string on the beads to add 13 beads and follow with another marker bead for the 21st bead – working small neat overhand knots in between.
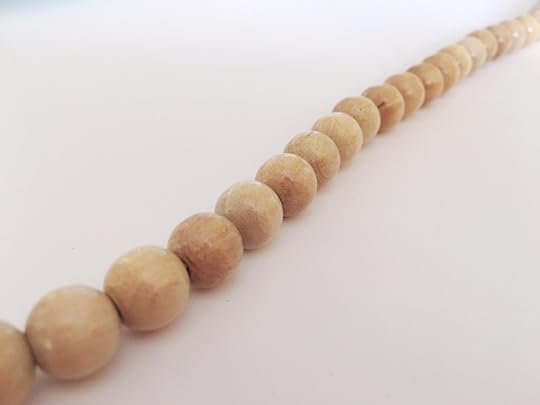 Ok, so now we’re getting into the swing of things – add a bead, make a small knot, easy right? Good, so now we got to add a whopping 66 beads to the cord! Yup! You did read that right, 66 beads. The process of sliding on the bead and making the knot is actually rather mediative in itself.
 Pro Tip!
It is easy to get into the zone when you’re adding such a large number of beads, so why not count them out and tip them into a small dish, so you have just the right amount to string onto the cord. Also, it will prevent them from rolling away, which (trust me!) ain’t great! Add a contrast bead for bead number 88 and knot in the same way, then string on a further 13 beads – knotting in place as you work, and add one final contrast bead for bead 102, before adding the final 6 beads.
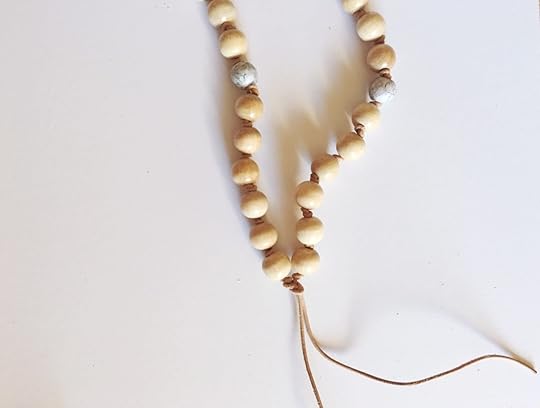 Make a small knot to join the truing of beads into a neat necklace, leaving the tails long for now.
 The focal bead – or guru bead – can be made from any bead you like – I decided that I wanted team a couple of the marker beads with a skull bead that has been lingering in my collection. [ps: the skull might look creepy so some, but skull motifs are commonly seen in mall designs – but you can pick any colour, style of design you like – its your choice!] I You can make your own tassel, or you can opt for one ready-made tassel from a craft store, both work super well!
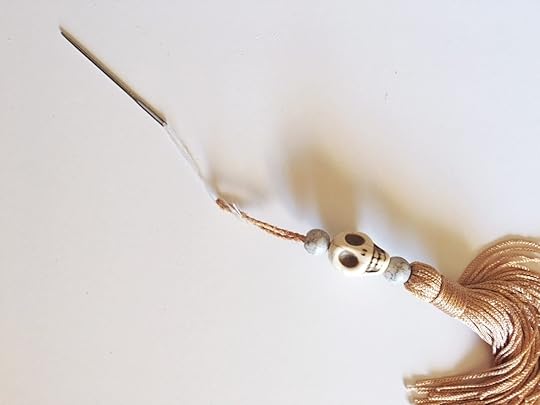 Thread the larger bead, or combination of beads, onto the tassel – to make it a little easier to draw the thicker cord of the tassel through the beads, double a length of cotton and thread through the loop of the tassel and secure, you can use the needle to draw them through the holes of the beads much easier! Secure the tassel embellished with the guru bead on to the end of the mala necklace with a couple of secure knots and trim the ends of the cord to finish.
 Tah Dah! You’re all set to go meditate!
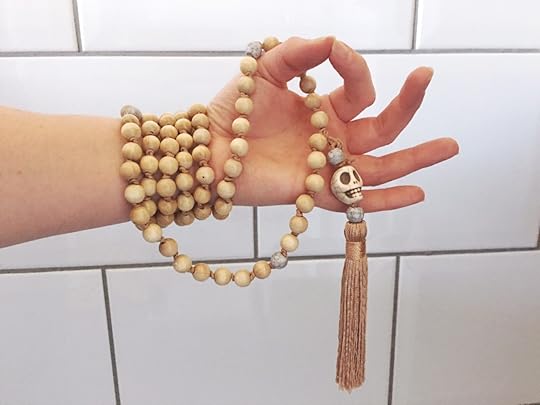 Namaste friends!
The post DIY Meditation Mala Beads appeared first on Made Peachy.
July 18, 2016
Crochet Chunky Rug!
Greeting friends!
I’m hoping that y’all are well and that your making the most of these sun shining days that we have been enjoying of late!
The last few weeks have been all about finishing projects and catching up on lots of exciting new ventures – but we’ll get to that!
I have just finished working on a rather exciting sewing project – I say ‘finished’ there are lots of loose ends to sew in (pardon the pun!) but I can’t wait to share more about it in the coming weeks – I know always with the secret projects!
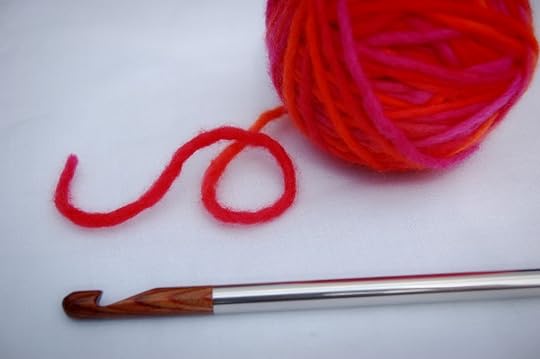
Well, here is something that I can share with you! If you love crochet – and why wouldn’t you? You’ll be able to find this delicious ice cream colour inspired chunky t-shirt yarn rug I crocheted in the latest issue of Mollie Makes – On sale now!
 What’s that you say? You’re new to crochet and are a little bit nervous about operating that hook-thingy?
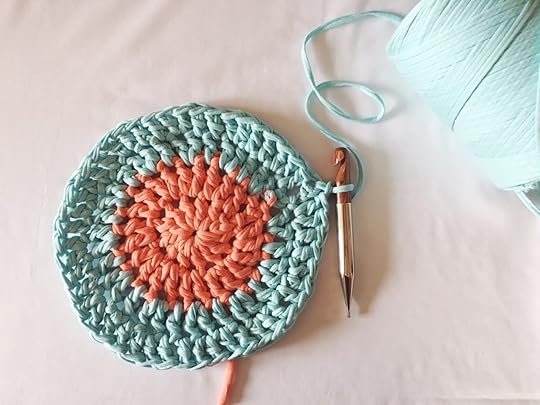 Fear not friends – remember I have a whole set of Crochet Videos right here to help you out! Enjoy!
The post Crochet Chunky Rug! appeared first on Made Peachy.
June 20, 2016
Teeny Weeny Baby Shoes
I don’t know about y’all but stitching for Little and babies makes my wee heart sing.
Firstly, there are an abundance of adorable prints out there – and I mean in the world of fabric stores not just my own stash, although it has reached the point where is it starting to look like I’m setting up my own fabric store.
Secondly, these mini-makes are often packed with clever stitching techniques or new skills to try out and, as they are on a smaller scale, they instantly feel more manageable and a lot less terrifying than if you were to contemplate them on a full sized garment.
Thirdly, baby makes are usually quick and fun to make. That means that they are the perfect project to work on when you have only a limited amount of time to pursuer your creative pastimes in the whole scheme of your busy day-to-day life. This shorter make times means that you will often finish them in one sitting, and you get that instant buzz of satisfaction that comes from finishing up a project – and I know I’m not alone in thinking that we all need more of that feeling of satisfaction in our lives!
Lastly, and by no means lastly, makes for babies and Littles are usually hugely appreciated and enjoyed and that, my friends, is a winner for everyone involved!
I have been working on a couple of big deadline of late, most of which have been keeping me firmly at my sewing machine – one of my tasks is to work on a few new quilts (and finish up some long languishing quilt tops) ready for this year’s Festival of Quilts. So, when the sweet folks over at the Sewing Directory asked if I’d like to work on a sweet new baby project, I literally jumped at the chance!
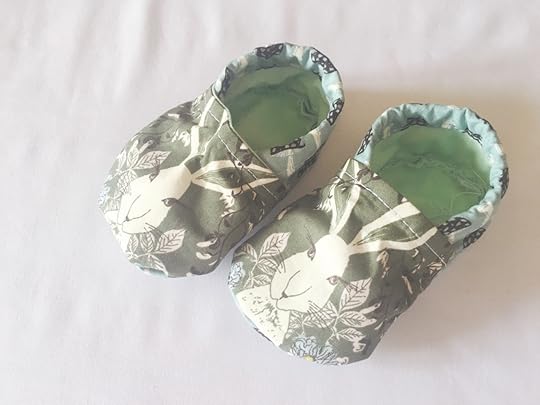 So, if you fancy working on a fun little mini make be sure to check out my step-by-step tutorial for sewing your own cloth baby shoes over on The Sewing Directory!
The post Teeny Weeny Baby Shoes appeared first on Made Peachy.
May 24, 2016
New Crochet Video Guides
Hello Friends!
Over the last few months things have undoubtedly been rather quiet over here – life got super busy and work has been exploding off the charts! I’m happy to say that I feel as though I’m finally catching up with a few things – and top of my do do list has been getting back to this creative journal!
 Since my last two crochet books have come out I get quite a few emails and messages from folks asking for information about learning the basics of crochet and building up their knowledge of different techniques. I don’t know about y’all but I find it so much easier to learn from someone actually showing me – sitting me down and demonstrating how each element of a technique is worked and brought together to create the finished result.
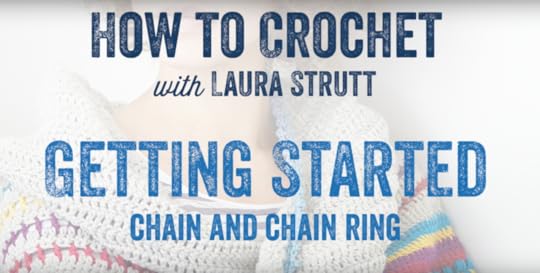 So, what better way to share these than with a few handy videos!
I have set up a new video tab that will take you directly to a selection of videos sharing crochet techniques along side arm & finger knitting tutorials – I hope that these will prove to be the perfect companions to my books!
Do take a look and let me know what you think – once you’ve mastered a few basic crochet techniques the whole crochet world is yours for the taking!
 Remember, if you are on the look out for a quick start guide to Crochet Abbreviations & Knitting Abbreviations be sure to check out these handy posts too!
Also, crochet fans, check out this rundown of crochet techniques and how-to guides!
The post New Crochet Video Guides appeared first on Made Peachy.
May 23, 2016
Great British Sewing Bee Guide to Fit & Style + Giveaway Winners!
Hello & Happy Monday!
What better way to kick off the week with a little announcement for the giveaway winners!
Thank you all for taking part in the GBSB Giveaway – both here in the comments, on Facebook, Twitter and over on Instagram too – I have been inundated with entries and it has taken me all morning to just collate all the entrants to enter them into the draw!
 But with out further ado, let’s announce the three luck winners…
CONGRATULATIONS…
Megan
Ingrid
Tessa
Please do email over your postal address so that we can get the copies of this great book out to you!
 Now, I’m always sad that there can’t be more winners – especially when the prize is a great one like this, so by how about some exclusive tips and tricks direct from the Great British Sewing Bee?
 Stitching Friends, here is your Great British Sewing Bee Guide to FIT AND STYLE SOLUTIONS
Most of us can be categorised into one of five shapes.
Which shape are you? Check the descriptions below to determine which silhouette best describes you and then choose garments that flatter your figure.
Rectangle or ‘athletic’
If your figure is straight up and down without a lot of curves, you fall into this body-type classification.
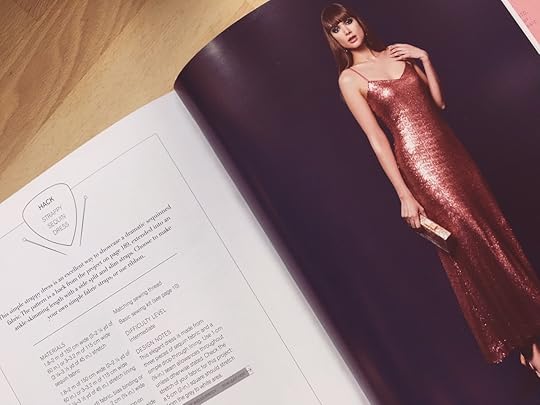
STYLE TIP: Create curves to flatter your figure – wrap-over styles work well for your shape, creating a nipped-in waistline. Choose styles with defined waistlines or two-piece outfits. Most skirt shapes will suit your figure. Try a peplum skirt, such as the Peplum Dress on page 104.
Triangle or ‘pear’
The most common female silhouette, this is where the upper body is noticeably smaller than the lower body.
STYLE TIP: Since the waist is your best feature, choose styles with a defined waistline. The Chinese-Inspired Top on page 148 is perfect for your shape. Alternatively, try the Jumpsuit on page 56.
Inverted triangle
When shoulders are wider than the hips,
you have an inverted triangle shape. You may also have a small waistline.
STYLE TIP: V-neck tops work well for your figure as they minimize the width at the bustline. Try the Bias-Cut Top on page 38. Balance out the upper half with an elegant flared skirt or trousers. Try the Palazzo Pants on page 138.
Apple
If you have a full figure with the upper body, especially the tummy, bigger than your lower half, you have an apple-shaped silhouette.
STYLE TIP: Fluid lines up and down the body work well for apple shapes as there are no seamlines drawing the eye. The Jersey Dress on page 100 is a perfect style that you will wear again and again.
Hourglass
The hourglass shape is curvy, with a clearly defined waist.
STYLE TIP: Wear belted dresses, skirts, tops or jackets to define the waist. Why not try the Wiggle Skirt on page 112.
Style it yourself
The beauty of sewing for yourself is that there are no rules. Wear patterns and colours that make you happy and feel confident. If you love tropical prints, then use them. If plain colours are your thing, then play with some colour blocking. Unlike shopping on the high street, you are the designer when you make your own clothes. So, have fun…and start sewing!
♥ – ♥ – ♥
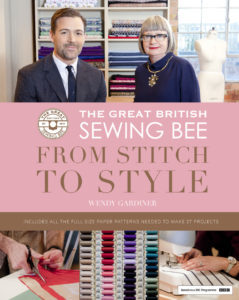
The Great British Sewing Bee: From Stitch to Style by Wendy Gardiner (Quadrille £25) © 2016 Love Productions. Photography © 2016 Jenni Hare & Charlotte Medlicott
The post Great British Sewing Bee Guide to Fit & Style + Giveaway Winners! appeared first on Made Peachy.
May 15, 2016
Great British Sewing Bee is Back & Giveaway!
Stitching Friends, the wait is finally over!
Tonight, at 9pm on BBC2 The Great British Sewing Bee is back! I can’t wait to meet all the new faces, check out their unique style and, most importantly, see what they are stitching!!
The previous seasons of the GBSB have been phenomenal – not only in seeing different stitchers react to a brief, add their own flair but also for seeing a wide range techniques and skills put into use.
Watching the GBSB is a fantastic way to pick up a few fancy techniques along the way, but sometimes it hard to remember all the wonderful tips, hints and hacks that are explored through out the shows.
Well, friends, this needn’t be a problem! The Great British Sewing Bee: From Stitch To Style by Wendy Gardiner (£20, Quadrille) is out now!
Very much like the show this book is sure to be a hit with stitchers – experienced and newbies alike! The book is packed with lots of technical information on everything from basic stitching, and in introduction onto garment making, through to developing your own unique style by learning how to gather inspiration, work with fabrics and silhouettes and experiment with more unusual materials and more complex techniques.
Not only that, the books comes with a collection of garment patterns in a full-sized pattern pack -allowing you to try your hand at a Sequin Evening Dress, Man’s Pin Tuck Shirt, Camisole & Short Set, Soft Cup Bra and Child’s Cape! Along side the vary wearable designs are full instructions and plenty of tips and handy hints to keep you on the right tracks – what more could you want?!
 What’s more, many of the garments featured in the pattern pack are those that appear in the challenges on the show – so, if you really fancy testing your stitching prowess you can stitch along with contestants and see how fair!
This is books is not only a fantastic accompaniment to the show, but it is also a wealth of information and brilliant, fashion-led garment patterns that will really help to take your stitching to the next level!
Aside from a glass of gin & tonic, this might just be the perfect companion for this seasons shows!
So, to celebrate the new series I have three copies of this awesome new book that is the perfect companion to the series to giveaway to lucky Made Peachy Readers!
Easy! So that y’all get a fair whack at it, there are a number of ways you can enter this giveaway – and the best part is each one will be counted as 1 entry…so, do all three and you will be entered three times my friend!
1 Please leave a comment below sharing what you love about the GBSB
2 Share this post on Twitter, tagging @madepeachy and using the hashtag #GBSBMadePeachy
3 Give the MadePeachy Facebook page a like, share the giveaway post and leave a comment on why you’d love to win!
Want a bonus entry? Then head over to the MadePeachy Instagram , follow and give the GBSB post a like & comment!
The giveaway is open to UK residents only (sorry international chums!) The winner will be pick at random from the entries and announced on the 23 May – Good Luck!
The post Great British Sewing Bee is Back & Giveaway! appeared first on Made Peachy.
May 8, 2016
Made Peachy – Where have you been?
Long time no blog, in fact it’s been the longest time!
And, you’d be forgiven if you’d have thought that I’d dropped off the face of the planet. Firstly, thank you all for sticking around, and luckily for me, I have not dropped off the face of the earth. I’ve just been so caught up with living that this little place has been sadly neglected of late.
What can I say, life has been getting in the way of late. I’m happy to say that work has been accelerating at a wild pace – and while it’s exhausting it’s so rewarding. It is a blessing to work in a creative industry and to be able to challenge myself in new creative ways.
A lot of my time has been taken up with working on a couple of exciting new books – although I’m sure that wont come as much of a surprise to y’all. I love writing books, believe it or not, I love the challenge of working to deadline (although most are often a little tighter then I might like!). I adore the process of pitching and refining initial ideas, I love the concept of building and developing a brief, I relish the process of sketching, gathering inspiration and designing. The making aspect is actually only a small portion of the whole process, there are lots of other stages of pattern checking, editing and proofreading before the final book is completed.
So, enough talk about process…how about a sneak peek of these two new books?
As many of you may know, knitting is one of my first loves, that is to say creating unique knitted items was my first venture into designing while I worked on the editorial team of Let’s Knit Magazine. While that feels like a life time ago, knitting is always one of my go-to creative pastimes, so working on a new collection of patterns was a real treat!
35 Knitted Baby Blankets – for the nursery, pram & playtime, £12.99, CICO Books
•On Sale September 2016•
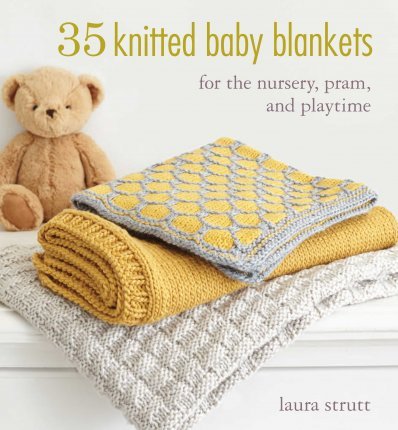
From the first car journey to an outing in a stroller, a knitted blanket will accompany baby wherever they go. Laura Strutt has designed a teddy bear travel blanket that cleverly folds away into a pillow and a hooded wrap for keeping cozy in a sling. For the nursery there is a soft crib cover and a dungaree-style sleeping sack in breathable merino yarn—perfect for a peaceful night’s rest. For playtime, there’s a cotton-backed blanket that can double up as a rug to take out and about and a tiny comforter blanket guaranteed to become baby’s closest companion.
Love knitting for baby? (me too!) You can pre-order you copy over on Amazon
Ready for the next sneak peek?
Weaving is craft that has taken a huge leap in the creative sphere in recent times, you don’t have to wander too far on Instagram or Etsy before you spot a whole range of wonder fin textile creations. The process of weaving and creating woven textile arts is both soothing a vibrant, allowing you too work with a range of materials and fibres to create unique one off pieces.
I’m so stoked to share this new book packed with lots of techniques to get you started, build your weaving skills and designs for you to try at home!
Modern Weaving – learn to weave with 25 bright & brilliant weaving projects, £12.99,
CICO Books
•On Sale October 2016•
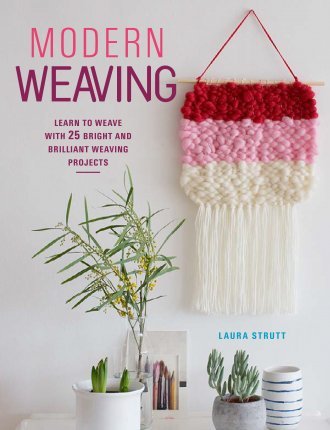
Laura Strutt has designed 25 contemporary weavings in a range of stylish colorways, from bright neons to pastels, Navajo-inspired earth tones, monochrome, and neutrals, as well as suggesting alternate colors so you can match your makes to your home and your accessories to your mood. With a comprehensive techniques section that covers everything from how to make your own loom, warping (preparing) a loom, basics such as tabby weave, bubbling, Egyptian knots, Soumak weave, basket weave, and many more, you will develop the skills you need to make a wide range of exciting projects, such as a stunning gold and cream wall hanging with extra-long Rya knots, a pastel-colored hanging with ribbons and strips of lace to create a tactile texture, or a pretty phone cover with Aztec-inspired triangles—the only difficult part is choosing what to make first!
Fancy giving weaving a go – and why wouldn’t you? You can pre-order on Amazon !
So all of this book-working has been keeping me super busy of late and when you truly love your job it is hard to determine where work stops and life starts, but Im so thrilled to be able to share this exciting new chapter (yes, that was a book pun – sorry, not sorry!)
Aside from these new books to look out for in the late summer, I have a few new technique vides to share with you very soon…so stay tuned!
The post Made Peachy – Where have you been? appeared first on Made Peachy.


