
Laura Strutt's Blog, page 11
March 16, 2015
DIY Washi Tape Book Mark
Hello Book Lovers!
One thing that I have to be thankful for about all my time on the road this month is the extra reading time that seems to go along with it. All the waiting about for public transport, a few minutes before the start of the day, lazy (tech free – see yesterday’s post!) evenings in hotel rooms, all amount to a few stolen moments to get in some reads. I regularly switch between reading on my Kindle and reading paperbacks and hardbacks – that is to say I;m an equal opportunity reader, and will rad anything I can get my hands on. When reading ebooks on my Kindle, pages are marked out for you and finding the spot where you left off is abreeze…paperbacks, not so much. So, when it comes to paperback reads I say you gots to have yourself a cute book mark!
 There is something exciting about picking out a new paperback to read, and so it should be celebrated with a cute little handmade book mark, so here’s a quick and cute DIY Washi Tape Book Mark to help save your spot in your latest fave read!
 Grab your supplies…
Old envelope
Collection of washi tapes
Scissors Make two neat cut on the sealed corner of the envelope (opposite the opening) to snip off a square.
 Fold the upper leaf of the square upwards to make a neat fold along the diagonal of the square.
 Using the fold line as a guide, snip away the lower corner to create the front part of the book mark.
 Snip lengths of washi tape slightly larger than the width of the bookmark, and begin to stitch to the surface using the lower cut edge of front of the book mark as a guide.
 Press the washi tape securely and carefully snip along the side of the envelope to neaten the upper section of the book mark.
 Working on the inside of the lower portion of the book mark, being adding lengths of washi tape to complete the front. Use the lower portion of the upper section as a guide for the placement of the tapes and cut them slightly longer than the width of the book mark.
 Press the washi tape to secure to the lower portion of the book mark and snip away the excess tape along the lower sides of the book mark.
 Flip the book mark over and decorate in the same way – pressing lengths of tape slightly longer than the envelope to cover the back. I’m a matchy-matchy kinda gal, so I repeated the same pattern of tape placement on the back, but you know what? Know yourself out and create any pattern or design that takes your fancy!
 Press the tape firmly in place along the whole surface of the book mark. Snip away the excess tape long the sides of the envelope to neaten.
 Ta Dah! This little decorated pocket-style book mark is ready to slip over the top of your pages ready to save the spot on your latest read!
 So, book lovers what are y’all reading right now, I’m always on the look pour for fresh reading recommendations!
The post DIY Washi Tape Book Mark appeared first on Made Peachy.


March 15, 2015
The Week That Was: Home – briefly
March has been a month on the road. With all the fun and trials that you might expect. I feel blessed to have met with lots of new creative folks at the Stitching, Sewing & Hobbycrafts show in Glasgow – and having met up with some great friends too!
But, there is also the trials of not having proper internet access – is is just me or does hotel internet access suck so bad? Not only does this mean that I’m not able to get here to update, share and have fun, but it also means that keeping up with work, emails and other business tasks have to take a back seat till I’m home.
While I have to admit not being able to keep on top of my work schedule (one of the troubles of being your own boss is that sometimes you feel like you are never off duty!) but it has given me the chance to have a bit of a break, to step away from the tech and spend some time doing something creative. So, over the last couple of weeks, while spending long tech-free evenings in hotel rooms, I have been catching up on a little hand patchwork. I mean, English Paper Piecing is probably the furthest thing from my usual tech-heavy evenings when I’m away form home. It’s lovely to work on something with no real brief, no deadline, no real objective other than to simply sew for the sake of sewing. So, I’ve been (slowly) piecing together this rainbow mini quilt. As much as it pains me to pack it away, I have resisted the urge to finish this up now that I’m home and have stowed it away to work on later in the week when I head off to Glasgow.
 This brief week at home has bee a flurry of catching up on emails, working over business admin (yawn) and cleaning the decks to work on a very fun commission. Nothing like a bit of nail art to brighten your mood, is there?
 The week ahead is to be filled with packing and preparing for my next trip – and of course, getting in as much face time with this little dude!
 Later this week I’ll be heading to Birmingham for the Sewing for Pleasure show at the NEC – are you coming along? I’ll be teaching some fun sewing skills in the mini makes workshops for The Vilene Sewing Club - if you are heading to the show, be sure to swing in past and say Hi!
The post The Week That Was: Home – briefly appeared first on Made Peachy.
March 11, 2015
Stitching, Sewing & Hobbycrafts – London Ticket Winners!
Hello folks! I’m finally back in the land of internet access! I had a blast in Glasgow, meeting some pretty rad folks! Now, I’m only really touching down at home – just long enough to get some laundry done and catch up on some long over due emails – before I’m heading off to the Sewing For Pleasure Show at the NEC next week!
It really is all go here! My head is actually spinning!
But, before I get too caught up in all catch-up tasks, it’s the time to announce the winners of the ticket Giveaway for the Stitching, Sewing & Hobbycrafts show at ExCel London!
 Congratulations!
Lynn
Anne
Lauren Hawkins
Jenny C
Amy

A big thank you to everyone that entered – it’s going to be a rad one!
Are you heading to any of the creative hobby & textile shows this year? Check out the events I’m attending and let me know if you’ll be there!
♥ – ♥ – ♥
Stitching, Sewing & Hobbycrafts with Fashion & Embroidery
ExCeL, London 27-29 March 2015 10am – 5pm
Ticket Prices:
Adult £10.00 (£8.00 Advance Price)
Senior £9.00 (£7.00 Advance Price)
Children free if accompanied by an adult with a valid ticket, otherwise £5.00
All advanced tickets are available online and need to be ordered by 5pm Monday 23rd March 2015
Picture © Daniel Graves Photography
The post Stitching, Sewing & Hobbycrafts – London Ticket Winners! appeared first on Made Peachy.
March 3, 2015
Pinterest: What They Did With Spring Cleaning Printables
This oh-so beautiful printable, £3.34 from Printable Wisdom would fit in perfectly in our home right now!
I’m guessing because I won’t be home much this month, but I have that overwhelming urge to clear out, clean and organise my little home!
There is something so satisfying about spring cleaning – or, the results of spring cleaning, to be more precise! I get that the thought of getting stuck in is more than a little bit overwhelming, so here are a few fun and motivational Spring Cleaning Printables from Pinterest to get you in the mood for a cleaning frenzy!
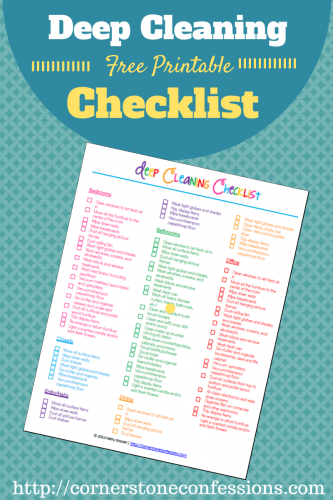 1 Deep Cleaning Printables ⇒ Cornerstone Confessions
 2 Reusable Spring Cleaning Check List ⇒ Craftaholics Anonymous
 3 The Ultimate Spring Clean Checklist ⇒ Snippets & Ink
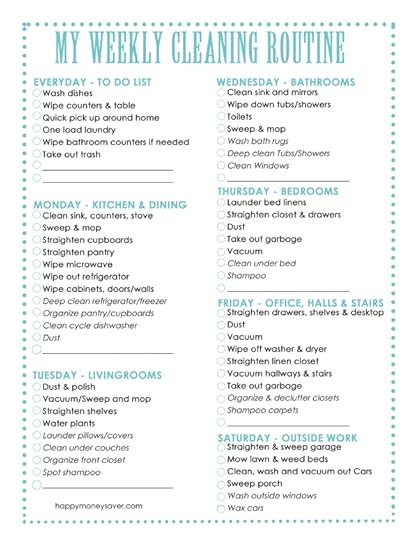 4 Happy Home Weekly Cleaning Routine ⇒ Happy Money Savers

 5 Printable Spring Cleaning Power Plan ⇒ Made Peachy Archives
 6 30 Day Spring Cleaning Challenge ⇒ Pop Sugar
If only pinning about spring cleaning would get the chore done – I would have a spotless home by now for sure! See what else I’m pinning right now!
 One of my main cleaning hurdles is the amount of creative clutter – sewing, knitting, crafting supplies are always in abundance in thous house – be sure to check out these tips for beating creative clutter!
Happy cleaning & organising folks!
The post Pinterest: What They Did With Spring Cleaning Printables appeared first on Made Peachy.
March 2, 2015
Hello March 2015!
It’s March and I’m more than late to the party with this month – in fact this entire year so far seems to have flown by at a rate of knots and I barely know where it has gone!
The last few months have been bursting at the seams with work, work, work. But, I’m happy to say that in the last couple of weeks I have been managing to sneak in some fresh new personal projects. I have finished up my very own Caponcho – and let me tell you this is the best garment for chilly springtime and I won’t be taking it off anytime soon!
Well the first part of this year have been working like a crazed thing on a secret project – which I’m happy to say that it’s not all that secret any more.
Friends, I have a new book coming out later this year….
 Modern Granny Square Crochet & More, £12.99, CICO Books will be on sale in early September! I am so stoked to finally be able to speak about this project! I had such a blast making the collection of projects for this book – it was a long and hard process that really tested my motivation, discipline and enthusiasm, but I’m so so happy and proud to be working over the final details of this book and getting it ready for print!
 While I’m talking about books – Thank you all for your kind words and support of my Arm Knitting Book, £12.99, CICO Books which came out earlier this year. Have you tried arm knitting? Have you made any projects? I’d love to hear about what you’ve been making – and, it would be awesome if you could leave a review on Amazon too!
Want to try arm knitting – then be sure to check out my arm knitting tutorial for CICO Books over on YouTube!
 So, what can I tell you about the month ahead? Well, for the most part I will be on the road touring with The Vilene Sewing Club and sharing a few fun mini make projects (for those not able to come along, I’ll be sharing the how-to guides here after the shows are finished!).
 To keep myself out of trouble and sane over the next few weeks on the road, I’ve decided that a mini hexi project is the perfect on-the-go make for me – so let’s see how this grows in my down time between workshops over the coming weeks!
Be sure to let me know if you’re coming along to any of the springtime shows - and do swing in past The Vilene Sewing Club to say Hi!
So, friends, what does march have in store for you?
The post Hello March 2015! appeared first on Made Peachy.
March 1, 2015
The Week That Was: Workshop Prep
Holy Rotary Cutter Batman!
 For the last seven days (and most evenings!) I have been chained to my rotary cutter and mat getting ready for my upcoming workshop schedules for the Vilene Sewing Club!
I’ll be packing up my bags and getting ready to hit the road for a three stop tour of the country- first port of call, Glasgow!
The Stitching, Sewing & Quilting Show: 5 – 8 March, SECC, Glasgow
Come along and attend the FREE Vilene Sewing Club Workshops discover new skills with these fun make and take sessions – perfect for beginners and stitching fans alike!
Sewing For Pleasure: 19 – 22 March, NEC, Birmingham
Vilene Sewing Club Workshops
Stitching, Sewing & Hobbycrafts: 27 – 29 March, ExCel, London
Vilene Sewing Club Workshops
The workshops are going to be a heap of fun this year – the projects are pretty cute, even if I do say so myself!
 If you’re coming along to the show at Glasgow, here is the schedule for the daily Vilene Sewing Club Workshops…
10.15am KNOTTED HEADBAND Create your own vintage style hair accessory with this beginner-friendly workshop ideal for sewing machine novices.
11.30am BANDANA BABY BIB Learn how to work with a simple pattern to create your own soft fabric baby bib.
12.45pm FABRIC KEY FOB Discover how to make the most of fabric scraps with this quick and easy key fob project.
2.00pm QUICK ZIP COSMETIC PURSE Purse making made simple – learn to create your own cosmetic case with a clever exposed lace zip.
3.15pm RETRO STYLE BOW BELT Finish your look with this quick and easy bow accent belt in this beginner-friendly workshop.
Want to get making right away? Be sure to check out these Vilene Sewing Club How-To Guides from last year’s events for making your own Peter Pan Collar, Every Day Purse, Simple Baby Bib, Ribbon-Tie Sleep Mask and Log Cabin Pot Holder!
Don’t fret if you can’t attend any of this year’s Vilene Sewing Club Workshops – I’ll be sharing all the patterns and How-To Guides after the events!
The post The Week That Was: Workshop Prep appeared first on Made Peachy.
February 26, 2015
Fab Fabrics: Athena by Angela Walters
I get very excited when new fabrics make there way to me here at PeachyHQ there is nothing more inspiring then a fresh selection of prints to really give your creative brain a shake up. I mean we’ve all been there, slap bang in the middle of a creative slump and then – whammo – new materials arrive and you are instantly filled with a whole new passion and more ideas for makes than there are hours in the day!
My creative slump has come in the form of wanting to create some new clothes for myself, but not finding the perfect fabrics to team with my fave new sewing patterns. That all changed when I got my hands on this oh-so-wearable collection by Angela Walters!
 It’s as though Angela has asked me personally what are my favourite shades of the moment – navy, gold and cream and created a collection just for me! Taking inspiration from classic Greek architecture, these fabrics have a very grown up kind of pretty – the kind of fabrics that will make the dress that you can’t wait to be seen stepping out in!
I can’t see past turning these prints into frocks, tops and accessories to pack out my wardrobe ready for the new season – be sure to check out the check out the Athena LookBook for inspiration for garments by the plenty, quilts, cushions and more! These stunning print cottons retail at around £12.50 per metre – seek them out from your local stockist!
I’m crushing hard on these designs for garments and accessories – what are they inspiring you to make, quilts, cushions, frocks or something else?
The post Fab Fabrics: Athena by Angela Walters appeared first on Made Peachy.
February 25, 2015
Guest Post: Cute Kitty Stitched Coasters
Calling all cat lovers! How about a fun stitching project that will brighten your afternoon tea break? Today Katie Norris, designer at Baker Ross is sharing this fun project so you can stitch up your own set of purrfect coasters; they make a brilliant gift for tea or coffee lovers!
 Grab your supplies…
Coloured Felt Value Pack
Scissors
Embroidery Thread Value Pack
Needle
Wadding/Stuffing
 Cute Kitty Stitched Coasters
1 Download and print the template provided. Trace two body shapes and two head shapes onto black felt and cut out. Trace two blue eyes onto blue felt, all ear/paw pad/nose pieces onto pink felt, and tail tip/nose shape/white paws onto white felt and cut out.
2 Start by stitching the two pink ear pieces to the ears on one head piece. Then stitch the white nose shape to the head piece, using the picture or template illustration as a guide. Sew the pink triangle nose centrally to the white nose shape, as shown.
3 Stitch a blue eye either side of the white nose shape, then stitch a little white spot in each eye by repeatedly stitching over the same area; use the picture as a guide. Sew a mouth using black embroidery thread. Put this head piece to one side for a moment. Stitch white paw pads to the corresponding front paws of one body shape using white thread.
4 Stitch circular pink paw pads centrally to the back paws with pink thread, then sew the white tail tip to the tail, as shown, with white thread. Add claw details to the front paws with black thread, using the picture as a guide.
5 Take the second body piece and match with the first, ensuring the embellished body piece is on top with paws/tail tip etc facing upwards. Make sure both pieces line up properly, then stitch together around the outside edges.
6 Now take your embellished head piece and match up with the second, plain head piece, ensuring the embellished shape is on top with all detail facing upwards. Make sure both shapes line up properly, then stitch together around the edges, leaving a gap big enough for the wadding.
7 Push wadding through the gap until there is enough inside, then stitch the gap closed. Secure the bottom edge of the head to the edge of the body, as shown, so that it sits upright when a mug or cup is placed on it.
8 Make the Blue Cat Coaster in the same way, adding details to one body piece and head piece first before stitching the coaster together.
 Orange Kitty Cat Coaster
1 The orange cat coaster is created in the same way as the Blue Cat and Black Cat coasters, with a few slight differences. There are additional paw and tummy panels for this design, all of which need to be stitched onto a main body piece before the two body panels are sewn together. The head is attached facing the opposite direction to the other designs, as shown.
 Top Tip
Stitching two body panels together gives the coaster extra stiffness, ensuring it’s sturdy and holds its shape!
♥ – ♥ – ♥
Baker Ross is a family owned and run business specialising in a wide range of arts and crafts supplies for kids and is one of the leading suppliers of creative suppliers to schools, playgroups and organisations in the UK! Be sure to check out the wide range of materials available in the extensive catalogue, or get some fresh inspiration for more projects, like these Cute Kitty Coasters, in the Create It Handicrafts Gallery!
The post Guest Post: Cute Kitty Stitched Coasters appeared first on Made Peachy.
February 24, 2015
Pinterst: What The Did With…Negative Space Mani
Short on time needn’t mean short on style – nope, friends, the negative space mani is the busy girl’s answer to looking polished when time is not on your side!
Simple, yet highly effective, this clever nail art trend is one that is great to experiment with – mask off sections, paint, add dots, finish with a glossy top coat or sweep with a matte finish to complete your own personal style.
I’m all for experimenting with new nail art designs check out these stylish Negative Nail Art Manis on Pinterest to inspire your next look!
 1 DIY Colour Block & Dots ⇒ Check out this colourful design from Made Peachy Archives!
 2 Negative Space Chevrons ⇒ Lulus
 3 Pastel Stripes ⇒ SoNailicious
 4 Duo Point Mani ⇒ Check out this glitzy mani from the Made Peachy Archives!
 5 Negative Space Flowers ⇒ Divine Caroline
 6 Negative Space Mosaic ⇒ Nail It Good
These are just a few of the amazing 5minute mani ideas I’ve been crushing on lately, be sure to check out I’m pinning right now!
The post Pinterst: What The Did With…Negative Space Mani appeared first on Made Peachy.
February 23, 2015
Stitching, Sewing & Hobbycrafts – London Tickets Giveaway!
You guys! It’s almost time for The Vilene Sewing Club again!
I’m prepping my workshop supplies and getting myself ready to pack up and head off for the first in a three-stop tour of the country with The Vilene Sewing Club! The third and final stop is much closer to home for me and I’m stoked to be able to offer you guys the chance to come along to The Stitching, Sewing & Hobbycrafts show at ExCel London on the 27 – 29 March!!
 So, you fancy coming along? I have ten pairs of tickets up for grabs for 10 lucky Made Peachy readers! Friends, here’s how you can enter this giveaway!
 Easy! There are a number of ways you can enter this Stitching, Sewing & Hobbycrafts Show Tickets giveaway – and the best part is each one will be counted as 1 entry…so, do all three and you will be entered three times – neat huh?!
1 Please leave a comment below sharing why you’d love to go to the Stitching, Sewing & Hobbycrafts Show
2 Share this post on Twitter, tagging @madepeachy and using the hashtag #SSHGiveawayMadePeachy
3 Give the MadePeachy Facebook page a like, share the giveaway post and leave a comment on why you’d love to win!
Want a bonus entry? Then head over to the MadePeachy Instagram, follow and give the Spring Knitting & Stitching Show post a like & comment!
The not-so-small print! The giveaway is open to UK entrants only – due to the show location. The ten winners will be pick at random and announced on the 5 March - Good Luck!
♥ – ♥ – ♥
Stitching, Sewing & Hobbycrafts with Fashion & Embroidery
ExCeL, London 27-29 March 2015 10am – 5pm
Ticket Prices:
Adult £10.00 (£8.00 Advance Price)
Senior £9.00 (£7.00 Advance Price)
Children free if accompanied by an adult with a valid ticket, otherwise £5.00
All advanced tickets are available online and need to be ordered by 5pm Monday 23rd March 2015
Picture © Daniel Graves Photography
The post Stitching, Sewing & Hobbycrafts – London Tickets Giveaway! appeared first on Made Peachy.


