
Laura Strutt's Blog, page 27
July 9, 2014
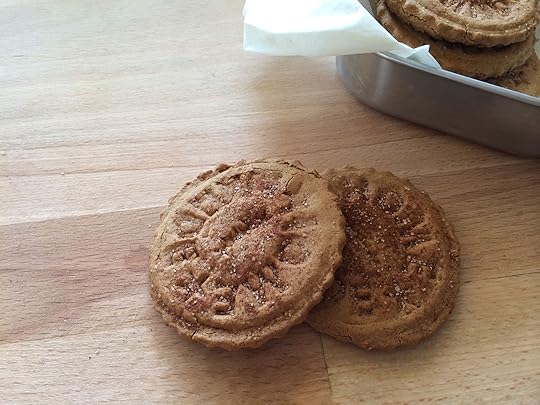
Campfire Cookies
Despite the fact that the work is stacking up into a huge heap that feels like it might come crashing down around my ears, we’re planning a camping trip. Yup! Sometimes you just need to ensure that there is enough, well, living in your life right?
So, I;ve been spending the last few days dreaming about campfires, marshmallows, drinking tea from tin mugs and spending some time with friends in the great outdoors. Camping is either your idea of heaven or hell when it comes to a mini-getaway. I think it is sheer bliss!
Part of the fun of a quick getaway is the planning and preparation. It’s the thinking about the day trips, deciding what to take, hunting out a deck of playing cards! I can’t help but think about toasting marshmallows on the fire and wanted to make some fresh cookies to bring along on the trips to enjoy with hot chocolate and marshmallows, or to make into delicious S’mores. So, I’ve been playing about in the kitchen and have come up with this recipe for tasty Campfire Cookies – I’ve called them this because they are not too sweet – so they wont be overkill with a mug of hot chocolate, they rare not too chewy so they will team perfectly with toasted marshmallows by the fire. So, here are my Campfire Cookies!
 Grab your supplies…
4oz (113g) wholemeal flour
6oz (170g) plain flour
2oz (55g) light brown sugar
1 heaped teaspoon of cinnamon
1 teaspoon baking soda
1/4 teaspoon salt
2 tablespoons runny honey
2 tablespoons treacle
Water (as needed)
Icing sugar for dusting
Topping (optional)
1 teaspoon white sugar
1 teaspoon cinnamon
Yield (approximately) 30 cookies
Into a mixer bowl blend together all of the dried ingredients before cubing the butter and adding to combine.
Spoon in the honey and treacle and mix together, adding in water by the spoonful to create a soft, yet not sticky dough.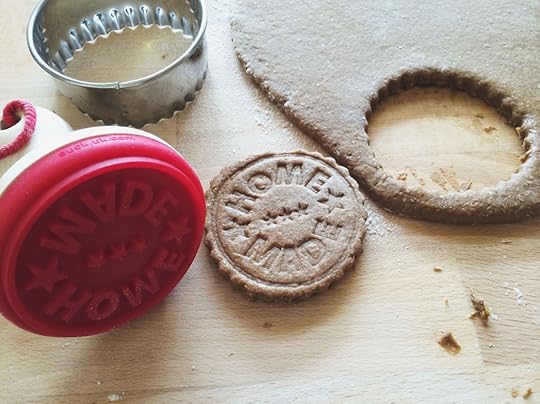 Roll the dough out onto a surface lightly dusted with icing sugar and roll out to 5mm thick, use a cookie cutter to cut out the cookies. And, if you’re feeling fancy like me, use a cute cookie stamp too!
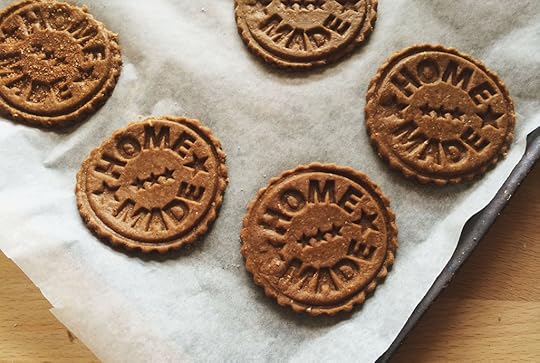 Sprinkle with a mix of white sugar and cinnamon and bake in a pre-heated over at 170C (150C for fan assisted) for 10-12minutes until the cookies are crisp and place on a wire rack to cool.
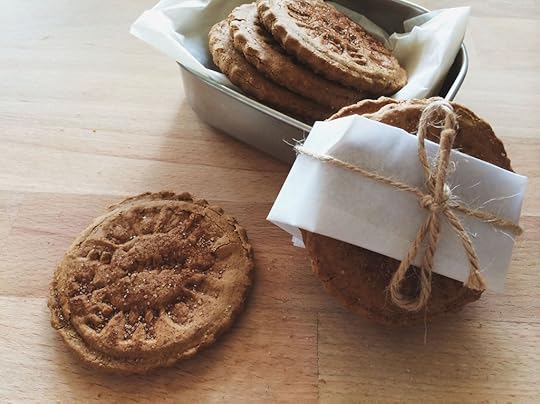 Now, all that is left to pack up and head to the nearest campsite! Here’s to steaming mugs of hot cocoa, S’mores and toasted marshmallows!
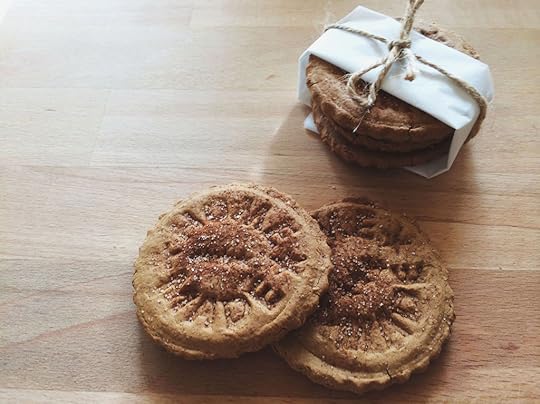 Delicious!
The post Campfire Cookies appeared first on Made Peachy.


July 8, 2014
Country Baskets Summer Wedding Challenge
When the sweet folks over at Country Baskets - the home of online supplies of artificial flowers, trimmings, ribbons and all manner of fancies for party and celebration decorations asked if I wanted to take part in a Summer Wedding Challenge, I said Yes! Of course I did. What’s not to love about summertime weddings, am I right?
Last week an amazing hamper of goodies arrived at Peachy HQ – I m talking ribbons, trims, elegant blooms and an entire galaxy of sparkles. As I have a current obsession with Calligraphy and lettering (you may have noticed!) I instantly knew that I wanted to use these sweet little place cards to make some striking table decorations!
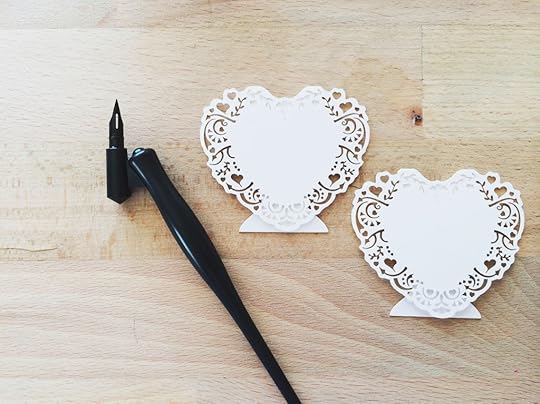 Vintage Romance Laser Cut Heart Free Standing Place Cards, Pack of 10, £3.77
So, here’s my howe to guide to create DIY Floral & Lace Jar Place Setting
Grab your supplies…
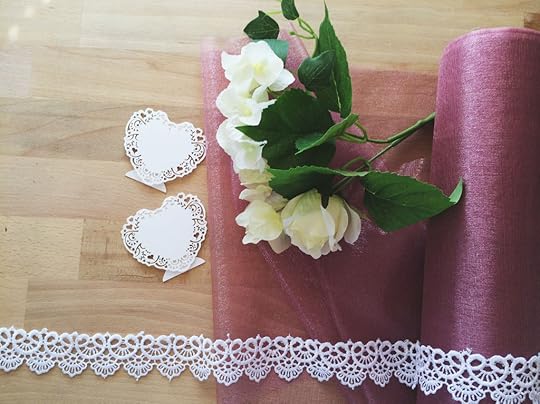
Pack of Vintage Romance Heart Place Setting Cards
Calligraphy pen & ink (Check out my fave beginners supplies here!)
Glass jars
Bunch of artificial flowers
Scalloped lace trimming
Organza
Hot glue or super glue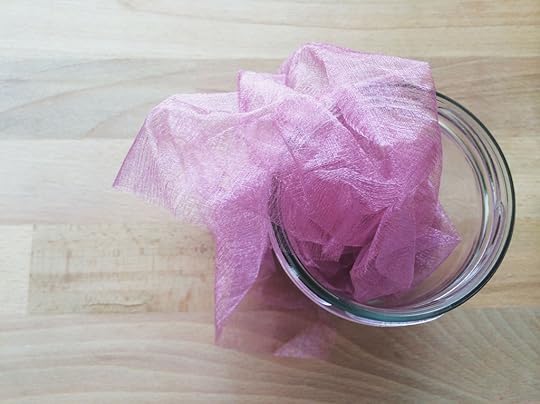 Cut a generous length of organza from the roll and begin to stuff into the jar. Scrunch and crush the organza into fill the jar with colour and provide a base to arrange the flowers.
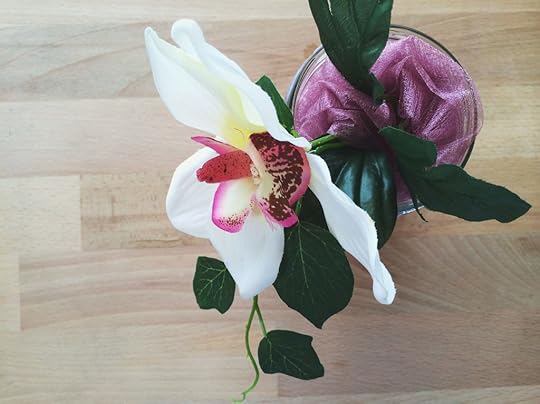 Insert a single artificial bloom into the centre, ensuring that the stem section is covered with the organza. The stems of the flowers are pretty flexible, so you can move and position them exactly as you wash to create the finished design.
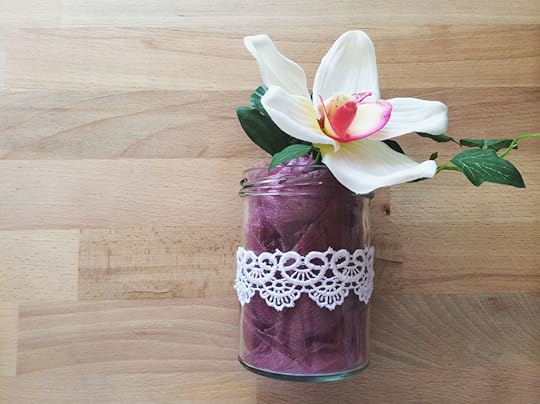 Cut a length of the scalloped lace trim, long enough to wrap around the centre of the jar with a 2cm over lap. Secure in place with a few desecrate dabs of hot glue.
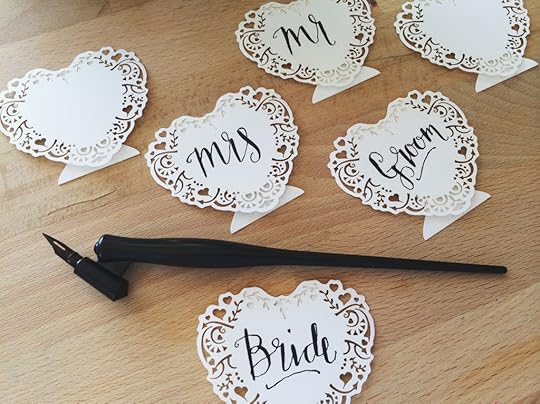 Use the calligraphy supplies – or even a letter stamp and ink pad set, if you prefer – to add the names to each of the place cards. If (like me!) you’re just starting out in calligraphy, sketch the words onto the place cards first in pencil to help you to get neat and elegant lettering – be sure to let the ink fully dry before erasing the pencil lines!
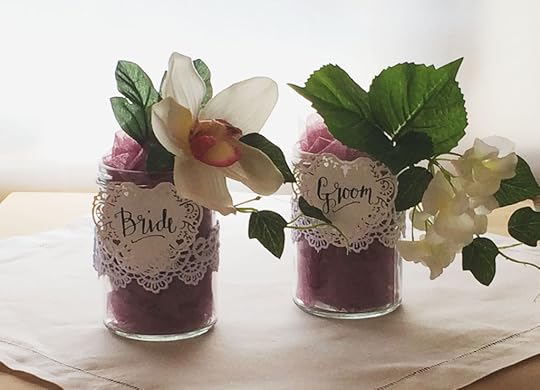 Insert the tab of the place card into the ribbon – and use a couple of small dabs of hot glue to secure it into position.
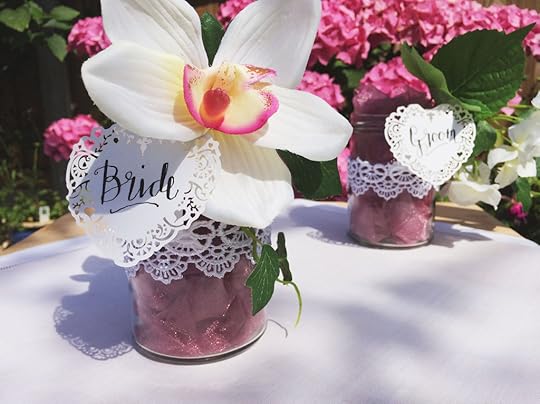 Add to your wedding table and enjoy, enjoy, enjoy!
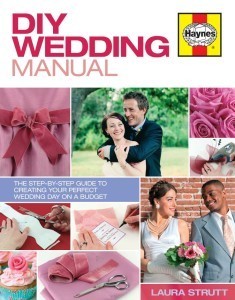 I think we all know how I feel about DIY weddings, don’t we?! In fact, I have shared heaps of sweet little makes, planning tips and other useful information about planing your Big Day on a budget in my book The DIY Wedding Manual – it’s on sale now for all you sweet love birds out there!
♥ – ♥ – ♥
All products featured c/o Country Baskets as part of the Summer Wedding Challenge - Country Baskets are suppliers of artificial flowers, ribbons, trimmings and party & occasion essentials. View the whole range online or at one of the 7 stores nationwide! Visit their blog or check out their Lookbooks for more inspiration or sign up for a a Green Card Membership to gain access to a host of special benefits!
The post Country Baskets Summer Wedding Challenge appeared first on Made Peachy.
July 7, 2014
Starting Calligraphy: Stocking up on Supplies
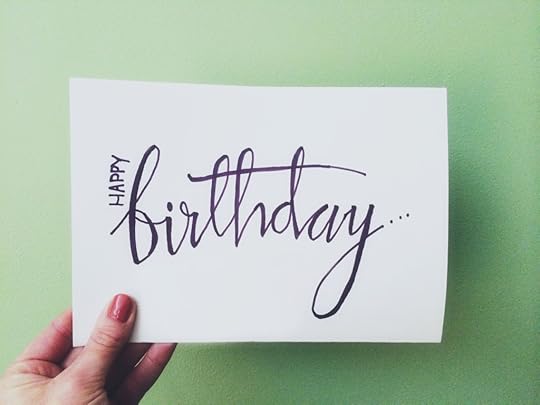
I think that it is safe to say when I get an idea in my head, I usually like to go for it. But, very rarely do I go so all out that it is virtually all I can think about. Well, I mentioned at the start of July (which, weirdly already feels like weeks ago!) that I wanted to learn a new skill. And, in just a few short days, I have become completely and utterly besotted with modern calligraphy!
For the longest time I have been stalking out the Instagram feeds of some super talented calligraphers, fawning over their amazing scripts and lettering. As a girl with perhaps the scrappiest daily handwriting on the planet, I always thought that such striking handwriting was just something that was always going to be beyond my reach. Then I realised how many times I have said to folks in my stitching workshops, “you don’t know if you’ll enjoy it or what you can achieve if you don’t try!” Yes! I say that to so many people that tell me they’s love to sew but they aren’t very creative/don’t have much free time/are scared to use a sewing machine. And, yes, it is about time I took a dose of my own medicine – if that theory is good enough for others then its good enough for me!
 I decided that I would give it a go! I mean really what do I have to loose? Nothing. Nada. Zip. So, decided to set aside half an hour each day to work on some calligraphy drills, letter forms and work construction and see if this is something that I might – one day – be able to master.
I had no idea when I set myself this little creative task, just how addictive this learning process would be. In all honesty I had expected that I would be spending months and months trying to get to grips with the pen and ink, forcing myself to be disciplined enough to repeat countless penmanship drills each day. But, far from it. The half an hour I had set aside to work on my first practise session soon ran in to an hour…then two…then I was hooked!
I think about working on my lettering almost every minute of every day – whenever I find I have a spare few moments, I find myself with my pen in hand working on a couple of words or letter shapes. I never for a second thought that the process of learning calligraphy would be so enjoyable – I had always assumed that the learning phase would be dull, require lots of effort and would be perpetually counting down to the day that I could say that I had finally mastered it and could let the real fun begin!
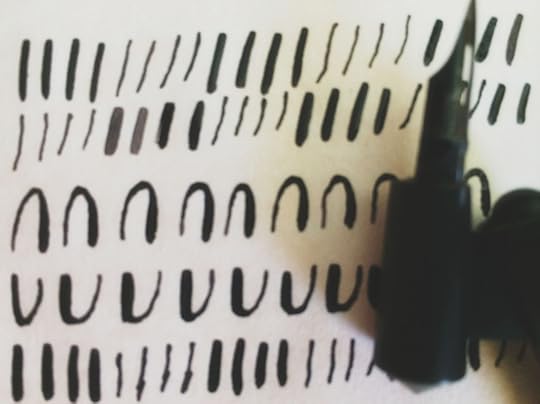
Ha! Was I ever a fool on that front! I started out just using an italic tipped fountain pen that I’ve had for close to two decades in my pencil case (and it’s barely seen the light of day!) and I soon realised that the results I wanted to achieve might need more specialist supplies. I am not one for suggesting that you shell out a fortune on new supplies for a new hobby that you have no clue whether you’ll enjoy or even want to continue in a weeks time so I set a budget of £10 and got hunting down some entry level tools. As soon as these arrived the letter practice and drills that I had been painstaking working on suddenly made a heap more sense (after all these were designed with a dip pen in mind!) So, I thought that I would share the beginners calligraphy supplies I’ve stocked up on, because trust me, as a complete novice, these are a real game changer!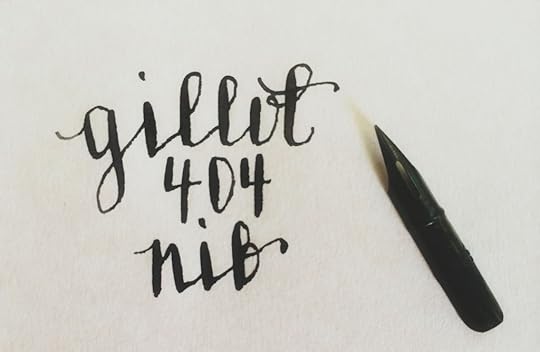 It’s all in the nib. Seems obvious to me now, but it didn’t dawn on me that the fine lines and contrasting deep swells created in copperplate lettering were created with the use of a fine, yet flexible nib. The Gillot 404 nib is recommended on a number of essential resources for beginners classes and courses online – so this is where I decided to start. This nib his a very fine point for drawing out the super thin lines of the upper sections of the letters, yet is is so flexible that when pressure is applied you are able to create dramatic sweeping lines that form the lower part of the letter. Instantly, my letter forms were transformed.
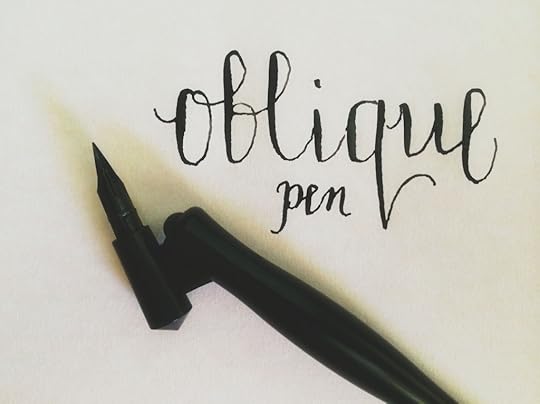 A little more research into supplies brought me to the oblique pen holder. This strange jointed pen holder looks like more of a torture device than a writing tool. But, this is all part of the magic! The angle at which the nib is held in the pen holder allows it to come into contact with the paper at just the right angle to enhance the swirling fluid shapes of copperplate lettering. Neat, huh? I know what you’re thinking – that can’t be comfortable to use! Quite the opposite in fact! The curved shape of the pen holder fits neatly into your hand and the joined section sits comfortably to the side. I say this as a right-handed person who usually holds the pen in between my thumb and middle finger with the index finger resting on, or curled over the top of the pen to support it. The oblique penholder not only helped me to find the correct position of the nib on the paper but to also grip the pen in the correct place and with the correct amount of pressure – which is surprisingly less that you think it would be!
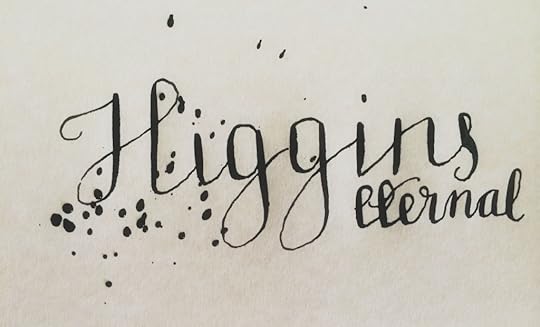 There are hundreds of inks to choose from, and I am sure that this will be something that I will be spending a lot of my pocket money on in future. But, in the interest of keeping things in check I decided to opt for a a classic black ink. There is a lot out there to read up on for the different qualities of inks and their suitabilities for different styles of calligraphy and papers – and don’t even get me into all the different colours and finished available! After much debate (and having to force myself to pick only one as a starting point!) I opted for Higgins Eternal Ink as this has the perfect consistency for use with dip pens and for creating those dramatic contrasting strokes seen in copperplate lettering styles. And black goes with everything, right!
Virtual basket full. Grand total of £8.74 and I’m good to go!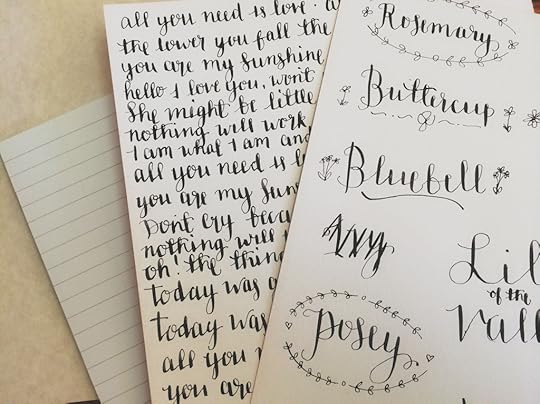 A number of dedicated calligraphy sites suggested beginners work with standard printer paper as a cheaper way to get practising, marking out lines and guides with a pencil and ruler. Perhaps I have the wrong type of printer paper – as this turned into a huge mess of bleeding inks for me. Back to the drawing board (!) and armed with a ream of craft papers, cards, notebooks and scrapbooking supplies (conveniently all stowed in the studio!) I was back in business!
 I still have a long way to go, but the satisfaction on seeing these small improvements through using a selection of more suitable tools has really spurred me on. I never thought that this would be come such a compelling craft for me! Now, just to find a calligraphy ink-friendly sketch book so that I can keep all my practise works in one place and really track and build on my progress! Any calligraphers or artists out there with a fave brand or recommendation – be sure to share your sketch book suggestions in the comments!
The post Starting Calligraphy: Stocking up on Supplies appeared first on Made Peachy.
July 6, 2014
The Week That Was: Hanging out with Pat Bravo!
Every now and again I get to head out into the big wide world in the name of work and I get to meet some pretty rad people and go to some pretty cool places!
Last week I was invited by the wonderful folks over at Hantex to The Custard Factory at Birmingham to demonstrate some of the projects that you can make using the Vilene products and the ranges of amazing collections of Art Gallery Fabrics. Sometimes I can’t even believe that his is real life, I mean, seriously, what an awesome way to spend a Friday! And, how cool is The Custard Factory? I didn’t have nearly enough time to explore it all, but wow, there was some rad indie boutique stores, artworks and rad graffiti! Pat Bravo is one inspiring lady – she own’s one of the most innovative fabric companies in the world, she designs breath-taking fabrics and she driven to inspire and empower those around her, from business owners to hobby stitchers, indie-designers to bloggers. My friends, Pat is a true power house!
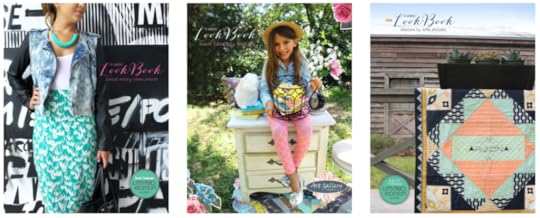
 Here’s something that you might not already know…each of the amazing collections from Art Gallery Fabrics comes with a digital Lookbook that is packed with inspiration – I’m talking quilting designs, accessories, garments – you name it, they’ve stitched it.
 So, now you’ll never be stuck in that place where you are surrounded with fabrics that you feel are too beautiful to begin cutting because you can’t visualise what they can become!
 Want to learn another exciting fact about the collections from Art Gallery Fabrics? Well, I’m gonna tell you, because this is rad! The fabric designs that are featured in the collections are repeatedly reprinted (with the exception of the AGF Limited Edition collections…but, I’ll get to that in a minute…so, hang tight!) What’s the big deal about reprinting the designs you say?
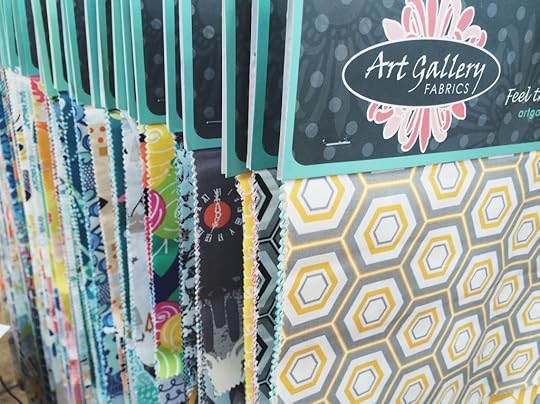 Well, unlike many other fabric houses, where fabric designs are printed once and one only, meaning that when the fabric has sold out, its discontinued, gone forever, no more. We all know that feeling only too well…you find that perfect dress you’ve been dying to make over on Pinterest, chasing high and low to find the fabric to make it for yourself, only to realise that you’re outta luck – the print was discontinued years ago! See, reprinting makes sense! It means that you will always be able to get hold of your favourite print - this for me is epic news, news that should probably put my fabric hoarding ways to rest!
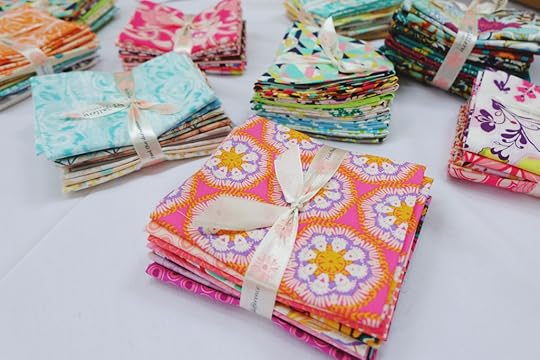
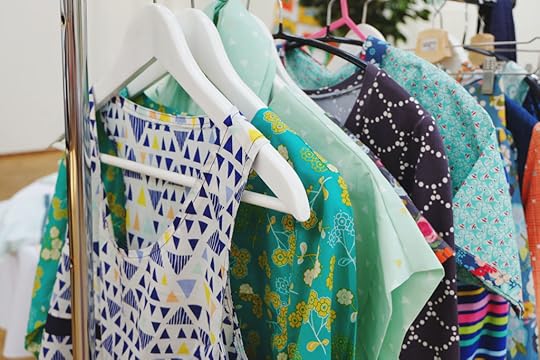 One of the most exciting things bout being able to take part in these fabulous press and trade events – aside from meeting up with so many awesome folks – is getting to see first hand the new collections. The phrase kid in a candy shop springs to mind! Not only were there samples of the new Voile and Knit fabrics (which I for one can’t wait to get stitching with!) there was also a whole collection of AGF Limited Edition Fabrics.
 These collections are a touch of genius – unlike the main collections, these are created in limited volumes by fresh new designers. Why am I so excited by these fabrics? Because I know these designers! OK, I don’t know them, know them…like we don’t hang out and drink lattes (I wish!) but I follow their blogs, so I feel like I know them! Say Hi to SewCaroline, SaraLawson & AprilRhodes!
These new Limited Edition Collections are amazing – so amazing! Y’all should check them out!
This has to be one of the biggest perks of the job right here – I just wish y’all could have come along and shared in the fun! So, by way of a little treat you sweet folks, I have one bundle of delicious fat quarters from Rapture designed by Pat Bravo herself up for grabs for one lucky Made Peachy Reader!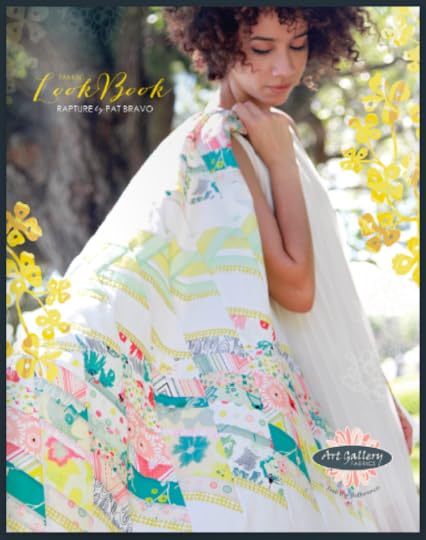 Trust me, you want to get your hands on this bundle that is for hot-damn sure – Check out the Raputre Lookbook and see for yourself!
1 Please leave a comment below sharing what you’d make this this glorious bundle of fabrics!
2 Share this post on Twitter, tagging @madepeachy and using the hashtag #AGFMadePeachy
3 Give the MadePeachy Facebook page a like, share the giveaway post and leave a comment on why you’d love to win!
Want a bonus entry? Then head over to the MadePeachy Instagram , follow and give the ArtGalleryFabrics post a like & comment!
The giveaway is open to everyone – if you have a postal address, no matter where in the world, you can enter! Yay for international prizes! The winner will be pick at random and announced on the 14 July - Good Luck!
The post The Week That Was: Hanging out with Pat Bravo! appeared first on Made Peachy.
July 5, 2014
Style Sunday: The Skort
The skirt is a thing. And, it’s not the sound you make when you’re choking on a mouthful of pop! This is a real life garment.
If you’ve never met one before, lemme introduce you! This cute Makeup Mavern Skort, £23.30 (currently with 50% off – at £11.65!) is the perfect example. The Skort is a pair of shorts with a skirt-style flap that crosses over the front to give the appearance of a skirt. Great for is you want to wear a super mini shirt but are keen to preserve a little modesty. It is both edgy and cute at the same time. Double Win! Essentially, what I am saying is that the Skort is the fashion result of a pair of short-cut shorts and a super mini skirt having a lovechild.
I know that little image will be sure to have got you interested…so here’s today’s Style Sunday The Skort mood board!
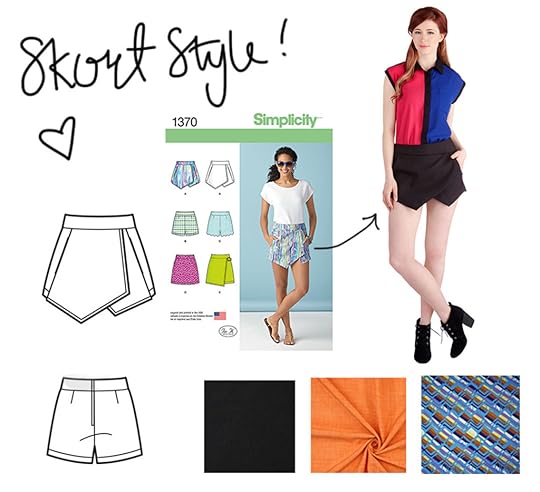 The Pattern
Simplicity 1370, sizes 4 – 20, £8.15 SimplicityNewLook
This asymmetric skirt design features pockets and a neat zip fastening in the back. Select Design A for the scalloped front overlay skirt variation.
The Fabrics
Black polycotton, £3.99 per meter, C&HFabrics
Orange polyweave, £4.05 per meter, MyFabrics
Blue Zig Zag cotton, £9.99 per metre, DittoFabrics
So, what do you think of the Skort – do you have a pair of these in your summertime wardrobe, or fancy stitching up a pair?
The post Style Sunday: The Skort appeared first on Made Peachy.
July 4, 2014
Mini Taggie Quilts
Sometimes you want to just work on something small, simple and satisfying – am I right?
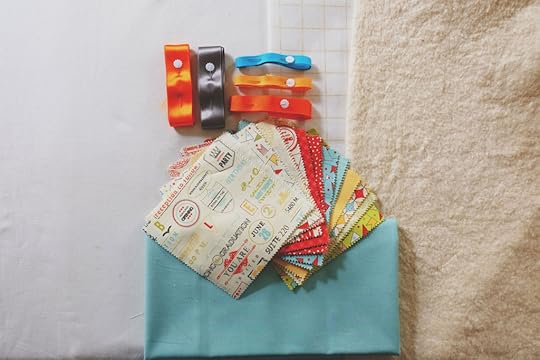 Little baby quilts are sweet and so much fun to make, so when Sewing World magazine asked if I could whizz up something a little lovely for their latest issue I just couldn’t resist! You can get the easy step-by-step for this project in issue 220 of Sewing World magazine.
Ribbon taggies make pretty sweet lifts for new babies – so if you’re looking for something to gift to a new arrival then a taggie quits is a brilliant choice! 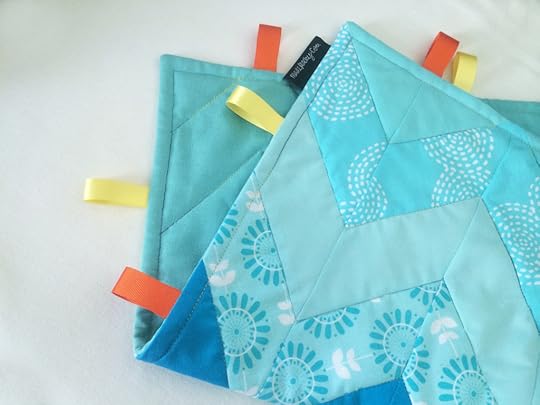 Or, if you’d like something a little more dramatic check out this design using a Simply Solids Stash Bundle – you can find the whole step-by-step over at the Sewing Directory!
This mini quilt uses Vilene Quilters Grid (I know that some of y’all quilters think that this is a bit of a cheat!) but this is a great way to get the precise and neat seams that give these small quilts their professional finish!
Speaking of mini quilts…I’ve been spending a lot (probably more than is heathy!) looking at mini quilts on blogs and Instagram. It amazes me how many folks can create dramatic, stunning and eye-catching designs in such a small space. The next few weeks I’m going to be elbow deep (you have no idea just how accurate that statement is!) in the second deadline for a large project and quilting should be the furthest thing from my mind. But, as with everything in life, you tell yourself you can’t do it or have it and it is the very first thing you want to do!
I’m going to see if I can squeeze in a couple of fun mini quilts between now and Festival of Quilts in August – speaking of FOQ…who is coming along?
The post Mini Taggie Quilts appeared first on Made Peachy.
July 3, 2014
Mollie Makes Wedding Giveaway Winners!
Happy Friday Y’all!
The weekend is right around the corner – I can hardly wait…mostly because I have a whole new bundle of calligraphy supplies arriving and I plan on dedicating some time to getting lovely lettering down! (And, yes, I really do need another creative hobby, I really and truly do!)
Thank you all for getting involved with the Mollie Makes Weddings giveaway last week – so many sweet entries and so many soon-to-be-brides! Now is the time to announce the winners…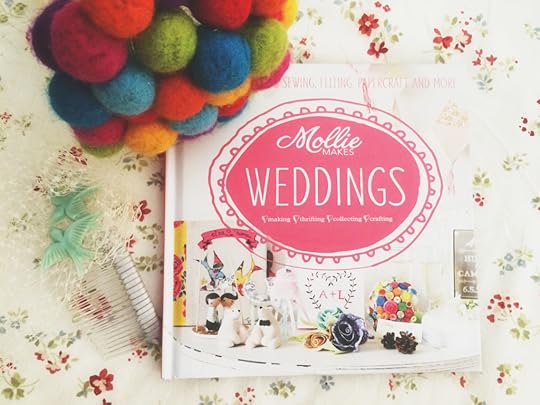
CONGRATULATIONS
HANNAH C
FIONA JOHNSTONE
Be sure to email over your postal addresses so we can get this beautiful wedding book out to you!
I’m sorry that there can’t be more winners – this sure is one stunning book, packed with so many amazing makes to transform your wedding day. 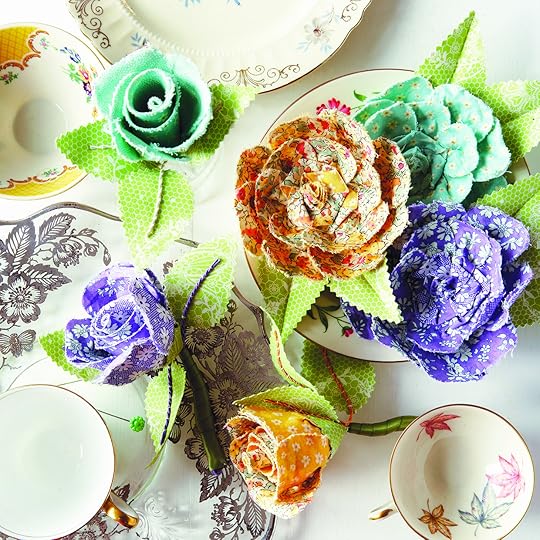 But, don’t just take my word for it…get your hands on one of the exclusive projects today to make this stunning fabric corsage and boutonniere set! Remember, this project is only available for a limited time – so get in quick!
The post Mollie Makes Wedding Giveaway Winners! appeared first on Made Peachy.
July 2, 2014
Happy Birthday Made Peachy
A little over a year ago I had an idea. I like to think that this was one of my best ideas to date – but, I guess that isn’t only for me to say! It has certainly be one of the most fun ideas I have had!
A year ago this month, Made Peachy was born. A little place to share makes, creative inspiration and all round handmade goodness. In the twelve months have been a real journey – I don’t know the destination of this yet, that’s all somewhere out there in futureland – but, don’t they say that the journey is more important than the destination?
This journey has been so amazing, and I can honestly say – hand on heart – that I have learnt a huge amount. I’ve learnt that running a creative lifestyle blog requires dedication to post each and every day, its about taking the rough with the smooth, about pushing yourself to try harder! I have learnt that not every cloud has a silver lining and that sometimes you should look that gift horse in the mouth. I’ve learnt that you really don;t know what you are capable of until you try and that sometimes the most amazing things can happen when you least expect it. I have also learnt that I still have a huge amount to learn – and that’s the most exciting thing of all!
Sometimes, particularly when I have had busy deadlines, it has taken lots of motivation to keep up with life on Made Peachy. Life has its way of showing you just what is important to you when you find you have very little ‘free time’. But, I have to confess that I have loved every minute of it – every single minute…even those tricky and tough ones! I have had the most amazing time making new projects, sharing new crafts and tying out new creative pastimes. But I think that my very favourite thing about the last year of Made Peachy is meeting so many wonderful people – both in real life and new internet friends. It has opened up so many more opportunities than I ever thought (or dreamed!) possible, and I quite simply couldn’t be happier!
Some of you guys have been reading and following Made Peachy from the very first few days – and for that I’m truly thankful. It would be a rad Birthday Treat if you would check out the (newly updated) gallery
[note: I've vowed to stay on top of updating this from here on, and you can hold me to that!]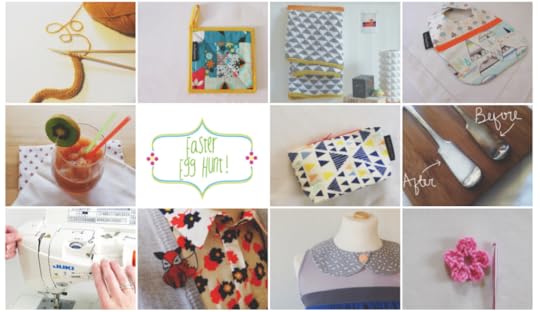
Check out some of the projects, tutorials, how to guides and recipes that I’ve shared over the last couple of months- I’d love to hear what your faves are – so leave a comment and let me know!
I wanted to say a big thank you to you guys that stop in past for a quick read, to pick pick some skills to grab a little inspiration, I love that you take the time to leave comments. Thank y’all from the bottom of my heart for being the sweet, creative folks that y’all are!
So, before I let this get more gushy than is acceptable, I want to say Thank You for stopping by and here’s to an exciting year ahead for Made Peachy!
The post Happy Birthday Made Peachy appeared first on Made Peachy.
July 1, 2014
Quick Catch Up: Hello July
Holy July Batman! I think I know pretty much how this month is going to play out already…I have another huge deadline at the end of the month and in-between it all I’m going to be trying to squeeze out as much summertime as I possibly can.
I love the new project that I’m working on…hopefully I will be able to share it at the end of this month – I’m totally crossing my fingers for that, I mean this is something that I just want to shout from the rooftops…but can’t just yet. You can imagine how tricky that is, right?!
New projects are great, the last month has been nothing short of a creative adventure…I’ve learnt so much, it has been such an amazing journey. There is a lot to be said for learning new things and trying out other ways to be creative. This has been in my thoughts a lot in the last few weeks, thinking about trying out something different…I mean something other than this new project that I have been working on. So, I’m going to try to squeeze in some new learning time this month. I have no clue where these extra hours in the day are going to come from, but already a couple of days into my Declutter Challenge and the house if feeling lighter, there is more space to breathe and that my friends is the perfect opportunity to try to squeeze in learning something creative, right?
While July will be a month of staying at home (with the occasional exciting day trip!) the coming months are pretty packed to the rafters, here’s where I’ll be over the next few months…
2014 Diary Dates
7 – 10 August The Festival of Quilts NEC Birmingham
9 – 12 October The Knitting & Stitching Show Alexandra Palace, London
30 October – 2 November The Knitting & Stitching Show RDS, Dublin
20 – 23 November The Knitting & Stitching Show HIC, Harrogate
Here’s a little round up of some of the things that have been going on here at Peachy HQ too…
Crafts: Fabric Corsage
 Style:
Easy-Make Rubber Band Bracelet
Style:
Easy-Make Rubber Band Bracelet
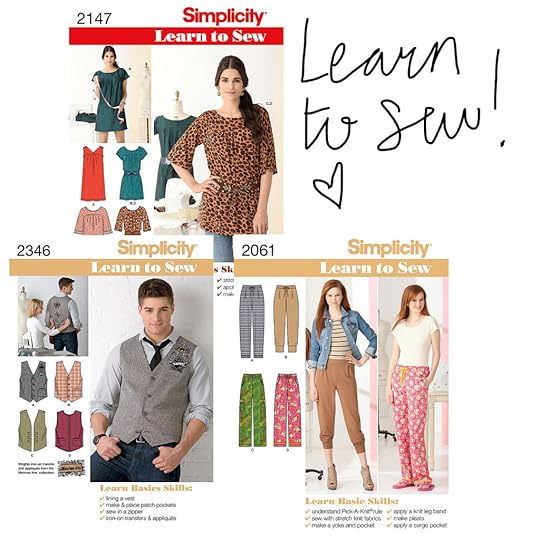 Skills: Learn To Sew With Wendy Gardiner
 Eats: Sweet Tea Ice Pops
My Browser Besties:
1: Molly Jacques
2: Skillshare
3: Scribblers
4: Blue Bonnet Lettering
My Blog Crushes:
1: Hi & Hello
2: Quality Sewing Tutorials
3: The Dainty Squid
4: Kerrie Michell
While I have had my hands full this last month, I have had still had time to keep up with some quality book time. I’ve even had the very special privilege of reading the first couple of chapters of a friends first work of fiction…oh, man – I can’t wait to read the rest!
My Months Reads:
So, here are the books that have been occupying downtime this month…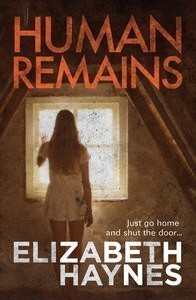 23 Human Remains- Elizabeth Haynes
Fantastic read…for fans of dark, dark, chilling reads. This is something of a slow burner as the characters and plot builds, but it is not a drag to read. While this is a dark and very twisted book, there is a strong sense of humanity in it and in many instances the characters give you pause to think about your own life and situations!
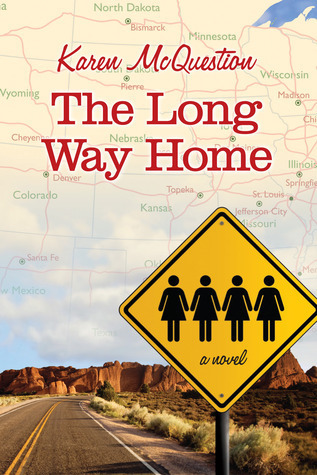 24 The Long Way Home– Karen McQuestion
I don’t think this book was a good choice for me. I was hoping there would be a bit more punch to the storyline of four women taking a once in a lifetime road trip. It seemed a little watered down for my tastes, still a quick and pleasant story.
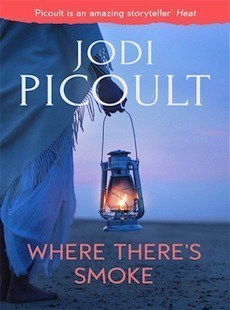 25 Where There’s Smoke - Jodi Picoult
I’m a long time fan of Jodi Picoult, so it goes without saying that I loved this (very) short story. The characters, as usual, are fascinating and intriguing and oh-so real. My only real complaint is that this is so short…I think that the editing might have been a little abrupt at the ending (but, I would say that!) Now, I just have to hang tight until Leaving Time comes out at the end of the year!
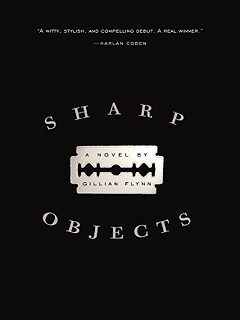 26 Sharp Objects- Gillian Flynn
Excellent! This book is brutal – with look away from the page moments. This is the third of Gillian Flynn’s books that I have read and this is far the best, most haunting and most definitely the most graphically chilling of them all.
 27 Paper Aeroplanes- Dawn O’Porter
I really, really wanted to enjoy this book, but it didn’t inspire the same buzz of nostalgia that Isable Ashdown’s Hurry Up & Wait did. Unsure whether to read to try the sequel…
What are y’all reading – do you have any recommendations to add to my July reading list?
If you are looking for something to read - be sure to keep up with the other books I’ve been reading this year - January Reads, February Reads, March Reads, April Reads, May Reads or come check out my Goodreads and say Hi!
So, for me July is going to be a month of breaking up deadlines by trying to learn something new – tell me, what are your plans for July?
The post Quick Catch Up: Hello July appeared first on Made Peachy.
June 30, 2014
Simplicity Sewing Tips with Wendy Gardiner – Sewing Special Fabrics
Happy Tuesday Y’all! Today is the last in the series of Guests Posts from sewing guru, Wendy Gardiner. This week Wendy shares some tips for Sewing With Special Fabrics…
In the recent series of Great British Sewing Bee one of the ways that they tested each stitchers skills was to ask the contestants to sew with slippery nylon, plush velvet and leather! Now, as many sewing enthusiasts will tell you, this can be a tricky task, but with a few pointers, you will be able to sew these special fabrics without any drama!
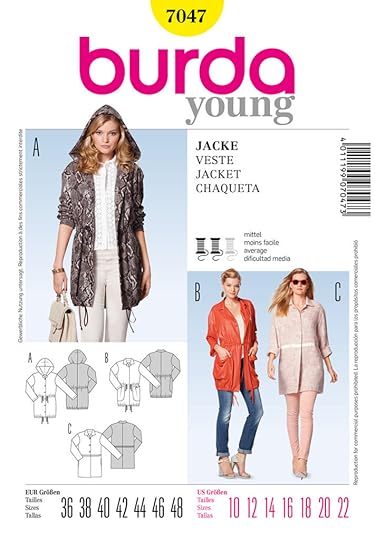 If you are looking for some patterns that feature Nylon, you might like to pick something like Burda 7047, sizes 10-22. This young style jacket is hip length with optional corded waist and hood. Again, it looks great in a lightweight nylon and is the perfect style to take us from the wet winter to spring…and even soggy summers!
 Velvet trousers are a real luxury and can look stunning. When choosing a design to make, I’d keep it simple – avoid things like welt pockets unless you make these fiddly features in a contrast. I liked New Look 6189, theses Capri pants are simple but look great in a plush velvet.
So, do you fancy sewing with special fabrics, here are a few of my tips on sewing velvet and leather successfully.
Leather
Use a leather needle that pierces the dense non-woven fabric – it has a groove in the shaft which helps it penetrate the fabric easily. As leather doesn’t fray, edges can be left raw and unfinished. You can of course also cut shapes without any difficulty.
To hold seams together before stitching, try a little double-sided tape. Do take care you don’t stretch the fabric whilst you stitch and if using the suede side of the leather, follow the ‘with nap’ layout on a pattern so that the shading all goes in the same direction.
Velvet
Like leather, use the ‘with nap’ layout so that pattern pieces are laid out in the same direction, so the pile of the velvet all goes the same way. Use a walking foot to help feed the layers of fabric evenly which will also prevent puckered seams.
Use a new needle to prevent snags or skipped stitches. Neaten raw edges and clip curved seams so that the seam will lie flat when turned through.
Now, why not use these tips to try stitching something a little more adventurous!
♥ – ♥ – ♥
 Wendy Gardiner is Simplicity’s Sewing Guru and loves to share tips and techniques to make sewing easier and fun.
For more tips, fitting advice and to browse and buy Simplicity, New Look and Burda patterns visit www.simplicitynewlook.com
For more Simplicity Sewing tips from Wendy, be sure to check out her other guest posts in this series Learning To Sew, Sewing with Knit Fabrics and Sewing Pleats & Piping!
The post Simplicity Sewing Tips with Wendy Gardiner – Sewing Special Fabrics appeared first on Made Peachy.


