Marc Spagnuolo's Blog, page 109
September 6, 2013
September Giveaway
We have some awesome stuff to giveaway this month & with our new giveaway system you have multiple ways to enter!
Learn more about each prize & enter on our Giveaway page.
You have until the end of the month to enter. Due to shipping restrictions only US & Canada are eligible for September’s Giveaway. Are you a company looking to participate in the giveaway? Contact Us!
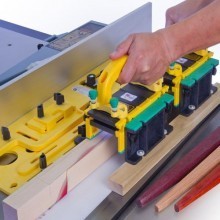
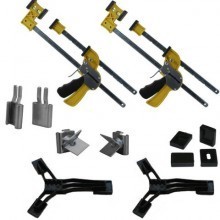 The Jackclamp System! This heavy-duty clamping system is capable of clamping your projects securely while also offering incredible jacking functionality. Can’t wait to see if you’ve won? Get 25% OFF all orders of $100 or more at Jackclamp.com! Use code WOOD25
MICRODIAL Tapering Jig & MicroJig T-Shirt! The PRECISION, SAFETY, and CONTROL of the MICRODIAL Tapering Jig advances your woodworking with ease. Cut tapers with surgical precision using the intuitive COLORMATCH system. Enjoy hassle-free adjustments between repeat cuts with built-in MEMORYLOCK technology.

Festool OF1010 Router!. The ergonomics and precision features of the OF 1010 EQ deliver a host of benefits which add up to an unbeatable tool. One-handed operation allows you to switch it on and off, plunge, cut and release with ease. The compact design and the efficient center of gravity make this tool extremely maneuverable.


September 5, 2013
Beginner, Intermediate or Advanced? Who Cares!
In my opinion, classifying woodworking projects by skill level is a mistake. Since I publish woodworking project plans and videos in the Guild, I often receive emails asking me why I don’t specify whether a project is Beginner, Intermediate, or Advanced. There’s a very good reason for it, which we’ll get to in a minute. You’ll also notice that our Viewer Project Gallery makes no mention of difficulty level. Instead, we simply list the number of years the person has been woodworking. We’ve all seen these traditional skill level classifications in magazines, project plans, and woodworking classes and as a result some folks don’t know how to gauge the appropriateness of a project without the label.
These classifications have a couple critical flaws. First, they depend heavily on our ability to self-identify with one group or another. Since there are no tests or regulations on woodworking skill levels, it’s pretty much a crapshoot and most of us simply make our best guess. Even if you consider yourself an Intermediate woodworker, how often have you found new woodworkers or non-woodworkers absolutely blown away by your “advanced” skill level? Depending on the perspective, you may or may not view your own skill level clearly. Second, even if you manage to rate your own skill with some level of accuracy, that doesn’t mean the people producing the plans/classes rate skill level on the same scale as you. There is no official published protocol for this stuff and most times the publisher is making their best guess. To make matters worse, did you ever notice that skill levels differ based on the intended audience? Is it fair to say that Fine Woodworking’s intermediate projects might be considered advanced in WOOD Magazine? Wonderful! Now I need a chart for woodworking publication skill level conversion rates!! Obviously I’m having a little fun here in an attempt to illustrate a point.
I think we would all look at a face grain cutting board and classify it as a beginner project, right? We might also look at a Philadelphia Chippendale Highboy and call it advanced. But what about everything in between? The giant mass of projects that fall somewhere between extreme beginner and extreme advanced represents a gray area that is nearly impossible to classify meaningfully and consistently.
Why do I care? Because I find these mostly meaningless classifications to be potentially limiting and discouraging. Most beginners will shy away from intermediate and advanced projects simply because they assume they just aren’t ready for them. After 5 years, they might still consider themselves a beginner and haven’t yet progressed beyond napkin holders and bird houses (not that there’s anything wrong with those projects). But if the woodworker’s goal is to become a highly-skilled craftsperson, he/she should intentionally take on projects that are beyond their current perceived skill level. Will they make mistakes? Yes. Will they need to make a couple parts more than once? Probably. Will they learn at an exponential rate because of these mistakes? You bet! One of the best ways to avoid mistakes is to experience the heartache of making them! Conversely, there is no better way to slow your progress than to do the woodworking equivalent of treading water: only working projects you already contain the skills to create.
I came to this conclusion during my first teaching gig at the William Ng School several years ago. Each class I teach attracts woodworkers with a wide variety of skill levels. That’s just how things go at woodworking schools. But I didn’t necessarily expect there to be a complete newbie in the class. One of my students was a busy LA professional who decided to take a woodworking class just to blow off some steam. He had absolutely no experience yet hoped to build a complex piece of furniture within five days. I had my doubts, but since I’m always up for a challenge I dove right in. I gave the guy extra attention where needed, especially as it concerned safety and using various tools for the first time, but other than that he was treated the same as everyone else and I certainly didn’t do any of the work for him. By the end of the five days, this “non-woodworker” was the first one finished and he made the fewest mistakes. He was given a series of steps and the tools to accomplish them and rose to the occasion. My mind was thoroughly blown. Since then, every class I teach at the William Ng School seems to have that same scenario with at least one person completely new to the craft. I am always delighted to work with them because they are usually full of pleasant surprises.
More recently, and in greater numbers, my experience with my fellow Wood Whisperer Guild members has reinforced my viewpoint. Time and time again a completely new or relatively new woodworker comes in and knocks out what I consider to be one of our more advanced projects. I can’t tell you how many “wet under the wings” woodworkers have built classic Guild projects like the Split-Top Roubo and the G&G Adirondack Chair. You can see some of them in our Guild Gallery if you are interested.
I recently emailed the Guild and asked them to send me pictures of their first or near-first projects. I wanted to see what these talented and energetic people were capable of building while most considered them beginners. I received over 80 submissions within two days! Obviously I can’t include them all here but I did pick some of my favorites. A big fat thank you to everyone who submitted a project and I truly regret not being able to showcase them all.
Check out some of these projects built by Guild members when they were very new to the craft. Each one of these projects was either a first or second project with the maker having 0-2 yrs experience:


Allen Grant, Chris, David, Dustin, Greg

Jalen Waggoner, Josh, Justin, Kerry, Marilyn Guthrie


Paul, Riley, Robert, Roger, Scott


Tim, Tom Buhl, Vic Hubbard
As you can see, even a beginner can produce fairly high level work. Would these woodworkers have been better off if they set their sights lower and focused only on projects appropriate for their noobness? I think not! Instead, they tackled projects that required them to think, practice, and improve. Well done my friends!
The intention of this project showcase is to inspire. I really don’t want anyone who might not have progressed as quickly as these folks to feel that they are somehow behind the curve. Each one of us is on our own personal woodworking journey and we all need to work at our own pace and comfort level. But I do encourage you to constantly challenge yourself. Progress as fast as YOU can, not as fast as other people can. In other words, bring your personal best to every project and you will get better quickly.
With the proper guidance and the right tools, no project is out of your reach! Take all skill level ratings with a grain of salt and instead of fixating on Beginner, Intermediate, or Advanced, examine the project itself and the skills, tools, and techniques required to make it in order to determine if it’s right for you. And if you are a lifetime student of the craft, you’ll nearly always choose projects that contain elements you don’t currently know how to accomplish. You don’t want to necessarily bite off more than you can chew but you should always have a good substantial mouthful.
September 4, 2013
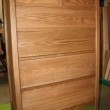
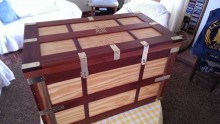
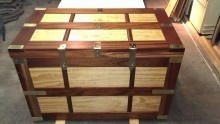
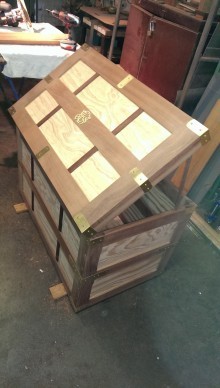
Mark’s Steamer Trunk
By: Mark van Koersveld (Cape Town, South Africa)
Experience: 0-2 Years
Woodworker Type: Hobbyist
Project Type: trunk
Material(s): Plywood, Solid Wood
Finish Type(s): Oil/Varnish Blend
Finishing Technique(s): Wiping
A novice when it comes to carpentry, this is my first large scale project. I was fortunate to grow up with a father who was a self-taught hobbyist. He liked to call himself MacGyver! He always managed to make a tool or jig to make his life easier and to save a few bucks. Sadly, growing up I never showed much interest in woodworking. By the time I got involved in DIY projects, my father had long since passed away. He had sold pretty much all of the bigger machines but he did leave his smaller hand power tools. Thanks to him, I’ve never been afraid of getting my hands dirty and getting involved when I needed to. I have finally found myself back in the workshop.
Prior to starting this project, I was trying to decide on a wedding gift for a mate and his wife. They had the usual gift registry, but I didn’t see anything I would actually want to give them. About this same time I had found The Wood Whisperer and came across the steamer trunk project. So I decided to build one thinking it wouldn’t be too tough since I had watched the videos and thought it simple enough. (Insert evil laugh here, dear reader.) Little did I know how tough it would actually be.
I used reclaimed wood from old train cabins that my grandfather had save in the 70′s when they were updating them. It was all Mahogany or Teak and I used it for the framework. For the paneling I used 4 mm thick pine ply. Initially I was concerned the two would not work well together but it was all I had. Fortunately, the contrast between the two gave a lovely finish. Not finding hardware that I liked, I ended up making it out of 1 mm brass plate. For the center piece, I drew on graph paper and then cut out of 3 mm thick brass plate. Let me tell you, hand fret saw work is not as easy as it looks.
I was working with an old Rockwell Delta Hobby table saw I had picked up cheap because it was not running. Turned out to be a loose wire on the start capacitor. Setting this little guy up was a mission because everything was worn from years of use. It gave me some problems but I figured it out. Once the planks were cut to length and width, I had to thin them down by a couple of mm. Not having machinery like a thicknesser to do this, I needed to find another way. Once again I hit the forums and online tutorials and found a way to use my spare router to get the job done. It’s in one of Marc’s videos when he was leveling out the workbench top he made. It works on a similar principal but rather than moving the bed and the router, you end up just having to clamp down your planks in the jig and then move the router freely above it and you can set how much you want to take off with how far your router allows. This worked really well. (Thanks Marc for the tip.) Once the planks were the same thickness, I could start getting the framework together, or so I thought. This was my next roadblock. I didn’t have the tools to make the joints I wanted. So yeah you guessed it, back to the internet. I soon found a way to do loose mortise and tenon joints once again using my spare router. Who would have thought a router could be so versatile. The jig basically allows you to do the vertical and horizontal mortises using the router. Once I made the jig I could set the depth on my router, set the width as well as centering or offsetting the mortise. The tenon which is almost like a rather thick biscuit, was made by cutting a length of timber which was the correct thickness for the mortise to the correct width. Then using a 1/4 round bit, I took off the edges so that it fit snugly into the mortise. I did this on my router table. Now all that was left to do was cut the tenon to fit, put the grooves in for the panels and then I was ready to put the framework together. The gluing process was fun because I only had enough clamps to do one at a time.
I finished up bending the brass I had cut for the edges and then it was time to get the base glued up. Again a challenge without sufficient clamps, but I managed to get it together. It is not 100% square and if you look closely you will see all the little irregularities. For the finish I used Woodoc No10 which is an indoor polywax sealer, applied with a sponge. It gave a velvety look which I really like.
I thoroughly enjoyed every bit of this build. Even those days when I thought I had hit a serious snag, there was always someone out there who was willing to pass on a bit of advice. And I am happy to say that my mate and his wife were super stoked!
I would like to thank Marc for a great site! I’m sure I would still be busy with this trunk if I had not had access to the amount of information that is so readily available here. I hope you all enjoyed this novice sharing a bit of his learning curve into the wonderful world of carpentry. I look forward to the journey of discovery that lies ahead!

September 2, 2013
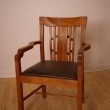
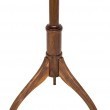
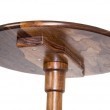
207 – Tilt-Top Table
Small tables are great skill-building projects. You can pack a lot of joinery and techniques into a very confined space while using a small amount of material. The Tilt-Top Table is a great example of this as it contains a turned post, sliding dovetails, curved and tapered legs, an elliptical top, and a classic shop-made tilt mechanism.
While this video summarizes the entire build, I have a lot more footage available for folks who actually want to build the project. In the Guild, this project is represented by 12 videos with over 4 hours of HD video footage. Of course we also have a detailed project plan and SketchUp diagrams for you as well. Get access to the full project series here.
Tools & Materials
- Pre-milled wood kits will be made available!
- Jointer, Planer, Tablesaw, Bandsaw
- Miter Saw, Drill, Router
- Lathe (for a turned post)
- Die Grinder and Rasps (for a sculpted post)
Techniques Demonstrated
- Cutting an ellipse
- Turning a table post
- Creating a “Poor Man’s Lathe” router jig
- Routing sliding dovetails
- Cutting curved/tapered legs
- Designing a tilt mechanism
- Carving an alternative spiral post


September 1, 2013
August Giveaway: Winners Announced
The August Giveaway is closed. Winners are announced below. Check out September’s giveaway!
Thanks to our wonderful friends at Festool, for the rest of the year we are going to give away a different Festool tool each month! Yes, you read that correctly! Because Festool has their own sweepstakes, you actually have two chances to win a Festool tool every month.
Here is what is up for grabs for the month of August:
 This Festool T12+3 Cordless Drill Set (564247) and SYS 1 Box (a $500+ value!) will go to one lucky winner! Congrats to Neil Becker!

We also have an amazing 11-piece carving set in a wooden box with a sharpening and honing DVD included to give away from the fine folks over at Two Cherries Congrats to Gary Norton
To celebrate the start of the Greene & Greene Blanket Chest in the Guild, we are giving away a Superfan membership (with all the goodies) to one lucky winner. Congrats to Dustin Smith!
Festool and Two Cherries prizes are US Only. The Guild membership is open to everyone.
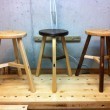
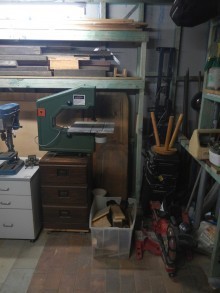
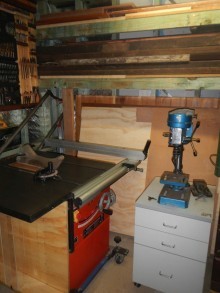
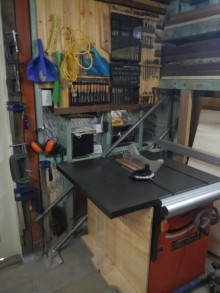
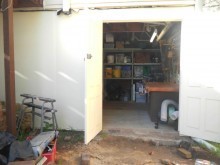
Mitchell’s “Down Under” Woodshop
From: Mitchell Sargeant (Sydney-New South Wales)
Shop Type: Garages
Shop Size: 0-249
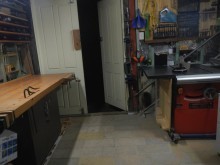
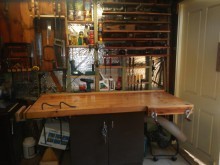
Hi, I’m Mitchell, I’m 16 and I live in Sydney, Australia. I built the shop myself with a little help from my family last year. Finally, I’m beginning to do some proper woodworking instead of laborious/boring construction! I started woodworking when I was 14 and built a small bench and large tool cabinet outside under the house. For a while, it worked out alright because I mainly used hand tools. However, when I started acquiring machinery, I didn’t feel safe with them left outside. From here, I built the workshop which is 3.4m (11 feet) by 3m (10 feet) to house my growing collection of tools. I built a second bench which features an end vice which I use a tail vice with dog holes and a homemade twin screw vice.
When I started out in woodworking, I grew an interest toward antique hand tools due to their quality and often low price. I now have a large collection of my grandad’s carpentry tools, as well as many garage sale finds and tools from ‘The Traditional Tools Group’ of which I am a member. I bought a 10” table saw thanks to a member on woodworkforums.com for very affordable price which is by far, my favourite machine. I thought some of you may want to know that I store my recently built crosscut sled under the otherwise wasted space of the extension wing. From the same gentleman, I received a small dust extractor which I use with the table saw and bandsaw.
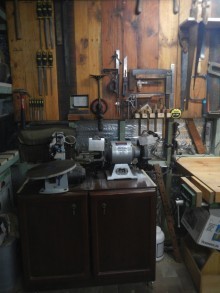
I bought a small drill press, bandsaw and scroll saw from a garage sale which have worked out well. A few of my grandad’s friends have donated their old lathe and an 8” grinder which serve me well. I bought a compound mitre saw from Aldi for constructing the stud work. It’s actually a decent saw considering its low price. Finally, I built a fairly large lumber rack which stores longer lengths of timber above and sheet materials below. My parents claimed the far wall for storage space as can be seen in the first photo.
Although I’m fairly tight for space, I think I’ve been able to pack a lot in and love how each tool has its individual place. My last year of school coming up in the next 3 months or so and I’m planning on building a slightly less complicated version of David Roentgen’s games table for my major timber project.
Hope you enjoy, Cheers!
August 28, 2013
Poll: Powered Miter Saws
 The role of the miter saw in the fine woodworking shop is a highly variable one. Some folks use it for nothing more than cutting down rough stock. Others have them tuned up for precision work and finish cuts. Personally, I use mine for both tasks. I occasionally use it to chop down a large board in the rough and I have it dialed in enough to produce clean and square cross-cuts on already milled material. In fact, it’s my primary cross-cutting tool. So to me, the miter saw (specifically the sliding compound miter saw) is essential. How about you? What do you think of the powered miter saw?
What do you think about powered miter saws in woodworking?
Our polls are created by Tom Iovino of TomsWorkbench.com.
August 27, 2013
We’re Hiring, Finally!
We’re looking for someone to help us with various behind the scenes Wood Whisperer stuff. Even though we are a very small business, we have a lot of irons in the fire at all times and we could use an energetic personality to lend a hand. Initially, we are hoping to bring someone in to help with written articles and post preparation. Where it goes from there depends on your skill level and interest. Being local to the Phoenix area is NOT a requirement.
We are not looking for an unpaid intern here but we certainly can’t offer a full-time salary, yet. The ideal candidate will see this as an opportunity to get involved with The Wood Whisperer, Inc. and the woodworking community in general while making a few extra bucks. Age is irrelevant and students are welcome to apply.
If you have a passion for woodworking, writing, research, and all the techno-babble that makes a website go vroom, we want to hear from you. Fill out the form below or click the link if you don’t see the form. All applications will be read but not necessarily responded to. We will contact you if we feel you are a potential good fit.
Can’t see the Google Form below? Click here to open in a new window
Loading…
August 26, 2013
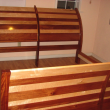
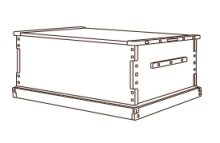
The Not-So-Secret Hidden Drawer
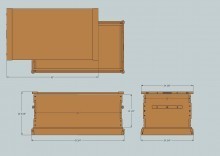 Right now in the Wood Whisperer Guild, we’re building a Greene & Greene Blanket Chest. As designed, the interior of the chest only has 13 1/2″ in depth even though the entire piece stands at about 20″. The reason for this is the fact that the case is propped up on a substantial base consisting of a deck and a finger jointed frame. So in essence, there’s a lot of wasted space under this bad boy.
Even though I provide a finished plan for Guild members to build from, everyone is encouraged to make modifications that suit their needs and tastes. It was pretty clear from the start that lots of folks wanted to redesign the piece slightly to recover some of that lost space.
I thought it over for a while and decided that a hidden drawer would be a fun alternative to more drastic solutions that might modify the look to some degree. My initial thought was to have a drawer placed in the back which would result in an obvious “drawer” to anyone who inspects the rear of the case. Not ideal. Thankfully, my buddy Aaron offered the perfect solution: use an entire side base piece as the drawer front. I quickly hopped into SketchUp and made it happen, virtually anyway. Here are some of the highlights from the hidden drawer build.
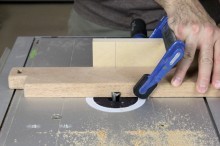 I started by creating the drawer. Since the drawer front is a pre-existing piece from the project, I needed to come up with a strong joint that wouldn’t change the look on the outside face or require making a new part. Sliding dovetails were the answer. Using the router, I created both the male and female parts of the joint.
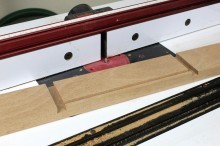
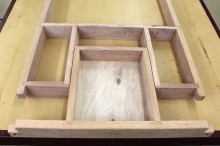
With the drawer parts cut to size, I began working on the frame. The frame not only supports the drawer but also provides extra support on the left side of the case, a job previously done by our new drawer front. None of the joints for this part were particularly interesting, consisting of simple dados, rabbets and grooves.
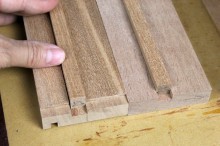 Wooden drawer runners were installed without the need for screws by gluing the runner stock into a groove that runs down the length of the framework. A similar groove is cut into the drawer side. Because a perfect fitting slide would actually be too tight for a drawer, the groove on the drawer side was cut slightly wider by 1/32″ to allow for smooth travel now and in the future. In the picture you’ll see the drawer side on the left and the frame piece on the right.
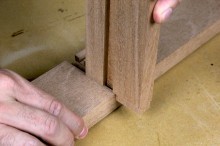
All that was left was assembly. I glued each part in phases, making sure each part was nice and square. Because this hidden drawer was not planned, I really didn’t want to lose additional time to do-overs. Fortunately, the glueup went quite well. Below you’ll see the finished assembly, open and closed.
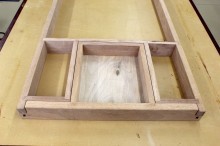
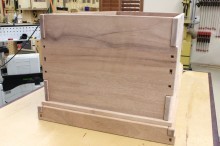
With the deck in place, you can see how the drawer will simply slide under without any obvious indicators of its presence. And with the case in place, the whole thing becomes even more obscured. Of course for this drawer to work at all, the blanket chest will need some feet to raise it up off the ground slightly. I have hard surface flooring in most rooms of my house so I won’t need more than maybe 1/8″ lift. Anyone with carpet will have to consider a more substantial rise.

Now that I’ve told all of you about it, it certainly isn’t much of a secret. But I don’t plan on hiding anything in there other than maybe a few comic books. All in all, this was an unexpected and fun addition to the build. Being able to think on your feet and design on the fly is a useful thing indeed, though I highly recommend planning things out ahead of time if only to prevent additional gray hairs, or loss of hair, as the case may be.
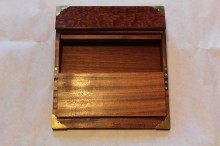
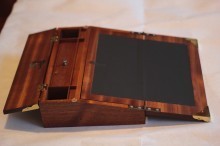
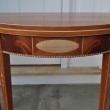
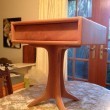
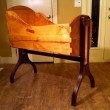
Nicholas’ Vintage Writing Slope
By: Nicholas Vanaria (Romeoville, IL)
Experience: 10+ Years
Woodworker Type: Hobbyist
Project Type: Miscellaneous
Material(s): Solid Wood
Finish Type(s): Oil
Finishing Technique(s): Wiping
This project was made as a Christmas present for my sister-in-law who is a journalist. It was inspired by some c.1820’s writing slopes that I had researched.
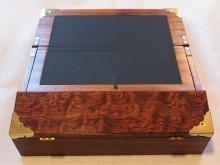
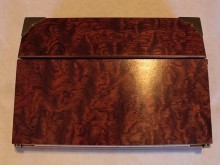
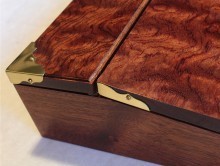
It is made from Sapele Mahogany. The top is veneered with Waterfall Bubinga and the writing surface is leather. When finished properly, the waterfall bubinga really looks like flowing water. It is probably one of the most beautiful woods out there and I try to use it whenever I can. This piece was hand-rubbed with a couple of coats of oil, and then polished over with some Renaissance Wax to give it a nice smooth feel.
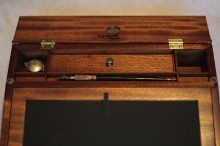
With all of the moving parts and angles on this, I have to say that it is the most challenging thing I have ever built. The leather actually acts as the hinge for the lid to the storage area inside the slope. The angle of the slope is 12-degrees. This proved to be the most challenging because not only did the top need to sit perfectly flat when it was opened, it had to sit flat when it was closed as well. So, the angles are not only on the slope, but also on the writing leaves when closed and on the stops inside the box keeping it level.
Finding the period authentic hinges was a bit of a challenge, but the good folks at Horton Brasses came through with those. My sister-in-law loved it. And that made Christmas even better. Thanks for looking!!!