Marc Spagnuolo's Blog, page 106
October 24, 2013
October’s Giveaway!
Be sure to head over to our Giveaway page or Facebook and add your name for a chance at winning 1 of 3 awesome prizes:
 The Festool CT 26 HEPA Dust Extractor! The new CT26 incorporates increased capacity, innovation and versatility into this new design. With the dual mode power activation, the user chooses either a tool activated or manual activated start-up. This CT unit is extremely mobile, with a sturdy chassis, extra large low abrasion rear tires, and double swivel casters.
Due to shipping restrictions this prize only open to US and Canada
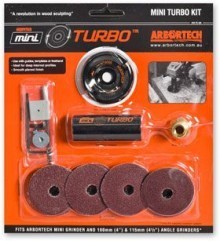 Arbortech Mini-Turbo Plane Kit! To celebrate the launch of Arbortech’s newest product we are giving one away here on TWW. The Mini-TURBO is ideal for free-hand shaping and is also suitable for use with guides and templates for accuracy. And if you can’t wait to find out if you won, you can pick one up here.
There is no location restriction on this prize
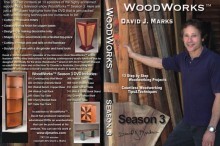 David Marks’ WoodWorks DVD set: Season 2 & 3! A total of 26 episodes from the highly popular woodworking television show WoodWorks. Not only will this show inspire you, but you will learn directly from the one and only David J. Marks.
There is no location restriction on this prize


210 – Woodworking in America 2013
Woodworking in America is a conference held every year by the folks at Popular Woodworking Magazine. The conference features classes from various woodworking experts, a bustling vendor floor where you can quickly max out your credit cards, and numerous official and unofficial after-hours events. Personally, my favorite aspect of the show is the camaraderie. More than any other woodworking event, WIA brings out the online woodworkers. That means I get to put faces with the names I’ve been communicating with for years. And for the first time ever, all three co-hosts of Wood Talk were in the same place at the same time. The result of that can be heard in Wood Talk #154.
While I’d love to show you extensive footage of the classes, that just isn’t possible. There are always intellectual property hurdles and not to mention, video/audio quality concerns. So this video shows a few highlights and then focuses primarily on the vendors. It’s always fun to see new tools I’ll probably never buy and the vendors usually aren’t shy about discussing their products.
We talked with Lie-Nielsen, Shenandoah Tool Works, Hamilton Marking Gauges, Vogt Tool Works, Scott Meek Woodworks, Hock Tools, Blue Spruce Tool Works, Juan Vergara – Planemaker,
Hybrid Woodworking Book Update
Now that Popular Woodworking is ramping up their promotion of my new book, Hybrid Woodworking, it’s creating a bit of confusion as to what’s available when and where. So let me clear things up.
Where You Can Buy
You can order the book from ShopWoodworking.com, Amazon.com, or TWWStore.com. The book is still set to release in November. The digital version is available TODAY at ShopWoodworking.com.
Bonus Video and Autograph
As many of you know, Amazon.com usually has the lowest prices and their shipping is hard to beat. So both ShopWoodworking.com and TWWStore.com are matching Amazon’s price. To further entice folks to order the book from us, we are also offering a FREE 17-minute bonus video titled, The Top 5 Planes for the Hybrid Woodworker. This bonus video is ONLY available when ordering from either ShopWoodworking.com or TWWStore.com.

An additional bonus is the fancy schmancy autograph. I will autograph every book we sell at TWWStore.com. Orders placed anywhere else will not be autographed.
In Summary
TWWSTore.com: $19.78 + Shipping, Bonus Video, Autograph
ShopWoodworking.com: $19.78 + Shipping, Bonus Video, Digital available (ShopWoodworking.com frequently offers discount codes and free shipping, so keep your eye out).
Amazon.com: $19.78 + Usually Free Shipping, No Bonus Video, No Autograph.
Regardless of where you buy the book, we see a direct benefit. So don’t feel like you have to buy the book from us. The important thing is that you get exactly what you want for the lowest price possible. I sincerely appreciate your support!
October 18, 2013
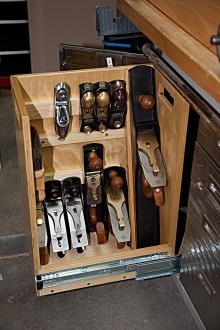
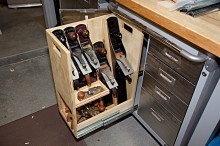
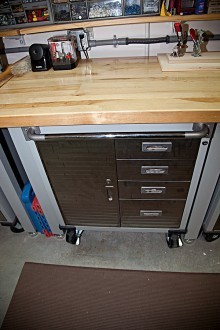
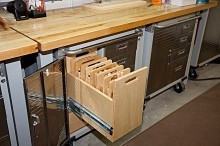
Brian’s Alternative Hand Tool Storage
By: Brian Tracey (Santa Fe, NM)
Experience: 10+ Years
Woodworker Type: Hobbyist
Project Type: Shop Projects
Material(s): Plywood
Finish Type(s): Oil/Varnish Blend
Finishing Technique(s): Wiping
Before starting to build my wood shop, I bought two worktables and four rolling carts at Sam’s club to have some form of storage and work surfaces in our two car garage.
After slowly putting together the wood shop, I still had the benches and rolling carts kinda in the way, so I started making use of the useless space in the rolling carts by building large pull out drawer/racks that can hold, store, and protect my hand tools. Now most of my hand tools have a place to live and are at hand when I need them, and protected when not in use. I used to have all the planes and chisels thrown in drawers. Now it’s a little more organized and all the sharp edges stay that way. The drawer/rack for the chisels has smaller removable chisel racks that nest together when not in use and come out individually when needed.


October 13, 2013
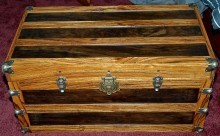
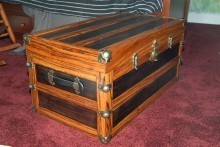
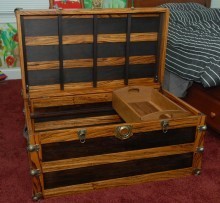
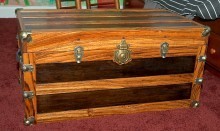
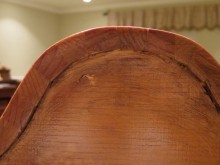
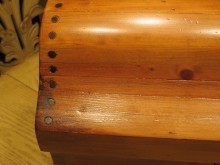
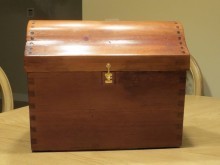
Michael’s Trunk
By: Michael Bissell (Oak Ridge, NC)
Experience: 2-5 Years
Woodworker Type: Hobbyist
Project Type: Chests
Material(s): Solid Wood
Finish Type(s): Oil/Varnish Blend, Wax
Finishing Technique(s): Brushing
Inspiration for this project came from the Rockler steamer trunk and the changes Marc made for the lid. I changed the lid further making it a little taller so that I could fit the tray (made of regular walnut). I also reinforced the top because I know my son Luke is going to sit and stand on it (and he’s a chunkster!) I made through mortises that can be seen front and back of the lid. The rest of the project I followed a combination of the plans and Marc’s videos from TWW. I used Peruvian walnut which was really nice to use, reminded me of mahogany. The Zebrawood is really porous and I found myself dealing with a lot of tear out. I was OK with the tear out because it gave the project a rustic quality.
The finish was Boiled Linseed Oil, two coats which I allowed two weeks to dry. I put a finishing coat of General Finishes Enduro-Var. Last a little wax. The only problem that I had was that the inside of the trunk smelled REALLY bad!
October 9, 2013
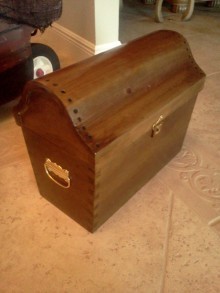
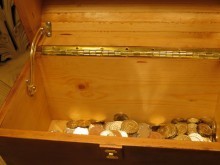
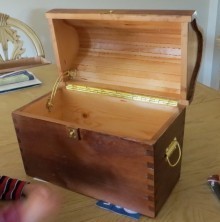
Pirate Treasure Chest
By: Chopnhack (Florida)
Experience: 5-10 Years
Woodworker Type: Hobbyist
Project Type: Chests
Material(s): Solid Wood
Finish Type(s): Dye, Shellac
Finishing Technique(s): HVLP
Done in time for Halloween!!! The boys wanted to be pirates last year and naturally needed a treasure chest to collect their booty from the neighborhood! LOL My search for plans yielded a few plans that were free but nothing fit the bill. I really wanted something special and the youngest watches a show that has a treasure chest in it and he wanted it to be that shape. A few quick renderings in sketchup and some tweaking in the shop for proportions and a box joint jig later and we had a chest! Well it wasn’t really that fast…the main pieces were cut out very quickly, the coopering of the top is another story. If only I had a pair of dividers. I did the top by carefully marking and fitting each piece using a block plane and sandpaper. I needed to use a dremel to carefully grind the underside of the slats to allow the side supports of the top to “notch” into the top slats as the slats started around the upper curve. Around the lower curve, the underside of the slats needed to be relieved to follow the curve. Fun, but time consuming and I probably should have jointed the slats first.
I used Transtint dyes and some van dyke brown glaze with shellac as the finish. The shellac was rubbed down with fine steel wool to take the sheen down a few notches. I used Radiata Pine and Eastern White Pine.
The brass latch in the front was improved upon by adding a small plastic “washer” cut out of a thin sheet of plastic from an electrical tape box cover. It stuck to the new finish well and allows the brass lock to pivot smoothly.
Thanks for looking, hope you liked it!
October 8, 2013
How to Install a Plywood Shop Floor
This is a re-post of a Guest article that I accidentally deleted. My bad. :) Please enjoy reading about Dave Frameli’s experience installing a plywood floor in his shop. —Marc
I built a 900sf wood shop on the back of a two car garage and I wanted a wood floor for a couple of reasons. First it’s easier on the body after standing all day and second, and just as important, was the insulation value. I wanted to keep my utility bills to a minimum so along with insulated 2X6 walls, 5/8” drywall and R43 insulation in the ceiling, I wanted an insulated floor. I did some research on-line but most of my plan came from what I read in books.
Getting Started
The first thing I did was fill in the cracks between the block foundation and the floor. My thought was to stop any moisture from getting to the floor and baseboard. I choose a polyurethane caulking made especially for concrete and masonry.
Securing the Lumber
To secure the 2x4s to the concrete I planned to shoot nails with .22 blanks. The first gun I tried wouldn’t drive the nails deep enough so I exchanged it for a gun that could handle a higher caliber blank. I tried this gun and the nail still didn’t go far enough in but this time it actually cracked my concrete. So within just a few hours I was on plan “C”, using Tapcon screws. I wasn’t looking forward to all the drilling but I wanted to secure the floor to eliminate any movement. If the wood floor gets taken out in the future, it will not be hard to fill the holes and cover the floor with an epoxy.
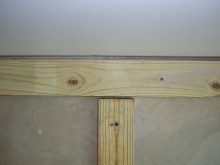 I started securing pressure treated 2X4’s along the entire perimeter. I ran a good sized bead of decking glue under the 2X4s and smeared the glue as I pressed the boards into position. I used an impact drill along with the bits that came with the Tapcon screws to drill through the lumber and into the concrete.
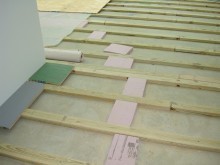
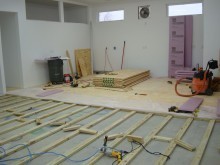
After the perimeter was complete, it was time to mark where I wanted the 4X8 sheets to lay. Every article I read said it was better to install the 2x4s on 24” centers but I didn’t feel this would be strong enough for all the heavy equipment in the shop so I installed the center boards on 16” centers. I’m glad I did. Everything I read also showed the plywood laying parallel with the 2X4s. I ran this through my head while looking at the floor and there seemed to be a better way. When the plywood lays parallel with the lumber, each sheet is supported by four lengths of 2X4s. If I laid the plywood across the 2X4s there would be seven lengths of 2X4s supporting each 4X8 sheet. So I experimented and laid out two sheets of plywood, one in each direction and sure enough there was a distinct difference in support.
Foam Insulation
I started cutting the foam boards on a table saw but it really made a mess with foam dust flying all around so I ended up using a jig saw instead. For every 4X8 sheet of foam board there was a 10-11” piece left over. I used the small scraps as a temporary walkway making it safer and easier on the ankles when carrying sheets of plywood into the shop. The leftovers then went into the attic.
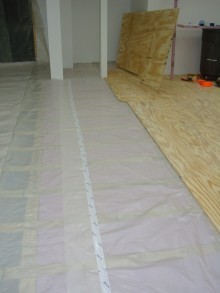
Vapor Barrier
 There’s not much to installing the plastic vapor barrier. I used 6 mil clear plastic from a 100’ roll. Once I laid it out I randomly stapled so it wouldn’t move when I walked on it. I did overlap the next sheet at least 6 inches and I taped the seams with some leftover Tyvek tape but any seal type tape will work. Note: Before you start laying the plywood down, inspect the plastic for small holes made from accidentally walking over the edge. It’s an easy fix, just cover the holes with tape.
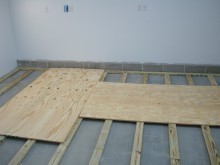
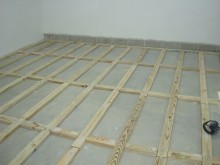
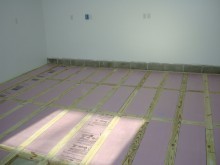
Plywood Flooring
 My initial plan was to use tongue and groove (T&G) plywood to ensure the edges would always remain level with each other even if some boards started to warp. The biggest drawback for the T&G was knowing the shop will go through many changes over the years and if I used T&G I would lose the option of pulling up sections of plywood to run wiring under the floor. I also had thought if a section of floor ever gets damaged and had to be replaced, what a chore that would be to repair it! I’m sure this floor will get damaged at some point along the way. I chose to use 23/32″ sanded plywood sheets that were not T&G. Note: Remember to stagger the plywood; it will make for a much stronger floor overall.
Securing the Plywood
 I used 2” Green exterior screws with T-20 star drive heads to secure the plywood to the 2X4s. Whatever screws you use make sure they can be used with treated lumber. Initially I made a story pole from scrap wood so I would know where to align my screws but I found the fastest way was to use a 4’ rule. Lay it down across the board and seat the screws into the plywood with a hammer about 1-1/4” from the edges and then every 16”.
Note: Do not screw in the corners until the next row has been installed. This helps prevent the corner edge from smashing outward which prevents the next row from having that perfect fit.
For driving the screws in, I didn’t set my drill clutch to leave the screws level with the surface of the floor because I wanted to drive the screws below the surface. This way I would feel comfortable sitting a wood project on the floor or even sliding it without gouging the project.
Finishing the Floor
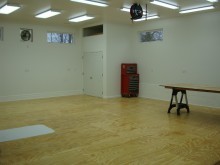 Overall the hardest decision was how to finish the floor. Initially I planned on putting down an epoxy but I couldn’t find one that could be used on wood. Then I planned on using a solid stain looking at colors from light green to gray. For these I stained some wood scraps and walked on them for a few days only to discover it would be too hard to sweep and keep clean. In the end I decided to lay down three coats of floor polyurethane.
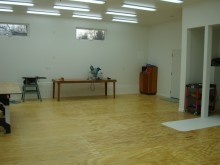 I just poured it directly from the can to the floor and I used a 10” 100% lambskin applicator to apply the finish. Between coats keep I kept the applicator on the stick and just wrapped the applicator in a few small plastic bags to keep it from drying. I only sanded after the second coat because I didn’t want the floor to be too slippery. Also using a clear finish showed all the marks in the plywood and even the paint showed along the edges so overall it gives the shop more character.
This project took longer than I expected but much of this was trying things out for the first time and rechecking it as I went along. I didn’t count the hours but I spent no more than (3) weekends and an hour or so each weekday to get it all completed including finish. After about 6 months of making saw dust I am no longer a concerned about the floor being slippery. Also with the finish on it, it is really easy to sweep up.
I hope this makes things easier if you’re deciding if you want to install your own plywood floor. OH, BY THE WAY, MY WIFE HELPED!
October 7, 2013
Poll: Do you Turn?
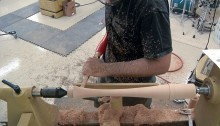 Woodworkers often say that when you start turning, you just can’t stop. I can see why. It’s a very artistic process with near-immediate gratification. There aren’t many furniture projects that can be built and finished in a single day but I can think of hundreds of turning projects than can.
While I certainly enjoy my time at the lathe, it never really grabbed me like it does with other woodworkers. So how about you? Have you ever turned a project?
Have you ever turned a project?
Our polls are created by Tom Iovino at TomsWorkbench.com.
Woodworking in America 2013 – Be There!

If you listen to Wood Talk, you probably heard us mention a few thousand times. But it’s for good reason folks. WIA has become the “can’t miss” event of the year for a lot of online (and offline) woodworkers. Education, tools, and camaraderie all in one place! You just can’t beat it.
So if you happen to be in the Cincinnati area October 18-20th, you owe it to yourself to and attend the event.
Meetups!
This is also the first time that my Wood Talk co-hosts (Matt Vanderlist and Shannon Rogers) and I will be in the same place at the same time! To celebrate this momentous occasion, we are having a Wood Talk Meetup at the Keystone Bar & Grill on Saturday Oct. 19th at about 6:30pm. We’ll be eating food, enjoying some refreshments, arm-wrestling, belly dancing, and autographing body parts. You know, all the normal stuff that happens when a bunch of middle-aged and near middle-aged people do when they get together.
If you aren’t attending Woodworking in America but you still want to come to the meetup, that’s perfectly fine!
I also want to mention that on Thursday night (7pm) at the same Keystone Bar & Grill, our friends at the Modern Woodworker’s Association will be having their meetup. I’ll be driving in from Missouri and I’m not sure if I’ll be there in time for this meetup but I am doing my best to be there.
Whether you catch me at one of the meetups or at the show itself, be sure to stop me and say hi! I absolutely love meeting people at these events and I carry a lot of hand sanitizer so BRING IT ON!
October 6, 2013
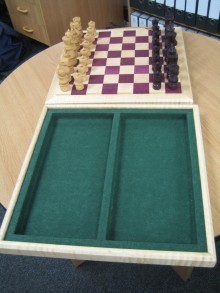
Greg’s Chess Set
By: Greg J (Cape Town, South Africa)
Experience: 2-5 Years
Woodworker Type: Hobbyist
Project Type: Games
Material(s): Solid Wood
Finish Type(s): Oil/Varnish Blend
Finishing Technique(s): Brushing
I have been an enthusiastic chess player all my life, and over the last eight years or so, have been trying to build up my woodworking skills (and tools!). This year I managed to put the two together and built this chess set and board as a present for my long time playing adversary’s 40th birthday!
We have played on many varied chess sets in the past, and had many discussions and arguments over what pieces are the best to play with, with regard to size, look and feel, and style in general. So armed with this knowledge, I came up with a design that I hope is original, but still falls into the Staunton style of chess piece that is readily identifiable.
There are definite sizes and ratios that should be adhered to with chess pieces, if the set is to be both functional and aesthetically pleasing. So the challenge, like with furniture, is to try and keep to these and be creative at the same time!
The design of the pieces is angular with straight clean lines, with the angles of the bases, bodies and heads of the various pieces being the same. There are no curved parts, except for the queens’ crown which have curves to add a slight feminine touch. :)
The pieces were turned on a Proxxon mini lathe and the knights and crowns carved by hand. The black pieces and squares of the board are made from Purple Heart and the white from European Beech. The kings are approximately 100mm (4″) high with a 38mm (1 1/2″) diameter base. The bottoms of the pieces are lead weighted with a felt lining.
The sides of the box/board are made of curly maple. I tried to keep to the angular theme with the box as well, with the straight lines and 45 degree chamfers in the sides. A nice feature is that where the lid and the base of the box meet, both have the 45 degree chamfer inwards, which 1) defines the two parts; 2) gives your fingers a place to purchase when opening; and 3) hides any misalignment where the two parts meet. The inside is lined with felt. If I had more time before the birthday date rushed up on me, I would have made individual compartments for the pieces!
My friend likes the set a lot and my wife is cross with me that I spent so much time on it and then gave it away. But my friend has promised we will play a lot of chess using this set and I have promised my wife I will build another one to keep in the family, so hopefully everyone is a winner in the end.
Thanks for a great site, Marc. I look forward to many years as part of the Wood Whisperer community!