
Marc Spagnuolo's Blog, page 102
January 9, 2014
Don’t Undervalue Your Work!
 Now more than ever, people are breaking out of the traditional employment mold. Thanks to the internet, a small niche business that would have died on the vine fifteen years ago can now thrive with low overhead and easy access to a worldwide customer base. It’s not all rainbows and unicorns for everyone, but for many, it’s a great way to make a living while re-defining your role as a world citizen.
I exchange emails with woodworkers everyday who are taking the plunge. The story is very often the same. You start making items for your own home as a hobby. Friends and neighbors find out that you’re a woodworker so they begin to inquire about your services. Because you’re a nice person, you charge them for materials only. Word gets around and you begin receiving requests from acquaintances who hear that you not only do good work, but you’re cheap too! This is where the problems begin. Even if you aren’t interested in becoming a full-time woodworker, you will likely start to wonder if you’re valuing your time appropriately. Is it fair to charge someone a reasonable fee when you truly LOVE what you do? Should you fight that sense of GUILT you feel at charging someone money while you fart around in the shop?
If you’re planning on changing careers and doing this woodworking thing for a living, you better answer with a resounding, “YES! It IS fair to charge a reasonable fee!” If you are taking on jobs as a side-business simply to keep your hobby going, your choice might be a little more difficult. Though I’m sure many professional woodworkers would really appreciate you charging appropriately for your work.
At the heart of this issue is the question of value. How valuable is your time? How valuable is the material you use? How valuable is your creativity? How valuable is the final product you produce? Does the customer see the same value in that product or do they value it more or less than you do? These are all interesting questions to ponder when deciding how much to charge for something. But if you are starting this process by undervaluing yourself and what you bring to the equation in terms of skill and creativity, then you’re going to have a significant uphill battle. If you don’t value your own time and skills, how can you possibly expect your customer to?! Undervaluing your work is a great way to become the busiest woodworker that ever went out of business.
 I bring this up today because of a video I recently watched from a friend of mine, Bill Doran. Bill is a prop-maker and owner of Punished Props. He makes custom props for use in cosplay, TV, and movies. Much like a woodworker, Bill receives commissions and has to price his work accordingly. He has to come up with the plan, source the materials, and build the item within a reasonable amount of time and he faces all of the same challenges woodworkers face. He recently made the video below explaining why he has to charge a hefty sum for his commissioned work. While he is focused on prop-making, the message applies to woodworkers.
As you can see, independent woodworkers aren’t the only ones struggling with this issue of valuing one’s time. In fact, here are three other articles I highly recommend you read:
- Materials, Time, Creativity
- Why You’re Undervaluing Yourself (And How To Stop)
- “How to Price Your Work”
This is a huge topic that deserves much more time than we can give it in a single blog post. After all, even after you convince yourself that you’re worth it, you still have to convince your customers. That’s always fun. But I’d love to hear some of your pricing stories, concerns, anecdotes. Do you struggle with pricing? Do you find that most of your clients are willing to pay your asking price? I’d also love to hear from folks who are currently undervaluing their work. Tell us why this works for you.
Like the cartoon above? It was created by my buddy Scott Johnson. Head over to his website for more awesome web comics!


January 7, 2014
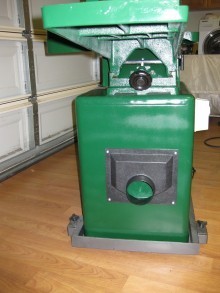
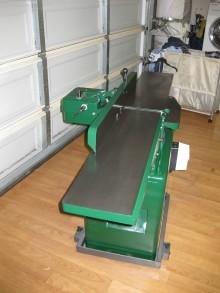
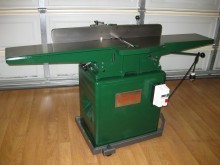
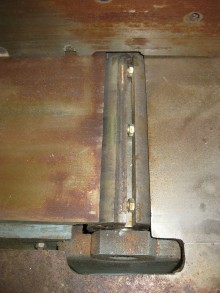
Jacob’s Refurbished Jointer
By: Jacob Heffelfinger (Monterey, CA)
Experience: 0-2 Years
Woodworker Type: Hobbyist
Project Type: Refurbished Tools
Finish Type(s): Paint
Finishing Technique(s): HVLP
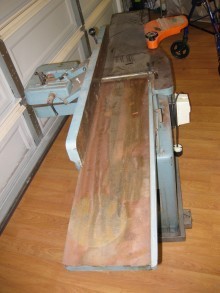
I’m relatively new to woodworking and am finding that about 85-90% of my projects revolve around the shop just to get setup. I’m sure this was and is true for most woodworkers who are just getting started. This is obviously one such project. I bought this ~30 year old jointer for $250 through an ad on Craigslist. I probably could have used it with a little fine tuning straight from the storage unit, but I wanted that “new” feeling one gets when purchasing a brand new tool!
It’s an 8” Enlon jointer that many will recognize as almost exactly the same as an original Grizzly G1018 or several other makes of about the same period. Apparently, all of these jointers came from the same factory with slight differences (paint, switch location, etc.) as specified by the commissioning companies.
When I picked the jointer up, it had been sitting in storage for about 15 years and was still covered in the sawdust and pitch from the one and only project it had been used on. As you can see, it also had a decent amount of rust on the tables, fence, stand, and mobile base.
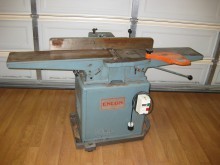
I started by disassembling the entire jointer. I then used a combination of chemical paint remover, wire brushes, and elbow grease to remove paint and rust from the stand. Then I discovered the joy of sand blasting…I sandblasted the remaining paint from the cast iron pieces, making sure to protect the tables and fence. This saved A LOT of time. Each piece, including the motor, with rust inhibiting primer, three coats of paint, and three more of clear coat. I removed the rust from the tables using Bioshield T-9 and a scouring pad for the top layers. Though there was no pitting, I unfortunately had to move to sand paper to get the most stubborn bits off. I started with 220 grit and worked my way up to 3000 grit automotive paper using a MDF board to make sure pressure was evenly distributed so I would keep the tables as flat as possible. I cleaned the cutter head, had the knives sharpened, and used Marc’s jointer setup video and a newly acquired OneWay Multi-Gauge to align everything. I’m getting great results, but think I’m going to get a spiral cutter head to replace the current one. Setting the knives on this thing is not fun!


January 6, 2014
Poll: Did You Make a New Years Resolution?
It’s that time of year again: the time when people make promises to themselves that they’ll never keep! ha! While I like to poke fun, the new year is a great time to think about what you hope to accomplish in the shop over the next twelve months. I tend to set realistic goals for myself in a very unofficial sense. That way I am more likely to achieve those goals and I don’t have to be too concerned if I don’t. Not the most adventurous way to go but it works for me. So how about you? If you made one, tell us about it in the comments.
Have you made any New Years resolutions about woodworking?
January 5, 2014
Shop Stool Build-Off
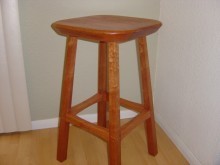 One of my most-used projects ever is my shop stool. I built it many years ago when I lived in California. The design is from David Marks and the project was featured on Woodworks. You can actually buy the paper plans on his website or you can purchase the video here. So if you haven’t already built yourself a nice shop stool, you should probably consider doing so.
My internet woodworking pal Chris Wong recently announced a Shop Stool Build-Off that I thought was a very cool idea. We are helping to sponsor the event by offering up a 1 Year Wood Whisperer Guild subscription. He is likely to have other prizes available as well. I don’t yet know the criteria for selecting winners but I think the prizes are just the icing on the cake. Building a nice sturdy shop stool is really the challenge and the prize all in one! If you’re interested, sign up here.
From Chris:
“The idea of this build-off is to have a group of woodworkers simultaneously build a shop stool and share pictures along the way.”
The build will begin Saturday, January 25th at 8 am Pacific though you can certainly do your research and planning ahead of time. After the stools are complete, Chris will share your pictures on his blog and distribute the prizes. You can read more and sign up for the event on Chris’s blog.
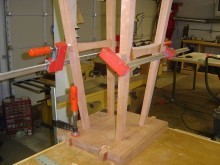
As I scoured my hard drive to find the stool picture above, I found a few of the in-process shots from the build. As you can see, even back then I had a problem acting “normal” in the shop especially where there was a camera around. Nicole loves it, especially around the holidays when we take family photos.

January 2, 2014
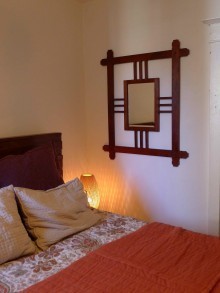
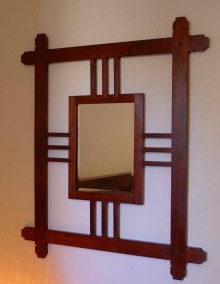
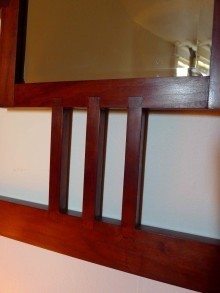
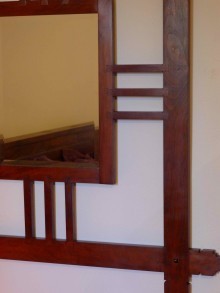
The Mysore Mirror
By: Chandan Narayan (Toronto, ON)
Experience: 0-2 Years
Woodworker Type: Hobbyist
Project Type: Frames
Material(s): Solid Wood
Finish Type(s): Dye, Shellac, Wax
Finishing Technique(s): Brushing
The inspiration for this Mirror Frame came from my grandfather’s home in Davangere, Karnataka, India. My family would visit there from California every other year when I was a kid. I had a vague recollection of the mirror which bade you goodbye as you exited the house.
When my grandparents and extended family in Davangere all passed away, they tore down the century-old house. The mirror went to my uncle in Bangalore, though my father admired it very much. I decided to replicate the mirror based on a single photograph. My wife and I registered for a 9 week intro woodworking course at Central Tech High School in Toronto in the summer of 2012, where I learned some basic skills.
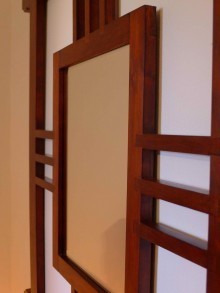
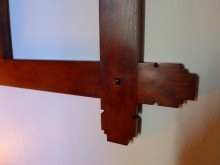
All the parts of the frame were milled to size at my friend’s shop, but all the joinery (half-laps, full laps, and sliding dovetails) and decorative shapes were done using hand tools in our apartment kitchen. The ebony plugs were an homage to my Californian upbringing (a la Greene and Greene).
With the help of the Wood Whisperer’s expert videos on the General Finishes Dye stains and shellac top coating, the mirror was completed and shipped to my folks in California.
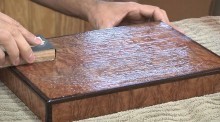
213 – Rubbing Out a High Gloss Finish
One of the biggest challenges woodworkers face is getting a nice smooth blemish-free finish. Let’s face it, very few of us have spray booths and our shops are far from ideal finishing environments. It’s to be expected that our finish will nearly always have dust and other pieces of debris residing within it. Fortunately, there is a way that just about ANY finish can be improved and it happens well after the final coat is applied. That process is called rubbing out.
Rubbing out is nothing more than abrading the surface until it’s nice and smooth. Take it to a high enough grit and you’ll be polishing the surface to a super high gloss. Stop sooner at a lower grit and you can achieve the perfect semi-gloss, satin, or matte finish.
The key to this process is letting the finish cure. Even after a finish dries to the touch, there is an additional period of time before the finish is up to full hardness. The harder the finish, the better it responds to rubbing out. Yes, this terminology is very hard to discuss with a straight face. Anyway, here’s a general guideline for wait times.
Lacquer, Shellac, Water-Based Finishes: 1 week
Oil-Based Varnish: 2 weeks
If you want to play it safe, wait 3-4 weeks for all finishes. Since finishes can differ dramatically from brand to brand and formulation to formulation and environmental conditions also play a role, you’ll want to err on the side of caution giving the finish plenty of time to cure for best results.
Rubbing out is a three-step process (not including pore-filling) that does require some specialized tools and materials. There are also lots of options and alternatives in this arena, so don’t be afraid to experiment a bit after doing some additional research on your own.
Fill the Pores
If you have an open-pored wood or one with deep grain lines, you should definitely do a pore-filling process. This can be done in a number of ways using a variety of materials, but I really like using Timbermate water-based filler. Once the pores are filled and the surface is flat and smooth, we can begin applying finish.
Stage One: Leveling
 No matter how good a finish looks, it will always have surface imperfections. To level things out, I like to sand by hand using a piece of plywood faced with cork. I use 320 grit wet/dry paper and a bit of soapy water as a lubricant. The soapy water helps prevent sandpaper clogging.
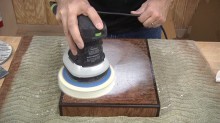
Stage Two: Smoothing
 Once the surface is leveled, we can proceed with abrading the surface with increasingly higher and higher grits. I like to use Festool Platin Abrasives, 500, 1000, and 2000. Unfortunately, it seems you can only get these pads in the large 15-packs which are quite expensive. As an alternative, try Mirka Abralon pads in 500, 1000, and 2000 grit.
These pads work with standard hook & loop random orbit sanders and do the work of smoothing the surface quickly and efficiently. Once again, soapy water serves as a lubricant.
Stage Three: Polishing
 The final steps of the process bring the surface to a super deep gloss. White there are traditional abrasive powders that you can use for this purpose, like rottenstone and pumice, the newest formulations in automotive rubbing compounds work like a charm. You might want to experiment with various brands but the one I decided on was Menzerna, primarily based on Jeff Jewitt’s endorsement of the product. I use two formulations: IP 2000 and SF 4000.
To apply the polishing compounds, I use Surbuf pads. These soft foam pads fit right onto standard hook & loop sanders. It’s a good idea to dedicate a pad for each specific compound so as to not end up with grit contamination.
 After the surface is fully polished, you should be left with a deep rich gloss that has no equal!
Interesting in learning more about the Humidor shown in the video? Join the Guild today!
December 31, 2013
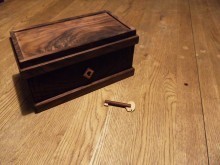
Kristiaan’s All Wood Locking Jewelry Box
By: Kristiaan Brenard (Belgium)
Experience: 5-10 Years
Woodworker Type: Hobbyist
Project Type: Boxes
Material(s): Solid Wood
Finish Type(s): Oil
Finishing Technique(s): Wiping
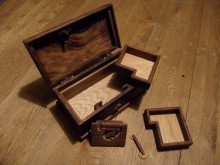
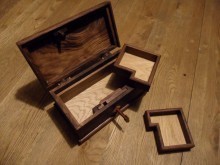
I always try to make my projects completely out of wood. Or at least I try to use as little other material as possible. Using wooden hinges was the first step for me to accomplish this. From the first time I used wooden hinges on a box, I hardly ever have used metal hinges again. Since I like things that are locked in some way, I began thinking/searching for possible locking mechanisms that could be made out of wood. Of course there are thousands of possibilities to make a wooden locking mechanism, visible and non-visible, and I did have a lot of fun trying different things over the last couple of years. What I did not try was a real lock (like a standard metal lock with key) because I didn’t really know how to start or if it would be possible. Until one day I came across the book by Tim Detweiler, “Making Working Wooden Locks”.
I went immediately to the local bookstore to order the book, I couldn’t wait to try this. The projects in the book are made to a very large size, more like conversation pieces than for actual practical use. But that doesn’t matter, I was just interested in the mechanism and therefore it’s a great book! I chose one of the designs in the book and made it smaller so that I could apply it to a box. I was quite surprised. I had expected it to be much more difficult than it was.
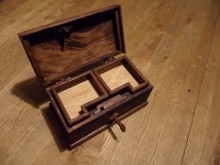
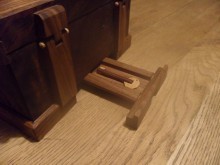
This jewelry box was my first attempt. I’ve made boxes with a better overall quality but for a first time endeavor, I was quite happy with the result. One problem though, because once attached, it wouldn’t be possible to see the lock nor would it be possible to see that it’s made out of wood. To solve this, I didn’t glue the lock in place, instead it can slide in place and is then secured with wooden pegs. Surprised reactions guaranteed ;)
I made a lot of things and I definitely will make a lot more but this is one of the special projects because it’s the first attempt of something I was thinking about for years but just never actually tried, until now. I hope you like it, and most of all I hope that I encourage some of you to also try this. I’m sure that I’m not the only one who is struggling with ideas and not sure how to make a start on them or thinking that it is too difficult.
December 30, 2013
Poll: Woodworking When You’re Sick?
 Tom’s inspiration for this poll was the fast that he just had a nasty sinus infection. And while I didn’t have a sinus issue, I did recently have a gruesome stomach flu thanks to daycare germs. While I did get a few things done in the shop while I was in recovery mode, I wasn’t really very productive and the only tool I touched was a drill. In general, I try not to work with any tools when I’m not 100%.
But some folks who do this woodworking thing as more than a hobby may not be so lucky. Sure, you take days off when you need to but the sooner you get back to work, the sooner you can collect that paycheck. So how about you? Do you ever do woodworking while you’re sick?
Have you ever woodworked while you were sick?
December 19, 2013
Woodworkers Fighting Cancer 2013 Update
The results are in! We had 210 Easel submissions and a total of $11,411 (the number went up since I filmed the video this morning).
We easily exceeded our goal of $10,000 and were able to give a substantial chunk of change to CancerCare. If you’d like to see the list of donors, take a look at the scrolling widget on the CancerCare Team Page.
We would like to thank each and every person who helped us out by building easels, making donations, and spreading the word about this event. We couldn’t have done it without you.
Don’t forget that you can still order your Woodworkers Fighting Cancer T-Shirts and Mugs!
Here’s to a happy and healthy new year!!
2014 Guild Projects
Are you considering a Guild Subscription for 2014? Well perhaps this will help you decide. The following projects are on deck for 2014. Sign up for a 1 Year Subscription today and you’ll get access to all three of these projects as they occur over the course of the year!
And if you’re looking for a last-minute gift for the person who has everything, you can purchase gift certificates to the Guild. To quote Cousin Eddie, “It’s the gift that keeps on giving the whole year!”
Sculpted Contemplation Bench – January 2014
 This sitting bench’s graceful curves are carved using a combination of power tools and hand tools. We’ll look at various carving implements available to woodworkers as well as alternative options that could make the job easier. I originally designed this bench back in 2005 so we’ll take some time to consider the overall look and how it might be improved upon. A project like this will not only hone your woodworking skills, but also your eye for design.
Morris Chair – May 2014
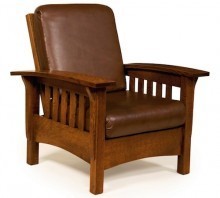 The Morris Chair is a classic woodworking project with a rich history dating back to 1866. The chair features a cushioned seat with a reclining back. The version of the chair we’re building is a play on the Mission style version popularized by Gustav Stickley in 1904. Pictured left is an example of a Morris chair, but not the exact chair we’re building.
September 2014
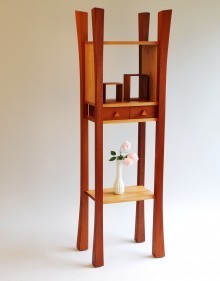 James Krenov (1920 – 2009) is a renknowned furniture-maker who influenced countless modern woodworkers. Krenov is perhaps best known for his amazing cabinets, typically held aloft by a set of beautiful long sweeping legs. Our friend Tom Buhl built his own version of a Krenov cabinet, pictured left, and we’ll make our own version using Tom’s plan as a starting point.
Keep in mind that if you aren’t interested in all three projects, you can simply pick and choose your projects throughout the year via our A La Carte system. But if you are interested in all three projects, the yearly subscription is definitely the best deal. Sign up today!


