
Marc Spagnuolo's Blog, page 99
March 3, 2014
Poll: Have You Tried Inlay?
Inlay is a wonderful way to embellish your projects. There are many ways to get the job done but essentially, you need to create a recess and then fill that recess with another wood species. If you’re interested in learning how to do this with your router, check out this video.
So the question today is, have you ever tried inlay? If so, what did you think of process? Piece of cake? Too finicky?
Have you ever tried making an inlay?
This poll was created by Tom Iovino of TomsWorkbench.com.


215 – Greene & Greene Blacker House Chair
 The Blacker House was one of the Greene & Greene Ultimate Bungalows built back in 1907. The entire house, furniture included, cost about $100,000 US or $2.5M in today’s money. And because trivia is fun, did you know that the interior shots of Doc Brown’s house in Back to the Future were filmed inside the Blacker House? Exterior shots were of the Gamble House. Both are located in Pasadena, CA.
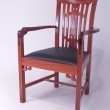
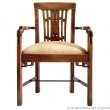
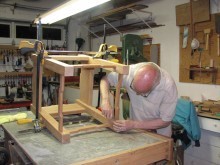
One of the most adored pieces to come out of the Blacker House is the living room chair. Many people have endeavored to re-create this chair and most put their own personal spin on it. One of my favorite variations comes from William Ng, owner of the William Ng School of Fine Woodworking. And it just so happens that William teaches a class on how to build his version of the chair, the only class of it’s kind. Since this project was on my personal bucket list, I took the opportunity to attend the class this past February and this video is the result of that effort.
Below on the left is William’s chair and on the right you can see the original, courtesy of Gamblehouse.org. William’s version conforms to modern standards for a dining room chair with a taller back and a comfortable seat height.
If you’re interested in building this chair, William offers this class a couple times a year. You can look at the latest class offerings here. And if the chair doesn’t fit the bill, take a look at all of the other great classes offered at the William Ng School of Fine Woodworking.
Finishing, Simply Put by Charles Neil
Is there anything more fun than starting a review with disclaimer? I consider Charles Neil a friend. Although we never met in person, we have had numerous chats on the phone and I even interviewed him in the Guild. I also wrote the Foreword to his finishing book which is the subject of this review. That said, if I didn’t like the book I would have just kept my mouth shut. The fact that this review exists is, in fact, something of an implied endorsement by itself.
 Charles Neil’s Finishing, Simply Put, is a 231-page wealth of information. I think one of the best ways to describe it is a “brain dump.” Charles is a guy who has extensive years of experience in the finishing world and probably finishes more projects in a month than I’ll finish this year. He has so many tips and tricks (as well as unique perspectives) that it would be a shame not to capture that information in this format for the world to benefit from. I had a feeling that’s what I would find in this book and I wasn’t disappointed. Another way to describe the book is a “missing manual.” In other words, a book that goes between the lines of the other books on the market, cutting right to the chase and filling in blanks.
The book immediately caught my attention by starting with a frank discussion about finishing preparation. Charles is a big believer in thinking about the finish before and during the build, not just after. This finish-focused approach to the building process sets the stage for a successful project. He then dives into blotch control, color treatments, chemical stains, application methods, sealers, defects, and rubbing out. The book closes with a very pleasant surprise: advice on setting up indoor and outdoor finishing areas. As someone who typically finishes in his driveway, this was very much appreciated.
The book is self-published by Charles and is wire-bound. The front and back pages are laminated which is great for a book that is likely going to end up in the shop on your finishing bench. The pictures are large and plentiful, which is extremely important in a finishing book.
Another important aspect of the book comes from the subtitle: “No Chemistry Degree Required.” If you ever saw one of Charles’ woodworking videos, you know he has a very no-nonsense style of teaching. And he isn’t one to over-complicate things with industry jargon. That core piece of Charles’ personality comes shining through in this book. At no point did I feel bogged down with chemical terms and because of that, the book is very approachable. It also helps that the book is unapologetically written in a pleasant conversational style. Frankly, the entire time I read the book I was reading it in Charles’ voice. I’m doing my best Charles impression right now but you won’t be able to appreciate it.
So is this book a solid replacement for other well-known finishing books on the market? Well, that depends. If you find traditional finishing books from folks like Jewitt and Flexner to be difficult to read or they simply don’t keep your interest, this is probably the finishing book for you. Even though it’s jam-packed with information, at no point does it seem daunting.
What if you already have one of the traditional finishing books sitting on your shelf? Is this book worth the purchase? Yes, I believe so. The reason goes back to what I said earlier in that this is more like a missing manual that cuts to the chase. In many ways, this book starts where others leaves off. So I feel it will also serve as an excellent supplement to existing finishing books that might already be in your collection.
Finishing, Simply Put, is packed full of the kind of information you might eventually absorb if you spent a few years working in a finishing shop. I don’t have that kind of time on my hands so I’ll read this book instead.
You can purchase the book directly on Charles Neil’s website. Happy finishing!
February 28, 2014
Last Day for iTunes Downloads!
If you use iTunes to watch The Wood Whisperer, today is the last day (for a while, at least) that you’ll be able to download our entire archive. The video host we’ve been using since 2006, Blip.tv, is no longer allowing downloads via iTunes. Transitioning over 200 videos to new servers will take some time but we do plan to have the entire archive available for download in the near future. We just can’t guarantee exactly when that will be.
So download while you still can! As of tomorrow, you’ll probably see the last 20 or so videos in the feed. Of course all new videos will continue to show up in iTunes as usual. Those videos will also continue to be downloadable directly on the website. Every month we’ll be adding more videos to the archive as we work our way back.
Thanks for your understanding and thanks for watching the show!
Compliments That Don’t Feel Like Compliments
 Let’s say you spent weeks working on what you consider to be your best project yet. Hours were dedicated to wood selection alone followed by weeks of effort in the joinery and construction. A week was spent perfecting the finish alone! With all of this emotional and physical investment, you finally bring the piece in from the shop for your family and friends to enjoy. Most compliments are the typical supportive pats on the back you expect from your loved ones, but then someone drops a bomb on you. They say something that is totally meant as a compliment, but your woodworker’s brain doesn’t quite know how to process it. Here are a few examples that I frequently hear.
“That feels like plastic!”
What the woodworker hears: “You spent all this time working on a natural wood product only to end up with something that feels like it was generated in a laboratory by a machine.”
What they meant: “The finish on this piece is so smooth and so perfect that it has a similar feel to plastic. You are incredibly skilled to be able to produce such a finish in your shop!”
“That looks better than store-bought!”
What the woodworker hears: “I am so surpised that you were able to make something that looks better than that particle board crap sold at Walmart!”
What they meant: “I usually only associate quality with manufactured products because my experience with hand-made furniture is quite limited. Therefore I am pleasantly surprised that you are able to make something that actually looks better than a comparable product that was mass-produced by a company with millions of dollars invested in the production of said product.”
“You built that?!”
What the woodworker hears: “I can’t believe you are actually skilled enough to make that!”
What they meant: “I had no idea you were such a skilled and capable craftsman! I am very impressed!”
I know I can’t be alone in this observation. What compliments have you received that didn’t initially FEEL like a compliment?
February 26, 2014
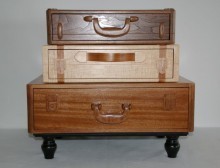
Ralph’s Suitcase End Table
By: Ralph Crowther (Mission Viejo, CA)
Experience: 10+ Years
Woodworker Type: Hobbyist
Project Type: Tables
Material(s): Solid Wood, Veneer
Finish Type(s): Oil/Varnish Blend
Finishing Technique(s): Brushing
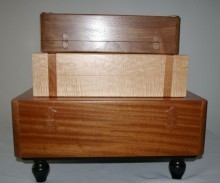
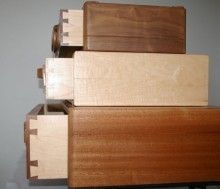
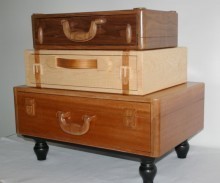
I like to make a unique piece of furniture to enter into the Orange County, CA fair each year. Last year my daughter, Kim showed me a picture of old stacked suitcases that were used by a designer as an end table. She suggested I make it out of wood. So with an idea in mind, I proceeded to sketch out a concept of stacking three suitcase on a small table.
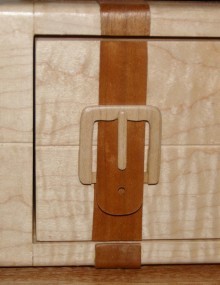
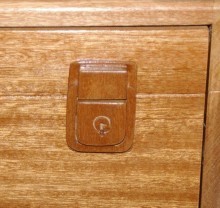
Each suitcase is basically a box with a drawer. The top and bottoms are veneer over MDF substrates. They each have a groove to simulate where it would open as a suitcase; non-functioning latches in the front; hinges in the back; and handles that serve as the drawer pulls. The middle box has a strap all around made from two pieces of veneer steamed and bent to the shape of the box and a strap handle made from 6 layers of veneer that were pressed in a jig. All the latches and handles were cut, shaped, and carved to look like the real thing (down to the screw details). The dovetails in the drawers were all hand-cut (this was my first attempt at hand cutting half blind dovetails and I viewed several online videos including Marc’s to see how to do it). Since it’s a table I used a poly satin clear finish.
The suitcases are permanently doweled together and were placed on a small table with turned legs made from poplar. I painted the table and legs a flat black to make it disappear so the suitcases are showcased.
February 23, 2014
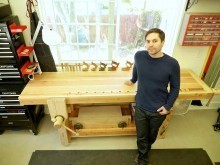
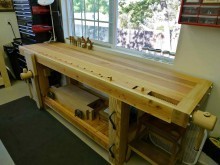
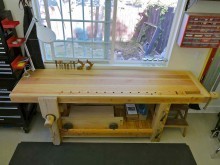
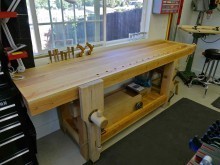
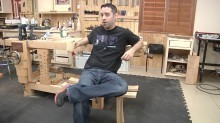
Michael’s Roubo Workbench
By: Michael Corwin (Los Angeles, CA)
Experience: 2-5 Years
Woodworker Type: Hobbyist
Project Type: Shop Projects
Material(s): Solid Wood
Finish Type(s): Oil/Varnish Blend
Finishing Technique(s): Wiping
This is my recently finished Roubo workbench. I’ve never had a workbench before and I decided on the Roubo for its utilitarian nature, ease of work-holding, and somewhat beginner-friendly construction.
For the construction of the top and legs, I used 6×6 construction-grade Douglas Fir beams that I picked up locally, and 2×6 Douglas Fir for the aprons. The leg and wagon vise chops were made of hard maple, as was the chisel/saw rack. After milling all the wood with both hand planes and my combination jointer/planer machine, I used dowels for registration before gluing everything up. Tenons for the legs were cut on the table saw and cleaned up with a router plane, and all mortises were done by a combination of router and chisels.
The vise hardware came from Lake Erie Toolworks and after some tedious finessing, I was able to get both the leg and wagon vise to operate smoothly and accurately (wax is your friend!). For the final flattening of the top, I decided to use Marc’s method of riding a router rails as featured on the TWW website. This video was a godsend after many hours of pre-flattening the top with a series of hand planes and the entire process of final flattening went off without a hitch, especially considering there was some major twist in the top after glue-up.
For the finish I used the 3-part boiled linseed oil/mineral spirits/poly that I’ve used on almost every other project I’ve done. Overall I’m extremely happy with how the bench came out, warts and all! I was able to employ hand tool techniques for the first time in my young woodworking journey and I learned that being a “hybrid woodworker” is definitely what I want to be in the future. Special thanks to Marc for his Guild videos on the Roubo build, as well as Shannon from The Renaissance Woodworker for all the help in making this bench. Happy woodworking to everyone!
February 22, 2014
Don’t Miss Out On This Month’s Giveaway!
 Every month we give away something AWESOME here at The Wood Whisperer and February is no exception! In fact it’s our biggest giveaway yet!
If you haven’t already, be sure to head on over to the Giveaway Page to learn about Powermatic PM1000 and enter to win. And be sure to bookmark the Giveaway Page so you can keep up with the latest giveaway details (because we do this every month! New giveaway will start on March 1st!
The winners notified directly & this post updated after they are randomly drawn at the beginning of the month.
February 19, 2014
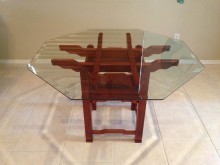
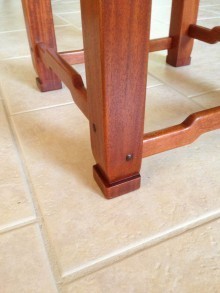
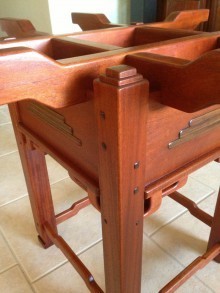
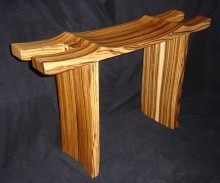
Randy’s Greene & Greene Table
By: Randy Braaten (Phoenix, AZ)
Experience: 5-10 Years
Woodworker Type: Hobbyist
Project Type: Tables
Project Style(s): Greene & Greene
Material(s): Solid Wood
Finish Type(s): Dye, Oil/Varnish Blend, Wax
Finishing Technique(s): Wiping
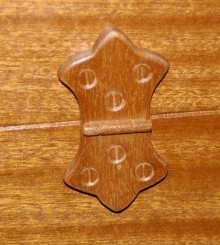
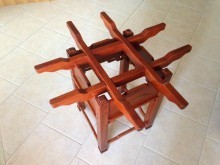
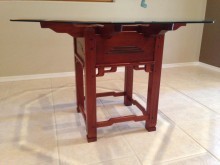
This is my interpretation of a Blacker style table. The glass top is certainly not traditional but I think it shows off the joinery and inlay well. The table is completely made of genuine mahogany. The finish is a 50/50 mix of General Finishes medium brown and orange followed with a coat of straight orange. The top coat is Arm-R-Seal rubbed on six times and wax.
The inlay and plugs are made of Caco De Negro—not quite as dark as I hoped for, but still a good contrast. The inlay is similar to a drawer pull from the Blacker house and of course the brackets are from one of the chairs. This is my first major piece in the G&G style after a practice frame to experiment with the joinery and plugs. The housed M&T joints were quite time consuming but worth it. I’ve read to cut the housing first but for me it made more sense to cut the mortise, fit the joint, then scribe around the perimeter of the piece and router out the recess finally paring to the line with a sharp chisel. I think I’m hooked, and plan to build a set of chairs to go with the table.
February 18, 2014
214 – Power-Sculpted Contemplation Bench
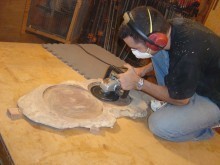 Back in the early days of my woodworking, I was heavily influenced by a show called Woodworks. The host, David Marks, would frequently engage in a process that was very new to me at the time: power-sculpting (aka power carving). I was so excited by this process that I drove all the way up to Santa Rosa to learn the technique from the man himself. So what you see in this video is largely inspired by the work of David Marks. If you’re interested in seeing some of the old Woodworks episodes, you can do so here.
 Once I returned home from Santa Rosa, I set out to create a simple sitting bench that would incorporate this carving technique. While the bench was only meant as a prototype, I went on to teach a class on the topic and my buddy Tom Iovino was able to write an article about the project for Woodcraft Magazine. Several years later, I wrote an article for Popular Woodworking Magazine on Free-form Sculpting which you can download here for free.
The New Version
 What you see here is the new and improved version nearly ten years later. My goal with this project was to make some subtle changes that result in big improvements. I did something very similar with a step-stool project a couple years ago. The idea was to apply my current knowledge base and design sensibilities to simply make the bench better, or at least my personal interpretation of “better.”
Power-Sculpting Tools
The two primary tools I use are an angle grinder and a 7″ polisher. I use an Arborech TurboPlane in the grinder but there are lots of other options available to you. If you’re looking to save a few bucks, check out the Holey Galahad Discs.
Learn More
This video is actually just an excerpt from a longer 2-hour series published in the Wood Whisperer Guild. We have six videos that show you every detail you need to know to build this project and refine your power-scultping and design skills. If you’re interested, check it out!
LIMITED TIME GIVEAWAY!
In honor of my friend David Marks who is the inspiration for this particular project, we are giving away a free DVD: Season 4 of Woodworks! All you need to do is enter a meaningful comment below. To clarify, a meaningful comment is one that asks a legitimate question or makes an on-topic observation. A non-meaningful comment is something like, “Pick me!” or “First!” or “Have you seen my baseball?” We’ll pick a winner tonight at 5pm Eastern. Good luck!


