
Marc Spagnuolo's Blog, page 101
January 30, 2014
Logan’s Secretary Desk
By: Logan Newman (Rochester)
Experience: 5-10 Years
Woodworker Type: Hobbyist
Project Type: Desks
Material(s): Plywood, Solid Wood
Finish Type(s): Oil, Oil/Varnish Blend
Finishing Technique(s): HVLP
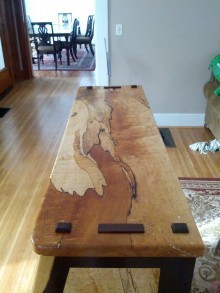
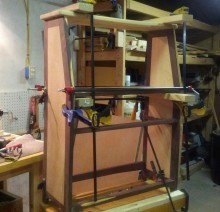
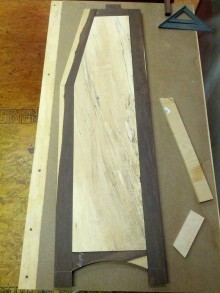
My wife and I needed to organize a spot in our house that had become a dumping ground for the kids’ school backpacks and various papers. We decided that a secretary desk with ample storage at the bottom would give us a place to throw the kids’ stuff. I came up with a design and my wife and I went to take a look at my favorite wood store where she selected the species and some boards to use. We picked up some Katalox, which I had never used before. It is a VERY dense South American wood and forms the frame of the desk. I actually broke several screws in it until I started drilling pilot holes. The Katalox is neat because the sapwood is blonde and the rest of the wood is very dark, which matches the spalt lines of the Spalted Maple beautifully.
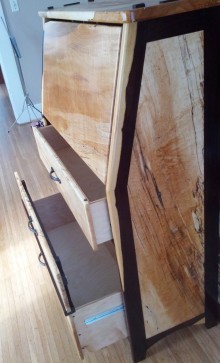
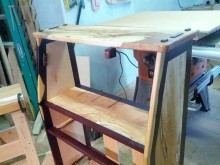
I built the sides first – it has a frame of Katalox with a 1/2″ thick piece of Spalted Maple on the outside and maple plywood on the inside. Crosspieces of Katalox were used to join the 2 sides using simple pocket screws and dowels. The top piece has mortises for the tenons from the side pieces because I like the look.
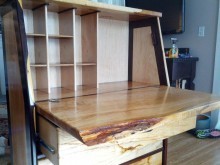
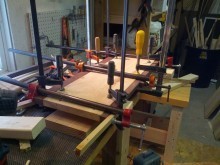
The cubby holes are made of half lapped maple as the uprights and walnut as shelves. I actually used spare lumber from around the shop to make these. I routed grooves in the top and bottom of the desk and cut mortises on the maple pieces to allow me to slide these in from the back. I used pieces of Katalox to make a neat little piece to fit between the top of the desk and the upright dividers.
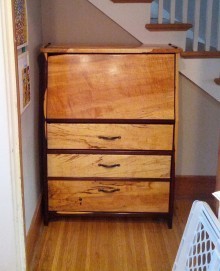
I designed this so that the top shelf acts as a support for the drop front of the desk and placed small pieces of Katalox on the sides to support the closed drop front. I used maple dowels to hold these to the sides (just because I liked the look). A plywood back provides support for the whole design. The whole piece was finished with 2 coats of Watco Danish Oil rub over 2 days and Arm-R-Seal coats over 5 days.
Overall, this was one of the hardest pieces I have built and it did not turn out as wonderfully as I had hoped. My wife, however, loves it and insists that I am the only one who notices my failings. I guess that’s good since I learned a great deal from this project, especially how hard it is to work with Katalox! I don’t think I will be using this wood again anytime soon.


January 27, 2014
Poll: What Do You Do With Warranty Cards?
 Pretty much every brand new tool comes with a warranty card. Registering your product with the company can save you quite a bit of hassle in the future, while also making sure you’re aware of any safety recalls. As important as that is, many folks simply ignore the card since it’s a pain in the butt to fill out and drop in the mail. Although these days, you can often register the product online. So we’re curious, what do you do with your warranty cards?
Do you return tool warranty cards?
Shannon’s Table Saw Sled
By: Shannon Huber (Lakeville, MN)
Experience: 10+ Years
Woodworker Type: Hobbyist
Project Type: Shop Projects
Material(s): MDF, Solid Wood
Finish Type(s): Wax
Finishing Technique(s): HVLP
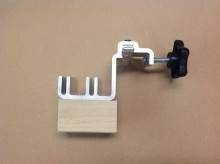
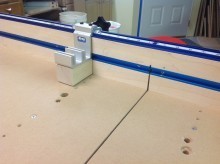
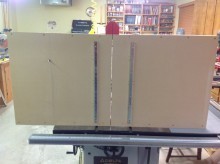
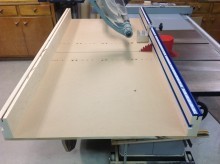
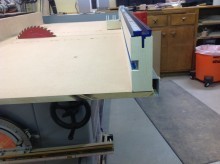
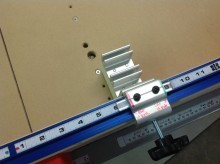
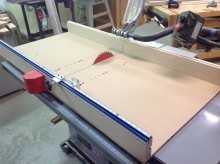
This is a table saw sled that I designed, adding many features that I have never seen on a table saw sled. I added a Kreg precision track and stop kit to the top. I had to modify the rear fence to accept the kit. This setup lets me set the length of the piece just by setting the stop at the correct measurement on the built in tape measure. I also added a t-track to the face of the fence for future jigs. The sled rides on Incra 25.5″ long special edition miter slides. These slides are adjustable for zero play.
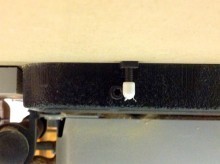
There are two safety features. The first is a rear block of maple painted red to save my fingers when the blade extends the rear of the sled. The second is an added through bolt that hits against a bolt that I installed on the table saw (I drilled and tapped a hole). This insures the sled can not move any further forward, therefore the blade will not protrude any further in the rear of the sled. Below is a video I made that further explains how to build this, along with tips on squaring the sled fence to the saw blade, thus ensuring perfect 90 degree cuts.
January 21, 2014
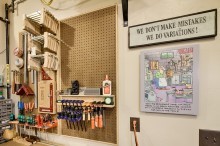
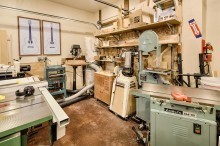
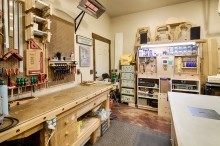
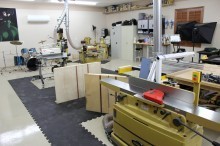
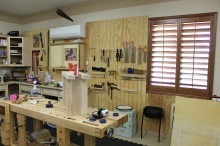
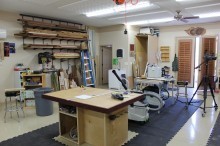
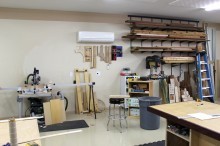
Tim’s Workshop
From: Tim Braun (Heber City, UT)
Shop Type: Garages
Shop Size: 0-249
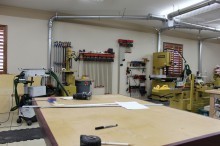
My newest garage shop is still a work in progress (as are all shops). I moved from Arizona to Utah in Oct 2009 after a lay-off. My tools went right into storage and I moved in with a friend. We have known each other for a long time and have lived together multiple times. I always took over the garage with my tools.
I told him when moving in, that I didn’t want that to happen again! After a while, we started talking garage cabinets…In came the tools! Last fall I moved my tools back in and my car out. I’ve added a gas infrared high-intensity heater (25,000 BTU), blown-in insulation to the ceiling and insulated the garage doors. I had an electrician add two dedicated 20 amp outlets and 220 volt for my table saw. I’ve built two cabinets so far. The tall one is waiting on more material for door and drawer fronts.
I didn’t want to throw up open shelving because of the future cabinets to come and the garage is nicely finished, but I needed shelves for storage. I decided to make a non-permanent wall to block the single garage door on my shop side and better insulate the area (it’s a 3-car garage). I made it so that the door could clear if opened, but unplugged the opener because I put tall things on the top shelf that I don’t want to come crashing down when I accidentally hit the button!
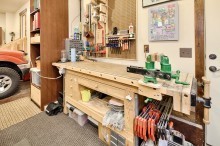
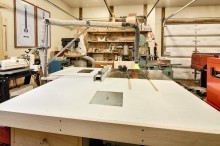
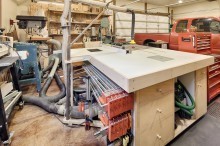
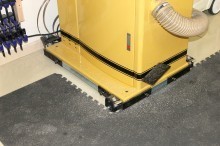
Many of my tools date back to the mid 90’s when, out of college in Illinois, I started buying to get serious about woodworking. I grew up woodworking as my grandfather and a family friend were both woodworkers and my mom owned (still owns) a big craft store. She kept us all busy! But I never had great tools as a kid. The General table saw was added around 2005. Last winter I built the outfeed table (3’x 5’), taking inspiration from Marc’s TWW/FWW torsion box project. I built mine specifically as an outfeed with undercuts for the back rail and access door for the motor. I also flush-mounted the Kreg pocket-hole plate. The base came from re-purposed cabinets that I added a sub-base to and a space in-between for my Festool vacuum. Besides the table saw, every tool is on wheels. Space is TIGHT! I have a shop’s worth of tools in a single car space. I positioned the table saw so that I can rip full-size sheet goods (barely) if I move the band saw and belt sander. My outfeed table and workbench stay nice and warm under the heater.
Over the years, I built a table or humidor or box. When I moved to AZ, I bought a welder and built many pieces out of steel and wood. Then I decided to challenge myself and built an acoustic guitar in 2003-04. It took a while, but It turned out great and I got hooked. I have focused on guitar making for the last ten years, on and off. I have built four acoustics and 7 electrics. I still own several and the others have gone to friends.
With my shop back up and running and with meeting some other builders and guitar shop owners here in Utah, my goal is to start building guitars again. One problem – I don’t have enough room in my shop for all of my guitar-building jigs! Maybe in shop #5.

January 19, 2014
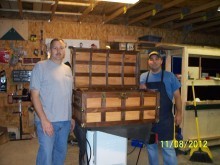
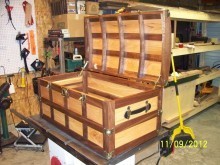
Robin’s Retirement Chest
By: Robin Thistle (Patuxent River)
Experience: 0-2 Years
Woodworker Type: Hobbyist
Project Type: Chests
Material(s): Plywood, Solid Wood
Finish Type(s): Shellac, Wax
Finishing Technique(s): Wiping
This was a retirement chest for a friend of mine who retired after 20 years of Naval service. I’ve done a few smaller projects but wanted to learn new skills and increase my confidence.
The walnut and oak were rough cut lumber purchased from a local Amish mill. Overall the project took about two months to complete, working mostly nights and weekends. I watched Marc’s video and took his advice on using the rabbet joints versus the miters in the corners, that saved time and they were hidden mostly by the brass hardware anyway. The most difficult part was the lid, cutting the ribs to size, cutting out the tenons and mortises and fitting the panels in, as they needed to be bowed slightly.
My friend Steve came to my rescue quite a few times, lending a hand and providing some advice. He also allowed me to use his shop on more than a few occasions throughout the course of the project. We added a simple lift out framed glass lid to the tray and simple shelves to support it. We finished it with a dry rub of boiled linseed oil to bring out the color in the wood and two coats of shellac, finishing with wax.
Overall the plans were simple to follow, although we did find a few contradictions between the cut list and written instructions in Rockler’s plans, such as the short sides of the tray. Be sure to read each step carefully.

January 16, 2014
12 Shop Layout Tips
I consider it part of my job to answer emails from my fellow woodworkers. Guild members or not, everyone receives a response. Occasionally, I get a question that requires a very detailed answer and that answer in and of itself would make for a decent blog post. That happened this morning when a Guild member asked me for advice on shop layout. I brainstormed some basic tips that I think apply to nearly all wood shops (at least the ones that incorporate some power tools). Of course, shop layout is something that evolves over time and really comes down to one’s personal preferences and tool choice. But here are some simple rules of thumb that came to mind; some more obvious than others. If you have some tips to add, please do so in the comments!
1. Think About Your Workflow
Consider the path a piece of wood takes from the moment it enters your shop. This will help guide you through nearly ALL of your shop layout decisions in the future.
2. Group Tools Sensibly
 Tools that perform similar functions or are typically used in succession should be located near one another. One of the most obvious groupings is the jointer/planer/table saw triad. During the milling process, these three tools will be used repeatedly so it’s a good idea to limit the distance between them.
3. Store Tools Near the Workbench
I like to keep my tools very close to the workbench, since that’s the place I will most likely use them. This includes both hand and power tools.
4. Put Your Bench Near a Window
 Natural light not only makes it easy to see what you’re working on, it makes for a more pleasant working environment. Your workbench is the place you will likely spend most of your time so why not have it located in a spot that gives you a nice view out the window.
5. Store Wood Near the Entrance
 Personally, I think it sucks to have to lug massive pieces of rough lumber and 4′ x 8′ plywood sheets all the way across a shop. Much respect to basement dwellers who have little choice in the matter. But for those with garage shops, you should think about storing your sheetgoods and solid stock near an entrance. This way when you come home from the lumber dealer, you can back up your vehicle and quickly load the stock into the shop.
6. Put the Miter Saw Near the Lumber Rack
 Many folks rely on the miter saw for cutting down rough stock, so it’s a good idea to limit the distance between these two things. If you’re a Festool MFT owner, it’s a good idea to do the same. My plywood rack is located right next to my MFT.
7. Locate the Assembly Table Centrally
During nearly all stages of a project, the assembly table is used for holding various parts and pieces. It makes sense then to have the assembly space located somewhere near the center of the shop. This way, your project parts are never more than a few steps away.
8. Keep the Clamps Near the Assembly Table
 Since most of your assembly will be done on the assembly table, it just makes sense to have your clamps nearby. If you’re short on wall space, try a rolling clamp cart! If you use your workbench for assembly, keep your clamps near the workbench. Check out these two helpful articles for clamp racks: A Simple Utilitarian Clamp Rack and A Parallel Clamp Rack.
9. Locate The Table Saw Centrally
Much like the assembly table, nearly every project in my shop makes extensive use of the table saw. And like it or not, my outfeed table becomes a second storage area for project parts and cut-offs. So I like to have mine located in the middle of the shop for the same reasons as the assembly table. Additionally, it’s nice to have ample space around the tablesaw for those larger workpieces. Unless it’s absolutely necessary, I’m not a fan of storing the table saw against a wall.
10. Finish Near a Window
 If you have a dedicated spot for preparing, mixing, and applying finishes, try to locate it near a window. Often times we’re dealing with toxic chemicals and it’s nice to have an open window nearby for ventilation. You’ll have the added bonus of natural light to help with color matching and close inspection of your work.
11. Put the Right Tools Against the Wall
Some tools work better against the wall than others. Bandsaws, router tables, drill presses, mortisers, and stationary sanders are all good candidates for placement against a wall. If you keep these tools next to each other, however, you may need to occasionally pull them away from the wall for full access. That brings us to our next tip.
12. Stay Mobile
 No matter how much you plan ahead, it’s almost inevitable that you’ll need to move your tools around, even if only temporarily for a particular operation. So the more mobile bases you incorporate, the better. In my opinion, this is the key element to a successful small shop.
January 13, 2014
Woodworking: Even Olympic Athletes Do It!
With the Olympics coming up in February, I’m getting pretty excited to see the world-class athletes doing what they do best. It always makes me wonder what would have happened if I had focused on skiing more as a kid, growing up a stones throw from all the Lake Tahoe ski resorts. Maybe I would be a competitive skier, or maybe I could be a alternate on the U.S. curling team… who knows.
For most of the world, we look on in awe of the amazing feats these athletes accomplish during the Olympics. Maybe in our spare time, we do a little skiing, or act like we are on a skeleton track when we are on our waxed up sledding saucers. We want to be able to do what they do!
Woodworking – An Olympic Sport?
Well, for one Olympic athlete, Dana Vollmer, the tables are turned. Now, I doubt that she watches the New Yankee Workshop with the same excitement and anticipation as we did watching her set a world record in the 100 meter fly in 2012; but she does enjoy woodworking in her spare time.
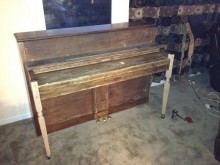 When asked how she strikes a balanced life with her training, woodworking was her answer. She’s the real deal too, garage workshop and all! She talks about her piano restoration project in the following video on NBC’s YouTube channel. Image sourced from her Facebook page.
Watch the video here!
It always amazes me when I learn more about the celebrities in the world. It turns out, they are not much different than you and I… except they are well known and have some amazing talent. Being a woodworker, I always love to hear about celebrities who enjoy woodworking. Many of us are quite aware of Nick Offerman’s affinity for woodworking, but did you know Harrison Ford was a carpenter prior to his career in acting? Amazing!
So, the next time your significant other gives you a hard time about your woodworking addiction, you can simply let them know that even Olympic gold medalists do it, and it’s part of your training. This year, while you are cheering your favorite athletes on in Sochi try to imagine what these high performance people do when they are not breaking world records. Who knows, maybe Shaun White practices dovetails in his spare time!
Poll: Do You Like Having Your Work Critiqued?
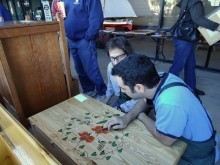 Over the years, I have received MANY critiques of my work, be it furniture, podcasts, DVDs, books, or even the way I speak. With the exception of two or three cases, ALL of them were unsolicited and from strangers. But that’s just life on the internet. If you post anything online, you should expect at least one or two people to offer an opinion on the quality of your work. I’d guess that most folks aren’t looking for criticism but there are some who absolutely thrive on it. And if you ever submit a project for judging, be prepared for there to be a rock in your gut when you see people inspecting your work with a pad and pencil in-hand. By the way, that’s a picture of David Marks and me judging a contest at a local Woodcraft store.
Part of the trouble with criticism is the fact that you have to first determine the validity of the critique and whether or not it applies to your situation. You know what they say opinions are like, right? But some opinions, even the ones that hurt, contain incredibly useful advice.
So the fundamental problem for someone who likes to critique is you never know if the person posting their project really wants your thoughts, unless they ask for it. As the person posting the work, you essentially have to critique the critiques!
No matter how you slice it, it’s a sensitive subject. So I’m curious, how do you feel about having your work critiqued? Can you share a story of a particular critique that was really helpful? Or maybe you had a negative experience you’d like to share.
Do you like having your work critiqued?
January 12, 2014
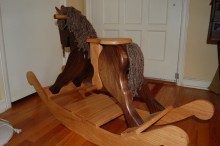
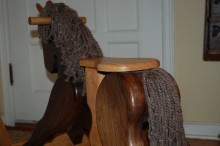
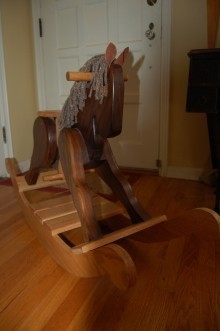
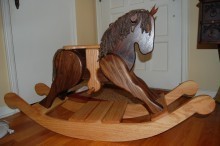
Sean’s Rocking Horse
By: Sean Kelsey (Topeka, KS)
Experience: 5-10 Years
Woodworker Type: Hobbyist
Project Type: Kids Projects
Material(s): Solid Wood
Finish Type(s): Oil, Oil/Varnish Blend
Finishing Technique(s): Wiping
I searched all over the internet for a good rocking horse plan. I wanted to build one for my son (first child) and ended up finally getting if finished to give to him for Christmas last year. Off and on it took 2+ years. Kinda hard to work on it when the shop is in the basement. I usually had to help take care of him when he was awake and when he was asleep, I couldn’t work on it. He loves it, as you can see from a picture taken Christmas morning!
I built the horse out of walnut and everything else is oak. The mane and tail is yarn. I put on 2 coats of clear danish oil followed up by 2 coats of clear poly. I made sure before doing the poly to write with a sharpie on the bottom To, From and the year. In between coats I lightly rubbed it down with some steel wool. Thanks for taking a look.


January 10, 2014
The Hobby Balance
It’s probably obvious to most of you that I eat, sleep, and drink woodworking. I’m guessing you’re pretty much the same, though you may hold down a day job in a different field. A craft like woodworking can quickly become an obsession as we contemplate new designs, new materials, new tools, and shop improvements.
As much as I enjoying getting lost in piles of wood chips, I also realize how important it is to occasionally step away. To not only take a break, but to take some time to geek out about other things. Now I’m not talking about family time here since that’s something I build into every day of my life. I’m talking about other hobbies. Do you golf? Do you like to barbecue? Do you like to keep tropical fish? Do you play video games? These are all things that can suck you in just as quickly as woodworking can and to tell you the truth, these secondary hobbies make me a better woodworker. If for no other reason, they give me time to re-charge my virtual 18-V batteries. By the time I’m done focusing on my other hobbies, I’m ready to dive back into woodworking head first with a full tank of creative fuel.
Since woodworking is my career, this sort of thing may be a little trickier for someone like me to pull off than it is for you, but I still think it’s a necessary element to anyone’s success. Perhaps woodworking IS that secondary hobby that makes you better at your day job. Just keep in mind that hobbyists can burn out too!
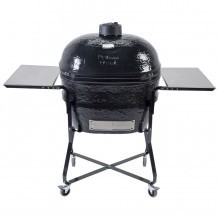 And just in case you’re wondering, I have many hobbies outside of woodworking. One of my favorite pastimes is grilling and barbecuing. Pictured left is my choice in smoking gear: a Primo XL komado style cooker. The things that captured my attention while I took a nice holiday break from woodworking were setting up our home entertainment system for cord-cutting and playing video games. I’ve been documenting my cord-cutting experience on my personal blog in case you care to read about it. Anyway, have a great weekend everyone!


