
Marc Spagnuolo's Blog, page 100
February 17, 2014
Poll: How Do You Feel About Sharpening?
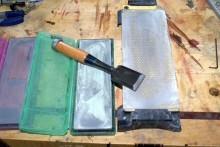 Do you remember the first time you realized what how a sharp well-tuned plane is supposed to behave? I sure do! For years I used an old Stanley block plane and thought it was the worst invention in the world. Instead of shavings, it would often emit large chips. I quickly learned that it was always safer NOT to use it on an important project. Then one day I visited a friend’s shop and had an opportunity to try out his new block plane. Fortunately, my friend knew the value of sharpening and the planing experience was pure pleasure. At first I thought it was the plane itself but in reality, it was the blade doing all the work. From then on, I knew that finely-honed blades were going to be a constant in my shop. I did some research on sharpening techniques, bought some water stones and a honing guide, and the rest is history.
While I don’t particularly enjoy the sharpening process, I don’t hate it either. I usually reserve it for those few days between projects when I’m in the mode of shop cleanup and maintenance. Knowing how powerful the results will be makes the entire effort worth it, so I don’t begrudge the process. How about you?
How do you feel about sharpening your tools?
Poll created by Tom Iovino of TomsWorkbench.com.


Don’t Get Caught Playing With Your Dinghy!
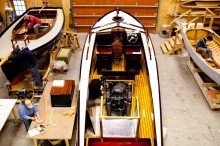 When I look at a wooden boat, the same thoughts run through my mind as looking at furniture did before I began woodworking – How do they do that? With almost anything that has to do with woodworking, I want to learn more about it, and building my own boat is definitely on the list.
Luckily, Andy Miller’s podcast, Boatworks Today, has been a great resource to learn more about boats, and I haven’t missed an episode of it yet. If you haven’t seen Andy’s videos yet, go check out his site and podcast. To be honest, I’ve been waiting anxiously for Andy to do a full-on boat build so I can figure out how the heck you build a boat that won’t sink. For now, I’ll keep waiting for the build, but I recently stumbled upon a great resource that can definitely help you learn how to build boats: The Great Lakes Boat Building School.
I ran across this video about the boat building school one day while perusing the internet for interesting woodworking videos. The focus on traditions and craftsmanship obviously caught my attention, but seeing all the boats in various stages of being built really got me excited. Check out these videos and tell me that you don’t want to quit your job tomorrow and move to Michigan to learn boat building!
The school offers one or two year certification programs for those who are serious about a boat building career, but after visiting their website I also found out that they offer a “Build Your Own Boat” summer workshop. Although I don’t have any plans to do it for a living, I sure would like to take a workshop about it.
Check out this video and try to tell me with a straight face that you don’t want to build a boat.
So, do you have a boat project on your horizon or have you built your own boat? Let me know what your project is/was. For me, just a little dinghy will do the trick so I can learn the basics of sailing.
February 16, 2014
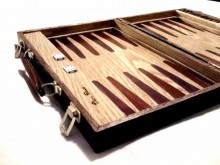
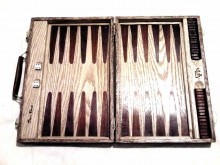
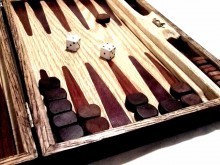
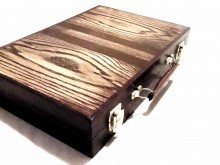
Daniel’s Backgammon Set
By: Daniel Ogden (Saskatchewan, Canada)
Experience: 5-10 Years
Woodworker Type: Professional
Project Type: Games
Material(s): Solid Wood
Finish Type(s): Commercial Stain, Oil/Varnish Blend
Finishing Technique(s): Wiping
A few years ago when I made this project, I had a friend ask me to build a backgammon set. I thought that it wouldn’t be hard to get done, so I took up the offer even though at the time I was only 14 and still in school. As you can imagine, it took a long time to finish.
The construction of the box was rather easy. It was nothing more than building a frame, cutting it in two at the table saw, then gluing the top and bottom planks on. After I had the main box done, I cut some grooves around the edges for the purple heart trim. But where it got tricky was the interior. My friend wanted me to make it look like it came out of the 1800s. I knew I had to make thin planks of wood for the interior, and that I had to use double bevel marquetry to inlay the spikes on the game board. So after I inlay the spikes, I left the boards in my bench to warp a bit. This technique if you can call it a technique, worked out great. Before they warped anymore I glued them to the box leaving a good gap on all sides which I later filled with trim.
Once the box was built, I decided to go with a really old-looking stain which I applied real thick to give it a nice old look. I heard of all the ways using chains and stuff to make your project look old, but never really liked the end result. All I did was use a cotton cloth and rubbed on a heavy coat of stain, then after it dried I took my scraper and scraped off most of the stain. I’d never tried this technique before, and it seemed to come out perfectly. So I’d definitely recommend it.
In all, it turned out to be a really enjoyable project, although I probably won’t make it again, just because it takes a lot time to build.

February 13, 2014
TWW Store—Delayed Shipping Notice
Just a quick note to let you know that the TWW Store “Shipping Department” will be away starting February 19th thru March 13th. However, The Wood Whisperer Store will remain open during this time to allow purchases of our digital products to continue as normal. This means that you’ll still be able to place orders for tangible products, but your order will not be processed or shipped until after March 13th, when the shipping team will be back in full swing.
Sorry for any inconvenience this may cause. In the meantime, if you just gotta have a cool Wood Talk T-Shirt or a TWW Coffee Mug and you can’t wait, I suggest you place your order before 3 PM PST on Tuesday, February 18th to insure prompt shipping!
February 12, 2014
Mosaic Tile Coffee Table
By: Shane Mooney (Offaly, Ireland)
Experience: 0-2 Years
Woodworker Type: Hobbyist
Project Type: Tables
Material(s): Solid Wood
Finish Type(s): Oil
Finishing Technique(s): Wiping
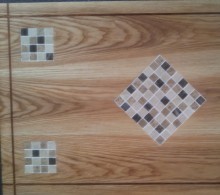
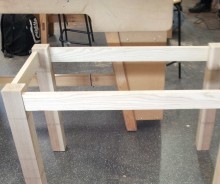
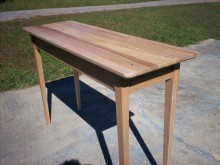
I chose this project for my final year practical exam in school. I had spare mosaic tiles left over from a recent tiling job, so I decided to put them into the tabletop. After various design ideas I came up with the final project.
This design was made to provide a built-in coasters for drinks or plates. It is a common household problem having cups mark, burn and scratch the wood. Now with the tiles you can easily rest your hot cup of coffee, tea etc. on it or you can place hot plates or any cutlery on the tiled centre piece.
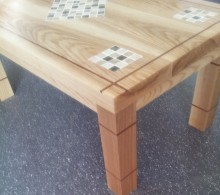
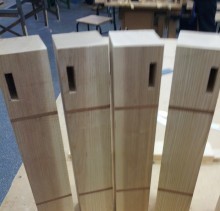
The idea of a colour scheme was always an idea but the rest of the wood in the room is Ash so I couldn’t really put a lot of Mahogany with it. So after thinking it out, I came up with the idea of the Mahogany inlay on the outline and it turned out very well. I also put inlay on the 4 legs. This was the most challenging as it took a lot of time to cut about 40 pieces—32 to go into legs and 8 spares. I left the inlay slightly proud of the surface and sanded it flat to give a good tight even finish.
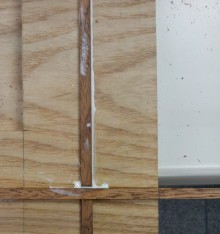
The table top is 3 planks of Ash biscuit-joined together. The frame is mortise and tenon. I cut 2 mortises and 2 tenons by hand and then 2 mortises on the mortiser and 2 tenons on the table saw. This allowed me to experience both hand tool and power tool methods. All joints fitted tight in the end!
I finished the table by sanding from 60 grit to 80, up to 120 and 180 and finally to 320 grit then dampening it down and sanding by hand to 320. Then I applied 4 coats of Danish Oil with a rag, sanding with steel wool in between coats. I then applied 4 coats of wipe-on polyurethane for protection.
Thanks for reading. I hope you like my table. Any questions or comments, let me know!
February 9, 2014
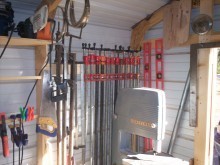
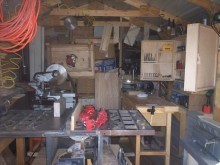
Richard’s Small Tennessee Workshop
From: Richard Arveaux (Smithville, TN)
Shop Type: Standalone
Shop Size: 0-249
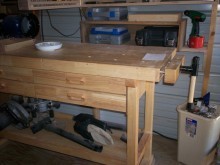
My shop is quite small at 108 sq ft. It’s actually a 9′x 16′metal storage building, of which 3′ is used for storage! I have the following tools snugly inside: 13″ planer, 40″ lathe, 12″ sliding miter saw, shop-made router table, small compressor, table top drill press, 5′ workbench w/vise, 6″ jointer, 10″ bandsaw, a couple of clamp racks both long and small, a wall-mounted shop-made storage cabinet, and a 10″ table saw.
I started putting this shop together just to build various things for the yard and garden. I mostly had arbors and benches in mind. I had a neighbor ask me to build an arbor for their climbing rose bushes and from there, things just started getting out of hand! Friends and neighbors started putting in requests and the next thing I knew, I had a small business going… requiring considerably more tools than when building arbors. Now, I’m building furniture…60% of which is made from reclaimed barns that I re-mill and re-purpose! I try not to work around the natural worm holes or bee holes, and do what I can to incorporate them into the finished product! I have a few pictures here, but I do a lot of small stuff like: one sided towel racks, cutting boards and racks to hold them, and wall-mount coat hangers. I use mixed antique woods using poplar and cherry.
The larger pieces usually are tables from old poplar or old oak. The project I’m working on at the moment is a queen size bed using a mixture of 100 year old red oak and new kiln-dried oak with M/T connections and held with draw-bored pegging using some black walnut from my firewood pile. Speaking of the firewood pile, I’ve made a few wooden mallets out of that pile using red oak, white oak, hickory, ash and a local wood the locals call “ironwood.” I’m not sure what that wood is exactly, but it’s rock hard and the leaves look like beech!
The best part of my shop, even though it’s small, is that I can reach everything easily, well, except maybe the bathroom! Thank you Marc, for the inspiration to keep at it!


February 6, 2014
Limited Time Offer—Order Guild T’s in Women or Youth Sizes!
Hi Folks, TWWMom here from the TWW Store. Every now and then we get requests from fans asking about special sizes for GUILD T-shirts. As a small family business, it is not practical for us to carry every size and then sit on inventory, waiting for it to move. However, we are getting ready to restock our inventory of GUILD T-Shirts which is an opportune time to extend an offer to you. If you would like to place a special order for a particular size shirt that we do not regularly stock in the Store, now’s your chance! Choose the original Charcoal colored Tee or Blue in the following cuts and sizes:
Youth Sizes XS to XL
Women Sizes XS to 3XL
Placing your order now means no additional fees or costs to you for special ordering. Your order just becomes part of our normal restocking. The only difference is that I will invoice you Proir to placing our order. Then when we receive the T’s, your order will be shipped.
Let’s keep The Wood Whisperer doing what he does best, so please address all Orders, questions or inquiries to me, TWWMom at store@thewoodwhisperer.com I will be more than happy to assist you and get your Order placed. Thank you!
This is a limited time offer—orders will be taken until COB, Friday, February 14th with delivery expected late March.
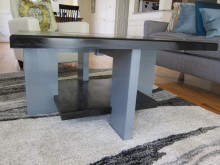
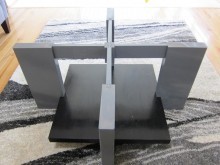
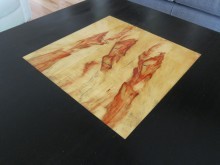
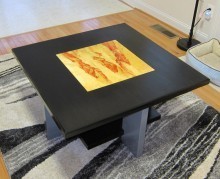
David’s Box Elder Coffee Table
By: David Doria (Havre de Grace, MD)
Experience: 0-2 Years
Woodworker Type: Hobbyist
Project Type: Tables
Material(s): Solid Wood
Finish Type(s): Oil/Varnish Blend, Paint
Finishing Technique(s): Brushing
My wife and I recently moved into a new house. The living room was very empty, so we decided that I should build a coffee table to fill it up. As I’m very new to woodworking, I was unsure of the species of wood to use for the table. I brought (dragged) my wife along to the lumber yard to get her input on the matter. She saw a piece of Box Elder, in all it’s red splotch glory, and suggested (decided) that it should be incorporated into the table. I ended up resawing the piece to 1/2″ thickness in order to make the 18″ inlay. I finished it with marine Waterlox, it looks like glass–very cool! I heard that I should use something like this with UV protection or the red splotches would turn brown.
The rest of the table is 8/4 soft maple. After a few weeks of trying different finishes to get a strong black to contrast the Box Elder, I punted and painted it black. Lesson learned–don’t try to achieve a dark black with a white wood.
For the table base, I took inspiration from the Wood Whisperer’s Sculpted End Table project and used sliding dovetails for stretchers attached to each leg with a little “turret” in the center for them to attach to.
I’m not sure it was a great plan to work above my level for such a prominent piece in my house, but I certainly learned a lot along the way, and most people will never know about all of the issues hidden under the top :)
February 2, 2014
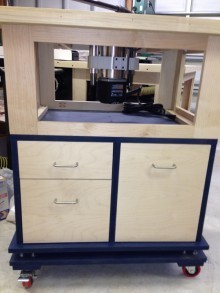
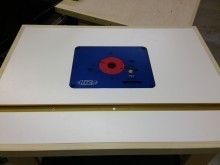
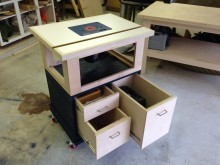
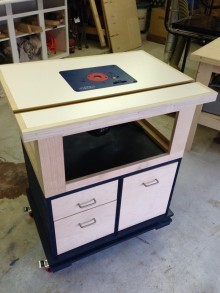
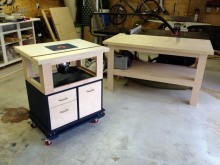
Raymond’s New Router Table
By: Raymond Chafin (Pearland, TX)
Experience: 5-10 Years
Woodworker Type: Hobbyist
Project Type: Shop Projects
Material(s): MDF, Plywood, Solid Wood
Finish Type(s): Paint
Finishing Technique(s): HVLP
I recently started to recommission my shop, and it finally came time to get a router table back in service. After searching around for ideas, I decided to build a table inspired by a video series from FineWoodworking. My table is very similar to the series, but with my own dimensions, drawer configuration, and table support construction.
The base cabinet is 3/4″ MDF, held together with Hi-Lo screws, supported on a dual layer MDF bottom that is separated by 1.5″solid wood stretchers. The drawers are 3/4″ maple plywood, and are flush fit to the MDF cabinet. The table support structure differs considerably from the FineWoodworking series. The series calls for 5/4 Maple held together by dowel joinery. I used 1″x4″ maple, and domino’ed the corners to form solid 90 degree “legs” and then used pocket screws to attache the horizontal face frame, and support stretchers beneath the table top. Although I’m sure the 5/4 maple would have been super rigid and durable over time, the nominal 1″x stock was on hand.
The top is dual layer 3/4″ MDF, and a laminated Formica top. I routed the recess for the Kreg lift, and the tool track, and trimmed the edges in some spare poplar I had lying around.
I still have to build a fence and dust collection hookup, but so far I am very happy with the result. I plan to start a series of picture frames soon and this table should start to earn it’s keep. I certainly welcome any thoughts or comments.

January 30, 2014
TWW Store News!
 Wood Whisperer Hats are back in stock! Check out the new color and lower price! Thanks to our awesome readers/viewers, we were able to make a bulk purchase and can pass the savings on to you! This is an unstructured cap with a low profile. The color is Black and features The Wood Whisperer logo embroidered on the front. And it sells for $16.99! Buy one today!
Our Hoodies and Woodworkers Fighting Cancer T-Shirts have been restocked and are available for purchase in all sizes.
We have had numerous inquiries about the Shop Master Apron. The Apron is currently on back order, but we expect to hear from our supplier any day. We will put a notice out when we have them back in stock and apologize for the inconvenience.
So stop by and check out the TWW Store today! See what’s new and be sure to check out our clearance section! Happy Woodworking!


