
Marc Spagnuolo's Blog, page 104
November 27, 2013
Powermatic’s Black Friday Sale
You should know by now that I’m a big fan of Powermatic. They’ve been a sponsor of ours for years now and I’m always glad to spread the Powermatic love with my fellow woodworkers. While there’s never a “bad” time to buy Powermatic, there certainly are better times than others. Enter the Powermatic Black Friday Sale!
From November 29th to December 2nd, you can get 15% OFF Powermatic machines and 20% off Powermatic accessories! Have you had your eye on that new PM1000 Table Saw or perhaps the PM1500 Band Saw? Now’s the time to jump into the black and gold water!
Most Powermatic vendors will be offering the special prices but you can always shop at Amazon.com.
Happy Holidays and happy shopping!


Sunglasses Made From Wood?
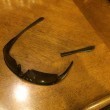 Marc’s recent tragedy involving Mateo and his sunglasses reminded me of a pretty awesome video that I recently ran across while surfing around the web. Creativity often comes from challenging the status quo. A small company in Portland Oregon gives a fresh update to sunglasses by using an old school material: wood! Just when you thought you’ve seen it all, someone decides that plastic sunglasses just aren’t cutting it, so they carve some out of wood.
 At first, I was taken aback at the idea because I had never heard of it before; but after giving it a second thought I realized that it was really not any different than the plastic frames we are used to today. I actually found myself laughing at the irony of my initial reaction since wood grain is quite often mimicked in plastic. Why not just use wood?
 Well, that’s exactly what Taylor Murray thought when he hand carved his first pair of wooden sunglasses. From the simple act of creating something different, a small business named Shwood was born in Portland, Oregon. Although the company has implemented processes to expand production, the final product remains handcrafted as the final details are still done by hand.
Shwood began as a simple experiment in design and craft, and it’s nice to see this company hasn’t forgotten those roots. Spotlighted on their Vimeo page are a bunch of clips showcasing other innovators in the Portland area within their “Makers” video series. Anyone who loves to see the spark of imagination come to life will enjoy checking it out.
So, the next time you have a tragic accident with your sunglasses, consider picking up some wooden shades from Shwood! Of course since we are all woodworkers here, we have to at least consider the option of building a pair ourselves. I’d be curious to know how you might go about it. Anyone ever try to make your own pair of sunglasses?
November 26, 2013
Hybrid Woodworking Launch Party: A Success!
It’s official! Hybrid Woodworking has launched and all pre-order copies have been shipped. If you still haven’t received yours by Dec 4th please contact us. Nearly 2000 books were autographed, packed, and shipped to woodworkers all over the world!
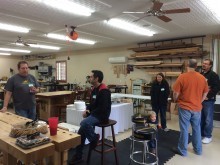
To celebrate the launch of the book, we held a launch party/BBQ at the shop last weekend. In spite of Mother Nature’s attempts to rain us out, the party was a success as 19 woodworkers and their families descended upon the Wood Whisperer shop. I cooked a batch of my not-so-famous smoked ribs and Nicole’s sweet tea flowed like sugar-filled brown river! I assure it tasted better than I just made it sound.
We’d like to thank everyone who showed up. A couple of extra big thank you’s go out to Scott who brought extra chairs and saved everyone from having to sit on the shop floor and Zac who helped us set everything up! I know there are many folks who wished they could have attended the event so we took a few pictures for posterity.


November 24, 2013
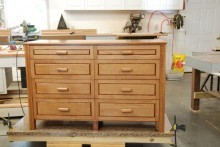
Jack’s Dresser
By: Jack Gill (Warsaw, MO)
Experience: 10+ Years
Woodworker Type: Hobbyist
Material(s): Solid Wood
Finish Type(s): Commercial Stain, Oil, Oil/Varnish Blend, Shellac
Finishing Technique(s): Wiping
I’ve been a hobbyist woodworker for more than 20 years. I started woodworking in my garage with just a few power tools and over the years upgraded and added as the budget would allow. My first major tool purchase was a used Craftsman 10″ radial arm saw. I did everything with that saw, mitre cuts, rip cuts, dados, and of course cross cuts. My first projects were end tables, blanket racks, plate racks, etc. Many projects ideas came from Woodsmith magazine.
After retiring in 2008 and a move from Nebraska to Missouri, I now have a 1200 sq.ft. dedicated shop which is well insulated, heated and air conditioned. My collection of tools has grown as well. I still have a “wish list” though and my vacuum system is still not finished. No space left for a closed-in finish room. Maybe I’ll have to build on!
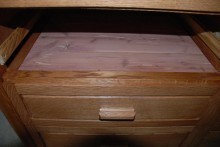
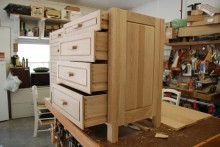
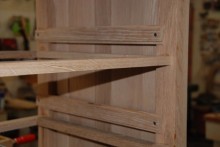
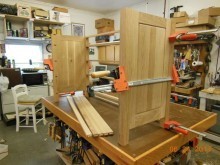
The dresser I recently finished starts out with a Google SketchUp drawing, as most of my projects do. Any changes I make to the final piece I try to update my SketchUp drawing with the changes. I enjoy the design process as much as the woodworking. I used quarter sawn white oak for the drawer fronts and top. Straight sawn white oak was used for the rest. I also put aromatic red cedar panels between the drawers.
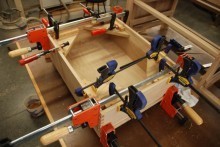
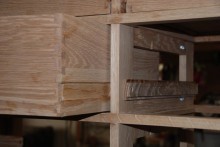
I started with the two end panels. I also rough cut the boards I would use for the top to let them acclimate to the shop humidity. After gluing up the posts and panels, I cut ½” dados in the insides of the posts to receive the tenon on the end panels. I used a shaker raised panel, stile and rail bit set to build the end panels. The next step was cutting the mortises in the end panel posts to accept the tenons on the rails for the drawer dividers. I cut the rail mortises in the legs before I glued them to the panels. I have a hollow chisel mortiser, so making mortises is mostly getting the locations marked correctly and making sure the chisel is square with the work piece. My next step was making the rails. I then did a dry fit with the end panels assembled and the rails installed. I hadn’t decided at that point how I was going to mount the drawers. Looking at several options, I chose sliding dovetails. I wanted to build as many parts as I could with wood. The only hardware I purchased were the brackets to hold the top in place and the screws to attach the drawer fronts. My main concern with the sliding dovetails was getting everything square, so the drawers wouldn’t bind.
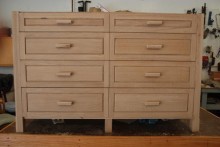
The drawers are all solid white oak with through dovetails. I cut the sliding dovetails in the drawer sides before I assembled the drawers. After mounting the drawers and getting them to slide correctly in the frame, I began working on the fronts. I numbered each of the drawers so they would go back in the same order. The fronts were quite easy to build. I again used the Shaker bit set and after assembly and glue up, I was ready to fit them to the openings and to attach them to the drawers. I marked and drilled the holes for the shop made pulls and then used those holes to adjust and temporarily attach the fronts to the drawers. When I had the best fit, I then attached the fronts with screws from the inside of the drawer to the front.
For the finish I wanted to match a bed I built a couple of years ago, I mixed 3 parts Golden Oak to one part Red Oak stain. I’ve used this mix on several of my projects. After the stain dried overnight, I used 100% wax-free shellac to which I added a small amount of boiled linseed oil. I’ve found the linseed oil prevents the shellac from drying too quickly and for me it’s easier to apply without getting sticky. As long as you don’t add too much linseed oil, it still dries very quickly. I always apply thin coats with a rag. For the final top coat, I used a semi-gloss oil-based polyurethane applied with a rag and sanded with 600 grit wet/dry sandpaper between coats.
November 21, 2013
Chairs by the Roadside – Inspiring Design Challenge for Charity
 There are many ways to help others in need, but doing through something you are passionate about always produces the best results. The Northwest Woodworking Studio recently combined a passion for design with aiding in the fight against hunger. Motivated by a passion for woodworking, the school was able to raise $10,000 for a local charity.
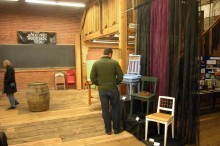
 The Northwest Woodworking Studio held the “Chairs by the Roadside” auction on November 8, 2013 in an effort to raise money to support Sisters of the Road Cafe, a local charity in Portland, Oregon. Mentor students of the school were given the task of building and adapting a simple chair design by the school director, Gary Rogowski, to be sold at auction. The proceeds of the event benefited the Sisters of the Road Cafe, an organization dedicated to feeding the hungry in Portland.
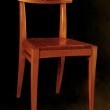
“Chairs by the Roadside” was chosen by Rogowski as the project theme given to mentor students of the Northwest Woodworking Studio. The students took a simple chair design by Rogowski and were tasked with molding that starting point into their own creation. As Rogowski explained, “What I did was to design a Cafe chair with loose tenons. I milled the stock and cut all the joints. Then I shipped the chair parts out to our graduates all over the country. They built the chair and then painted, carved, and embellished their chair. Whatever they wanted to do.” The finished chairs were then auctioned off. Out of the original 18 chairs, over half of them sold raising more than $10,000 for Sisters of the Road Cafe.
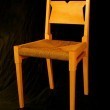
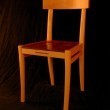
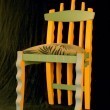
The design challenge allowed the students to begin at a starting point, and expand that design to impart individualism and craftsmanship. Although the underlying form of each piece is the same, it’s difficult to imagine that they all started out identical. The students utilized a number of techniques and design elements to transform their chair into something totally unique. No part of the chair went untouched. From different leg tapers to seat types, each chair had it’s own flair.
Projects like these not only inspire me to practice and expand my design abilities. It is always good to step outside of the comfort zone and explore design to see where it can take you. Being able to help others out while doing something you love and expanding our talents is the icing on the cake!
To find out more about the event, you can head on over to the Northwest Woodworking Studio Facebook Page, and if you want to learn more about the studio or Gary Rogowski, head on over to the school’s website: NorthwestWoodworking.com.
November 20, 2013
Michael’s Standalone Shop
From: Micheal Musall (Fishers, IN)
Shop Type: Standalone
Shop Size: 0-249
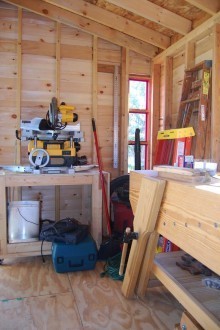
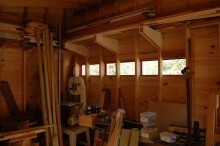
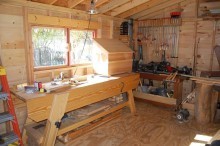
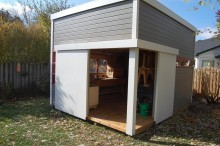
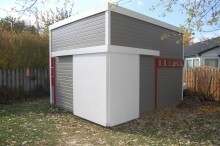
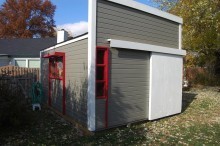
After years splitting woodworking chores between the mini-barn (rough cuts and heavy mill work) and garage (detail work, assembly and finish) I decided to design and built a standalone workshop in place of the mini-barn. My woodworking projects tend to be modern and “out there”, so I thought it would be appropriate that the new shop be the same way.
The dedicated shop saves time because before I built it, I would have to move vehicles, mowers and garden tools when I wanted to work on a project, then move everything back afterwards. The garage is no longer inundated with saw dust and the new shop’s wood floor will be easier on my middle-aged knees.
The shop is only 190 square feet, but with the scale of projects I work on, that is plenty of space. I recently decided to start using more hand tools and even built my first woodworking bench, so the small space is perfect for that. I wanted a lean-to design so any storage could be kept up and off to the side (instead of directly above with my former gambrel roof mini-barn). I wanted windows on at least three sides for natural light and two sliding doors at the corner to both maximize my wall space to place equipment and allow long pieces to be milled if needed.
There will be power supplied to it so I won’t be running an extension cord all the time from the house. The south windows can be removed when it is warm out. It took much more time to build (I still have some touch-up work left) but it has been worth the effort.
Holiday Project Ideas For Everyone
Do you have people in your family who are difficult to buy for? Tired of cheap and meaningless gifts from the airport gift store? Why don’t you try building something for them instead!
For the Cook
First up is a tried and true project. We call it the episode that launched a thousand cutting boards. Either make one for yourself or give it as a present. We guarantee it will be a great gift!
Or how about a simple knife block?
For the Person Who Enjoys Putting Things on the Wall
I don’t know if it’s a tradition in your house but calendars are always a staple gift in ours. So why not build a unique calendar holder for the calendar-lover in your life?
Yes we live in a digital world, but most people still love reading the paper version of a magazine or newspaper. Here’s something you can make to help them organize their collection.
Or maybe a wall shelf for storing stuff and things?
Make a custom frame for a prized photo or piece of artwork!
For the Office Worker
An easy project to make with scrap wood: a pencil holder. Do non-woodworkers still use pencils?
Since we have absolutely no other ways to tell time these days!
For the kids in your life
Added bonus to this project: if you build it and send us a picture by December 9th, 2013. We will donate $5 to this years cancer charity!
Give your kid something to do like rocking back and for for hours on this rocking horse!
A beautiful keepsake box, is great for kids or adults!
November 17, 2013
Are You Building Holiday Gifts This Year?
Unfortunately, I don’t have much time for making holiday gifts this year. Hopefully that’s not the case for you! So what do you have planned?
 If you need some inspiration and you’re short on ideas and time, you’ll want to check out Tom Iovino’s Last Minute Elf Week (Dec. 1st-7th). All week long, Tom will be sharing simple and quick projects that can be completed in time for the holidays! So I suppose even I don’t have a good excuse now!
Are you building holiday gifts this year?
November 14, 2013
Robert’s Beanbag/Chalkboard Easel
By: Robert Jacobi (Corpus Christi, TX)
Experience: 2-5 Years
Woodworker Type: Hobbyist
Project Type: Kids Projects
Material(s): Solid Wood
Finish Type(s): Paint
Finishing Technique(s): Brushing
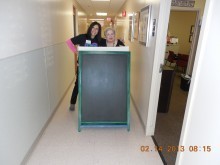
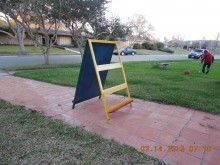
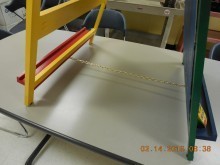
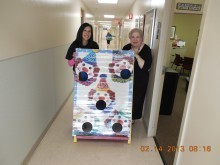
Driscoll Children’s Hospital puts on many events for its in-patients and alumni patients all of which involve games of some sort. One is a bean bag toss but the stand was just not sturdy enough to withstand the constant pounding of bead bags. So I constructed a large easel that would accept the bean bag face and on the other side a large chalkboard for the kids to be creative. The easel is large and versatile enough to be used for other games and signs. Since I gave it to the hospital, hundreds of kids, many fighting cancer or with cancer in remission, have enjoyed its use!
The design is a knock-off of an industrial easel I saw on Restoration Hardware. The joinery is simply a combination of dowels, pocket hole screws, and glue for added strength. In a hospital setting, especially a children’s hospital, you need to avoid anything that could bump, snag or cut a child which explains why the chain is on the bottom and in the middle of the easel. If I owned a router I would have rounded over all of the outside edges, corners, and intersections. The ladies in the pictures are Administrators of Volunteer Services at the hospital where I have the pleasure of volunteering two days a week.
November 11, 2013
Hybrid Woodworking Launch Party & BBQ
 Come celebrate the launch of Marc’s newest book: Hybrid Woodworking!. We’ve never done this before, but if you are in the Phoenix, AZ area on November 23, 2013, you won’t want to miss this opportunity to meet Marc & tour the shop. The event will be limited to 20 people and we will provide lunch (Marc will be cooking some BBQ!). If you don’t have a copy of the book yet, we will also have them available for purchase at the shop.
Once all available tickets are gone, Nicole will send out an email with additional information & directions. If you RSVP and find out you can’t make it, please let us know ASAP so we can release the ticket for someone else’s use. If you find that all tickets are sold out, be sure to sign up for the waitlist with the event. You never know if someone might cancel.
Disclaimer: We realize some of you will want to bring your families and that is fine. We just need to know how many family members are attending (we have limited space & need to know how much food to prepare). NOTE: The event will be held in the shop which is not a child safe environment, so you’ll have to keep an eye on your critters :)
Don’t see the registration form below? Click here to go to the page directly
Sell Tickets Online through Eventbrite


