Marc Spagnuolo's Blog, page 108
September 17, 2013
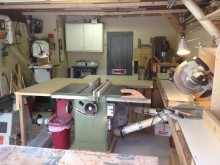
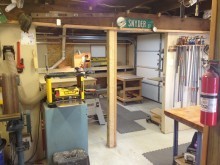
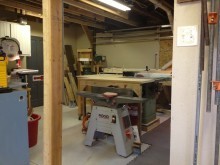
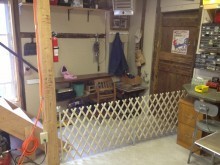
Bob’s Standalone Workshop
From: Bob Riefer (Collegeville, PA)
Shop Type: Standalone
Shop Size: 250-499
In my mind, when I look to get into a hobby, I need to try to maximize the potential that I’ll enjoy that hobby. For example, if playing basketball, I’d want a decent hoop and a ball that bounces. So, when I decided I wanted to get into woodworking, I set out to have a shop that would enable me to enjoy the learning process. Trouble was, I had no building experience, had a full time job, kids to raise, etc., etc. Oh, and my starting point was a 110 year old barn that was in shambles. The 25×30, 2-story structure leaned badly, was sinking on rotten posts, had inadequate and dangerous electric, no insulation…Great project for a newbie.
The dream (now realized) was to have an exercise room, general storage, a rec room upstairs and a 20×20 shop downstairs. At times, the project was a nightmare, but it turned out great in the end and I experienced enormous personal growth throughout the effort.
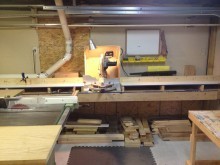
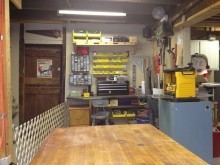
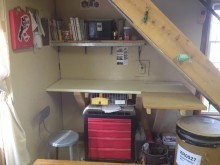
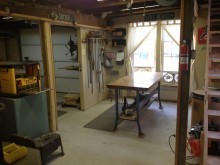
Anyways, fast forward 4 years, and the barn has been saved and I have outfitted my workshop to be pretty capable of almost any woodworking task. Put together through Craigslist and patience, I was able to equip the shop very cost effectively. She won’t win any beauty contests, but she sure does have personality!
I have an underpowered dust collection system (with Thien separator) that I need to upgrade at some point, cabinet table saw, 12′long miter station, drill press, band saw, 6″ jointer, 12″ planer, router table, and other standard construction tools (e.g., nailers, circular saws, etc.). I have yet to build up my hand tool collection, but I just want to build stuff right now and will return to outfitting the shop in the future.
I borrowed ideas from Sawmill Creek and my woodworking instructor and have been happy with the shop flow. Work surfaces are set at a common height, castors used when it makes sense, shop built everything to keep my budget and build my skills. It ain’t perfect, but it can grow with me over time.
I have built a fair amount of functional furniture such as Adirondack chairs, coffee tables, kitchen island, bar for our rec room and have done TONS of construction work now (full kitchen remodel, rec room build upstairs in my barn, etc.) and am looking forward to expanding my woodworking skills towards more difficult projects. I recently taught myself sketchup to aid the design process and am taking on some boxes for some upcoming wedding presents.
Thanks for looking!


September 15, 2013
Poll: Multiple Projects at Once?
There are a lot of steps to woodworking projects. No matter how large or small the project is, every one must go through the following steps: planning, acquiring stock, rough-cutting, milling, joinery, assembly and finishing. Since some of these steps drag more than others, like finishing, I can see why some folks might be tempted to start another project before the first one is totally complete.
 Personally, I avoid doing this. In fact, I truly have a one-track mind in that regard. I need to completely finish a project before even thinking about the next one. Recently, I had to break away from this personal policy due to time constraints. I was right in the middle of building a rustic outdoor dining table (future free site project by the way) when I had to put on the brakes to start the Greene & Greene Blanket Chest for the Guild. Seeing partially-milled stock and project parts laying around the shop drives me nuts! So as much as I am enjoying this blanket chest build, I simply cannot wait for it to be over so that I can complete the unfinished project sitting in a pile on my outfeed table.
So while it can’t always be helped, I avoid working on multiple projects like the plague! What about you?
Do you ever start a new project before finishing an old one?
This poll was created by Tom Iovino of TomsWorkbench.com.
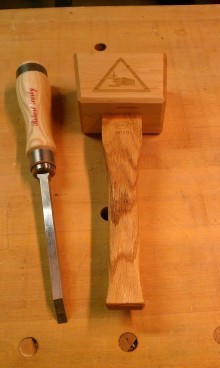
Thor’s Mallet
By: Doug Nicholson (Acworth, GA)
Experience: 10+ Years
Woodworker Type: Hobbyist
Project Type: Shop Projects
Material(s): Solid Wood
Finish Type(s): Oil
Finishing Technique(s): Wiping
I have been using a turned mallet that I made several years ago out of some laminated pieces of red oak. I still have it and it serves quite well to this day, although a chunk of it finally went flying a few weeks ago.
I finally got around to purchasing a set of Sorby sash mortise chisels and figured it was time for a respectable cabinetmaker’s mallet. I have access to a laser cutter at work, so I figured why not dress it up just a touch and have a little fun with it.
The head is left over hard maple from when I built my Roubo workbench a couple of years ago and the oak handle is from the scrap pile. The handle has about a 10 degree splay into the head and I put in some walnut wedges to keep it secure. It shouldn’t go anywhere for quite some time.

September 13, 2013
The New Giveaway System
I’ve heard a few grumblings recently about how we are doing the new monthly giveaways. You can see the new system here. While you can still enter by simply submitting your email address like always, we now have some new options that will increase your chances of winning by making use of social media. This puts the folks who don’t use social media sites at a disadvantage.
If this bothers you, let me ask you a simple question: Would you rather have a 1/100 chance of winning a 5-pack of pencils or a 1/1000 chance of winning a $410 router, a $130 Tapering Jig and a $120 Clamping System?
To put it bluntly, the only reason these companies offer items for the giveaway is because they get something out of it: exposure. The more exposure they get, the more higher value items they are willing to offer up. And while there will always be a certain percentage of people who don’t use social media, you have to understand that the rest of the world does. By tapping into these social channels, we can offer these companies an insane level of exposure for their investment. This is why we are able to give away something north of Crackerjack prizes.
Please remember that these giveaways are free and even a small chance of winning today is a chance you didn’t have yesterday.
*Edit*
And while I’m setting the record straight, let me say a few words about international shipping. MOST US-based giveaways do not allow international entries. Like it or not, shipping overseas is expensive. Those who pre-ordered my new book from outside the US know exactly what I’m talking about! Personally, I can’t begrudge a company for NOT wanting to pay this extra fee. That said, every item we have control over will always be open to international entries. But when it comes to outside giveaway sponsors, we always give them a choice. Since they are doing the shipping, it’s their prerogative.
OK I feel better now. :)
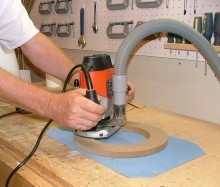
Custom Dust Port Fittings For Portable Power Tools
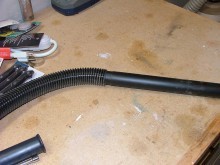
A shop vacuum plugged into a dust port is a great way to collect the dust produced by hand held power tools. Unfortunately there does not seem to be any consistency to the size of dust ports and it is likely that the standard 1 1/4″ hose that comes with many vacuums will not fit. Adapters are costly and clumsy to use but there is an easy and inexpensive way to make your own custom sized bushings.
Purchase a golf club protector tube – these go inside the golf bag and make it easier to take the clubs in and out. They are about $1.50 at sporting goods stores and the most common ones have an inside diameter of exactly 1 1/4″ which is what makes them useful for this application. The picture below on the right shows a standard hose plugged into the end of a protector tube.
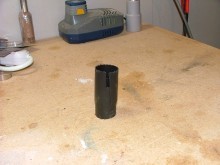
Use a fine toothed saw to cut several lengths about 1 1/2″ long. Put one aside and then use a pair of scissors to slit the others so that they fit over the one that has not been cut. The cut pieces now have enough flexibility to fit over the non-cut piece, creating a wider diameter port on one side. You can add more cut pieces as needed to increase the diameter until it fits into your tool port. Just be sure to align your split pieces so that the gaps don’t overlap.
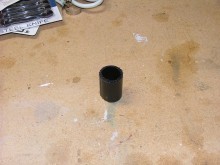
When the outside diameter is just a tiny bit smaller than your dust port, wrap a couple of turns of electrical tape around the outside. This will keep everything together and you now have a bushing with an inside diameter of 1 1/4″ and an outside diameter guaranteed to exactly fit the dust port.
The finished product is shown fitted onto a standard hose. One tube will make perhaps 4 or 5 bushings so you can have different sized adapters for all your tools for just pennies.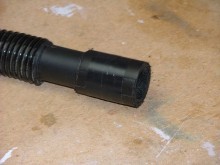
Eric Wood is a retired university professor from Ontario, Canada. An avid (some might say rabid) do-it-yourselfer, he enjoys the challenge of devising low-tech, low-cost solutions to workshop problems.
September 12, 2013
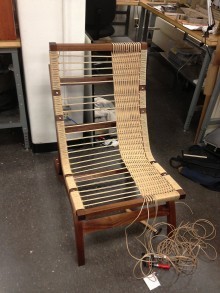
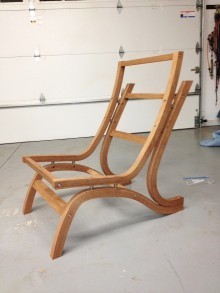
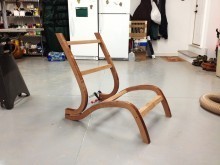
Aaron’s Danish-Inspired Lounge Chair
By: Aaron Gahr (Charlottesville, VA)
Experience: 0-2 Years
Woodworker Type: Hobbyist
Project Type: Chairs & Stools
Material(s): Solid Wood
Finish Type(s): Oil
Finishing Technique(s): Wiping
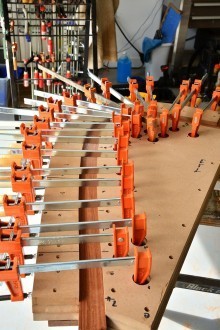
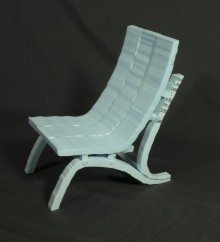
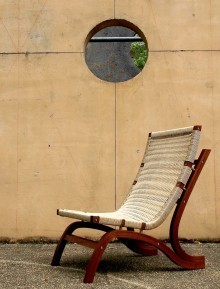
This Danish-inspired lounge chair was the result of a love of mid-century Danish furniture and a fascination with the process of bending wood. Along with this fascination there also existed a goal of creating an object that could be disassembled to help aid in the process of moving. In the end I was able to bring this loose collection of ideas and goals together into a cohesive project.
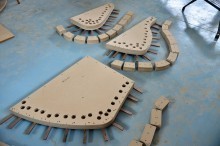
Early during the design process, research into the works of Hans Wegner and Poul Kjaerholm was used to set decisions regarding general form and a desired material. On top of that, extensive research and photography of comfortable sitting positions and desirable proportions was used to bring the chair into the proper scale for the individual and eventually its users. From here a series of 1/4 scale models were created so the chair could be seen in space.
The chair is composed of 6 bent laminations, 4 for the frame and 2 for the seat. Each laminated frame member consists of 28 plies cut at a thickness of 1/16th of an inch. The relatively extreme bends of the forms drove the thickness of the plies and less the idea of wanting to disguise the process of lamination. A series of stretcher bars, six in total, were placed between the left and right side of the frame to prevent racking and set the overall width of the chair. A secondary design idea was trying to disassociate the frame and the seat. In many of the works of Poul Kjaerholm, a technique of placing spacers between the two so that they could be read as 2 separate entities was employed. Beyond simply looking nice, this would help me solve a later design challenge of weaving the seat.
Briefly, the seat of the chair is woven from a traditional Danish material called a Danish cording. The cording is imported from Denmark and is made from strands of twisted brown paper. On its own in a coil the material is fairly uninspiring, but when built up and woven, it forms a taut surface with slight give to help cradle the user while also allowing for the seat to breath.
Lastly, the issue of dis-assembly needed to be tackled, which meant research into specific hardware and joinery for this process. The entire chair is assembled without glue, except between the laminated plies of course. Instead, it relies on barrel nuts and mortise and tenons to hold the entire chair together. Each stretcher bar has been cut with a shoulder mortise as well as drilled out to receive a barrel nut and bolt. In total, the frame and seat are held together with 16 bolts, and 8 bolts connecting the seat to the frame. Through this method of joinery, one ends up a with a chair with extremely minimal to no racking but can also be disassembled fairly easily, even if there are no plans to ever take it apart.
This project served as a laboratory to test and push my abilities as both a designer and as a carpenter.

September 10, 2013
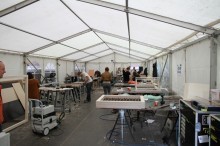
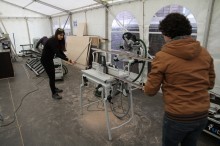
Bucky Lab – Mobile Prototyping Workshop
From: Marcel Bilow (Delft, The Netherlands)
Shop Type: Standalone
Shop Size: 500-999
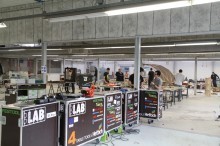
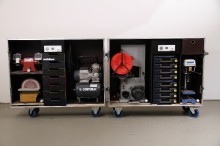
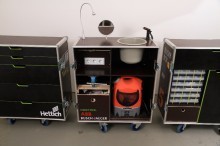
Within the architecture master program of the TU Delft in The Netherlands, we have the 1st semester master course called the Bucky Lab. Wihin this course we teach the students how to develop facade related prototypes from sketch to working prototype. Due to the fact that we are using the workshop for only 2 weeks per semester, we had to close our permanent workshop. Our idea of a mobile workshop was born. Stored in the basement when not in use in 5 big flight cases, the mobile workshop can be placed anywhere we need our tools. In the summertime we rent a tent to set up the workshop—in the winter we rent an old industrial hall.
The workshop is fully equipped with woodworking tools from Festool, Makita, Fein and other brands. We claim to be able to build everything with it and up to now it works quite well. The core of the tools is built by a Festool Precisio CS70, a Kapex and a TS55 plunge saw with 3 Walko workbenches. We love our OF1010 router in combination with a CMS system from Festool.
This set will be completed with a lot of Festool tools like routers, jigsaws, different types of sanders, and a domino. Next to this we have a drill press, a band saw and a compressor in the box. Everything is fitted in the boxes to be safely transported and easy to access and maintain. A set of 5 big worktables on height adjustable a-frames creates the workspace. The boxes are also equipped with iPod docks to have a good vibe during our building weeks. We travel a lot with the workshop and its quite amazing as we open the boxes and turn any place into a full workshop. It allows us to turn the world into our workshop!


September 9, 2013
Poll: Tool Belts
 In a wood shop, we generally have the luxury of organizing our gear in such a way that nothing is more than a few feet away. A pencil, eye protection, a square, even a calculator are usually within arms reach for most folks. Yet some of us like to have our most frequently-used items directly on our bodies with the help of either an apron or a tool belt.
If it weren’t so darn hot here all the time, I’d use an apron every day. It protects my clothes from dust, glue, and finish and ensures my adjustable square and pencil are always ready to go. It’s also handy for stashing peanut M&Ms. And while a tool belt would certainly be cooler (temperature-wise), it seems like it brings a lot of clunkiness around the hip area, which is usually where you’re going to come into contact with stationary tools and workbenches. So as far as I’m concerned, the tool belt is best left for the job site.
So what about you folks? What do you think about tool belts for woodworkers?
What do you think about tool belts for woodworking?
This poll was created by Tom Iovino from TomsWorkbench.com.
Delayed Shipping in the TWW Store
Hey Folks! Just a quick note to let you know that the TWW Store “Shipping Department” will be on vacation starting Tuesday, September 10th thru the 24th. The Wood Whisperer Store will remain open during this time to allow purchases of our digital products to continue as normal. This also means that you be able to place orders for tangible products, but your order will not be processed or shipped until after September 24th when the shipping team will be back in full swing.
Sorry for any inconvenience this may cause but if you just gotta have a cool Wood Talk T-Shirt or a TWW Coffee Mug and you can’t wait, I suggest you place your order before 3 PM PST on Monday to insure prompt shipping!
September 7, 2013
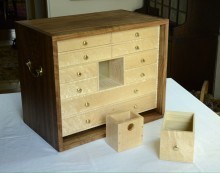
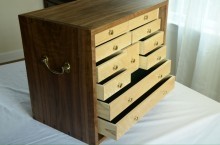
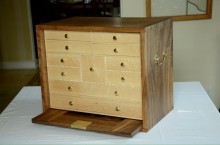
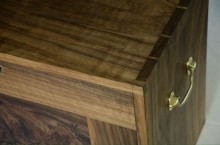
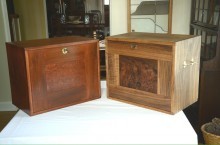
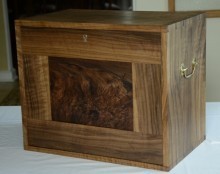
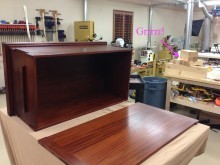
Rusty’s Tool Chest – Collector’s Cabinet
By: Rusty Burwell (South Orange)
Experience: 2-5 Years
Woodworker Type: Hobbyist
Project Type: Chests
Material(s): Plywood, Solid Wood, Veneer
Finish Type(s): Oil, Shellac, Wax
Finishing Technique(s): HVLP
In March 2013, I got a message from my niece Mari that she wanted to talk about a ‘chest’ for her husband, Jason. He is a knife collector and she thought it about time that he had proper storage for his knives. She had come across the venerable Gerstner Chests—classic tool chests built in Ohio since 1906 (gerstnerusa.com). She wondered if there were others like this or if I might be interested in a commission to build a chest for his birthday in July.
I jumped at the chance. Some facets of the build were similar to things I have done, but others would give me a chance to learn new skills. That nice balance between pushing myself ahead, but still within the range of what I thought I could handle—after all, it would be unacceptable to mess up a birthday present!
Mari and I talked about what Jason might like and appreciate in terms of wood, details and size. She sent pictures of his collection, so I had a good idea of the need. The Gerstner chests have a few different sizes and styles, as well as different drawer configurations. I liked the idea of a chest that would lock (keep the kids out) and was portable to easily carry around to show off the collection. Jason is a budding woodworker, so I wanted to build it in a way that he would appreciate—dovetailed case, gorgeous wood, ‘close to the wood’ finish, attention to detail.
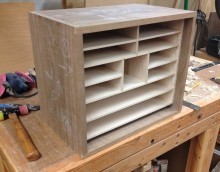
Though I decided almost immediately to build the case from walnut and the drawers from bird’s eye maple, I also decided I would build a prototype first with the case from poplar and the drawers tiger maple. I wanted to work out the size, but in particular, the drawer gallery and drawers. While I’ve made a few small drawers, I hadn’t made a drawer gallery like this.
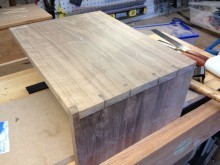
The chest has a removable, lockable door on the front with a matching fixed panel on the back. I’ve done some veneering, so I knew I could do eye-catching center panels for the doors. For the prototype I used maple burl veneer. I made the poplar case with box joints which are quick and easy and solid. The gallery took a lot of ‘futzing’ with, but in the end, wasn’t that difficult, just required precision. I was able to knock out the drawers quickly and with my growing comfort with hand planes, I was able to fit them pretty easily.
I did a lot of hunting for hardware—handles for the sides, small knobs for the drawers and a half-mortise lockset. I found pieces that I liked from different suppliers online. I decided to use brass pieces, but I don’t like the shiny lacquered finish, so I stripped the pieces after I got them.
Making the prototype accomplished just what I needed—sorting out the joinery, confirming the size, making sure the drawer layout worked, figuring out the finish, etc. With the work it took to make the prototype, I did want it to be a solid, usable piece. I decided to finish it with a cherry stain to produce some drama between a darker case and lighter interior.
Now, on to the actual piece. I went in search of wood and found a 4/4 by 12 inch piece of walnut for the case that had some great figure—good color and some ‘curl’ and the bird’s eye maple I needed for the drawers. I haven’t worked with walnut before, but it is a joy. I found the best stretch of the board for the sides and top—all in one line so there is a grain match from the side, over the top and to the other side. I cut the dovetails for the case, and while I’m still learning, I am getting better, especially at cleaning up any gaps after the fact!
I used simple half-lap joints for the front and back because I like seeing the joinery. The panels are veneered with some spectacular walnut crotch I found at Veneer Supplies. I applied the veneer using my Roarockit vacuum press, a great, inexpensive vacuum setup for small panels.
Next came making the maple gallery and drawers, which went quickly given the work on the prototype. I put the drawers together with rabbet joints since they are small and won’t take much abuse. The drawer bottoms are plywood which will be strong and stable and covered with felt. I don’t like the look of the nylon-polyester-whatever cheap felt you see so much of and a little research produced natural wool felt which is harder to find and more expensive, but much nicer to the eye.
The door has two brass pins along the bottom that fit a couple of brass sleeves fit into the case. The pins slip into the sleeves and the door swings in at the top to be locked. I was apprehensive about fitting the lock, since I hadn’t done that before, but I’m finding that I’m learning my way with a sharp chisel.
I definitely wanted a finish that would show off the wood. I liked what I had seen of the Masterpiece Wood Finish, from Highland Woodworking in Atlanta. Its a 3-part finish process: a base coat made with special oils that penetrate to seal the wood and enhance color and grain; a mid-coat blend of oils and waxes that fill the wood’s pores; and a top-coat paste wax for additional sheen and luster. Definitely not for a table top or ‘hard use’ situation, but great for this. For the drawers, I used a clear shellac for a little shine to highlight the maple.