Marc Spagnuolo's Blog, page 110
August 22, 2013
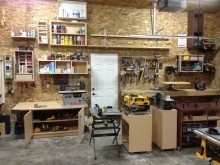
Luke’s Garage Shop
From: Luke Pinno (Red Deer, AB)
Shop Type: Garages
Shop Size: 250-499
In the past, I have worked mostly for two general contractors doing finish carpentry, though I worked four months in a large commercial cabinet shop. This past year, I’ve been working for a custom cabinet shop. I am fairly new to actual woodworking, having done very few projects with true joinery. This is my shop.
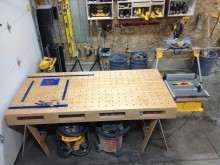
I opted for a workbench design by Ron Paulk, mostly because it’s portable for on-site use, and it serves as an extended table saw outfeed and router table. The workbench itself is made entirely of 1/2″ maple plywood. Soon, I intend on making a cross cut jig he designed for the Festool track saw, as well as his design for a miter saw stand. I re-purposed two solid-core doors for a more solid workbench for heavier work.
The table saw is Dewalt’s 26″ portable contractor version, though for most ripping/crosscutting, I use the Festool 55 tracksaw. Presently, I use a Dewalt 12″ double bevel miter saw with default stand and I have a Porter Cable’s benchtop jointer (or the tracksaw for edges) and Dewalt’s 13″ thickness planer.
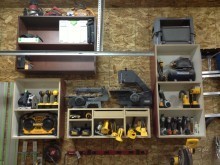
I have a selection of Bosch, Dewalt and Porter Cable routers. The Dewalt plunge palm router being my first choice. The drill press is a low-end benchtop version. For drills, I have a selection of Bosch, Dewalt and Milwaukee. For quick joinery, I have a Dewalt biscuit joiner, Freud doweller and a Kreg pocket screw jig. For finishing, I have an Earlex 5500 spray station.
I use a Dewalt auto-start vacuum hooked up to the tool in use for dust collection, as well as a Rigid vacuum for general clean up.
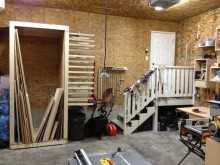
The band saw, scroll saw and other older tools on display in the second photo belonged to my grandpas. One was a finishing carpenter and the other was a farmer whose winter hobby was woodworking.


August 20, 2013
Max’s Pirate Ship
By: Benjamin Tyler (Sherman Oaks, CA)
Experience: 5-10 Years
Woodworker Type: Hobbyist
Project Type: Kids Projects
Material(s): Solid Wood
Finish Type(s): Commercial Stain, Oil/Varnish Blend
Finishing Technique(s): Wiping
When my daughter told me the theme for my grandson’s first birthday would be Pirates I knew right away I wanted to make a ship. I checked all of my wood sources for a pattern in scroll work or Intarsia and could not find anything. So I searched pictures of pirate ships and found one I was inspired by.
When I debuted the ship at the party, I received many compliments. Someone asked me how I curved the wood for the sails and I told them they were carved not bent. I have included a picture of the ship that inspired the design. I also made a round cupcake stand with a crows nest on top with a Lego pirate standing in it. I enjoy making things for family and friends and have yet to make something to sell.


August 19, 2013
We Hit Our Pre-Order Goal!
A huge thank you to all of those who took advantage of our Early Bird Pre-order offer on the new Hybrid Woodworking book. We not only hit our goal but exceeded it by nearly 50%!! Looks like a lot of folks were waiting until the last minute.
As promised, here’s our big Lifetime Subscription winner: Brian Greenburg
Congrats Brian and thanks for your support!
And as an additional token of our appreciation, we are giving away two 1-Year Subscriptions to folks who pre-ordered! And here they are:
Steve Poutre and Michael Corwin!
Thanks again everyone! I hope you enjoy the new book in November!
August 18, 2013
New Tools From Jet and Powermatic
This past week I was invited out to the Jet and Powermatic press event in Nashville, Tennessee. If you can believe it, some people consider me press! haha. So I hopped on a plane headed for Music City! The event was held at a very cool place called 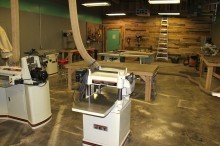 It features a full woodworking shop, bike shop, photography studio, and plenty of general workspace. For a monthly fee, you can take advantage of all of their services and tools. Numerous small woodworking business are getting their feet on the ground without having to make a huge investment in their own tools. Frankly, I wish every major city had something like this as it truly is an incredible resource run by some energetic and forward-thinking people. It’s good for the community and good for the country as a whole!
As excited as I was by Fort Houston, my real purpose for being there was the tools. JET/Powermatic decided not to attend AWFS this year in favor of this private event so I couldn’t wait to see what they had in store. Most of the tools that were unveiled were under the JET brand and it seems like the company is really trying to cement JET’s presence as a top-tier solution for the average Joe/Jane woodworker. JET had me worried a few years ago with some of their lower-end offerings as it appeared like they were participating in that dreaded “race to the bottom.” Thankfully, these new tools appear to be rock solid and easily exceed the quality level I have come to expect from JET.
You’ve heard me say before that I am not a tool reviewer and getting deep into machine specs makes me want to take a nice long nap. So I’m going to show you some pictures of the tools I found most interesting. I’ll drop in the specs, say something insightful and witty (or not), and let you do the comparing and contrasting with other tools for yourself.
Powermatic PM1000 Table Saw
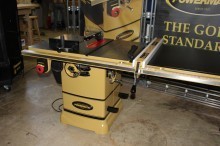 First up is the Powermatic PM1000. As you might gather from the model number, this saw is a step down from the PM2000. It offers many of the same features and benefits of the full-size cabinet saw yet runs on 115V power. The fit and finish were every bit as good as the PM2000 from what I could see in my limited time with the tool. The Accu-Fence was smooth and sturdy and locked down just as well as any other high quality Biesemeyer style fence system. Other features include an arbor lock for easy blade changes, a miter gauge that’s actually worth a damn, a poly-v belt for reduced vibration, and a fairly standard splitter/blade guard assembly. The saw will come in two versions: 30″ rip capacity (#1791000K) for $1999.99 and 52″ rip capacity (#1791001K) for $2099.99.
JET 14-Inch Steel Frame Band Saw
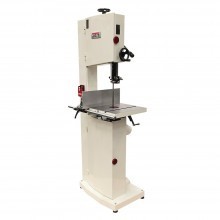 I love the fact that more and more companies are offering these “industrial-style” bandsaws in the 14″ size range. Many folks in smaller shops have no need of a massive bandsaw, yet they might want the dependability and various upgrades that come with the bigger saws. JET’s new 14″ model appears to be made with power and accuracy in mind and doesn’t skimp on features. It has a 13 1/2″ resaw height as well as 13 1/2″ blade-to-frame cutting width. The motor is 1 3/4 HP and 115V. The table is 21 1/2″ x 16″ and features a micro-adjustable extruded aluminum fence measuring a “nice to have” 6″ in height. Other features include tension quick release, dual 4″ dust ports, and an impressive bearing guide system. The saw also has an adjustable aluminum insert than can be leveled to the table surface with set screws. The unit (#714500) will retail for $1899.99.

JET 8″ Woodworking Bench Grinder
 Oddly enough, this was one of the things I was most excited by. What can I say? I like things that make my tools sharp! The new bench grinder was made with woodworkers in mind. The speed is set at 1725 rpm and instead of flimsy tool rests, this unit features sturdy oversized rests that are easily adjustable to the nearest degree. Perhaps the coolest feature is the included grinding wheels from Norton: 80 grit 3X Blue Ceramic Alumina K for coarse grinding and a 100 grit White Aluminum Oxide wheel for finish grinding. How nice is it to buy a grinder whose wheels don’t immediately need replacing! This unit is by no means inexpensive ($329.99) but you should keep in mind that it does come with two high quality wheels (valued around $85 from what my research tells me).
JET also made an update to their line of mini lathes which brings with it some nice improvements so be on the lookout for that. We also received a behind the scenes look at some of the designs coming down the line including a major update to Jet’s drill press and drum sander line. I can’t say much about those two things but it certainly looks promising!
So what do you think? Any of these tools have you excited?
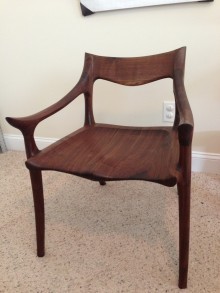
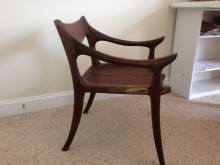
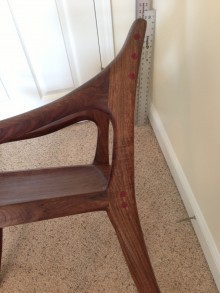
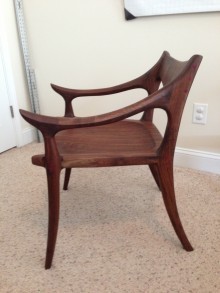
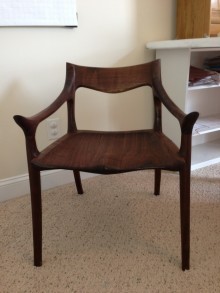
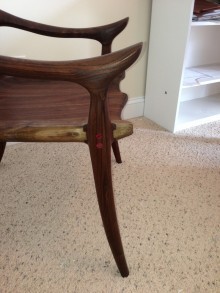
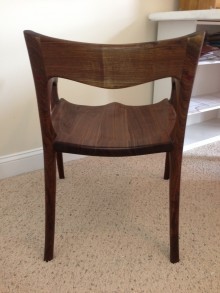
Maloof-Inspired Low Back Chair
By: Joe Davis (Murrells Inlet, SC)
Experience: 2-5 Years
Woodworker Type: Hobbyist
Project Type: Chairs & Stools
Material(s): Solid Wood
Finish Type(s): Oil, Wax
Finishing Technique(s): Wiping
This is my very first chair and I have to say it was a lot of fun to make. I’ve been wanting to build a dining set for a long time so I started looking into chairs and I found Sam Maloof’s work very inspiring. Having no experience in chair building I did some digging around and found some templates online and started building the low back chair that Sam referenced in his book. It looked like a good 1st chair rather than a high back or a rocker. I used walnut with purple heart plugs and an oil wax finish. I have about 25-30 hours in it.
I was going to build a set of 6 dining chairs next but my wife suggested that I build a rocker instead. There’s no point in rushing the dining set as I’m still waiting on a giant walnut crotch to get sawn and dry out so I can build the slab table, The slab for the table will be 4′x10′x 2 3/4″ thick from the mill. I think my wife really knew what I wanted to build next =) So I recently started milling walnut this week for the Maloof rocker.
After building the low back chair I can say that I found it to be easy to assemble and fun to shape albeit with a lot of elbow grease. But I think that is the beauty of Sam’s work, simple but elegant. I have plans to build at least 10 more chairs.
August 15, 2013
Pre-Order Update: Win a Lifetime Guild Subscription!
 The super awesome pre-order bonus ends tomorrow, August 16th, 2013. You have one more day to place your order! But we wouldn’t be the Spagnuolos if we didn’t make things a little more interesting at the last minute.
In our family, setting goals is something of a hobby. Little goals, big goals, silly goals, it doesn’t matter. We love setting our sights on a target and hitting it (if we can). So as the pre-orders are rolling in, I decided I had a target number in mind that I wanted to reach. The number itself really doesn’t matter as it’s just a personal goal, but you should know that we are VERY close and with a full day left, we just might make it!
So to stack the cards in my favor, I’m sweetening the pot. If we reach our goal, one lucky random winner will be selected to receive a Lifetime Guild Subscription! So if you already pre-ordered the book, you are automatically entered to win. But keep in mind, we still need your help! We need you to spread the word about this pre-order bonus because if we don’t hit the target, we’re not giving away the Lifetime Subscription.
So spread the word to your family, friends, neighbors, dentists, pizza delivery guys, whoever, and send them to www.HybridWoodworking.com to learn more about the pre-order. But hurry up! There isn’t much time left!
I’ll let you know if we hit the goal tomorrow evening. I’ll announce the winner this weekend.
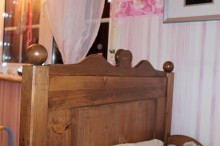
Christian’s Nostalgic Childhood Bed
By: Christian Kuhl (Germany)
Experience: 0-2 Years
Woodworker Type: Hobbyist
Project Type: Beds
Material(s): Solid Wood
Finish Type(s): Commercial Stain, Lacquer
Finishing Technique(s): Brushing
Greetings from Germany! It was weeks before Christmas last year when my wife and I decided it was time that our daughter (by then 2.5 years) got a bed which would allow her to get out by herself.
It was clear to us that it should be a permanent solution in the way that it should be still adequate for most of her childhood, yet we were afraid that she might simply fall off of a “normal bed” at night. In the course of our discussion we were led to the design of a so-called “nostalgia bed”, which is of an appropriate size for most of her childhood, but also provides some lateral support to prevent her from simply rolling off the bed. They were quite common in Germany in the past, but a look at the furniture market in Germany quickly provided us with the frustrating insight that either the above requirements were not met or the piece would simply not be affordable, let alone the fact that even the expensive beds we saw were of pretty poor quality.
So, what to do about it? I had to build it by myself. As much as I liked the idea, I faced some challenges with this project: Being a relatively new woodworker, my “shop” basically was the storage cellar in my parents’ house. So both limited in space and budget, this is what I came up with. The construction mainly consists of two “door frames” with a slightly profiled panel in them (barely visible in the photos) and the two side pieces, which are connected to the side posts by mortise and tenon joints with floating tenons. To leave the bed detachable, the tenons from the side pieces are not glued into the side posts, instead they are secured by long screws which fit into anchor nuts in the side pieces. The screws are hidden by some end-grain plugs which I rounded over by hand and which are detachable, if needed.
The decorative pieces are doweled in place and were made mainly with my router and some templates I made. For the finish I applied stain, which I don’t particularly like to do, but I wanted the piece to match with the rest of my daughter’s room, and hardwood simply was not within our budget. I then applied some brushed-on coats of lacquer.
If I were to do this project again, there would be plenty of things I would like to change. Most importantly, I would plan in more time (the project had to be done by Christmas and time pressure was very hard in the end). If I had owned a band saw and/or a lathe at that time, I would have styled the bedposts differently.
But all in all, I am pretty happy with the way the bed turned out, and most importantly, my daughter loves it!
I would love to hear your comments on this piece!


August 12, 2013
Poll: What’s the Most You’ve Spent on a Single Tool?
 Tools can be quite expensive, especially if you buy them new or you just happen to have a thing for premium quality. While in every category there are always less expensive options available, the high end will put a serious dent in your credit card. The 20″ helical head planer pictured left costs about $4300. Powermatic is definitely a high quality brand, but they aren’t even close to the most expensive on the market!
And if you’re a hand tool user, you aren’t exempt from this question. I have seen products from companies like Bridge City Toolworks and Sauer & Steiner that make my wallet quiver in fear.
So we are curious, what’s the most you’ve ever spent on a single tool purchase?
For my international viewers, the values are in U.S. Dollars. To convert your currency to USD, visit this Universal Currency Converter.
What is the most you have ever spent on a single tool?
This poll was created by Tom Iovino of TomsWorkbench.com.
August 11, 2013
Hybrid Woodworking Pre-Order
My new book, Hybrid Woodworking, will be available in November. We are currently offering a special Early Bird Pre-Order Bonus: 3 months of Wood Whisperer Guild time!
Offer ends August 16th, 2013 so don’t delay. Click here for all of the details!
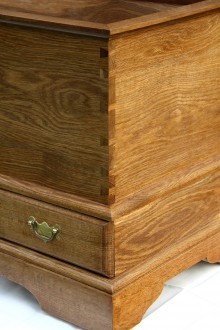
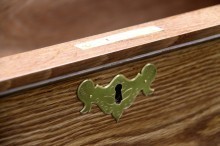
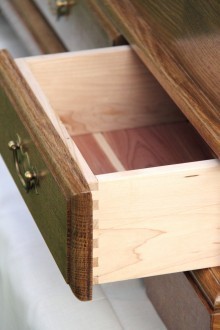
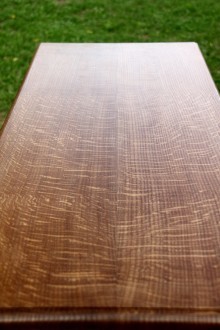
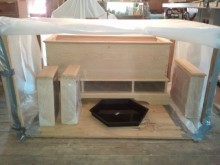
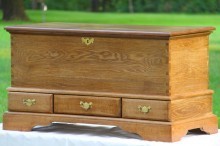
Jim’s White Oak Blanket Chest
By: Jim Basile (Dundee, MI)
Experience: 2-5 Years
Woodworker Type: Hobbyist
Project Type: Chests
Project Style(s): Mission
Material(s): Solid Wood
Finish Type(s): Shellac, Wax
Finishing Technique(s): Wiping
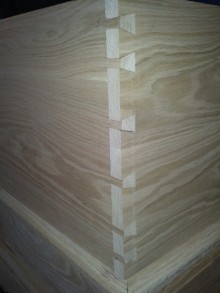
As somewhat of a woodworking newbie, I like to choose projects that focus on individual techniques such as specific joint or a finish that will help add new skills and/or perfect my current ones. When my wife asked me for a blanket chest, it took about a year to find a design that we both agreed upon. This chest was a real stretch for me because I had never tried a dovetail joint before and it was my first project utilizing white oak. Adding to the difficulty, I decided to finish it in a traditional Mission manner by fuming it with ammonia and coating it with shellac to really bring out the rays on the quarter sawn.
To start this project I first needed materials, and after shopping for while I found a good deal on a rough sawn and air dried white oak log on Craigslist. Next I took some time selecting what boards to use for which panels and then started cutting. When it came time to cut the dovetails, I spent weeks practicing different techniques on scraps and eventually settled on a hybrid cut. With the use of a homemade jig, I cut the tails first in the front and rear panels using waste wood on the front and back to eliminate tearout, then with a dovetail saw and a very sharp chisel, I cut the pins to fit.
The hardware was a challenge because I could not find a single supplier that sold everything I needed; the pulls and escutcheon are from one source and the lock and hinges from another. I turned to the art of using a card scraper, another first and now one of my more favorite tools, to help clean up the machine marks before final sanding with 220 grit. When it came to the finish, I again practiced different techniques for weeks using the leftover scraps. I finally settled on an ammonia fume for approximately 18 hours, followed by multiple wipe-on coats of amber shellac. A final rubdown with #0000 steel wool and a couple coats of furniture wax and I was able to give this blanket chest to my wife on our 25th wedding anniversary.