
Marc Spagnuolo's Blog, page 114
June 18, 2013
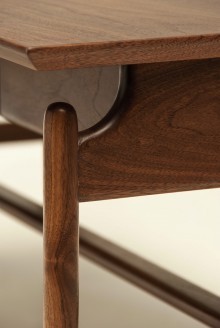
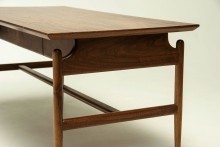
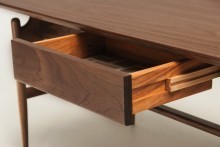
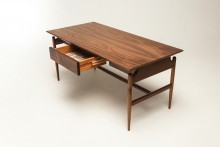
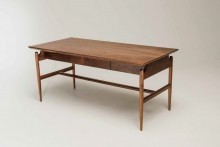
Nate’s Walnut Coffee Table
By: Nate (Canada)
Experience: 5-10 Years
Woodworker Type: Semi-Pro
Material(s): MDF, Solid Wood, Veneer
Finish Type(s): Oil/Varnish Blend, Wax
Finishing Technique(s): Wiping
This table was the biggest project during my first year of studying furniture design at Sheridan College in Oakville, Ontario, Canada. The design brief required us to build a table of any kind that had a drawer, was smaller than 6 sq ft, and was under a certain material allowance. The design of this table was appropriated from a Finn Juhl writing table from the 1940s. I was really interested in Danish Modern furniture at the time and was immediately drawn to the simple form and lightness of Juhl’s table.
The rails were cut with a round shoulder to fit the diameter of the turned legs perfectly. Slip tenons were used to assemble most joints, with sliding dovetails rounding out the remainder of the joinery. The top is bookmatched walnut veneer on MDF. The drawer I suspect is of butternut and it rides on full extension maple drawer slides. The lining of the drawer was hand printed and stitched by my wonderful friend, Tamsin, who is studying textiles at Sheridan.
This was an extremely rewarding project as I learned a lot about my design inclinations as well as many technical abilities needed to realize these designs. I’m very interested to hear people’s thoughts about my work. All studio photos were taken by me.


June 16, 2013
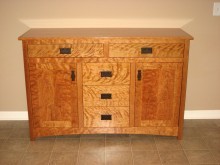
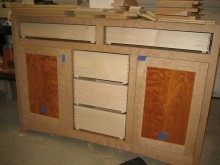
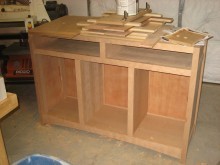
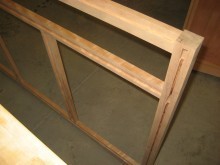
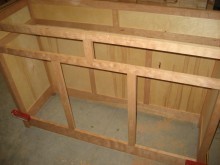
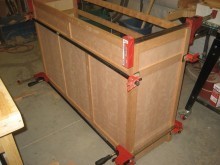
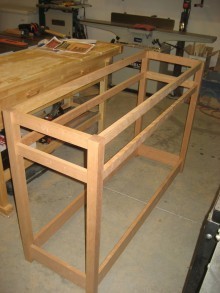
Jeremy’s Curly Cherry Buffet Table
By: Jeremy Scuteri (Greensboro, NC)
Experience: 2-5 Years
Woodworker Type: Hobbyist
Material(s): Plywood, Solid Wood
Finish Type(s): Oil, Oil/Varnish Blend
Finishing Technique(s): Wiping
This was the most challenging project I’ve attempted so far. I have a handful of projects under my belt, and each one has been a little more difficult than the previous. We wanted a buffet table to go in our kitchen and we wanted the utility of more storage space as well. I found a few sets of plans and took elements from each one to create this piece. It has 44 mortise and tenon joints, lots of dadoes and 5 dovetailed drawers. I used soft close drawer slides and cabinet door hinges. The offset between the legs and the front face of the cabinet made hinge selection a little tricky, but I was able to find something that works.
The cabinet door panels are resawn curly cherry. I used cherry plywood for the panels that make up the body of the piece. The interior and dividers inside are also cherry plywood. The top is solid curly cherry.
I wiped the finish on everything using Boiled Linseed Oil followed by several coats of General Finishes Arm-R-Seal. I used 600 grit between coats and used a 2000 grit Platin pad with mineral oil to “rub out” the final coat after it had several weeks to cure.
June 13, 2013
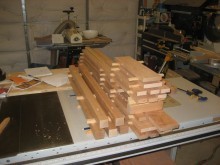
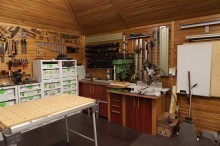
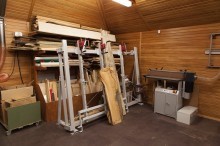
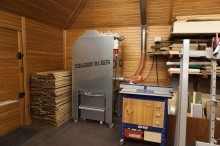
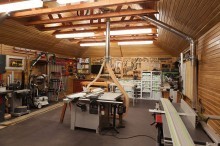
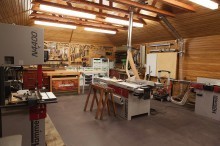
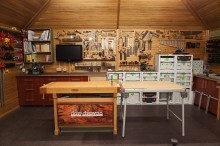
Jarek’s Workshop
From: Jarek Ostaszewski (Zerkow, Poland)
Shop Type: Standalone
Shop Size: 500-999
My old shop had only 130 Sq Ft. It was very small place, but so cozy. When I decided to build a new one at 700 Sq Ft, I wanted this shop to be nice and cozy as well. It’s still in progress now :)
In late autumn I started to prepare a wooden structure and believe me it was a race against time to finish it before winter. I made it all of wood (outside and inside). Roof structure supported by trusses gives a very nice visual effect. Slip plywood floor provides comfort and extra insulation. No window, just 2 doors, one of normal size and the second is wider so you can drive a forklift truck in.
I have a couple of Felder’s wood machines:
- B3 – Winner Comfort (dimension saw + spindle moulder)
- A341 – Planer & thicknesser with silent power cutter head
- N4400 – Bandsaw
- RL125 – Great dust extractor and air cleaner
and of course a lot of Festool stuff and hand tools as well. I can spend whole days at my workshop…of course with my wife Lidia :)


June 12, 2013
Poll: Is Woodworking Art?
For many, woodworking is simply cutting big boards into smaller boards and assembling those smaller boards into something useful. For others, woodworking is the expression of creativity and emotion. How do you feel about the craft of woodworking? Is it art?
What exactly is woodworking?
Our polls are created by Tom Iovino at Tomsworkbench.com.
June 11, 2013
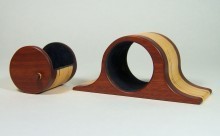
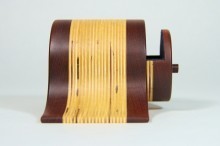
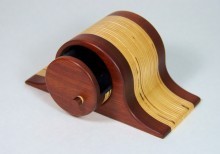
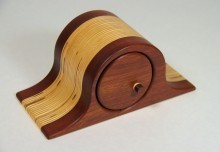
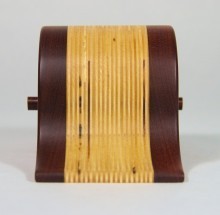
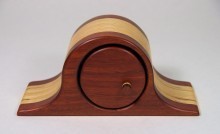
“Ohio” Bandsaw Box
By: The Drunken Woodworker (Toledo, OH)
Experience: 2-5 Years
Woodworker Type: Hobbyist
Project Type: Boxes
Material(s): Plywood, Solid Wood
Finish Type(s): Oil, Wax
Finishing Technique(s): Wiping
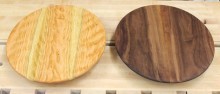
In preparation for a large art/craft show, I made about 10 different bandsaw box designs and other small wooden crafts and photography prints. I call this particular design “Ohio.” I name all my bandsaw box designs using locations. I think naming them gives my boxes an identity and helps me reference past designs.
I work with a lot of plywood sandwiched between exotic woods. I’m a big fan of repeating elements in design and the exposed edge in plywood gives me that satisfaction.
The dimensions of this box are 8″ wide, 4″ tall and the depth is 3.5″. More designs and photos can be seen on my website. Thanks for looking!
June 10, 2013
203 – Invisible Panel Joints
Whenever I glue multiple boards together, my ultimate goal is to hide the fact that it is indeed a glueup. If I can make it appear as if the panel was cut from one super wide board, I’m a very happy boy. The first step in achieving this lofty goal is to make sure the edges are milled properly. If the two mating surfaces don’t complement one another perfectly, you’ll have a noticeable glue line. But if the two edges are clean and square, the joint will have minimal visual impact. You’ll also have the added benefit of a solid glue bond and a panel that won’t fall apart 100 years from now.
While the joint itself is an important factor, it isn’t the primary thing I’m looking at when trying to create the illusion of a single wide board. For me, it’s all about the grain. If the boards are properly color-matched and the grain is aligned so that it looks like it continues through through the joint, the average person will NEVER know the joint is there. Of course, woodworkers should be able to spot it. But I’m not building my furniture for woodworkers. I’m building it for regular people. So if I can make a joint that meets a woodworker’s approval, I can be confident that the vast majority of the population will be fooled by my efforts.
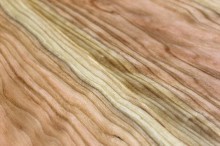
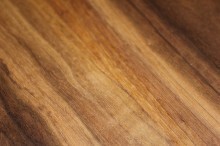
Here are two good examples. Below you’ll see two table tops that are being used for my Tilt-Top Table project in the Guild. Can you spot the joints? Click the image to see a graphic that shows you exactly where the joints are located.

Now let’s take a closer look. In these two images, it’s still pretty difficult to make out where the joints are. When you have to strain to see it, you know you’ve hit the mark.
So how did I accomplish this? It’s all about color, grain, and distraction. If the color and grain look the same on both sides of the joint, it becomes harder to notice the glue line. Also, if you can draw the viewer’s eye AWAY from the joint, you essentially nullify its visual impact. If you’re clever and careful, you can also create visual “red herrings” as I did in the examples above.
Match the Color and Grain
The first step is board selection, and this is something that should be happening well before you cut any wood. While selecting your boards at the lumber yard, think about the most visible glueups in your project and plan ahead. Inspect each board for color and grain. If one board has straight grain and another board has wavy grain, you probably don’t want to use them together. If one board has an overall lighter color and a second board is darker, again, these are not good bedfellows. Always try to select boards with the same color and similar grain patterns. If you can, use chalk and a tape measure to mock up your eventual cut plan. As long as you plan on buying the boards, the lumber yard won’t care much if you mark them up.
Use the Same Board
I certainly can’t claim to have a highly-developed eye for color and grain matching. I am getting better and I’m always trying to hone that skill. In the mean time, I like to cheat! Well, it isn’t so much cheating as stacking the cards in my favor. Instead of trying to match color on a board by board basis, I always try to get my smaller boards from one larger board. Since most boards retain grain and color throughout, there’s a good chance that any child boards that come from a parent board will be similar.
Use Distraction
The secret to being a good magician is using distraction to divert the onlooker’s attention. So I try to be a woodworking magician. If possible, I like to include visually prominent elements in the vicinity of the joint line. Whether it’s a knot, some sap wood, or even a dark streak of grain, anything along these lines will help distract the eye from the dead straight glue line and will cause it to be lost in the shuffle.
 So now let’s take another look at those two table tops. To ensure color and grain matching, the smaller boards were cut from one long board. The boards were flipped and rotated in various positions to find the layout that looked the most natural. You’ll also notice I relied heavily on the distraction concept. I really wanted to showcase the sapwood in the cherry boards and the light streak in the walnut was too cool to resist. So by including those features right at the joint, the glue line becomes invisible. We aren’t always able to employ distraction, but when done properly it can indeed be a magical thing. At the very least, mill your joints accurately and match up your color and grain and you’ll be well on your way to invisible panel joints.
June 9, 2013
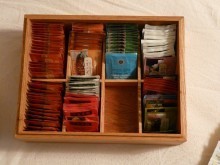
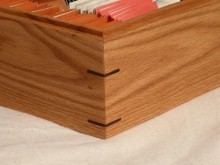
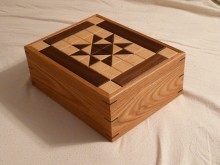
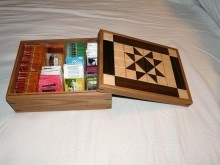
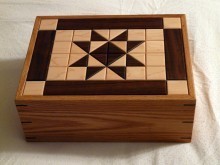
Adam’s Tea Box
By: Adam Reemts (Cedar Park, TX)
Experience: 2-5 Years
Woodworker Type: Hobbyist
Project Type: Boxes
Material(s): Plywood, Solid Wood
Finish Type(s): Oil, Wax
Finishing Technique(s): Wiping
My wife really enjoys drinking tea, and up until now she’s been keeping her tea bags in an old shoe box in the cupboard. When I told her that I was thinking about making her a tea box for Christmas, she said, “Well, you might as well make one for my mom and my sister as well, because they’ll want one, too.” Then I tacked on one for my mother and one for my brother-in-law’s wife, and before I knew it one box had turned into five!
I couldn’t find a tea box plan that I liked, so I just adapted a Woodsmith Magazine plan (August 2010 – Issue 190) I had. I basically just followed the plan with two adjustments. I increased the height of the box to provide enough clearance for the tea bags, and I simplified the decorative top pattern for four of the five boxes. The one you see here is my wife’s box, it follows the quilt-top pattern from the original design. The other four boxes used a simplified pattern made up of nothing but rectangles to save time. I forgot to take pictures of those boxes before we sent them out.
The box is pretty straight forward. You assemble the box with the plywood top and bottom captured in dadoes. The lip for the lid is formed by two dadoes, one on either side of the workpiece, separated by a very thin piece of wood holding the box together. Once the box is assembled and the glue has dried, you cut away the top on the tablesaw. At least that was how it was supposed to go–somehow my two dadoes got spaced a bit too far apart, so I had extra wood left on the lids to cut away. I ended up having to build a jig something like a tenoning jig to hold the lid steady while I trimmed away the remaining wood. Then some work with a hand plane to finish cleaning things up.
The pattern on the lid is 1/4″thick pieces of red oak, walnut, and maple glued onto the plywood top. I spent a lot of time with a shooting board trimming those pieces to fit! Each of the pieces has a 1/8″ roundover on it. These create shadow lines to help hide any small gaps, and actually the plan recommends having just a tiny bit of wiggle room to help with the final fitting. The box is finished with a beeswax/mineral oil finish.
This project was a great challenge for me–definitely the most difficult piece I’ve built so far. I enjoyed trying out new techniques like adding the splines and creating the lipped lid, and there were two or three instances where I had to stretch my mind a bit and do some problem solving along the way. I have to say that the best was getting a text from my dad, who is a long-time woodworker himself, saying that he got “outclassed” in the woodworking gift department this year! Now it’s on to my next gift project for my wife–an oak sewing desk.
June 7, 2013
Win Marc’s Festool TS55 Track Saw!
I recently upgraded to the new Festool TS55R. That means my old TS55 is up for grabs! Festool was kind enough to completely refurbish my old saw so that we can give it away to one lucky winner. To enter, put your email in the box below. One entry per person, please. International entries are welcome, though you might have some issues with the plug.
Loading…
Win Marc’s Festool TS55 Tracksaw!
I recently upgraded to the new Festool TS55R. That means my old TS55 is up for grabs! Festool was kind enough to completely refurbish my old saw so that we can give it away to one lucky winner. To enter, put your email in the box below. One entry per person, please. International entries are welcome, though you might have some issues with the plug.
Loading…
June 6, 2013
May Giveaway – Winners Announced
May’s Giveaway is officially closed. Be sure to subscribe to the feed for announcements for next months giveaway! Here are the May giveaway winners of the three two-packs of DVDs.
Each winner will receive a copy of the Greene & Greene Adirondack Chair DVD (a $49.99 value).
 One winner will also receive Season 2 of Woodworks starring David J. Marks – This DVD set contains all 13 episodes of the highly acclaimed woodworking television show WoodWorks (Season 2) (a $69.99 value).
Winner: Marcus Chick
 One winner will also receive Season 3 of Woodworks starring David J Marks – This DVD set contains all 13 episodes of the highly acclaimed woodworking television show WoodWorks Season 3 (a $69.99 value). Winner: Pete Noe
 One winner will also receive the Complete Wood Magazine Collection Issues 1-216 in searchable digital format (a $149.95 value)
Winner: John Ray


