
Marc Spagnuolo's Blog, page 112
July 22, 2013
Christmas In July Sale!
 If you’ve been thinking about buying a new Wood Whisperer T-Shirt or maybe a Wood Talk Online T-Shirt, or even a Coffee Cup or a Travel Mug, wait no longer! July 25th is your day to buy! This Thursday we will be having our Christmas in July Sale! For one day only, everything in the Wood Whisperer store will be 20% off. Mark your calendars so you don’t miss it! This sale will not be repeated….well, at least not until Thanksgiving!
Sorry, but this 20% sale offer cannot be combined with any other offer or coupon code!


July 21, 2013
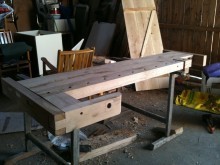
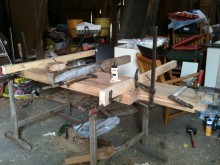
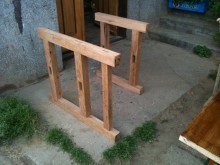
Hrvoje’s Workbench
By: Hrvoje Hrncic (Zagreb / Croatia)
Experience: 2-5 Years
Woodworker Type: Hobbyist
Project Type: Shop Projects
Material(s): Solid Wood
Finish Type(s): Oil
Finishing Technique(s): Brushing
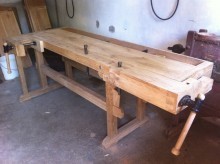
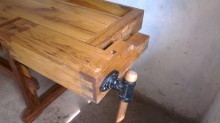
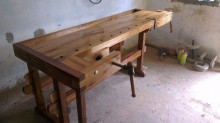
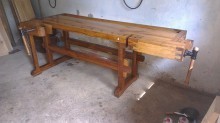
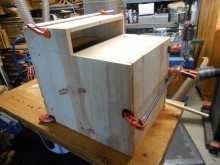
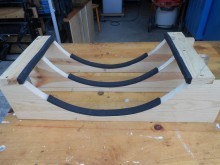
I live in town but I have a grandpa’s house in a village. I love woodworking and I make little projects whenever I can. I think every woodworker needs to have a workbench so one day when I was cleaning out old boards at my grandpa’s house I found oak boards (they were part of an old bridge) and I decided to make big project and build a European style workbench.
I don’t have a combination of machines so I went to old woodworker to help me build it with his machines and knowledge. He told me what to do and I did it. I had some wood (for legs) and I had to buy wood for the tabletop. Thickness of tabletop is 7,5 cm, vices were ordered from Czech Republic because there aren’t any in Croatia to buy.
Table is made from European style workbench plans by Frank Klaus, but with a few modifications (no holes on end vice, different leg connection with no screws). Dimensions of the table are 7,5cm x 45cm (80cm at shoulder vice) x 220 cm. The finish is linseed oil in 3 coats. Table top is really heavy (I think about 80-90 kg), and because of that the table is rock solid. It did take me one year to finish it but I think the end result is great. Keep up with the great work!
July 18, 2013
Confessions of a Lazy Woodworker
 Sometimes at the beginning of a project, I sit in my shop for hours staring at the wood pile. It’s just sitting there, waiting to be worked. I have no excuse NOT to start the project, yet I continually find things to do that distract me from the inevitable. I pry small pebbles out of the treads in my sneakers. I check to make sure my camera battery is fully charged. I haven’t filmed anything yet so obviously it is. I check Facebook to see if anyone finds my latest comment funny, they don’t. So the only thing left to do is stare at the massive pile of Western Red Cedar.
Perhaps it’s a little bit of uncertainty because I haven’t worked out every little detail of the project. Maybe it’s just a time-management issue. If I make one cut, then that leads to another cut, which then leads to a glueup. Do I actually have enough time for all that?
Of course you do you lazy #*&$^! Put on some lively music and get to work! It’s procrastination at its best folks. Fortunately, once I do make that cut my entire mindset changes and I’m in the groove. Happens on nearly every project. And the more time-sensitive the project, the more difficult it is for me to start. It’s the curse of the highly-motivated lazy person. Am I alone here?
July 17, 2013
Reclaiming Some Inspiration!
As woodworkers, we are not only posed with the challenge of engineering structures that are strong enough to support their intended purpose, we are also expected to make them attractive. Thankfully, the wood itself does much of the heavy lifting with the many colors and grain patterns offered up by Mother Nature. If you’re like me, you generally only think about fresh-cut material. If that’s the case, you might want to broaden your horizons by seeking out reclaimed stock. While fresh-cut wood can be beautiful, there’s something magical about wood that has experienced the natural aging process that occurs from long exposure to sunlight, air, weather, micro-organisms, plants, and bugs. An already magnificent piece of timber will evolve into something all-together different with a patina that is very difficult, if not impossible, to replicate with new stock.
Yesterday, I visited Porter Barn Wood in Phoenix, AZ to see what they had on hand. To be honest, I had no idea this resource existed until last year when the company decided to open their business to the general public. Having no reasonable source for reclaimed wood is exactly why I never considered it before. We don’t have many barns in Phoenix so much of the material comes from Northern Arizona and other areas of the country where old barns are plentiful.
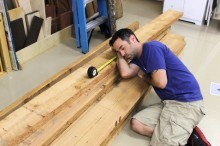
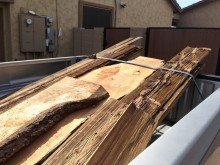 Thomas Porter greeted me at his lumber yard and gave me a nice little tour. I’ll admit that in many cases, you really have to use your imagination to see the beauty that lies just below the worn and aged surface. After taking a look at a few finished pieces, I was sold. While I don’t expect to use this stuff a lot in my work, I do intend to make a few special projects that feature this amazing material. Thomas set me up with a nice little truck load and I wanted to share some of the highlights with you.
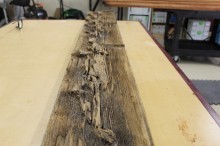
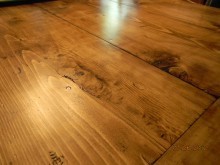
First up is something called “mushroom wood.” I can’t recall the species but apparently this is wood that is used on the bottom of mushroom-growing containers. The mushrooms are in constant contact with the surface and as you can imagine the wood is heavily worn. The end result is a surface that looks, oddly enough, like the underside of a mushroom cap. So even if this wood wasn’t created by mushrooms, I can see why someone might decided to give it that monicker. Below are examples of boards that have been brushed aggressively to clean out the gunk.

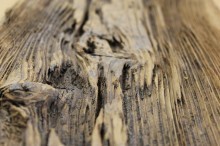
 This is another example of mushroom wood, only this board has been sandblasted. As you can see, the end result is a much more soft and dull appearance when compared to the brushed version.
I have a number of other boards including some cool Hemolock pieces that have some serious potential, but they aren’t much to look at in their current state. So let’s skip to some of the live edge boards I picked up.
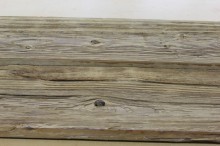
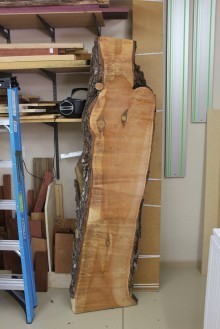
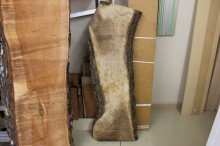 This is a thick live edge walnut board. As you can see, it’s mostly sapwood. Most times we see walnut consisting primarily of heartwood with a few sapwood streaks. But this board represents something of a reversal of that typical pattern and it was intriguing to me. We’ll see what we can do with it.
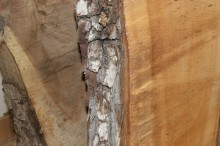
Below you’ll see an example of Alligator Juniper. Look closely at the bark and you’ll see how this wood received its name. This particular slab is massive and features some prominent knots and grain changes. Can you imagine this thing as a table top or even a desk top? AWESOME!
I am seriously intrigued by the things Porter Barn Wood is doing out in Phoenix and this won’t be my last visit. I can’t wait to bring the video camera and give you folks a proper tour. Perhaps we’ll even get some helpful tips and tricks for working with this special material from Thomas and his crew. I’d like to thank Porter Barn Wood for their hospitality and excellent work in providing this much-needed service.
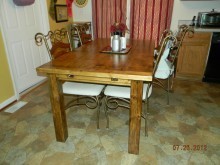
Mac’s Farmhouse Style Kitchen Table
By: Daniel "Mac" McAfee (Thomasville, NC)
Experience: 0-2 Years
Woodworker Type: Hobbyist
Project Type: Tables
Material(s): Solid Wood
Finish Type(s): Oil/Varnish Blend
Finishing Technique(s): Wiping
My wife has wanted a new kitchen/dining room table for some time, and I must admit, I did too. The one we had was a 48” round table and 4 chairs. It had a wrought iron look to the legs and chairs but the chairs wouldn’t go under the table far enough to be out of the way. Our kitchen is not very large so the round table was really in the way. We wanted something rectangular shaped and big enough to seat our growing family plus guests.
My wife has liked the farmhouse style after seeing one at a friend’s house. She found one online that just happened to come with plans. I had to tweak the plans a bit to suit our needs. The original plans called for stretchers under the table to better stabilize the legs, but if I had put those in, once again our chairs would not have been able to go under all the way. That was a major issue for us. So I took the stretchers out and to my delight the table is still very sturdy.
I originally wanted to use Knotty Pine but found it to be expensive and more than I wanted to spend. I settled on Cypress since it too has some pretty good knots and is relatively inexpensive. I made the top out of four 2×10 Cypress boards, the breadboards, apron and top supports are made from 2×4s. It is very difficult to find untreated 4×4s in my area so I had to call several places before I was able to find some. They turned out to be Yellow Pine but since I was going to stain it a dark color, I didn’t think it would make a difference.
As for the assembly…I decided to put the entire piece together using pocket screws. I did have to glue the extensions to get the 13.5” that I wanted. The extensions have two 2×2s screwed to the underneath to be able to slide the extension into the two 2×2 holes in the end aprons. I also glued the end aprons to the top supports in order to make sure the holes for the extensions lined up. Other than that, no glue anywhere else on the table. The finished size of the table is 68-5/8L x 36-5/8W x 30H. Length is 82-1/8 with the extensions.
We decided to finish the table in a contrasting color to our cabinets since matching may not be that easy. I used Minwax Polyshades Mission Oak. As this was my first build, I wanted easy finishing if at all possible. I used Minwax PreStain since the wood had never been stained before and then one coat of the Mission Oak, wiped on. I then covered that with 2 more coats of Minwax Polyurethane since I wasn’t sure if the stain/poly mix would protect enough.
All in all I am very pleased with how my first furniture build turned out considering the limited space, tools, and experience! I plan on making 2 benches with backs for the long sides to allow more seating per side.


July 15, 2013
Build a Greene & Greene Blanket Chest
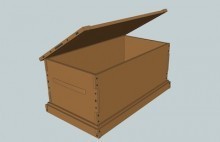 It’s time to kick off the next Guild Build: The Greene & Greene Blanket Chest. On July 19th we’ll be starting off with a live virtual project tour at 9pm Eastern and you’re invited!
This session is open to the public!
Normally, Guild live sessions are for Guild members only but I thought it would be fun to let everyone get an inside look into the Guild Build process. Head to the Live Page on the day of the event to watch live.
Want to Build Along?
Subscribing Guild members will get this project for free and already have access. New members can either purchase the project directly A La Carte or simply purchase a 1-year Subscription (the best value) to gain access. Please keep in mind that once the project begins on the 19th, it will NOT be included with new subscriptions.
Techniques
The project will feature numerous Greene & Greene techniques including finger joints, ebony plugs, arched handles, and breadboard ends. If you’re not a fan of the Greene & Greene style, you can simply leave the Greene & Greene details out and you’ll still have a beautiful and serviceable blanket chest. And for those of you who might be all-together tired of Greene & Greene, don’t worry. This is the last G&G project we’ll be doing for a while.
Historical Relevance
Charles and Henry Greene designed a series of “ultimate bungalows” in the early 1900′s and filled the houses with masterfully-designed furniture. Each house has it’s own special features and furniture pieces. The Thorsen House in Berkeley, Ca. was built by the Greenes in 1909 and is currently owned by the Sigma Phi fraternity. Much of the original furniture is either missing or in private collections. One piece that has yet to be reproduced is the blanket chest.
G&G expert and furniture-maker Darrell Peart, helped us design this chest with modern sensibilities in mind. You can build yourself a little piece of history by making a modern interpretation of the Thorsen House Blanket Chest.
Purchase access today!
July 12, 2013
206 – The Pizza Peel & Tomato Pie Recipe
A pizza peel is a giant spatula intended to deliver a raw pizza to the oven as well as pull the cooked pizza out. Professional versions feature long handles that allow the cook to reach the very back of the oven. A version for the average home can be much more compact.
The pizza peel I designed can be made from any wood you like and certainly doesn’t need to be made from expensive woods like bubinga and figured maple. And before you give me crap about it, these were scraps from previous projects that would have sat in the lumber pile for years if I didn’t incorporate them into something useful.
History
Ever since I left New Jersey, I have been on a quest to find good pizza. In Trenton, we had numerous typical pizza parlors but there were also a bunch of places that specialized in what is known as tomato pie. While there are many variants in the Northeast, the key to a good tomato pie is the focus on the sauce, not the cheese. The Trenton version features an incredibly thin crust and the taste is very clean, not too oily, and absolutely NOTHING like the crap Pizza Hut passes off as “pizza.” Sorry Pizza Hut, your pizza-cake is gross.
The Project
All stock should be milled to 1/2″ thick.
Middle Piece: 2 1/2″ Wide x 26″ Long
Inner Pieces: 3 1/4″ wide x 17 1/2″ Long
Outer Pieces: 3 1/2″ Wide x 17 1/2″ Long
Handle Piece: 2 1/2″ Wide x 10″ Long
Keep in mind that the measurements above were primarily driven by the stock I had on hand and the dimensions of my pizza stone. If you are making your peel from on species of wood, you certainly don’t need to use as many pieces to create the primarily platform of the peel.
There are a lot of ways you can tackle a simple project like this. But when it comes to small kitchen items, it’s always best to prepare for making multiples. So instead of gluing the boards together and cutting them to shape directly, I recommend making a template. This way you can make multiples now or in the future. As long as you have a flush trim bit for your router, you’re good to go.
The Tomato Pie Recipe
Disclaimer: We are not professional chefs and I’m sure there are many ways to improve this recipe and our methods. The goal here was only to have some fun and show you how we made some delicious pizza in the Spagnuolo house.
July 11, 2013
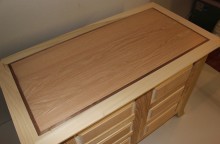
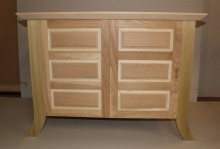
Kenny’s Raised Panel Cabinet
By: Kenny (Glasgow / Scotland)
Experience: 2-5 Years
Woodworker Type: Professional
Project Type: Cabinetry
Material(s): MDF, Solid Wood, Veneer
Finish Type(s): Oil
Finishing Technique(s): HVLP
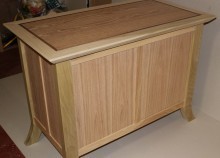
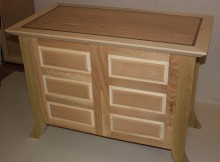
After seeing Marc’s Fancy Raised Panel video, I really liked the design on the raised panel doors, something I hadn’t ever seen before. I was intrigued with the use of two timbers sandwiched together to give the beautiful contrasting effect. This is my first ever attempt at any raised panel and I am delighted with the results. I have to say the amount of detail Marc goes into even on these free for all videos is absolutely outstanding, and he definitely influenced and inspired me to give it a go. I decided on using Oak and Poplar as my main timbers as I like the visual contrast these timbers offer side by side. I worked to my own dimensions, and tweaked little bits of the design here and there. The cabinet has not had any finish applied as yet as I’m still looking into the options, but I’m thinking it’ll be an oil finish. Although I am a woodworker as my full time occupation, I would definitely still class myself as a beginner as I’ve only really started to take it seriously since deciding to do it full time a couple of years ago. I am confident my abilities can only get better with the knowledge I gain through Marc and The Wood Whisperer site.
Keep up the excellent work Marc, and all you fellow woodworkers. Your stories, videos, discussions etc are my inspiration. Many thanks.
July 9, 2013
Eric’s Breeze Machine
By: Eric R (Kissimmee, FL)
Experience: 2-5 Years
Woodworker Type: Hobbyist
Project Type: Miscellaneous
Material(s): Solid Wood
Finish Type(s): Shellac
Finishing Technique(s): Brushing
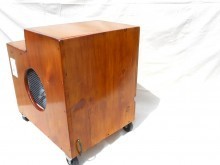
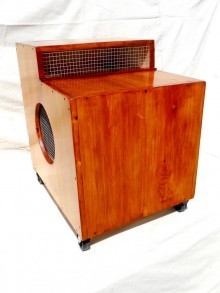
What do you do when you have a powerful blower, some left over pine, screening, casters, wiring and switches? Why, you make a “Breeze Machine” of course. That is if you live down in Central Florida and you need a nice breeze out on the lanai during the warm, humid evenings.
This machine runs as quiet as a mouse, and depending on placement, it can deliver a gentle breeze, all the way up to a freaking tornado! The cabinet is about 24”H x 24”L x 16”W, and weighs about 45 lbs.
For the finish I used three coats of Amber Shellac and two coats of Spar Urethane.


July 8, 2013
June Winner Announced
 We had an amazing turnout for June’s Giveaway and we’d like to thank everyone who entered.
Congratulations to Doug Hill who was the lucky winner of Marc’s refurbished Festool TS55 Track Saw!


