
Marc Spagnuolo's Blog, page 111
August 10, 2013
Joshua’s Garage Shop
From: Joshua Genz (colorado springs)
Shop Size: 0-249
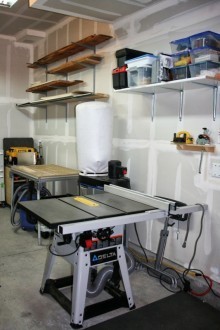
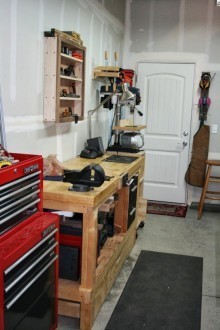
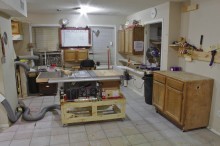
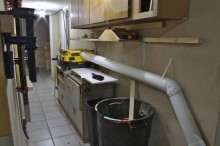
When my wife and I started looking for a new home one of my requirements was a 3-car garage so I could have space to set up a shop. When we found our home, I was amazed that it actually had a 4-car garage (almost 1,000 sq.ft). I have been able to set up my shop, park both vehicles and still have plenty of room for kids’ bikes and toys (I don’t know think a 3-car would have been big enough).
The garage is t-shaped with the shop area directly in front of the middle garage bay and is about 250 sq.ft. Unfortunately I’ve spent most of my time setting up the shop instead of working on any projects. I have done a few simple projects for around the house, but nothing too exciting yet.
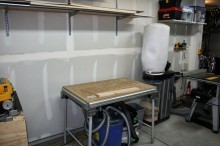
Over the years I have upgraded my tools. I found my Delta Table-Saw and dust-collector on Craigslist. The saw was in immaculate condition, and the seller included a zero-clearance insert with Micro-jig splitter, two Freud Industrial thin-kerf blades, and an after-market dado-insert all for $350. I had a 220-volt outlet installed in the garage and converted the saw to 220-volt (I plan on purchasing a 3-hp cabinet saw next year). The dust-collector is a 1-hp unit, but easily handles the dust from the table saw and planer. The Dewalt DW735 planer was another CL find and I built a stand/cart for it.
Prior to having all of this space I needed to be able to easily set-up and tear-down all my tools which was a big reason why I purchased the Festool MFT and TS55. This quickly led to buying an ETS 150 sander, a PS 300 jigsaw, an OF1400 router and most recently a CT26 dust extractor. Now that I have the table-saw, the TS55 is primarily used to break-down plywood, and for edge jointing until I get a jointer.
To mill rough-lumber, I skip-plane the board to get it reasonably flat on one face with my Lee-Nielsen jack-place, then I send it through the planer. To get a clean edge I the use the TS55, and then finally run it through the table saw to square the opposing edge. This process works relatively well, but I plan on purchasing an 8-inch jointer in the future.
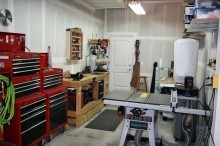
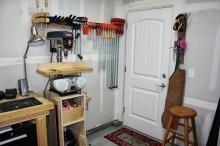
My drill-press is nothing special, but gets the job done. I custom built the table and stand. I built my bench a few years ago with simple 2×4 and plywood construction. The bench is very solid and works relatively well, but I would like to build a proper woodworker’s bench in the future. Above the bench is a simple cabinet/shelf that I built for my hand-planes.
Finally, the Craftsman tool box on the right holds all wood-working related tools (saws, chisels, router-bits, etc.), the one on the left is for my automotive tools.


August 8, 2013
Joshua’s Garage Workshop
From: Joshua Genz (Colorado Springs)
Shop Type: Garages
Shop Size: 0-249
When my wife and I started looking for a new home one of my requirements was a 3-car garage so I could have space to set up a shop. When we found our home, I was amazed that it actually had a 4-car garage (almost 1,000 sq.ft). I have been able to set up my shop, park both vehicles and still have plenty of room for kids’ bikes and toys (I don’t know think a 3-car would have been big enough).
The garage is t-shaped with the shop area directly in front of the middle garage bay and is about 250 sq.ft. Unfortunately I’ve spent most of my time setting up the shop instead of working on any projects. I have done a few simple projects for around the house, but nothing too exciting yet.
Over the years I have upgraded my tools. I found my Delta Table-Saw and dust-collector on Craigslist. The saw was in immaculate condition, and the seller included a zero-clearance insert with Micro-jig splitter, two Freud Industrial thin-kerf blades, and an after-market dado-insert all for $350. I had a 220-volt outlet installed in the garage and converted the saw to 220-volt (I plan on purchasing a 3-hp cabinet saw next year). The dust-collector is a 1-hp unit, but easily handles the dust from the table saw and planer. The Dewalt DW735 planer was another CL find and I built a stand/cart for it.
Prior to having all of this space I needed to be able to easily set-up and tear-down all my tools which was a big reason why I purchased the Festool MFT and TS55. This quickly led to buying an ETS 150 sander, a PS 300 jigsaw, an OF1400 router and most recently a CT26 dust extractor. Now that I have the table-saw, the TS55 is primarily used to break-down plywood, and for edge jointing until I get a jointer.
To mill rough-lumber, I skip-plane the board to get it reasonably flat on one face with my Lee-Nielsen jack-place, then I send it through the planer. To get a clean edge I the use the TS55, and then finally run it through the table saw to square the opposing edge. This process works relatively well, but I plan on purchasing an 8-inch jointer in the future.
My drill-press is nothing special, but gets the job done. I custom built the table and stand. I built my bench a few years ago with simple 2×4 and plywood construction. The bench is very solid and works relatively well, but I would like to build a proper woodworker’s bench in the future. Above the bench is a simple cabinet/shelf that I built for my hand-planes.
Finally, the Craftsman tool box on the right holds all wood-working related tools (saws, chisels, router-bits, etc.), the one on the left is for my automotive tools.
[image error]
[image error]
[image error]
[image error]
[image error]
[image error]
August 7, 2013
Welsh Bardic Chair
By: Carwyn Owen (Welshpool, Wales)
Experience: 10+ Years
Woodworker Type: Semi-Pro
Project Type: Chairs & Stools
Material(s): Solid Wood
Finish Type(s): Lacquer, Wax
Finishing Technique(s): HVLP
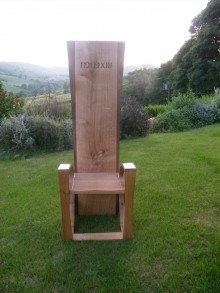
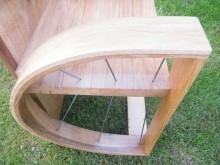
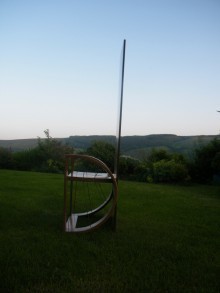
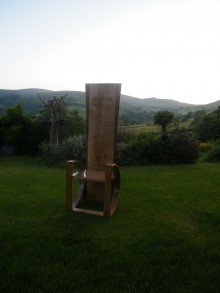
This is a Bardic Chair, “what is a Bardic Chair” you ask? Well it’s a chair built for a traditional Welsh festival called the Eisteddfod. It is won by a bard or poet for writing the best poem. Here’s more on the Eisteddfod http://en.wikipedia.org/wiki/Eisteddfod. Being asked to build one of these chairs is a massive honour to any craftsmen in Wales. It is a great opportunity to build essentially a throne for the best bard. So being commissioned at the age of 17, to build this chair was amazing. So I needed a stunning design. I’m happy that I was able to deliver for the 2013 Powys Eisteddfod.
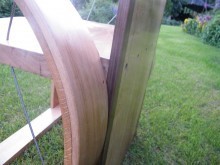
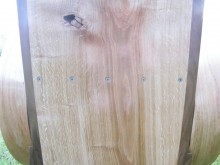
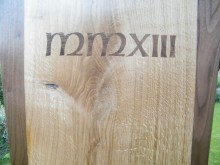
The chair is built mainly of oak, a massive 20” wide 7’ tall board fills the back. Along side of that are two boards of walnut. The seat is also one board, originally 2” thick. The seat and the back had to be flattened by hand plane. The two are joined by a hidden dado and bolts with threaded inserts, a impeccably strong joint. The arm/leg is two separate parts of steam bent oak, laminated together. There are also stainless steel cables to add another dimension and detail. These are crimped at either end inside the lamination. The writing is 2013 in Roman numerals, and is a router-based inlay.
The chair was photographed on my parent’s lawn, showing the view of the valley.
August 5, 2013
Poll: Woodworking Gadgets
 The woodworking industry isn’t exactly a hotbed of innovation, unless we get into the world of CNC and production work. For the most part, this lack of innovation stems from the fact that real innovation isn’t needed. After all, we technically don’t even need power to do what we do! Of course, businesses need to create new products in order to capture our interest and our dollars. Sometimes these new gadgets and gizmos represent novel ways to accomplish a singular goal. Other times, they seem to be aimed at solving a problem that doesn’t actually exist.
If you want some examples, take a look at Rockler’s new Glue Applicator Set and Woodpecker’s list of One-Time Tools.
So how do you feel about these woodworking gadgets and gizmos?
What do you generally think about these new devices?
My buddy Tom Iovino usually makes the poll but this week’s was created by me! See, I’m good for something. :)
August 1, 2013
August Giveaway
Thanks to our wonderful friends at Festool, for the rest of the year we are going to give away a different Festool tool each month! Yes, you read that correctly! Because Festool has their own sweepstakes, you actually have two chances to win a Festool tool every month.
Here is what is up for grabs for the month of August:
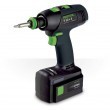 This Festool T12+3 Cordless Drill Set (564247) and SYS 1 Box (a $500+ value!) will go to one lucky winner!

We also have an amazing 11-piece carving set in a wooden box with a sharpening and honing DVD included to give away from the fine folks over at Two Cherries
To celebrate the start of the Greene & Greene Blanket Chest in the Guild, we are giving away a Superfan membership (with all the goodies) to one lucky winner.
Loading…
July 31, 2013
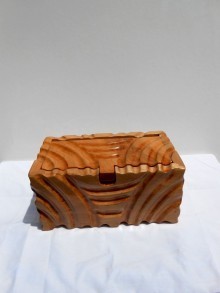
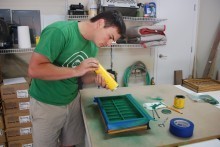
Eric’s Sculpted Box
By: Eric Rusch, Sr. (Kissimmee, FL)
Experience: 5-10 Years
Woodworker Type: Hobbyist
Project Type: Boxes
Material(s): Solid Wood
Finish Type(s): Oil/Varnish Blend
Finishing Technique(s): Wiping
I wanted to try a free hand sculpted art piece box and this is what I made. It was a fun project and offered me some new challenges.
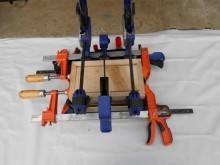
I’ve seen many with the inset lid hinge-pinned after construction, but I wanted to hide the pin. So, I trapped the 3/16 brass lid hinge pin in during glue up. This is a lot harder, trying to hold everything together: pinned lid, biscuited miters, inset bottom and so on while trying to attach the clamps. A lot of small pieces coming together at once.
After tons of sanding it was finally ready for finish. Three coats of Classic Oak stain and two of spray Polyurethane. The box measures approximately 10”W x 5”D x 4.5”H


July 30, 2013
Poll: Files and Rasps
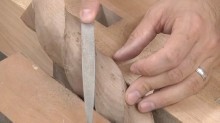 Files and rasps can be handy to have in the shop. Initially, a tool like a rasp can be intimidating as there are no fences or stops. You just plop it on the surface and go. But once I broke the barrier of straight and dove head first into the world of curved, the rasp soon became one of my favorite tools to use. You can see my rasps in action in this recent video.
So how about you? What do you think of files and rasps?
What do you think about rasps and files?
This poll was created by Tom Iovino at TomsWorkbench.com.
July 27, 2013
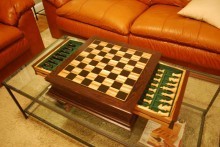
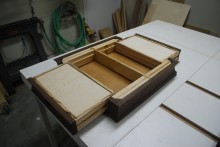
Dustin’s African Hardwood Chess Board
By: Dustin Smith
Experience: 2-5 Years
Project Type: Games
Material(s): Solid Wood
Finish Type(s): Lacquer, Shellac
I built this chess board for myself over the course of a year or so (this was my “toy” project so it stayed on the back burner for the duration of the build). I wanted an exotic hardwood board, with a case underneath to store the pieces and raise the playing surface up off the table. I decided on wenge for the case and ebony/zebrawood for the light and dark squares. Originally, I intended to turn my own pieces on a lathe, but to be honest I am not a turner and didn’t want to invest in a lathe and turning tools for what would probably be a one-time project/occasion. I ended up buying the pieces online for about a hundred bucks and was done with it!
All of the moldings were made on the router table with some specialty bits from Rockler. The drawers are tongue and dado joinery for simplicity and since the drawers will see very light use. I made a my own drawer pulls using scrap ebony, the pulls are mortised into the drawer fronts.
The finish is a couple coats of shellac both inside and out, topped with Deft spray lacquer (spray can, nothing fancy). I rubbed out the top, starting with 320g and working my way up to Rottenstone.
This was a very fun project to build, and my first project with no real “due date” which was a big plus in making it fun to build. No rush!


July 25, 2013
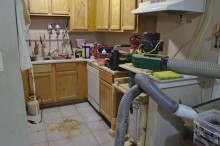
Jay’s “3 Bedroom” Workshop
From: Jay Bates (Starkville, MS)
Shop Type: Unique
Shop Size: 500-999
This is a rather unique shop location. My day job is maintenance at an apartment complex. They had a spare 3 bedroom apartment that they were using as storage when I took the job. I removed all the trash, cleaned it up, put my tools in and have since called it “my shop.” As you can tell, this is a function over fashion type of shop.
When you first walk in you are in the living room, better known as the assembly area. I keep this 12′x 12′ area relatively free to accommodate larger project assembly. It is also really handy to have a space for plywood breakdown before it hits the table saw.
Moving right to left you will start in on my miter saw area. The dining room has a small coat closet that works great for a miter saw location. For material support I use a small bi-fold door to give slightly more than 6′ of support to the left. For material support on the right I use a salvaged sink base cabinet with casters on the bottom. This allows me to support longer stock by simply sliding the cabinet around. I like this method a lot better than having a dedicated support cabinet/shelf that may at some point be in the way.
Right to left again, the kitchen area is where I store most of my “junk”, finishes, and chemicals. This area stays in a state of organized chaos so I figured I would leave it as is for the picture. Having access to a sink in the shop is something I have grown very fond of. When the time comes to build my own shop I will definitely have some type of running water in it. I also have my modified Harbor Freight dust collector in the kitchen. To eliminate the need for a decent canister filter I modified the unit to incorporate a the in baffle right below the motor and ported the exhaust air outside. The duct work is half 4″ Sewer and Drain PVC and half 4″ flexible hose. This runs back to the miter saw, out to the table saw station, and into the hallway for my planer station.
The table saw station is a simple half lap 2×4 skeleton. It houses my Porter-Cable PCB270TS table saw and my dual router setup. I purchased plans for a homemade router lift and am extremely satisfied with the results. I have two routers on separate lifts for less money than one manufactured lift (routers included). This station is on casters as well to allow for easy shop changes. I also have 2 other small shop carts on casters for wheeling material around during a build.
I recently moved my planer into the hallway and am really glad I did so. This gives me plenty of infeed and outfeed support. It is stationed on top of a reused dresser that I found. I also have some reused cabinets above that are great for storage that is not accessed often.
The bedroom at the end of the hall is where I store my lumber scraps and my air compressor. I have the compressor in a closet which keeps the noise down considerably in the main work area. I also like this because I can just throw the hose out of the back window and spray finishes outside. The hallway is also where I store my clamps, levels, and straight edges. The other two bedrooms are full of doors and other supplies for my day job.
Moving along we are back at the entry door. I store all of my jigs and patterns along this wall. Its amazing how quickly they can add up. I also store my stackable saw horses behind the door. These get used daily. When the time comes for me to move I will be building my first actual standalone shop. In the mean time, I am grateful to have access to this unique shop space.


July 24, 2013
Poll: The Heart of Your Shop?
 Many woodworkers say the table saw is the heart of the workshop. But in recent years, folks have been ditching their tablesaw for safer alternatives. So there must be something else serving as the heart of the workshop. Perhaps the workbench? For me, personally, I do consider it the workbench. That’s my home base. Everything begins there and at some point project parts are processed there. And yes, some things are even finished there. It also happens to be the starting point for every video we make. What about you?
What do you think is the heart of your shop?
This poll was created by Tom Iovino of TomsWorkbench.com.


