Marc Spagnuolo's Blog, page 107
October 4, 2013
209 – The Not-So-Rustic Rustic Outdoor Table (Part 2 of 2)
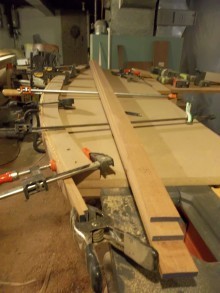
 The table and bench tops are assembled from multiple smaller boards. Normally I like to use the widest boards possible for something like this, but this particular batch of cedar features boards that contain the pith (center of the tree). The pith can be quite unstable so for the longevity of the project I am cutting each board down and removing the center section. Ultimately it’s a good idea to leave your boards at their full width to make the glueup much easier.
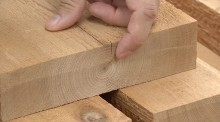
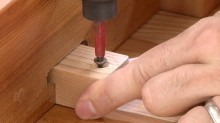
Breadboard Ends with the Domino
I decided to include breadboard ends on this project for a couple of reasons. First, is the fact that it looks cool. Second is stability. By running across the width of the table, a breadboard end will help keep a panel flat over time. Furthermore, by blocking the end grain, a breadboard end will slow down the uptake and loss of moisture by covering and protecting the end grain.
There are lots of great ways to make breadboard ends but they all have to satisfy the same requirement: the top must be allowed to expand and contract. I have seen designs out there that simple screw the breadboard to the table with no allowance for expansion and contraction and unfortunately that’s a recipe for disaster. Because I was already on a Domino XL kick, I decided to see if I could use it to make the joint. I did a quick web search to see if anyone had already done this and found this blog post. Seemed like a quick and easy way to get the job done so I gave it a shot.
 For those who are Domino nerds, I’ll explain why this works. The Dominos are glued into the table side of the joint with glue and no slop. On the breadboard side, the two center mortises are cut with no slop but the outside mortises are all cut on the loose setting. This loose setting will allow the table to expand and contract but they won’t do anything to hold the breadboard end tight against the table. So I used glue on the two center Dominos, locking them in place and drilled through the outside dominos for dowels.
If I were a little more motivated on this project, I would have tried what would surely have produced a tighter joint: the drawboring technique. But laziness won and I simply drove the dowels through with clamps holding the breadboard tight against the table.
Extra Protection
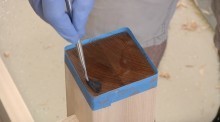 Before applying the finish, I gave the table some extra protection by sealing the bottoms of the legs. By preventing moisture from being pulled up into the end grain, the longevity of this table is increased dramatically. The product I used is a 2-part epoxy finish called Clear Penetrating Epoxy Sealer (CPES).
The Finish
 The finish I chose was Watco Teak Oil. Teak oil is not made from teak wood, but FOR teak wood. It can also be used for other woods so don’t let the name fool you. Teak oil is really just an oil/varnish blend that’s formulated for outdoor use. It applies just like a danish oil (flood on, wipe off) and produces a low lustre finish that adds at least some protection to the surface. I’m not a fan of heavy film finishes, especially on outdoor pieces, so this finish product fits the bill.
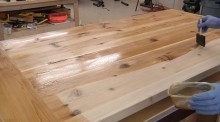 The thing to keep in mind is that this isn’t a low-maintenance finish. Every year or two, I’m going to have to give this table and benches some love. Perhaps a very light sanding and a light reapplication of the teak oil product. But since I do this stuff for a living, I think nothing of spending an afternoon re-applying finish to one of my projects every year or two.
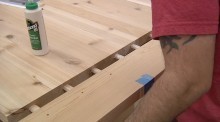
Attaching the Tops
 The table and bench tops are attached to the frames using the shop-made clips we made previously. Each clip is positioned in such a way to allow for movement as the tops expand and contract over time.
The Plans
 Thanks to the assistance of my good friend Aaron Marshall, we have both a SketchUp File and a PDF plan that you can download.


October 3, 2013
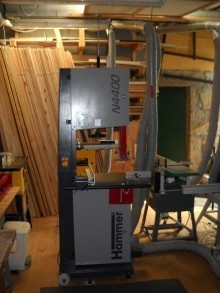
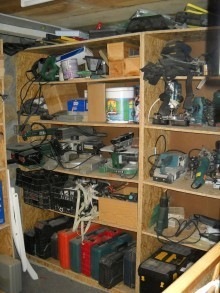
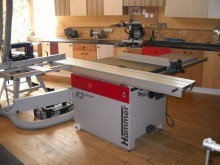
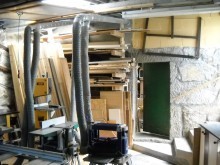
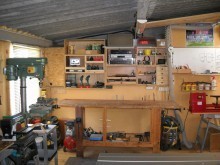
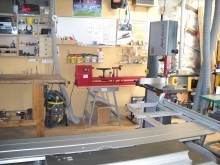
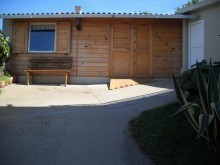
Jose’s Standalone Shop in Spain
From: Jose L. Varela (Vigo, Spain )
Shop Type: Standalone
Shop Size: 500-999
This is my new workshop. It is an independent workshop. I am a professional in carpentry, which is also my great love.
The shop is 55 square meters in size. I have two large Felder-Hammer machines, a bandsaw and a table saw. I also have a small band saw, lathe, planer, router table, miter and drill column. Next to the workshop is a small room with shelves which is where I keep all handheld power tools, milling sanders etc. I also store my work tools there as well.
I hope you enjoy seeing my shop. If you would like to see more photos as well as work done, you can find me on facebook at “carpinteria HEMACOM”.
October 1, 2013
Poll: Do You Like Biscuits?
 In case you aren’t familiar, biscuits are small football-shaped discs that are inserted into a complimentary slot cut into a board. If you have a biscuit joiner, you simply line the tool up with a center line on each board to be joined and plunge. The pre-made biscuits fit perfectly (sometimes) into the slots and with the addition of glue, add some strength to the joint. Personally, I began my woodworking journey using biscuits but as time marched on, I began to use them for alignment purposes only. Once the Festool Domino came out, providing more depth and strength than a biscuit, I no longer had a need for a biscuit joiner.
Some folks hate them, others love them. What do you think of biscuit joints?
What do you think about biscuit joints?
Our polls are created by Tom Iovino of TomsWorkbench.com.
Repurposing Household Items for the Shop
In the world of woodworking and shop-ownership, creativity goes a long way. You can occasionally save time and money by simply pilfering your home for everyday household items instead of buying something online at an expensive woodworking retailer. Now keep in mind, this can and will get you into trouble. The time I used Nicole’s electric hand mixer to stir latex paint comes to mind. But if you’re careful about it and stick to using the things that are no longer needed in the house (or the ones that are due for replacement), you could very well find yourself with a treasure trove of shop helpers at your disposal.
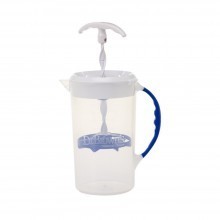 My latest comes courtesy of my son Mateo. While he spent the first 7 months of his life enjoys nature’s perfect food, we eventually had to switch to formula. Mixing formula everyday is kind of a pain in the butt and I found the Dr. Brown’s formula mixer to be absolutely awesome! Mixes easily with no clumps and no bubbles and I can pour right out of the container. Fast-forward a year or so and we no longer use the formula mixer.
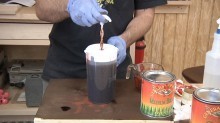
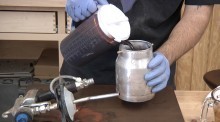
During a recent Guild project, I was mixing dye as per Darrell Peart’s formula and realized there was a better way. I headed into the kitchen, picked up the Dr. Browns mixer, ASKED PERMISSION (this is very important people!), and headed back to the shop with my new toy. As you can see in the photos, the mixer worked perfectly and gave me a very easy and clean way to transfer the dye to the spray cup.
I honestly don’t recommend you spend $13 on this formula mixer for your shop. But if you happen to have one and you don’t plan on having another kid, it’s a really good option.
I’d love to hear your ideas and stories about things you repurposed for use in the shop. And perhaps, let us know how much trouble you got into after the fact.
September 30, 2013
Joe’s Fishing Boat Entertainment Center
By: Joe Oliver (Eaton, IN)
Experience: 0-2 Years
Woodworker Type: Hobbyist
Project Type: Entertainment Centers
Material(s): Plywood, Solid Wood
Finish Type(s): Oil/Varnish Blend
Finishing Technique(s): Wiping
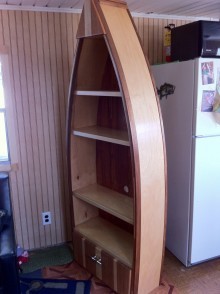
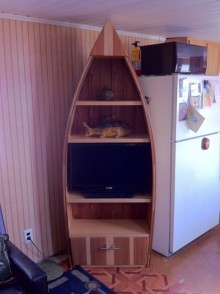
My mom called one day asking what I thought about a boat-shaped bookshelf/dresser thing she had seen at a craft store. She wanted to put a small TV on it for use at their place at the lake. After looking it over, I thought, I could make that! And probably better! And probably for less than the price they’re wanting!
So I came up with a plan, materials list, and the tools I would need. I just recently purchased a decent table saw after saving up for over a year and I was dying to make something nice and big! I gave mom an estimate of what I thought would cover the lumber and some basic tools. Well, this being my first actual project, I was way off. It cost quite a bit more in both lumber and tools (and time) than I thought it would. But I have to say I think it turned out great and I learned a whole lot that I didn’t know just a few months ago.
I learned to make dados, bevel cuts, joining boards, big glue ups, routing, finishing and a lot more. It was fun and kept me wanting to get back out in the shop (I’m learning to call it that instead of my one-car garage!). Along the way, I came across a lot of “head scratchers” that had me thinking. So, of course, I went right to TheWoodWhisperer.com and watched and re-watched Marc’s videos, which got me right back on track. I’m grateful for this awesome resource for us new hobbyist woodworkers.
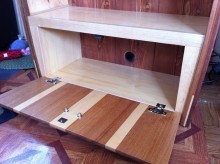
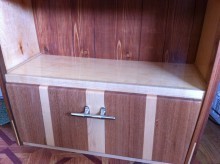
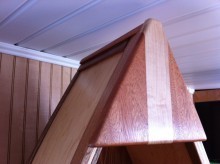
The boat is made of both maple and mahogany, and maple veneered plywood. I like the contrast of those two woods. The back is thin pine paneling laminated to plywood to give it a more rustic look. I stained it so it would be a similar tone as the mahogany. The cabinet at the bottom was an idea my wife had when I was having trouble coming up with a way to make the whole unit stable enough for a TV, yet keep the look and feel of a small fishing boat. I think her solution was just the ticket! My dad calls it the live well for his keepers. I drilled a couple holes behind the cabinet and the TV shelf, so that a DVD player could be easily tucked away out of sight. I even found a nice boat cleat to use as a handle for the door!
For the finish I decided to go with a wipe-on varnish, using Marc’s techniques to get a good build-up of coats. I wasn’t sure how to complete it to make it look great, so I came back here to see if there were any hints, and lo and behold, a video about finishing the finish had just been posted a few hours earlier. I followed Marc’s steps and it came out silky smooth. My parents love their new “boat” and I am thrilled with my first major build as a woodworker!

September 28, 2013
Humidor Guild Build Begins October 25th
On October 25th at 8pm Eastern we are having our LIVE virtual tour of the Humidor Guild Build. Every project begins with a tour like this as it gets you acquainted with the project and allows for plenty of Q&A.
We are still finishing up the current Guild project, the G&G Blanket Chest, and I’ll be out of town for Woodworking in America mid-month. With such a tight time table, I’m doing my best to provide a timely distribution of the design details and material specifications. Please bear with me on that.
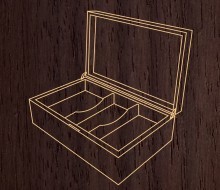 What I can tell you about the project is that I plan on showing the following things: basic box construction, veneering, perimeter inlay, decorative inlay, splined miters, glass work, and of course everything associated with building a solid humidor. Because I am not a smoker, this humidor is a gift for my father. I’ll be building an alternative version to house the ashes of our dog Lexi, who we lost just this past week. So while the project is being billed as a humidor, we will discuss how it can easily be made into a keepsake box or valet case of some sort.
The project is not listed on the Guild page yet and I’ll let you know when it’s available for purchase. As always, Guild subscribers will get this project automatically and all Hybrid Woodworking Pre-Order Bonus customers will have access as well. Anyone else interested in the project can either purchase it A La Carte or pick up a 1 Yr. Subscription. Head to the Guild site if you want to learn more about the Guild.
September 27, 2013
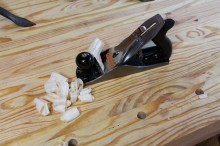
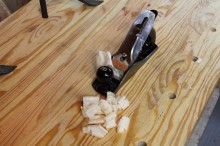
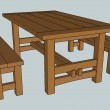
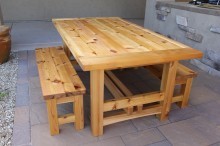
208 – The Not-So-Rustic Rustic Outdoor Table (Part 1 of 2)
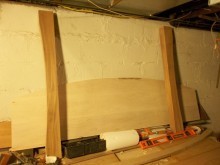
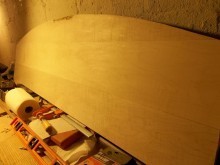
Recently, Nicole requested an outdoor dining table. To be honest, she doesn’t ask for much so when she makes a request I like to act quickly. Not to mention, the “outdoor season” in Arizona is just beginning so the timing is perfect. For everyone outside of Arizona, you might find this project helpful next Spring. Ha! I gave it some thought and came up with a simple design for table and two benches. The set has a bit of stylistic flair that isn’t overpowering, but I do have trouble calling this a truly “rustic” project, hence the title of the video. Keep in mind that details like the curves and the breadboard ends are completely optional and you can leave those out if you prefer something more vanilla.
The Wood
 I chose Western Red Cedar for this project. I intentionally purchased the knottiest boards I could find. I want the table to look rustic but I’m not about to begin distressing the wood. I take out my frustrations on imaginary people in video games, not on my projects. So the knots will give the wood that naturally rustic look I’m going for, without the chains, spikes, and other medieval torture implements.
Western Red Cedar also has a very high decay resistance and should hold up well in most environmental conditions. It’s very soft (when compared to the exotic and domestic hardwoods I typically work with) but it machines easily.
If you don’t want to foot the bill for expensive outdoor friendly wood, you certainly can build this project from construction-grade lumber. Your boards won’t be quite as thick as listed in the plan, but it should still turn out nice.
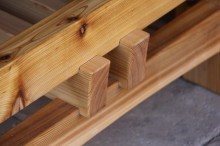
The Joinery
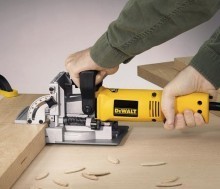
 I wanted to knock this project out in a hurry but I didn’t want to sacrifice quality. I recently received a Festool Domino XL for testing and I thought it would be the perfect application for the tool. Like the original Domino DF500, the Domino XL is capable of cutting loose tenon joinery with the speed of a biscuit joiner. It’s a real “point and shoot” type of machine. The great thing about the XL, as the name implies, is the fact that it does much larger scale joinery perfect for large tables, beds, doors, and anything else you can imagine.
Like any Festool product, the Domino XL has a hefty price tag but I don’t know anyone who’s regretted the purchase. That said, I feel it’s important to mention a couple of alternatives that you might consider because I want everyone to be able to build this project.
Traditional Mortise and Tenons – You can’t argue with the classic mortise and tenon joint. If I weren’t in such a rush, this is the joinery I’d use. I would cut the mortises with my router and the tenons at the tablesaw. If you go this route, be sure to add about 4″ to the length of your rails to account for the tenon stock.
Dowels – A simple doweling jig will serve as a reasonable substitute. I’d recommend at least three 1/2″ dowels per joint.
Pocket Screws – While not my favorite option for larger-scale projects like this, you can certainly use pocket screws to assemble this table. In terms of speed, the pocket screw is tough to beat!
Assembly
This is one of those projects where long clamps are a life-saver. If you don’t have clamps that are long enough, consider hooking two shorter clamps head to head to span the required distances.
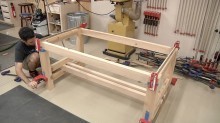 With parts of this size, I always try to strategize the glueup by creating smaller sub-assemblies. In the case of the table, I assemble the long rails and legs first. I then clamp the notched stretchers to the lower side rails so the entire unit can move as one. I then connect the stretchers and rails to the long rail/leg assembly all at once. This worked quite well as you’ll see in the video. For the benches, the assembly is much easier. The legs and short side rails comprise the initial sub-assembly which are later connected to one another via the long rails. My glue of choice for this project is Titebond III, specifically formulated for outdoor use.
The Plans
Thanks to the assistance of my good friend Aaron Marshall, we have both a SketchUp File and a PDF plan that you can download. Please note that the board widths for the table top and bench tops are dependent upon your stock. What you see in the plans represents the ideal situation so don’t go out of your way to find boards of those exact widths. Just worry about getting enough boards to span the entire panel width.
September 23, 2013
Poll: Face Frame Joinery
 Face frames are incredibly common in modern furniture and cabinets. They can dress up a simple plywood carcass giving it a much more visually substantial appearance. The pieces used for the face frame are typically only about 1 1/2″ wide and where vertical pieces meet horizontal pieces, some sort of joinery is usually needed. So that’s what we want to know today: what’s your preferred method for joining face frame parts?
What is your preferred method of joining face frames?
This poll was created by Tom Iovino of Tomsworkbench.com.
September 22, 2013
Scott’s Hardwood Headboard
By: Scott Willis (Cincinnati, OH)
Experience: 2-5 Years
Woodworker Type: Hobbyist
Project Type: Beds
Material(s): Solid Wood
Finish Type(s): Lacquer, Oil, Shellac
Finishing Technique(s): HVLP
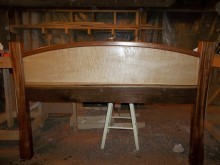
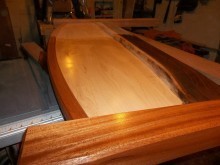
For our 2nd Anniversary I knew I wanted to do something ‘different’, so I decided to make a headboard for my wife using our existing queen-sized metal bed frame. This was my first venture into figured woods and I’m not sure I’ll ever go back, as the results turned out so much nicer than the basic ‘Red Oak’ that’s available in my area. Taking advice from other woodworkers in the Woodwhisperer Forums, I decided on a simple design since I only had 4 months to work on the project.
The main part of the backboard is Curly Maple planks jointed together. The facing on the bottom of the Maple is a piece of Walnut I found with two live edges that I ripped in half and put one half on each side. The posts are from one piece of 12/4 Honduran Mahogany that was just the right height so I could rip it into two 4″ wide pieces. The top rail is made of 6 laminated strips of 1/4″ x 1 1/2″ African Mahogany.
I planed the Maple boards and simply edge-glued them together. Once dried, I cut it to shape (with a rough curve on the top). I cleaned the live edges of the Walnut with sandpaper and glued it to the board with the live edge up on the bottom of both sides of the headboard.
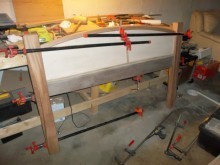
The legs were ripped from a single 12″x42″ piece of 12/4 Honduran Mahogany. I cut reliefs into one side on each board making sure to keep the cutoff for later clamping :). I used a long piece of scrap to make the arc for this. I sanded and chamfered all of the edges.
I created the large arch at the top by taking a sheet of MDF and creating the arc with a piece of scrap wood. Because this arc doesn’t always come out uniform and I needed more surface to clamp to, I cut it 3 times with a jigsaw, screwed them together with one of the curves backwards and sanded it uniform. This allowed the high points and low points on the curve to be evened out. I then clamped in place one 1/4″ strip of African Mahogany I had ripped and glued another piece to it. When it dried it held the curve. I continued this process until I had 6 pieces of mahogany glued to make a 1-1/2 x 1-1/2 curved piece. I chamfered all the edges and using my router and edge guide, I slowly cleaned out a 3/4″ deep recess along its maximum needed length and then cut the scrap from both sides. I used this piece to mark the final curve on the main board and cut that curve.
When all the pieces were cut, I was so ready to cut the groove into the legs and glue them together but discovered that in order to make the headboard fit, I would have to cut down the thickness of the Walnut at the ends, otherwise it would be almost the same thickness as the legs. I used a hand plane, sandpaper, scraper, pull-saw, and just about anything else I could to cut it down to where I needed it.
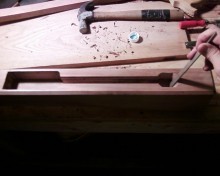
I then placed the legs against the headboard and drew the outline of the headboard and top rail on the legs leaving a 1/4-inch gap between the top of the headboard and the inside top of the rail so the wood could expand but still fit together. I finally began the last long process of carving out the legs 2″ deep with a router and chisels which were needed to get the angles for where the curved top rail enters the legs.
I raised the grain with water and gave it a final sanding. I glued the bottom of the headboard ‘tongue’ as well as the outside of the top rail. There was plenty of contact to ensure a strong bond while still allowing the maple to expand/contract into the top rail.
I was very pleased when I removed the clamps. There was no warping, it was the exact length I needed, and stood upright on its own! I gave the whole thing a low-high sanding, finishing at 600 grit before soaking it in Boiled Linseed Oil for 15-min then wiping the excess off. This brought out so much of the character of the wood, it really made the Curly Maple and Honduran Mahogany POP! I then applied 3 coats of shellac, lightly sanding between each coat, and then sprayed a few coats of Glossy Lacquer for a final finish!
Using simple bolts from Home Depot, I drilled the holes and mounted it to the frame. It made a great present that I barely finished in time. I must say I learned a lot on this project. Working with these woods, I can’t wait to use them again…maybe next time for a foot-board!
September 19, 2013
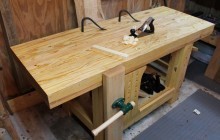
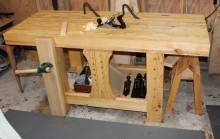
Carter’s Roubo Style Workbench
By: Carter (Jacksonville)
Experience: 0-2 Years
Woodworker Type: Hobbyist
Material(s): Solid Wood
Finish Type(s): Oil
Finishing Technique(s): Wiping
Building this bench was my first major project. It took about two months to build after I let the wood sit in my shop for a couple months. The entire bench is made of 2 x 10 southern yellow pine I bought from Home Depot, and the vise is made from a piece of hard maple I had lying around. The bench is 31″ tall, 5 1/2′ long, and 2′ wide. For me the most difficult part was jointing and laminating the massive top. Laminating all those boards really helped me fine tune my power joiner and planer skills. I did the large mortises with a forstner bit and mortise chisel. Surprisingly, creating the mortise and tenons was pretty easy. The tenons are held in place by dowels using the lessons from Marc’s drawboring episode. I flattened the top and bottom of the benchtop using a #5 and #8 handplane, which was a real workout. I applied two coats of boiled linseed oil for a finish.
I was lucky enough to order a pair of Phil Koontz holdfasts for the bench a few months before he quit making them. I have been using the bench for a few months now and it has made using my hand tools a real joy.