
Marc Spagnuolo's Blog, page 105
November 11, 2013
Egads! That’s a Lot of Books!
 It looks like the book fairy came to visit me last night. Actually, it was a FedEx Freight guy who needed help getting the pallets up the driveway and I doubt he’d appreciate being called a fairy. Anyway, the books are here!! Have you ordered your copy yet? If not, you can do so here.
As excited as I am about the success of our pre-order campaign, I have to say that I’m a little intimidated by the thought of autographing that many books. If you see me wearing one of those wrist thingies in the next video, you’ll know why.
When Will it Ship?!
Our plan is to begin shipping books immediately. In case you don’t already know, our business is very small and consists of yours truly, Nicole, my mom, and my step-dad. So although we’ll begin shipping the books today, I am expecting it to take at least a week for us to get ALL of these books out the door. I will post another update when all of the books have been sent out. Until that point, please abstain from inquiring about delivery dates.
Autographs
As mentioned above, every book will feature a distinct line of chicken scratch that I call my signature.
Update Your Address
The pre-order took place in August and some of you may have moved since then. If you haven’t already notified us of your change of address, please do so now.
Thanks for your support everyone! This book would not have been possible without your feedback and encouragement throughout the years!


November 7, 2013
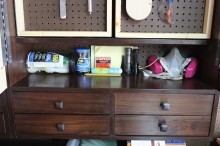
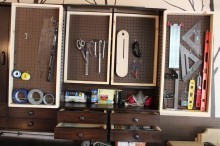
Eric’s Hanging Tool Cabinets
By: Eric Ball (Rancho Santa Margarita, CA)
Experience: 0-2 Years
Woodworker Type: Hobbyist
Project Type: Shop Projects
Material(s): Plywood, Solid Wood
Finish Type(s): Commercial Stain, Shellac, Waterborne, Wax
Finishing Technique(s): Brushing
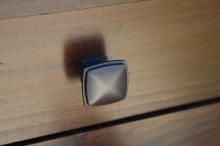
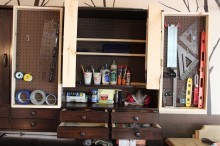
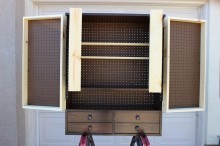
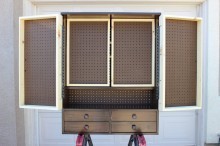
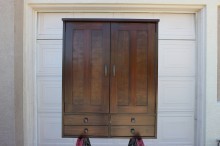
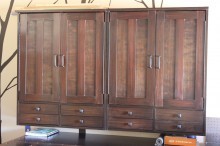
I’ve been meaning to build two tool cabinets for my garage for over a year now, and finally had the time. I had originally intended to make a “sliding door pegboard cabinet” found online, but decided I wanted a more finished look (no visible pegboard). So back to the internet to find a better option. I found a new plan, but it was done a bit cheaply so I was looking for a way to spruce it up and add some drawers. Low and behold I came back to my favorite woodworking site, “TheWoodWhisperer” and found Rusty’s version of the plans I had been looking at. Rusty’s Tool Cabinet version added bottom drawers and had a very elegant finish. Thanks Rusty!!!
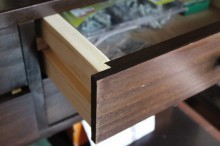
I did change a couple things, mostly with materials due to costs. I only added 2 drawers to the bottom because I wanted deeper drawers. I used maple plywood from the big box store and cheap pine for the door cases and the nicer pine for the doors themselves.
Something new this time was using some iron-on edgebanding veneer. Turned out to be very easy to use. I applied all the edgebanding first and then assembled afterwards. It did leave a couple areas not exactly flush pushing out the veneer a little at the dado and rabbit joints (corners and drawer separator). I realized this may be an issue but wanted to try it. Also tried it that way because I stained everything first before assembly (another first time trial).
I started with a coat of 1 lb clear dewaxed shellac. Then a coat of red mahogany stain, followed by a coat of dark walnut stain. Finished with a couple coats of GF High Performance Water based Poly-Satin. Finally a coat of wax and buffed (trying to bring sheen down even more). Finishing is definitely not my specialty and I’m always looking for a better way. Still trying to find a way to not get streaks in the poly. Don’t have a sprayer yet. I have since done a lot of research and will try to make some adjustments next time.
Ordered the hinges, door pulls and knobs ($2 ea) off the internet. I bought the piano hinges in 4′ lengths and cut them down, then spray painted black (the ‘oiled bronze’ ones were a bit too pricey for me).
Anyway, thanks again Rusty and Marc. Hopefully going to start on a coffee table next.
Carba-Tec Launches Powermatic in Australia!
 If you’re an Australian woodworker, you might be excited to know that Carba-Tec is now selling Powermatic equipment. In fact, they are making a big deal about it by hosting several launch events. If you’re in the area, you owe it to yourself to attend. Here’s what’s on the agenda:
- Demonstrations
- Talks and Q&A
- Free gift: Powermatic travel mug
- Exclusive limited-time offers
- Complimentary food and beverages
- LUCKY DOOR PRIZE: PM 14″ BANDSAW (one per store)
Spaces are limited, so RSVP is essential! Attendees will need to specify which of the following events they will be attending (email marketing@carbatec.com.au):
BRISBANE
Monday 11th November – from 5:30pm
128 Ingleston Rd, Wakerley QLD
SYDNEY
Tuesday 12th November – from 5:30pm
113 Station Rd, Aurburn NSW
MELBOURNE
Wednesday 13th November – from 5:30pm
80-82 Osborne Ave, Springvale VIC
For more information, click here.
November 5, 2013
Michael’s Cot Project
By: Michael Bibby (Chester, UK)
Experience: 0-2 Years
Woodworker Type: Hobbyist
Project Type: Cribs & Cradles
Material(s): Solid Wood
Finish Type(s): Dye, Pigment, Wax
Finishing Technique(s): Wiping
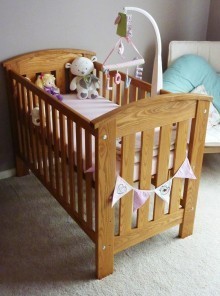
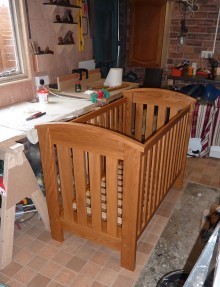
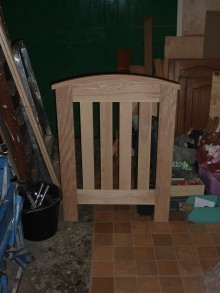
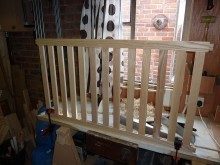
Last year, knowing I was going to become a daddy soon, I decided to build a good quality, solid cot for my soon-to-arrive baby. At the time I still had a good 7 months before the due date and figured I’d have plenty of time to complete the project. Looking back on this (after a total of 9 months!) I realise that it was actually quite an ambitious project! My daughter did finally get her birthday present, although it ended up being over 2 months late :)
I have written a full blog post about this project on my woodworking site (http://www.diyguidebook.co.uk) so rather than re-write it all, I have put just some of the highlights of the project in this post.
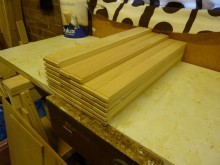
A cot is made up of a “lot” of separate parts and so a large amount of my time was devoted to cutting, jointing and thicknessing the parts I would need. It wasn’t until after all of this work had been done that I finally got to the fun part of actually cutting joints.
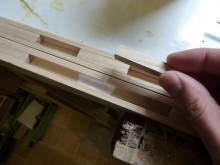
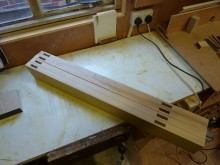
All of the side slats were given stub tenons which I cut on the router table. A channel was then cut into all side rails into which the tenons would fit. I also cut small spacer blocks which I glued into the gaps between the slats to ensure the spacing was consistent and helped strengthen the joints…it also looked nicer.
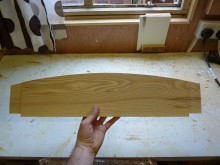
For the rounded parts of the cot, I created a template out of MDF using a router on a length of stiff string. This template was then used with a bearing guided router bit to cut the top sections of the cot. All mortises were cut by drilling waste out of the wood with a drill press and then using a hand mortise chisel to clean up the mortises.
My initial plan had been to glue everything together, but it occurred to me that if I did that, the cot would be too heavy, large and cumbersome to move around the house once finished. Also it meant it could not be easily stored for future use. So I opted to use a set of cross dowel bolts to hold the sides and headboards together, essentially turning the cot into a flat-pack project. The mattress base was also held in with dowel bolts and three separate height holes were drilled into the legs to allow for optional heights of the mattress.
To finish the project, I wanted to do something which would maintain the natural appearance of the wood. I really like the grain patterns in American Ash and so chose to use both a dye (general finishes water based dye stains) to colour the wood evenly and then a pigment stain (general finishes gel stain) to help pop the grain nicely. I did some experiments with this to ensure that the contrast would not be too oppressive and that the colours worked well together. I used a toy-safe wax paste as the top-coat. I know this may not be the most hard-wearing, but I don’t really like deep shiny finishes, so I opted for wax to maintain the natural feel of the wood.
All in all I am really pleased with the end result. My daughter seems to like it too…although she’s probably a little too young to say so yet :) I’m an amateur woodworker living in the UK where woodworking is not a massively popular hobby, so its great to be featured on The Wood Whisperer’s website where everyone is so passionate about our hobby. I look forward to reading your comments.
November 4, 2013
211 – The Young Artist’s Easel – Woodworkers Fighting Cancer 2013
This year’s Woodworkers Fighting Cancer build is an awesome little artist’s easel. This is a simple project that can be easily done in a weekend!
This year, our goal is to raise $10,000 for CancerCare, a national nonprofit organization that provides free, professional support services to anyone affected by cancer: people with cancer, caregivers, children, loved ones and the bereaved.
How You Can Help
You can either donate directly or simply make one of these Artist’s Easels. All you have to do is build the easel and send me a photo by December 9th, 2013. I will then donate $5 to CancerCare for each picture I receive (one per person, please). We also have many corporate sponsors who are donating $5 per submission. Submit your project here!
If you’d like more details on Woodworkers Fighting Cancer, our mission, our sponsors, and our history, head to the Woodworkers Fighting Cancer page.
How to Get Started
- Download the Plan
- Buy a Lumber Kit from Bell Forest Products – Bell Forest is donating $10 for every kit purchased!
Pretty much everything needed for this project can be purchased from your local Home Depot or other big box store.
Materials
(4) Legs: 3/4” T x 2” W x 44” L
(4) Rails: 3/4” T x 2” W x 28 1/4” L
(2) Cleats: 1/2” T x 1” W x 28 1/4” L
(2) Tray Sides: 1/2” T x 3” W x 27 5/8” L
(4) Tray Fronts/Backs: 1/2” T x 3” W x 28 13/16” L
(1) Chalk Board Panel: 22”W x 25”L
(1) Dry Erase Panel (Melamine): 22” W x 25” L
(2) Tray Bottoms: 1/4″ T x 4 1/2” W x 28 5/16” L (Plywood)
(1) 3/4″ Dowel Rod – 36” Long
Hardware
(4) 1/4-20 threaded inserts
(4) 1 1/4” long decorative bolts
(4) #8 1” wood screw
(1) #8 1 1/4” wood screw
(2) 2” strap hinges
(8) #10 SAE washers
Tooling
- 3/8” rabbeting bit
- 1/4” roundover bit
- 3/4” forstner bit
- Dado stack
A huge heartfelt thank you to all who participate in this year’s charity event!
November 1, 2013
November Giveaway
The holidays came early here at The Wood Whisperer! Be sure to head over to the Giveaway page or Facebook to enter for a chance to win one of two awesome prizes!
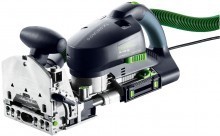 The Festool Domino XL Joiner DF 700 ! Festool has taken the revolutionary concept of the original Domino joiner and made it larger! The Domino XL offers an elegant solution to the challenge of large- scale joinery. Fast, accurate and amazingly simple to use. The Domino XL now complements the capabilities of the original Domino DF 500 with a maximum tenon size of about 5 1/2″ (140 mm). Learn more about the differences between the Domino 500 and 700
This prize is only open to US and Canadian residents.
 Fuji Spray Hobby-PRO 2™ System! The Hobby-PRO 2 is the perfect HVLP Spray System for the serious Hobbyist. This system includes the Fuji M-Model non-bleed spray gun which has a nice feature set including a rear pattern control knob to adjust the fan size. The size of the bottom feed cup is 1 quart. A powerful 2-stage motor provides enough power to spray just about anything (thinning may be required).
This prize is only open to US and Canadian residents.
October 30, 2013
Domino DF500 vs Domino XL DF700 – Which is Right for Me?
I receive this question in my inbox at least once a week so I decided it was time to make my response more official. Because I value your time, let me start off by giving you the short and sweet answer: it depends on the kind of work you do.
 VS
VS 
The Domino DF500 is great for small to medium-scale projects including panels, frames, cabinetry, boxes, and small furniture. The Domino XL DF700 is well-suited for large scale furniture projects such as entry doors, beds, big tables, and larger structural components. In my opinion, the majority of users will be best-served by the Domino DF500.
Of course, the tools have a bit of overlap on the high end of the DF500 and the low end of the DF700. To elucidate this gray area, we need to dig into the details.
In Case You Aren’t Famliar
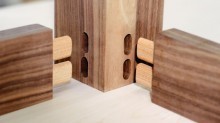 The Festool Domino is functionally similar to the classic biscuit joiner. You simply plunge the tool into the work and seconds later you have a mortise. But there are some major differences between a biscuit and a Domino tenon. Most folks believe biscuits are fairly weak and they typically aren’t used in applications where joint strength is critical. Part of this comes from the thickness of the biscuit itself but also from the shallow penetration and the fairly loose fit. A Domino tenon suffers from none of these issues. The solid wood tenon is strong, tight, and penetrates deep into the adjoining boards.
The Domino now comes in to two flavors: the original Domino DF500 and the Domino XL DF700. To help you decide which Domino is right for you, let’s evaluate three important attributes: mortise sizes, weight, and cost.
Mortise Sizes
DF500
Cutters available for 4, 5, 6, 8, and 10 mm thick tenons.
Max depth 1 3/32″ (28mm)
DF700
Cutters available for 8, 10, 12, and 14 mm thick tenons.
Max Depth: 2-3/4″ (70mm)
When looking at the resulting joint made by a Domino, the two most important factors are penetration depth and tenon thickness. As you can see, the two tools overlap in the 8mm – 10mm range. So if you are the kind of woodworker who makes a lot of smaller craft items and you occasionally delve into small furniture and casework, the DF500 is an obvious choice. If you primarily make full-size tables and chairs and you occasionally delve into large-scale work like conference tables and entry doors, the DF700 is the clear winner. If you tend to focus solely in that middle range of small to medium-sized furniture (the one that makes frequent use of the 8-10 mm tenons), you’re in the gray area. And if you’re like me and your work tends to span the entire range, you’re in even more of a pickle. Of course the ideal solution is to have both tools but most budgets just won’t allow for that. So here’s how I break the tie.
For me, it comes down to a fundamental woodworking component: panels. Nearly all woodworking eventually requires you to take two boards and glue them together to create a wider board (table tops, frame and panel doors, etc). Because I like trouble-free glueups, I use the 5mm x 30mm Domino to assist with alignment. Unlike a biscuit, the domino has zero slop and ensures I have very little flattening work to do after the glueup. It’s like having another set of hands (or cauls) working for you behind the scenes. As a result, the 5mm x 30mm Domino is the most frequently-used size in my shop. And that’s a size I can only use with the DF500. While thicker tenons would still work, I find the 5 mm size to be ideal for the task.
Weight
 What makes the Domino tool so special is the fact that you can take the tool to the wood. This is incredibly helpful whether you’re on a job site or working in a cramped shop space. So no matter how large the workpiece is, you can always make your marks and cut your mortises easily. But all of this movement means there’s a potential for wrist fatigue. The DF500 weighs in at 7 lbs and the DF700 weighs in at 11.4 lbs. While both tools are ergonomically designed and are probably about as comfortable to use as they can be, an additional 4.4 lbs is a lot of extra weight to sling around your shop. Not a deal breaker by any means, but it’s something to consider if you’re on the fence.
Cost
For the tool alone with no accessories or Domino tenons, the DF500 costs $825 and the DF700 costs $1200 (as of November 2013). If you specifically need one size range or the other, the price isn’t really relevant. But if you’re on the fence, the cost savings of the DF500 is certainly something to think about.
Rumors
Frankly, I don’t follow the Festool rumor mill very closely but I have heard that smaller cutters are going to be made available for the DF700. These are not Festool cutters and obviously Festool recommends against using them. Having no specific knowledge of these cutters myself, I can’t really comment.
In Summary
As you can probably tell by now, the DF500 would be my choice if I had to pick only one unit. I have used the DF500 for years now and there were only a few times I thought to myself, “I wish they made a larger version.” Part of that stems from the fact that I still make a lot of traditional mortise and tenon joints in my work. Since I teach woodworking for a living, I can’t exactly whip out the Domino on every project.
No doubt someone else will provide a well-reasoned argument for the DF700 as the only Domino you need. Since each of us represents a different use-case, it’s hard for anyone to make a one-size-fits-all recommendation. And being realistic, most of us would ultimately be happy with EITHER tool. The fact that they have a bit of overlap in the middle range means that many of our joinery needs can be met by both tools.
My hope is that you’ll review the facts and specs and decide for yourself what would be best for your shop. Be sure to read the resulting comments below as your fellow woodworkers are likely to chime in with their personal opinions on the subject and they may very well sway your opinion.
October 27, 2013
Fr. Thomas Bailey’s Book Stand
By: Fr. Thomas Bailey (Conception, MO)
Experience: 5-10 Years
Woodworker Type: Hobbyist
Project Type: Miscellaneous
Material(s): Solid Wood
Finish Type(s): Lacquer, Shellac
Finishing Technique(s): Brushing
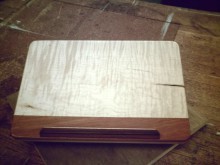
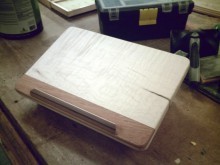
It had been 6 months since I last set foot in my woodshop because of work. I decided it was way too long and that no matter what, I was going to spend a Saturday in the shop. I wanted a project that I was able to start and finish in one day, and so I decided on a simple book stand. (I entered at 9:00 am and after the last coat of varnish it was 10:30 pm.)
I enjoy the look of blended/complementary woods and wanted to add that element to the piece. After dimensioning the stand’s top (9.5″x13″x1″), I used a straight bit on the router to take out a 2.5″ strip on the edge at a little less than 3/8″. I flattened it out and took it down to 3/8″ with a jack plane. I clamped it all up for several hours and worked on the base, which is made out of 3/8″ thick doussie that was cut at a 15 degree angle. I also built a spline jig, glued up a small piece of doussie, katalox, and maple and shaped it into the book rest, and created a one-off template for the rounded corners. The rounded corners received a katalox spline. The base legs were joined to the top with a simple stop dado joint. The finish was a shellac sealant layer and three layers of brushing varnish with a light sanding between coats.


Poll: Tell Us About Your Shop
 Don’t think for a second that I don’t know how lucky I am to have a dedicated shop space. I exchange emails on a daily basis with people who are sharing their shop space with toys, exercise equipment, lawn mowers, and *gulp* cars. But necessity is the mother of invention and when you have the woodworking bug, you do what you have to do. So what’s your shop situation? Do you have to share the space?
Interested in seeing other woodworkers’ shops? Check out our Shop Tours section!
Is your shop a totally dedicated space?
This poll was created by Tom Iovino of TomsWorkbench.com.
October 24, 2013
October Giveaway!
Be sure to head over to our Giveaway page or Facebook and add your name for a chance at winning 1 of 3 awesome prizes:
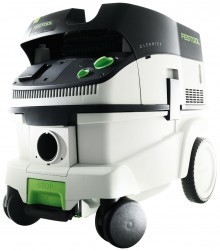 The Festool CT 26 HEPA Dust Extractor! The new CT26 incorporates increased capacity, innovation and versatility into this new design. With the dual mode power activation, the user chooses either a tool activated or manual activated start-up. This CT unit is extremely mobile, with a sturdy chassis, extra large low abrasion rear tires, and double swivel casters.
Due to shipping restrictions this prize only open to US and Canada
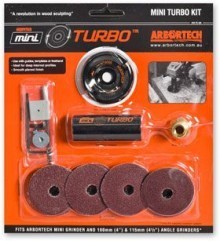 Arbortech Mini-Turbo Plane Kit! To celebrate the launch of Arbortech’s newest product we are giving one away here on TWW. The Mini-TURBO is ideal for free-hand shaping and is also suitable for use with guides and templates for accuracy. And if you can’t wait to find out if you won, you can pick one up here.
There is no location restriction on this prize
 David Marks’ WoodWorks DVD set: Season 2 & 3! A total of 26 episodes from the highly popular woodworking television show WoodWorks. Not only will this show inspire you, but you will learn directly from the one and only David J. Marks.
There is no location restriction on this prize


