
Marc Spagnuolo's Blog, page 113
July 8, 2013
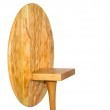
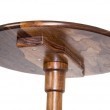
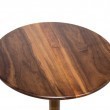
The Tilt-Top Table
The Tilt-Top Table is the latest project from the Wood Whisperer Guild. I thought I’d share a few pictures as well as some details about the build. You can get immediate access to over 4 hours of footage as well as detailed plans dedicated to this project. Join the Guild today!
This tilt-top table was presented in two forms, a classic design inspired by the table Mario Rodriguez built for Fine Woodworking Magazine, and a more modern interpretation designed by my friend Aaron Marshall. Both versions feature pleasing proportions, a turned post, an oval top, and curved/tapered legs. Here are some of the details you might want to know if you decide to purchase this series:
Tools & Materials
- Pre-milled wood kits will be made available!
- Jointer, Planer, Tablesaw, Bandsaw
- Miter Saw, Drill, Router
- Lathe (for a turned post)
- Die Grinder and Rasps (for a sculpted post)
Techniques Demonstrated
- Cutting an ellipse
- Turning a table post
- Creating a “Poor Man’s Lathe” router jig
- Routing sliding dovetails
- Cutting curved/tapered legs
- Designing a tilt mechanism
- Carving an alternative spiral post


July 7, 2013
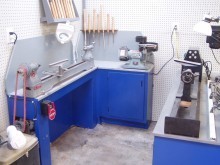
Gary’s Garage Workshop
From: Gary Lucas (Indianapolis)
Shop Type: Garages
Shop Size: 500-999
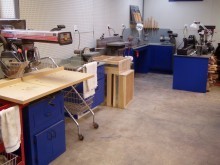
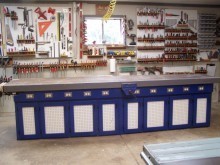
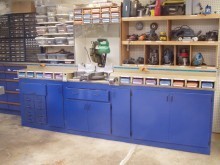
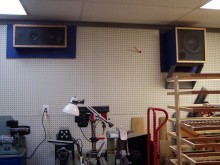
Located north of Indianapolis 500 Race, my shop has been well insulated. The 12′ workbench has 3 vises, 2 cup holders and t-track which replaces dogs and allows tools like jigs to be easily connected. The back wall holds tools in sections by what they do…cutting, driving,filing, etc. on movable sheets held by french cleats for easy future changes. The 12′ mitre saw station also holds all the portable power tools and the mitre saw is boxed in to control sawdust. The center of the shop is ready for the main power tools to be added when I get them. The turning section has sharpening tools at hand. I built in homemade speakers in the wall.

July 3, 2013
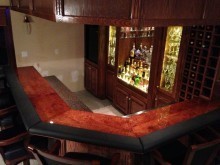
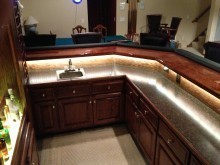
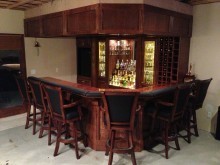
Shannon’s Basement Bar
By: Shannon Huber (Lakeville, MN)
Experience: 10+ Years
Woodworker Type: Hobbyist
Project Type: Built-ins
Material(s): MDF, Plywood, Solid Wood, Veneer
Finish Type(s): Commercial Stain, Dye, Oil/Varnish Blend
Finishing Technique(s): Brushing
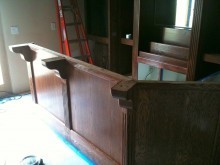
I recently finished a big project that has taken me almost 2 years to complete. This is a custom designed and built bar in my basement. The design is one my wife and I came up with. We knew we wanted an old style bar, so we went to numerous bars to come up with ideas. The refrigerator is elevated to eye level, and the wine rack complements the other end of the bar. I built and installed soffit cabinets with under cabinet lighting. I added in cabinet lighting for the glasses, and built a light box for the bottles. I also added several accent lights, along with under bar top lighting. The sink was a must. It took a little work, but we were able to do all the plumbing and wiring ourselves. The only things I had to hire out were the sewing on the padded bar rails, and cutting the glass for the shelves, doors, and mirror.
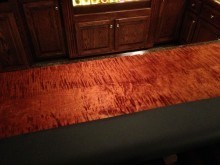
We wanted a sturdy top, so I designed and built the corbels that support the upper bar top. The lower bar top is made from a laminate that looks like granite. The bar is made from red oak (to match the other wood in my house) along with a tiger maple upper bar top. For the top, I had to make a road trip to get the amount of tiger maple required for the project, but it was well worth the drive in the end. The whole bar except for the top is finished with cherry color oil stain, and topped off with 3 coats of oil polyurethane. The bar top was more challenging. Since I wanted to use an epoxy coating, I was concerned about using the oil stain as a base. I spent 2 days experimenting with alcohol based dyes before I was able to match the color and technique without streaking. It can be very difficult to stain tiger maple a dark color, but with patience, my time paid off. I wound up using a dry rag to work in the dye in very small amounts to get the look I wanted. I finished the top with 2 coats of pour epoxy. I built and finished 30 raised panel doors, along with 6 doors. Everything was finished after building except for the wine rack, which I finished before I assembled, and then I added a face frame and finished that in place. The bar top finish was poured prior to placing the finished bar top on the sub bar top I made from MDF.
We still have to add the ceiling, and will be trimmed with crown molding. The finished part of the soffit extends up to where it will meet the crown molding.
This was a long project that I worked on while working on other projects, along with having to work my real job to pay the bills. That being said, now I can sit back and relax and enjoy a cocktail until I start the next project…Tomorrow.

July 2, 2013
Tools You Regret?
 We’ve all done it. You’re flipping through the pages of a magazine or perhaps browsing a popular woodworking vendor’s website and you can’t help but be sucked in by the allure of a new thing-a-ma-jiggie. It could be a tool, a gadget, a shop-helper, whatever. After you take delivery of the item and put it to use, you quickly realize this particular thing could have been easily made in the shop (cauls, winding sticks, jigs, etc..). Or, perhaps, it just doesn’t live up to the hype (the latest gizmo from company X). Maybe, it’s something you realized wasn’t the best way to get the job done or you decided going the traditional route was the better option.
I am certainly not immune to this problem, but I consider it all part of the learning curve. I have plenty of things in my shop that I could easily live without. As evidenced by last year’s charity auction, I also have a desire to move the useless OUT of the shop to make room for the useful. Just because something isn’t useful to me, doesn’t mean someone else out there might not have a use for it. To each his own.
In the world of woodworking, innovation is hard to come by. Think about it. We are participants in a very old craft steeped in tradition. As a result, we are part of a very niche market filled with numerous modern companies that need to make real money. That means we often see the marketplace filled with solutions to problems that don’t exist or problems easily solved by other simpler/cheaper means. But there are times when a new innovation hits the mark, and the woodworking world is better for it. So I am personally thankful that companies still find it profitable enough to compete in this arena, even if some of the offerings are duds.
All of this is written to preface a simple question:
What tools/gadget/gizmos have you purchased that you now regret, either because you found a better way or because you realized you could have made the thing yourself?
June 29, 2013
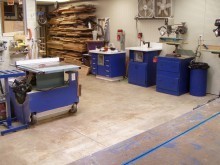
Boj’s Garage Shop
From: Boj (Barneveld, Holland)
Shop Type: Garages
Shop Size: 0-249
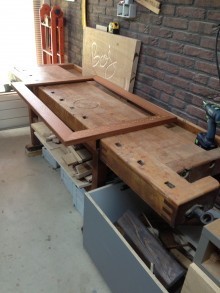
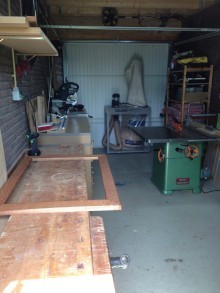
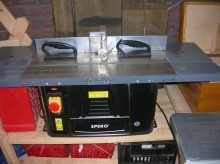
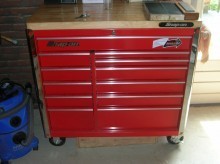
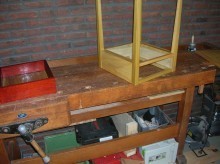
Hi, I’m Boj and I am 16 and this is my shop. I have included photos of my Snap-on kra2212a toolbox (I call it my Roles-Royce), my router with a new router bit purchased to build the Guild Shaker Table and some of my planes and chisels.
One photo is of my workbench with my shaker table in progress. And lastly is my new router table and my new metabo bandsaw. Its not a very big workshop with very good tools (some are) like Marc’s beautiful workshop, but for now it works.
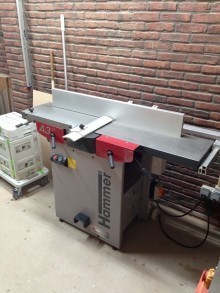
*UPDATE*
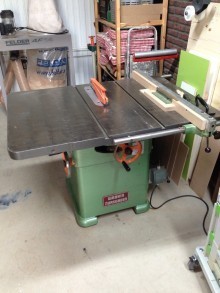
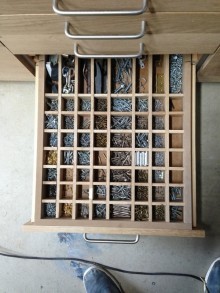
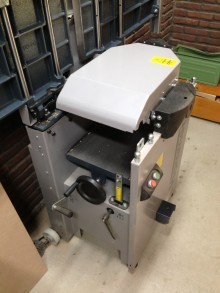
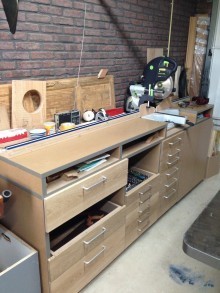
Here is an update from my shop. There’s been a lot of change in a year. First there’s new electrical wiring and 12 outlets. I bought a Festool kapex as well as some other Festool stuff. I have a new planer/jointer, a hammer a3-31, and a Felder af14 dust extractor. I made a big cabinet for my kapex, with drawers for all my hand tools, finishes, sandpaper and screws (I still need to make the last drawers). I recently bought a Wadkin Bursgreen tablesaw from the 70′s with a new motor. I hope I can make a new workbench this autumn with a Lie-Nielsen chain vice and a Benchcrafted tail vise.

June 28, 2013
205 – Twisted Candle Stand
I recently made a 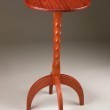 David Marks made this awesome lamp stand with a spiral post. With David’s permission, I’m going to show you a variation of the technique that I learned from him. While Season 4 of Woodworks isn’t available just yet, you can buy Seasons 1, 2 and 3 right now at DJMarks.com. Both downloads and DVDs are available. And if you aren’t familiar with Woodworks, you seriously need to pick up a season or two!
My original goal was to simply show you the spiral carving technique. But it’s always more fun to actually make something useful, so I quickly shoe-horned the spiral pattern into a small candle stand. Aside from the spiral itself, construction of this candle stand is quite simple. So let’s dive in.
Prepare the Blank
The post blank starts at 2″W x 2″T x 8″L. While I give you specific numbers for laying out the spiral pattern, keep in mind that you might want to change these numbers to suit your tastes. You can have more spirals by diving the blank length by a larger number. Or you can have fewer spirals by dividing by a smaller number. You might also play with the start and stop point of the spiral, allowing it to transition back to square. It’s completely up to you.
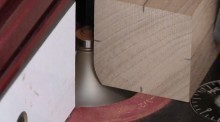 To bring the blank as close to a cylinder as possible, I use a large 1″ roundover bit taking multiple passes and sneaking the bit up a little bit at a time. If you take too big of a bite, the workpiece may tear out or kick back. Keep in mind with each pass, you are essentially removing your reference material for safe routing. This is why we can’t bring the blank into a full cylindrical shape. When finished, there should be at least a 1/4″ wide flat area on each side.
Using the method described in the video, lay out the spiral to your liking. Blue tape or even electrical tape works quite well for connecting the dots of the spiral pattern. Once the spiral is completely traced onto the blank, it’s time to sculpt.
Sculpting the Spiral
To sculpt the spiral, I’m using a Makita electric die grinder. The model linked to is the new version of the one I’m using. The die grinder accepts 1/4″ shanks and the bit I’m using is a 1″ carbide ball mill (or burr). Traditionally, this bit has been difficult to track down (as stated in the video). But I did a little digging and I found something comparable here.
 Using the die grinder, remove the stock between the lines slowly. The action is a lot like erasing with a pencil. Work your way down being careful to keep the lines intact. I like to work down in stages. During the first stage, I might only remove stock to 1/8″ depth at the very center of the spiral, but I’ll do this over the entire post. Stage two widens the “trough” while also making it deeper. The process continues until the spiral is at full depth (about 3/16″) and full width. By working the spiral down in stages, I have the advantage of course-correction when required.
Refine the Spiral
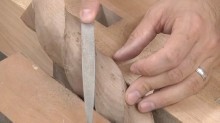 Once the spiral is roughed out with the die grinder, I switch to a fine rasp for the finishing touches. The rasp not only smooths out the rough surface left by the carbide burr, it also helps finesse the final details. Using sandpaper wrapped around a round contoured sanding pad (or a dowel) I smooth the surface up to 220-320 grit.
The Base
The base and top of the candle stand are made up of small wooden disks. The top disk is 1/2″ thick x 3 1/2″ diameter. The bottom is actually a stack of two discs: one at 1/2″ thick x 3 1/2″ diameter and one at 1/4″ thick x 3″ diameter. The post is attached to the base and top via a small length of 1/2″ diameter dowel stock. 3 1/2″
The Finish
The finish is pretty basic: wiping varnish. I started with Minwax Satin Poly and diluted it about 50% with mineral spirits. I then wiped on a total of three coats over the course of a day and a half. Before the final coat, I sanded the surface with 1000 grit wet-dry paper. The final coat goes on smooth and pretty much stays that way.
The Verdict
This was a bit of a rushed design and I’m really not in love with the end result. But it works for now and it’s still a perfectly usable candle stand. If I were to make another one, the first thing I would change is the diameter of the base. It should probably be 1/2″ wider to help give the piece proper visual balance.
June 26, 2013
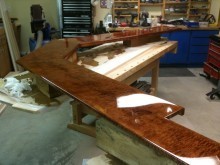
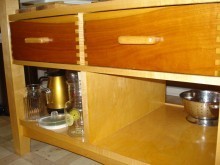
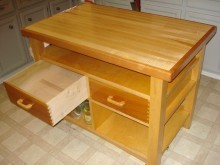
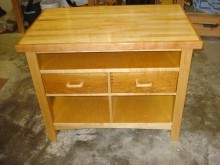
Vic’s Kitchen Island
By: Vic Rice (Shoreacres, TX)
Experience: 2-5 Years
Woodworker Type: Hobbyist
Material(s): Plywood, Solid Wood
Finish Type(s): Oil/Varnish Blend
Finishing Technique(s): Brushing
After years of “planning” to take up the hobby of woodworking, I actually took the plunge about 3 years ago. I’ve spent most of the 3 years getting a shop established (tools, jigs, etc.) that would allow me to tackle a serious piece, at least serious for me. This is that piece! Not only was this Kitchen Island needed, I knew I would be challenged by the build. I designed it from scratch relying HEAVILY on Sketchup. Frankly, I can’t imagine anyone taking woodworking seriously and not benefiting from using this amazing tool. I achieved a significant amount of prototyping, virtually, via Sketchup. This is especially true regarding much of the joinery in this project.
The Island is constructed from hard maple for the top, legs and plywood edge banding. All the shelves are maple ply. The top trim and the drawer fronts are cherry. The drawer sides are poplar.
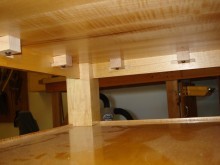
This project had a few “wrinkles” I think are worthy of note. First, I desperately wanted a border trim around the edge grain butcher block top and I wanted it to be some contrasting colored wood. I chose cherry. The obvious issue here is the possible wood movement in the hard maple butcher block. In order to accommodate, I chose a loose tenon based bread board concept. As you can see in the exploded Sketchup image (shows the underside of the top), both the top and the trim are mortised to accept the hard maple floating tenons. The tenons are glued into the trim pieces but simply float in the over sized mortises in the top. As you can see, the tenons towards the edges of the top have elongated holes to accommodate the wood movement. In addition I made use of a draw-bore technique in the placement of the holes to attach the cherry ends without any glue being involved. Hopefully this will adequately accommodate any eventual wood movement.
The second issue with the top trim was what to do at the joint between the end pieces and the side pieces. Again they could not be simply joined with some rigid joint due to the possible movement of the top. So, I chose the dowel joint (kind of) shown in the Sketchup image. The dowels are glued into holes in the end pieces, BUT they float in corresponding holes in the side pieces. I chose this approach simply to provide some visual interest at this joint where the pieces may in fact move apart from one another. I didn’t want a gap to be there with nothing in it. Lastly the edge banding is a bit unique in that I chose to have it extend up above the top service of the shelving to provide a lip. The intent is to prevent stuff from sliding off. However, I suspected that simply gluing edge banding to a flat surface might not be strong enough to withstand the forces that might impact it from stuff hitting the lip. So I chose to make use of a router bit set that created a tongue and grove joint for the edge banding. I figured this would add extra strength to prevent something from knocking the edge banding off. Lastly, I have few comments about the drawers. I did not want hardware for the drawers. This was just a design choice on my part. I used a center runner and guide setup, all hard maple. I also employed some little Teflon “buttons” to give me the offset between the drawer and the case and provide some slick surfaces for sliding.
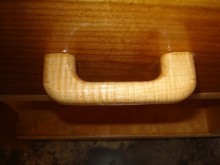
To add visual interest I wanted to use a contrasting wood for the fronts. I chose cherry. For additional visual interest, I used box joints for the front to side connections. This also gave me a reason to use my newly created box joint jig from Mr. Wandel’s design. I found a piece of cherry with some interesting grain and sap wood which I used to have it flow all the way across the front. I fashioned the drawer pulls from some scrap hard maple pieces.
I chose two different finishes for the piece. I was not going to use the top as true butcher block since I didn’t want to deal with the added maintenance. And besides, several of my early projects were cutting boards. So, I finished the top with 7 coats of Behlens Salad Bowl finish. This still gives me a nice tough, glossy, low maintenance finish that is still food safe. The rest of the piece was finished with 6 coats of Waterlox Original. I finished all the parts separately, and then did the glue-up and assembly. I’m happy I did since all the nooks and crannies in this thing would have presented a challenge during the finishing process.
Designing and building this piece was a blast. I’m truly hooked on this hobby! Even joined the Guild!

June 25, 2013
Poll: Have You Done a 2×4 Challenge?
 If you have been in the woodworking world for a while, you have no doubt heard of a 2×4 challenge. In case you haven’t, this is where various woodworkers get together in a friendly competition to see who can make the best project from a single construction grade 2×4. In other words, who can make something out of nothing. So we’re curious, have you ever participated in such a challenge?
Have you ever participated in a 2 x 4 contest?
June 24, 2013
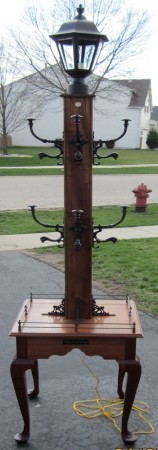
Nicholas’ Special Hat Rack
By: Nicholas Vanaria (Romeoville, IL)
Experience: 10+ Years
Woodworker Type: Hobbyist
Project Type: Miscellaneous, Tables
Material(s): Solid Wood
Finish Type(s): Oil
Finishing Technique(s): Wiping
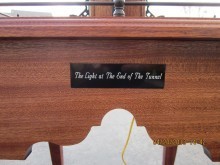
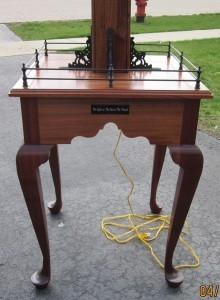
My latest and distinctly proudest project: A self designed “Victorian Hat Rack/Table”.
It is inspired by a Victorian era gas lamp street light, and made for my niece Katie who, sadly, needs chemo and has lost her hair. This table is entitled “The Light at The End of The Tunnel” to help her during her journey and to hold the many hats she wears (which is what the inlaid plaque on the front states). Of ALL the pieces I have made, of this one, I am most proud. I delivered it to her last night and a spectacular night was had by all.
The height of the piece (it is 21″ square by 94″ high). The light in the top is a flickering candle bulb to mimic an actual flame and it is made entirely of Sapele “Ribbon Stripe” Mahogany with bronze iron hardware.

June 21, 2013
204 – The 10-Minute Spinning Top
A few weeks back, I visited professional turner and instructor Matt Monaco’s shop in Phoenix, AZ. I was there to film a segment for a recent Guild project but Matt also offered to show us how he turns a spinning top in under ten minutes! He does it all with a roughing gouge and a skew chisel.
During the little interview section at the end, Matt mentions a turning tool company that he really believes in. Here’s the link in case you want to check them out: Thompson Tools


