Marc Spagnuolo's Blog, page 98
March 24, 2014
Poll: Favorite Time To Woodwork?
 Some people embrace the morning, springing to action after their eyes open in the early morning. Others don’t get going until after the kids have gone to bed, the favorite shows are over and the sun has long since set.
In woodworking – as with all other things in life – people tend to be more focused, motivated and productive during different parts of the day, and have trouble keeping themselves in the groove outside of that active period.
This week, tell us which part of the day is your favorite for woodworking? Do you like to run with the wolves at night or soar with the eagles in the morning?
What is your favorite time to woodwork?


March 19, 2014
Shop Master Aprons Are Back In Stock!
 Just a heads up that our Shop Master Apron is back in stock and available for purchase in the TWW Store. You asked and we listened and went back to the original Natural-colored canvas. So stop by the store today and pick up an Apron, or maybe a new T-Shirt, or perhaps some TWW Pencils, or a Coffee Mug and while your there, don’t forget your “must have” TWW Mouse Pad!
March 18, 2014
Live Guild Session Tonight – You’re Invited!
 Tonight we are having one of our live Guild demonstrations at 9pm Eastern/6pm Pacific. These monthly events are for Wood Whisperer Guild members and they typically include a live woodworking demonstration, a project show ‘n tell, and some live Q&A. The event is usually private but today we are allowing everyone to sit in.
Tonight’s demonstration is High Quality Edge-Banding. I’ll show you the materials and techniques I like to use to get top-notch results when dressing up and protecting those ugly plywood edges. It’s going to be a blast!
So what’s the catch? If you’re not a Guild member, you won’t be able to submit a question. Guild members have their own special chat room and that’s where I pull the questions from. You also won’t be able to view the session later on. A few days from now, I’ll release a fully-edited concise version of the demonstration for Guild members to refer to indefinitely. Although these are privileges reserved for Guild members, I think there is still great value in experiencing the live Guild session as presented and I hope you enjoy it.
You can view the event on our Live Page at 9pm Eastern/6pm Pacific. If you’re interested in participating, you can join the Guild right now. Keep in mind, Guild membership is “for life” so if you buy any project or subscription, you’ll always be able to participate and access these demonstrations.
March 17, 2014
Win a Festool Kapex!
 Every month we give away something AWESOME here at The Wood Whisperer and March is no exception! Yes, we said this last month, but it’s still true :)
If you haven’t already, be sure to head on over to the Giveaway Page to learn about Festool Kapex Sliding Miter Saw and enter to win. And be sure to bookmark the Giveaway Page so you can keep up with the latest giveaway details (because we do this every month! A new giveaway will start on April 1st!
The winners notified directly & this post updated after they are randomly drawn at the beginning of the month.
You can also check out all of our past giveaways and winners here.
March 15, 2014
Secret Locks and Compartments, Woodworking Magic Tricks
One trait that every woodworker shares is the desire to be able to build something with their own hands. Many woodworkers start out by building projects based on other people’s plans. Then, either by necessity or ambition, the woodworker begins designing their own plans. Eventually, the desire to not only design something from scratch, but also incorporate some engineering trickiness begins to develop.
If you are like me, seeing puzzle boxes and secret compartments that operate in ways that seem to defy the laws of physics captures your full undivided attention. I love to watch these engineering marvels at work and I can’t sleep until I know how they work.
The funny thing is, I have never incorporated any trap doors or tricky locks into any project I’ve built so far. Creating a design from scratch usually leaves me wanting to get to work – not do more designing. I find myself lacking the motivation to put in the effort of adding complex parts to the design, and it just never gets done.
I was reminded today that adding some engineering awesome-sauce doesn’t have to be complex. There are quite a few simple ways to add a little mystique to a project without hiring a mechanical engineer. On the other hand, you could also take the Da Vinci route and fabricate something that will likely be shown on the TV show Modern Marvels. Either way, it’s fun to be able to add some personal touches to a project that will leave others in awe of your skill. Check out the following video to see how James Vavra over at Artistry in Wood added a simple magnet to transform a beautiful, but otherwise unassuming box, into a secret locking box.
I also stumbled upon another great trick box that I found from MAKE Magazine’s YouTube channel. In the video, Kip Kay goes through the steps to make a "UnaBox" puzzle box. This is another fairly simple, yet tricky, woodworking project that can be built in a day or so.
So what are you waiting for, get out there and put a little Houdini into your next project. Got any tricks up your sleeve? Share your secret design in the comments below or tell us about a tricky project that you want to try out.
March 14, 2014
216 – Poker Chip Trays
SPECIAL GIVEAWAY: Build a set of poker chip trays by April 15th and you’ll have a chance to win a private one hour Skype session with poker legend Phil Gordon! First ten submissions will also receive an autographed copy of Phil’s latest DVD. Email your entries to thewoodwhisperer@gmail.com
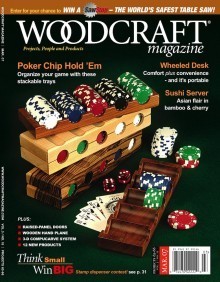 Way back in 2006, I was commissioned to build a set of poker chip trays by a gentleman named Chris Hoomani. I then had the good fortune of writing an article in Woodcraft Magazine featuring those very trays. Read the article here. I haven’t revisited this project since then and I thought it was time to bring this design to the Wood Whisperer audience. These trays are fun to make and you better make a bunch of them since poker fans really love these things!
You can download plans for this project in both SketchUp and PDF formats.
March 13, 2014
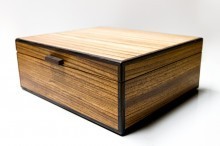
Jorge’s Keepsake Box
By: Jorge Araujo (North Hollywood, CA)
Experience: 0-2 Years
Woodworker Type: Hobbyist
Project Type: Boxes
Material(s): Plywood, Solid Wood, Veneer
Finish Type(s): Oil, Wax
Finishing Technique(s): Wiping
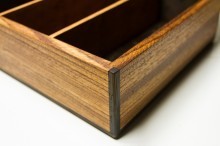
Watching the “Humidor Build” on the Guild site, I decided I wanted to make a keepsake box as I didn’t know anybody who smoked cigars. I made some simple changes to the way the box was constructed. I started with the sides. I milled Zebrawood from 3/4″ thick to 1/2″ thick and learned that Zebrawood doesn’t like to be planed with a benchtop planer. But I got it rough thickness that way and then planed them with my #4 bench plane. They were put together with rabbet joints and I made rabbets for the top and bottom panels. For the top and bottom panels, I used plywood veneered with Zebrawood. Then I used my Box Joint Blade set at 1/4″ to cut the edges, and then apply the Wenge trim. Initially I tried doing a 3-way miter on the corners of the trim, but that proved a little too complicated and I couldn’t get it perfect. So I went with just the top and bottom edges mitered and the side edges cut flat and butted up to those.
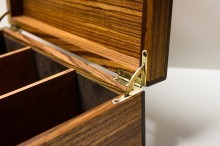
After completing the box, it was time to cut the lid off. I used my table saw with a thin kerf blade and it was a lot easier than I thought, LOL! I used the quadrant hinges which proved to be a bit of a challenge, but after 4 or 5 tries on scrap wood, I felt confident and had no real trouble on the actual box. I lined the inside of the box with Pig Skin Suede which I got from a leather shop. It smells amazing! I decided to use the suede since I wasn’t going to get the smell of Cedar, I wanted something nice when you open it, and it really did the trick! I may be using this for any boxes I make in the future. It was easy to apply—just brushed wood glue to the surface of the wood, applied the suede and then pressed it down with a straight edge. One little trick I used and really liked was to line the bottom panel during construction of the box, that way the seams are perfect.
The finish is a very simple oil wax blend. I used HOWARDS butcher block oil, which gave it a great deep, rich color and sating wax finish. I had a lot of fun and I can’t wait to build another one.

March 9, 2014
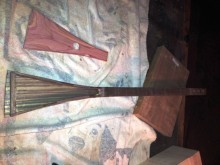
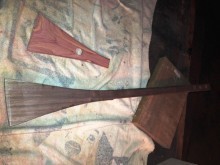
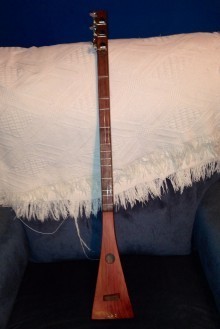
Bill’s Strum Stick
By: Bill Akins (Lithia Springs, GA)
Experience: 5-10 Years
Woodworker Type: Hobbyist
Project Type: Music-Related Projects
Material(s): Solid Wood
Finish Type(s): Oil, Shellac
Finishing Technique(s): Wiping
I have always wanted to make a stringed instrument and I figured that this would be a good start. Made from a walnut log with a cedar top, 3 strings that is based on a dulcimer. It was a very fun project that turned out well with a good sound. Now for the hard part, learning to play.
I have included a video below of the build.
March 6, 2014
A Windfall of Cash?
 So let’s say you suddenly have a windfall of cash. Maybe you won the lottery. Maybe you discovered a pirate’s treasure. Maybe the government realized you’ve been over-paying your taxes for the past 30 years. HAHA! Whatever the reason, you have this new sum of cash just burning a hole in your pocket. Let’s also assume you already did the sensible stuff like paying off bills, helping family, and donating to charity. Isn’t the imagination a wonderful thing?
So my question for you is, what’s the first woodworking-related item you’d buy? Even if you’re something of a tool minimalist, you might still be tempted to splurge on that gorgeous figured mahogany board you’ve been eyeing up at the lumber yard. So what’s on your short list?
March 4, 2014
Nikki’s Jewelry Case
By: Christopher Bowen (Sagamore Hills, OH)
Experience: 2-5 Years
Woodworker Type: Hobbyist
Project Type: Boxes
Material(s): Solid Wood
Finish Type(s): Oil/Varnish Blend
Finishing Technique(s): Wiping
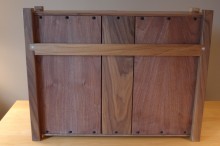
My beloved commissioned me for a jewelry cabinet to house her growing collection of necklaces, so I scoured the internet and Pinterest for inspiration and decided to use Marc’s Gadget Station design as the basic structure. Many thanks to Marc for the excellent videos he produced when he made that project. I referred to them several times during the course of this build.
There were many “firsts” for me on this project, and it was a great challenge and learning experience. This was my first project where I really tried to pay attention to grain and the effect it would have on the final visual result. The overall size is about 24 x 18 x 6.
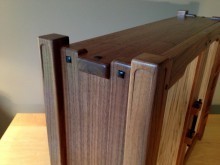
The Carcase—This is pretty much Marc’s design with broad, proud finger joints. While I liked his Orthanc-style legs, I went with something a little less ambitious (okay…a lot less so). I used Darrell Peart’s router jig technique to create the Blacker indents outlined in his Greene & Greene Design Elements for the Workshop book. Rounding of the fingers was done by hand with rasps and files.
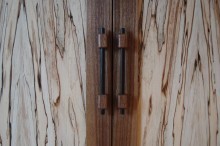
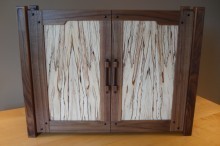
The Doors—I got my spalted maple online from Spirit of the Woods. I felt I got really lucky with board I chose. While there were parts of it that were a bit punky, the portion with the best spalting that I used for the book-matched panels was good and stable. I cut 1/16 proud veneers and contact cemented them to ¼” oak panels. Just seeing how well those turned out had me really excited for this project! I went with full overlay doors using through mortise and tenons. The mortises were cut on the band saw, and then cleared with a chisel. Tenons were done on the table saw. I really liked Marc’s variation on the rail-stile configuration that carried and matched the grain across the rails, so I carefully chose wood to get the arched effect on the upper rails.
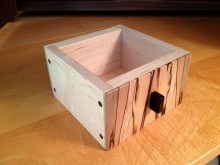
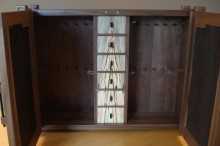
Interior—This looks pretty much like an Iron Maiden with lots of pegs for maximum storage. (Hopefully things won’t get too tangled up in there!) Of course, I couldn’t stay away from what was left of the resawn spalted maple, so I book matched more veneers being careful to account for the drawer shelves and get the grain to flow smoothly up the bank. The panels for the back on either side of the drawers are also book matched.
Hardware—There are 22 ebony plugs on this case. Ten 5/16” plugs cover the screws on the case and the twelve ¼” plugs on the doors are merely decorative. No mortising machine here, so those were cut by hand with a mortising chisel and a mallet. I did find that once you have the hole established good and square at a reasonable depth, you could chuck up the mortising chisel and bit into a cordless drill to carefully hog out material. The plugs themselves were made using William Ng’s cordless drill method, which yields decent results. As always, your last plug is usually your best! I decided on Krenov-style pull for the doors. There are easier things than bashing ebony through a Lie-Nielsen dowel plate, but I did end up reasonably round in the end. For the drawers, I knew I wanted something small that would not detract from the spalted maple grain, hence the little ebony “chiclets” mounted vertically.
The Back—This case can either stand on its legs or be wall-hung with a French cleat.
Nearly everything about this project was something I’d never attempted before and I had a great time building it. For my own part, though, I wish I had done something more/different with the legs as I feel the piece has too “boxy” a look.