Marc Spagnuolo's Blog, page 94
June 2, 2014
Poll: How Clean is Your Shop, Right Now?
 Shops come in many shapes and sizes. They feature different tools, configurations and workflow patterns. They can be just about anywhere in a home, an outbuilding or somewhere completely unexpected.
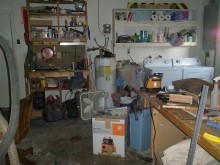
But, one thing is certain. There are shops that are as neat as a pin, with a place for everything and everything in its place. For others, well, you might expect to find Jimmy Hoffa stashed in a corner – if you were able to get to the corner in the first place.
So, today, I want each of you to go over to your shop (or drive, if you must) and poke your head inside. Let us know just how clean your shop is right now, at this very moment…
Right now, this very minute, how clean is your shop?


May 29, 2014
220 – 60 Seconds to Sharp!
Most videos about sharpening, including my own, focus on how to tune up an old tool or properly set a new one. Thankfully, once you do that process it isn’t likely you’ll have to do it again for a very long time. From that point on, you’ll be sharpening in maintenance mode. So while some sharpening systems lend themselves well to that initial setup process, the thing we should probably evaluate is how fast they allow you to sharpen a slightly dulled edge. After all, that’s the lion’s share of sharpening you’ll be doing throughout your woodworking career.
Fortunately, most systems that work well for the initial setup of an edge also work well for maintenance. If yours doesn’t, you might consider looking into other options. I know I’m not alone when I say that if the system isn’t fast and convenient, I won’t use it as frequently as I should. And it isn’t all about the gear either. Some techniques work better than others and your methodology can have even more impact than your sharpening medium.
How it’s Done!
Now I can’t claim my setup is the fastest one out there, but it certainly is fast enough for me. Most tools can be sharpened in 60 seconds or less. In order for this to work, the tool has to be set up properly in the first place with a flat back and a polished bevel of the appropriate angle. Also, the tool can’t be excessively dull. Well, it can be, but that just means taking more time to work with the lower grits.
Sharpening Medium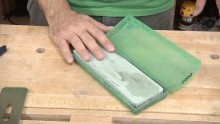 My sharpening medium of choice is an 8000 grit Shapton Ceramic Stone. While expensive, this stone will likely outlast my career and the trait most pertinent to this discussion is the fact that it doesn’t require soaking like other water stones. Instead, a quick spritz from a spray bottle is all I need to prep the surface.
Secondary Bevel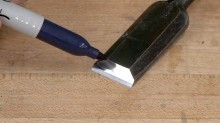 The importance of the secondary bevel can’t be overstated. The more metal you have to polish, the longer the process takes. So if we isolate our sharpening efforts to the very tip of the chisel, it doesn’t take nearly as long to establish a sharp edge. The real trick with a secondary bevel is being able to hit that exact same angle each and every time you sharpen.
Honing Guide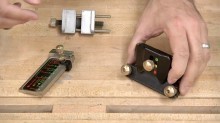 Honing guides are one of those hotly debated topics in woodworking. I myself am an unapologetic honing guide user. I can get decent results going free-hand and some tools just won’t fit into a honing guide. So I will go sans honing guide when necessary, but for maintenance sharpening I really enjoy the accuracy and repeatability of a honing guide. The one I use is the Veritas Mk.II. The reason I like this one in particular is because it allows me to easily set the blade for micro-bevel sharpening, which is essential to this quick sharpening system.
Technique
I’ll do about 20 strokes on the bevel and then another 20 strokes on the back. That’s it. About half of the 60 seconds is spent messing with the jig and the other half is spent on actual sharpening.
With a grand total of one minute invested, you can see how this system allows you to develop a good habit of sharpening early and often. Dull tools are dangerous and the longer you put off sharpening, the more you put yourself at risk. Not to mention, your work benefits greatly from sharp tools. So get yourself a system that’s quick, easy, and convenient and you’ll never regret it!
May 28, 2014
Poll: Have You Tried Veneer?
 Adding veneer to a project is a time-honored way to add visual interest and to extend the supply of beautifully-figured wood. Plus, wow, is it ever cheap to use, instead of springing for a whole board of an exotic looking species.
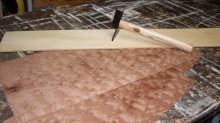
The only problem with veneering is that it takes a little bit of know-how with different techniques. Whether you want to work with a modern vacuum veneer press or use traditional hide glue and a veneer hammer, the process can be intimidating at first.
So, this week, let us know have you ever worked with veneer, and what your thoughts are on it.
Have you ever used veneer in a project?
May 26, 2014
Stephen’s Flag Case
By: Stephen Porter (Pittsburgh, PA)
Experience: 0-2 Years
Woodworker Type: Hobbyist
Project Type: Boxes
Material(s): Plywood, Solid Wood
Finish Type(s): Shellac, Wax
Finishing Technique(s): Wiping
I am a 16 year old woodworker in Pittsburgh, and this is my second big project since I began woodworking. I built this flag case for a project called Freedom Flag Cases, which matches woodworkers with the family of a fallen American soldier in order to provide them with a special, handmade place to put their folded American Flags. This program was originally started by woodworker Ed Sallee several years ago, and I, Stephen Porter, am taking over the operation. As I am just getting started, it will take a while to get everything organized.
The case is made of walnut and joined at the corners by 45 degree miter joints. I was careful in the planning stage to make sure the grain would wrap continuously around the entire case.
I created a sort of rabbet for the glass in front by cutting 1/8 inch thick strips from the front of each piece, and then reattaching them about 1/4 inch inward. I cleaned up the resulting step by beveling back the edges with my hand plane, preserving the continuous grain and creating a rather distinctive element.
The original bottom of the piece was not very flat, and I also wanted to bulk it up. As I don’t have a jointer, I flattened both the bottom and the face of another board by hand, and glued them together. This created a more stable, stronger looking base.
I completed the project by making a simple rabbet in the back for the oak plywood panel. The entire project was finished with many coats of orange shellac, and then rubbed down with paste wax.
I hope the family I send this to will understand the appreciation I and all Americans have for their son’s sacrifice, and that the box will allow them to display and preserve the flag and the memory of their son.
And if you are interested in building a Flag Case, please visit my website, Freedom Flag Cases.


May 24, 2014
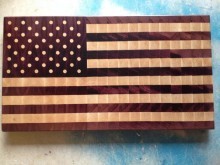
Jack’s American Flag Cutting Board
By: Jack Wilson (Herndon, VA)
Experience: 10+ Years
Woodworker Type: Hobbyist
Material(s): Solid Wood
Finish Type(s): Oil
Finishing Technique(s): Wiping
One of my business partners wanted a large cutting board. I had made two or three of Marc’s standard design boards for different people at work, so I decided to see if I could come up with something a little different. I tried several different designs but nothing really seemed to be right. Then one day I was watching a foot ball game and they had stretched out an American Flag across the field and the idea was born!
I gave it to him and he loved it but says its too nice to use a knife on and that he only uses it as a serving board. So I guess, someday I will have to make him a standard board.
Hope you like it!
May 19, 2014
Weekend with WOOD 2014
I just returned from the second annual Weekend with WOOD, an educational conference provided by the folks at WOOD Magazine in Des Moines, Iowa. While I only had two sessions to teach, I didn’t have much of an opportunity to sit in on other classes. I was too busy taking tours and chatting with staff and other woodworkers. But I had a blast and I do feel my time was well spent. Here are some of the highlights.
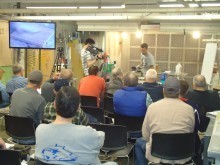 My own class was focused on the basics of oil-based finishes as well as how to apply a simple varnish finish. What you see here is the typical class size. Because the event is held at the Meredith campus (WOOD’s parent company), they can only fit so many attendees into each room. While this makes for a cozy and intimate experience, I have to say that it makes it a little awkward to find your classes. For instance, to attend my session you would need to go down the hall, take the third door on the left, head down two flights of stairs into the basement, hang a right, and it’s the second room on the right. Of course, there was ample signage that made this process much less painful than it could have been. All of the classes were full so attendees were clearly able to get where they needed to be without much trouble.
One of my favorite parts of the trip was the tour of the Meredith facility. What many folks don’t realize about our favorite woodworking magazines is that they are usually owned by very large parent companies. Oftentimes their “personalities” and content choices are largely dictated by the rules of the mother ship. In the case of WOOD, the mother ship is a behemoth! The amount of space dedicated to sets and props for publications like Better Homes & Gardens was mind-blowing! From the looks of it, they must have one guy who’s only job is to build fake walls! And yes, that is the one and only Steve Ramsey (below) from Woodworking for Mere Mortals who appears to be contemplating his options in second-hand stemware. By the way, the view of downtown Des Moines was remarkable!


The WOOD office and shop spaces were pretty awesome too, featuring past and future projects scattered around the building. Here’s just a small sampling of what we saw.


As we continued our tour, we had the opportunity to see the area where WOOD designs and builds their projects. Picture this: a typical cubicle jungle with a fully-functional wood shop in the middle. We’re talking heavy duty tools and a fully-functional dust collection system. From what I understand, the sound isolation is really good and the folks working in the office aren’t disturbed by the shop noise.

I also learned some interesting facts about their production process. Apparently, all of the projects are built in the office-shop mentioned above. When it comes time to take photos, the project is carted down to the basement for the photographic treatment. I suppose this wouldn’t be so bad if you’re just taking pictures of the finished piece but this process is done for ALL of the photos that appear in the magazine, including the in-process shots!
And perhaps even more interesting is how their stage-shop does double duty. One side is built to look like a classic woodworking shop with lots of tools and wood paneling. This area is used for the more advanced projects. For the beginner/entry-level projects, they use the other side of room which is made to look like a typical DIY’ers garage or basement space. Pretty cool stuff!


I’d like to thank the folks at WOOD Magazine for the opportunity to teach and attend. For those of you who attended my sessions, it was awesome getting to know you and I hope you enjoyed the experience as much as I did.
Poll: How Do You Deal With Wide Boards
 Most of today’s lumber you can buy is pretty narrow when you compare it to the stuff pulled out of the virgin forests more than 100 years ago.
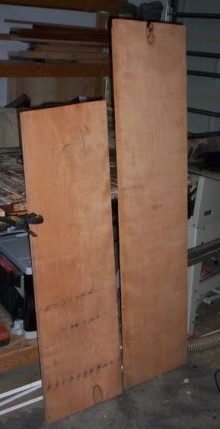
Entire table tops could be made from one board. That’s what makes wide boards such as these two 16 ” wide cherry specimens I had in my shop a few years back something very special.
When it comes to using them, there are two schools of thought. One is to use the board as is in all its glory. The other us to rip the board into smaller widths and glue it back together to reduce the likelihood of warping.
So, which camp do you fall in to?
How would you go about making a table top from a wide board?
May 16, 2014
Darth’s Modified Tool Case
By: Darth Rust (Chesapeake, VA)
Experience: 0-2 Years
Woodworker Type: Hobbyist
Project Type: Shop Projects
Material(s): Plywood, Solid Wood
Finish Type(s): Shellac
Finishing Technique(s): Wiping
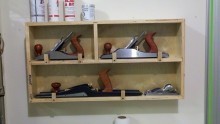
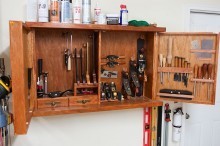
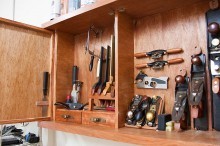
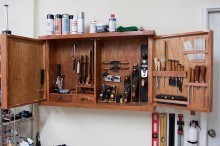
My hand tool collection has been growing. Storing a Jointer plane was a challenge, but a knocked together case of scrap plywood kept the jointer, jack and smoother in good enough shape. That simple case made from scraps and screws lasted about a year. Then I picked up a shoulder plane, more block planes, but it was the spoke shaves that pushed me over the edge. Luckily TWW had a great video series on building just such a thing a while back, it made the solution obvious.
Baltic birch was problematic to source in 18mm around here. I had other projects in mind that would call for 4’x’8’s and my hardwood dealer had sheets of Luan with 15 plys for relatively cheap—cabinet grade, so they say. I wanted to test that stuff and there’s no better place to do that than shop furniture. The down side was that the exposed plys have no where near as pleasing of an appearance as Baltic birch. Some experimentation with finishes revealed that under dewaxed shellac, bubinga was a decent match in grain and color to make some edge banding and other fixtures. It also used up some scrap I’d been hoarding for a while.
Construction and joinery are pretty much right down to the video spec. Instead of shelves, I consolidated my saw till into the left hand side and added two drawers on the bottom. I’d never made drawers before, so that was an adventure in and of itself, but it did give me a useful little nook to store spare plane blades, screws, and other assorted debris. The saw till rail itself was as easy as it appears and I thought it really shows off how flexible this case is; the possibilities for organization are endless. Of note, when I built my Ruobo, the trailer hitch and 55 mph casters were out of stock at Benchcrafted (go figure), but this case with the french cleat should move reasonably well when I have to reorganize the shop. I went a little nuts with the magnet idea and have one under every plane, even the block planes. While a fun innovation, I found myself experimenting with ways to get the magnet just a little bit recessed to keep it from contacting the sole of the plane. Probably a bit of paranoia, but I didn’t want to risk dissimilar metal corrosion or let repeated use start pitting my planes since I don’t know the hardness of rare earth magnets. The top is also obvious space for various other bits of widgetry. You may notice the gaping void on the right above the spoke shaves—that’s reserved for a router plane.


May 14, 2014
Getting Started in Blacksmithing
 As a woodworker, I often find myself learning about other skilled trades that complement my woodworking either by necessity or just for fun. Throughout my woodworking career, I have dipped my toes into many different skills, such as: upholstering, machine refurbishing, metal machining, leather work, resin casting; and the list goes on. Most of the time, I have been forced to educate myself in these related areas because of a project I am working on, but on some occasions I am just inclined to extend my skills and knowledge.
In many cases, the topics I want to learn about are interesting but aren’t important enough for me to actually take action on. Some are things that I am definitely going to do, but just haven’t known where to begin. Blacksmithing has always been on the “definite” list because the skills are totally practical and helpful to my woodworking. Not only will I have a better understanding of metals, which can help tremendously in the sharpening arena, but I will be able to make tools and even hardware for my woodworking projects.
The Spark That Lit The Fire
Although I have always wanted to learn more about blacksmithing, I somehow assumed that it would be really complicated or expensive to dive into. Where would you even begin? I know that there are some schools out there that you can learn blacksmithing at, but who has the time or money for that? Especially since it would be more of a hobby than anything. There is also the fact I don’t know anyone where I live who is a blacksmith. So, it remained on the list of things to do… someday.
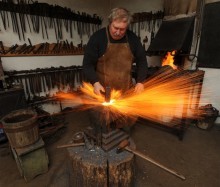
That all changed when I ran across the following YouTube video that Tim Charles from A Slice of Wood Workshop created showing how to make your own anvil out of a piece of heavy railroad track. Check out how he just whips out an angle grinder and turns a random piece of metal into a functional anvil.
Tim’s video reminded me that there are many ways to skin a cat, and you don’t necessarily need to shell out a bunch of cash when you begin a new adventure. It turns out that Tim has only been smithing for about a year, and he is already producing some really awesome work. He forges iron in his backyard with a fairly simple setup and limited set of tools proving that your skills and motivation produce your end results, not a bunch of fancy tools.
After doing a little research online, I found quite a bit of information to help me get going, and I even found a local blacksmith in Reno who holds an open forge twice a week. Open forge is pretty awesome, and it allows beginners – literally zero skills – to not only learn about blacksmithing, but also get hands on experience.
Before I begin, I have to add a little disclaimer that I am definitely no expert when it comes to blacksmithing. Honestly, I’m a complete novice in this area. I have tried it once, and I am definitely not a natural. I can, however, share resources and some basic suggestions on what you need to get started.
Blacksmith Websites, Organizations, and Communities
The best (and probably safest) way to get started is to find other people who actually know what they are doing and have the necessary equipment. There are actually tons of resources available at the click of a mouse such as websites, schools, clubs, professional blacksmiths, books and videos, and more. If you are serious about getting into it, the best way to ensure that you will follow through with it is to get involved with others who are doing it already. They will help to motivate you to get out there and start forging.
AnvilFire
For a great overview of getting started, I recommend checking out Anvilfire.com. They have an entire page on their website dedicated to getting started. It answered all of the questions I had, plus it answered some questions that I hadn’t even thought about yet.
ABANA – The Artists Blacksmith Association of North America
ABANA offers a wealth of information to help you get started. Their website has a ton of information to help you learn more about blacksmithing, metals, tools, etc. They also have a listing of all the ABANA local chapters around the U.S. The first step would be to take a peek around their site and get in touch with your local chapter.
As with woodworking guilds and clubs, they usually have regular meetings that are often held in members shops. This is a great way to dip your toes in to see if you enjoy it without having to spend a lot of money. With just a little digging I found a local artist, Brett Moten, who offers an open forge night for people just like me who want to dig in and learn about blacksmithing.
Brett operates Infinity Forge in Reno, and he is a local member of the California Blacksmith Association (we don’t have a chapter in Nevada). My first night at his open forge, there were three newbies there with zero experience. Brett showed us how everything works and even gave us projects to work on right off the bat – nails and wall hooks. In one night, I learned how to operate the forge, draw the metal out, proper hammer techniques, hot cutting, twisting, scrolling, and much more. If you can find a local artist in your area, definitely stop by if they have open forge nights, you won’t regret it!
iForgeIron.com
iForgeIron.com is an online community and forum dedicated to the topic of blacksmithing. You will find a wealth of information and people who are willing to help you get started. Everything from tools, welding, safety, machinery, and everything in between.
Tools of the Trade
If you’re like me, you won’t be satisfied using other people’s tools for very long. I will definitely be going back up to open forge night at Brett’s shop to continue learning, but I’m the type of person who only gets so much out of the allotted time available during open shops and classes. Therefore, I plan to setup a forge at my own shop to practice whenever I want and for as long as I need.
I used to think that it was going to cost a small fortune to buy the necessary equipment; however, the truth is you can get started for well under $1,000. I initially assumed that I would need to build a massive brick oven forge, buy a ten thousand pound anvil, and amass a whole slew of random tools that I would have no clue how to use, let alone identify.
In reality, a small and inexpensive set of tools is all you really need to get started. I have put together a list of the bare necessities that you would want to have to get started.
Anvil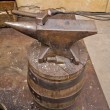 The anvil is somewhat similar to the workbench in woodworking. It is what allows you to shape and form your workpiece. Something in the 75-500 pound range is the optimal weight, but you can get by with lighter if you have to. Bringing it back to woodworking, I would consider it along the same lines as workbenches. Sure, you can start out with a split top roubo made out of maple, but you will get woodworking done on a solid core door on top of saw horses.
It can be somewhat difficult to find a decent used anvil, and it’s by far the most expensive item on the list, unless you build your own from scrap. You can buy a brand new one, but it’s really going to cost you. The truth is, anything made from decent steel will suffice if you are just starting out. As Tim showed in his video, you can make your own anvil. Railroad track works, but you can just as easily piece together an anvil out of steel from a scrap yard or an I-beam. Buying an anvil will set you back a few hundred dollars, but if you take the time to make your own, you can be up and running for much cheaper.
For more information about anvil selection, check out this article by Jock Dempsey on Anvil Fire.
Forge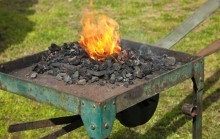 The forge is what heats your steel up so that you can work it. This is probably the most important thing that you will need, but luckily this one is pretty easy to piece together out of spare parts and scrap. Of course, you can buy one new, but that will definitely be much more expensive. You can build a simple forge out of an old car brake drum, some pipe, and a cheap blow drier. There are lots of videos on YouTube showing how to put one together, and I also found an article on Anvil Fire that covers building a break drum forge.
One thing to keep in mind is forges can run on different types of fuel. The two most common are coal and propane, but you can also use oil. I know nothing about oil forges, so I won’t even go into it. Propane is by far the easiest to use, as it turns on and off quick, its cleaner burning; but it’s much more expensive than coal. Coal burning forges are easy to make, but it may be more difficult to find a source for buying coal depending on where you live. This is where getting to know others in your area will benefit a beginner.
Vise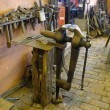 A good vise will help out a ton with your work. Vises are used in many different ways, and generally, the heftier vise the better. You can get by with smaller machinist vises, but they will not hold up to the abuse of hammering on them. To get started though, just find the beefiest vise you can get and make sure it is secured to a sturdy bench.
Like most tools, the quality of vises ranges drastically. I can’t say that I have enough knowledge about the subject to really provide much help. Again, there are lots of resources out there to help you understand what to look for in an anvil, but again you don’t need perfect tools to produce good work.
Vise Photo by Penny Mayes [CC-BY-SA-2.0 (http://creativecommons.org/licenses/b...)], via Wikimedia Commons
Hammer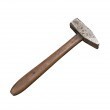 Of course, most importantly you need to be able to shape the metal you are working on, so you will need a hammer. You can pick up a hammer at the local hardware or big box store that will work, but don’t pull out your claw hammer and expect to get good results. One of the most versatile type of hammer that you can use is a cross peen hammer. Generally, a 1.75 to 3 pound hammer will work fine. My main word of advice is to make sure you don’t start out with too heavy a hammer. At open forge, I started out with a pretty heavy hammer, and I ended up dropping to a lower weight pretty quickly.
Safety Gear
As with any hobby, you need to play it safe. Blacksmithing is simply not something I would categorize as a safe hobby, but with a little safety practice I wouldn’t classify it as extremely dangerous either. Number 1 on that list is safety glasses – you definitely don’t want any hot sparks from your work and even from the forge landing in your eye. Ear protection is also pretty useful since the clanging of metal on metal is pretty loud. One other thing to keep in mind is that synthetic materials will melt to your skin if it gets too hot or lights on fire. Wear cotton instead. Also, leather aprons and gloves can be helpful, as well as proper footwear such as steel toed leather boots.
Like woodworking, blacksmithing comes with a healthy list of dangers. Make sure that you put safety first if you decide to give it a try. You are dealing with a very hot fire, sharp metal, and pounding on heavy objects. Keep your fingers out of the way, keep your fire controlled, and as Tim told me… “Even black metal is hot metal.” If you are looking to start something with less risk, there is always knitting (although you gotta watch out for those sharp needles).
Miscellaneous There are tons of miscellaneous tools that are very helpful to the blacksmith. Many of which, you will be able to add to the toolbox as needed. In the beginning, however, it will be very useful to have a pair of needle nose pliers and something that you can use as tongs. The metal you are working gets pretty hot, and having something to grab the smaller pieces with is often necessary. Vise grips can work fine as tongs and will get you started, but you will quickly learn that they are really too short to be highly useful.
Luckily, there are number of tools that many people already have that can be highly useful when working metals. One of the first things I noticed during my first shot at blacksmithing is that there’s a lot more to it than merely swinging a hammer. In some cases, the workpiece will gain nothing by heating it up. In those cases, you will need items such as files, measuring devices, and and pliers. You’d be surprised to learn how many tools you already have that can be used in a blacksmith shop. One other somewhat important item to have on hand is a quench bucket. This one’s pretty simple – a bucket filled with water to cool the workpiece with.
Other Resources
As with woodworking, there are a lot of great resources available for those interested in learning more about blacksmithing on the internet, but one place to look (that we often don’t even think of anymore) is the library. Just about every resource I have found has a list of suggested books, and the California Blacksmith Association even has a lending library available for free to members. When I spoke with Tim Charles about where I should look to find out more about, he suggested checking out Mark Aspery’s books and videos as well. Aspery has a website where you can pick up his books, and he even has a YouTube channel.
Get Smithing
So, if you’re interested in learning and starting blacksmithing, you’ll find it is not very hard to get going. If you are lucky to have a local group to join, you’ll be able to get started without even having to purchase tools. If you would like your own setup, you’re probably looking at a few hundred dollars to get up and running.
You may find, as I did, that you are absolutely horrible at blacksmithing the first time you try it. Keep trying and you will get better. Learn from others around you with more experience, and you will start to make some amazing things. I’m hoping to be able to make my own tools, furniture parts, and hardware some day. Thanks to Tim, I’m already on my way!
And speaking of creating woodworking-related tools, check out Marc and Matt’s review of Forging a Compass with Peter Ross.
So, how about you. Is blacksmithing something you would want to try out, or is it just something cool to watch from a distance? If you got started, what would you make?
May 13, 2014
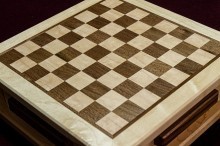
Colin’s Chess Set
By: Colin Linerode (Irvine, CA)
Experience: 2-5 Years
Woodworker Type: Hobbyist
Project Type: Games
Material(s): Solid Wood
Finish Type(s): Lacquer
Finishing Technique(s): HVLP
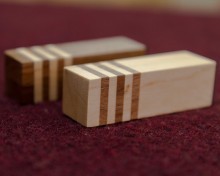
For the past three Christmases I have built small toys for my nephews and a Sudoku set for my sister-in-law. This past year was finally my brother’s turn. It took me a while to decide what to build for him and then I figured out—by epiphany—that a chess set was in order. I immediately began to research how to build one when I came across Steve Ramsey’s YouTube series. I have to give Steve credit as his step-by-step process showed me that a chess set is within my skill-set range. I chose the very classic maple/walnut pairing because I love the contrasting woods and they are easy woods to find and work with.
The field itself is 12″ x 12″; each unique square is 1 1/2″. The walnut strip and maple band around the outside together are another 1 1/2″, which makes the total top 15″ by 15″. The top is 3/4″ thick and has a small chamfer to ease the edge.
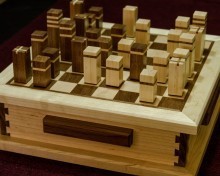
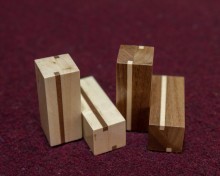
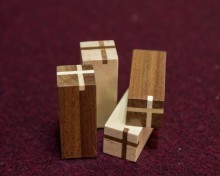
A lot of thought was given to specific design details. I knew that I wanted to build the board, a full case, and the pieces. The pieces were fun and challenging to build. They are matching sets—just flipped woods. Each piece is 1″ square, varying in height. The accent “stripe” on each piece is 1/8″. The pawns are 1 3/4″ tall with a single horizontal stripe 1/2″ down from the top. The bishops, knights, and rooks are each 2 1/4″ tall. The bishop is pretty much a blown-up pawn, but with the stripe just 1/4″ down from the top. The knight (my personal favorite) has two vertical stripes on opposite faces, 1/4″ in from the edge. The rooks have the stripe on the top, in an offset cross, starting 1/4″ in from the short edge. The queen is 2 7/8″ tall with two horizontal stripes, starting 1/4″ down from the top. The king is 3″ tall with 3 horizontal stripes, starting 1/4″ down from the top. The horizontal striping was done through a series of sandwiching very thin pieces together to build up the height. The striping on the knight and rook are from a 1/8″ router bit. Each piece is bottom-lined with felt.
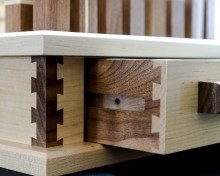
For the case I wanted to add elements to make the piece stand out. Impressed with the Incra positioner system that enables you to build very fancy dovetails, I was immediately struck by the beauty of the corner-post dovetail, but didn’t think I had the ability to create it. As I continued to research the corner-post, I realized that it is actually a simple joint, just adjoining half-blind dovetails. I was thrilled! I used my dovetailing jig to create the corner-post. This element is my favorite across the entirety of the piece. The drawers also use dovetail joinery—half-blinds. They “attach” themselves to the case through runners. I debated about a runner underneath the drawer instead of in the side. I chose the latter because I did not have the confidence that I could set the runner high enough to get me the desired 1/16″ gap on all four sides. The last detail are the 6″ pulls on all four sides. The side two are for lifting the whole unit (so you aren’t lifting from the lip of the board) and the two on the drawers are for opening the drawer.
The one drawback to my design is that I did not have sufficient space within the drawer to create a framework to store each piece. Had I expanded the width of the drawer I may have been able to accomplish this, but it would have taken away from the impact of the corner-post. The pieces just lay inside the felt-lined drawer.
The finish is spray lacquer. I really wanted that mirrored-finish. Marc’s recent video about “rubbing out a finish” was very aptly timed as it gave me great insight on how I could accomplish this. I ultimately decided that a more satin look was sufficient for this project. Frankly, I was getting anxious that it took as long as it did to get it finished and I really wanted to get it to my brother.
I have a friend who took the pictures I am sharing. As we were shooting I kept noticing the nuances in the grain patterns. I am amazed at how many languages wood speaks. I’ve been a hobbyist for 3 1/2″ years and with each successive project, I see my skill set increasing. I believe this to be my best work to-date. I have shared pictures and videos with friends and family and everyone has been very complimentary of the work. Many, including my wife, have called it “professional” looking. If that isn’t a confidence booster to a hobbyist, I don’t know what is! I have even had several folks, jokingly or non-jokingly (I can’t tell), suggest they’d consider commissioning me to build one for them. I might be all for that, I just need to review Marc’s article “Pricing Your Work”.
I appreciate the opportunity to share with TWW community!