
Marc Spagnuolo's Blog, page 92
July 2, 2014
222 – TWW Live: Does Wood Really Move?
- Last Month’s Winners: Noah Mudge (Arbortech Mini Grinder) and Tonia Roberts (Fuji Mini-Mite HVLP)
- This Month’s Giveaway (Enter Now!): Powermatic PM2800B Drill Press
News/Announcements
- Thanks to Denis DeMichiel for the awesome Blue Angels posters.
- Don’t miss the Christmas in July Sale, Tuesday, July 8th where you can get Wood Whisperer Gear, Books, and DVDs for 20% OFF in the Wood Whisperer Store.
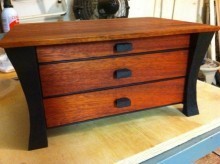
Featured Project
- Cory’s Purpleheart Bed by Cory Spence
- Submit Your Project
Kickback
- Is the concern for wood movement overblown?
- How do you explain breadboard ends?
- Check out the Woodshop Widget for help with wood movement calculations.
- Breadboard ends with a sprung joint?
- A FWW article on sprung joints by Gary Rogowski.
In Case you Missed It
- April Wilkerson’s video about Garden of Innocence:
- The Six Most Important Woodworkers I’ve Ever Known by Bob Lang.
- The Highland Woodworker 13:
Recommendations
- Civil War Woodworking Volume II by A.J. Hamler
In the Shop
- The Morris Chair comes to life with its first coat of finish. Purchase access today!
Q&A
- Bob Wilson – “What about sealed???? I have heard don’t worry about movement if you seal it in poly?”
- Nick Ferry – “Would you ever do a joint build with Nicole or a build-off. Something simple not requiring many tools?”
- Mathew S. – “How far can I get with a contractor style saw, and what issues will I run into? I don’t have room or budget for a cabinet saw. Thanks!”
- Collin Burris – “I am just starting out, what would be better spending my money on, a table saw or a compound miter saw?
- Texfire – “Do you feel that woodworking as a craft is still in decline or are we in the middle of a resurgence?”
- Mark Nylund – “Why can’t I keep my shop as clean as yours?”
- JMK89 – “Do you use infeed/outfeed support at the bandsaw? Any ideas on what might be the best way to approach this?”
Tune in to the next show on Friday, August 1st at 1pm Eastern!
If you’d like to view the full unedited version of this TWW Live episode, you can watch it here.


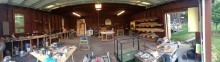
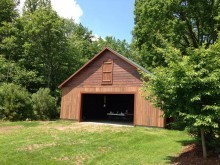
Will’s Standalone Shop
From: Will Marlowe (Raleigh, NC)
Shop Type: Standalone
Shop Size: 500-999
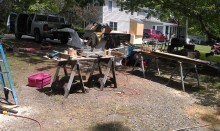
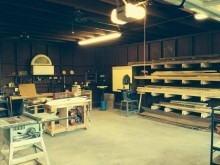
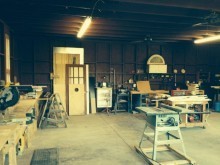
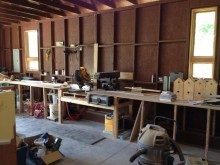
So this shop was built by my dad after he out grew his two tobacco barns. The constant hoarding of construction materials, his daughter’s desire for a “rustic barn” wedding local, and the sometimes annoying, only son and fellow woodworker telling him to do it, finally lead to what you see now.
The building itself is 30′x32′ and features a 12′ automatic garage door and a 8′ door that we made ourselves. We’re still working on insulation, AC, etc., but for the time being, its just fine. The next big step is dust collection which is basically a vacuum following me around all day at the moment.
By the way Marc, just might recognize the lumber rack. Thanks for checking out my shop and let me know what you think.

June 30, 2014
From Hobbyist to Seller – Starting a Side Business
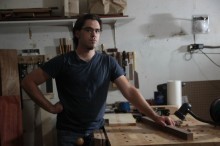
At what point do we cross the threshold into selling our work, and how can you be successful? I would be willing to wager that the idea of starting a business, or at bare minimum selling items on the side has crossed the mind of every hobbyist woodworker. I’m definitely guilty, and I’m currently in the process of trying to figure out how to make a profit from my craft too.
I think the most reasonable way to create a woodworking business is by starting it up on the side while maintaining a steady source of income. Sure, we all dream of quitting the day job to pursue our passion, but there are many drawbacks to this course of action – lack of income being the main problem. Starting a side business not only eliminates any drop in income, in most cases it should actually increase your income so long as you keep expenses at a minimum.
A Great Side Business Success Story
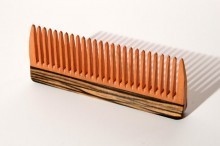 A fellow LumberJock that I follow, Brian Timmons, recently started up a side business selling handmade wooden combs, which are flat out awesome! I saw that he had opened up an Etsy shop, and he actually sold out the first day. His story is a great example of what’s possible when you take the plunge and sell your work. So, I decided to interview Brian to dig even deeper into his story and his side business, Big T Woodworks. In the interview, Brian shares his back story, the motivation to open shop, and some really great tips for new sellers.
Enjoy the interview, I hope it provides some motivation to open up shop and some tips to get going. Also, check out the video at the end of the interview where Brian talks a bit about his business and shows some of the processes he uses to build his awesome combs.
How long have you been woodworking? “I’ve dabbled here and there all my life, but I got serious about it two and a half years ago. A lot of separate influences led me here. My uncle is a professional woodworker, so whenever I was a kid and we’d visit him in New Mexico he loved to show off his tools to my older brother and I. I remember having my little mind blown by a hollow chisel mortiser. A machine that drills square holes! Clearly anything was possible.
Growing up around music and playing cello led me to a couple of jobs, first in a general music store. They had pianos, drums, guitars, and whatnot, but my favorite thing about the whole job was getting to watch the string instrument repairman work. He’s a violin and bow maker, and if I didn’t have to deal with customers I could’ve watched him work all day.
 Later I got a sales job in a specialty shop selling violin family instruments, and I also got to help in the shop too. I never went after bona fide luthier training, but I was taught how to varnish and setup instruments, which was really cool.
Later in life I kept having the urge to do more with wood, and to break new ground beyond what I had already done. Once I got married and bought a house I finally had a garage to work in. My first real project was the jewelry box I made for my wife. It was all downhill from there.”
What made you decide to make combs?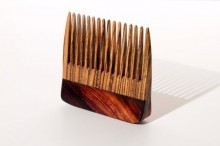 “I wanted to get serious about making some money with my woodworking. Or at the very least, not actually losing money on it. Working from my home on a shoestring budget, I started to think about what criteria I should use for projects to get my business off the ground. Here’s what I decided on.
Something small and easy to ship. I didn’t want to mess around with packing huge items and all the extra costs associated with that. Also, big items seem more likely to get damaged in shipping.
Items that can made in batches. This way I can repeat my processes once I have a machine set up the way I need it, and I’m not constantly switching between tools and moving my dust collection hose around the garage. Tool switching is time consuming, especially for those of us in small spaces that don’t have enough outlets to leave everything plugged in, or might have to move one tool out of the way in order to use another.
Low cost per item. It seems like a safer bet to make lots of small things that aren’t prohibitively expensive. I’d love to try a Nakashima style table or a Krenov style cabinet made from top shelf woods, but if I can’t find a buyer willing to spend thousands it doesn’t do me much good.
So with all that in mind, wooden combs fit the bill. They’re practical, tough, and stylish. And unlike cutting boards, the market isn’t completely and utterly saturated. Sure there are others making them, but mine still manage to stand out.”
 How did you decide to shift from strictly hobbyist to seller?
“Honestly, a lot behind that decision was borne out of frustration and resentment. I was sick of being broke all the time. I’ve always wanted to make a living with my hands in some way, and I hated that the skills I’m learning weren’t helping me provide for my family. I’m very happy now that I took the plunge, since people are buying my stuff. It’s a very rewarding feeling.”
Do you think you would ever go full time with your woodworking business?
“I do have a 9-5 day job, which I get no satisfaction from. If I get to a point where I’m making enough money from woodworking that I can go full time, I will quit my job at relativistic speed.”
Has the decision to sell your work changed anything about your woodworking?
“The nature of making things in quantity has made me more efficient in the shop. But that hasn’t made me a mindless automaton, either. I still enjoy the Zen flow I had with earlier projects. And because I’m more practiced that means less wasted motion, which makes for more enjoyable work.
I’ve heard some folks on forums say that once they turned their woodworking hobby into a business, they immediately lost all enjoyment because suddenly it felt like just another job.
 I can see how that would be the case if you’re doing plain and boxy plywood cabinets all the time, but I certainly don’t feel that way. The validation that comes with people buying my work is awesome. Getting compliments is great, but money does indeed talk. Complete strangers from all over the US, the UK, France, and Germany have bought something I made, and I can’t help but feel good about that.
Selling what I make hasn’t just changed my woodworking, it’s also been a great benefit to my marriage! Before I was selling, my wife usually regarded my woodworking as messy and expensive. She liked what I made just fine and would try to nurture my creative side, but I knew it bothered her that I was dumping money into a hobby and getting nothing out of it. She had her doubts, and I don’t blame her.
Now she’s bought me a ton of beautiful woods to work with, a new band saw, and a lathe! All my hard work is starting to pay off now that I’m putting myself out there. Making sales is great, but it pales in comparison to knowing that my wife really believes in me now. It’s been a huge boost to my confidence and it makes me love her even more.”
Do you have any advice for people who are thinking about starting to sell their work?
“Do your homework, but try not to second guess yourself either. I had a bunch of combs made and I sat on them for months, unsure if anyone would buy a single one. One night I figured, ah what the hell, I’ll just go ahead and sign up on Etsy, see if I get any views. Well, I got more than just a few views. Once I opened, I nearly sold out in less than 24 hours. I was over the moon that day. I couldn’t believe I had waited so long.
 Don’t fall into the trap of thinking that selling your work makes you less of an artist. Somehow we’ve romanticized the archetype of the starving artist, this notion that “selling out” makes your work somehow impure. I can think of numerous cases where that rings true. But also consider Da Vinci, Shakespeare, and Beethoven. They all got paid for their work, and I don’t think anyone would seriously try to argue that they were somehow less of an artist for doing so.
Not to compare myself to the greats or anything, but my point is that it just seems like a silly idea for people get wrapped up in. Don’t be afraid of success.”
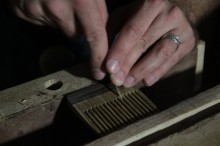
Check out Brian’s video that covers more about his business as well as some of the processes he uses to craft his beautiful combs. He’s got a couple really neat processes that he has devised to batch out the processes.
bigtwoodworks.com | Brian Timmons from Seaver Helms on Vimeo.
I just want to give a big Thank You to Brian for taking the time to share his thoughts, story and his insight into starting up his side business. Congratulations on your Grand Opening, and to your continued success with Big T Woodworks!
I hope that the interview with Brian provides a little bit of hope and motivation for the up-and-coming side business entrepreneur out there. There is nothing better than getting your work into the hands of people who not only truly enjoy it, but pay you for your work too! It’s amazing how much feedback you get on your work, how much you learn once you enter the selling world, and how much more gratifying your work in the shop can be when you realize there is demand for what you make.
So, what advice do you have for starting up a side business to sell your work? Any other success stories out there that you would like to share? I’d love to hear about it, leave a comment below.
Poll: Have You Ever Built an Outdoor Project?
 It’s summertime, and the living’s easy. Without the threat of blizzards, freezing temperatures or ice storms, everyone is looking to get outside and enjoy the great outdoors. Even in sweltering Florida, Arizona and other hot climes, at least the kids are out of school, and getting them outside keeps them – and you – from going stir crazy.
With all of this outdoor activity, I’m sure that we woodworkers have thought at least once, “Gosh, it sure would be great if I could build a garden shed/planter box/picnic table/play structure/some other outdoor project that could be perfect for outdoor enjoyment.”
So, this week, tell us if you have ever built and outdoor project, and what the experience was like for you.
Have you ever built an outdoor project?
June 29, 2014
Joe’s “Defective” Serving Tray
By: Joe Laviolette (Springfield)
Experience: 0-2 Years
Woodworker Type: Hobbyist
Project Type: Kitchen Projects
Material(s): Solid Wood
Finish Type(s): Shellac
Finishing Technique(s): French Polish
I planed down some select grade maple for my wife to use for cutting boards. It was ugly–even in the rough. There were quite a few knots I needed to cut around. Once the shag started coming off in the planer, I noticed the unmistakable tiger maple waves. The knots were also very deep, very dark, and very irregular. Rather than work around them, I decided to feature them in this serving tray after filling them with many coats of CA.
I also had a crazy piece of red oak. In general, I am not a fan of red oak, but this was a special board. It had more chatoyancy than any piece of wood I have ever seen. I re-sawed it and bookmatched it for the bottom.
To preserve the chatoyancy and give it the finish it deserves, I decided to french polish it. This was my first go around with the french polish technique and red oak is a terrible species to try it out on. After abandoning traditional washcoat/pumice pore filling for some Tasmanian Oak timbermate, things got a lot easier. I used superblonde shellac and am very happy with both the oak and the maple.
Construction is your basic splined miter (thin walnut splines) and rabbeted bottom. The handles came out of the off cuts of the maple I used and have a few defects in them also.
I have some really cool “defective” cherry on the bench ready for another one. Now to figure out splayed miters.


June 26, 2014
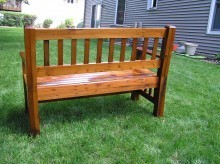
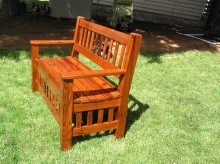
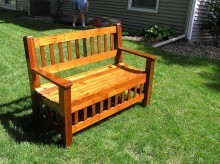
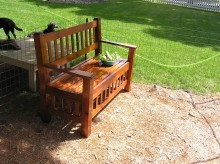
Ronn’s Garden Bench
By: Ronn Winkler (Eden Prairie, MN)
Experience: 2-5 Years
Woodworker Type: Hobbyist
Project Type: Chairs & Stools, Outdoor Projects
Material(s): Solid Wood
Finish Type(s): Oil/Varnish Blend
Finishing Technique(s): Brushing
This is one of my favorite projects to date. Last year my wife asked me to build a bench for her garden so she could sit and watch the tomatoes grow. She found a plan online that looked to be a real challenge. Not a simple bench but a very nice looking solid design.
I like each project to have a new element or challenge that I have not done before. This one was all mortise and joints and all of the main pieces were at least a full 1” thick. The legs gave me my first band saw experience and I got to work with Redwood.
Since it would live outside most of the year, cedar seemed to be a good choice but finding good quality western cedar in Minnesota is not easy and what I did find had so many knots that I just dreaded the prospect of routing mortises. Then the woodworking gods smiled on me when a friend said that he had over a dozen 16 foot long pieces of 2×4 Redwood that he had rescued from a deck demolition. The wood was obviously very old and was covered with a reddish brown deck stain. But each 2×4 was, to the eye at least, perfectly straight. It turns out that the grain was nearly dead straight with no pith or even curves of the grain visible on the ends of the 2×4’s. This wood must have come from a very large tree.
The wood that was exposed when I trimmed the stain off the pieces was beautiful with quite a variety of colors. The old nail holes just added to the character of the piece. I learned that old dirty wood will ding up your jointer and planar blades in a hurry, but it did not seem to bother my carbide tipped saw blades.
I decided to make my mortise and tenon joints square rather than rounding off the tenons. It was a lot of chisel work but, I was surprised to find that I enjoyed every minute of it.
The slats are planed to 3/8” thick and are mortised into the rails without cutting a tenon. Everything else is a full 1” thick with 1” deep mortises into the legs. The legs are 2¾” square. I had to square up and glue four 2×4’s together and then re-cut them to make the legs. The only fasteners used are the #8 screws that hold the seat slats in place. Those are countersunk and plugged.
Since the bench is meant for exterior use, I decided to try epoxy glue for the first time. I am very happy with the results and the fact that I had a good 20 minutes or more to make adjustments and get my clamps in place.
Even though the Redwood itself can take the weather, I wanted to try to preserve the beautiful color of the wood. So I chose high gloss marine spar varnish for the finish. Three coats with the first thinned 50%, the second 75% and the third 15%. It is my hope that the varnish will block enough sunlight to keep the wood from turning gray for several years.
June 23, 2014
Poll: Repairing Antiques
The craftsmen and women who have built furniture in the past have done some incredible work. From entire banks of hand-dovetailed drawers to intricate carvings executed over weeks of strenuous work – we can learn a lot from the methods they used.
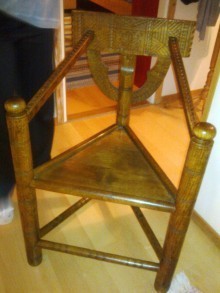 Unfortunately, there are times when modern life visits hazards upon these beautiful pieces of work and they sometimes need repairs. Kind of like the time when my neighbor’s brother broke apart an antique Munkstol (a traditional Swedish seat that had been in their family for generations) in an effort to help pack it for shipping. I had to surgically piece the seat back together to bring it back to life.
So today, I want to know if you have ever had to repair a piece of antique furniture and what you thought the process was like.
Have you ever repaired a piece of antique furniture?
June 22, 2014
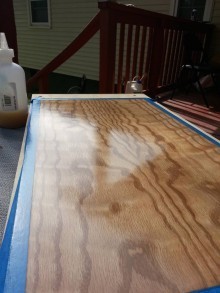
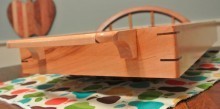
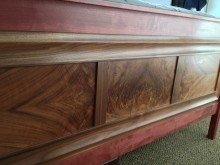
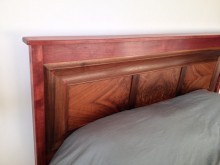
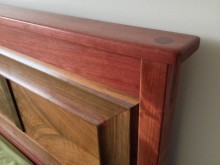
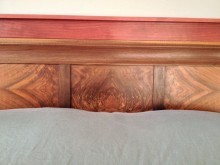
Cory’s Purpleheart Bed
By: Cory Spence (Parksville, British Columbia)
Experience: 10+ Years
Woodworker Type: Professional
Material(s): MDF, Plywood, Solid Wood, Veneer
Finish Type(s): Oil/Varnish Blend
Finishing Technique(s): Wiping
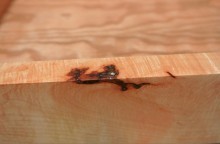
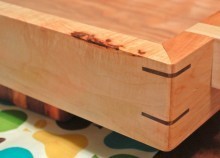
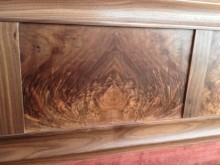
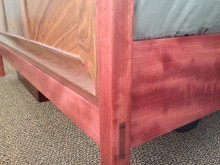
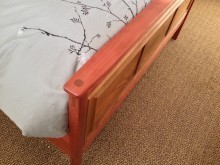
As a Professional Cabinetmaker, it tends to be difficult to find the time to build projects for my loved ones…as I am always working on the paid projects. After relocating my family to the west coast, I was able to find employment in a custom cabinet shop where I was allowed to stay after-hours and work on my own personal projects, as I did not have a shop space of my own and I only owned small power and hand tools. After bouncing ideas around for a year and a chance stop at the local hardwood supplier where my wife and I found a beautiful timber of Purpleheart (2″x 13″ x 16″) and some shorts of walnut, the idea was cemented and we committed to the project.
It took 3 months of staying late and occasional weekends to complete the project. I used through-tenon joinery with a notch and wedge to secure it in place. The dowels on the top of the post were made from-the-posts with a jig/fixture on a table saw. I shaped the inside of the walnut frame with a table saw by skewing the lumber and angling the blade to create the cove and tenon separately which left the peak shape in the profile. Walnut was the wise choice on this part, as it was relatively easy to sand out the saw kerfs. The “bowties” or “dovetail keys” at the miters of the frame were a nice treat. I used the hardness of the Purpleheart and a deadblow hammer to drive them into a small cut from the walnut, which once executed, were extremely strong.
Due to dry climate and poor storage, I had to prep the Walnut veneer prior to pressing it onto the MDF Panels by using a glycerine mixture and clamps/culls, in a newspaper, fiberglass, veneer, fiberglass, newspaper sandwich to soften the brittle veneer. The supporting bed structure is Alder. It locks together with tenons and dadoes, with adjustable feet on all supports. The rails were re-sawn from the original board and almost ruined the whole project as they warped dramatically. However, they were able to be re-shaped through a process of clamping and bending against the warp. They are attached to the headboard and foot board with standard bed hardware from Lee Valley.
The finishing was done by hand with Minwax wipe-on poly. Three coats with a sanding/slurry process in between and a final buffing with shop rags and a thin amount of wipe-on poly to make it shine. (My wife had her hand in on the whole process BTW)


June 19, 2014
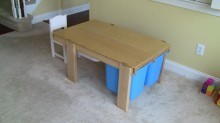
Paul’s Toddler Table
By: Paul Kranz (Princeton, NJ)
Experience: 2-5 Years
Woodworker Type: Hobbyist
Project Type: Kids Projects
Material(s): Plywood, Solid Wood
Finish Type(s): Oil/Varnish Blend
Finishing Technique(s): Wiping
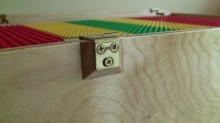
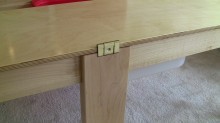
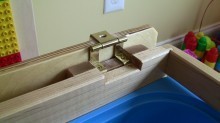
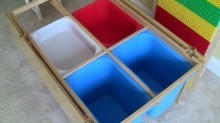
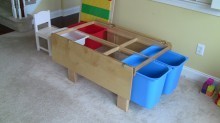
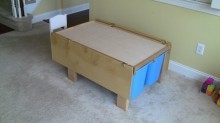
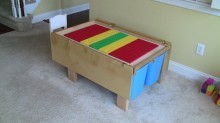
This Toddler Table (my 3rd major project) came about because I wanted one table that could perform several functions: a writing surface, a Duplo/Lego Table, a surface for a train set, and a place to store the toys associated with each activity.
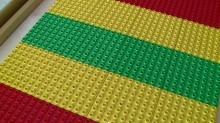
The default writing surface is cut down the middle and the wings flip up 270 degrees and rest on the sides of the table. Underneath is a flippable panel—on one side I attached Duplo building plates, the other side’s use is yet to be decided. Remove the panel and you have access to 4 Ikea storage bins below. These bins slide out from the side so you can access them when the table is closed or when the wings are open and they slide out completely to accommodate more kids at the table.
I used 1/2″ Baltic Birch plywood for the top, 4/4 Soft Maple for the frame, and 6/4 Soft Maple for the legs. This is the first project where I implemented the techniques from Marc’s finishing video, so I used a coat of Seal-A-Cell and 4 coats of Arm-R-Seal.
The joinery is nothing special, but quite a bit of effort was focused on adapting the 270 degree hinges, which are designed for 3/4″ materials (maybe too much effort, if I do this again I may just use a 3/4 table top). To make up the difference, I cut some pyramid bases to ease the transition from the underside of the table to the hinge, since when the table is open toddlers will be in contact this area. I also needed to cut a mortise to drop the hinge down a half inch.
The proportions here are not stunning, but there were some limitations in the max height of the table to draw comfortably, the height of the bottom of the table to sit comfortably, and having enough space inside the table to hang the bins and store the flippable panel. The leg proportions are based on the dimensions of a rare Grecian urn I’m found of— just kidding…they’re based on a couple jointer passes of the rough lumber (wanted to use every cubic centimeter). I didn’t edge band the plywood top. At 1/2″ it’s not too displeasing, plus there is a large chamfer for safety so much of the edge banding would have been routed anyway.
I’ve made a quick YouTube video that demonstrates how the table transforms:
Lessons learned:
1. Identify the hardware you’re going to use during the design phase, particularly when dealing with hardware like 270 degree hinges where there are not many options.
2. Don’t dry your show surface vertically. To save time I tried to coat the entire structure and needed to leave the wings hanging down to avoid surface contact. I got a pretty long drip across the table top.
3. Don’t drop the wood. I had some delicate 1/2″ pieces on the edges of a couple boards that broke off when I dropped them.
4. Don’t expect the panels to lay flat. Before finishing I spent time making sure the wings sat flat touching the entire surface of the frame, but after the first coat they were slightly off already. In the future I would probably hang the hinges a little higher and only expect the doors to touch the frame in the middle.
Poll: How Old Is Your Oldest Tool?
Getting involved in electronics can be tricky business. Every time a new technology is invented, processor speed increased or new storage medium is heralded as the next great thing, your computer, stereo or television is one step closer to needing to be upgraded.
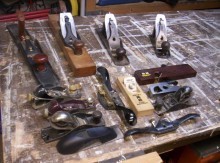 Fortunately, this isn’t the case when it comes to woodworking tools. Power tools built in the 1950′s still slice through lumber and planes and chisels more than a century old still slice and dice joinery as well as the day they were made. And they can still do their work despite the fact that many of these babies sat languishing in some cellar or out-building for decades before being brought back to life.
This week, let us know how old the oldest tool is in your collection. Power or hand tool – it doesn’t matter. The one caveat is that the tool still has to do work for you in a your shop. No living room display case models are allowed.
How old is the oldest tool – that you use – in your collection?


