
Marc Spagnuolo's Blog, page 95
May 12, 2014
Poll: Do You Build Magazine Projects?
There are few sources of woodworking know-how as rich as the many woodworking magazines published around the world. From magazines that appeal to a wide woodworking audience to specialized titles that focus on one aspect of the craft, there’s something to suit everyone’s woodworking needs.
 Each edition is loaded with shop tips, projects, background articles and plans for easy-to-build jigs. The writers and editors have a great opportunity to strut their stuff and provide valuable information for their target audience. If you subscribe, this wisdom comes right to your mailbox as each edition rolls off the presses. Month after month.
Their strength – frequency of issue – can also be a weakness. After all, by the time you get a chance to read through the magazine, scheme in your mind what you would like to build and find the time to do it, the next edition is just about ready to ship. And, the process begins all over again.
This week, we want to know approximately how much do you build and incorporate from each edition of woodworking magazine you receive. Do you build everything you possibly can from each issue, or do you find yourself just trying to keep pace?
Approximately how many projects do you build from one edition of a woodworking magazine?


May 11, 2014
The Highland Woodworker #12
Did you catch the latest Highland Woodworker? I sure as heck did. Here’s what you may have missed:
Moment with a Master
Mary May is a talented carver and I’ve had the good fortune of learning from her in person. She has a refreshing teaching style and clearly knows her way around a gouge! Mary has an online school that you might be interested in as well.
Feature
Nashville luthier Kipp Krusa crafts an incredible guitar. Learn how he makes the magic!
Tips, Tricks, & Techniques
Glen Huey gives us the rundown on shellac including how to make sense of dilutions.
Generation Next
Two brothers run a very cool company in Tennessee that takes down old barns and builds amazing furniture out of the recovered material. Check out the Tennessee Barn Project.
May 8, 2014
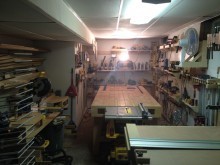
Luke’s Basement Woodshop
From: Luke Pinno (Saskatchewan)
Shop Type: Basements
Shop Size: 0-249
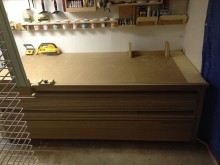
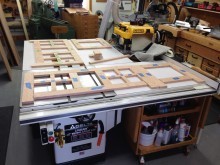
Smaller than my previous shop, I opted for the french cleat system to allow for organizable quick access to my most used tools. Another benefit is when I get a bigger shop again, the cleats are easy to move. My previous shop had rough cabinets made from scraps, but I’m finding I rather like not having to really put anything ‘away’ or wrap up cords even as I’m lazy.
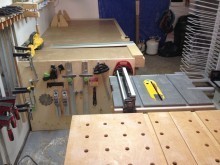
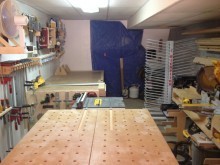
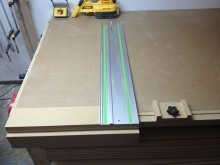
Paulk’s workbench and mitre stand are still the centerpoints of the shop. For another work surface that is as close to the Festool MFT as I can currently afford, I doubled the plywood storage top. I bought a drying rack from Richelieu instead of making a shop one; it works reasonably well. For a lumber rack, I used cheap support brackets. I still use an auto-start Dewalt dust extractor for dust collection, as well as general cleanup. My drill press, second router table, jointer and planer are stored where possible and brought out for use. Not exactly ideal, but for now it’s functional. I’m presently building an entire kitchen, so cabinet storage was pushed over into the utility room.
For tools, more than half of mine are Dewalt, but I’m branching out. I’ve expanded my Festool collection from a track saw, to a track saw and a whole two cases. Their organization is lovely for a small shop.Due to space, shop organization and tidiness are rather critical issues. I’m a bit OCD in this shop.
For spraying, the set-up is far from ideal. Two windows and a fan provide enough ventilation for the most part. Enough ish, at least. That is a brief tour of my shop. I hope you enjoyed it.

May 6, 2014
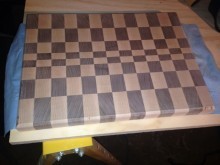
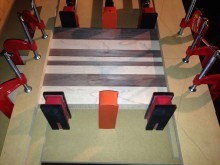
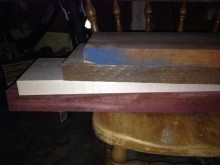
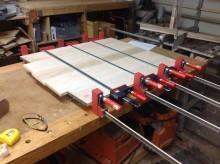
Geoff’s Mothers Day Cutting Board Project
By: Geoff Campbell (College Station, TX)
Experience: 0-2 Years
Woodworker Type: Hobbyist
Project Type: Kitchen Projects
Material(s): Solid Wood
Finish Type(s): Oil/Varnish Blend
Finishing Technique(s): Wiping
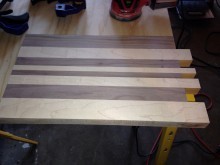
I have been watching The Wood Whisperer for a couple of years, and decided last year that I wanted to do some woodworking. I also wanted to give my mom something for Mother’s Day, so I acquired the bare minimum tools needed to follow Marc’s cutting board episode and managed to find a little bit of hardwood to begin the project. I wanted to use Purple Heart and Maple, but my Purple Heart board was not quite wide enough to follow the directions exactly, so I went with Walnut and Hard Maple. I soon realized that I did not have 8/4 stock like Marc suggested (I realized this after I watched Episode 4 – A Lumbering Feeling), so I downloaded CBdesigner and went to work to figure out how I could make a board of the same dimensions with wood that was only 1 ½” thick.
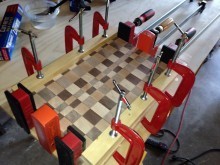
I ended up milling my wood down to 1 ¼” thick, but using 18” strips for the first glue-up. The widths were the same as Marc’s. After sanding the first glued piece back to flat (you can see my cutting skills aren’t yet top notch in the picture) using only a random orbit sander and a card scraper, I made my next cuts 1 ¼”, but instead of 11 of them I cut out 13 strips. I flipped every other strip and glued again. Next I sanded more—much more. It took me half a day to sand this block smooth. I also learned how very badly I need to follow Marc’s advice on the 5-cut squaring method.
From here I used my router table and stop blocks with a ¾” straight bit to cut out the handles. Then I took the router off the table and used a ¼” round over bit on the bottom, and a 3/8” bit on the top. This only left me with more sanding (by hand this time).
Finally, I used Watco butcher block oil (its similar to what Marc used) cut with about 65% mineral spirits for the finish. It took 3 coats; with the last one being wiped off right away since it wasn’t absorbing.
This is the first woodworking project I’ve ever attempted, and it was super satisfying. I appreciate Marc and everyone on here who has left a comment (they are super helpful). I hope my mom likes her Mother’s Day gift.

May 5, 2014
May’s Safety Giveaway
 Every month we give away something AWESOME here at The Wood Whisperer and since May is focused on safety, we thought we would stick to the theme!
If you haven’t already, be sure to head on over to the Giveaway Page to learn about the Festool & 3M products we are giving away and enter to win. Be sure to bookmark the Giveaway Page so you can keep up with the latest giveaway details (because we do this every month)!
The winners notified directly & this post updated after they are randomly drawn at the beginning of the new month.
You can also check out all of our past giveaways and winners here.
Poll: How Long Before Removing Clamps?
 When I get into the woodworking groove, the last thing I want to do is slow down and wait. Unfortunately, that’s exactly what I have to do when it comes to glue ups. Sure, you can do some work on those other parts of the project that aren’t in the clamps, but I am like a kid waiting to unwrap his birthday presents when I see a part of my project sitting in the clamps.
Today, tell us just how long you let your yellow (carpenters) glue-ups sit in their clamps. Are you someone who rushes to strip the clamps off or can you wait for a good long time before you take the pressure off?
How long do you leave your yellow glue glue ups in the clamps?
May 2, 2014
Why I Don’t Offer Woodworking Business Advice
I periodically receive emails from aspiring woodworkers who are looking to start a new woodworking business. Most of them say something like,
“I see you’ve been successful in your business and I too am looking to start building furniture for a living. Do you have tips or advice for someone just starting out? I really don’t like my current job and I’m hoping to make a career out of something I love.”
 I always feel a bit awkward as I break the news to them: I do not make my living as a professional woodworker. You can read my About and FAQ pages if you’d like more details on my personal situation, but my business is 100% online. Every dollar I make comes from videos, books, dvds, advertising, sponsorship, and teaching engagements. The only client projects I take on these days are the ones I actually WANT to take on. So there’s a bit of a misconception about what I do that leads folks to believe I run a successful custom furniture business. The simple reality is I don’t.
In the past, I did run a custom furniture business. It was called Marc’s Wood Creations (because that just rolls off the tongue) and I would build anything a customer wanted. The cool projects were very few and far between as most folks just wanted odd-sized/cheap cabinets. None of these jobs paid well and I kept my doors open by taking on refinishing work, working part time in a refinishing shop, and collaborating with another local woodworker on larger commercial projects. In the end, most of my jobs would net me about $10/hr if I was lucky. At one point, I even had to find a 9-5 job just to make ends meet until the woodworking business picked up again.
I eventually made enough money to satisfy the portion of the bills Nicole couldn’t handle. At this point, I had already established a relationship with my mentor David Marks and we collaborated on a little side business selling veneer cut-offs and walnut burl bowl blanks sourced from Northern California. I also taught woodworking classes to locals in my shop for a while. In spite of working my butt off, I was just barely getting by.
 In an effort to boost business, I came up with the idea to start filming my projects. The goal was to show clients just how much work went into their furniture so that perhaps I could start charging what I felt my time was worth. That was back in 2006 and at the time, there wasn’t much in the way of woodworking video content online. In fact, The Wood Whisperer was officially the first woodworking video podcast. Credit goes to my buddy Matt Vanderlist for being the first audio podcast hence his nickname “The Woodworking Podfather.” Much to my surprise, my videos were proving more attractive to woodworkers than they were to clients. In fact, the clients didn’t seem to care. So within a few months of launching my first video, I came to realize my future was in online education and not furniture production.
This is why I feel I am in absolutely NO position to dispense advice to people who are looking to start a woodworking business. I can certainly share my personal experiences in hopes that you’ll be able to glean something from it, but I will never be able to tell you what works and what doesn’t. Not to mention, there are so many variables to consider: your shop, your skill, your target market, your competitive edge (if you have one), your family, your motivation, your business acumen, and the viability of your products, just to name a few.
 There is actually one small piece of advice I can give you, assuming you’re coming at this as a career change. In fact, most inquiries I receive are just that: a person who’s not happy in their current job and they’re looking to turn their passion into dollars. For this person, I recommend doing what I did when I started out: hold down a solid job while building the business on the side. My day job served as something of an insurance policy and it wasn’t until I had more work than I could handle on nights and weekends that I took the plunge and quit the corporate world. While this method doesn’t provide you with any real guarantees, it will give you at least some additional confidence that you’re making the right decision. Furthermore, you can use your steady paycheck to purchase the tools and other things you might need for your business to run smoothly.
What if you can’t drum up enough business to fill your nights and weekends with work? You keep your day job! Depending on your life situation and tolerance for risk, you might be willing to take a chance. But don’t be foolish about it. If it isn’t a viable business, your love for the craft won’t save you and it certainly won’t pay the bills. For many, woodworking as a hobby while receiving a steady paycheck IS the best-case scenario.
Part of the problem here is that folks tend to make assumptions about me and my fellow bloggers and podcasters. Whether you know it or not, the vast majority of people producing content online are holding day jobs in completely separate fields. Their writing/videos are a hobby almost as much as woodworking is. Some of them are able to derive a second income from their efforts and the whole thing supports their woodworking. But very few of them are professional woodworkers who make a living solely by producing furniture and goods for other people. These folks do exist and some of them blog about their adventures, but most of them are too busy working long hours to take the time to document their efforts online. Why do you think some of the biggest names in woodworking start their own schools and regularly produce books and DVDs? Because teaching people how to woodwork is generally easier and more predictable (many times more profitable) than doing the woodworking yourself.
By example, here’s a small sampling of woodworkers I know personally who are making a living as professionals. Notice that most of them have links to their blogs which are either minimal, unpopulated, or dead. Dorset Custom Furniture is probably the one exception and how Dan has enough time to write such great blog posts while running a successful woodworking business, I’ll never know.
Dorset Custom Furniture – Dan and his family craft amazing stand-alone pieces and built-ins on a scale most of us can only dream of!
KALA Studios – Kaleo is an old friend of the show who builds his unique furiniture designs in the DC area.
CK Valenti Designs – Chris is a Phoenix-area local who crafts amazing designs in both wood and metal.
R Jones Woodworks – Another Phoenix area local, Ron’s bread and butter is CNC work. He’s the guy that makes all of the templates and push sticks we sell in our store.
Of course I’m not recommending that people leave their blogs empty, quite the opposite in fact. If you want to talk about how good content marketing can be for your business, that’s a discussion I’m willing to have. My point is simply that running your own business is a potentially all-consuming endeavor. Should you succeed, your biggest challenge won’t be how to fit all the work in, it’ll be how to make time for the other important things in life like family, friends, and *gulp* vacation!
Ultimately, I would hate for someone to make any career decisions based on my or any other online personality’s perceived success. Running a woodworking business is a tremendous amount of work and has all of the same challenges found in any other business. Just because you love the subject matter doesn’t mean you’ll automatically know how to design a successful business around it. The work may hold a deeper meaning for YOU but at the end of the day, you’re making a widget and selling a widget. To do that successfully you need good old fashioned business know-how, determination, and even a little luck. So I guess that’s another piece of advice: treat your business like a business. Take some business courses. Learn what it means to be a business owner well before you are one.
While most of this article is intended to be a splash of cold water for some, I should be clear that I’m not being negative for kicks. I’m just trying to be painfully realistic and honest. I’m also trying to make sure folks understand the reason why I won’t dish out “pearls of wisdom” whenever asked. It certainly isn’t because I’m hoarding all of the good ideas for myself. A smart person knows what they know. A wise person knows what they don’t know and isn’t afraid to admit it.
So what about our up-and-comers looking to make a career in woodworking? First and foremost, learn to ask for advice from the right people! Speak to career counselors, local successful business owners, and take some business courses. You’d be surprised how little woodworking is involved in starting and running a successful woodworking business. Of course the woodworking knowledge is essential as well, but it’s actually the easiest part of the game (in my opinion).
So to sum up: I went to school for biology, started to get my MBA, became a woodworker, and now I’m essentially a dancing monkey on YouTube. What the heck do I know about running a successful woodworking business?!
May 1, 2014
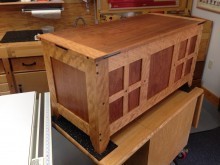
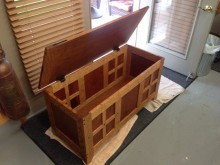
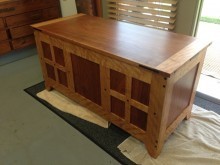
Anna’s Hope Chest
By: Steve Boudreau (Coldwater, OH)
Experience: 10+ Years
Woodworker Type: Hobbyist
Project Style(s): Greene & Greene
Material(s): Solid Wood
Finish Type(s): Oil/Varnish Blend, Wax
Finishing Technique(s): HVLP
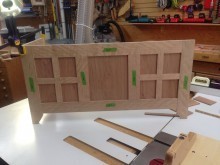
The idea for this project was a birthday present for my daughter. While it is not a terribly complex build it started out to be a much simpler Shaker/Mission type design. After many drawings and looking at assorted different photos of chests things got a little more elaborate and challenging until I came up with this design. One of the things I wanted to accomplish with this project was to use more hand tools and fewer power tools and very few mechanical fasteners. The addition of the Greene and Greene style details came late in the construction as an after thought really, my first attempt. I was happy with the look but wish I had added a little more in the design. The stiles, rails, and breadboard ends are Curly Cherry and the panels, top and bottom are Pensylvania Cherry that was cut from a 12/4 piece that was approximately 21″ wide and about 8′ tall. The panels within the fields were pre-finished before I assembled the front, back and sides. The biggest challenge with them was gluing up all the joints and inserting all the panels before the glue started to set. For that I did use a special slow set glue from Garrett Wade that worked very well.
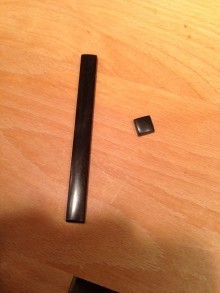
The plugs and splines are made of Ebony. I used the William Ng method on the plugs and made a profile scraper for the splines. The final finish is about 6 to 8 coats of Danish oil rubbed in and wet sanded to 600 and 2 coats of wax. I will also be adding a till/tray to the inside.
It was a very challenging and fun piece to build. Thanks to Marc and William Ng for their online postings and videos that helped with some of the techniques. I also want to thank Marc for continuing to share his knowledge. This piece was built for my daughter and dedicated to my Dad for allowing me to sweep up all that sawdust in his shop when I was little and teaching and inspiring me to become a woodworker.
219 – Safety Gear Upgrades
There aren’t usually a lot of new innovations in the world of woodworking safety gear but there are occasional improvements that can really make a practical difference in the shop. Let’s take a look at a few such improvements in eye, lung, and hearing protection.
The Eyes Have It
Ever since I started woodworking I have been using fairly standard protective lenses. While they get the job done, using them in conjunction with ear muffs and a respirator can be a little less than comfortable. Thankfully, there are many other options on the market including 3M SecureFit Protective Eyewear. Instead the arms being made from a thick plastic material, they are thin and flexible. The end result is a much more comfortable fit for long periods of use.
 Since standard protective lenses can still allow fine debris to get to the eye by going around the lens, some folks might be interested in the 3m Virtua lenses that feature a foam gasket. Or for even more protection, consider 3M Safety Goggles.
Another option brought to my attention by friend of the show Andrew are the FULLPRO Protective lenses. Instead of resting on your ears, the “arms” are actually velcro strips that attach to your favorite set of ear muffs. Talk about comfortable!
Do You Smell That?
 For years, I have recommended the 3M 7500 Series respirator due to it’s comfortable design and down-firing exhaust. The 6500 Series retains those same attributes but has a nifty extra feature: a quick-release latch. While this isn’t a ground-breaking innovation, it does make it easier to release the respirator for a quick conversation or a sip of coffee.
Bluetooth for the Win!
I love to listen to music, podcasts, and audiobooks while I’m working. In the ideal world, I’d be able to do this without the hazard and inconvenience of cords. Bluetooth is the answer! Unfortunately, protective ear muffs with bluetooth and speakers run into the hundreds of dollars. I think we can do better.
 I picked up a set of Howard Leight Stereo Ear Muffs, a Bluetooth Adapter, and a small male to male adapter for a homemade Bluetooth headset solution. Now I can protect my hearing while enjoying a nice brain-enriching book from Audible. No wires, no painful earbuds, and the only additional battery is the rechargable one in the bluetooth adapter. This new setup is fantastic and I highly recommend it!
For many folks, shop safety must be balanced with comfort and convenience. So these little creature comfort upgrades help reinforce shop safety by making it that much more likely they’ll be used in the first place. So if you aren’t happy with a particular piece of personal protective equipment, look around. There just might be something better just waiting for you!
A Note About Safety Day
As mentioned in the video, I am passing the Safety Day baton to my friends over at Modern Woodworker’s Association. To be honest, I’ve been growing a little bored of the event. I think the guys at MWA can certainly breathe some new life into the event and get other folks in the community excited about participating. So keep an eye on their site for updates concerning current and future Safety Day events.
The Giveaway
Use the widget below to enter the giveaway.
April 28, 2014
DIY Sawmills: Turning Logs Into Lumber for Furniture
For most woodworkers, buying lumber for our projects usually happens at the local hardwood dealer, local big box store, or even online. However, in some rare occasions you might just find yourself with a whole log that needs to be milled after you cut it down… so now what?
Turning Logs Into Lumber
So, if one day you come home and find a log sitting in your front yard, you’ve got some options to choose from that will turn that log into useable lumber.
First off, you can try to find a local sawmill to take it to and have them cut it. Depending on the size of the log and how willing you are to strap it to the top of your Honda Civic, that may not really be possible without further help (and cost) to get it there.
The second option is to bring the sawmill to your log. There are lots of sawyers out there with portable mills that will literally come to your front door. I found a couple portable sawmill locators online. One is provided by Wood-Mizer, a company that makes portable sawmills that setup a locator service. I also found out that Ron Trout, a member of LumberJocks (TreeBones) and operator of a portable sawmill operation, set up a website that will help you locate portable sawmills.
Build Your Own Sawmill
I’m always a huge fan of taking the initiative and trying something new. There are a few ways that you could get this accomplished on your own, each with varying degrees of difficulty and final outcome. You can try to use a chainsaw to hack it up, but it would be pretty difficult to freehand that, and chainsaws have a pretty big kerf and waste quite a bit of material.
For the truly brave and daring, you can just build your on milling bandsaw like Matthias Wandel did.
Things to Think About Before Milling Your Own Logs
I’m absolutely no expert on sawmills, so I suggest finding out more from someone who has experience milling logs or even a sawmill operator. However, here are a couple things to keep in mind.
First off, you will have to wait for the wood to dry before you start using it for projects. The general rule of thumb is one year per inch of thickness, but rules of thumb are only general guidelines. Each case will be different, but the takeaway is there will be a drying time before use. Also, you need to realize that there will be quite a bit of waste that comes off the log. So, if you think you will be getting 10″ wide boards out of a log that is 10″ in diameter, think again. You’ve got bark and a lot of sapwood on the edges, so the usable yield will be smaller than the log.
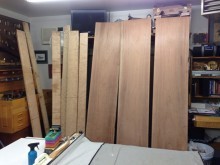
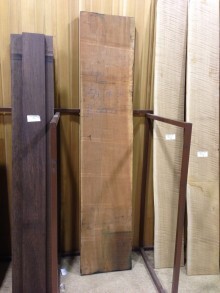
I hope this article opens up new ideas and avenues for sourcing wood and getting it milled. I was lucky enough to purchase some wood that was privately milled from felled logs, and it’s amazing what doors that opens up for you. I wasn’t involved in the milling process, but having access to thick boards and an entire tree really provides some design freedom that you typically can’t get from store bought lumber.
I’m curious how many people have actually milled their own logs (with or without your own homemade sawmill) to be used in their woodcraft. Have you milled your own logs before, or would you give it a try? Leave a comment and let me know.


