Marc Spagnuolo's Blog, page 93
June 15, 2014
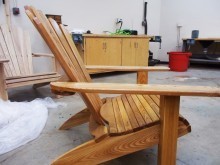
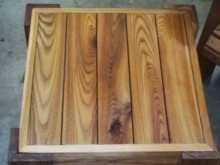
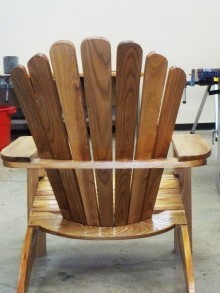
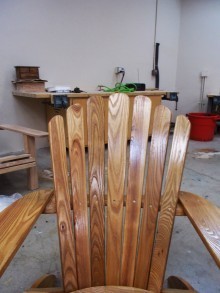
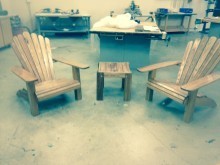
Adirondack Chairs for Grady’s All-Stars
By: Dan Funk (Pittsburgh, PA)
Experience: 0-2 Years
Woodworker Type: Hobbyist
Project Type: Chairs & Stools
Material(s): Solid Wood
Finish Type(s): Commercial Stain
Finishing Technique(s): Brushing
This project was built by my students at Sto-Rox High School. We are a low income school and I am responsible for bringing this program back. This is what we have done in our first full year of existence and we are proud!
The purpose of this program is to get students working together. We work like an assemble line from cutting on the band saw, to using the router and flush cut trim, and finally sanding (no one likes sanding in my class). I initially wanted to donate these chairs to an elderly home or a home for homeless veterans, as a veteran, that is important to me. However, earlier this year one of our teachers loss one of his sons to a debilitating disease that both of his children were born with. When this happened, I changed my plan and decided to hold a silent auction for the chair set with the goal of giving all proceeds to Grady’s All-Stars which raises money for Bartters Syndrome. I am proud of my students for their hard work and plan to continue this program.
The students who built this set are Wood Working II students. Next year we are adding another section of the course and my goal is to make three total sets that we will auction off. Each class will make a full set rather than each class working on one chair.


June 13, 2014
Sears Now Carries Ebony – A Customer Service Blunder
 I recently received an email from David that really made me laugh, so I thought I’d share it with you. Apparently Dave has his eye on a pre-made butcher block work surface available from Sears (pictured left). A great way to jump-start a workbench build.
 Like any self-respecting woodworker, he wanted to know what species the butcher block is made from. It’s clearly hard to tell just from the image so he used the handy online customer service tool to ask his question. Here’s a transcript of the conversation:
Info: Please wait for a Sears Tool Crew member to respond.
Info: Thank you for contacting the Sears Tool Crew! My name is Campbell and it’s my pleasure to help you today.
David: What kind of wood is this made of? Craftsman Butcher Block Work Surface
Campbell: Sure, let me check the information for you.
Campbell: David, we do not have this information in our resources and I will check with our product support to know the exact information on this.
David: ok. Thanks. It makes a big difference in work surfaces
Campbell: While I check the information for you, may I know how are you doing today?
David: All is good here. Thanks.
Campbell: I am checking the information with our product support and now I am connected with my product expert.
Campbell: David, I checked with our product support and this wood is made of African Ebony hardwood and this is the best quality which we sell online.
Campbell: Are there any other questions I can assist you with today?
David: Well…that answer is plainly incorrect. Sorry. The product expert is wrong at best.
David: Ebony is black in color. It also costs an exorbitant amount, like $45 for one piece 1″ x 2″ x 24″.
David: A full bench top this size, beyond being black, would cost thousands.
Campbell: Just a moment, David.
Campbell: David, this is not the African ebony that is used to manufacture the expensive furnitures. This is the degraded ones which is used to prepare blocks and is referred to as Ebony hard wood.
David: Have a good day.
Campbell: Just a moment.
Campbell: This unit is also polished with Woodgrain color.
David: :) OK. Thanks. Have a good day
Campbell: You are welcome.
Campbell: May I help you in any other way today?
David: Nope. Bye.
OK so this really isn’t too surprising as we’ve all had our share of crappy overseas customer service. It’s really a shame but I think this is about par for the course. When you actually do get decent customer service, it’s always a pleasant surprise. So while this isn’t all that unusual (and we mean no disrespect to Sears), it’s pretty funny to a woodworker. It’s a little like going to a Toyota dealer and being told that the red Corolla in the showroom is a Ferrari. Funny stuff!
Now if you’ll excuse me, I need to go polish my Morris Chair with some “woodgrain color.”
June 12, 2014
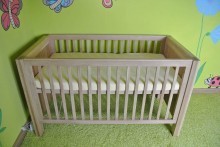
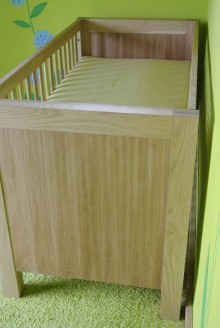
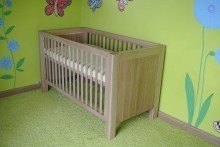
James’ Oak Cot
By: James Rimell (Prague - Czech Republic)
Experience: 0-2 Years
Woodworker Type: Hobbyist
Project Type: Cribs & Cradles
Material(s): Solid Wood
Finish Type(s): Waterborne, Wax
Finishing Technique(s): Wiping
This was my first large furniture build. I’ve made small tables, but nothing of this size. It was inspired firstly by wanting to do something for my upcoming child, but mainly because to buy anything remotely similar would cost upwards of 700 Euros. I did not want her to be enclosed in a Swedish manufacturer’s generic frame.
The Design:
Wearing my creative hat and spending some time on Google images, I fired up Sketchup and got the basic design sorted. This process also allowed me to play virtually with the pieces to determine joint and connection strategy. Then there were a few more weeks of Googling to work out what regulations actually apply to cots! For anyone interested, apparently American, Australian, British and European infants are all different sizes since the regulations for each country concerning various sizes/ratios are all different! Finally pacifying my conscious that I was not creating a potential deathtrap, a few sizing adjustments were made to the build and I was ready to go.
The Build:
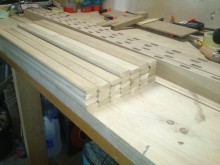
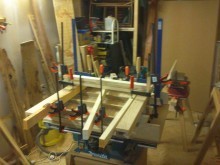
I decided on a much chunkier design than originally planned, so it was off to the timber merchants to supplement the already purchased material with about 200% extra oak. All stock was bought as rough sawn planks and I was lucky that they allowed me to sort through the stacks to get what I wanted.
The veneered end panels, of which there are four (inside and outside), took one of the longest—the veneers where cut from 60mm thick stock on a table saw (I do not have a bandsaw) and bookmatched when glued—the learning here was to stop curling on gluing, I actually needed 2mm veneers, not my originally planned 3mm. Fortunately, I worked this out on the first ‘test’ panel.
For the mortises in the rails that received the bars, I created a simple jig which worked well since I had no play at all since these are visible.
The only midway design change was the addition of the 15mm replaceable ‘chew’ bars to the top rails of the sides. Since this actually added to the depth of the cot, there was no issue. I had not drilled the bolt holes for the sides at that point, so I could easily adjust.
The Finish:
Sanding, lots of sanding – I had made the rounded sides of the bars with a top and bottom pass of a quarter inch round-over bit which left a very small lip at the joint. I didn’t want to sand beforehand in case I created a gap at the mortice ends, so I ended up sanding in a very awkward position once the sides where assembled.
The Lessons Learned:
Watch a lot more of The Wood Whisperer—it is the little things you pick up that make the difference…like using copious amounts of blue/masking tape instead of clamps, and the use of grease-proof paper as a glue barrier to aid in paneling/veneering.
What I would do differently:
Buy a rounded bull nose router bit—sanding down all the slight lips of the bars from two passes of a round-over bit is not fun!
Put shoulders on the rails so tenon fit does not need to be so perfect and tight all the way around.
Take more photos during the build!

June 11, 2014
Andre’s Poppy’s Urn
By: Andre Skanes (Ottawa, ON, Canada)
Experience: 5-10 Years
Woodworker Type: Hobbyist
Material(s): Solid Wood
Finish Type(s): Oil/Varnish Blend
Finishing Technique(s): Wiping
A couple of years ago my grandfather (and patriarch of the family) passed away. We had the funeral in Sudbury, Ontario where most of the family lived, but Poppy wanted to be buried in Newfoundland, where he’s from originally. The family decided that the burial would be the following summer to give as many of us as possible the chance to go. I was shocked and honored when asked if I would be willing to build his burial urn.
I decided that I would not tell the family about the design I was going to use, both so it could be a surprise to them and also because we have a BIG family and I didn’t want dozens of (well meaning) suggestions coming my way. Although it didn’t take long for my wife and I to start throwing some ideas around about how we wanted it to look.
I wanted to honour my grandfather for who he was. It took months of design work and 4 prototypes, but I finally decided that this design was the best way I could think to do that.
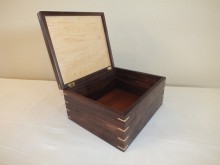
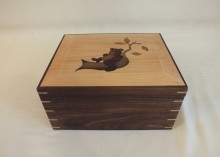
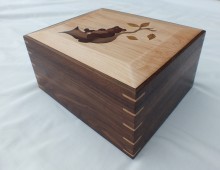
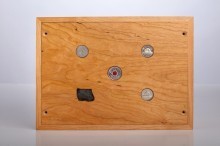
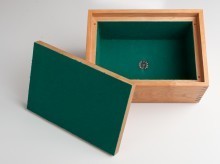
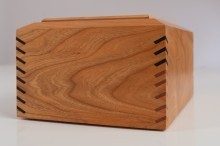
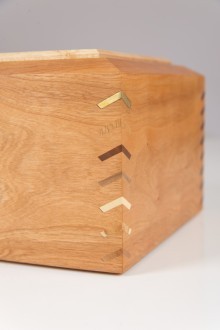
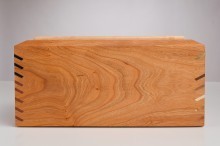
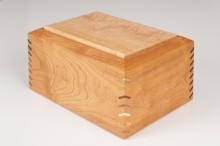
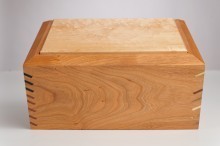
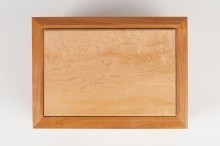
The box is made of black cherry, choke cherry being one of the only hardwoods native to Newfoundland (but not very good for building with). The top is birds eye maple, a popular wood for pool cues (my grandfather was a VERY good player). To symbolize his family, I put one spline in the corners for each of his children, grandchildren and great-grandchildren. The splines for his 7 children are: brass, walnut, red oak, willow, holly, apple and iron wood. Each of these representing something that makes them who they are. The splines for his grandchildren are ebony heart wood and his great-grandchildren are ebony sap wood. I chose this because I wanted to use the same type of wood for both and needed something with a striking colour difference.
I lined the inside of the box with actual pool table felt donated from his favorite pool hall in Sudbury. In the bottom I inlayed 3 nickles (Poppy was a nickle miner in Sudbury) showing the year of his birth, the year the family moved from Newfoundland to Ontario and the year of his death. I also inlayed a piece of slag from the nickle mine in Sudbury where he had worked. The last thing I inlayed in the bottom is a Veteran’s Memorial Quarter to represent his time in our Armed Forces.
I spent hours picking through the stacks at my local lumber yard to find just the right boards and my hands were almost shaking when it came time to make the first cut. The finish is a simple wipe-on varnish blend (thanks for the recipe Marc!!) and wax over that. I also put the box outside to tan a bit for a few weeks before we left for Newfoundland (I wanted the cherry to be as dark as possible).
The reactions from my family when they saw it ranged from stunned silence to great sobs and tears. Everyone thought it was a perfect way to honour the central figure of our family. This is definitely my proudest project and I thank my family for giving me the chance to make it.
Andre’s Poppy`s Urn
By: Andre Skanes (Ottawa, ON, Canada)
Experience: 5-10 Years
Woodworker Type: Hobbyist
Material(s): Solid Wood
Finish Type(s): Oil/Varnish Blend
Finishing Technique(s): Wiping
A couple of years ago my grandfather (and patriarch of the family) passed away. We had the funeral in Sudbury, Ontario where most of the family lived, but Poppy wanted to be buried in Newfoundland, where he`s from originally. The family decided that the burial would be the following summer to give as many of us as possible the chance to go. I was shocked and honored when asked if I would be willing to build his burial urn.
I decided that I would not tell the family about the design I was going to use, both so it could be a surprise to them and also because we have a BIG family and I didn’t want dozens of (well meaning) suggestions coming my way. Although it didn’t take long for my wife and I to start throwing some ideas around about how we wanted it to look.
I wanted to honour my grandfather for who he was. It took months of design work and 4 prototypes, but I finally decided that this design was the best way I could think to do that.
The box is made of black cherry, choke cherry being one of the only hardwoods native to Newfoundland (but not very good for building with). The top is birds eye maple, a popular wood for pool cues (my grandfather was a VERY good player). To symbolize his family, I put one spline in the corners for each of his children, grandchildren and great-grandchildren. The splines for his 7 children are: brass, walnut, red oak, willow, holly, apple and iron wood. Each of these representing something that makes them who they are. The splines for his grandchildren are ebony heart wood and his great-grandchildren are ebony sap wood. I chose this because I wanted to use the same type of wood for both and needed something with a striking colour difference.
I lined the inside of the box with actual pool table felt donated from his favorite pool hall in Sudbury. In the bottom I inlayed 3 nickles (Poppy was a nickle miner in Sudbury) showing the year of his birth, the year the family moved from Newfoundland to Ontario and the year of his death. I also inlayed a piece of slag from the nickle mine in Sudbury where he had worked. The last thing I inlayed in the bottom is a Veteran’s Memorial Quarter to represent his time in our Armed Forces.
I spent hours picking through the stacks at my local lumber yard to find just the right boards and my hands were almost shaking when it came time to make the first cut. The finish is a simple wipe-on varnish blend (thanks for the recipe Marc!!) and wax over that. I also put the box outside to tan a bit for a few weeks before we left for Newfoundland (I wanted the cherry to be as dark as possible).
The reactions from my family when they saw it ranged from stunned silence to great sobs and tears. Everyone thought it was a perfect way to honour the central figure of our family. This is definitely my proudest project and I thank my family for giving me the chance to make it.
June 10, 2014
Poll: How Often Do You Calibrate Your Table Saw?
Wouldn’t it be great if all woodworking tools needed absolutely no maintenance? I mean, you uncrate your table saw, unwrap your new set of chisels, grab that sweet dovetail saw and head right out into the shop to achieve perfect results.
Yeah, keep dreaming.
 Just about every tool in your shop can benefit from a little TLC from time to time. Whether it’s sharpening, cleaning pitch off your blades or waxing table tops, there are a ton of easy maintenance jobs that take very little time and aren’t all that involved.
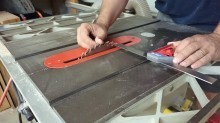
Then, there are those projects that take a little bit more time, are a tad more involved and aren’t as easy as those other, more simple ones. One that would fall into this category would be aligning your table saw.
So, how frequently do you align your table saw? Every week? Every blue moon? Are these things adjustable?
How frequently do you align your table saw (rip fence, blade, etc.)?
June 6, 2014
221 – TWW Live: Are You a Maker or a Woodworker?
Welcome to the first in a new series of live shows called TWW Live! The latest news, reviews, and your projects and questions.
Giveaways
- Last Month’s Winners: Janet B. (Festool CT36 Vac and ETS150 Sander) and Brian R. (3M Safety Bundle)
- This Month’s Giveaway (Enter Now!):
Arbortech Mini Grinder
Fuji Mini-Mite 3 HVLP Turbine
News/Announcements
- The Great Bessey/Lowes Feeding Frenzy of 2014: Ryan Royal gets the “no-prize.” He picked up $1032 worth of clamps for just $200!
Featured Project
- Anna’s Hope Chest by Steve Boudreau
- Submit Your Project
Kickback
- Chuck Hampton wonders if we need another video series that shows projects and answers questions.
- Chris is trying to decide if he’s a Maker or a Woodworker, after reading this Nerdist article.
- Ashley has some insightful thoughts about what makes a Maker a Maker.
In Case you Missed It
- Bill Doran – Leatherman Pouch
- Adam Savage – Why We Make
Gear Up!
- Check out the new SENCO FinishPro 21LXP, a 21 gauge brad nailer.
Learnin’ Time
- David Marks Season V of Woodworks
In the Shop
- A beautiful jewelry box collaboration project with Gary Rogowski.
- Bending forms for the Morris Chair.
Q&A
- WatchingDragon – “How do you cut wood for a wooden tankard with only hand tools?”
- Jonathan – “When burning wood scraps, are there any types that are dangerous?”
- Eric – “Suggestions for a good cheap readily-available wood for a beginning woodworker?
- Matt – “Have you ever had the problem that you spend the majority of time building things for the shop?”
- JayC – “Any suggestions for finishes for children’s toys?”
Tune in to the next show on Wednesday, July 2nd at 1pm Eastern!
June 5, 2014
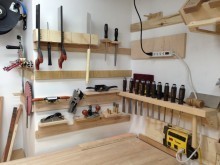
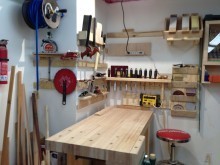
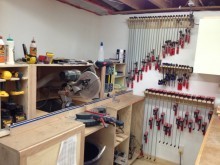
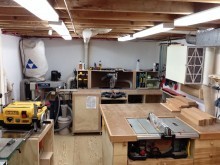
Marcel’s Basement Shop
From: Marcel (Ottawa, Ontario)
Shop Type: Basements
Shop Size: 250-499
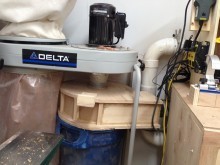
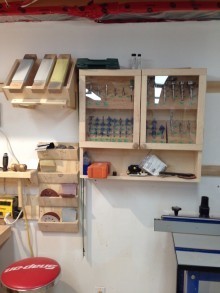
I’m really happy with how my shop turned out and there’s not much I’d change about it. Being a small shop and in the basement, my thinking was it needed to be well-organized and provide decent dust collection. Since my basement floor was very unlevel (3.5inch across 10 feet) I started by building a plywood sub floor to level it out. A very nice benefit is the added comfort vs. walking around on a concrete slab during long sessions.
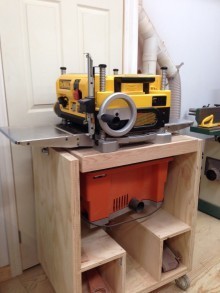
The middle of my shop consists of my table saw housed in a torsion box table. It functions perfectly as my out feed table as well as a good assembly and finishing spot. My miter saw station takes most of the far wall and has a semi circle dust shoot which does a great job at catching the dust. My woodworking table was built from a few extra boxes of ¾ inch maple flooring. After using my bandsaw to remove the finish from the flooring I was able to laminate the the boards together to build a strong heavy top. My 13″ Dewalt planer shares a swivel top table with my Rigid oscillating sander. This is a great space saver for small shops since you don’t often have to switch between them during a build.
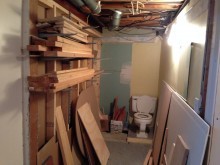
I was also able to cannibalize a bathroom right beside my shop for my wood storage needs. The only thing left from the bathroom is the toilet which is perfect to keep me from tracking more dust upstairs—when you have to go you have to go. It also gets a few laughs when people visit my shop.
June 4, 2014
TWW Live!
So what are you doing this Friday at 1pm Eastern? If you don’t have plans already, you do now! Join us for the first in a new series of LIVE shows called TWW Live. The show will be a fast-paced look at the latest news and content from the woodworking world. We’ll also dabble in some quick book, DVD and tool reviews. But the most important feature of this new show is YOU. We’ll be highlighting some of our favorite work from the community as well as answering your questions. All in glorious LIVE HD video. It should be a blast!
Some of our friends who’ve been with us since 2006 probably remember the old Wednesday Chat nights. Nicole would play music and we’d all sit in the TWW chat room and shoot the breeze. We like to think of this new monthly event as the 2014 version of the old Wednesday chat.
Of course, the format of the show may change over time based on your feedback and we’d love to hear your thoughts right now. Obviously, you haven’t seen the show yet but I’d love to hear what things you’d like us to cover in a LIVE format like this. Feel free to leave a comment below.
Our plan is to do the show on the first Friday of each month. So join us for the first event:
Date: Friday, June 6th
Time: 1pm Eastern
Where: YouTube or TWW Live Page
For those that can’t make it, the event will be recorded, edited, and available for download after the fact. And for Guild members who might be wondering, this new live event has no impact on our regular monthly live Demos. Those will still occur as per usual.
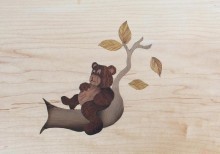
Bear Inlay Keepsake Box
By: Brian Benham (Elbert, CO)
Experience: 10+ Years
Woodworker Type: Professional
Project Type: Boxes
Material(s): Plywood, Solid Wood, Veneer
Finish Type(s): Lacquer, Oil, Shellac
Finishing Technique(s): HVLP
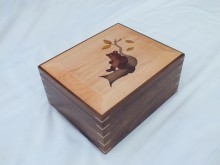
This keepsake box was made for a special girl who passed away from epilepsy earlier this year—just before her 4th birthday. The inspiration for the bear inlay came from her nickname “Claire Bear”, a nickname that quickly became popular around the hospital as all the doctors and nurses used it during her frequent visits.
To create the inlay I used a similar technique that Marc used in his Video #115 “Router Based Inlay”. I found his technique to work really well. The first few pieces took longer than expected, but as I continued I started to refine the technique and each piece went in better than the one before it. I suppose it’s like anything else, it just takes practice.
I used seven different woods on this project. For the box I used walnut. The top and mitered corner keys are made from hard maple. The tree is walnut, and the leaves are African Cerejeira. The bear’s legs, arms, and head are made of quarter sawn African Mahogany. The belly and face are made from quarter sawn African Makore, and the ears and eyes are European Pear Wood. The bottom of the box is Mahogany ply.
The finish is a three step combination of finishes. I first rubbed on a coat of Danish oil to bring out the colors of the woods used for the inlay. Then I sealed the oil with a coat of shellac. I didn’t want the inside of the box to have a strong chemical smell so I did two more coats of shellac on the inside. To give the outside of the box the sheen I wanted and a bit more durability, I sprayed on 3 coats of lacquer.
I created a time-lapse progress video of the inlay as I installed it, which you can find on my blog along with further details and progress photos of the box.
If anybody is interested in getting involved and helping kids with epilepsy, you can do so at www.clairehales.com where you will find links to the Doernbecher’s Children’s Hospital charity that helped Claire Bear as well as a link to help the family out directly with their medical bills, which accumulated over Claire’s life.