
Marc Spagnuolo's Blog, page 90
August 10, 2014
Poll: How Do You Cut Tenons?
Let’s build on last week’s poll! Salt and pepper. Laurel and Hardy. Macaroni and cheese. Some things are just natural partners. And, when it comes to woodworking, there are few partners as famous as the mortise and tenon.
 While cutting mortises presents its own challenges, cutting the tenon can be tricky as well. There are a ton of options from all machine to all hand to a hybrid approach. In this week’s poll, we want to know what your preferred tenon-cutting method is.
How do you cut tenons in your shop?


Help Me Find My Next Interview
 Zac here. After having such a great interview with Brian Timmons of Big T Woodworks, I’ve decided to go ahead and search out more talented woodworkers who are finding success with their side or main business.
I know that there are many great stories out there waiting to be told that I may not be aware of. In order to find the most interesting and talented people for interviews, I wanted to ask the woodworking community to help me out. With your suggestions, I’ll be able to connect with a wider variety of people and share some great inspirational interviews with everyone.
I’ve set up a simple submission form where you can enter a name, website/shop, and why I should interview them. I’ll be checking submissions regularly and setting up interviews as soon as possible.
So, if you’ve got a good suggestion for an interview, follow this link to the submission form.
Thanks for your help, and keep an eye out for more interviews coming soon!
August 4, 2014
Poll: How Do You Cut Mortises?
It’s one of those fundamental joints that nearly every woodworker has to master. The mortise and tenon joint has been around for millennia, and it is one of the hardest working joints out there. It holds stubbornly in chairs, tables, post and beam construction and a million and one other projects.
 Of course, the challenge is finding a way to cut the components in a manner that is fast, easy and accurate. So, this week, let’s focus on one half of the equation… the mortise. I’m sure we have all cut them several different ways, and maybe our preferences have changed over the years. But, for today, tell us what your current preferred method is to cut a mortise.
How do you cut mortises in your shop?
Jens’ Serenity Rocker
By: Jens Olson (Idaho)
Experience: 0-2 Years
Woodworker Type: Semi-Pro
Project Type: Chairs & Stools
Material(s): Solid Wood
Finish Type(s): Oil/Varnish Blend
Finishing Technique(s): Brushing
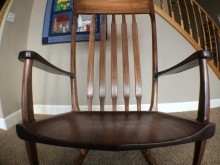
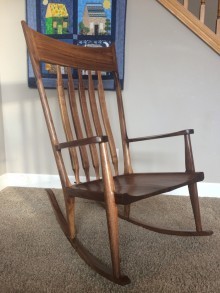
This project was first thought up by my father, David Olson, 30 years ago when he went to a Sam Maloof workshop and saw Sam’s Sculpted Rockers. He made a rocker back then while he was a full time furniture maker, but the bug of sculpted rockers stayed with him over the years. It finally came to a head last year when my father and I decided to re-open Olsons WoodWorks. First thing we did was buy a big CNC machine and then the two first projects on the docket where a sculpted rocker and a low back dining room chair (which he had been promising my mom for years).
We started off drawing up, or is it clicking up, a 3D mockup in Rhino (see photo). After the chair was modeled it was time to figure out how to actually cut/machine the chair. It probably took a month of prototyping to get the CNC accurately cutting out each of the parts. Some parts where easy to program, like the arms and the seat. For those it was just programing in the 3D contours and hit go. One prototype and they where ready. Other parts like the back legs proved to be much more challenging. Those parts took the most prototyping but also offered the most learning.
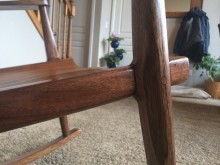
With a part like the back legs, we wanted to CNC the two legs nested in order to save wood and time. But it took time to figure out how to get the best finished surface and make sure they where held securely together so they could be flipped to do both sides. We ended up using a round over bit for the outsides of the legs and 3D carving the insides. This gave us reliable results, quick cut times, and didn’t compromise our design.
It takes us about a day and a half to get the lumber milled and cut on the CNC. After that we cut the Maloof joints on the back legs, using the table saw as there is no easy way to do the precise compound cuts on the CNC. Then a couple hours of final sanding and fitting and the chair is ready for assembly. Off the CNC, most parts are pretty clean and a little bit of 220 grit sandpaper on a random orbit sander is all that’s needed. Assembly was pretty easy we just took one joint at a time and drilled, screwed and plugged.
As for finishes, we used the traditional Maloof Oil/Poly and Oil/Wax, 3 coats of each with some light sanding in-between and that is it. It took us two months to get the design and the first one done, but we can now produce two a week.


Jens’ Serenity Rockler
By: Jens Olson (Idaho)
Experience: 0-2 Years
Woodworker Type: Semi-Pro
Project Type: Chairs & Stools
Material(s): Solid Wood
Finish Type(s): Oil/Varnish Blend
Finishing Technique(s): Brushing
This project was first thought up by my father, David Olson, 30 years ago when he went to a Sam Maloof workshop and saw Sam’s Sculpted Rockers. He made a rocker back then while he was a full time furniture maker, but the bug of sculpted rockers stayed with him over the years. It finally came to a head last year when my father and I decided to re-open Olsons WoodWorks. First thing we did was buy a big CNC machine and then the two first projects on the docket where a sculpted rocker and a low back dining room chair (which he had been promising my mom for years).
We started off drawing up, or is it clicking up, a 3D mockup in Rhino (see photo). After the chair was modeled it was time to figure out how to actually cut/machine the chair. It probably took a month of prototyping to get the CNC accurately cutting out each of the parts. Some parts where easy to program, like the arms and the seat. For those it was just programing in the 3D contours and hit go. One prototype and they where ready. Other parts like the back legs proved to be much more challenging. Those parts took the most prototyping but also offered the most learning.
With a part like the back legs, we wanted to CNC the two legs nested in order to save wood and time. But it took time to figure out how to get the best finished surface and make sure they where held securely together so they could be flipped to do both sides. We ended up using a round over bit for the outsides of the legs and 3D carving the insides. This gave us reliable results, quick cut times, and didn’t compromise our design.
It takes us about a day and a half to get the lumber milled and cut on the CNC. After that we cut the Maloof joints on the back legs, using the table saw as there is no easy way to do the precise compound cuts on the CNC. Then a couple hours of final sanding and fitting and the chair is ready for assembly. Off the CNC, most parts are pretty clean and a little bit of 220 grit sandpaper on a random orbit sander is all that’s needed. Assembly was pretty easy we just took one joint at a time and drilled, screwed and plugged.
As for finishes, we used the traditional Maloof Oil/Poly and Oil/Wax, 3 coats of each with some light sanding in-between and that is it. It took us two months to get the design and the first one done, but we can now produce two a week.
August 1, 2014
225 – TWW Live: Simple Woodworking & Photographing Your Work
- Last Month’s Winners: Noah Mudge (Powermatic Drill Press)
- This Month’s Giveaway (Enter Now!): Clear Vue CV1800 Cyclone
News/Announcements
- Check out our new store!
- New SketchUp Viewer launches for iOS and Android and is priced at $9.99.
Featured Project
- Margie’s Great Auk Kayak
- Submit Your Project
Kickback
- Some kind and thoughtful works from Steve Jordan.
In Case you Missed It
- Vet can’t build projects for military families due to HOA restrictions.
- Steve Carmichael at Carmichael Workshop – Whac-A-Woodworker
Laney Shaunessy’s video on the Whirligig Wars:
- Instructables Woodworking Projects for Beginners (sent in by Eric)
Gear Up!
- My recommendations for a basic woodworking kit: Plunge Router, 6″ ROS, Drill, Jigsaw, Circular Saw, Chisels, and general purpose Hand Saw.
Demo
- How to make your own track for a circular saw.
Reviews
- Ridiculously Simple Furniture Projects by Spike Carlsen
In the Shop
- A close look at the setup I use for photographing my work.
- Imact Background Drives
- Impact Hooks
- Savage 107” Beige Paper Roll
- Steve Kaeser Lighting
Q&A
- @JCRoupp – Once the learning curve is over, are hand cut dovetails just as easy and fast as a jig?
- mattty38 – How do you deal with insects in your shop, especially when finishing?
- Matthew S – Can I handle rough lumber without a planer or jointer?
- Aaron – I’m thinking about buying a turbine sprayer. I’m wondering if I should pay a little more for the extra air pressure option like your higher end model sprayer you have.
- Ozuma4688 – Do you put finish over a painted project. If so, what type of finish?
Tune in to the next show on September 5th at 1pm Eastern!
If you’d like to view the full unedited version of this TWW Live episode, you can watch it here.
July 31, 2014
David’s Super Mario Pixel by Pixel
By: David Picciuto (Toledo, OH)
Experience: 2-5 Years
Woodworker Type: Hobbyist
Project Type: Miscellaneous
Material(s): Solid Wood
Finish Type(s): Oil/Varnish Blend
Finishing Technique(s): Wiping
Super Mario wall hanging made out of leopardwood, maple, walnut and red oak. 170 total pixels, each 1″ x 1″ with a 45 degree bevel on all four sides to add depth and attention to every piece.
Project is mounted on red oak plywood and framed with walnut. I finished it with a blend of boiled linseed oil and polyurethane.


July 30, 2014
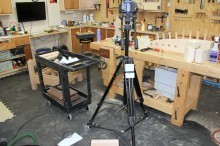
Why is Your Shop So Clean?
Whenever I post a picture of my shop, I get more than a few comments about how clean the space is. Most of them say something like, “Way too clean!” or “You must not do any woodworking!” or “A real wood shop is never that clean!” I also see these comments come in on other people’s Shop Tours just because the shop owner thought it prudent to run the shop vac before snapping a few pictures for the world to see. While I think this sort of commentary is just harmless woodworker banter, I thought it would be a good discussion topic to dig into.
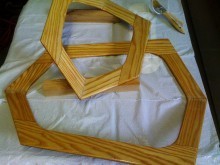
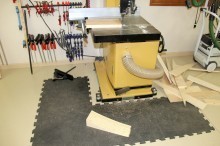 First thing’s first: my shop isn’t as clean as you might think it is! Like anyone else’s shop, every phase of a project brings with it a new mess. I made a few plywood bending forms recently and between cutting at the bandsaw, flush-trimming at the workbench, and drilling at the drill press, there’s plenty of dust and debris on the floor. But whenever taking photos for the website or my social media pages, I try not to focus on the mess. Instead, I keep the camera up high allowing the eye to focus on the object of the photo. I hope I’m not wrong in assuming that folks want to see the actual work being done and not the garbage on the floor. If we start judging the quality of our work by the mess we leave behind, I think I can start calling my 2-yr old son a “master craftsman” whose medium of choice is milk and Goldfish.
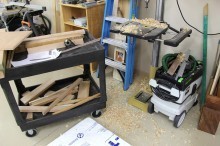
Of course I realize that “messy” is a very subjective concept and many of you will look at my pictures above and laugh. Using my best Crocodile Dundee voice: “That’s not a mess….. THAT’S a mess!” But there are a few good reasons why my version of a mess really isn’t all that messy and why my shop is typically cleaner than most.
I’m a Neat-Freak
My desk is usually clutter-free. My comic books are arranged in nice little stacks. I only wear one color and brand of socks. I never have more than a few icons on my computer desktop. I have a very specific burger to fry ratio. Simply put, my shop is an extension of my personality. Your shop is likely an extension of your personality as well, for better or for worse. Some people may feel right at home in a messy or dirty environment and I’d never begrudge that. For me, I find a messy space incredibly stifling to my creativity and motivation. There’s just something about walking into a nice clean and organized shop that gets me amped up to create and build.
Of course my penchant for cleanliness can only go so far with a 2-yr old in the house. It takes about 5 minutes for it to look like a hurricane ripped through our living room. But the shop is “Daddy’s playroom” and I have complete control over its appearance and condition. It’s comforting to know that the shop will always be in the exact state I left it.
I Had A Master Plan
I’m sure most of you remember the video showing how the shop was built. I was incredibly fortunate to build my shop from the ground up for one singular purpose: to support woodworking and videography. As a result, I have sufficient dust collection, power where I need it, ample space for spreading out projects, and proper storage for tools, finishes, and lumber. While things aren’t perfect and I still have a lot of organization and storage options to work on, the space functions very efficiently in its current state. If you ever have the opportunity to design a shop space from scratch, I guarantee you’ll end up with a cleaner and more organized space. If you don’t, you may have done something wrong.


It’s a Studio Too!
Everything I do in the shop is documented, either with still photos or video. That means I have very expensive equipment that isn’t exactly happy in a dusty environment. The less dust in the shop, the longer my gear lasts. Also, I am constantly moving a rolling tripod around from one shot to another. Leaving scraps laying all over the floor is a great way to end up tipping over the camera.
Safety First!
I practically live in my shop. I probably spend as much time there as I do in my home. I hope to do this woodworking thing for a long time so I’d rather not force myself to breathe any more dusty air than I have to, especially since I often have to remove my respirator to talk on-camera right after making cuts. So good dust collection is an absolute must and a clutter-free space is much easier to clean with a vacuum. I’m also much less likely to trip and fall on my face.
I Have an Arlie!
The final reason why my shop is so clean is something of a a luxury. My step-dad Arlie really enjoys cleaning and I pay him a few bucks to vacuum once a week. I don’t always have the time to clean the shop to my liking and having Arlie come through with the shop vac is really what makes the shop the clean, neat, and organized space I need it to be. If you don’t have an Arlie, I highly recommend getting one. They’re so choice!
A Few Tips
The thing to keep in mind here is that there are two things that comprise a messy shop: dust/shavings and clutter. Those are the two things you need to evaluate when trying to figure out how to keep a cleaner shop. For dust, the solutions are easier said than done since they usually involve extra labor and equipment. I can’t just say, “Get a ClearVue” since that may not be in your budget or you may not have the space. But you should at least try to work up to a dust collection system of some sort. Put a cyclone separator in front of it and collect the dust at the source. Connect your small portable power tools to a shop vac and be sure to use a filter bag. Otherwise, that dust will just clog up the pleated filter and shorten the life of your vac. Also, don’t be shy about running the shop vac daily. Try to get into the habit of running it for a few minutes at the end of every day. Yes, I know you’re tired, but investing a few minutes cleaning while you’re already dirty and sweaty is much better than walking into a dirty environment the next morning when you’re freshly-showered and ready to start your day.
As far as clutter is concerned, you just need to get a little more organized. Consider building a tool cabinet to store all of your tools in a small compact space. Build some decent lumber storage so your materials stay off the floor. And don’t forget the old “ten-things” trick. At the end of every shop day (before you vacuum), simply put ten things away. It doesn’t matter what they are, a screwdriver, a drill, a jig, a can of finish, anything goes. Just put ten things away at the end of the day and you’ll find your space will be much less cluttered.
I would never imply that my method of work and personal preferences are right for everyone. I’m only offering this article as a bit of an explanation for why my space looks the way it does and it gives me something to link to when the inevitable shop-cleanliness comments come in. The advice here is intended to help folks who feel they might benefit from a cleaner and more organized space, not to convince people they need to be clean. So if you’re happily disorganized and dirty, all the power to you! There’s nothing that says you can’t be incredibly creative and productive in a messy environment. I just can’t.
July 28, 2014
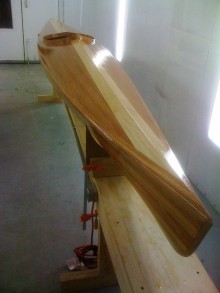
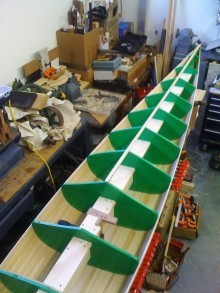
Margie’s Great Auk Kayak
By: Omar M. Rashash (Hampstead, NC)
Experience: 10+ Years
Woodworker Type: Semi-Pro
Material(s): Solid Wood
Finish Type(s): Oil/Varnish Blend
Finishing Technique(s): HVLP
All projects have a beginning…
This project began three years ago at the 10th Annual Cape Fear Community College (CFCC) Boat Show. Margie had a Goldilocks moment when she sat in Steve Garret’s Great Auk at that boat show—it was just right. She suggested to Omar that building her a Great Auk would be a perfect project for him since he was beginning the CFCC Wood Boat Building Program. The boat building program at CFCC is one of only a handful of full-time programs in the country.
The station molds were purchased in December’09, materials were gathered to build the strong back, and the strips for the boat were milled in the shop at the school. The first strip to build the boat was applied to the molds on June 19, 2010.
The hull was completed July 5th; the deck on July 23rd; and the unfinished boat was displayed at the 2010 CFCC Annual Wooden Boat Show.
The boat was sanded then fiberglass applied in the school shop early Fall 2010, then displayed at the Georgetown Wooden Boat Show.
The project was put on hold until March 2011. More epoxy was applied; the coaming for the cockpit installed; and deck fittings designed, manufactured, and installed. Then more sanding and epoxy. The almost finished boat was displayed in May at the Beaufort Wooden Boat Show, winning an award for the “Best Up-and-Coming Boatbuilder”.
Once again back in the shop, additional fiberglass was added as reinforcement to the bottom of the hull for Margie’s hard landings on shells and rocks. Hatches were cut, then their frames and hold-downs manufactured and installed. The boat was wet-sanded up through 320 grit then sent out to clear coat on July 15th.
The fully outfitted boat had her inaugural launch July 2, 2011 in Wrightsville Sound. The boat was displayed at the 2011 Southport Wooden Boat Show and won for “Best Non-Power Row/Paddle.”
This kayak was built from plans and is a Nick Schade design. It has a hull made from bead and cove strips of Atlantic White Cedar (Juniper) and the deck is stripped in African Mahogany and White Ash. The hardwood strips were applied to the deck in the order they were cut from the plank. The kayak is a composite structure encased in fiberglass cloth and epoxy resin with 6 oz. cloth on the interior and 4 oz. cloth on the exterior. No metal staples or fasteners were used in construction and the ready to paddle weight is 48 lbs. It has an overall length of 17’ and the beam is 24”.


July 24, 2014
Brian’s Cherry Sideboard
By: Brian McKnight (Mastic, NY)
Experience: 5-10 Years
Woodworker Type: Hobbyist
Project Type: Cabinetry
Material(s): MDF, Plywood, Solid Wood
Finish Type(s): Oil/Varnish Blend
Finishing Technique(s): Wiping
This project was my first attempt at a sideboard. I based it loosely on one built by Garrett Hack.
I kept it pretty simple using frame and panel construction. The joinery was also kept simple. I used the dowel max for all joint construction. This tool proved to be very accurate and easy to use. A hand plane was used to make the under bevel on the top.
Cherry was my choice of wood for this project. Inner parts were constructed of maple plywood. Soft close drawer slides, stainless steel knife hinges, drawer pulls, and knobs were incorporated into this build. This was my first project completed since Super Storm Sandy. Luckily I didn’t suffer the damage that some of my local Long Islanders did, but it did take the wind out of my sails. Its good to be back on track again. On to the next!!


