Marc Spagnuolo's Blog, page 87
October 5, 2014
Poll: Shortcut Joinery and “Real” Woodworking
Here’s a great philosophical one for today. Classic wooden joints have been around for millennia. Dovetails and mortise and tenon joints were used by ancient Egyptian woodworkers back in the time of the pharaohs.
 Until recently in the craft, flawlessly executing those joints has been the hallmark of a truly talented woodworker. But as time has passed, many new joinery methods have been developed to help shorten the learning curve for new woodworkers. Dowel joints, biscuits, pocket screws, the Festool Domino and other joinery methods have allowed woodworkers of many different ability levels to build beautiful furniture without mastering the classic joints.
This week, do you believe that a true craftsperson can use these joinery methods and still be called a ‘true’ woodworker? Should it even matter?
Do ‘real’ woodworkers use dowels, biscuits, pocket screws and Festool dominoes?


October 3, 2014
TWW Live 05 – Hot Dog Sauce
Last month, James Henderson won a Powermatic 15” Bandsaw! Congrats James. This month, you can enter to win a Festool CT36 plus Boom Arm! Enter today!
News & Announcements
– Woodworkers Fighting Cancer 2014 benefiting Cancer Research Institute. Keep an eye out for the Powermatic Drill Press auction! Keep up with the latest at WoodworkersFightingCancer.com!
– Get your WFC charity T-shirt and Mug!
– A special thank-you goes out to David Piccuito and his fiance Kelly at DrunkenWoodworker.com!
– Bangle Bowl Submissions! – Through Oct. 22nd
– Matt’s Basement Workshop Patreon Campaign
– Glen Huey, Chuck Bender, and Bob Lang are leaving Popular Woodworking. Calm down everyone!
Featured Viewer Project
– Roger Garza’s Small Folk Harp
– Submit YOUR Project
In Case You Missed It
– Highland Woodworker Episode 14
Gear Up!
– Benchcrafted Leg Vise Upgrade
– Powermatic Drill Press
In the Shop
– A preview of the charity toy box build.
Live Q&A
– Daniel Taylor – “For a woodworker new to building furniture, would you suggest starting with plywood or solid lumber projects?”
– Sarina Flores – “How do you feel about using designs from stores like Pottery Barn and Crate & Barrel as inspiration?”
– Todd Sparger – “Have you been happy with the rubber floor tiles you are using in your shop as far as being able to roll heavy tools around on it?”
– tranceformer110 – “Marc, what is your opinion of diamond plates for sharpening. Thinking about get some DMT plates since they are on sale at woodcraft.”
– Cactus Chris Makes – “Are those the floor tiles they sell at Woodworker’s Source?”
– RJsumthn – “Have you ever used colored or tinted wax when finishing a project?”
– RookieMistakes0607 – “Can you sharpen bandsaw blades? or would you just replace when they get dull?”
TWW Live Today at 1pm Eastern!
Today at 1pm Eastern/10am Pacific, we’ll be hosting another great TWW Live session!
On Today’s Show!
Woodworkers Fighting Cancer announcements, breaking news from around the Woodworking World, the featured viewer project, a look at a few new tools (the latest Benchcrafted Leg Vise hardware and Powermatic’s new Bandsaw), a sneak peak at the upcoming charity build, and of course a live Q&A session. We’ll close the show with a demonstration of simple shop-made mortising jigs.
Win a Guild Membership!
As if that weren’t enough, we’re also starting a new tradition. At the end of each show we’ll be giving away a Guild membership. In order to win, you’ll need to participate in the discussion either on the YouTube live page or our own Live Page. Nicole picks the winner and she can’t choose your name if you’re not participating in the discussion, so don’t be shy!
How to Watch
Check us out on the Live Page or on Youtube!
Or if you just want to enjoy the show and not participate, you can always watch below:
September 30, 2014
Jason’s 1920’s Inspired Frame
By: Jason Jones (Dallas, TX)
Experience: 0-2 Years
Woodworker Type: Hobbyist
Project Type: Frames
Material(s): Solid Wood
Finish Type(s): Oil
Finishing Technique(s): Wiping
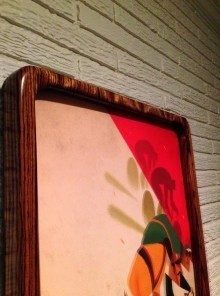
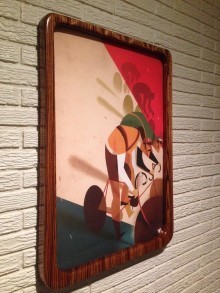
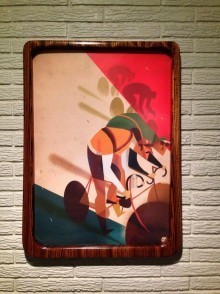
Sometimes we see that special something that just inspires us. Such was the case for me with a certain poster. When not at my real job or working in the shop, I like to spend time outdoors cycling. Last year to commemorate the 100th anniversary of the Tour de France, a cycling company commissioned ten artists to each produce a limited edition poster that reflects their interpretation of each decade of the tour. I fell in love with the poster by Riccardo Guasco commemorating 1913-1923. The colors were so bold and the style so simple, yet sophisticated. I knew I needed to make something fitting in which to house it.
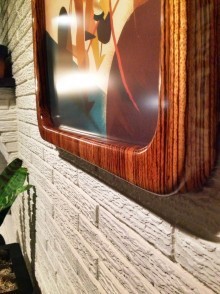
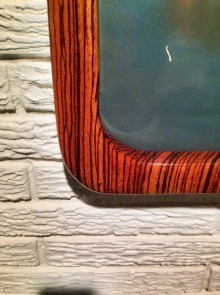
My design process began by researching both the architecture and furniture design used in that period. I was searching to find a balance between something that could stand in its own right and complement the piece, yet not distract from it. I settled on zebrawood for its prominence in high-end design at the time and its uniquely beautiful pattern. I wanted to design something as unique as the print itself. As I examined the print, I was drawn to the shape of the riders on their bikes, which I viewed as forming something akin to a trapezoid. I went through a number of iterations of designing a frame with a trapezoid outer shape with a standard rectangular inner shape. I was never quite satisfied with the balance. Then a spark went off, and I decided to make the top and bottom match the respective thickness of the side where they each met the side. I really liked the look, but it was a bit too harsh. Studying the picture again, I realized the curve of the wheels reduced the harshness of the trapezoid and made the form more organic. Once I incorporated curves along each of the edges, I knew I had my design complete.
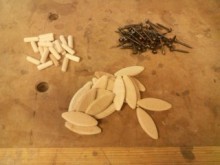
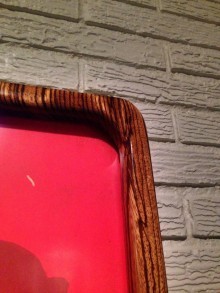
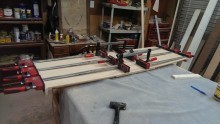
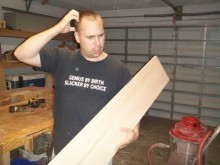
I spent considerable time trying to determine how to make the piece look natural despite the very contrived shape and distinctive grain pattern of the zebrawood. I decided it would be best to make the frame look as though it was a single piece of wood, with no apparent seams or changes in grain pattern to distract your eye. I needed to build the frame from one piece of lumber to ensure consistency in both color and grain pattern throughout. I spent hours drawing out on the board where each piece would come from and finding grain patterns that would match the piece where it was connecting. I cut the sides first because of the length of each one. After that I turned to the top and bottom pieces. To keep the grain direction consistent throughout the whole frame, the top and bottom pieces had to be cut from the width of the board, which was only about 4 1/2″ at that point. Both the top and the bottom of the frame ended up being made out of four pieces each that were joined together using mortise and tenon joinery. Thanks to the striped pattern of the wood, I was able to make almost every joint hard to discern.
For the finish, I chose Liberon Finishing Oil, with around 12 coats in total. Each coat was sanded in, which built a nice slurry that slowly filled the grain. Each coat sat for about ten minutes allowing the slurry in the pores to harden enough to not be removed when wiping the rest off. I used a single grain of sandpaper for each coat, beginning with 320 grit, working up to 4,000 grit.
I am pretty happy with how the piece turned out. I think it achieved my goal of being able to stand on its own and complement the print, yet not distract from it. I also treasure the piece as it was the first one I built in the shop at our new house.
September 29, 2014
Poll: Weekend Projects
 You see them in just about every woodworking book and magazine. The ‘weekend’ project – something that you should be able to plan out on a Friday and by Sunday you’re admiring your work. They SHOULD be quick and easy to accomplish right? But in today’s poll, let us know if you have ever been able to pull this feat off.
Have you ever been able to complete a ‘weekend project’ in just one weekend?
September 28, 2014
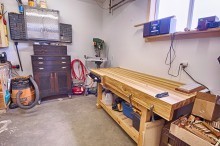
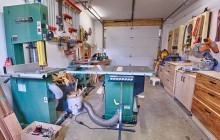
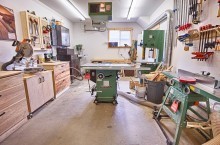
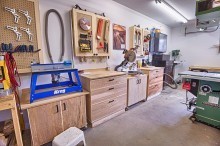
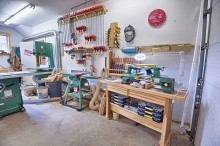
Michael’s Garage Workshop
From: Michael James (Edmonton, Alberta, Canada)
Shop Type: Garages
Shop Size: 250-499
In the summer of 2013, we demolished our very small single car garage and built a new two-car, two-story behemoth. The idea being that we had a place for our van, a permanent place for woodworking, and some extra needed storage. We put a partition wall up between the two sides to keep the dust off the vehicle while providing another wall for electrical and tools to go against.
Because we lived in an older neighbourhood, the power to the house was overhead—this became a problem with the new build so we ended up running the main line through the new garage and underground to the house. The benefit for me was having a brand new, full size panel in my shop where I could have as many breakers as I wanted. I have both 110v and 220v lines run and lots of room for more if I choose.
It’s a bit of a General showroom, but I’ve been very happy with the quality of their tools and have purchased both new and used. There’s built-in dust collection along the one wall. I’m still working out all the kinks in that and have realized I’m a bit under powered but it’s liveable. The DC is in a closet that was created by the staircase that goes to the second floor.
All my lumber storage is on the second floor. It could have been developed as a suite but to run plumbing to the detached garage would have been a large expense. Sheet goods are stored along the wall on the car side of the garage.
I’ve built most of the fixtures in there except for the drill press table. I just finished my first real bench—nothing fancy—so I thought I was done. What I’ve learned is that I’ll probably never be done completely. There’s always something to tweak or move or a tool you realize doesn’t need to be there so it will be replaced etc…etc…there’s always something to do.
This is my first real shop so I’m not sure there’s a ton of efficiency at each station but because it’s so small (25’ x 11’), it’s not that big of a deal. There’s a small garage heater that allows me to use the space in the cold Edmonton winters. It takes about 20 minutes to heat up the space from the 10C I keep it at to my working 18C-–not much time compared to the unheated garage I used to be in. That would take all day with the pathetic heaters I used to use.
September 25, 2014
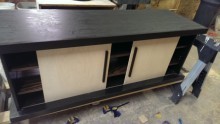
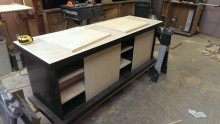
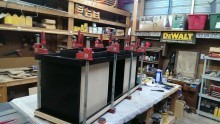
Jeremy’s Entertainment Center
By: Jeremy Paul Lovelace (San Antonio, TX)
Experience: 0-2 Years
Woodworker Type: Hobbyist
Project Type: Entertainment Centers
Material(s): Plywood, Solid Wood
Finish Type(s): Commercial Stain, Oil/Varnish Blend
Finishing Technique(s): Brushing
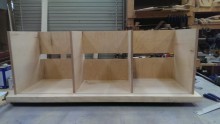
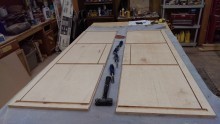
We have a 12′ wall in our living room, that served as our TV wall. Even with a 60″ TV, it still looked completely empty. I watched the ‘Low Entertainment Center’ set of videos for inspiration on this, and used the plans on the website, with a few modifications.
The height and length are the same as specified in the plans, but the width is about 4 inches more shallow, to fit better in the space we have. All joinery is the same as in the videos; dadoes, grooves, etc.
The top and bottom plates are 3/4″ Maple ply, as are the four interior dividers and base. The interior divider facing is 3/4″ Cherry, because that’s what I had laying around! The six shelves are 3/4″ Pine Ply, with pine facing. The bottom plate edging is 1×2 Pine. The top plate edging is 1×2 Maple. The doors are 1/4″ Maple, and the handles are Wenge.
This design lacks the 15 degree angle cuts, as called for in the plans. I decided to ‘square it’ all, for a more modern look. The different shades of brown, plus the maple, match the rug in the living room (or so my wife tells me).
The stain is Rustoleum Kona, applied the incorrect way. Two layers, that are brushed on, but not wiped off, to get the deep color. Two top coats of PolyAcrylic on top of that.
The wall shelves, which complete the ‘entertainment wall’ and encase the TV, are 3/4″ Birch, with the same stain and Poly. Each one has 12″ decking screws running through the entire width, and into the studs behind. The far right has movable shelves.


September 24, 2014
229 – Handy Glue Rollers
My recent Bow Arm Morris Chair project had me spreading glue like a mad man for the various bent laminations. It occurred to me that many of you may not be aware of how handy a decent glue roller can be. So I thought I’d take a few minutes to tell you about my preferred roller, where you can get it, and how it’s used.
Soon, you’ll be rolling glue like a mad man (or woman) too!
September 22, 2014
Poll: Tired Woodworking Debates
Paper or plastic? Aisle or window seat? Soup or salad?
When it comes to our everyday lives, there are lots of decisions to make, and there will always be people who will want to debate the merits of each choice. Some do it with great passion.
 In woodworking, there are lots of debates to be had as well including things like tool choice and work methods. Some of those debates are brought up time and time again. And again. And again! This week, what do you think is the most overdone ‘debate’ in woodworking? Is it even on this list, or do you know of others where the proverbial dead horse is beaten?
September 21, 2014
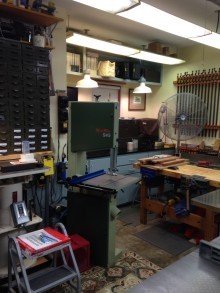
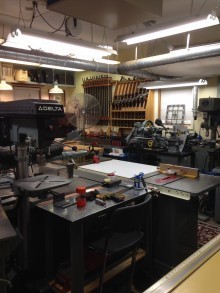
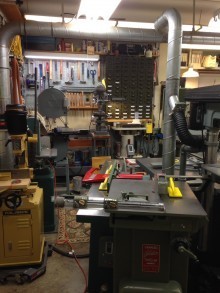
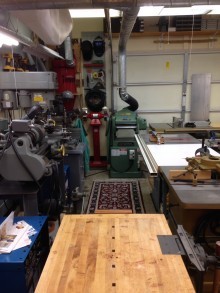
Eric’s Garage Workshop
From: Eric (Madison, MS)
Shop Type: Garages
Shop Size: 250-499
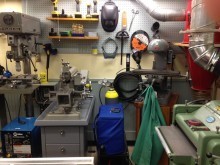
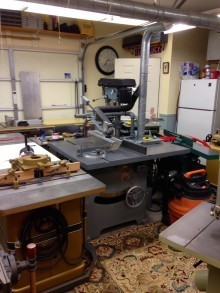
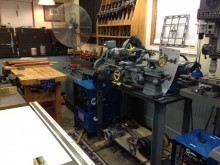
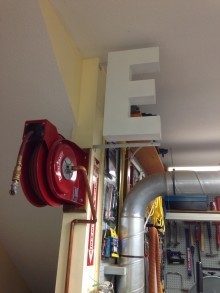
This is my small shop. It is 17’x 22’and is the third stall of my three car garage. I consider this my “machine room” where all milling and joinery operations occur. The other two stalls house additional machinery and the family car. I like to use oriental rugs as I can usually find them at Goodwill for a small cost. They are easy on the legs and hide lots of dust and occasional oil spills when doing metal working. I have both metalworking machines combined with woodworking machines which I would like to separate one day if a larger shop is in my future. I also have a couple welders as I have enjoyed mixing wood and steel together for my furniture projects. I use the space my family car is in for an assembly area. I mainly do stock preparation and welding in the other garage stalls.
All of my equipment has been collected over the years and was purchased very economically, finding them on Craiglist or at local auctions. The heart of the shop is a 16″Tannewitz table saw used mostly for joiner tasks. There is an Oliver 144 BD Jointer and a smaller Delta DJ-15 jointer. I have a General 130 Planer for finish work and a Powermatic 100 in the other garage for rough stock. There is a Powermatic Shaper, Max Spindle Sander, Minimax Band Saw, and other machinery shoehorned into this space. There are also several other dedicated table saws here, along with my favorite, a Hammond Sliding Trim o Saw. I put dust collection in a couple years back which is pretty effective. I also have compressed air and a rotary phase converter tucked under the stairs along with a vintage Delta scroll saw. Everything has been carefully placed and accommodates my project work flow. Hope you enjoy my work space.