
Marc Spagnuolo's Blog, page 85
November 10, 2014
November TWW Giveaway
 If you haven’t been keeping up with the giveaway announcements on Twitter and Facebook, let this be your heads up on what we are giving away in November! The great people over at Arbortech and Festool have given us some great tools to give away this month! First up is the newly released Arbortech Contour Sander: Check out this video to see this tool in action.
Festool is also back with an amazing tool combo to give away. This month you could win a TS55 Plunge-Cut Saw and CT 26 Dust Extractor. In addition to the TWW giveaway, Festool also has a giveaway and this month they are giving away a Festool Cordless T18 Drill + Cordless Carvex Jigsaw! So be sure to enter there as well!
How do I enter?
Head on over to the TWW Giveaway Page to learn more about Arbortech & Festool and enter to win. And be sure to bookmark the Giveaway Page so you can keep up with the latest giveaway details (because we do this every month! A new giveaway will start on December 1st!)
The winners notified directly & this post updated after they are randomly drawn at the beginning of the new month.
You can also check out all of our past giveaways and winners here.


Poll: Getting Shop-Blocked?
 Let’s face it, hanging out in the shop is fun. As woodworkers, we take the money other folks would spend on golf clubs, fishing tackle or bowling balls and blow it on miter saws, hand planes and cabinet scrapers. We could spend hours standing in the same place in our shop using a belt sander to flatten a poorly glued end-grain cutting board and actually enjoy it.
But as always seems to be the case, we never have enough shop time. All of those little obligations that we agreed to, or were thrust upon us by others, tend to soak up the time we would otherwise spend creating masterpieces in the shop.
So this week, we want to know what you consider to be the greatest obstacle to getting more shop time. Is it family? Work? Something else?
November 8, 2014
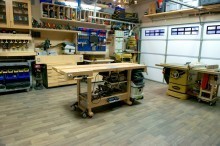
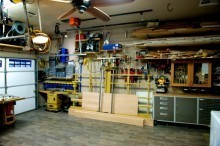
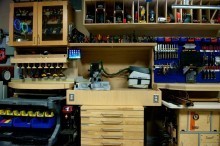
Rod’s Garage Woodshop
From: Rod Krouskup (Fresno, California)
Shop Type: Garages
Shop Size: 250-499
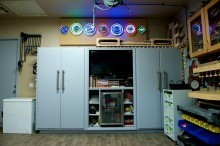
I’m a 35 yr old Corporate Banker by day with a wife and 3 small daughters who rule the roost at my house. Most evenings, after the girls are put to bed, I retreat to my garage to woodwork which is my only hobby/stress reliever. Two+ yrs ago I decided to clear out my 2-car garage and transform the space into a woodshop. At the time my only tools were a Bosch contractor table saw and miter saw and a couple cordless drills. So virtually every tool you see I acquired in the last 2 yrs. The garage had one dim light and one outlet with only a single receptacle. I started by adding substantial lighting and a 100amp sub panel. I’ve since added 40 additional outlets including 220v. Next I built the storage unit, mounted a TV and framed in a beverage frig. I then floated the concrete floor and installed laminate to provide some cushion.
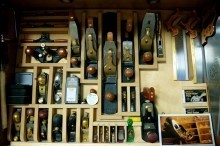
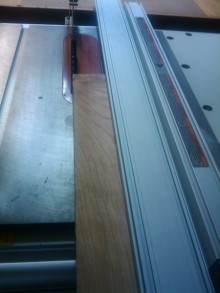
For large equipment I went with Powermatic table saw, band saw, and jointer & planer both with helical cutter heads. All on casters for mobility/storage in my small shop. Hand power tools are mostly Festool. The tool I am least proficient with is the hand plane and yet I absolutely love the history, beauty and feel of planes, so I built a display case for my Lie Nielsen and Veritas planes. In Fresno the heat reaches 110 most summers, so I put up a ceiling fan, insulated my garage panels, installed a whole house fan, and added ductwork for zoned A/C with an independent thermostat. I’m a novice at electrical but I tackled all the power/wiring myself on everything pertaining to the garage including the sub panel and wiring up my 240v Quincy reciprocating screw 80gl compressor & condensation dryer. Space is limited so I designed everything to roll up against the walls when not in use. My most ambitious project was cutting through drywall, 5 load bearing studs, and stucco to create a 5’x2′ hole in my exterior wall. I built temp wall/ceiling support to carry the load while I reframed the structural header support and built the recessed dust box which houses both my Kapex and Bosch Miter saws (I plan to hook the dust box up to my 5hp ClearView Cyclone dust collector but haven’t decided on a design for the duct system yet). The box is both for dust collection and frees up substantial shop space by allowing the saws to sit deep behind the original wall. The unit works in tandem with the floating outfeed tables designed specifically to maximize floor space by allowing various tools to roll/store beneath them.
I often work with sheet goods and grew tired of running full sheets thru my table saw so I invested in a Powermatic vertical panel saw. I set up two router tables, one with an Incra lift & fence and the other has a woodpecker lift. Both have a 3 1/4hp Porter Cable motor. Having 2 tables makes rail/style assemblies a breeze and drastically reduces my setup time by not having to change out bits (wish I would have skipped buying all the tables, lifts, motors, and router bits and purchased a shaper right from the start). Now I can’t justify the cost of a shaper with what I’ve already invested in the router tables/bits. I use pocket holes for much of my face frame joinery and grew frustrated on large projects so I purchased the powered automatic Kreg machine which makes pocket holing a joy.
I have a sizable investment in this woodworking hobby of mine, but I’ve never charged a dime for the many projects I’ve built for family and friends. The satisfaction comes from the appreciation I receive for what I’ve created and if I were to charge for what I build, then it becomes a job. And with a second job comes added stress which defeats the purpose, so for now I’m blessed to have it solely as a hobby. Couldn’t even begin to count how many hours I’ve spent over the last 2+ yrs creating this space. I hope you enjoyed the tour. Long live The Wood Whisperer!

November 3, 2014
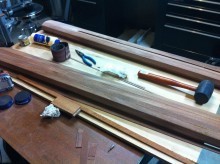
Luke’s Zebrawood iPhone Cases
By: Luke Pinno (Saskatchewan)
Experience: 0-2 Years
Woodworker Type: Professional
Project Type: Miscellaneous
Material(s): Solid Wood
Finish Type(s): Lacquer
Finishing Technique(s): Brushing
I watched a YouTube video by WoodWorkWeb, and rather liked the concept of a wood iPhone case. I made one from cherry initially that the phone slipped into from the top, and a small removable shim was pushed in to hold it secure. Several people commented on it, some wanting one made for their phone. Due to the time involved in the initial project, it wasn’t a money-making venture. I made one for each of my sisters. The second was walnut and the top and bottom were separate, removing the need for a shim. The third was macawood, with the same design as the original, but thinner. Both proved too time consuming to sell (though the macawood one received much more feedback than the first two).
Gluing the project together from an individual front, back and edges worked, but phone cases carved from a solid piece inspired me to try my own. I made three different jigs to router it out. The initial jig was for using a 5/8″ spiral bit to remove the bulk of the hollow. The second was used with a 1/2 key-slot router bit to create the lip for the phone. The third was simply to use the 5/8″ spiral bit again to route out a space for the foam or felt to rest in. Those three made the case. A fourth jig was used to route out for the volume, silent mode and power buttons. The hole for the camera and flash were made using two different bits and stops on the drill press. The holes for the headphone jack, speakers and usb plug were made using stops on the router table. A sander template and the drill press rounded the corners. After it was machined completely, I cut it in half on the table saw. They had been left over sized to allow for the blade.
I applied three coats of brush lacquer. I made a jig to trace the foam/felt (as it looped around the camera/flash area), and stuck that in. It was one of the most enjoyable projects in my workshop lately. Though the jigs worked fairly well to produce them quicker than glue-up ones, they would still need improvements to actually work to cut a profit.


October 29, 2014
Mark’s Sleigh Crib
By: Mark Stubblefield (Atlanta, GA)
Experience: 0-2 Years
Woodworker Type: Hobbyist
Project Type: Cribs & Cradles
Material(s): Solid Wood
Finish Type(s): Oil, Oil/Varnish Blend
Finishing Technique(s): HVLP
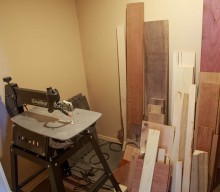
This was my very first ‘real’ furniture project. I have dabbled in pens on the lathe and small projects (shelves, knickknacks, etc), but never anything of this scale. I started the project when my wife was about 3 months pregnant, figuring I’d get done easily before my little girl was born. Well, I was wrong. Not only did I vastly underestimate the amount of time it takes to do all the mortise and tenon joinery, as well as the finishing, but my little girl showed up a whole month early, which delayed the final project until about 6 months after she was born. I’m very happy with the completed project, and now I have a very strong understanding of the time and dedication it takes to hand make furniture.
The entire bed was modeled after some plans I found online. I changed a few things here and there to fit my needs. The entire project was built with only a Jet portable contractor saw and a Grizzly 14″ band saw for the big tools. Lots of hand fitting the tenons, dovetails on the drawers, and sanding. I’ve since acquired a lot more tools, so I can imagine the next go-round will be quicker.
The whole bed is solid African mahogany, and the only places I used something different are the side inset panels and the drawer bottoms. Both are mahogany veneer plywood.
The curved portion of the front and back of the sleigh bed were done by ripping long strips from the same board, mitering their edges, and gluing and screwing them together to get the general shape, minding the grain patterns to keep them matched up. After that, there was a LOT of sanding by hand and a belt sander. Not having a jointer made this process a bit difficult. I pretty much jointed with the table saw. I still have a ‘real’ jointer on my wish list.
The front folds down for easier access for my wife and I, and the bed height is adjustable with a kit I found online. I put little bumpers on the front posts to keep the flip down portion from crashing into the slats and damaging them. The entire bed breaks down very easily with through bolts and captive threaded inserts. It converts into a toddler bed with a replacement front that is just a fence to keep the little lady from rolling out, and can eventually convert into a full size bed by removing the sides (and the front as well if just the headboard is needed).
I put some nice, long, full extension slides on the drawers which are solidly attached as I’m sure I’ll find the little one crawling on them one of these days.
Finish is General Finishes Java gel, with 4 or 5 coats of HVLP applied GF High Performance Poly, sanding between coats. The wood grain shows through a little, which I love, but the wood is very well protected from the little one.
I had a LOT of fun building this project, and once I get some other things done around the house, I plan to make some more furniture in the future with all of the knowledge I’ve gained.


232 – Clear Vue Mini CV-06 Update
 The new ClearVue Mini CV-06 is an improved version of Clear Vue’s cyclone separator. I tested the old unit in my Cyclone Separator Shootout back in 2012 and the unit didn’t do all that well. More dust passed through the system (compared to comparable units) and the bucket collapsed under pressure. I’m happy to report that the new Mini CV-06 does not suffer from any of these issues and now performs at least as well as the best competition on the market, including the winner of the 2012 shootout The Dust Deputy from Oneida.
If you’re in the market for a cyclone separator, the Clear Vue Mini CV-06 is now a strong contender and it’s worth your consideration.
October 27, 2014
Poll: Holiday Themed Projects
 There are plenty of different types of woodworking projects. Turnings. Cabinetry. Lutherie. Believe me, there are plenty of choices. But, then there are decorations. Woodworking projects that are just used seasonally to make your yard or home look more festive.
Whether they are decorative reindeer for Christmas, red white and blue decorations for Independence Day or even spooky coffins like the one I built a few years back to add some fright to the Halloween decorations in the yard, you have lots of options out there for bringing a unique woodworking element to your holiday celebrations.
So today, tell us if you have ever built a decorative holiday themed project.
Have you ever built a decorative project for a holiday?
October 23, 2014
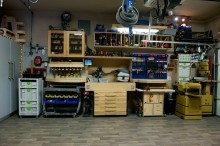
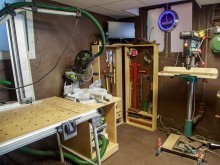
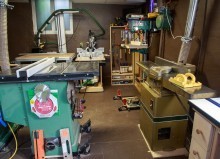
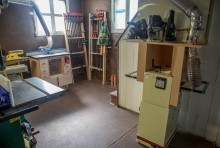
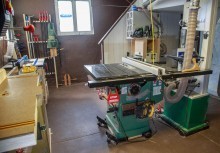
Shannon’s Basement Woodshop
From: Shannon (St. Louis, MO)
Shop Type: Basements
Shop Size: 250-499
This is my second shop since I began woodworking. My first was in the small basement of a townhouse and while it was great to work in, I had a pesky thing called neighbors on both sides of the wall and had to strategically plan my woodworking time. But along with rising rent, it was clear I needed to start renting my own house (with the long term plan of saving for a down payment for a permanent home).
Now in a house with no one directly on the other side of the wall, noise is no longer a concern and it’s awesome to just pop in at 1AM and start working. There’s a door leading outside that is welcomed for hauling materials in and out (despite a challenging angle.) The downside is that the ceiling is MUCH lower than my old shop.
The heart of my shop features my trusty General International granite top table saw. My Rikon 10-325 bandsaw sits in the empty wing of the table saw as space is limited. Definitely a controversial place to put it and admittedly it would be better suited for a router table station, but I already have a router table station I wasn’t going to part with, and this unusual setup actually has some advantages. I’m able to take advantage of the hall area behind it for long boards, and the table saw fence can be jigged with a platform to serve as an outfeed for the bandsaw. The disadvantage is that the maximum width I can cut on the table saw is limited, but I figured the Festool MFT/track saw could do this in the tablesaw’s place and I’ve found the arrangement perfectly acceptable.
I have a Jet JPM-13CS 13″ planer with a custom platform I built to place a Jet air filtration unit. The air filter hung on the ceiling in the center of my old shop, but due to low ceilings here this is the only solution I could come up. Not the optimal placement, but it does help with dust. The platform also has my Festool TS55 tracksaw, OF-1400 router and Domino sitting there.
Behind the planer towards the back corner are my clamp racks and the router table station, loosely based on the Norm Abrams’ design. It’s a bit beat up but works exceptionally well, the only thing I would improve in the future would be a router lift.
Next to the router station is a 1987 Powermatic 60 8″ jointer I bought off a woodworking production shop in Illinois a few years ago. I ran into a dangerous situation when a cutterhead head block bolt came loose, causing the head to smash into the porkchop, throw the knifes and shoot one out the flange (thankfully the dust port I installed on the flange stopped it). The cutterhead was ruined and rather than hunt down a used one, I bought a Byrd spiral cutterhead to replace it. After installing the spiral and new/stronger bolts, the jointer has been true ever since. Also, the router table is level with the jointer which helps with additional in-feed on long things.
Next to the jointer is a Grizzly drill press. There are things I don’t like about it, but it drills and I can’t ask for much more than that. I built a custom table/fence for it, and I can also lower the table to serve as additional outfeed for the jointer.
Moving along the wall is a Festool Kapex mitre saw station with a CT26 underneath. Next to that is the MFT which is where I cut plywood, and serves as my primary workbench and sanding station. Not pictured is a Mirka Ceros sander hanging up which I can quickly access. The boomarm dust hose above is shared between the Kapex, sander and any power tools I need.
In the opposite corner of the MFT station is a modified Harbor Freight dust collector, connected to blast-gated duct work running to nearly all major power tools. I altered it into a two stage collector with trash can, Thein baffle and Wynn air filter. Unfortunately at the time I modded this, I ran out of plywood to build a proper cart, and have no motivation to finish it right now as it currently does the job.
Next to the dust collector is a Jet 16-32 drum sander. A luxury for sure! I don’t consider it for actual sanding so much as for doing everything that the jointer/planer would rip up or can’t handle. Thin strips, bent lamination, flattening exotic woods and large panels, etc.
In a small room behind the drum sander is wood storage and my scroll saw. The laundry area has a utility sink and a shelf where I store all finishing products and where I clean up my Earlex HVLP. The door is nearby so I spray outside on nice days and try to stick with water-based finish when I can for easier cleanup.
And that is my shop, though there is a bittersweet epilogue to the story: I’m about to lose my shop for a while. I’ve been battling problems with mice since moving in and exterminators and my efforts have been ineffective. My lease up in two months, I have no plans to renew and be forced to put effort on what is not my own property. So my plans have been accelerated: when the lease expires, I’m putting nearly everything I own in storage while I continue to save for a down payment on the perfect home. So after one final project I’m doing, it’s goodbye…for now.
I think it will be totally worth it in the end. I’m tired of not owning my own place and not being able to do what I want. I want to be able to add/remove walls and finish the area, and have MORE than two stinkin 120v outlets and more 220v outlets that don’t need to share with the dryer. Once I find the right place that passes inspector blessings but just needs a little TLC, my power tools become my paintbrush and I can finally put together a home (and workshop!) in my own vision.


October 21, 2014
Poll: Edge Jointing Boards
 In order to get tight joinery and excellent results with your woodworking projects, you have to start with flat, straight and true boards. And, when it comes to edge jointing your boards, there are lots of options out there.
From shelling out big bucks for an aircraft carrier sized jointer to some clever and creative work arounds, everyone has their favorite method for getting their boards edge jointed.
So, what is your preference? How do you get those arrow straight board edges when it comes time to mill your lumber?
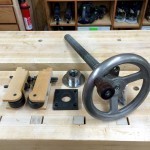
WFC Auction BenchCrafted Leg Vise
The winning bid of this charity auction will win a BenchCrafted Leg Vise (previously used on Marc’s Roubo Bench), a 1 year subscription to The Wood Whisperer Guild (with the Split-Top Roubo project unlocked immediately if you don’t already have it) and phone consulting (up to 1 hour) with Marc Spagnuolo. You can no longer buy this version of the leg vise (featuring the parallel guide rollers), but it works perfectly and the Guild videos will show you how to install it and build the associated chop and parallel guide. If you already have a subscription to the Guild, this will add 1 year to your subscription time.
The original retail value of the leg vise was $399, the value of the 1 year guild membership $129, value of the Spilt-Top Roubo $100, and the value of the call with Marc. Priceless ;)
You must use your full name and a valid email so we can contact you for questions and if win. Please no fake bids, you will be banned from all of the auctions.
The winning bidder will be contacted via email with instructions for completing their purchase and will have 24 hours to complete their donation to Cancer Research Institute. If at that time, they have not completed their donation, the next bidder will be contacted as the winner of the auction.
Be sure to check out the other 2 auctions going on right now!
Click here for the Powermatic Drill Press auction Ends October 31st!
Click here for the Powermatic PM1000 Table Saw auction Ends November 7th!
BenchCrafted Leg Vise, 1 year subscription to TWW Guild plus Roubo Bench and Call with Marc

Starting Bid: $100.00
Going for
$475.00 Winning: Brandon Michels
Ending On: November 14, 2014 11:59 pm
Description Bid Here Bids WatchThe winning bid of this charity auction will win a BenchCrafted Leg Vise (previously used on Marc's Roubo Bench), a 1 year subscription to The Wood Whisperer Guild (with the Split-Top Roubo project unlocked immediately if you don't already have it) and phone consulting (up to 1 hour) with Marc Spagnuolo. You can no longer buy this version of the leg vise, but it works perfectly and the Guild videos will show you how to install it. If you already have a subscription to the Guild, this will add 1 year to your subscription time.
The original retail value of the leg vise was $399, the value of the 1 year guild membership $129, value of the Spilt-Top Roubo $100, and the value of the call with Marc. Priceless ;)
You must use your full name and a valid email so we can contact you for questions and if win. Please no fake bids, you will be banned from all of the auctions.
The winning bidder will be contacted via email with instructions for completing their purchase and will have 24 hours to complete their donation to Cancer Research Institute at http://my.e2rm.com/TeamPage.aspx?team... If at that time, they have not completed their donation, the next bidder will be contacted as the winner of the auction.
Your Name
Your Email
URL
Enter Your Maximum Bid
Bid $500.00 or higher [?]
Reserve:
[n/a]
USD
Brandon Michels bid $475.00 on October 21, 2014 1:31 pmBrian bid $450.00 on October 21, 2014 1:30 pm [auto]Brandon M. bid $450.00 on October 21, 2014 1:30 pmBrian bid $425.00 on October 21, 2014 12:22 pm [auto]Chris Albee bid $400.00 on October 21, 2014 12:22 pmBrian bid $375.00 on October 21, 2014 11:40 amChris Pennell bid $326.00 on October 21, 2014 10:19 amDanielle Cox bid $301.00 on October 21, 2014 9:54 amJames bid $225.00 on October 21, 2014 9:51 amDerek Warmack bid $200.00 on October 21, 2014 9:44 amSergio Bandala bid $175.00 on October 21, 2014 9:42 amGonzalo Plaza bid $150.00 on October 21, 2014 9:40 am [auto]Lance bid $125.00 on October 21, 2014 9:40 amGonzalo Plaza bid $100.00 on October 21, 2014 9:17 amEnter your email below to get notifications of new bids placed on the above item.
Watch this Auction Shipping DetailsShipping: Free Shipping for US & Canada. Could ship international, but may require additional money to ship. Please contact us before bidding
From: US
To: Worldwide
Payment DetailsThe winning bid will be made directly to Cancer Research Institute at http://my.e2rm.com/TeamPage.aspx?team...


