
Marc Spagnuolo's Blog, page 89
August 28, 2014
227 – Installing Urethane Bandsaw Tires
Recently, I was making a routine cut at the bandsaw and noticed that the blade was behaving in an odd way. Out of the ordinary vibration and noise should never be ignored so I immediately stopped the cut and turned off the saw. Much to my surprise, I noticed that the bandsaw tire had partially migrated off of the the wheel and the blade was on it’s way to doing the same. YIKES! It was pretty clear the tires were shot.
 I’ve known about urethane bandsaw tires for some time now but never had a need or opportunity to install them, until now. I picked up this set from Amazon.com and prepared for the installation. I decided to film the process for your use and amusement.
Urethane VS Rubber
How much better is urethane than traditional rubber? I’m certainly no bandsaw tire expert but allow me to pass on some of what I discovered in my research as well as share my limited experience.
- Durability: Urethane tires are more durable and last longer than rubber. I’m guessing the hot and dry Arizona air contributed to short life of my rubber bandsaw tires and I’m hoping the urethane will last longer.
- No Cement: Rubber tires can sometimes require cement to keep them secured on the bandsaw wheel. This isn’t always the case and I never had to use cement on my tires. Perhaps if I did, I wouldn’t have experienced the slippage. Urethane tires do not require cement. No cement means easier installation and replacement if/when the time comes.
- Quieter and Smoother-Running: This is an area folks typically experience a huge improvement. While I did notice it was indeed quieter and smoother-running, the different wasn’t dramatic.
- Cool color: Seriously. Bright orange? Yes please!
On the negative side, I have noticed that the tires pick up dust a lot faster than rubber tires. Routine cleanings should take care of that but it’s something to be aware of.
If all of the above proves true, it seems like urethane is the clear choice for bandsaw tire replacement, especially since they seem to cost about the same as rubber tires. Keep in mind that not all saws can or should have urethane tires so consult with the manufacturer just to be safe.
If you have perfectly-functioning tires on your saw, don’t run out and replace them with urethane. When your rubber tires are ready for replacement, do your research and consider the switch.


August 25, 2014
Poll: What State is Your Project In, Right Now?
 When it comes to woodworking, it seems as if we are always in some part of the project-building process. Whether just starting to develop plans and gather materials or buffing out a glowing finish, there are numerous places along the woodworking path where we often find ourselves.
So, why not share with us what ‘state’ your projects are in right now as you sit to read this poll. If you need to, poke your head out into your shop and come back to answer. We’ll be waiting!
Right now, what’s your current ‘state of project?’
August 24, 2014
Interview With Kyle Toth
After getting a warm response from my last interview, I have decided to keep going with the interviews to highlight more great woodworkers out there. So, I hope you enjoy the next interview with a very talented woodworker, Kyle Toth who runs Wood By Kyle Toth in Temecula, California.
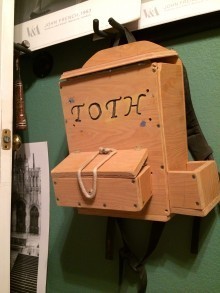 Kyle does some amazing work, and he has some great examples of the furniture, turnings, and other works on his website as well as videos on his YouTube channel. His love for woodworking was evident in high school when he created a wooden backpack that he actually used for school. Seriously! He also got into woodturning in high school, and produces some amazing turned works of art in addition to furniture.
After high school, Kyle attended the North Bennett Street School to get a formal education in woodworking. That alone tells you what kind of skill set he has got, and it definitely shows in his work. As he stated in the interview, “The school’s motto was ‘An education and craftsmanship.” Since high school, Kyle has honed his craft and has worked with some big names like Disney, Metallica, and Jelly Skateboards.
One of the things that caught my attention was Kyle’s beer tap handle video, in which he shows the process of making 100 beer tap handles for Refuge Brewery. It’s a really great process to watch, and the end results are beautiful.
I also recently learned that Kyle is on the forefront of pushing for more education about the trades to our younger generations. He is one of three craftsman who are working with AWFS (The Association of Woodworking & Furniture Suppliers) in the “Meet the New Face of Manufacturing” campaign, which is intended to raise awareness of the trades and manufacturing jobs to students, schools, educators and counselors. You can find out more about the campaign on the AWFS website.
In the interview, I dig into what makes Kyle tick and managed to get some woodworking business tips as well. Kyle didn’t disappoint in his answers, so enjoy the interview!
You do quite a range of different types of projects from furniture to turnings to beer tap handles. What is your favorite type of project to work on?
“My favorite type of projects to work on are desks and dining room tables. I love the fact that with the dining room table, whole families can gather together and sit around something that was designed for them.
I really love the Art Deco style of furniture. So I would say that art deco pieces are my favorite to design and work on.”
Where do you get design inspiration from?
“My design inspiration comes from simplistic things, art deco style, things that are free formed and appeared to be floating, repeating patterns, simple curves.”
What goals do you have for your craft and/or business?
“Goals that I have would be to get my lounge chairs into more of a production/more available.
I am always working on segmented vases. I would like to get more into the Art Deco style of furniture. Another goal I have is to find an employee/apprentice and train them to keep the same quality of work that I have. Also, I want to finish my gallery/showroom which is above my shop and have it filled up with my new work by december.”
What is on your woodworking ‘bucket list’?
“The one thing on my woodworking bucket list would have to be a Bombe’ chest of drawers made in Bubinga.”
What part of woodworking challenges you the most?
“The part of woodworking that challenges me the most is carving by hand with gouges and chisels to make something look real and believable. But it’s a challenge that I enjoy!”
What are the greatest challenges you face running a woodworking business?
“The greatest challenges I have running woodworking business is keeping up with online website updates, social media post and basically anything having to do with the Internet haha. I love the whole design process, buying the materials, starting and finishing.”
What is the best tip you can offer someone who is starting up a woodworking business?
“One of the best are the best tips I can offer someone looking to get into a woodworking business is just don’t turn down any jobs, take them all. You will learn so much. It’ll force you to put yourself in situations where you have to learn.”
Well, I hope you enjoyed learning more about Kyle. He provided some great insight into his work and even some business tips! I want to thank Kyle for taking the time to let us get to know him better and share more about his craft too.
Kyle is currently working on a staircase rail and spindles as well as another 100 beer tap handles for Refuge Brewery. So, check out his website and YouTube channel to keep up with what Kyle is working on and see some amazing work in action.
August 23, 2014
Diana’s Sewing Table
By: Larry Speight (Waddell, AZ)
Experience: 2-5 Years
Woodworker Type: Hobbyist
Project Type: Tables
Material(s): Plywood, Solid Wood
Finish Type(s): Oil/Varnish Blend, Shellac
Finishing Technique(s): Wiping
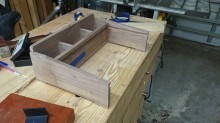
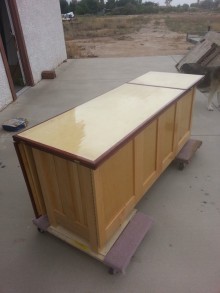
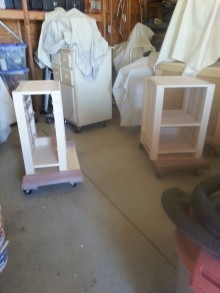
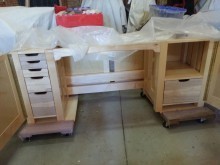
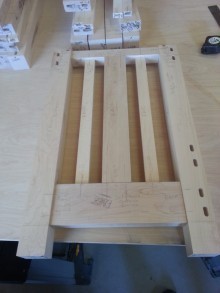
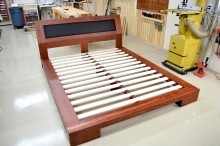
My daughter needed a sewing table. She liked the Rockler plans but wanted an additional table added to provide more room for material. I got the Rockler plans and started re-working them in an attempt to meet her needs when my wife pointed out something interesting with the plans. The area where the sewing machine lift was placed had the needle of the sewing machine on the extreme left side of the sitting area. This would mean that an individual would have to sit crooked in order to position their body behind the needle. With this revelation, I extended the seating area so that the sewing machine operator could sit directly behind the needle. I didn’t change the cabinet sizes so the overall cabinet grew in length. I think the biggest frustration I faced was the table tops. I had hoped to make them out of solid maple but after glue up, I could not get the boards to stay flat. They cupped really badly. So I fell back to using maple plywood which worked well. I surrounded the maple plywood with purpleheart (inspired by some work Marc had done) and it turned out pretty well. The drawer fronts are spalted maple with poplar sides and plywood bottoms. I used dovetails for the drawer fronts.
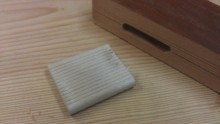
In the picture of the dry fit-up of one of the cabinets, you will notice that I write on the wood a lot so that I don’t put a piece in the wrong place. I speak from the dregs of bitter, bitter experience of earlier projects. Writing on the wood and labeling is the way I have learned to avoid costly and time consuming mistakes.
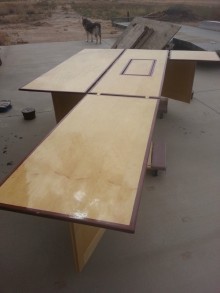
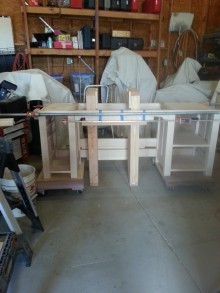
Another picture shows the glue-up jig I had to build in order to glue the two cabinets together. I work in my shop alone which requires me to do some rather creative things when I have to do something that would be easy with two people. This jig worked remarkably well, but I did have to carefully plan how to build it and then remove it. Marc has me thinking and planning ahead much better!
I used dominoes throughout the project and some pocket screws when securing the cabinets together. They are hidden but provide the strength I wanted for the tops and bottoms of the cabinets.
I finished the sewing table using “super blond” shellac and Arm-R-Seal. I was tempted to spray the poly but chickened out at the last minute. Vertical spraying has always challenged me and then reading about spraying oil-based poly was not too encouraging either. I will just have to take some time and experiment with the oil-based poly and doing vertical surfaces at a later time.
Now I have got to figure out how to get this thing up to Eugene, Oregon!
August 22, 2014
Build the Krenov-Inspired Display Stand
On September 5th we are starting a new Guild Build: the Krenov Display Stand.
Get Access to this build for 10% OFF this weekend ONLY! (Use code KRENOV)
 Not familiar with Krenov? James Krenov (1920–2009) is a renowned furniture-maker who influenced countless modern woodworkers with his woodworking and writing. Krenov is perhaps best known for his amazing cabinets, typically held aloft by a set of beautiful long sweeping legs. Our friend and fellow woodworker Tom Buhl built his own version of a Krenov-inspired display stand (pictured left) and let us use his design as a starting point. While not truly a Krenov piece, it will serve as an excellent entry point into the world of decorative cabinet-making.
The piece features bandsawn and hand-cut dovetails, compound curved legs, and a center-guided drawer! It promises to be a really fun build and we’ll post a video each Friday until the project is complete. If you’re interested, you can get the project for 10% OFF this weekend ONLY by using the code KRENOV at checkout. Subscribe Today! Just add the Krenov Display Stand to your cart, use the code, and you’ll be all set. Thanks and have an awesome weekend!
August 21, 2014
Selling Wood Whisperer Designs for Profit
 Someone asked me recently what my policies were concerning people building my projects and designs for profit. In most cases, my policy is “Have at it!” My personal mission is to teach woodworking and share the love of the craft. That includes encouraging people to build the projects I design. Once you start building quality furniture, it won’t take long before that first commission rolls in from a family-member, a friend, or a neighbor. So if you can support your hobby by building something I designed, that’s just awesome!
So what about the next stage? Let’s say you are a professional woodworker and you have an e-commerce site or Etsy store and you want to offer one of my designs as a regular item. Guess what? I still don’t mind! This is all part of my desire to spread the love of furniture-building and I consider it a win-win situation. Furthermore, my designs are not all that unique and I am heavily-influenced by the woodworking I see on a daily basis. Most things I make are either conscious or subconscious iterations of numerous other things, combined or modified into a form I find pleasing. So being excessively over-protective of such creations feels a bit overzealous to me. Ultimately, you selling those pieces has absolutely no impact on the business that puts Goldfish in my son’s mouth.
But there is one favor I ask and it’s really just a simple professional courtesy: give credit. If you’re building an exact copy of my Gadget Station, put something like “Original Design from TheWoodWhisperer.com” at the end of the description. It isn’t hard to do and you don’t wind up looking like a turd. The truth is, all I can do is make the request. I would never pursue a legal battle and I wouldn’t have much ground to stand on if I did. The woodworking community is very small and if you post a copy of something online it won’t take long before someone sees it and calls you out. So do yourself a favor and give credit where it’s due.
 Here’s an example of something that came across my inbox today: Etsy Custom Bed Listing. You might recognize that bed as the Dogon Platform Bed I built for a client last year. If James can actually get $8500 for that bed (I only charged $5000), all the power to him. But you’ll notice that the description makes no mention of who designed the piece. I have since emailed the seller and requested that he add a line to the description. If he doesn’t respond, so be it.
*UPDATE* – It looks like James updated the page to include attribution. I want to be very clear that I had no intention of villainizing James in any way and I truly hope he can sell the bed. Because I have never made an official public statement about my policies on this sort of thing, I was using this Etsy post as an example to help illustrate my point. Credit to James for responding quickly and making the change!
Please keep in mind that these are just MY policies. Not every woodworker out there is so willing to let you build their designs for profit (legal realities aside). So do your homework before you sell and when in doubt, ask! If you’re interested in reading up on the ethical and legal issues involved in reproducing someone else’s designs for profit, check out these helpful articles:
- Is Copying Furniture Legal? – Fine Woodworking
- Imitation Could Be Illegal – Popular Woodworking
- Is OK to Sell Furniture Based on FWW Articles? – Fine Woodworking
Clear Vue Cyclone Giveaway!
 It’s hard to believe that August is almost over (hello Fall!) If you haven’t been keeping up with the giveaway announcements on Twitter and Facebook, let this be your heads up on what we are giving away this month! The great people over at Clear Vue donated a CV1800 1P Cyclone System with Filters for one lucky viewer!
What more info on the installation of a Cyclone? Check out this video Marc did last year on the installation of his system.
How do I enter?
Head on over to the Giveaway Page to learn more about Clear Vue Cyclones and enter to win. And be sure to bookmark the Giveaway Page so you can keep up with the latest giveaway details (because we do this every month! A new giveaway will start on September 1st!
The winners notified directly & this post updated after they are randomly drawn at the beginning of the month.
You can also check out all of our past giveaways and winners here.
August 20, 2014
Poll: Tenon Terminology
 Do you see the piece of wood on the bench laying next to the mortise? You know, the piece that joins them together once you glue and clamp it? It’s an interesting way to join two boards without creating an integral tenon on one of them.
But, what do you call it? I’ve seen woodworkers get worked up about different terms for it. They will argue their point all day long that a certain term applies, and none of the others make sense. So, what do you call it in your shop?
What do you call the piece of wood that joins a pair of mortises?
August 19, 2014
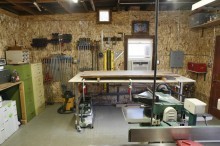
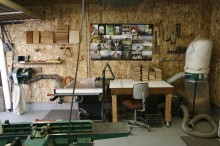
Josh’s Standalone Shop
From: Josh Jackson (Pasadena, CA)
Shop Type: Standalone
Shop Size: 250-499
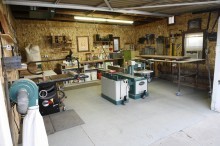
I have gleaned so much from all of the shop tours over the years, I figured I might as well share my shop. :)
We are a two person shop that builds custom furniture out of reclaimed wood for individuals, retailers and restaurants. We work primarily with reclaimed Douglas fir from old buildings in Southern California and reclaimed hardwoods like oak, hickory and walnut from barns in the Midwest.
My shop started as a 20′ X 20′ garage that had a laundry room built inside of it and was only big enough for one car. After ripping out the laundry room, I added a layer of framing/insulation/OSB to the existing white walls for sound protection and to give me the raw look I wanted for the shop. Then we ran 60 W of power and added a sub panel for all of my 220 tools.
While the shop is small for a full time furniture maker, it serves our purposes well (and we couldn’t possibly afford a shop or retail space here in Southern California). A few notes on function in case you’re interested:
- Having the mobile table saw, jointer and planer in the middle of the shop works great because we can open the double garage doors and run longer boards through.
- My main shop table has a custom fabricated steel base with a hardwood/plywood top. When we are knocking out mortise and tenon joints and assembling frames, the flat top works great. When we are doing glue ups, we take the top off and use the metal frame.
- For dust collection, I have a few different set ups. The big Grizzly dust collector has one permanent line to the table saw. The other line coming from it alternates between the planer and jointer. I also have a small Grizzly dust collector next to the table saw that is attached to the magnetic Veritas dust chute which collects table saw dust right on the saw. The Festool Kapex miter saw is permanently connected to a Rigid dust vac, which works brilliantly. All of my sanders are connected to the Festool CT26 dust collector. And finally, I have a Grizzly overhead dust collector as well that I turn on from time to time at the end of a work day.
- My shop is usually this clean by the end of every work day. Fifteen minutes at the end of a day can go a long ways! :) And because I meet with clients at the shop on a regular basis, I like to keep the space presentable.
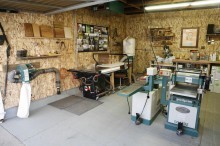
- The tools you see now have been slowly accumulated since our business inception in 2010. Over the past four years of running a full time shop, I have spent hours and hours researching tools and using different tools in different price ranges. I am really happy with the tools I have acquired, both in function and price range. In case you want the tool lowdown:
- FESTOOL: Kapex Miter Saw, RQ 150 Sander, 1400 Router, T75 Track Saw, Carvex Jig Saw, Domino XL and the CT26.
- SAWSTOP: I have the SawStop Professional, 3HP, 36″ table.
- GRIZZLY: 8″ Parallelogram Jointer with spiral cutterhead. 15″ Planer with spiral cutterhead. One floor dust collector, one on the wall and one on the ceiling. I couldn’t be happier with my Grizzly products. Really affordable and some of the best customer service I’ve run into.
Alright, I think that is about it. Thanks for letting me share and thanks for sharing all of yours shops with me!
August 14, 2014
226 – Grasshopper Pull Toy
This fun little pull toy is easy to make. The great thing about it is you can get your child involved in the process at whatever level you’re comfortable with. Older kids can cut and sand the parts. Younger kids can paint and assemble the grasshoppers.
This was the first project I included “the Apprentice” in and he had an absolute blast. His little friend Devyn had a great time too and both kids played with their grasshoppers all night long. So these are definitely kid-approved at this point. In today’s world of pre-packaged plastic, I think it’s good to encourage kids to make their own toys with their own hands.
The Templates
I didn’t have the benefit of templates when I made this video but we had a nice template document made up for your convenience. It shows not only the various shapes but also the drilling locations. All you need to do is download the Template File and print it. Make sure you print full size with no scaling. Cut the parts out and attach them to your workpieces with some spray adhesive and start cutting and drilling. When the parts are fully milled, you can remove the template with some minerals spirits or acetone in preparation for painting.
Pre-Made Parts
The wheels and the axel pegs are all pre-made for simplicity. While you should be able to find them at any decent craft store, we specifically got ours from a local Jo-anne store.
Safety Note
We make no claims as to the safety of this toy for children. Do your research and decide for yourself if the toy is safe enough for your child. Also, keep in mind that if the toy will end up in a child’s mouth, you have to be very careful about what you finish the toy with. My son is almost three so a simple water-based kid’s paint is just fine for us.


