Marc Spagnuolo's Blog, page 91
July 22, 2014
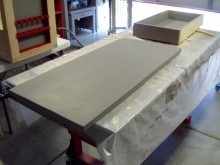
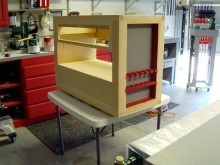
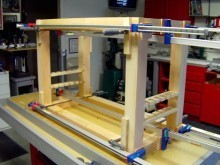
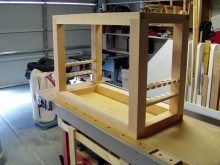
Daniel’s Woodworking Bench
By: Daniel Jacobson (Rota, Spain)
Experience: 0-2 Years
Woodworker Type: Hobbyist
Project Type: Shop Projects
Material(s): Solid Wood
Finish Type(s): Oil, Oil/Varnish Blend
Finishing Technique(s): Brushing
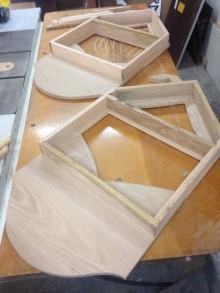
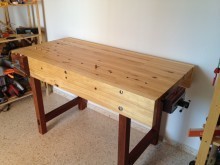
As a new woodworker, starting last year at the ripe age of 34, I was tired of the sub-par store-bought MDF workbenches. After watching various videos on YouTube, I decided it was essential to have a trusty work surface that would not move around.
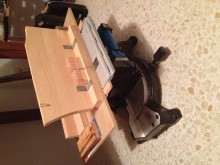
Stationed overseas with the Navy, wood selection is…shall I say—limited. Pine being the overwhelming favorite here in Spain, I set on a course to build a workbench using limited tools (basic hand tools, plunge router, corded drill, and powered miter/tablesaw combo and techniques learned from Paul Sellers, Steve Ramsey, and of course, The Wood Whisperer!
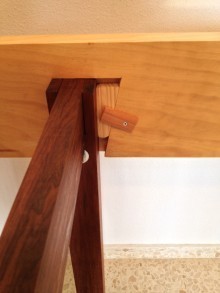
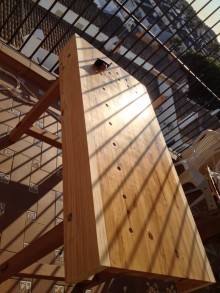
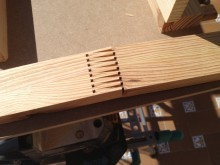
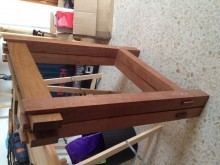
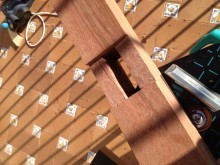
In the military, I move a lot, so I needed a bench that would last and survive 3-4 moves per decade. Without any real plans, I set to work using through tenons with chiseled mortises, draw-bored anchoring, finger joints (to extend the length of the bench top), lamination, and improvised vise engineering.
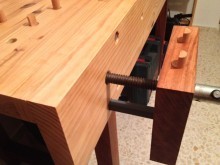
The leg assemblies are static, made of Bangkirai and Ipe. The top is 5′ long with laminated and finger-joint-extended lengths of pine. The primary vise screw was procured locally, the support is simply a square steel pipe with a mortised through-hole for a guide, and the jaw is made of Sapele. The secondary vise was re purposed from a sub-par MDF bench (and will likely be replaced in a year or so) and uses a Bangkirai jaw with a Purpleheart dog. The dog holes are 20mm with matching dogs made from dowels. The top was finished with 6 coats of varnish and the legs and jaws were treated with linseed oil.
There will likely be changes to come and upgrades to consider, but overall, as a first real woodworking project (outside of command plaques), I am very pleased. The workbench takes 30 minutes to put together and remains rock-solid while retaining the movability factor.
I greatly appreciate the training and inspiration Marc and others have provided. I hope that this project goes to show that with minimal tools, incredible lessons can be learned and a worthwhile addition to any shop can be accomplished. Thank you for looking!


July 20, 2014
Poll: Radial Arm Saws
Since its invention by Raymond DeWalt back in 1923, the radial arm saw has had quite an interesting history. Once held as the ultimate home woodworking machine, the saw could crosscut, rip, dado, cut joints and do other tasks with specialized attachments.
 While the saw was enjoying its reputation, questions about its accuracy, space utilization and – most importantly – safety were being raised.
With the invention of the power miter saw in the 1970′s, radial arm saw use declined precipitously. While radial arm saws are still produced today, table saws far outsell these machines. So where do you stand when it comes to these tools?
What do you think about radial arm saws?
July 17, 2014
Eric’s Daughter’s Theme Bed
By: Eric Bong (Cedar Rapids, IA)
Experience: 10+ Years
Woodworker Type: Hobbyist
Project Type: Beds, Kids Projects
Material(s): Plywood, Solid Wood
Finish Type(s): Paint
Finishing Technique(s): Brushing
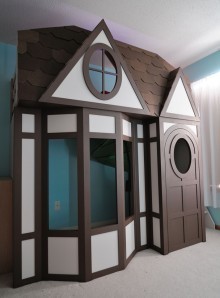
Last year I was in need of a project to keep my mind occupied over the winter. My 4 year old daughter helped me decide that we should build her a bed. We searched the internet and found several ideas for building miniature houses. She was really in love with a Tudor style house, so we decided to start there.
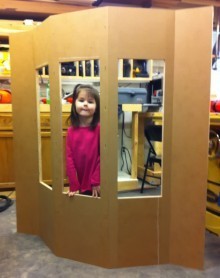
This was my first project that I started without a definitive plan. I’ve built quite a few things, but I always drew up a plan first and worked from it. This time we just threw caution to the wind and made adjustments on the fly. The entire bed was built in a modular design so we could take it down if we ever moved. That made it easier to design on the fly as well.
The first thing was to set the height of “roof line” where the mattress would sit. Her mattress platform has a special place in my heart—my dad built it in 1985. I used it throughout college as my bed loft and now she is using it. It just feels good to keep using it. The platform is attached to the back wall and is supported by the front wall of the house. The 2″x4″s in the first picture are strictly there for initial support. Next we built the main walls. Everything was constructed out of MDO plywood, a great material to work with and so much easier than MDF. The bay window is held together with dominoes.
This was my first project with the new jointer. It really worked well. The joints were very easy to fit and very strong. Unfortunately I cut the slots a little deep in the front piece but little wood putty fixed that mistake. The “roof” was next on the build list. There is about 6″ of clearance to the top of the ceiling. The shingles are made from 18″ tempered hardboard. This part took the longest to complete since almost every single shingle needed to be individually cut to fit—many trips from the basement to the second floor. The trim is made from resawn poplar from the BORG. It was painted separately then nailed on. We added some LED lighting on the main floor and in the roof line. I removed all the wiring behind the stairs that shows in the final picture. I figured that 12V DC was much safer than the 110V AC. All in all this was a very satisfying winter distraction. She loves it! I have a 9 year old son to build for as well. But that will be another project submission!


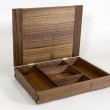
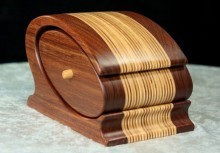
224 – Jewelry Box with Gary Rogowski
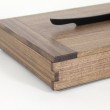
I recently had the good fortune of working with Gary Rogowski, a well-known educator and author. If you aren’t familiar with Gary, he wrote Taunton’s Complete Illustrated Guide to Joinery. You know, that little reference book almost every woodworker has in their library? Since Gary was in the area on family business, we decided to spend a couple days together building one of his projects: a jewelry box with a slight Asian influence.
The seemingly simple box serves as an opportunity to work on numerous techniques including finger joints, breadboard ends, sprung joints, dowel reinforcement, and rice paper application. And speaking of finger joints, Gary has a really cool trick for getting accurate and repeatable finger joints at the bandsaw.
With only two short days to work with, we weren’t able to complete the entire box with Gary. But I picked up where he left off and finished it up myself. I didn’t really like the original base so I decided to give mine some small feet. Seems like a good place to put your own spin on such a beautiful box.
This project was documented in Popular Woodworking Issue #190 (June 2011) under the name Jasmine Jewelry Box. You can read text from the article here.
Download the Plans
Cut List:
Front/Back – 2 1/4″W x 16 1/8″L x 1/2″T
Sides – 2 1/4″W x 12 1/8″L x 1/2″T
Bottom (1/4″ Ply) – 11 1/2″W x 15 1/2″L (Cut to fit!)
Top – 12″W x 12″L x 1/2″T
Breadboards – 2″W x 12 1/8″L x x 1/2″T
Handle – 1″W x 11″L x 1/4″T
Feet – 3/4″W x 3/4″T x 3/4″L
July 14, 2014
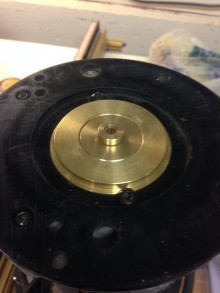
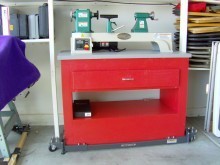
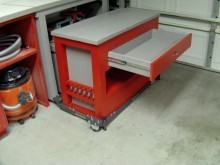
Nick’s Woodturning Lathe Stand
By: Nick Piccinonno (Las Vegas, NV)
Experience: 0-2 Years
Woodworker Type: Hobbyist
Project Type: Shop Projects
Material(s): MDF, Solid Wood
Finish Type(s): Paint
Finishing Technique(s): Brushing
My name is Nick (Nicky P if you dare) and I’m a 54 year old kid (at heart). I’ve been fascinated with woodworking since wood shop in middle school. However, my desire to create and build has been sidetracked for the past 40 years as a bartender in my 20′s and a Las Vegas Pit Boss ever since with only dabbling at best during this time in the wonderful world of wood. Well I finally came to the realization that it’s never too late, so about a year ago I made the commitment to create a woodworking shop in my garage and get back in the game.
I have longed to become a wood turner, as I feel the therapeutic value will be very gratifying for mind, soul, and spirit…plus I could use a few candlesticks. The following project was inspired based on a need for my lathe, a place to put it in the shop, and a lot of research regarding wood turning in general. I hope you like it.
July 13, 2014
Poll: Do You Name Your Projects?
Let’s face it – our woodworking projects are something we can be very proud of. Whether a perfectly executed set of kitchen cabinets or an expertly turned piece, we want that work to be identified with us.
 For some people, they will name the project they are working on, much as an artist will name a painting or a sculpture. For instance, David Picciuto (The Drunken Woodworker) routinely names his projects, such as the pattern for this bandsawn box called Chicago, based on its resemblance to the letter C. This week, tell us if you name your pieces.
Have you ever named one of your projects?
July 11, 2014
TWW Store News
 Just a quick update about our store. First things first, a big thank you to all who participated in our recent Christmas In July Sale. It was a huge success and orders are being packed and shipped as quickly as possible, so we appreciate your patience.
My mom and step dad (the TWW store employees) will be out of town for family matters for a few weeks so the Store will be closed. If you didn’t get to pick up something you wanted during the sale, you have until NOON PST on Monday, July 14th to do so.
We expect to be open and ready for business the first week of August. An announcement will be posted! Thanks again for all your past purchases…it helps keep the old folks busy and out of the Bingo Halls!
July 10, 2014
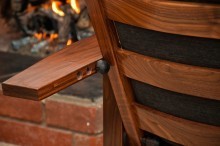
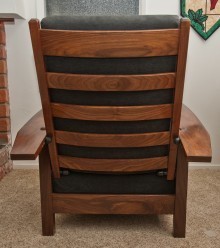
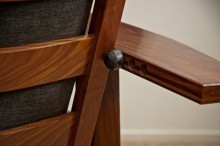
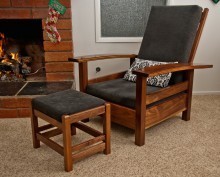
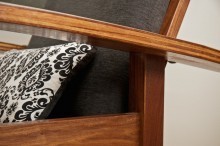
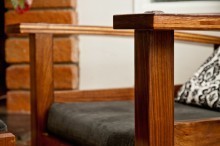
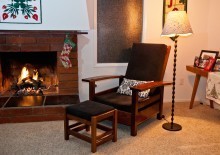
Matthew’s Bowed Arm Morris Chair
By: Matthew Parker (Redondo Beach, CA)
Experience: 2-5 Years
Woodworker Type: Hobbyist
Project Type: Chairs & Stools
Material(s): Solid Wood
Finish Type(s): Oil/Varnish Blend, Shellac
Finishing Technique(s): Wiping
Up until recently I got my woodworking fix by building and or fixing up my homes. That all changed when my wife and I moved into the parsonage at her new church. I decided that I would change my woodworking focus to things that I could take with me.
I hemmed and hawed about what to build first and ultimately decided on a Morris chair. I was not really satisfied with the traditional styles so I created my own more modern interpretation of the Morris chair. I also chose to break from the traditional Quartersawn White Oak and used Walnut for my chair. I love the look and really can’t understand why it is not done more often. I’m looking forward to seeing what Marc does with the Guild version.
If you’re interested in building your own Morris Chair, head over to The Wood Whisperer Guild for the details & plans.

223 – Aging Wood with Baking Soda
While you are probably familiar with the pigment and dye-based stains available on the market, you might not be aware of a whole other class of stains known as chemical stains. Instead of depositing color particles on the wood, these stains create color via a chemical reaction within the wood itself. The effects can range from mild to dramatic depending on the wood species and chemical used.
Woods contain a molecule known as tannins and some species have more tannins than others. The more tannins, the greater potential for color change. Woods like mahogany and cherry are great candidates for chemical staining with baking soda but a wood like maple doesn’t have much change, as you’ll see in the video.
The baking soda mixture is simple: 1 Tablespoon of baking soda in 1 cup of water (distilled if possible). Paint the material on the wood and let it dry. Keep in mind that the water will raise the grain so it’s a good idea to pre-raise the grain prior to using the baking soda.
July 8, 2014
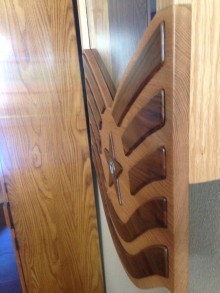
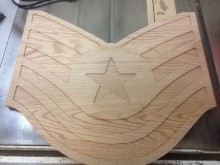
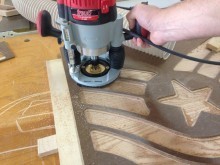
Chet’s Air Force Shadow Box
By: Chet (Camas, WA)
Experience: 10+ Years
Woodworker Type: Hobbyist
Material(s): Solid Wood
Finish Type(s): Lacquer
Finishing Technique(s): HVLP
I was asked by my cousin if I could build his Shadow Box to commemorate his retirement from the United States Air Force. I was more than happy to oblige. He showed me his Commanding Officer’s Shadow Box in California and I then went home to make his.
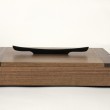
The Box is solid White Oak with Black Walnut inlays which stand about 1/8″ proud of the surface of the Oak. I used an inlay bushing and bit kit with homemade templates (those took a while to get right) to cut the inlays. It measures 42″ X 22″ and is 4.5″ deep. I also mounted a challenge coin showing his rank right into the center of the star. I used a multi-tongue and groove joint bit to make the lower panel. To join the rest of it together, I used pocket hole screws and homemade dowels from project scraps to plug the holes.
I had the glass cut locally, but I was not pleased with the service, so I will use another source next time. When my cousin received his Shadow Box he was thrilled with the results!