Marc Spagnuolo's Blog, page 88
September 18, 2014
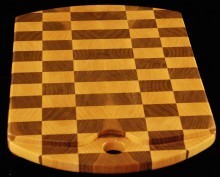
Art’s End Grain Cutting Board with Curved Relief
By: Art (Gilbert, AZ)
Experience: 2-5 Years
Woodworker Type: Hobbyist
Project Type: Kitchen Projects
Material(s): Solid Wood
Finish Type(s): Oil/Varnish Blend
Finishing Technique(s): Brushing
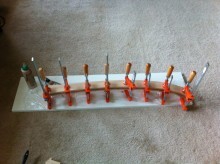
I got the idea for this cutting board from a project I found online which had a curved handle that was done as a separate piece inserted into a slot. When I built that board I realized that it was a bad design because of the grain mismatch between the handle and the board. It cracked badly with its first exposure to moisture. However, the curved handle, finger hole, and radii really gave the project a nice look and feel.
Wanting to keep the aesthetics, but ditch the flawed construction techniques, I opted for a monolithic board with the handle being by routing out the material around it from the solid blank. This solved the moisture movement issue, and created a very interesting effect with the wood grain as it traverses the relief for the handle and finger hole. I then used Marc’s recommended finishing technique (diluted salad bowl finish), and the result was what you see here.


September 16, 2014
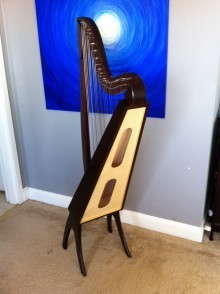
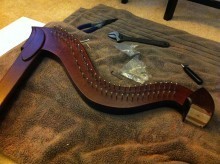
Roger’s Small Folk Harp
By: Roger Garza (Arlington, VA)
Experience: 0-2 Years
Woodworker Type: Hobbyist
Project Type: Music-Related Projects
Material(s): Plywood, Solid Wood
Finish Type(s): Commercial Stain, Dye, Oil/Varnish Blend, Waterborne
Finishing Technique(s): Wiping
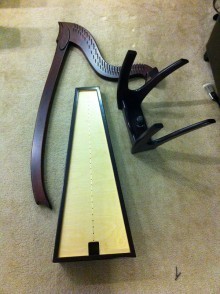
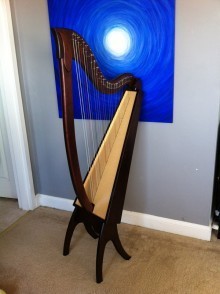
I’d been wanting to build a harp for over a decade, so I finally took the plunge and ordered blueprints for a small folk harp from a luthier in Minnesota.
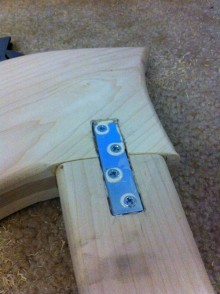
I used hard maple for the sound box, neck, and pillar, and Baltic Birch plywood for the soundboard and back. The neck and pillar are both made of laminated maple. I used three layers of half inch solid maple with the center layer laid out at 90 degrees to the outside layers to give strength, as the neck of small harps in particular must withstand almost 1,000 lbs of tension from the strings. The neck/pillar joint must also resist the pull of the strings to one side of the neck, so in addition to the overlays called for in the plans, I added metal brackets recessed into the neck and pillar. The top of the neck at the soundboard is kept from falling over by an extra 1.5 inches of hardwood. A dowel keeps this block centered on top of the sound box while stringing; the bottom of the pillar is held in place by two wood screws. The entire neck and column are built to lean away from the strings about 3 degrees. Besides the dowels and screws, the only thing holding the harp together is the tension of the strings. The neck/pillar assembly is removable in case it needs repair in the future.
I decided to stain the maple, and after many samples, ended up using GF Rosewood water based stain as a base coat with an added coat of Dark Brown water based dye. I left the birch ply natural. A little gold leaf was added to trim the sound box and back, followed by a wipe-on satin polyurethane as a finish.
This is my first “fine” woodworking project, and though I made mistakes, I’m very happy with the results!


September 15, 2014
Poll: Your Workbench Situation
While some folks claim the table saw is the heart of the shop, the workbench is, in my opinion, where all the action really is.
 From setting down that first cup of joe in the morning to surveying the shop before you get to work until the final project stands gleaming upon it, it will probably be the location of much planing, cutting, routing, sanding and assembly throughout the course of your build.
While there is very little disagreement about the workbench being the center of action, there are many different workbench situations. Some can double as altars for some minor woodworking religion, while others exist only in the mind. Some folks labor for months building something that would look just as happy in a dining room, others get everything done with a Port-a-Mate folding work table.
In today’s poll, tell us about your workbench situation.
September 12, 2014
TWW Store News
 Be sure to check out the new and improved TWW Store!. We have a new store front that is easy to navigate with a much more user-friendly checkout process.
NEW SHIRTS! We have a couple of new T-Shirts in stock including the ever-popular Wood Whisperer T-Shirt in BLACK and the Guild Member T-Shirt in BLACK. And since the new black shirts are replacing the Camel colored shirts, the Camel shirts now on clearance at a reduced price (limited sizes).
So stop in today and give the “shipping department” something to do! Happy Woodworking!
September 11, 2014
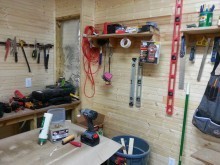
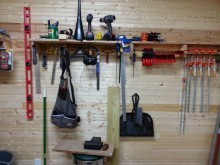
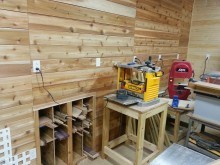
David’s Basement Shop
From: David Jordan (Huntingtown)
Shop Type: Basements
Shop Size: 0-249
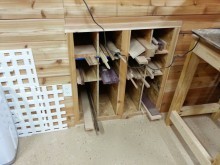
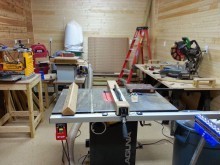
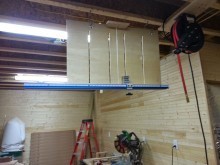
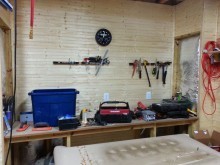
This is my small shop in my basement. It was the storage room and it’s about 22ft x 12ft in size. I used garage floor paint to make it easy for cleanup. I recently had it wired up with 20 heavy duty outlets that can all be turned off with 4 switches at the door. I also added a 400 cfm exhaust fan. Started out by putting cedar on one wall, but due to money constraints, I had to finish up with some wood paneling from a big box store. I added some wood storage under the stairs. All walls have Roxul Safe-n-Sound insulation in them to help eliminate sound going upstairs.
At a point that I am fairly happy with it, so obviously it is time to move. Our house will be up for sale soon but I will enjoy the shop until the day we move!

September 9, 2014
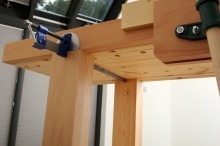
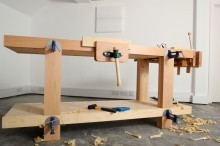
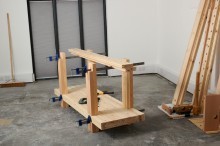
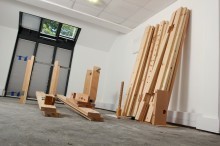
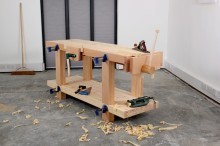
Edward’s Sash Clamped Workbench
By: Edward Slater (London / UK)
Experience: 2-5 Years
Woodworker Type: Hobbyist
Project Type: Shop Projects
Material(s): Solid Wood
Finish Type(s): Oil
Finishing Technique(s): Wiping
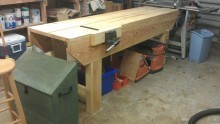
This workbench was designed to have a good weight and surface area while still allowing the user to continually transport it in a small car. The workbench remains portable as it is not glued but held together by four sash bar clamps.
Made from a mix of budget redwood and steamed beech, this bench hopes to fuse an economical build spec, good transportability and a recognisable shape. Finished in Osmo transparent wax oil, the user will soon find out if this is a useful design or a waste of clamps!


September 8, 2014
228 – Fixing Common Woodworking Mistakes
Whether we like to admit it or not, mistakes will happen. Knowing how to repair them may make the difference between a nerve-wracking build and a relaxed one. So in this demo (recorded live), I’ll show you some of the most common mistakes and errors I encounter and the various ways I like to fix them.
What You’ll Need
CA Glue – Cyanoacrylate is a quick-drying adhesive that makes it easy to re-attach small bits of wood. Used with a quick-set activator, it’s an incredibly ally in the battle of repairs.
Wood Filler – While many folks poo poo wood filler, there are just some flaws that call for the stuff. Getting the right color is the key and knowing a few tricks to give the appearnce of real wood is also a big help. The stuff I like to use is Timbermate Wood Filler.
Clothes Iron – Sometimes the best solution is a little heat and moisture. A household iron will help us steam out dents and scratches.
Repairing Tearout With Filler
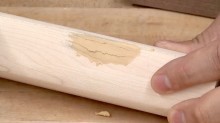 In some cases, a gnarly bit of tearout is best repaired with filler. A good quality filler that won’t shrink and accepts stain will give you the best chance of a good match. Since fillers are typically colored to match the primary background color of the wood, it can sometimes help to use a colored pencil to draw in the missing wood grain. Though I only resort to that for large/obvious repairs where the missing grain would be an eyesore.
Misplaced Mortise
 A mortise is nothing more than a big hole, so filling it with wood is usually the best and most reliable fix. Be sure to orient the grain so that the repair is in line with the grain of the workpiece. This provides the best visual match and in many cases makes the repair all but invisible. Cut the repair piece a little bit longer than the size of the hole and use sandpaper to create a slight taper at each end. This ensures a nice tight fit at each end where the repair is likely to be most visible.
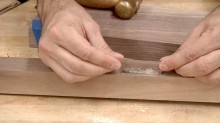
Repairing Chipout with Recovered Piece
 On occasion, fortune smiles upon you and a chipped out piece of wood is recovered. This is a good thing since the piece will most likely nest right back into position without any visible gaps. So all you need to do is use a little CA glue and re-attach the piece. Once the glue cures, sand the area thoroughly and you should have a nearly flawless fix.
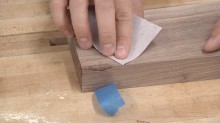
Repairing Chipout with a Patch
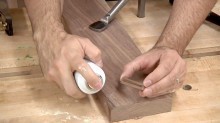 When you can’t find the chipped out piece (or it has been disintegrated by the Woodworking Gods) and you don’t want to use filler, a patch is often the most appropriate course of action. Since chipout/tearout is never a pretty sight, you’ll need to work the affected area with a plan or chisel to create a flat area for the repair. This is one case where you actually need to make the flaw bigger for the greater good. Once a nice flat area is established, simply glue in a small scrap of wood using CA glue. Plane, saw, scrape, or chisel away the excess stock and sand smooth.
Steaming Dents & Scratches
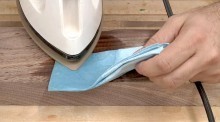 Blunt force trauma is a common occurrence in the wood shop. Whether you drop a workpiece on the floor or something drops onto the workpiece, you’ll often be confronted with dents that are too deep to just sand away. Fortunately, dents are nothing more than aggressively compressed fibers. Since wood fibers expand with moisture, we can steam the dents using a wet towel and a household clothes iron. With a few seconds of treatment, the wood fibers expand to fill the dented areas. Of course this will only work on shallow dents but it can still be used to lessen the impact of deeper dents. The same theory applies to scratches in solid wood and plywood.
September 7, 2014
Poll – Shop Aprons
 Whether fashion statements, safety gear or a wearable tool kit, shop aprons can help keep your woodworking clothes free of glue smears, finish spatters and caked-on sawdust. They can also be hot, uncomfortable, awkward and a complete pain in the rear.
This week, how do you feel about shop aprons? Something you reach for all of the time or something you avoid like the plague? By the way, if you’re in the market for a comfortable high quality apron, check out the Wood Whisperer Apron!
What do you think about shop aprons?
September 5, 2014
TWW Live 04 – The Bangles!
- Last Month’s Winner: Daryn Kiely (Clear Vue CV1800 Cyclone)
- This Month’s Giveaway (Enter Now!): Powermatic PM1500 Bandsaw
News/Announcements
- Nick Carruthers – a woodworker’s Labor Day weekend BBQ
-
- Krenov Cabinet Build Starts TODAY!
- Woodworks Conference – Sept. 26-28 – Perth, Ontario, Canada.
- Don’t miss the Bangle Bowl! – Enter your bangle in October and win some stuff! #BangleBowl2014
Featured Project
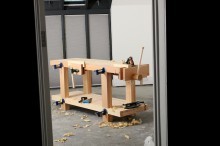
- Jens’ Serenity Rocker (cut on a CNC machine)
- Submit Your Project
In Case you Missed It
- Kyle Toth Segmented Bracelet
- Zac Higgens – Metal Core Bangle Tutorial
- David Piccuito (Drunken Woodworker) – Bandsaw Box
Gear Up!
- A look at the new ClearVue Mini CV06 Cyclone Separator
In the Shop
- Progress update on the Krenov-Inspired Display Stand
Q&A
- Tom Cocker – “How do you keep your enthusiasm up for a project when it begins to run out of steam? I am so close to the end of a couple of big projects, but struggling to make myself finish. Any suggestions?”
- Brian Pickrell – “Thinking of going the hand plane route to mill wood instaed of power tools. What kind of setup should I go with? Meaning, recommend a couple of planes for me as a hand tool newbie.”
- Russel Troyan – “How much do you tell clients about wood movement? Do you educate them, give them a quick warning, or leave them to experience the wonder themselves?”
- Michael Pickering – “I was wondering if you (aka your wife) have a tool budget. Primarily if you get a certain percentage of gross profits to put back into the shop or a certain percentage of net or a set dollar amount. Or if you just wear down the wife till she gives in and lets you get a new toy.”
- Terry Throop – “I want to carve a name in my project and I would like to stain the name dark, but no the rest of the project. How do I do that?”
- McGinn’s WoodShop – What’s a good method to check bandsaw wheel alignment? I have one I restored and no matter where I set the top wheel angle, the bottom won’t stay center.”
- S. Smith – “Do you have any preference on doweling jigs?”
- Donald Dean – “Can you put lacquer over an oil or oil varnish mix?”
- Impact-Vector – “What’s the ideal tool for dust collection on a compound miter?”
- 0bi1ken0bi – Do you use Kreg jigs or do you make your own?
Tune in to the next show on October 3rd at 1pm Eastern!
September 4, 2014
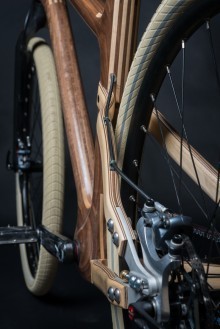
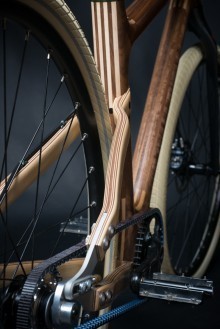
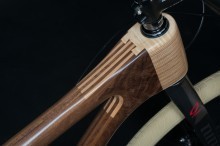
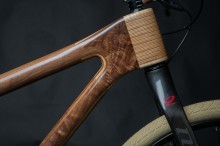
Mike’s AnalogOne.One
By: Mike Pecsok (Camarillo, CA)
Experience: 10+ Years
Woodworker Type: Professional
Project Type: Miscellaneous
Material(s): Solid Wood
Finish Type(s): Shellac, Wax
Finishing Technique(s): HVLP
Here is AnalogOne.One, the second rendition of my wooden bike design. I’ve used some figured walnut and maple in this build. The main frame is laminated from 9 alternating layers so that the seams are crossed-lapped. The chain stay and seat stay (rear triangle area) are bent-laminated using 33 layers of veneer and WestSystem epoxy. The main frame has been hollowed to facilitate internal cable routing, weight savings, and feel.
It was very important to me that this bike is fully functional. For this reason, I have used a carbon fork and standard bike components. It has a smooth ride that is silent thanks to the belt drive and sound absorbing properties of wood.
I’ve finished the bike with shellac after a long though on the correct finish. I know that shellac is not the most resilient; however, I chose to use it because, if the bike frame were to be dented or damaged, the shellac could easily be blended back into itself.
If anyone has specific questions, I will be happy to answer them!