Marc Spagnuolo's Blog, page 97
April 8, 2014
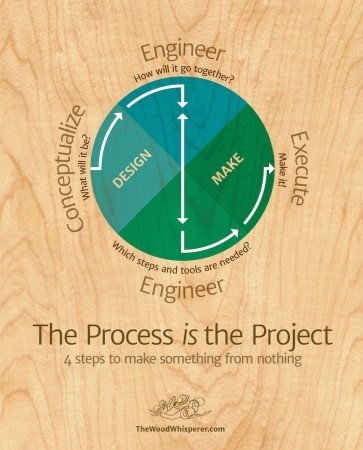
The Process is the Project
The furniture-making process is one that I think about a lot, though admittedly my mind is mostly focused on the actual cutting of wood and the tools required to do the work. As I recently discovered, the construction of a piece of furniture is only one slice of a delicious and much larger pie. I guess I always knew that the earlier parts of the process (those surrounding design) were both challenging and rewarding, but it wasn’t until I completed the Blacker House Chair recently that things became so painfully obvious to me. More on the chair later.
So let’s start this bit of public self-reflection by laying out the four phases of the creation process, as I see them. Although my focus here is on furniture, I believe these phases apply to any creative project be it physical, digital, edible or audible.
1- Conceptualize the design
2- Engineer the design
3- Engineer the build
4- Execute the build
The Four Phases
Phase One – Conceptualize the Design
In the simplest terms this phase answers the questions, “What will it be? What does it do? What does it look like?” In other words, it’s all about developing the form and function. For a guy like me, the visual aspect of a piece of furniture is the most challenging. Fortunately, most functional pieces will naturally limit our visual options to some extent; and that does help. But I personally find it very difficult to create something out of nothing and most of my designs are largely derivative of other objects I’ve seen in my life. Some might argue that all designs are derivative these days, but I think more than a few lucky people simply have a knack of coming up with designs that are different enough to be considered unique. I am not one of those people.
Phase Two – Engineer the Design
Once you know what you want this thing to look like, you have to engineer the joinery and other elements that will hold it together. If the first phase declares, “Part A connects to Part B at a 30 degree angle.” the second phase must ask, “How will Part A connect to Part B?” So the real value in this phase is that it ensures whatever is being made will not only work, but will not fall apart after its first use.
Phase Three – Engineer the Build
After we have a form and the structural elements to support it we have to decide what tools and jigs we’ll need to create the various parts. If the previous phase says, “Here are the joints you need to cut.” Phase 3 asks “How should I cut them?” This is actually much harder than it sounds and creativity and experience will go a long way. I often say that woodworking is nothing but a series of steps. Some people know the steps and some don’t. Once you know that series of steps, you too can make that particular piece. The sometimes seemingly “magical” series of steps is the stuff that makes up this phase. Some questions you’ll have to answer are: “In what order will I construct the parts? What tools will I use? How will I use those tools? What jigs might I employ to make the process accurate and repeatable?”
What’s cool about this particular phase is that it can often lead you backwards. Let’s say the part required to achieve a desired curve is just too severe and the material repeatedly breaks. If there’s no feasible way to create the part, it’s time to take a step back and revisit the design. Perhaps a slight modification in the design will yield a part that can be created with the tools, materials, and skills we currently have access to.
Phase Four – Execute the Build
While the three previous phases fall under the umbrella of thinking, the last phase is all about doing. A skilled set of hands is required to bring the project to life. This is where the craftsmanship comes into play. Music provides an apt metaphor. Just because someone can play a piece of sheet music perfectly doesn’t mean they can play it in a way that touches the listener’s emotions as the original composer intended. Subtle elements brought to the music by the player have the potential to fill the gaps between the notes, giving the piece a sense of drama and purpose. This is what a good woodworker can do with a simple set of plans; creating a piece to specification while leaving their own echo of personality and style.
Each phase is as challenging as it is necessary. If you leave anything out, the entire project could fall apart. A brilliant design amounts to very little if there isn’t someone there to craft it into existence. A terrible design is still terrible even if it’s built by a seasoned craftsperson.
Do You Need to Master All Phases?
Does success hinge upon a single person mastering all aspects of the creative process? Absolutely not. Look no further than your average large company for an example of efficient (sometimes?) specialization. In other words, they let the designers design and the builders build. Even Greene & Greene furniture (a woodworker favorite) was designed by the Greene brothers and built by the Hall brothers. Obviously, the system becomes much more efficient when the specialist of a particular phase has a knowledge-base that extends into the other phases as well. So as an individual, you are in an excellent position to design remarkable objects thanks to your knowledge and understanding of the tools and techniques used to bring it to life. There’s no better way for the left hand to know what the right hand is doing than to have those hands attached to the same body.
So while it might be nice to daydream about having a design passed down to your shop from the Creative Department, the truth is you are most likely at your happiest when you have a hand in all four phases (at least I am). Of course there are always exceptions and plenty of talented woodworkers are perfectly content building everything from pre-defined plans. But for most people, I have to imagine your enjoyment of the process goes beyond just building. For better or for worse, I will continue to dabble in all phases of the process.
The Blacker House Chair
 The genesis for this conversation was my recent Blacker House Chair class at the William Ng School. I have adored the design of this chair for years now and in many ways, I consider it to be one of the most interesting pieces of furniture ever built. And now I own one that was made with my own two hands. You might think I’d be overwhelmed by the sense of accomplishment having reached a pinnacle of my building career, but the truth is I’m not. Don’t get me wrong, I feel incredibly satisfied with the experience and I learned a LOT. In fact, I think I learned more during this chair build than I have on any previous project. But something’s definitely missing. It wasn’t until I sat down (in my new chair) to ponder my feelings on the situation that I figured it out: the Blacker House Chair experience consisted of only one single phase of the process.
I didn’t conceptualize this chair. Charles Greene did. I didn’t engineer the joinery. Again, Charles Greene did. I didn’t even engineer the building process as that credit goes to William Ng. All I had to do was take the raw materials and shape them according to William’s process and Charles Greene’s design. As someone who aspires to have a hand in all phases of furniture-making, you might now see how coming home with a complete Blacker House Chair after an 8-day class might not hold the same level of accomplishment and personal satisfaction as executing a much simpler design that was one of my own creation.
I don’t think I’ll ever be able to design something as complex and unique as the Blacker House Chair, but building one certainly opened my eyes to new design possibilities. Seeing how William tackled the various construction challenges helped me realize that just about any joint or shape can be made with enough forethought (and tools). And that’s why I wouldn’t hesitate to take a class like this again in the future. While it’s true that my only job was to build the chair, I walked away with a greater understanding of the Blacker House Chair design and the logic behind its construction. These are things I could very well apply to other projects in the future when I am in complete control of all phases of the process.
I can’t really claim to have any real moral to this story. I’m really just thinking out loud and sharing my understanding of my personal situation with you. Perhaps this will get your gears turning and help you identify which parts of the process you’re weak in and how you might go about improving them. Now that I have worked this out in my head, I feel I have a much better understanding of who I am as a woodworker and what my goals should be. Just a little food for thought. And now I’m full.
What About You?
How do you view your role in the furniture-building process? Do you typically spend most of your time in one phase or another? Is there a phase you excel at or one that you avoid at all costs? I’m curious to hear your feedback.


April 7, 2014
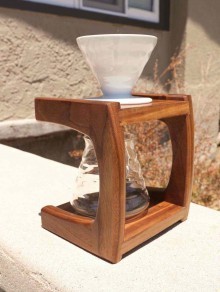
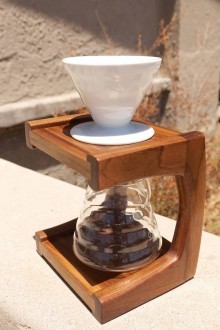
Walnut Coffee Pour Over Stand
By: Michael Corwin (Los Angeles, CA)
Experience: 0-2 Years
Woodworker Type: Hobbyist
Project Type: Kitchen Projects
Material(s): Solid Wood
Finish Type(s): Oil/Varnish Blend
Finishing Technique(s): Wiping
In the last few years, Los Angeles has undergone a coffee renaissance and many local roasters and cafes are sprouting up left and right. Because of this, I’ve recently upped my coffee game and have explored and tested different brew methods, grind sizes, and all sorts of coffee at home. One of my favorite methods is the pour over, in which you manually soak the grounds with hot water in a ceramic funnel. I decided to make myself a stand for the items needed, namely a Hario V60 filter and carafe.
For the project I used Walnut, which I domino’d together to form the butt joints. I then cut the dadoes for the shelves on my table saw with a dado stack. From there I freehand drew some curves on the two sections and cut them out on the bandsaw, refining the ridges with rasps and sandpaper. I rounded all the edges over with a series of round-over bits on my router table, and finished refining any imperfections with a block plane and rasp. Since the back section is curved, I had to make angled cuts so the shelves would fit. To do this I used my miter gauge at the bandsaw set to the appropriate degree and made the cuts.
After assembly and a period of sanding, I decided to finish the piece with an oil/varnish blend. I’ve been used to making my own mixture from BLO, but I wanted to try something new and since I live in CA, I am unable to get Arm-R-Seal which is really what I wanted to experiment with. After a trip to Rockler, I picked up some Sam Maloof Oil/Poly blend and put on 4 coats, then finished with Renaissance Wax. I’m very impressed with how the finish turned out, it is definitely a very satin “begging to be touched” finish that seems natural to Walnut.


Poll: Plastic Tool Cases
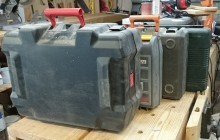 There’s nothing quite like getting a new tool back to your shop. And if that new tool is a hand-held power tool, you are probably opening a blow-molded plastic case that contains the tool, the manual, and all of the essential accessories you will need to use it.
The only problems? They are big, they take up space, and they are super bulky!
This week, let us know what you do with those cases. Do you store the tools and accessories in them, store them just in case, give them to the kids to play with or something else? Click Here to see what Marc does!
What do you do with the plastic cases your tools come in?
April 4, 2014
2014 Teaching Dates
Anyone who knows me well knows how much I hate flying. Unfortunately, that’s in direct conflict with the fact that I love teaching! As a result, some years are “travel years” and some years are “hide in my shop like a hermit” years. This is a travel year.
Weekend with WOOD – 5/16 – 5/18 (Des Moines, Iowa)
 This is a small weekend conference being hosted by the folks at WOOD Magazine. I’ll be teaching a few seminars on finishing, with a focus on hand-applied oil-based finishes. I have already heard from folks who are attending and I can’t wait to meet you. From what I see, the weekend is already sold out but you can put yourself on a waiting list if you’re really interested. Check it out!
William Ng School – 6/2 – 6/6 (Anaheim, CA)
 It seems like I take two trips to William’s shop every year: once to learn and once to teach. This June I’ll be taking students on a journey through the construction of the G&G Inspired Blanket Chest, recently featured in Popular Woodworking Magazine and demonstrated in the Wood Whisperer Guild.
Sign up today!
Center for Furniture Craftsmanship – 9/1 – 9/5 (Rockport, ME)
 This class is definitely going to be an interesting one! A class dedicated solely to making videos about your woodworking. Whether for profit or for fun, I’ll show you the tips and tricks I use to create each episode of The Wood Whisperer. By no means am I an expert in the field of videography but I have been making a living with my video content since 2006. So like anything I do, my hope is to share my experience with you so that you’ll be able to reach your goals too. Sign up today!
If you think you’ll be attending any of these events, let me know in the comments below. I’d love to meet some readers/viewers from the online woodworking community!
*note* Whenever I post a schedule, I inevitably get questions about when I’m coming to a particular city or region. I always find it funny picturing myself as a one-man rock band that can simply cherry-pick cities and venues. Unfortunately, that’s not how it works. In order to go anywhere, I need to be invited by a particular school or organization. So if you’re interested in me coming to your city, you need to contact your local resources and let them know. Sadly, I often have to turn these offers down because I can’t afford the time away from the shop and my schedule gets booked up quickly, but it never hurts to try.
April 2, 2014
217 – Tool Storage Cabinet
Tool storage is a challenge for any workshop. Even in my spacious 1800 square foot “warehouse,” I am constantly looking for ways to be more efficient and to prevent my tools from taking up more space than is truly necessary. My current dilemma is how to store my portable power tools so that they are out of their cases and accessible. There is no one-size-fits-all solution, but I hope sharing my thoughts on this topic will at least get your gears turning so you can tackle the storage challenges in your own shop.
A Case of Bloat
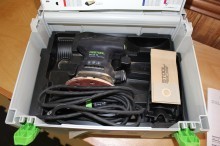 The manufacturers of portable power tools tools usually provide a molded plastic case that allows you to transport and store the tool safely. Unfortunately these cases tend to take up 2-4 times the space of the tool itself. In addition, the cases tend to be various shapes and sizes which makes them very difficult to stack; Festool Systainers being the obvious exception. But even Systainers can suffer from space bloat, as you can see in the picture to the left.
Toddler Inspiration
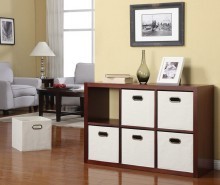 My solution was inspired by my son’s playroom. My wife purchased a simple cubby system (she wasn’t about to wait three years for me to build one) to help organize my son’s toys. I often thought this form-factor would lend itself well to storing things like sanders, routers, jigsaws, etc. But storing these tools would pose an additional challenge, and that’s the storage of the various accessories that come with all of these tools. The Tool Storage Cabinet is the answer to that challenge.
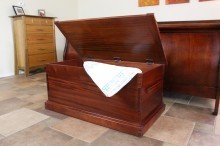
The Solution
 The Tool Storage Cabinet features five rows, two of which are just wide enough to house Festool Systainers. Each row features an adjustable shelf for the ultimate in versatility. The top consists of a split lid that covers additional storage compartments. If you don’t like the idea of a hinged lid, consider converting the storage bins into full-extension drawers. Feel free to download the SketchUp file below and modify the model as you see fit.
Download the SketchUp File
Download the PDF Plan with Cut List
Tools & Materials
The project consumes three sheets of 3/4″ plywood. You’ll have a lot of material left over on that third sheet so changing the dimensions or overall design could very well result in reducing the material to only two sheets.
This is a very Festool-focused build primarily because I wanted this project built quickly and efficiently without sacrificing quality. But you don’t need a Domino and a track saw to build it! There’s no reason you can’t use classic cabinet joinery such as dados and rabbets, or even one of the other popular construction methods including biscuits, screws, and dowels. For cutting down the plywood, consider making your own circular saw guide for precision “track saw-like” cuts.
If you’re looking for the hinges I used in this video, click here!
Join the Guild and Get A Simple Varnish Finish for FREE!
 We made a few internal changes recently and as a result, we are no longer selling A Simple Varnish Finish as a download in the TWWStore (the DVD will still be available). Instead, the download is now available for purchase in the Wood Whisperer Guild.
There are technical reasons for this change but the one that might matter most to you is the fact that in the Guild, we have more flexibility. For years, I have answered the same questions numerous times about topics in the DVD. The Guild gives us a permanent place to hold those discussions. Also, a lot has changed since 2008. I now have some different perspectives that I’d love to film and use as a supplement to the content of A Simple Varnish Finish. This is easily accomplished in the Guild.
So here’s the sales pitch. If you purchase a Guild subscription by the end of Monday, April 7th, you’ll receive A Simple Varnish Finish for FREE. Of course this is in addition to the free archived project you get when signing up and the next three projects that will take place in the coming year. By the way, the next project starts in May and it’s a sweet-looking Morris Chair!
To clarify, you have to purchase either a 1-Yr Standard Subscription or a 1-Yr Superfan Subscription in order to be eligible for this promotion. Sign up today!
Past Purchasers
If you purchased A Simple Varnish Finish via DVD or download in the past, I know what you’re thinking: “Well what about me?” Because we truly appreciate your support, you are eligible for access to A Simple Varnish Finish in the Guild. That means you not only have access to the video but you’ll also be an official A La Carte Guild member, with all of the features and benefits that come with membership. All I need from you is proof of purchase (email receipt is fine). Simply email us your proof of purchase and we’ll set you up. Please note that as a very small business run by a guy who isn’t afraid of wearing a wig and lip gloss on a woodworking show, we don’t have perfect records of all digital purchases since 2008. So you MUST have proof of purchase in order for us to give you Guild access. Thanks for your understanding and happy woodworking!
April 1, 2014
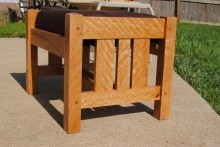
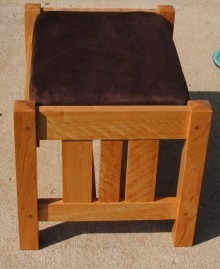
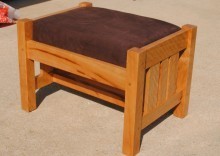
Tyler’s Arts and Crafts Ottoman
By: Tyler Williams (Georgetown, KY)
Experience: 0-2 Years
Woodworker Type: Hobbyist
Project Type: Chairs & Stools
Project Style(s): Mission
Material(s): Solid Wood
Finish Type(s): Oil/Varnish Blend
Finishing Technique(s): Wiping
I’ve done rough carpentry work my whole life (all 24 years of it) and I just started getting into fine woodworking about 10 months ago. Pretty much everything I’ve learned has been from online resources (The Wood Whisperer, Matt’s Basement Workshop, The Renaissance Woodworker, etc.) I really love arts and crafts style furniture, so I wanted to try something along the lines of a Morris chair. Given the intricacies of the Morris chair, I wanted to build, I decided for a first project I would start with an ottoman to accompany my future chair. I found some plans online and modified them slightly to suit my tastes.
When I say that I’ve learned pretty much everything from online resources, here’s what I mean:
1) Picking out the lumber for the project: TWW Episode 4: A Lumbering Feeling
2) Cutting the mortises and Tenons: TWW Episode 10: Tenons Anyone?
3) Matching the Grain: TWW Episode 69: Gadget Station (Pt. 12), among other episodes. This is especially apparent in the picture where you can see that the top and bottom stretchers are cut from the same piece of material with the dark streak continuing on both pieces.
4) Using thinned amber shellac to pop the grain to show off the curly cherry figure on the ends: TWW Episode 32: Pop Goes The Maple
5) Drawboring all of the critical mortise and tenon joints: TWW Episode 168: Drawbored Mortise & Tenon, and
6) Finished with Arm-R-Seal: TWW, basically every other episode!
Not to mention all of the little techniques I had to use for making it (i.e. I used a cross cut sled on my table saw to cut most of the pieces:TWW Episode 146 and I needed sharp chisels for a lot of the paring operations: TWW Episodes 21 and 181.
Thanks to all of this free online info, I’ve ended up with an heirloom quality piece of furniture that I’m really proud of. In short, this is more of a “Look what online woodworking can create” than it is a “look what Tyler can create.” I can honestly say that without all of the online resources, I never would have branched out from rough carpentry. So thanks to all of the online woodworkers out there, keep up the great work!

March 31, 2014
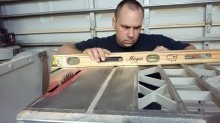
Poll: Are your tools on the level?
 There are lots of things you are supposed to do when you buy and set up power tools. You have to plan for how to get power to them. How they fit into your work flow. How easily they can be moved around the shop.
And, according to most owner’s manuals, they have to be leveled once they are set into place.
Oh, sure, the reasoning is sound. You don’t want to introduce any warp into your tool’s top, but, come on. We are woodworkers, not machinists. We want to start building as fast as possible!
So, this week, tell us, do you go through the step of leveling your tools, or it that something you don’t consider?
Do you level your power tools before you use them?
March 27, 2014
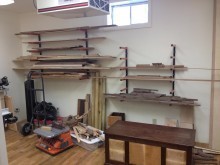
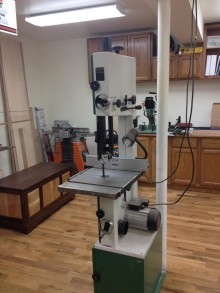
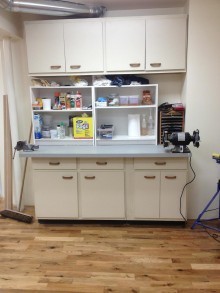
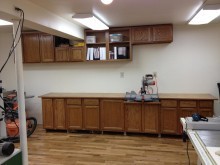
Jeff’s Basement Workshop
From: Jeff Marx (Chester Springs)
Shop Type: Basements
Shop Size: 500-999
We moved into our new house about 3 years ago in part so I could build a “proper” shop in the unfinished basement. I had formerly shared part of my basement between shop and gym equipment, and it really didn’t work.
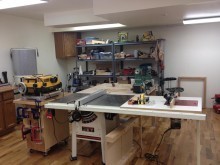
I carved out about 600 sq ft after much negotiation with my wife. I framed, wired, and sheet-rocked it and put in an oak hardwood floor on T&G ply and on top of foam insulation. I used a combination of recycled and new build cabinets to build a miter saw station and other recycled cabinets for finishing storage/area.
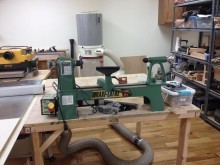
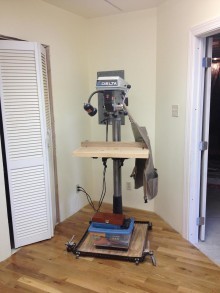
I have a Jet hybrid table saw with an integrated router lift (Porter Cable,) a Rikon band saw, Delta drill press with a custom table I built, a 6″ Rigid jointer, General lathe, Jet dust collector, and Dewalt planer. I just finished building a split-top Roubo workbench leveraging the Wood Whisperer Guild.
I love seeing other shops to learn from them. Eventually I plan to install duct work and blast gates for dust collection vs. moving the hose. I’m most jealous of the guys and gals with bigger jointers. I hope you enjoy! Your thoughts and suggestions will be greatly appreciated.
March 25, 2014
David’s Claddagh Jewelry Box
By: David Snoddy (Chantilly, VA)
Experience: 10+ Years
Woodworker Type: Hobbyist
Project Type: Boxes
Material(s): Plywood, Solid Wood
Finish Type(s): Commercial Stain, Oil/Varnish Blend, Wax
Finishing Technique(s): HVLP
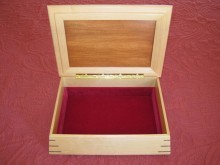
I recently completed this jewelry box for my wife and while is not the largest or most complex project I’ve ever tackled, this project ended up being far more time consuming than one would expect a project of such size to be.
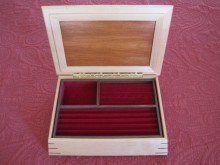
My wife has been asking me to build her a jewelry box for more than a year. Several times I made it as far as combing through all of my woodworking magazines and books for design ideas, but the project did not progress beyond that stage. That was until both my wife and I watched an episode of the Woodsmith Shop that featured a project they called the “Contoured Keepsake Box” which we both liked. Using that basic design as the starting point, I started working on my own version in Sketchup nearly five months ago. The actual modification of their plan and the design of the pull-out tray went rather quickly. What slowed down my effort was a decision to chip carve a design on the lid.
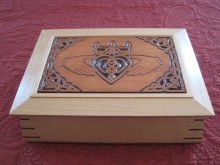
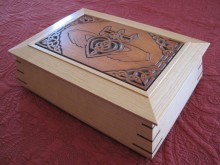
There were two time consuming ramifications of the decision to do a carving for the lid. First I wanted to develop my own original carving pattern for the lid based on a Claddagh Ring in a Celtic knot style. Consequently, the design for the lid took me three months to develop and refine until I arrived at a design both my wife and I liked (eight versions later!) Second, and perhaps more significantly, I had never chip carved before. So, I bought a chip carving book and the basic set of two chip carving knifes and took both a basic and advanced chip carving class at my local Woodcraft Store to develop the necessary skills.
The box and the frame for the lid is made from solid cherry with walnut splines and a plywood bottom. The pull-out tray is made from walnut. The chip carved center lid panel is basswood.
I pre-stained the basswood and then applied several coats of spray poly before I did the carving. Once the carving was complete, I applied a darker cherry stain to deepen the contrast of the Claddagh pattern. I sprayed upwards of five coats of poly on the box, tray, and lid and followed that with paste wax. The lining of both the box and tray is a self-adhesive velvet.