
Colin McCrate's Blog, page 19
September 2, 2016
Encyclopedia Botanica Podcast, Episode 11: Leaf Miners
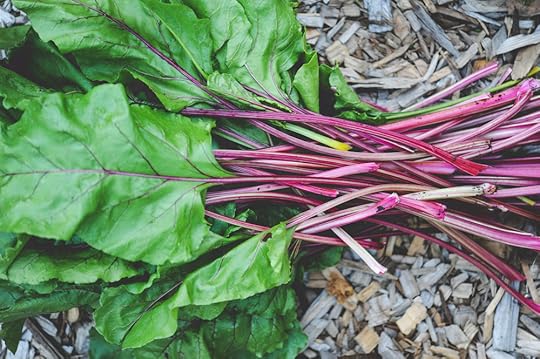
This week we’ll be talking about leaf miners. In my experience, I have found that leaf miners are more of an issue in the late spring and early summer, but many people have been asking about them in response to photos I have been posting of my beet greens on our various social media accounts so I wanted to go ahead and talk about them now in the late summer, because realistically, they can be a problem just about any time during the season.
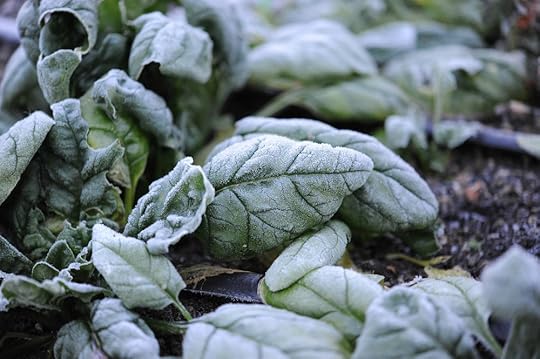
Leaf miner damage can be misleading because on first inspection, it looks more like damage from a disease than damage from a pest. To add to the confusion, there are two types of leaf miners that you might find in your annual garden: Vegetable leaf miners and spinach leaf miner. Vegetable leaf miners create serpentine mines which wind snake-like across the leaves gradually widening, whereas spinach leaf miners are a type of blotch leaf miner, creating irregularly-rounded shaped mines. There are actually lots of other types of insects known as leaf miners that affect a wide range of plant species including shrubs and trees, but for our purposes, we’ll focus on those that show up on our annual vegetables.


The Spinach Leaf miner feeds on:
spinach Swiss chard tomato cucumberceleryThe Vegetable Leaf miner feeds on:
beans eggplant pepper potato squash tomatowatermelon cucumberbeet pea lettuce many other plantsSome basic things to know about leaf miners:
Leaf miners are actually insect larva and the adults of both species are small flies.As the larvae feed and develop, they create “mines” of dead tissue where they have fed. These mines are opaque initially and then later turn brown.They are able to move from leaf to leaf when plants are touching, enabling them to damage an entire row of plants.The tunnels are small to begin with, but enlarge when the developing white maggots devour the material between the top and bottom layers of the leaves.They overwinter in the soil as pupae and hatch in mid-spring. The fly then begins the life cycle again by laying eggs on the leaves of the target plants. There can be three to four generations of leafminers per year, but the greatest activity is in mid to late May, late June and mid-August.The damage does not usually kill a plant, but they do render many greens inedible.Managing Leaf miners in your organic garden:
The parasitic wasp Diglyphus isaea is a commercially available beneficial insect that will kill leaf miner larva in the mine. However, to establish a population of beneficial insects typically requires multiple releases and the establishment of suitable habitat for all life cycles of the beneficial. Therefore, the release of wasps is more of a long term investment, definitely not a quick fix type of solution. Remove the infected leaves. In order for this form of control to be successful, you must be diligent. As we mentioned before, the miners can move between touching leaves and sometime they have already moved on to a leaf before you start to notice any signs of them. So if you’re employing this method of pest control, be sure to remove leaves as soon as you notice any small signs of damage. The more often you are able to visit the garden to check for damage, the more successful this technique will be.Organic neem oil. The oil is supposed to break the pests’ life-cycle by preventing larva from reaching maturity. Neem oil may also have repellent qualities and interfere with egg laying activities. I can’t say for certain that this method is successful, but it is a relatively easy and inexpensive option and Neem oil is a great organic spray to have on hand for an array of possible pest and disease issues.Preventing Leaf miners:
Floating row cover. Floating row cover creates a physical barrier between the pest and the crop. We actually discussed floating row covers, or reemay, in last week’s episode as a tool for season extension.Floating row cover is a lightweight spun-bonded polyester. The weight of row cover materials vary, so when choosing a row cover for pest-prevention, you might consider a lighter weight than you would for season extension so as not to overheat the crops. Some suppliers actually offer row covers made of a very fine mesh that is specifically designed for pest control. These fine mesh covers offer even more air circulation that the polyester type.
If you already have leafminer issues, don't trap the pests right in the bed with your crops! If you’re planning to use floating row cover, install it over a brand new planting in an area of your garden that has not previously been affected by leaf miners. The best technique would be to place the row cover over your new crop as soon as they have been seeded or transplanted into the garden.

There are many ways to use a row cover. The most common practice is to drape it over a series of hoops that span the top of your garden bed. These hoops can be made of bent plastic like PVC (see photo above) or electrical conduit or can be made from metal (Johnny’s selected seeds actually sells really nice thin metal rods specifically for this purpose).
Another technique that requires even less infrastructure is to simply lay the fabric directly on top of the crops. This method is great in that it does not require any additional materials besides the fabric and something to hold it in place. Many crops can grow by simply pushing up on the fabric as they mature. It should be noted that this technique can deform stems and leaves of crops and in certain weather can lead to fungal issues since air flow can be restricted when it is used in this way.


August 26, 2016
Encyclopedia Botanica Podcast, Episode 10: Cool Season Salad Greens
This week we’ll be talking about fall salad greens. Even though it’s mid-August and we are in the midst of record high temperatures here in Seattle, it’s a perfect time to be thinking about fall and winter harvests.
Derived from wild greens in the Mediterranean, lettuces and many other salad greens are well known for their reluctance to grow in hot conditions. One of my favorite ways to take advantage of the cooler temperatures of fall is to grow a variety of baby leaf crops and salad mixes. There are a lot of salad greens to choose from and I typically grow an assortment, including head lettuces, arugula, baby lettuce mix, mesclun mix, mizuna and spinach.
Fall salads can be particularly refreshing because in many climates, hot summer weather makes it extremely challenging to grow quality greens for a few months right in the middle of the gardening season. Some types of greens seem to perform even better in fall than they do in spring. For example, in our climate, fall is by far the best season for spinach and bok choi.
Like most of your other fall crops, it is essential to get these plants and seeds in the ground well before light levels and temperatures begin to drop. In most instances, you should determine your average first frost date and then work backwards using the crops “days to maturity” to decide when to put in your final fall plantings of salad greens. Remember that crops can grow a little more slowly as temperatures begin to cool, so it’s often advisable to be somewhat conservative when estimating how fast things will grow (meaning, allow them even more time that it says on the seed packet).
In the northern part of the US, our daylength changes dramatically from season to season. In the middle of summer, the days are extremely long, but in winter, there is not enough sunlight for most plants to continue to photosynthesize effectively. In northern regions, there is a portion of the year that some growers refer to as the “persephone period”. The persephone period starts when the total number of daylight hours dips below ten hours, resulting in a dramatic slowing of plant growth.
The “Persephone Period,” is named after the daughter of Demeter, the greek goddess of the harvest. Demeter was not very happy that Hades, the god of the underworld, was able to take Persephone away half of the year. The expression of her anguish became cold and dark days, otherwise known as winter, when plant growth cannot take place. Spring represents the yearly emergence of Persephone from the underworld. At least that is the short version of the tale, if you’re interested in mythology, it’s definitely a story worth investigating. Here in Seattle, our persephone period starts right at November 1 and lasts all the way until March 1. During this time, we don’t plant any new crops unless they are grown indoors with supplemental light. I’d encourage you to look up your daylight hours and put the beginning and end of your persephone period on your calendar.
Salad greens can be broken into two categories, cold hardy and moderately cold-hardy. Cold hardy crops can typically withstand regularly freezing temperatures and moderately cold-hardy crops can withstand occasional light frosts.
Crop planning for your salad greens should be informed by each species tolerance to freezing temperatures. Its advisable to plant more space in the garden with crops that can withstand lower temperatures and more regular frosts, because those crops will provide a much longer harvest period and a more robust overall harvest.
As an example, let’s compare lettuce mix with spinach. Baby lettuce mix is much less cold hardy than spinach. Therefore you may want to dedicate more space to spinach in your fall garden.
Since lettuce mix is only moderately cold hardy, if it is seeded only 4-6 weeks before your expected first frost, you might not have a very long harvest window for the planting. Since it is sensitive to freezing temperatures, it will start to deteriorate immediately after your first frost, thus forcing you to harvest all of the greens you can in a very short period of time. In contrast, spinach can tolerate very cold temperatures and even long periods below freezing. Therefore, a planting of spinach has the opportunity to provide greens starting in early fall, but lasting all the way through the end of winter. Other examples of very cold hardy crops are mustard greens, cabbage and kale.
The harvest period of all winter crops can be extended by planting in a greenhouse, using floating row covers, and planting under cold-frames. These season extension methods help keep crops warmer and help protect them from drying and damaging winter wind.
Season extension is a whole world in and of itself, so I won’t go too deep into this topic for now, except to say that, if you’re new to this concept, and would like a place to start, look into installing some simple floating row covers on a few beds this fall and see how it goes. Floating row cover is a white, spun polyester fabric that is breathable, so allows airflow and moisture to move across the barrier, but also adds a significant layer of protection. It can be purchased online and in many local garden stores. If you have a hard time locating it, growers sometimes refer to it by the brand name Reemay, spelled r-e-e-m-a-y.
Most winter crops are harvested just like they would be during the primary growing season. Crops like cabbage, head lettuce and bok choi are cut only once. Mature broccoli and kale can provide ongoing pickings, and in our climate can last through the winter and into March. Many other winter greens are grown as “cut and come again crops”. Cut and come again is a term that simply indicates that the plant can be harvested and then allowed to regrow to maturity for another cutting. Some of these crops can provide 3, 4 or even 5 cuttings through the winter season. While summer cut and come again crops will resprout very quickly, the winter version will happen much more slowly.
I particularly like cut and come again crops because they can be seeded in large swaths and do not need to be thinned down, allowing you to maximize your space during the time of year when plants grow very slowly.
Unpredictable winter weather conditions make it impossible to ensure that all fall and winter crops survive to maturity, so planting a range of different species will provide you with the best chance of success. If you find that some of your fall and winter crops don’t perform well on your first attempt, don’t be discouraged, growing during the off season like this can be challenging. Take note of the crops that do best and adjust your plantings next season.
Hello, I’m Hilary Dahl and this is Encyclopedia Botanica, a weekly podcast about edible gardening. Outside of this podcast, my job is to help beginning and experienced growers create beautiful and productive gardens. I have the unique experience of working in on a wide range of projects, from small backyard garden plots to multi-acre vegetable farms. I also work in my own garden every day when I get home. This podcast is an opportunity to discuss seasonal garden topics and share the the joy of growing your own food.

August 19, 2016
Encyclopedia Botanica Podcast 9: Peppers

Anaheim Peppers
It’s mid August, the time of year when, in many climates, peppers are starting to ripen. So, I want to talk a little about how to know when your peppers are ready to harvest. We’ll also discuss a little bit of the science behind pepper’s characteristic heat.
The plants that we refer to as “peppers” are part of the plant genus Capsicum. Peppers are part of the same broader plant family commonly referred to as “nightshades” which also includes tomatoes, potatoes and eggplant.
Cross-pollination between peppers happens in nature and through breeding efforts to create pepper new strains. This breeding has resulted in an astounding range of more than 3,000 known varieties of Capsicum, with new varieties continuing to emerge every year.
Peppers originated in Central America and these original wild peppers have been domesticated into hundreds of sweet and hot varieties. Generally speaking, bell and hot pepper plants like the same growing conditions- namely hot, sunny, dry weather.
Most gardeners are surprised to find out that green bell peppers are not necessarily a crop in themselves but merely unripe bell peppers that will eventually turn yellow, orange, red and sometimes even purple. Similarly, all hot peppers will eventually turn from green into a rainbow of bright, ripe colors, depending on the variety.
Both sweet and hot peppers can be eaten at all stages of growth but are typically most flavorful when mature and fully ripe. Most peppers start out green and very often do not turn colors until late in the season and the different cultivars vary drastically in size and shape.
So this begs the question, how do you know when to pick your peppers?
It should be noted that some varieties of sweet and hot peppers are traditionally picked when still green. Common examples would be jalapenos, anaheims and your ubiquitous green sweet bell pepper. There is absolutely nothing wrong with picking peppers green, and sometimes your planned use will dictate the desired level of ripeness. Sometimes you may find that you simply have to pick some of your peppers while still green due to weather conditions, such as an impending cold front or excessive rains.

Dried Cayenne peppers - Cayenne's picked green will mature to red while drying.
Given the huge number of varietals available, the first step in your process should be to simply identify the variety and research its mature size and color, which should be easy to track down from your seed supplier or just through an online search. Once you know the name and characteristics of the mature fruit, you can start to consider how you might use the peppers and look into recipes and recommended uses for that specific type. Some peppers are best eaten fresh and underripe, some are best when fully ripe, others are typically grown to be dried or ground into a traditional hot sauce. Chances are that your peppers can be used in a number of different ways, but the key is really to just learn about its characteristics and make a plan for when to harvest.

Padrone peppers are traditionally harvested green.
When thinking about pepper ripeness, you may also consider its level of spiciness. These days, it isn’t uncommon to hear people talk about the relative hotness of peppers in terms of Scoville Units. The Scoville scale was created to allow accurate measurement of the pungency of peppers. Their heat and location on the scale is determined by the capsaicin concentration in the fruit. Capsaicin is a compound within the peppers that makes them taste hot.
Obviously, the spiciness of peppers can vary widely, from totally sweet bell peppers to extremely hot types like ghost peppers and habanero; and everything in between. Cultivated varieties are selected for higher or lower levels of capsaicin. Bell peppers are cultivated varieties that have been selected for low capsaicin content, rated as zero on the Scoville scale; and ghost peppers for the highest level possible, rated upwards of a million on the same scale. As a point of reference, Jalapeno peppers rate about 2,500 on the scale.
It’s theorized that peppers and other plants with high levels of capsaicin have evolved this compound as a protective measure against being eaten by mammals or attacked by various fungi in the wild. Interestingly, birds have receptors that are insensitive to capsaicin so they are able to help spread the seed.
In garden circles, it is generally accepted that pepper plants will perform best and create the hottest fruits if they are exposed to dry, hot weather. However, some peppers growers have hypothesized that exposure to extra moisture may induce a pepper plant to increase its capsaicinoid production. The idea being that the plant will produce more of this compound in order to fight off potential fungal diseases during periods of rain or high humidity.
If this is true, it would suggest that plants grown in wetter conditions would produce spicer fruit. At this point, it is somewhat unclear how much evidence of this behavior has been scientifically documented, but it certainly seems worth taking note of.
I do know that last summer we had really really warm weather for our region, and the peppers we grew for our clients were very productive. I grew a handful of padrone plants in my garden and was roasting them all summer long and eating them whole. When fall came around, it started to rain a bit earlier than normal and the peppers kept producing late season fruits. I found that these fruit were significantly spicer. We received similar reports from a few of our restaurant clients last fall, clearly anecdotal evidence and not at all conclusive, but interesting nonetheless.
As pepper fruit ripens, this process also triggers capsaicin production; again, this likely serves as a way to stave off fungi and protect the maturing seeds inside.
It seems likely that, starving the plants of water, as typically suggested, stresses the plant slightly, forcing the fruit to ripen more quickly and increasing the production of capsaicinoids. This same concept is often applied to tomatoes and wine grapes, wherein many growers reduce water to the plants during fruiting in an effort to speed up ripening and increase the intensity of flavor within the fruit.
Well, I hope this has been a helpful primer on pepper ripeness. Thanks for listening and I’ll see you next week!
August 12, 2016
Encyclopedia Botanica Podcast, Episode 8: Radishes

French Breakfast Radishes
This week we will be talking about radishes. August is a good time to start planting radishes for a fall harvest, so I want to talk about how you might want to think about planning for and planting your fall radishes and also about some varieties that have actually been bred specifically for fall production.
Many people think of radish as a spring crop because, well, they are! It’s less well known that radishes are a great late-summer and early fall crop and that some varieties actually require the cooler, shorter days of fall to bulb up.
Frankly, I learned this the hard way. Years ago I got REALLY into radishes and started ordering all these new varieties of daikon and watermelon radishes to try out. I sowed them in the spring and early summer, when I would normally plant radishes and every time they would germinate, and grow up until the point that I would think they were ready to harvest and I would go to pick them and they would be all greens and no root. So I would leave them a little longer and they would start to bolt, but still no root.
I decided to dig deeper and it turns out that radishes can be split into three categories, when it comes to seasonal preference, there are spring, summer and fall radishes. The lines between spring and summer radishes are a little blurred, but the more you know about their preferred growing conditions, the more successful you’ll be in the long run. Generally, the radishes denoted as “spring” types can often be planted throughout the entire growing season. The designation of spring radish can be a little confusing, so it’s probably easiest to just remember that spring radishes are the most adaptable and typically perform well as spring, summer and fall crops.
I want to quickly discuss the growing culture of spring and summer radishes and then later in the podcast I will revisit the specific needs of the fall varieties.
In general, growing radishes is super simple. They are direct-seeded into the garden beds, so there is no need to mess with transplants. Direct seeding also facilitates easy succession planting because all you need are the seeds and some space in your garden. For a continual harvest of radishes, seed short rows every 2 weeks during the growing season. Radishes can be harvested in as little as three weeks after sowing.
Because they grow so quickly, radishes are a great crop to plant alongside longer season crops. You can interplant them with brassicas, squash or nightshades and get a quick harvest while your long season transplants are just starting to size up. Keep in mind that radishes are a brassica family crop, so practice crop rotation whenever possible and refrain from planting them in areas of the garden that may be affected by brassica diseases such as clubroot.
Radishes will grow in a wide range of climatic conditions, but most grow best in cool weather, around 50 F to 65 F. You can direct seed them as early as 6 weeks before your average last frost in the spring and all the way up until about 6 weeks before your average first frost date in fall. You’ll seed them about ½” deep and thin them to 1-2” spacing after they’ve germinated. Of course, you’ll want to make sure to eat your thinnings. Try them on top of a salad or in a sandwich.
Like all root crops, proper thinning will provide you with the best quality crop, but radishes are a little more forgiving than other crops like beets or carrots. Often, if radishes are a bit crowded, they will simply push each other out of the way and you can harvesting the largest roots first and leave the smaller ones to continue to sizing up for another week or two.
In the middle of summer, hot weather can reduce quality, making the roots pithy and can also increase the pungency or spiciness of the radish. If you find that your summer temperatures are too hot for radishes, often evidenced by bolting, just stop planting for a while in the peak of summer and resume your successions when things start to cool down again a little bit. Some, more heat tolerant “summer varieties” like Summer Cross do exist. Check descriptions in your seed catalog if you are looking to select different varieties for spring, summer and fall plantings. In our climate, we find that many spring radish types will grow well throughout the summer season.

Misato Rose Radish
Winter radishes behave a bit differently than the spring and summer types. Winter radishes will typically grow more slowly, taking up to 2 months or more to reach maturity. They will also produce larger roots and some of these have atypical shapes, like the cylindrical daikon. Winter radishes will also hold their quality much longer than spring and summer varieties. You may see winter radish types referred to as Oriental, Daikon, Japanese, Chinese, or Spanish radishes. Like all late season crops, winter radishes need to be planted in summer for fall harvest.
You’ll want to plant most winter varieties so that they mature around your first fall frost date, so you might want to have them all in the ground about 6-8 weeks before your expected first frost. A light frost will improve the flavor and texture of most winter varieties. Since winter varieties are typically larger than other radishes, they need more space, so you’ll want thin them to about 4-6-inches depending on the variety.
So if you are interested in expanding your radish horizons, I encourage you to start exploring different types now. Get some seed on hand and start to get your fall crop in the ground.
Here is a quick list of my favorite radish types, I’ll have these listed on our blog for easy reference after I post this podcast.
For spring and summer:
Cherriette (a typical small red round type that seems to always grow perfectly)D’Avingon (a french breakfast type which is longer and narrower with a two-tone pink and white color).Easter Egg radishes (which is a mix of different colors that can all grow together)Shunkyo (which is a narrow Chinese type that can be grown in spring).For fall:
Nero Tondo and Round Black Spanish (black radish)Misato RoseDaikon radishesWell, that’s it for this week. Remember, you can subscribe to our podcast via iTunes and we’d love to hear what you think, so leave us a review!
August 5, 2016
Encyclopedia Botanica Podcast, Episode 7: Curing and Dry Storage

Hello, I’m Hilary Dahl and this is Encyclopedia Botanica, a weekly podcast about edible gardening. This week we will be talking about curing and dry storage techniques for onions, garlic and winter squash.
Certain crops can be cured before eating and storing so as to improve flavor and increase storage life. Curing is the process of holding a crop at a relatively high temperature for a short period after harvest. Because the curing process varies by crop, we’ll discuss a few specifics here.
Let’s start with onions. Onions are, in my opinion, some of the most satisfying crops to grow. They are among the first transplants to be tucked into the early spring garden, and are ready to harvest at the onset of peak harvest season, a harbinger of the forthcoming abundance. Luckily the crops are happy to be stored away for us to enjoy during less bounteous times of year. However, to store onions for more than a few weeks it’s necessary to cure them. Curing onions allows the outer layers to dry out and tighten, forming a protective wrapping around the bulb.
Bulbing onions are ready to harvest once the stems start to turn brown and die back. The tops will also start to flop over and portion of the bulb will usually be above the soil surface at this time. To harvest, lift the entire plant from your garden beds. If the weather is warm and sunny, you can leave the onions in your garden for several days to begin the curing process- just be sure to pull them undercover if it starts to rain. We’ve been having funny weather here in Seattle this summer, and I accidentally left all 34 of my onions out during an overnight downpour a few weeks ago. I have them back out in the sun to continue curing, but I am pretty sure that this soaking has compromised the storage life of my onion crop.
If you have left your onions out in the sun, you’ll want to move them to a covered, well-ventilated location after a few days. This could be a covered car port or a porch, or a greenhouse or shed with the doors left open. Lay the onions out on a surface that is off of the ground. A metal outdoor dining table- the kind with the mesh top- work really well because they allow air circulation around the bulbs. Leave your onions like this until the tops are fully browned and dried (this should take about two weeks). Once the tops are fully browned and dried, you can trim the roots and tops within 1 inch of the bulbs and move them into long-term storage. Depending on the quantity you grew, a long term storage location could be a large mesh bowl on your countertop, a few cloth-mesh bags, or a large crate.
If you have left your onions out in the sun, you’ll want to move them to a covered, well-ventilated location after a few days. This could be a covered car port or a porch, or a greenhouse or shed with the doors left open. Lay the onions out on a surface that is off of the ground. A metal outdoor dining table- the kind with the mesh top- work really well because they allow air circulation around the bulbs. Leave your onions like this until the tops are fully browned and dried (this should take about two weeks). Once the tops are fully browned and dried, you can trim the roots and tops within 1 inch of the bulbs and move them into long-term storage. Depending on the quantity you grew, a long term storage location could be a large mesh basket [image error]on your countertop, mesh bag[image error] or wire hanging basket[image error].
Depending on the variety, onions will have different storage capacities. Generally, yellow types store longest, but be sure to read about the varieties you are growing, or planning to grow before deciding which ones to cook with first. If properly cured and stored, it is possible to eat bulbing onions from midsummer through the following spring.
Next I want to touch on storing garlic. As with onions, garlic must be cured for long-term storage. Harvest garlic when about half of the leaves are brown and half are still green. If you wait until the entire plant is brown, the storage life will be compromised because the cloves will have already started to separate and won’t have that nice thick layer of paper to protect the cloves. When choosing which heads to store, the ones with the tightest grouping of cloves and thickest paper are the heads that will sure the best and keep the longest.
To cure, do not wash your garlic with water, simply knock off any large clumps of dirt that may be clinging to the plant and the roots. Do not remove the cloves from their papery wrapping. Unlike onions, garlic does not benefit from time curing in the sun. Immediately hang the plants, fully intact, in a warm, dry, dark place for several weeks. This will increase the storage life. After 4-6 weeks of curing, the garlic stalk and roots can be trimmed back to so that the bulb resembles one that you would buy at the store or farmers market. This trimming of the stalk and roots is not necessary, but does make using the garlic a little easier when it comes time to cook with it. The smaller heads also require less storage space.
Lastly, I’d like to discuss winter squash and pumpkin storage. As with both onions and garlic, winter squash and pumpkins do not need to be cured before eating, but they will keep best if cured for 7-10 days. For best flavor, wait to harvest winter squash and pumpkins until their stems are dry and they have a yellowish/brownish mark where they have been in contact with the ground. Leave at least 4 inches of stem on your fruit. A broken stem exposes the fruit to rot, so be careful when harvesting and transporting fruit. If the stem breaks off completely, be sure to use it within a few weeks of harvest.
Fruit that is exposed to freezing temperatures will not store long, so make sure to harvest winter squash before the first frost in the fall. In general, temperature extremes reduce storage life, so aim to keep your winter squash in a dry location that stays between 50 and 55°F.
A harvested winter squash continues to breathe or respire. During the curing process, the skin becomes harder, forming a protective layer over flesh. That harder skin slows respiration, which ultimately improves fruit keeping quality. Harder skin also resists rot better.
Unlike onions and garlic, you will want to wash the squash with a very mild solution of 1 tablespoon of bleach to 1 gallon of water before curing, to eliminate fungal spores. Squash cures best at 70-80 degrees Fahrenheit. Since we harvest it late in the season, you might have to create the ideal conditions instead of relying on nature. Once the fruit has been cleaned, you can bring it indoors and place it in a sunny window or warm room. After 7-10 days of curing, the fruits can be moved to a well-ventilated shelf or counter for long-term storage. I like to keep my squash in place that is in plain sight so I don’t forget about them and so I can catch any that may be starting to go bad.
Well, hopefully that covers some of the basics of curing and dry storage. As always, there is plenty more to discuss on the topic and we’ll continue to dig into these concepts in future episodes. Feel free to leave any questions you may have on the podcast transcript on our blog. I’d also love to hear your what you think about the podcast so far so leave a review on iTunes! Happy curing and I’ll see you next week!
Related Archives:
ENCYCLOPEDIA BOTANICA PODCAST, EPISODE 6: TIMING YOUR HARVESTHARVESTING WINTER SQUASHHARVEST AND STORE YOUR GARLIC AND ONIONSJuly 22, 2016
Encyclopedia Botanica Podcast, Episode 6: Timing Your Harvest

Harvesting Arugula
Hello, I’m Hilary Dahl and this is Encyclopedia Botanica, a weekly podcast about edible gardening. This week we will be talking about harvesting your crops for maximum freshness and quality.
This is a little discussed but super important topic. Considering how much time and effort you have invested into your garden, the least you can do for yourself is to ensure that you pick your crops when they are at their peak. The taste, texture and storage life differential between a crop at its peak and one past its prime is enormous. Like anything else in gardening, the exact timing and methodology for harvesting will vary based on the species. The information we’ll talk about today is partially excerpted from our book High-Yield Vegetable Gardening, which also includes charts and graphs about harvest and storage temperatures for all of the crops. Today I’d like to explore some of the major concepts so that you can begin to watch your developing crops a little more closely and capture that extra goodness that comes from harvesting at the peak of perfection.
Unless you’re a middle school science teacher, you may not consider this on a regular basis, but your crops are always undergoing cellular respiration. Cellular respiration is a major part of the metabolic process. It releases energy to fuel plant growth by breaking down sugars and other nutrients. However, cellular respiration continues on in your harvested greens or fruit even after they have been picked from the plant. No longer actively participating in the metabolic process of the plant, this energy cycle continues to break down nutrients and begins to decompose the plant matter.
Interestingly, some vegetable crops have much higher cellular respiration rates than others, and the higher this rate, the faster the deterioration. Lettuce is a good example of a crop with a high respiration rate. You’ve probably seen this when you cut a head of lettuce and it starts to wilt almost immediately after harvest. The best way to extend the storage life of the lettuce and to maintain quality prior to eating, is to dunk or spray the greens with cold water as soon as possible after harvest. As a general rule, crops with high cellular respiration should be cooled as quickly as possible once harvested from the garden; thus slowing down the respiration process and extending the life of the harvest.
Crops with high respiration rates are best eaten as soon as possible after harvest. Fresh-picked ears of corn that are purchased from a farmers market or roadside stand are always tastier than corn that has been sitting in a grocery store for days. This is because sweet corn has a very high respiration rate. High respiration crops can be very satisfying to grow at home because you get to eat them at their peak. Other high respiration crops include: Asparagus, broccoli, peas, sweet corn, artichokes, Brussels sprouts, green onions and snap beans.
If you haven’t tried this before, I highly recommend picking an ear of corn out of the garden and eating it immediately, without cooking and even without taking the obligatory photo instagram. It can be a truly transcendental experience. Even more so with asparagus. Next time you see a nice, healthy spear of asparagus ready to pick, cut it off and eat it raw right there in the garden. I think you’ll find it's almost an entirely different food, extremely tender and sweet.
One of the easiest ways to ensure post-harvest quality is to pick your crops at an appropriate time of day.
If a high respiration crop needs to be cooled to preserve its post-harvest quality, it makes sense to harvest it when the air temperature is cooler. If you cut a head of lettuce or pick a bunch of kale at noon when it’s 80 degrees outside and leave them in the sun for even a few minutes, they will quickly wilt. However, if you pick them at 7:00 in the morning when the temperature is only 60 degrees, they will hold their quality much longer.
Additionally, many crops store best at high humidity levels because it will help them stay hydrated and crisp. If you pick these crops when there’s still dew on them, it’s easier to maintain an appropriate humidity level after harvesting. Some large commercial lettuce operations actually do their harvesting at night because it saves them a lot of time and energy that would otherwise need to be spent on cooling and hydrating the lettuce.
In contrast to lettuce, some crops keep best when harvested after the dew has burned off, like tomatoes and cucumbers. These crops can be more prone to rot after harvest if their outer surface is wet.
A good strategy is to pick crops that like to be cool and wet early in the morning, and to pick crops that like to be dry in the mid-day or evening when dew has burned off.
For small quantities, all you need to do is harvest your crops when it’s cool outside and there’s still dew on the leaves, place them in a plastic bag, and set them in the fridge. The bag keeps the humidity high, and the fridge quickly cools things down. Be careful not to jam too much produce into a small drawer or compartment; air circulation around the bags is important to cool the crops. If you need to keep the produce outside for a while, bag it to maintain humidity and be sure to keep it in the shade. You might give each bag a spritz of water if the crop is completely dry at harvest time.
If the crops are dirty and/or were harvested during the heat of the day, place them in a colander and give them a good rinsing. This will clean them up and cool them down. For mixed lettuces and salad greens like arugula, mizuna, or baby spinach, a salad spinner works well for drying before packing. For larger quantities, fill a mesh laundry bag and spin it around by hand (be sure to wash and dry the mesh bag in between uses.
In contrast to these cool, wet crops; there are a bunch of crops that prefer to be picked when warm and dry. Examples include Potatoes, eggplant, tomatoes, peppers, squash, cucumbers, melons, beans and alliums.
This makes harvesting easy because all you need to do is wait until the dew has dried off and then start picking. If the crops need to be cleaned or are still a little damp with dew, most of them can be wiped off with a dry rag, or wear soft cotton gloves while you’re harvesting and wipe them off as you pick.
Most of crops that like to be dry also don’t mind being a little warmer at harvest time. If you’ll be eating them soon, don’t worry about cooling down your tomatoes or squash, just pick them and store them at room temperature until they’re ready to use. Some storage crops like onions, garlic and potatoes need to be cured before storage and we’ll discuss this during next week’s show.
Well, hopefully that covers some of the basics of harvest science and timing. There is plenty more to discuss on peak harvest techniques and we’ll continue to dig into these concepts in future episodes. Happy harvesting, I’ll see you next week when we begin to explore the wild world of curing and dry storage.
July 15, 2016
Encyclopedia Botanica Podcast, Episode 5: Fall Crops

Hello, I’m Hilary Dahl and this is Encyclopedia Botanica, a weekly podcast about edible gardening. This week we will be talking about fall vegetable crops and how to plan ahead to make sure you get them in the ground in time for a robust late season harvest.
Gardening is fraught with misnomers and confusing terminology. A classic example is the term “winter squash”. Experienced growers will know that cucurbits are categorized as winter squash if they are meant to be stored and eaten during the winter months. Examples include acorn squash, hubbard squash and pumpkins. However, beginners often assume that the term indicates that the crops should be planted in winter. You have no idea how many first time gardeners have asked us about planting Butternut squash in October.
Similarly, many beginning gardeners start their fall brassica and root crops too late in the season because they assume that these crops are planted in the fall, whereas these crops are actually meant to be harvested in the fall.
In order to have a successful fall and winter harvest, you need to start many of your crops in the peak of summer, meaning July and August in most regions. Some faster growing fall crops like lettuce and radishes can be planted into late September; But many desirable fall crops like Broccoli and Carrots need several months of prime growing conditions in order to mature before cold weather and low light levels set in.
Each crop has a relatively predictable lifespan, meaning that you can anticipate approximately how long it will take to reach harvestable size. The lifespan of the crop is usually defined by the phrase “days to maturity”. The exact days to maturity indicated for your crop on the seed package or plant tag will vary by environmental conditions, but should be fairly accurate. Some plants, once mature will live for several weeks or even months in the garden (examples of these crops are: broccoli, kale, beets and spinach), others need to be harvested quickly in order to capture their peak quality (examples of these crops are: lettuce, cilantro, and radish)
By planting fall crops in July and August, they have time to size up while the growing conditions are still good. Depending on your growing zone, these crops may be ready to start eating in September or October and, in milder climates like here in the Pacific Northwest, many of these crops can survive through the winter, providing much needed garden love in the gloomier months of the year. Think about winter gardening as a way to turn your vegetable plot into a giant refrigerator. If you plan properly, you can be harvesting from the garden all through the cold season and into the early spring.
A key to planning a successful fall garden is the proper management of spring and summer plantings. In most gardens, where space is limited, it is imperative that early season crops are harvested and removed from the garden in a timely fashion in order to make room for the new fall plantings. Examples of crops that may be finishing up in your garden mid-summer and should be cleared out to make room are Garlic, Onions, Potatoes and spring Brassicas like Cauliflower, Cabbage and Broccoli. You might also have some salad greens that are exhausted and ready to come out or even your spring beets and carrots. If you haven’t done a full year crop plan for the garden in anticipation of fall plantings, I would recommend doing an inventory of harvestable crops in the garden now and begin to figure out how much space you will have available over the next couple of weeks as things are ready to clear out and store.
Because fall weather is typically cooler and day lengths are shorter, fall and winter crops often keep their quality longer and bolt more slowly than summer crops. Fall crops have different levels of tolerance for cold, depending on species. Some, like spinach can handle consistent frosts and even snow. Others, like beets, should be harvested before hard frosts set in.
While all of this “fall gardening business” might sound too good to be true, you must keep in mind that only certain crops are cold tolerant enough to survive fall and winter weather. Therefore, your selection of plants will be more restricted than in the spring and summer.
With that being said, there are some great crops, probably some of your favorites, that you can plant for fall or winter harvest.
A list of crops for fall planting can be found on our blog, but here is a quick list of some of my favorite varieties:
Some examples crops that need to be planted earlier in summer (so right about now) for fall success are Beets, Broccoli, Cabbage, Carrots, Cauliflower, and Kale. Specific varieties I like are: Arcadia Broccoli, Marathon Broccoli, Melissa Savoy Cabbage, Nelson Carrots, Snow Crown Cauliflower, and Lacinato Kale.
Great fall choices that can be planted later in the summer and into early fall are Arugula, Lettuce, Mustard Greens, Radishes and Spinach. In fall, I particularly like growing Romaine head lettuce, Mizuna, Watermelon Radishes and Regiment Spinach.
To circle back to timing, it is important to remember that, in general, fall crops need a little extra time to mature because the amount of daylight they are receiving less and less daylight as the season progresses- so when in doubt plant your fall crops a little early.
Well, that’s it for this week, you can read a lot more about fall and winter gardening on our blog and in both of our books, Food Grown Right, In Your Backyard and High-Yield Vegetable Gardening. Get out there, find some space in the garden and get your fall crops growing!
July 8, 2016
Encyclopedia Botanica Podcast, Episode 4: Cilantro

Cilantro ready to harvest
Hello, I’m Hilary Dahl and this is Encyclopedia Botanica, a weekly podcast about edible gardening. This week we will be talking about the herb cilantro. There are so many interesting herbs, that I will revisit the subject in subsequent podcasts, but for now I want to focus on one of my very favorite crops to grow, cilantro. Like basil and dill, cilantro is an annual herb, meaning that it is replanted in the garden every season. Plants categorized as “herbs” come in all shapes and sizes, including large, woody perennials, herbaceous perennials, biennials and annuals. The lifespan and hardiness of herb species depends largely on your climate, but cilantro is a particularly peculiar case because of its surprisingly short productive life.
In our opinion, cilantro is the finest of herbs, but many people think it tastes like soap! The reasoning behind this is interesting, but too complicated to dive into in this episode. To learn more, check out this New York Times article.
When the topic of cilantro comes up, the phrase I hear most common is, and I quote: “Whenever I plant cilantro, it just bolts so quickly!”. Yes indeed, cilantro will always bolt quickly. It should provide some level of relief to most gardeners that, fast bolting cilantro in your garden is not an indication that you did something wrong, it is simply the inevitable growth habit of the crop.
When reviewing seed suppliers, you can count on the fact that most of the varieties of cilantro will be described as “slow bolting” or “slowest bolting”. I think slowest bolting is a much more honest assessment, because, no matter what variety you plant and no matter what environmental conditions you provide, cilantro will bolt more quickly than you’d like. There are not as many varieties to select from as there are for many other crops, and to date, we’ve had the best luck with Santo, although we continue to experiment with other varieties including caribe, which has not been germinating as reliably as our trusted Santo type.
Even though the mature plant is very tolerant of cold weather and can survive light frosts, cilantro does not germinate well in cold soil. Given its short lifespan and predilection to bolting, we always direct seed cilantro into the garden and never bother with transplants. Cilantro seed is huge, so it's very easy to seed at the thickness you desire and it's very easy to see how evenly you have seeded the crop. We seed relatively wide and short rows of cilantro, an average planting might be a row about 2” wide and 12” long. The planting plan for cilantro in our gardens is very small but frequent and consistent plantings to ensure a steady supply of the crop. If you want useable cilantro from the garden through the season, I would recommend direct seeding a 12” row every 1 to 2 weeks through the entire season, starting in mid-spring once soil temperatures are above 50 degrees and lasting all the way through early fall and coinciding with your last plantings of salad greens, which for us in zone 8A, around mid-September.

Cilantro seedlings
Because cilantro bolts quickly, it is important to cut the leaves down as soon as you notice their readiness. The leaves will not hold long in the garden, so once the plants have reached about 5-8” tall, cut the plants down to 1” stems with scissors or a sharp knife. If harvested at this stage, the stems will continue to produce. A healthy planting of cilantro should yield 2 or 3 cuttings before the plants are too stressed to produce new, healthy leaves. In fact, I recommend cutting down cilantro plants as soon as they are ready for harvest even if you don’t think you will be able to use all of the leaves. The leaves will often store longer in the fridge than on the plant, and by harvesting when at their peak, you will set the plant up to begin growing another flush of leaves. For continual cilantro harvest, it is actually better to harvest leaves and compost them (if you can’t use them all), than to leave them on the plant. If left on the plant too long, they will bolt, ruining your chances for a good second or third growth off the planting. Our practice is to remove the planting immediately after the third cutting to make room for a new crop in the garden.
If you are succession planting cilantro throughout the season, you may choose to let one or more of your successions flower and go to seed. The flowers are beautiful and great for attracting beneficial insects to the garden. As you may know, the seed of the plant is used as the spice called “coriander”. To get a year’s supply of coriander seed, simply let a few plantings bolt, flower and set seed. The coriander seed is ready to harvest when the plants have turned brown and the seed fully dried. The entire lifecycle from direct seeding to coriander harvest should be about 3 months give or take, depending on weather conditions.
So to sum things up, to maximize your cilantro harvest, select a slower bolting variety, direct seed into the garden, succession every 1 to 2 weeks, harvest often, and let several plantings bolt for a second crop of coriander.
If you’re thinking about canning salsa later this summer, now is a great time to seed your cilantro!
I hope this was a helpful and uplifting primer on cilantro, thanks for listening and I’ll see you next time.

Flowering cilantro and immature seed heads.
Seed saving: Cilantro seed is very easy to save. After a few cuttings, your cilantro will start to bolt. Allow the plant to flower and eventually the flower heads will produce seeds. Wait until the majority of the plant and seed heads turns brown before cutting down the plant. Once plant has turned brown, cut off the seed heads (the part the was the flower) and hang them upside down in a brown paper bag. When the seeds are fully dried they will easily fall off the flower head. Place them in a glass jar or paper bag and store them in cool, dark, dry place until spring!
July 1, 2016
Encyclopedia Botanica Podcast, Episode 3: Bush Beans

Hello, I’m Hilary Dahl and this is Encyclopedia Botanica, a weekly podcast about edible gardening. This week we’re talking about beans. Specifically, I want to talk about bush beans and why they are a great choice for the home vegetable garden.
In order to understand how to select appropriate varieties of beans, it might be helpful to begin by reviewing some basic bean terminology. Some of the following descriptions are taken from our new book “High-Yield Vegetable Gardening”
Differentiating between Snap and Shell beans:
When growers talk about beans, you’ll often hear the words “snap” and “shell” being bandied about.
“Snap” means that you eat the seeds themselves, and also the pod or shell that encases them. Your standard “green beans” are all snap beans because you’re eating the pod along with the immature bean seeds.
“Shell” or “Shelling” means the shell or pod is removed from the beans before eating. “Shelling Beans” are the spherical ones you hated as a kid (but are actually amazing when harvested fresh from the garden). Think Lima beans, other popular varieties include edamame and cranberry beans. “Fresh Shell Beans” are dry bean varieties that are harvested when the pod is still green and the inner beans are very tender. These beans are usually shelled and steamed or sautéed lightly, or added to soups. Fresh shell beans are rarely available in grocery stores, so are a special treat coming from the home garden. To remove the pod from a shell bean, you usually snap the stem end off, pull the string that holds the pod together, then open the pod and remove the seeds. These same beans can be dried for storage, and that’s how you get “dry beans”.
“Dry beans” are shelling beans that are harvested after they’re fully mature and the pods are withered and dry (they’re usually dried further for extended storage). Examples include black beans, pinto beans and black eyed peas.
The terms “Pole” and “Bush” are two other commonly used words to describe the cultural practices used to grow beans. Pole beans are usually grown vertically on a trellis, and bush beans are shorter and don’t need to be trellised. There are many varieties of bush and pole beans and in fact, some varieties come in both growth forms. To confuse you even more, snap and shelling beans can have both bush and pole growth habits.
In our gardens we like to plant snap beans with both pole beans and bush growth habits. We tend not to plant many shelling beans because they take up a lot of space and require a very long growing season. Many varieties actually grow well in our climate, but the space required to grow enough to make the effort worthwhile, doesn’t make sense for most of our urban gardens. Pole beans are great because, once they are mature and producing fruit, they will continuously supply a crop for weeks and weeks, providing a great, extended harvest. Bush beans are a perfect compliment to pole beans because they mature faster, often resulting in an earlier harvest and they fruit in a more condensed time frame, so the total plant life cycle is also much quicker. This has two advantages, one, since the fruit are all ready near the same time, they are great for canning or other recipes that require large quantities of beans. Also, because the life cycle is relatively short, it is easy to plant multiple successions through the season to maintain a steady supply and diversify your selection. These qualities also make bush beans great for a small-space garden. In fact, any planting container that is at least 8 inches deep will fine for bush beans.
Right now, at the end of June, in the PNW it’s a little too late to plant pole beans, but a perfect time to put in another succession (or your first planting) of bush beans. Fortunately, this times up well with the impending removal of a lot of crops from the spring garden like cabbage, cauliflower, onions and garlic. For example, since my home garden isn’t huge, I will be pulling all of the onions and curing them out of the ground for storage and I will plant bush beans in their place.
Direct seeding is the most common way to plant bush beans. Sow seeds about 1 inch deep and 2 inches apart in rows spaced 1 foot apart. Once the seeds have germinated, thin to one plant every 4 inches.

I really like to grow my bush beans in what I think of as a block. Instead of planting one long row, I would plant 3 for 4 shorter rows, spanning the width of the garden bed. When bush beans reach a mature height, they are about 18”- 2 feet tall, and can shade out neighboring crops. When they are planted in more of a block, the hold each other up and interfere less with the neighboring plants. If you want to devote a smaller amount of space to the beans, planting a row or two along one side of a raised bed is a great option. As the plants grow taller, you can encourage them to flop towards the pathway, instead of into their neighboring plants.
12 plants will yield about 1lb of beans. So one row along the side of a 8’ raised bed would yield about 3lbs of beans.
Four varieties of bush beans that I have grown many times and found to be consistently productive and delicious are:
Provider: Traditional green bean with 5-5 ½ inch long, round podsRoyal Burgundy: This is a purple bean with round pods similar in size to the provider. I love using this tender, sweet bean fresh in salads because it does turn green when cooked.Indy Gold wax bean: This bean is highly productive! I just learned that the seed is now patented, and so I was hesitant to suggest it here, but it’s the only yellow-wax variety I have grown. For more information in seed patented and open source seeding, visit osseeds.orgGreencrop: This is a flat-podded Romano type. They are great because pods can grow up to 8" long while still retaining good quality- giving you a little extra time to harvest.Two pickling recipes that are handy for excess snap beans:
Pickled Green Beans Gherkin Refrigerator Pickles (Just substitute snap beans for gherkins)June 28, 2016
Powdery Mildew

Powdery Mildew is caused by a fungus and, unlike many funguses; it can proliferate in hot dry conditions. It is recognizable by a white powdery growth of spores on leaf surface, followed by yellowing and dying of leaves.
Towards the end of a warm, dry spring you may start to see little dusty grey spots show up on leaves in your garden. These dusty spots are a disease called Powdery Mildew. This disease is caused by a fungus and, unlike many funguses; it tends to proliferate in hot dry conditions. It is recognizable by a white powdery growth of spores on leaf surface, followed by yellowing and dying of leaves.
This unsightly fungal disease affects a wide range of plants including ornamentals. It stresses and weakens plants, which can affect the flavor and reduce yields of some fruits and vegetables. If enough of the plant surface is covered in the fungus photosynthesis can be inhibited and the plant can die prematurely. We find it most commonly occurring on cucumbers, peas, summer squash and winter squash, but can appear on almost any crop.
Fungal spores are spread by wind and overwinter on plants and in plant debris. Unlike mildews that appear in bathrooms or basements, powdery mildew does not need direct contact with water in order to grow. The warm days and cool nights of late summer create an ideal climate for spore growth and dispersal.
The fungi can overwinter in your garden on weeds or other debris. Because of this, if your plant is heavily infected it is best to remove the entire plant from the garden.
Prevention:
Rotate cropsPlant varieties that are resistant to powdery mildewAllow for air flow by maintaining proper spacing between cropsClean up yellowing and dead foliageWork soil between plantingsTreatment:
Remove affected leavesBaking soda spray: Spraying leaves with baking soda raises the pH, creating an inhospitable environment for powdery mildew.

