
Colin McCrate's Blog, page 20
June 23, 2016
Encyclopedia Botanica Podcast, Episode 2: Rust

Hello, I’m Hilary Dahl and this is Encyclopedia Botanica, a weekly podcast about edible gardening. This week we’ll be looking into the pernicious fungal disease known as rust.
The name Rust actually pertains to a whole family of fungi, affecting a wide range of plant species. In fact, rust is one of the most dreaded and rampant crop diseases worldwide, damaging major crops such as corn, wheat, sugarcane and coffee every year. However, today we’ll narrow our focus to a type that is more likely to affect the home vegetable garden, Puccinia allii. This is the rust that finds its way onto allium crops like garlic and onions.
Rust can appear on any member of the Allium species including garlic, leeks, shallots, onions, scallions and chives. It can also be found on wild and volunteer alliums in and out of the garden. While allium rust is not typically a fatal disease and many plants can still produce a moderate harvest after infection, it can cause major crop drops in production on working farms. Interestingly, rust strands seem to have different crop preferences in different locales. For example. In a study of rust damage in California, the fungus crippled the garlic crop but did not infect leek, shallot or elephant garlic. Whereas, in Great Britain it appears to favor leeks above all other allium species.
The rust is an obligate parasite, meaning that it requires a living host to complete its lifecycle. It is also autoecious, which means that it completes its entire lifecycle on a single host. What this means is that, while rust It infects and feeds on plant cells, it does not kill them, it merely reduces vigor and productivity. Allium rust tends to complete several cycles of spore production in a single growing season, and either produces dormant spores to survive the winter or overwinters on volunteer crops or wild hosts.
Rust can infect otherwise healthy crops and tends to make its appearance after periods of rain, fog, high humidity or excessive irrigation. Infection rates are highest at cool temperatures in the 50’s and 60’s and high humidity.
Early symptoms of rust include small white or yellow spots. Over time, the spots grow and become oval or diamond shaped and take on an orange coloration. Later in the season, black oval spots begin to appear. Heavily infected plants have a very orange appearance, the outer leaves begin to yellow and wither, and bulb size is likely to be reduced.

Rust on garlic

Rust on chives
Unfortunately, there are no easy or incredibly reliable organic controls for rust. We have tried applications of all organically approved fungicides including neem oil and sesame oil with little to no discernible effect. However, the case is not hopeless! Here are a few cultural methods you can employ to help reduce or eliminate an infection of rust:
Avoid consecutive plantings of garlic or onion in the same location. In other words, practice good crop rotation whenever possible.Remove infected plant residues from the garden. Fortunately, rust can only survive on living plant tissue, which means that dead leaves will not host spores over winter, but there is no reason to leave the infected residue in the garden.Practice proper plant spacing. Dense plantings will reduce air circulation, which favors fungal spore production. Fertilize adequately, but not excessively. Over application of nitrogen may enhance infections.Use drip irrigation. Wetting of the leaves by overhead watering can exacerbate spore production and lead to or increase infection rates.In very bad cases, consider rotating out of Allium crops for 2 to 3 years and destroy all volunteers and Allium weeds from the garden.That’ll do it for this week’s podcast. As as great poet once said “It’s better to burn out, than it is to rust” so keep an eye on your alliums, practice good cultural controls and good luck! Stay tuned for another show next week and thanks for listening.


June 16, 2016
Encyclopedia Botanica Podcast, Episode 1: Trimming Pea Tops

Welcome to episode #1 of our new weekly podcast, Encyclopedia Botanica! We will be sharing timely gardening tips and topics in a short 10 minute-ish weekly podcast. The content will also be available in a text transcript accompanying the audio.
Thanks for listening! Let us know what you think!

Peas plant leaf axis
Transcript:
Hi, I’m Hilary Dahl and this is Encyclopedia Botannica, a weekly podcast about edible gardening. This week we’ll be discussing peas. In particular, I want to talk about caring for your sugar snap and other climbing peas. But first we should talk a little about the basics of pea culture.
Peas prefer growing in cool weather which is why gardeners typically plant them in early spring and/or early fall. This way, the plants don’t have to grow during the hottest part of the summer. Here in the Pacific Northwest, we have the best luck growing peas in spring and typically start planting them outdoors in early March. You can direct seed peas right into the garden or grow them as transplants. I prefer to propagate them as transplants, which seems to help reduce casualties from slugs, snails, birds and rodents. Peas are especially attractive to animals because, at planting time, you are essentially proffering dozens of huge sugar treats to creatures that have just spent the winter desperately scavenging for food. Huge is a relative term, but don’t be surprised if a small animal looking for a big payoff absconds with your carefully planted seeds or transplants. Always be prepared with backups ready to replant as soon as you notice something is amiss.
Peas are a legume, and benefit from an application of Rhizobia bacteria at planting time. Rhizobia are species specific bacteria that live on the plant root, helping to fix atmospheric nitrogen into the soil, leading to more robust plants and a healthier soil ecosystem. If you’re not familiar with nitrogen fixation, I’d encourage some research on the topic, it’s incredibly fascinating.
Peas, like most vegetable plants, come in all shapes and sizes. The most popular for home gardening are snow peas, snap peas and shelling peas. Snap peas and snow peas are eaten whole (pod and all), while shelling peas (also called English peas) are removed from the shell and only the seeds are eaten. Similar to beans, peas come in dwarfing varieties and climbing varieties. Dwarfing types can be self supporting or tied up with short stakes and twine, but climbing peas need a serious trellising plan in order to remain manageable as they mature.
I like to grow climbing peas on tipi structures and along fence lines. In my home garden, I have attached a nylon net to the fence boards to provide structure for the peas to grow up. Even though this net is in place, it is essential to add extra support to the plants as they grow, so I wrap a piece of twine across the front of the row each week to help train them to the net and prevent them from falling all over the garden. Even though peas have tendrils to grab onto the net or other trellis structure, the vines are so heavy and unwieldy, unless consistently trained, they grow into a chaotic mess and sprawl just about everywhere but on the intended trellis.
Remarkably, even when properly contained, peas can overwhelm a full sized trellis structure. The vines can reach upwards of 10’ tall, which is typically higher than most garden trellises and certainly higher than most gardeners can reach. Professional basketball players excluded. I recommend cutting off the growing tip of your climbing pea vines once they reach the limit of your trellis. The process is easy, simply take a sharp pair of scissors or pruners and clip back the top of each plant to a leaf axis just above the top of the structure. The added bonus is that you can eat these top shoots (raw or cooked) and they taste just like the forthcoming fruit. Don’t be surprised if the plants send out new growth after your clipping, simply cut these new shoots off and eat them as well. You’ll get an extra harvest and ensure that your plants remain healthy and manageable through the end of harvest time.
The end of the pea plant lifecycle comes quickly, so make sure to pick the pods while fresh and keep picking every few days through the short period of peak harvest. Once the plants have exhausted their fruit supply, they will rapidly decline and be ready to remove from the garden. In our region, the end of pea season comes with a heavy dose of powdery mildew on the plants. I try to remove the plants as quickly as possible once mildew begins to set in, knowing that the remaining fruit (if there are any) will be stringy and tough and because I don’t want those fungal spores to start spreading around the garden. If you’re able to, cut the plants off at ground level and leave the roots in the soil to decompose. Keeping them in place will help increase the nitrogen levels from those Rhizobial bacteria and make sure your next planting is healthier and more productive than the last.
That’ll do it for this week’s podcast. Enjoy your peas while they last, and stay tuned for another show next week.
June 15, 2016
High-Yield Vegetable Gardening Podcast with Theresa Loe

Colin recently had the opportunity to chat with Theresa Loe on her Living Homegrown Podcast. They had a great conversation about simple techniques you can employ to make the most out of your small space garden! Check out the podcast here:
LH 56: Tips for High Yield Vegetable Gardening

Theresa Loe is the founder of Living Homegrown® and the Canning Academy® and is the Co-Executive Producer & Canning Expert on the national PBS gardening series, Growing A Greener World®. Theresa homesteads on just 1/10th of an acre in Los Angeles with her husband, two teenage boys and several disorderly but totally adorable chickens. Learn more about Living Homegrown here and about the Canning Academy here.
Colin McCrate is the founder and co-owner of Seattle Urban Farm Company, a landscape firm that blends sustainable farming principles with ecological design to create unique, productive outdoor spaces. The author of two books; Food Grown Right, In Your Backyard (Mountaineers Books, 2012) and High-Yield Vegetable Gardening (Storey Publishing, 2015); Colin has been growing food organically for the past 15 years and has helped guide hundreds of urban farmers through the design, construction and management of their own edible landscape. He believes that sustainable urban agriculture can promote healthy diets, environmental stewardship, stronger communities and improved quality of life.

June 8, 2016
Harvest and Store Your Garlic and Onions

Garlic and onions are, in my opinion, some of the most satisfying crops to grow. They are among the first transplants to be tucked into the early spring garden, and are ready to harvest at the onset of peak harvest season, a harbinger of the forthcoming abundance. Luckily the crops are happy to be stored away for us to enjoy during less bounteous times of year.
These are simple crops to harvest. In fact, with both crops, the less you do to the harvested plant, the longer and better they will store. Both crops are harvested by lifting entire plant out of the ground with a spade, fork or trowel (or by hand). The following tips will help you know when your crops are ready to harvest and how to store them:
Garlic:
Once half of the stems have turned brown (half should still be green) and started to dry out, the garlic can be harvested. If you harvest the plants too early, the cloves may not be fully formed. Alternately, if you wait until the entire plant has died back, the cloves will start to separate, resulting in loose heads that won’t store as long. You can start cooking with your garlic the minute you pull it out of the garden, but if you’d like to store some or all of your harvest, read on...Do not wash your garlic with water, simply knock off any large clumps of dirt that may be clinging to the plant and the roots. Do not remove the cloves from their papery wrapping.Hang the plants, fully intact, in a warm, dry, dark place for several weeks to cure. This will increase the storage life.After 4-6 weeks of curing, the garlic stalk and root can be trimmed back to so that the bulb resembles one that you would buy at the store or farmers market. This trimming of the stalk and roots is not necessary, but does make using the garlic a little easier when it comes time to cook with it. The smaller heads also require less storage space.Types of Garlic: Hardneck vs. Softneck: Two distinct types of garlic that are commonly grown by the home gardener are Hardneck and Softneck garlic. Hardneck has a stiff central stem and fewer and larger cloves. It generally doesn’t store as long as softneck, but is easier to peel and, many people feel, has a better taste. Softneck garlic has a flexible central stem, and the bulbs tend to have many small cloves and thick wrapper skins. Softneck is widely grown because it keeps very well all winter long.

Harvest garlic and onions by lifting the entire plant.

Garlic ready to harvest.
Onions:
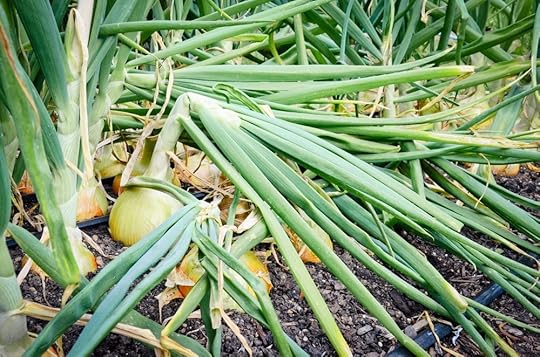
Bulbing onions are ready to harvest once the stems start to turn brown and die back. The tops will start to flop over. A portion of the bulb will usually be above the soil surface at this time.
Unlike garlic, onions can stay in the garden after they have reached their harvest peak and you can pull them as you need them. Be sure to pull the remaining crop before the first frost, or a heavy rain to help extend the storage life.
Just like garlic, you can cook with your onions right out of the garden, but if you’d like to store some or all of your harvest, read on…
Do not wash your onions with water, simply knock off any large clumps of dirt that may be clinging to the plant and the roots.
Trim back the roots and pull off any outer leaves that look yellow, or otherwise undesirable.
Leave plants to cure in a dry sunny spot to cure for 5-7 days.
Once cured, cut back the stems to about 1 inch above the bulb. If there is still moisture in the stems, let the onions cure in the sun for a few more days- or until the tops are dry.
Onions store best in a well-ventilated mesh bag[image error] or wire hanging basket[image error]. Hang the bag or basket in a dark, cool location such as a pantry or basement.
Depending on the variety, onions will have different storage capacities. Generally, yellow types store longest, but be sure to read about the varieties you are growing, or planning to grow before deciding which ones to cook with first. If properly cured and stored, it is possible to eat bulbing onions from midsummer through the following spring.

A thick skinned storage-variety onion.

Onions curing after harvest.
June 6, 2016
Capitol Hill Urban Cohousing + Lark Rooftop Farm
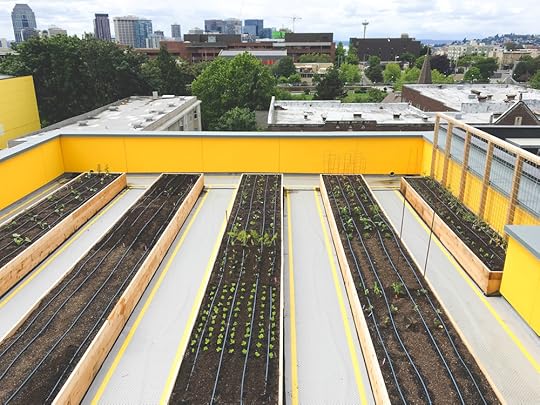
We are excited to be a part of the Capitol Hill Urban Cohousing (CHUC) project, a new urban cohousing community in the heart of the Capitol Hill neighborhood of Seattle. The 4,500 sf urban village infill lot provides nine homes, a community dining room and kitchen, guest room, ground-related commercial space for a 15-person architecture practice, and a 1,600sf rooftop urban farm in a five-story building.
We’ve been involved in three phases during the development of the project. During the first phase we consulted with Schemata Workshop, the project’s lead architecture firm, on the design of the rooftop farm. The second phase was the installation of the site’s drip irrigation system, and the third phase (happening right now!) is the planting and maintenance of the rooftop farm. We sowed the first round of crops on the site in late May, and will continue to maintain the rooftop farm on weekly basis for the remainder of the year.
The CHUC community extends beyond this one site, they will be sharing the garden space with Lark, a well-known artisan restaurant located a few blocks away. The CHUC residential community will be claiming 10 percent of the planter beds and the other 90 percent going down the street to Lark (952 E. Seneca St.). Johnathan Sundstrom, the owner and head chef at Lark, and his kitchen staff will work side-by-side with us at the farm and will use these harvests to inform their seasonal menu.
The residents at CHUC will use the garden as an educational tool,inviting classes from Seattle Central College and other institutions to experience first-hand the community-building and personal health benefits of urban agriculture.
More on the project:
Capitol Hill’s cohousing pioneers are ready to move in on 12th Ave
At Lark, You’ll Soon Be Eating 12th Ave-Grown ‘Lettuce And Tender Herbs’
Capitol Hill Cohousing Residents Show Off New Digs
First-of-its-kind Capitol Hill Urban Cohousing building breaks ground on 12th Ave
May 11, 2016
The Safeco Field Urban Farm
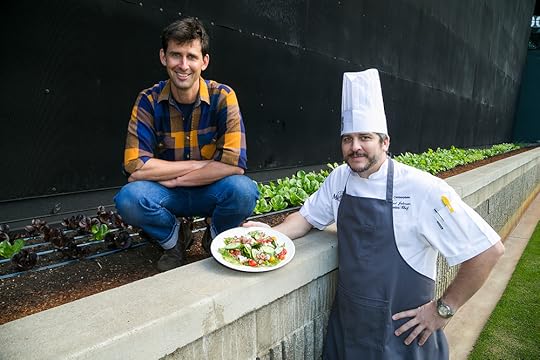
Colin McCrate, Founder of Seattle Urban Farm Co. and Safeco Field Executive Chef Michael Johnson
We're excited to announce that we will be planting and caring for the new Safeco Field Urban Farm! Tucked behind the centerfield wall at Safeco Field, home of the Seattle Mariners, is a new urban garden that will supply fresh-picked greens, herbs and vegetables for the ballpark menu.
The Safeco Field Urban Garden will be tended with sustainable practices such as water-saving drip irrigation and the use of organic products and nutrient rich compost from Cedar Grove. The 450-square foot raised bed was prepared in late March with Cedar Grove Booster Blend organic compost plus manure and potting mix to improve the existing soil.
The early spring planting in late March included hardy plants such as Romaine and butter lettuce, red cabbage, onions (kale, arugula, cilantro, mustard greens, radishes???). Later plantings will include a variety of warm weather loving peppers, basil, beets, parsley, scallions, Roma tomatoes and cucumbers.
Centerplate, the Mariners concessions partner at Safeco Field, will incorporate the fresh produce into menu items for the Hit It Here Café throughout the baseball season.
“This garden closes the loop on the Mariners’ organics recycling program, using compost, manufactured by Cedar Grove using food scraps collected at Safeco Field, to grow vegetables at the ballpark to be consumed by fans,” said Karen Dawson, director of community relations, Cedar Grove.
Safeco Field has been collecting recycling compostables since 2007, resulting in the diversion of 9.4 million pounds of food and yard waste from the landfill. The food scraps and grass clippings are mingled with organic matter collected from businesses, restaurants, and homeowners across the greater Seattle area and transformed by Cedar Grove into compost that is prized by gardeners across the Northwest.
To learn more about the project, visit the following links:
Line drives and lettuce? Yup, you'll find both right there on the field at Safeco
From (Center) Field to Table – Safeco’s Urban Garden
May 2, 2016
Brussels Sprouts

For many people, just the mention of Brussels sprouts seems to bring about a look of disgust. Chances are they were probably forced to eat a boiled, mushy version of them as a child, and swore that they would never eat them as an adult. If you are one of those people, and you've never grown Brussels sprouts in your garden because you hate them, I challenge you to grow them this year. Harvest them from your own garden, cut them in half and roast them with olive oil and salt. The result is more like a cabbage French fry then cabbage mush. Not only are they high in vitamins and are said to have cancer fighting properties but, when prepared well, they are delicious.
Plant: Mid to late May is a great time to plant Brussels. One of the reasons Brussels are planted so late in the spring around here, is that many people believe that the sprouts actually taste better when they have been exposed to a light frost. In late summer, remove the top 6-8 inches of your Brussels sprouts plants. This will encourage the plant send energy into developing larger sprouts over the next couple of months, just in time for a nice light frost.
Brussels can grow up to 36 inches tall and 24 inches wide. They are best when transplanted. Space plants 18 inches apart. Like all brassicas, we recommend mixing 1/4 cup of balanced fertilizer, like this Dr. Earth Organic 7 All Purpose Fertilizer  , into the hole when planting.
If you have seed, and are eager to try direct seeding, you can do so by planting 3 seeds in one spot, every 18 inches. Once they've sprouted and the seedlings are about 1 inch tall, thin down to one plant per 18 inches. Be sure to feed your direct seeded plants with a foliar feed that is high in nitrogen, such as Dr Earth Nitro Big Fertilizer
 on a weekly basis once they've sprouted. Once the plants have reach 4 inches tall, change liquid fertilizer regime to every 2-3 weeks.
Once the Brussels start to put on sprouts, we recommended that you remove the lower 6-8 leaves on your plants. Be sure to also remove any yellowing leaves the plant may have. Around this same time (usually late summer), you will notice a small, cabbage-like flower forming at the top of your plant. Cut this off to encourage the plant to send more energy into the sprouts. Eat the top after you cut it off! They are delicious sautéed or roasted.
Harvest: Late-spring planted Brussels should be ready to harvest in early fall. If sprouts feel tight and dense when squeezed, you can pull or cut them off the main stem. We usually just harvest our Brussels sprouts off of the stalk as needed, but these days it seems a popular among our clients to cut down and roast the entire stalk for a special occasion. If temperatures are going to drop below 20 degrees, be sure to harvest all or your sprouts and bring them inside because they will rot after a few hard freezes.
Storage: The sprouts will store for several weeks in a sealed container or plastic bag in the refrigerator. If freezing the sprouts: blanch for 3-4 minutes, then dry and freeze immediately.


April 20, 2016
Why Drip Irrigation?

Vegetables need adequate and consistent water to grow well. Most vegetables are 70-95 percent water, and they need to get all that from somewhere. When it comes to watering your vegetable garden, we have found that a drip irrigation system with an automatic timer is the best way to achieve the consistent watering that crops require. A drip irrigation system, while a little more costly and time consuming to install than say, a garden hose, will end up saving you time, water and money in the long run.
Drip irrigation is a system of narrow plastic tubes that deliver water at a slow rate directly to the surface of the soil. Since the water is emitted slowly, it has time to soak into the soil, rather than run off or through the soil. A properly installed and monitored drip system will deliver just the right amount of water with very little waste. Once installed, its is largely hands-off, although you will want to check the moisture level of the soil every week or so as the weather changes, to make sure you are not over- or underwatering. A weekly moisture check and 30 seconds updating your timer settings will ensure proper watering all season long.
Drip irrigation can also provide useful when planning your garden. We always seed and transplant along drip lines, so that we have consistent germination and water sent right to the emerging plant roots.

Seed along drip tape for best germination

Spring garden with drip tape irrigation

Transplanted kale growing along drip tape
One of the most important benefits is that, once you have a drip system installed and operational, you can spend your garden time weeding, planting and harvesting rather than just standing around with a hose. You’ll be amazed at how much easier it is to keep up with seasonal garden tasks with the watering component off the to-do list.
Drip irrigation systems can seem complex, but all you need for a vegetable garden is something simple, easy and inexpensive.
Many companies sell drip irrigation kits for small gardens that include everything you need to build your system. We strongly recommend looking into these. We particularly like the The Economy Kit from Dripworks. (Do not be confused by the designation: Soaker Drip Line, this is actually ¼ tubing with emitters every 6 inches. We recommend emitter tubing of any size over soaker hose, as it tends to last much longer and water more evenly.) We also like the Drip Tape Row Crop Kit. Drip tape is our favorite irrigation medium, and what we use in 80% of clients gardens, but it is also less flexible in terms of spatial arrangement.
When it comes to timers, we like to keep it simple. We use DGTL Hose End Timer .
.They are very affordable and straightforward to set up and adjust.

1/4 inch emitter tubing in a pot

Arugula seeded along 1/4 inch emitter tubing
For detailed instructions on how to install your own drip irrigation system, check out our book: Food Grown Right, In Your Backyard
Happy planting!
April 13, 2016
Buying healthy Vegetable Transplants
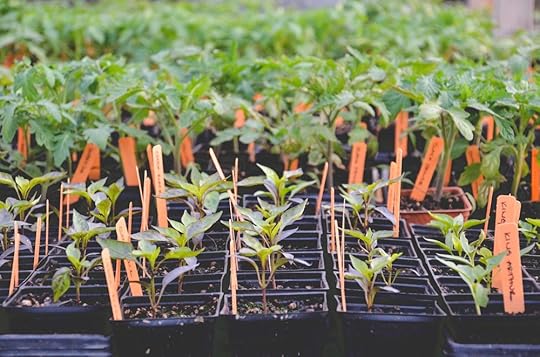
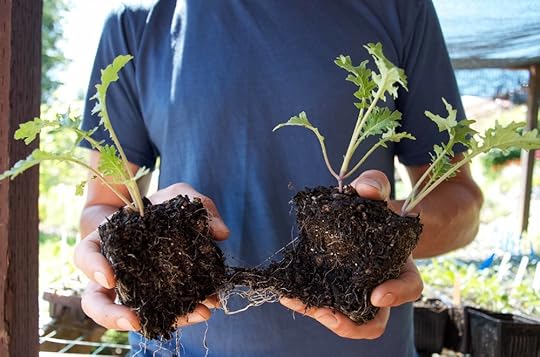
It’s the time of year when vegetable transplants (or “starts) begin to show up at nurseries, hardware and grocery stores, and plant sales. Transplants are wonderful for many reasons. First, certain crops are difficult to grow from seed and will simply perform better if transplanted. In order to grow to maturity, many summer crops need to be propagated indoors for several weeks while the weather is still too cold to plant outside. Most plants from professional greenhouses arrive healthy and viable, but they don’t always receive the care they need from the retailer. Vegetable plants grow quickly. When stuck in small nursery containers, they can use up all of the available soil nutrients and become so stressed that its hard for them to fully recover. Here are a few things to consider when buying vegetable transplants:
Bigger isn’t always better: You want transplants that are large enough that they are ready for outdoor planting (typically they should be showing at least 2 true leaves*), but not so large that they are discolored stressed or already starting to bolt*. I look for a supple quality in my transplants. Plants that have been potted up too long start to look tall and “leggy”, and the stems often look a little stiff. A vegetable transplant that is oversized for its nursery pot may have a hard time adjusting to the garden and setting out healthy roots.Look for plants that have recently arrived at the nursery: You want dark green, healthy-looking plants. While some varieties are grown for their unique color (think red cabbage or purple kale), generally if the leaves have started to turn blue, purple, or yellow, they are probably not worth buying. Discoloration is a sign of nutrient deficiency. Keep in mind that, flowers are not necessarily a good thing: It’s enticing to pick out the tomato transplant that already has a set of flowers. Flowers equal fruit, right? Technically, yes, but flowers also signal that a plant believes it has reached maturity and is ready to reproduce. If you purchase an 8” tall tomato plant that is already spending energy on flower production, it may never reach its full size and potential. If allow those first flowers to set fruit, it’s likely the plant will be stunted and you may get 3 lovely little tomatoes this season. However, if you select a dark green, non-flowering tomato, and encourage lots of green vegetative growth before allowing it to set flowers, you’re likely to end up with tens or even hundreds of tomatoes from the same sized transplant. If you do find an otherwise healthy looking vegetable start that happens to have flowers, no worries, just be sure to pinch them off before planting!
Take a close look to and determine how many plants are actually in the pot: If you just bought broccoli, for instance, you will likely see three or four stems coming up from the soil. Congratulations- you just bought four broccoli plants, not one! The problem is, to grow properly, broccoli plants need to be spaced at least 12 inches apart. So you will either need to remove them from the pot and gently separate them, or you will want to cut off all but one plant. Because greenhouse space is valuable, nurseries have to overseed these containers, therefore it’s likely that most of the pots you buy will have more than one plant in it, so take a close look before you plant and make sure to space crops appropriately!!
Plant out quickly when possible: Do not plan to keep purchased plants in their pots for too long. It’s best to shop for plants a day or two before you plan to plant them. When small pots get set aside, it’s very easy to forget about them and let them dry out. If you do have to keep them in the pot for awhile after purchasing, feed them with an organic liquid fertilizer, make sure the receive adequate sunlight and don’t let them dry out.


Common annual crops we highly recommend transplanting INclude:LeeksOnionsCabbageKaleBroccoliCauliflowerTomatoesPeppersEggplantCollardsBrusselsCeleryFennel (annual bulb-types)KohlrabiParsleyTomatillos
February 27, 2016
Planting Calendars for Home Gardeners

A planting calendar is just what it sounds like: something you can look at each week to determine how much of each crop to plant. Whether you're planning grow enough peppers to pickle for the winter or want to have a supply of arugula in the garden for fresh salads all summer long, a calendar is there to help you make the most out of your garden space!
The actual calendar can take many forms. The following are three general formats you might use to build your calendar:
Print Calendar/ Online Calendar: These are great because you can quickly see what’s coming up next week or next month. Online calendars are helpful because you can make one entry and set it to repeat for succession plantings. Google, Yahoo, Microsoft, and other online email services provide digital calendars to their users. Although these calendars are easy to use, they may not have a lot of extra space for taking notes or keeping track of other details.
Spreadsheet Calendar: You can make your own calendar in the form of a spreadsheet, which will allow you to keep track of many different types of information. You can do this by hand if you like, but a computer-generated spreadsheet program (such as Microsoft Excel or Google Sheets) is much more efficient. We generate planting calendars this way for every growing space, ranging from 200-square-foot backyard gardens to 20-acre production farms, and it works great.
Could-Based Farm Record Keeping: You can create a planting calendar using online software that is specifically designed for farms, such as AgSquared or Cog Pro. These programs allow for very advanced and detailed record-keeping, and are suitable for managing organic certification records and/or running a professional production farm. They can work well for intensive home growers too. A yearly fee is charged for these programs.

Annual Short Season Crop

Annual Half Season Crop

Annual Long Season Crop

Succession Planting Carrots
Making the Calendar
Step #1: Figure out how much to plant
Determine how much produce you buy at the store each weekTake the number of pounds you need of each crop per year (A) and divide by the crop’s yield per row foot (B) = how many row feet to plant (C) (add 20% to allow for problems) A / B = C ( x 1.2 )Get yield information from our book, our website, online research, and your own garden recordsStep #2: Figure out how often to plant
Plant short season crops frequently (every 1-3 weeks)Plant half season crops 2 to 4 times a yearPlant long season crops 1 to 3 times a yearStep #3: Figure out when your first and last plantings should happen
Check the table below for recommended planting successions for specific cropsUse your first and last frost dates and crop recommendations (example: plant tomatoes 2 weeks after your last frost)Even better: ask experienced gardeners in your climate what their planting dates are (in Seattle, we plant our tomatoes during the 2nd and 3rd weeks of May)What to write on the CalendarAt a bare minimum, you’ll want to note each crop you intend to plant, how much you need to plant, and the week or date that you’ll be actually doing the planting. This might be tracked in the number of row feet for direct seeded crops, or in the number of plants when transplanting. You’ll also need a blank space to note the date that you actually do the planting (in case it’s not the same date you originally planned), and how many row feet you actually seed or actual number of transplants you set out. Here are a few other items that are useful to note:
crop varietyexact location in the gardenweather conditionsfertilization application quantities and datesDon't forget to experiment!
Many variables can affect planting dates for outdoor crops (primarily your local climate and microclimate). For example, in the Pacific Northwest, it is possible to harvest broccoli side shoots from the field all winter because of the mild weather. But in order to do this, the plant must have reached maturity by mid-September. This means that the planting date for this crop is extremely important (in many regions, the same broccoli would be killed at the onset of winter).


