
Colin McCrate's Blog
October 8, 2025
3 Reasons to Grow Vertically: Plants, People, and Productivity
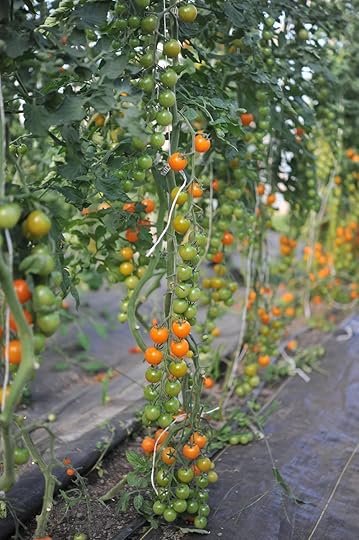
We’re all about vertical gardening. Why? Because space in the home garden is almost always a limiting factor. How many times have you said “I wish I had room for a few more basil plants!”. Well, if you take full advantage of your vertical space, by training your vining plants straight up, you might just have enough room next season to make all of your pesto dreams come true.
Growing upward instead of outward might just be one of the simplest ways to grow smarter. Vertical gardening—encouraging your plants to climb instead of sprawl—saves space, reduces pests, and makes gardening (and harvesting) a whole lot easier.
Whether you’re training tomatoes up a string trellis or letting sweet peas climb a net, growing vertically helps both your garden and your back.
Vertical gardening simply means giving your plants something to climb. Most crops grow upward naturally, but vining plants—like tomatoes, cucumbers, and beans—need extra support to stay off the ground.
A trellis is the structure that provides this support. When vines are lifted onto a trellis, they’re healthier, easier to harvest, and far more space-efficient.
Pro tip: Set up your trellis before planting. Moving supports later can damage tender stems and roots.
Growing up instead of out brings benefits to your plants, your garden design, and your own comfort. Here’s how trellising helps in three big ways:
1. Plants: Healthier, Stronger, HappierBetter airflow = fewer diseases.
When vines sprawl across soil, leaves stay damp after rain or morning dew, which encourages fungal diseases like powdery mildew. Lifting plants off of the ground up increases air circulation so foliage dries faster and stays healthier!
More sunlight, more growth.
Trellising opens up the plant’s canopy so every leaf gets its share of sunshine, improving photosynthesis and overall plant vigor.
Easier pest management.
Tangled vines make it harder to spot and manage pests. A trellised plant helps you easily monitor, prune, and remove pests and any affected parts of the plant.
 2. People: Easier Gardening, Easier Harvests
No more garden gymnastics.
Vertical gardening means less bending, crouching, and crawling to find ripe fruit. Everything's closer to eye level—tomatoes, cucumbers, and beans practically hand themselves to you.
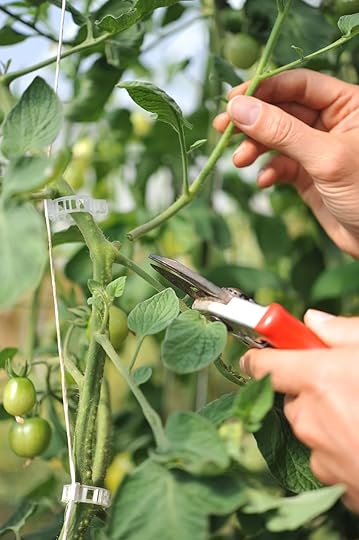
Simpler training and pruning.
Guiding plants up their supports lets you see and manage growth patterns clearly. Redirect an errant branch or clip a stray vine—no more guesswork under a canopy of tangled leaves.
A prettier garden (and proud gardener).
A tidy trellised row not only functions better, it looks better. Visitors will ask how you keep your garden so organized, and you can smile modestly while saying, “Oh, I just grow vertically.”
 3. Productivity: More Food, Less Fuss
Protect your harvest.
Keeping fruit off the ground reduces rot and deters pests like slugs, rodents, and insects that love a ground-level buffet.
Prevent breakage.
Trellised plants are less likely to snap under the weight of heavy fruit or strong winds. No more heartbreak from a loaded tomato branch breaking before harvest.
Grow more in less space.
Vertical gardening doubles your growing potential by using both horizontal and vertical space. In small urban gardens or raised beds, this is a game-changer—more yield, same footprint.
Not every plant needs a trellis—but most benefit from one. Here are a few that thrive when lifted skyward:
Vining Crops
Tomatoes
Cucumbers
Pole beans
Peas
Melons
Summer squash
Winter squash
Top-Heavy Crops
Peppers
Eggplant
Fava beans
Bush beans
Climbing Flowers
Sweet peas
Dahlias
Runner beans
Nasturtiums (climbing varieties)
Install supports before planting. Avoid damaging roots later.
Train early. Check plants weekly and guide them toward the trellis.
Use clips or twine as needed. Some vines (like cucumbers) climb naturally, while others (like peppers) need a gentle tie for support.
Mix and match systems. Combine string trellising for tomatoes with garden netting for peas—it’s a beautiful and efficient combo.
Growing vertically is about working with your plants, not against them. You’ll grow healthier crops, make harvesting easier, and transform a cluttered garden into a productive and beautiful space.
Whether you’re working with a single raised bed or a backyard full of vines, a few well-placed trellises can make your garden more bountiful—for your plants, for you, and for your productivity.
Shop vertical growing supplies

Vegetable Garden Soil Health 101
 Vegetable Garden Soil Health 101: How to Build and Maintain Healthy Soil
By Colin McCrate
Healthy soil grows healthy plants—it’s that simple. This is the backbone of organic agriculture: tend to the soil and the plants will take care of themselves. In fact, if you want to sound like an authentic, overzealous garden nerd, you can start saying things like “I don’t grow plants, I grow soil.” It’s typically best to reserve comments like this for precarious social situations, such as an awkward silence on a first date.
If you want abundant harvests and nutrient-rich vegetables, start by improving your soil. Soil health determines the quality, productivity, and long-term success of your garden.
Whether you’re building a new raised bed or maintaining a long-loved garden plot, the principles are the same: test, amend, and feed it consistently. Here’s how to create and sustain soil that gives back year after year.
Your soil is more than dirt—it’s a living system. It contains minerals, organic matter, microbes, and fungi that interact to support plant growth. When soil is in balance, plants are stronger, pests are fewer, and yields are higher.
Unfortunately, most residential soils—especially urban or compacted ones—lack key nutrients and structure. That’s why improving garden soil isn’t a one-time task. It’s an ongoing process, your soil should get healthier over time (rather than more depleted).
Before planting, it’s a good idea to understand what you’re working with.
If your garden site is in an older urban area, test for lead or other contaminants before building edible garden beds. (You can find soil testing resources at the end of this article.)
Once you know your soil is safe to use, (or if you’ve decided to import all of your soil, use containers, etc) you’ll want to measure its pH (how acidic or alkaline it is). pH controls how easily plants can absorb nutrients. The pH matters because, even if you add compost and fertilizer, your plants may not be able to absorb their nutrients if the pH is out of whack.
Ideal Vegetable Garden pH6.2–6.9 is the perfect range for most annual vegetables.
Below 6.2 = acidic soil. Add calcitic lime or dolomitic lime to raise pH.
Above 6.9 = alkaline soil. Add elemental sulfur to gently lower pH.
Tip: Test your soil pH once a year, ideally several months before planting. This gives amendments time to work on adjusting the acidity before you plant. You don’t need anything fancy, an at-home pH test kit or digital meter is perfectly adequate and will give you precise enough information to act on.
If soil health had a secret ingredient, it would be compost. When you add compost, it breaks down into humus—the rich, dark, crumbly material that gives soil its structure and resilience.
Humus improves tilth, meaning the soil holds together in soft clumps that are easy to work with. It acts like a sponge, balancing moisture by holding water in sandy soil and improving drainage in heavy clay.
As humus decomposes, it also feeds your crops naturally, releasing nutrients slowly throughout the growing season.
What to DoApply 2–3 inches of finished compost to your beds every year.
In spring and fall, loosen (don’t turn) your soil with a garden fork to preserve soil structure and beneficial microbes.
Compost not only boosts yields—it’s one of the best ways to build long-term soil health.
 Step 3: Feed Your Soil (and Plants) with Organic Fertilizers
Vegetable plants are heavy feeders. This means that they absorb lots of nutrients from the soil. Even with good pH and compost, most vegetable plants do better with some supplemental fertilizer. Organic fertilizers keep soil microbes active and nutrients cycling all season long.
It’s important not to overapply fertilizers, since this can create a buildup of salts in the soil and actually harm your crops. However, it’s been our experience that most beginning gardeners dramatically underfertilize! Always follow the directions on the package since application rates depend on the mix you buy. But just know that on your first go, you may be surprised at how much you actually need to use.
Here’s how we recommend applying fertilizers:
Before PlantingMix granular organic fertilizer* into the top 4 inches of soil.
For direct-seeded or densely planted crops, broadcast it evenly across the bed.
For larger crops like tomatoes or winter squash, add fertilizer directly into each planting hole.
* Our second book, Grow More Food (Storey 2022) includes the recipe for our time tested homemade granular organic fertilizer blend!
Side-dress heavy feeders (like tomatoes, corn, and brassicas) every 2–4 weeks with granular or liquid fertilizer.
For liquids, dilute as recommended on the label, apply at the base of plants, and rinse your watering can after each use.
Seedlings & transplants: Use low-dose liquid fertilizer 2–3 times per week after emergence. We tend to use fish, kelp or seaweed-based liquid fertilizers.
Transplanting: Use a high-phosphorus blend (2-4-2) to encourage root development.
Fruiting plants: Apply a 0-5-5 foliar spray for better fruit quality.
Leafy crops: Side-dress with a high-nitrogen mix (5-1-1) or straight blood meal (12-0-0) for lush green growth.
Healthy soil is alive—and like any living system, it needs care, balance, and food.
By adding compost, maintaining pH, and feeding with organic fertilizers, you’ll build soil that’s productive, resilient, and teeming with beneficial life.
The payoff? Healthier plants, higher yields, and a garden that gets better every year.
Shop our best-selling how-to gardening booksString Trellising: The best way to trellis???
By Colin McCrate
Imagine this: you walk down immaculate rows of vegetable crops. Each tomato plant extends perfectly straight towards the heavens. Brilliant arrays of orange, red, yellow, and purple fruit dazzle. You effortlessly pluck your harvest without once stooping over or scratching your arm on rusty wire. Your focus remains in the present, enjoying the sights and sounds of the morning, rather than considering the date of your latest tetanus shot. Is it pure fantasy, or is it string trellising?
If you want healthier plants, easier harvests, and a more efficient garden layout, string trellising might just change the way you grow.
A technique devised by professional farmers and refined for the home garden, this minimalist method turns simple twine into a powerful vertical support system for tomatoes, cucumbers, beans, and much more.
What Is String Trellising?
String trellising uses twine instead of cages or other structures to support plants. Each plant is supported by string, growing upward toward light and air.
The approach originated in greenhouse vegetable production, where crops like tomatoes and cucumbers are grown on hanging strings. But you don’t need a greenhouse to make it work—just a simple frame, some good twine, and a few minutes a week.
Why String Trellising Works So WellString trellising keeps plants organized, accessible, and productive. Here’s why we love it:
Better plant health. Lifting foliage improves airflow and reduces soil-borne disease.
Simpler pruning and harvests. Fruit grows at eye level, and vines stay neat and open.
Higher yields in less space. Plants grow vertically, so you can fit more per bed.
Cleaner fruit. No muddy cucumbers or bruised tomatoes from sprawling on the soil.
Once you try it, you’ll see why professional growers rely on strings —it’s faster, cleaner, and easier to maintain.
Choosing the Right TwineHemp twine – The strongest natural twine. It’s biodegradable, can hold virtually anything and easily lasts a full season.
Linen twine - Nearly as strong as hemp, just as attractive and also biodegradable. Our linen twine comes in a variety of colors.
Jute twine – Good for horizontal strings, lighter crops, and netting.
Plastic twine – We don’t recommend plastic twine. It’s durable but not biodegradable; it can shed microplastics into the garden and removing it from old vines can be tedious.
Whenever possible, go with natural fibers. At season’s end natural twine and spent vines can go straight into the compost—no plastic waste, no cleanup headache.
Vertical strings, Horizontal Strings, and Nets
There are 3 main approaches to string trellising:
Vertical string trellising: One string per plant (or per main stem - we often let our tomatoes have 3-4 main stems, so we add additional strings to support them), hanging straight down. Ideal for tomatoes, cucumbers, beans, and peppers.
Horizontal string trellising: Twine runs side-to-side between posts, supporting plants in layers—great for peas, flowers, and even bush beans - short crops that need a “fence” rather than a single line.
Netting: String nets are a great mix with benefits of both vertical and horizontal strings. Set up the net before planting and train crops to grab on as they grow. Nets work best when supplemented by occasional horizontal strings across the front (to help fruit-laden vines stay in place)
Many gardeners mix these methods in the garden: vertical strings for tall crops like tomatoes, cucumbers, and pole beans, horizontal lines or nets for peas and flowers.
Set up your frame. Install two sturdy posts and a crossbar 5–7 feet above the ground. A Freyr trellis, cedar posts, or an existing arbor all work.
Attach the string. For vertical strings, you’ll drape twine over the top bar so both ends hang to the soil. Clip or tie them loosely to the plant’s base. For horizontal strings, simply tie the string to a post, weave it between your plants and tie off on the other post.
Train the plant. As stems grow, gently wrap them around the string, add new horizontal strings, and/or secure them with trellis clips. Check weekly and guide new growth upward.
Prune as you go. Remove crowded or downward-facing branches to keep air and light moving freely.
Pro tip: When using vertical strings, use a double string (looped up and over the bar). It’s stronger and avoids tension knots that can slip or weaken midseason.
Not all plants will reach the top of the trellis, but some particularly vigorous vines, like indeterminate tomatoes can. When plants climb past the top of the trellis, we like to let them get about 6-12” above the top bar. This is short enough that the branches won’t snap or bend, but tall enough that it looks great and gives you a little extra vertical space.
When they’ve reached a height that you can still easily manage, simply snip off the tops. Some plants will send up new shoots, which is okay, just trim those tops as needed for the rest of the season.
If your plants regularly exceed that height, you can use a tomahook or similar reel to unwind extra string and lower the vine in a gentle arc.
 Best Crops for String Trellising
Tomatoes: Wrap or clip the main stems weekly for tidy, high-yield growth.
Cucumbers: Their tendrils naturally climb the string.
Peppers & Eggplants: Support the main stem to prevent bending under fruit weight.
Pole Beans: The easiest crop—just drop a string and let them climb.
Peas: Pair horizontal netting with front support strings to prevent collapse.
Small Squash & Melons: Choose compact varieties and provide slings for heavy fruit.
Summer squash: Look for climbing varieties like Incredible Escalator Zucchini (shown in photo above)
How tall should my trellis be?
5–7 feet is ideal. It keeps most crops upright and reachable for easy harvest.
Do I need clips?
Not always. Tomatoes and squash can be wrapped by hand; delicate vines benefit from soft plastic or biodegradable clips.
Can I reuse the string?
Natural fiber twine breaks down quickly, so it can easily be composted at the end of each season. Reuse only if it’s still strong and hasn’t had prolonged exposure to water, and it’s disease-free.
Organic Fertilizer in the Vegetable Garden: What to Use, When, and How
By Colin McCrate
Vegetables are needy. They need you to delicately place them under 1/8” of perfectly screened, organic germination mix. They need you to water them gingerly, as if they were bathing in the fine mist of a waterfall deep in the Shire. They need you to pick them up from the mall after the midnight screening of Little Shop of Horrors. And, most of all (maybe because they’ve seen that movie too many times) what they really need is for you to feed them!
Compared to most ornamentals, annual veggies demand more nutrients, more often. In perfect conditions, humus-rich soil can supply everything they need. In real gardens, a smart organic fertilizing plan keeps plants vigorous and yields high.
This guide covers what’s in organic fertilizers, how to read NPK labels, when to use slow-release vs. soluble products (and why both matter), plus crop-specific tips and foliar feeding basics.
Organic fertilizers come from animal, plant, or mineral sources and are processed to be safe for gardens.
Mineral sources: greensand, rock phosphate, sulfate of potash, glacial rock dust.
Animal byproducts: blood meal, bone meal (cow/fish), feather meal, crab/whole fish meal, bat guano, chicken manure, worm castings.
Plant sources: kelp, alfalfa, cottonseed, soybean meal.
Each ingredient contributes a different nutrient profile and release speed. Blends combine them to hit target ratios.
The three big numbers are N-P-K:
Nitrogen (N): leafy/vegetative growth.
Phosphorus (P): root growth, flowering, early vigor.
Potassium (K): fruit quality, stress resilience, disease resistance.
Also important: Calcium (Ca) for cell walls and blossom-end rot prevention; Magnesium (Mg) for chlorophyll (aim for a Ca:Mg ratio around 5–7:1 for good availability), plus micronutrients (S, B, Zn, Mn, Fe, Cu).
Balanced fertilizers (e.g., 5-5-5, 3-2-3) simplify pre-plant and side-dress needs across mixed beds.
Slow-release (granular/insoluble):
Microbes break these down gradually, reducing leaching and feeding plants at a pace they can use. Great for pre-plant and scheduled side-dressings.
Soluble (liquid/quick-release):
Provides an immediate bump—ideal for transplant shock, visible deficiencies, or early fruit set. Think of granular as the “meal” and liquid as the “energy gel.”
Blood meal offers both: a quick bit of soluble N (often 1–6% of its N) plus a longer tail of slow N.
Plants can absorb diluted nutrients through leaf stomata—often faster than roots. Use foliar sprays to correct shortfalls or support early fruit set.
When: Cloudy days or before 8 a.m.—avoid full sun to prevent leaf burn.
What: Most organic liquids work if diluted per label (e.g., kelp/fish blends).
How: Fine mist to the undersides of leaves (dicots have more stomata there). Add a surfactant (molasses or yucca) so droplets spread and stick.
Tools: Hand pump sprayer for beds; backpack sprayer for larger areas.
Foliar feeding complements soil fertility—it doesn’t replace it.
Early spring & cool soils: Use a high-phosphorus fertilizer (e.g., 2-4-2) at transplant to support roots when P uptake is limited by cold.
Heavy feeders (tomatoes, cukes, winter squash): Need steady nitrogen—side-dress throughout the season.
Leafy/brassica crops: Favor higher-N feeds (e.g., 5-1-1). We often use straight blood meal (12-0-0) to side-dress garlic, onions, brassicas, arugula, and lettuce.
Fruiting crops at early set: Foliar or liquid feeds with P-K-Ca (e.g., 0-5-5) can improve fruit quality and reduce disorders.
As you refine soil health (compost + pH management), you may reduce inputs—but most mixed veggie gardens still benefit from a thoughtful fertilizer plan.
When to Apply Organic FertilizerBefore Planting (Bed Prep)
Broadcast a balanced granular fertilizer and mix into the top 4 in of soil - our second book, “Grow More Food” (Storey 2025), has a great recipe for home-made balanced organic fertilizer.
For big spacings (tomatoes, potatoes, winter squash): blend into each planting hole.
Side-dress heavy feeders at 2, 4, and 6 weeks after planting with granular or liquid.
Granular: sprinkle the labeled amount around the dripline, scratch into the top 1 in, and water.
Liquid: dilute per label in a watering can or hose-end sprayer; rinse tools afterward (organic liquids can clog and… smell).
Apply low-dose liquid 2–3×/week from emergence to transplant for steady, gentle growth.
Pre-plant: balanced organic 5-5-5 across beds; add 2-4-2 in transplant holes for spring/roots.
Weeks 2/4/6: side-dress with 5-1-1 (leafy) or balanced for mixed beds; use 12-0-0 blood meal for garlic/onion/brassicas if needed.
Early fruit set: foliar 0-5-5 + Ca on tomatoes/peppers/cukes.
Spot issues: apply diluted liquid feed; recheck soil moisture and pH.
Feed the soil first with compost and good structure; use granular fertilizers to maintain baseline fertility; deploy liquid and foliar when plants need a quick nudge. That combo keeps crops humming from seedling to final harvest.
May 9, 2025
How To Grow Cucumbers

Cucumbers growing vertically on a Freyr trellis.
All photos by Hilary Dahl

Honeybee on Helenium - we’ve grown this perennial for over 15 years, and it’s ALWAYS loaded with pollinators. Great low maintenance flower to attract pollinators!
Cucumbers are part of the Cucurbitaceae family, a widely popular group also known for bringing us watermelons, pumpkins, and squash. The fruit itself is classified as a pepo, which is a type of berry. In botany, a berry is a fleshy fruit without a pit produced from a single flower containing one ovary. So, the category is actually very wide, and in addition to cucumbers, you could eggplants and bananas are also berries. Which is worth noting only because it may come in handy the next time you play Trivial Pursuit.
Cucumber berries are typically pollinated by bees, in particular honeybees and bumblebees. Most cucumbers can’t self pollinate, which means that they need the pollen of another plant to form seeds and fruit. So as a general rule, you never want to plant just one cucumber, unless it’s parthenocarpic.
This is a big botanical word that means they create fruit without pollination, and those fruits don’t have seeds. In seed catalogs they are often called either “burpless” or “seedless.” So if you do only want to plant a single cucumber, or only have space for one, make sure you pick out one of these varieties.
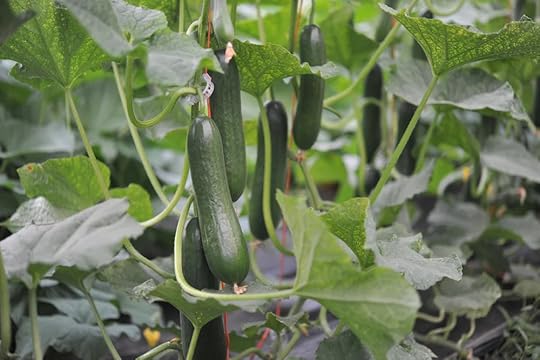
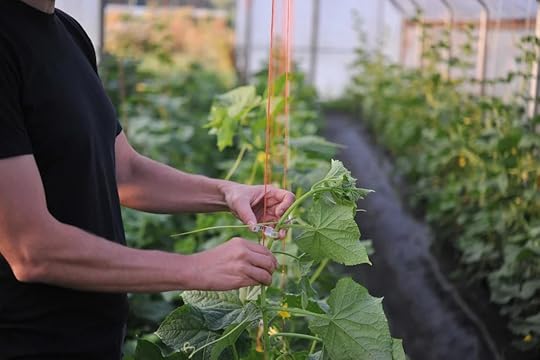
How to trellis cucumbersCucumbers grow best when they have support. We prefer to grow our cucumbers vertically using the Freyr trellis set up to 5’ in height. Vertically trained cucumbers are easier to harvest and are less susceptible to pests and diseases.
Vertically growing cucumbers also allows you to maximize your growing space by keeping them from sprawling all over your garden. Cucumbers have tendrils so they’re very easy to grow vertically. Their tendrils will grab onto the vertical support, but it can also be helpful (but not always necessary) to twist your plants around the twine every now and then, and use compostable trellis clips when your plants are heavy with fruit.
When planting cucumbers on a vertical string, space your plants 12” apart. After planting, throw a piece of twine over the top of your support so that you end up with both ends of the string at soil level with your plant. Then tie a loose knot around the base of your seedling, or use a compostable trellis clip to secure the string to the plant.
If you’re more of a visual person, here’s a short video on how to do this :)
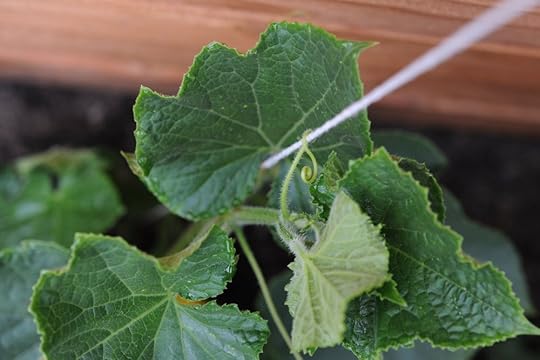
Cucumber tendrils grabbing onto hemp twine

Cucumbers growing vertically on strings. Heavy fruit set supported by compostable trellis clips
Types of cucumbers
When you get to the seed catalogs, the main categories of cultivated cucumbers you’ll find are slicing, pickling, and seedless (aka parthenocarpic).
Slicers are grown to eat fresh and are generally longer, smoother, and have tougher skin. Although any cucumber can be pickled, commercial pickles are made from cucumbers specially bred for uniformity of length-to-diameter ratio.
Picklers usually grow to about (3 to 4 in) long and (1 in) wide so they fit easily into jars. Compared to slicers, picklers tend to be shorter, thicker, and have a bumpier skin.
Seedless varieties are supposed to be sweeter and have a thinner skin than other types. Thinner skins and lack of seeds is supposed to reduce the fruit’s bitterness, which is where the name “burpless” came from, since they are supposed to be easier to digest.

Mid-summer Straight Eight cucumber harvest
More cucumber basicsWhat you eat: The fruit.
Recommended varieties: Marketmore, Straight Eight, Suyo Long, Tasty Treat Slicer, Armenian.
Hardiness: Cucumbers can’t tolerate frost, and grow best at 60°F and up.
Seed information: Germination temp. 65°– 100°F, optimal 86°; germination time 6 days at 68°, 3 days at 86°. Seed viability 2–5 years.
Mature plant size: Up to 5–6 ft. tall in a trellis, or 5–6 ft. long if spread on the ground.
How to plant: In cooler climates, cucumbers are best grown from transplants, but in areas with longer, warmer seasons, cucumbers can easily be grown from seed ourdoors. Cucumbers can be direct-seeded once the soil has warmed above 60°. Space plants 1-2 feet apart.
When to plant: Cucumbers like it warm, so it’s best to wait until the weather has really warmed up to set out transplants. If the weather is still cool and rainy, don’t be afraid to wait.
How much to plant: Expect to harvest 2–5 lb. of cucumbers per plant. 1 or 2 plants is plenty for most gardeners, but if you plan to make a lot of pickles, add another 3 or 4 plants.
When to fertilize: Before planting, and at 3 and 6 weeks after transplanting. Use 1⁄4 cup balanced fertilizer per plant, or liquid fertilizer.

A Dandelion Yellow Freyr trellis planted ½ in poles peas, and then other ½ with cucumbers.
Succession planting: Cucumbers grow to maturity in around 60 days. This means in many growing regions there’s enough time to plant multiple successions of cucumbers as a way of extending your harvest window.
For example, you may plant your first crop in May for a summer harvest, and then a second planting in August to extend your harvest into the early fall. Cucumbers’ relatively short lifespan also makes them a great crop to succession mid-summer after a different spring crop. An example of this would be planting cucumbers where your snap peas were growing, once they’re done producing.
We’ve found that this technique works really well when growing on the Freyr trellis, or on a similar vertical growing structure, and allows you to really maximize your vertical growing structure by growing more than one crop on your trellis per season.
General care: Watch for slug, snail, and cut-worm damage on young seedlings. Cucumbers like plenty of water when setting fruit, so make sure they have an ample supply. Underwatering may lead to very thick skin on your fruit.
Pests: Cucumber beetles, leaf miners, and squash bugs may try to eat the foliage.
Diseases: Powdery mildew, downy mildew, Verticillium wilt, and black rot.
Container suitability: Good. Use 3 gal. pots or larger, or anything at least 9 in. deep.
When and how to harvest: Harvest cucumbers when they’re about the size—depending on the type—that you’d expect to see in the grocery store. After the first harvest, check the plants every 2–3 days to make sure the cukes don’t get too large. Frequent harvesting encourages the plant to produce more fruit and keeps the skins from getting tough. Cucumber stems can be pretty tough, so scissors or a knife can make it much easier to remove the fruit from the plant.
Cucumbers are mostly water (90–95 percent but still give you a healthy dose of potassium and antioxidants. They are almost always picked “green,” which refers to their color but also the fact that they are immature fruit. If left on the vine, a cucumber will eventually ripen to yellow. At that point it is mature but also very bitter and not so good for eating (although there are types that are intended to be eaten yellow, such as the “lemon cucumber”).

Harvesting pickling cucumbers growing vertically on the Freyr trellis.
Storage and preservation:
Fridge: Cucumbers keep best at 40°–50°F, but will do better in the refrigerator than if left out at room temperature. Expect them to keep a few weeks.
Canned: Pickles. We recommend refrigerator pickles for a quick and easy solution.
Cucumber’s scientific name is Cucumis sativus. Many readers may recognize the species name sativus, or the variation sativa, from certain “herbs” they keep around the house. In fact, this species name is exceedingly common. To name a few other sativas you may already be growing: Allium sativum (garlic), Daucus carota subsp. Sativus (carrot), Eruca sativa (arugula), Lactuca sativa, (lettuce), Pastinaca sativa (parsnip), and Pisum sativum, (peas).
Sativa, sativus, and sativum are Latin botanical adjectives that mean “cultivated”. Cultivation is the act of caring for or raising plants (i.e. gardening). So basically, these latin names are just telling us that all of these plants are cultivated varieties descended from wild cousins.
In fact, it’s believed that cucumbers have been cultivated for at least 3,000 years. The cucumber originated in India, where a great many wild and cultivated varieties still exist. Which may prompt you to wonder, “How do people even figure out where plants originate?” Well, when trying to identify the origin of a species, botanists look for what is called a center of origin (or center of diversity). The basic idea is that, if you find an area with a lot of cucumbers and those cucumbers contain a huge range of genetic variability, this is probably the area where they originally evolved.
In addition to earning world class sleuth credibility, locating the origin of a crop like cucumber is essential to effective plant breeding. Knowing where a plant comes from allows you to locate wild relatives, related species, and find new genetic diversity. This is especially important today as we face climate change and the untold changes to crop pests and diseases it may cause.
We could literally talk about cucumbers all day, but probably shouldn’t. If you haven’t planted any in the garden yet, or if you planted them early and they didn’t survive, now is a great time to get them in the ground. You’ll be joining in the odyssey of over 3,000 years of human history with this plant. Reason enough to plant at least two (or one parthenocarpic) specimens in the garden this season.
About the Author:April 10, 2025
How to grow tomatoes

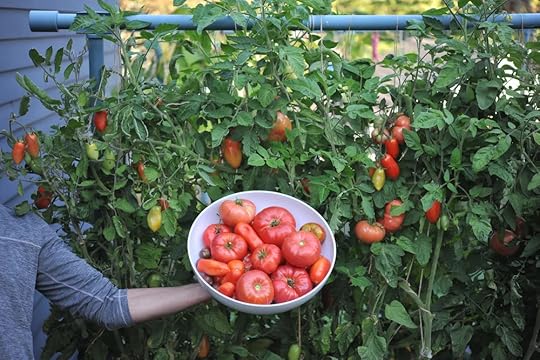
San Marzano and Brandywine tomatoes growing on a Freyr trellis using a vertical string support method
TomatoesLycopersicon esculentum
Tomatoes are an incredible crop and probably the most popular garden vegetable. The tomato originated in South America and eventually made its way into the cuisine of just about every culture on the planet. There are many stories about the slow adoption of tomatoes in parts of Europe due to its similarity to poisonous nightshade plants. But eventually the temptation of the sweet, prolific fruits won out over the fear of a horrible death, and pizza was born. Tomatoes contain vitamins A and C and a host of healthful phytochemicals such as lutein and lycopene.
Types of tomato plantsThere are two main types of tomato plants you can grow. This is an important distinction, so remember to look for the type on each seed packet or plant tag:
Determinate tomato plants grow to a certain height, then flower and set fruit over a short period of time. Determinate tomatoes can be grown on a shorter trellis. Since all of the fruit mature at the same time, they are generally grown for preservation and canning; many determinate types are Roma or plum tomatoes.
Indeterminate tomato plants will continue to grow larger and larger through the season and continue to set fruit for many weeks (usually until the end of the season, when they are killed by cold or wet weather). Indeterminate tomatoes require a tall trellis. Most cherry tomatoes and many slicing tomatoes are indeterminate varieties.
Tomatoes come in a variety of shapes and sizes. Some principal categories are:
Cherry, Grape: Small, very sweet tomatoes usually eaten whole. Usually indeterminate plants.
Slicing, Beefsteak: Large tomatoes used for slicing for sandwiches, for caprese salad, you name it. Usually indeterminate plants.
Plum, Roma: Medium-sized fruit, usually with an oblong, narrow shape (similar to a plum), used for sauces and for canning. Usually determinate plants.
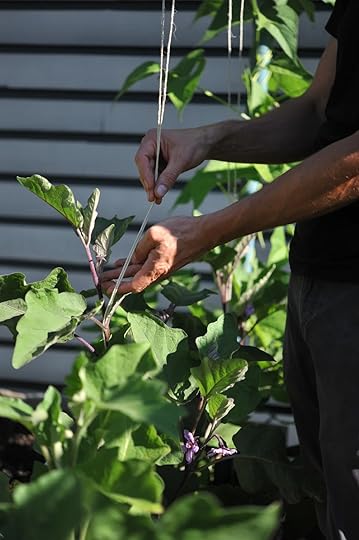
How to trellis tomatoesTomatoes are vines and grow best when supported by a trellis. Unlike some other vining vegetable crops (such as peas, cucumbers, and pole beans), tomatoes don’t have tendrils. This means that they don’t grab onto a vertical support in the same way that other crops do. This makes trellising slightly more complicated, but also more satisfying when done right.
A supporting your tomatoes properly will ensure that:
The branches don’t break: which would reduce your harvest and make them more susceptible to disease.
The fruits are easy to harvest: because you’ll have access to the fruits closer to eye level and without needing to dig through the foliage on the ground.
The fruits are more likely to mature: trellises tomatoes have better access to sunlight and airflow, making them more likely to mature (so you can eat them!).
The fruits are less prone to pest damage: tomatoes grown on the ground are easy targets for pests of all kinds, including insects, rodents, and birds.
The plants look attractive: a well-trained tomato is a thing of beauty and makes your garden much more enjoyable to spend time in.
Cherry tomatoes and slicing tomatoes growing on vertical strings on Dandelion yellow Freyr trellises
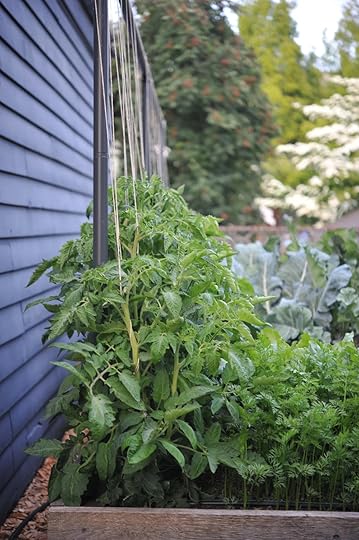
Vertical string trellising: Our preferred technique is to support tomato plants on vertical strings. Growing tomatoes this way is the reason we invented the Freyr trellis. Growing on vertical strings is easy:
Hang 1 string for each main leader of your tomato. The number of leaders will depend on your preference. Some people like to have 1 leader, others prefer 2 or 3. We like to keep 4-5 leaders per plant. This means you’ll just hang 4 or 5 strings for each tomato plant and train 1 leader per string.
Gently wrap the leader around the string as it grows. New tomato growth is very pliable and easy to work with. We recommend training your tomatoes about once a week. Older growth gets more stiff and is more likely to break, so the more often you train, the easier it is!
Add trellis clips as needed. We like to clip the string to the base of our plant and then add a clip every few feet as they grow. Clips are especially helpful if the growth is a little older and you think it’s likely to snap. Just add a clip instead of twisting the branch around the twine.
Remove extra branches as the plants grow (more on pruning below).
Horizontal string trellising: Another great way to support tomatoes with strings. This technique is also called the Florida weave or stake-and-weave.
Simply tie a string onto a vertical support on one end of your row of tomatoes. Weave the string down the row so that it goes in front of the first plant, behind the second plant, in front of the third plant, and so on.
When you reach the post at the other end of the row, wrap it and go back along the row in the opposite direction.
Repeat this process every time the plants grow 6-12”.
Other trellising techniques: We love string trellising, but here are a few other ways to support your tomato plants.
Tomato cage: Cages make trellising simple, but keep in mind that many cages may be too short for your plants. If your plants overgrow the top of the cage, the branches are likely to break. It’s also easy to lose track of your fruit in the middle of the cage, so make sure that you’re checking our your plants regularly so you don’t miss your harvest!
Single stakes: You can grow each tomato plant on a single vertical stake made of a strong material. Just make sure that the stake is at least 5-7’ tall (for indeterminates) and strong enough to remain straight when the plant is mature and loaded with fruit. Rebar or another type of metal is a good option. Since tomatoes don’t wrap themselves or have tendrils, you’ll need to tie them regularly to the stake with twine to keep them upright.
more tomato basics
Here are a few key things to keep in mind when buying, growing, harvesting, and preserving your tomatoes:
How to pot up baby tomato transplants
What you eat: The fruit.
Recommended varieties: There are hundreds of varieties of tomatoes. Here are a few of our favorites:
Cherry: Sungold, Sweet 100, White Currant
Slicing: Stupice, Moskvich, Big Beef, Black Prince, Cherokee Purple, Berkeley Tie-Dye, Black Krim
Roma: San Marzano, Window Box Roma
Hardiness: Frost will kill tomatoes.
Seed information: Germination temp. 60°–90°F, optimal 77°; germination time 14 days at 59°, 6 days at 77°. Seed viability 3–7 years.
Mature plant size: Up to 8 ft. tall and 36 in. wide.
ABOVE: Trim off lower leaves and plant the stem of the tomato plant underground. The buried stem will grow roots, leading to a more vigorous plant." >
Plant your tomatoes deeply
Trim off lower leaves and plant the stem of the tomato plant underground. The buried stem will grow roots, leading to a more vigorous plant.
How to plant: It’s crucial to start with large, healthy transplants. Look for plants with dark green vegetation in 4 in. or larger pots.
Space plants 18 in. apart. Snip the lowest side branches and the bottom set of leaves off of your transplants, and dig a hole deep enough for each plant to be buried up to the next lowest set of leaves. (Tomatoes set new roots out of the buried stem, so planting them this way gives them the opportunity to develop a large root structure very quickly.)
Add 1⁄4 cup of balanced fertilizer to the hole and mix with a trowel. Set the plant in the hole and fill it back in with soil.
When to plant: In most regions, tomatoes are best planted in late spring, mid- to late May in many areas.
How much to plant: Tomato yield is variable, but you’ll likely harvest 4–8 lb. per plant (up to 20 lb. in ideal conditions). We recommend starting with 2–6 plants for your first year.
When to fertilize: Before planting, and at 3 and 6 weeks after planting. Use 1⁄4 cup balanced fertilizer per plant, or liquid fertilizer.
General care: Prune and train your tomatoes to their trellis (see above). After the plants have started ripening their first fruits, you can consider reducing the amount you water them. Water-stressing your tomatoes will reduce the size of the tomatoes and the overall yield of the plants, but can encourage ripening and improve flavor.
Pests: Tomato hornworms, aphids, slugs, nematodes.
Diseases: Early and late blight, anthracnose, Verticillium and Fusarium wilt.
Container suitability: Good. Use 5 gal. pots or larger, or anything at least 12 in. in. deep.
When and how to harvest: Tomatoes taste best when ripened on the plant. They’re ready when fully red (or yellow, orange, or purple) and slightly soft to the touch. Harvest by cutting the stem just above the tomato, or by breaking it off with your hand. Tomatoes also ripen well off the vine if held at room temperature. This is useful for large tomatoes that don’t fully ripen on the vine, and in the fall when temperatures aren’t high enough to ripen the fruit outdoors.
Storage and preservation:
Counter: Tomatoes should be stored at 60°–70°F. A basket on the counter is perfect. Avoid the fridge unless you like mealy, tasteless tomatoes!
Freezer: You can puree fresh tomatoes, drain the excess liquid, and freeze them immediately, or you can cook the puree to the desired thickness and then freeze.
Dried: Sun-dried tomatoes.
Canned: Tomato sauce, salsa, whole or sliced tomatoes, paste.
How to Prune tomatoesPruning helps ensure high yields of fruit and greater ripening success, especially with indeterminate types.
It limits the overall number of tomatoes, so the plant can produce and ripen higher-quality fruits.
It increases air circulation through the plant (which helps keep disease down) and improves sunlight penetration (which helps with ripening).
Late-summer pruning reduces the production of late-season tomatoes, so that the plant has a better chance of ripening the existing fruit.
Generally speaking, determinate tomatoes need considerably less pruning than indeterminate types.
The ideal tomato plant has between 1-5 main stems (called leaders), with single lateral branches radiating from each stem. We recommend pruning tomatoes a few times over the course of the season to keep them under control. Prune by breaking excess branches off with your fingers, or use pruning shears if branches are too large to break.
A. At transplanting time, check the crotch of each branch. Break off any new branch growing from the crotch. Also, break off any forming flower buds.
B. Continue to check branch crotches each week and break off new branches. Also, break off any flower buds that appear for 2–3 weeks after transplanting.
C. Tie each leader to a string or other support. If the plant develops other large stems that compete with the leaders you’ve selected, cut them off.

Tomatoes need support
The Freyr trellis makes is easy to train, prune and harvest your tomatoes!
D. Keep this basic structure going as the plant grows. Prune off any yellowing, dying, or diseased leaves. The plant will continue to grow, set new flowers, and fruit.
E. Starting in mid-August, prune off any new flower buds. This will keep the plant from setting fruit too late into the fall.
F. This process may sound kind of complicated, but you’ll do great! You’ll get more and more comfortable each time you prune.
This basic technique of selectively removing foliage can help you with managing diseases and improving air circulation for any fruiting crop.
Parts of this article are excerpts from our first book, Food Grown Right, In Your Backyard: A Beginner’s Guide To Growing Crops At Home (Mountaineers Publishing 2012).
April 6, 2025
Seattle Urban Farm Co x Ecolibrium Farms Edible Plant and Trellis Sale

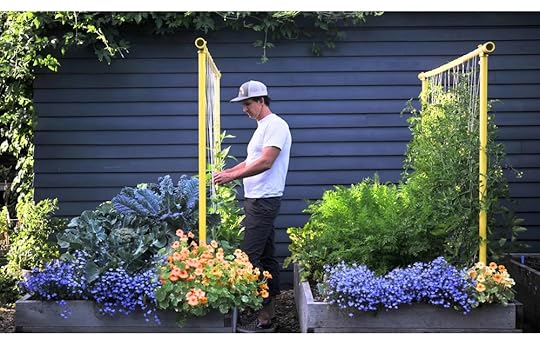
Beans and cucumbers growing on Dandelion Yellow Freyr trellis with Alaska Mix nasturtiums and Lobelia in the foreground.

Thanks for your interest in our spring Freyr trellis and edible plant sale. We’re looking forward to showing you the Freyr trellis in person, and answering your questions! We’ll also have the Freyr trellis and all of our accessories for sale at the event. Bonus, we don’t have to ship your order, so all trellises and accessories will be on SALE!
The details:
When: Saturday 4/26 from 10am-2pm
Where: 13607 Redmond Woodinville Rd NE, Redmond, WA 98052
What: The Seattle Urban Farm Co team will be selling Freyr trellises, accessories, and books, as well as local flower bouquets from Grow Girl Seattle. The team at Ecolibrium will have thousands of vegetable and flower plant starts, as well as soil amendments, so basically everything you need to get growing this spring!
The Sale: All Freyr trellises will be on sale!*
- Freyr trellises will be discounted $45/trellis, or $55/trellis for 3 or more.
- All books and accessories will be 20% off.
*prices only valid for purchases made in person at the event.
We’d love to hear from you if you’re planning on coming so we know how many people to expect, and how approximately many trellises to bring to the event :)
Name * First Name Last Name Email * Do you plan on purchasing a Freyr trellis at the event? Yes No If yes, how many? 1 2 3 3 or more What is your color preference? Basil Charcoal Dandelion Yellow Dusty Blue LavenderThank you!

March 27, 2025
How to Grow Peas Q +A

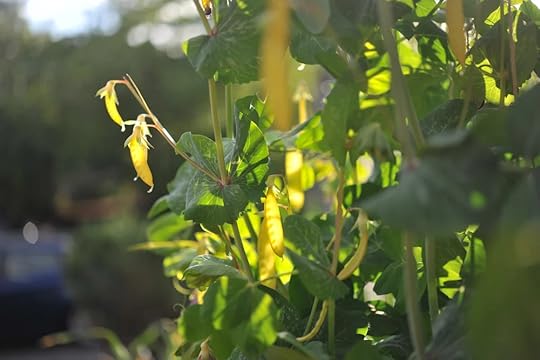
Sugar snap peas on a Freyr trellis .
We often quote our book “Food Grown Right, In Your Backyard” and say that fresh snap peas are a reason unto themselves to have your own garden. I’ve never eaten a pea that has tasted as good as the ones I grow in my home garden, and I want you to have the same experience.
Read this article to find the answers to your pea-growing questions and get set up for success!
Pea Q & A
Snap Peas on Freyr Trellis
Before we start, please note:
This post addresses snap and shelling peas (aka. edible peas.) Sweet peas, which are grown for their flower and are not edible, are an entirely different beast.
Edible peas fall into two general categories. Shelling peas are typically grown to maturity on the vine and then the shell is removed before eating. Snap peas are harvested before they are fully mature on the vine and usually eaten whole with the shell on.
Q: How close together can you seed/transplant snap, snow, and shelling peas?
A: Pea plants should be spaced 1-2 inches apart. Peas can grow well when spaced close together, so don’t be afraid to pack them in a little. If you do plant them this close together, space rows several feet apart. Over-planting reduces air circulation and makes your plants more susceptible to mildew.
Q: When can you plant peas?
A: Snap peas are ready to harvest around 60 days after they’re planted, and are a cool-weather crop. Your planting date will depend on your growing region. Peas grow well when temperatures are between 55-65 degrees F, and they don’t germinate or grow well when temperatures get above 75°F. The climatic limitations make peas a great crop for spring or fall planting. In Seattle, we plant our spring peas from mid-February through late-March.
You can also plant peas for fall harvest by seeding them in late summer. We’ve found that this technique can be tricky for a few reasons:
Mid-July tends to be when gardens are the fullest, so it can be difficult to find space to plant peas for fall.
You have to plant them in the height of summer to give them enough time to mature before the growing season comes to a close. Often, summer temperatures are just too warm for peas to germinate and perform well. We’ve had some success sowing varieties with a slightly shorter lifespan (maturing in about 50 days) in the fall. Sugar Ann and Tom Thumb are some good fall planting options. These varieties tend to also have a shorter growth habit than longer season varieties.
Q: Should you direct-seed or transplant peas?
A: Both work well, but we prefer to transplant.
We tend to transplant peas because birds and slugs love newly buried pea seeds and tiny pea sprouts. We find that transplanted peas are less likely to be eaten by hungry critters.
If you want to direct seed, just keep a close eye on your planting! Direct-seeded peas usually germinate within a week. If you notice that your new sprouts are getting chomped by slugs or birds, just reseed as soon as possible. If your seed doesn’t germinate at all, or germination is spotty, gently dig around your seeded row and see if the seed is still there. Crows and other birds love eating them whole. You can fill in a spotty row with new seeds and the later-planted ones often catch up with the original row.
If you are having pest issues, sprinkle your planting with iron phosphate (to keep the slugs at bay) and drape some bird netting over your bed. After your peas have grown to about 3 inches in height, gently remove the bird netting. Be sure not to break any of the growing tips on your pea plants as you do this. If you forget to remove your bird netting, your plants will start to get caught in the netting and you’ll have created a new issue for yourself to negotiate. :)
A note on timing: If sown early enough (in the PNW, sometime in March), direct seeded peas often catch up with transplanted peas once it comes time to start producing.
Q: What is the best way to trellis peas?
A: There are a few great ways to support your pea plants.
First, a few notes about how peas grow:
Peas are a vining plant that holds onto your trellis with tendrils. However, their tendrils are relatively weak compared to those of other crops like pole beans. This means that they need extra training to keep them attached to any trellis. Without ongoing training, they are likely to pull off of your trellis under their own weight. This usually snaps the top of the vines and reduces your overall harvest.
Remember that pea vines are very delicate, which means that you don’t want to try and move or adjust them very much once they are growing. So your training technique needs to be very delicate to help keep your vines intact.
Different types of peas have different mature heights. For example, Oregon Giant snow peas only grow about 4’ tall, but Sugar Snap peas can grow up to 7’ (or more). The height of your trellis should accommodate the variety you’re planting. This is one of the many reasons we designed the Freyr Trellis, it can adjust in both height and length, making it easy to grow different crops and different varieties of crops. Fortunately, the tops of any pea plant can be trimmed off. We often trim our peas 3-6” above the top of our trellis to make sure the vines don’t fall over and snap. In fact, trimming your tops once your plants have reached their mature height can actually encourage your plants to set more blossoms on the lower sections, making harvesting easier.
We’ve been growing peas for decades and have tried every trellising option:
Bamboo tipi: You can create a simple tipi structure and train your peas up the poles. To keep the vines attached to the trellis, make sure to wrap the entire planting with twine every week as they grow.
Pea netting: Setting up a net gives your peas a great surface to grow up. Their tendrils will wrap around the net and this technique tends to make harvesting and training easier than growing on a tipi. However, since the plants are heavy and fragile, it’s still a good idea to add extra pieces of horizontal twine to help hold the peas against the net as they grow. This is very easy and only takes a few minutes a week. It can give you a perfect planting of peas.
Horizontal strings: Similar to using a pea net, we also love to just use horizontal strings to wrap around our pea planting. The technique is simple, just wrap a piece of twine across both the front and back of the planting. Repeat this every 6-12 inches as they grow. To add extra support, you can tie the front and back strings together (or use a trellis clip to hold them together) check out the video below to see how we do this on our Freyr trellis.
Q: Peas only take 58 days to mature, so if I plant them now (in early March), I can pull them and plant my tomatoes in their place in early May, right?
A: Probably not.
This is a common point of confusion and it comes down to two things:
Not all growing days are created equal. Early spring days and early fall days may technically be part of your growing season, but plants are going to grow much more slowly in these cooler and shorter days than they will during the long, warm days of summer. This means that even though peas need to be started while the soil temperature is still cool, they won’t get going until things warm up a bit.
Fruiting crops have an extended harvest period. Peas are a fruiting crop, which generally means that they will produce many fruits over an extended period of time, as opposed to a head of lettuce, which is one done and ready to harvest for a short period of time. Your peas might START producing after 58 days in the ground, but that doesn’t mean you want to pick the first 10 peas and call it a season. You want those plants to continue producing as long as possible. After all, you’ve waited 58 days and probably dedicated some valuable garden space to the plants.
We tend to remove March-planted peas from gardens in mid-July. This is closer to 110-120 days after planting. At this point in the season the heat is starting to get to the peas and they start to get powdery mildew. By this point we’ve harvested pounds and pounds of fruit off of the hard-working plants over an extended period of time.
Since we generally plant tomatoes in mid-May, there are actually 2 months of overlap when both peas and tomatoes are in the garden.
In short, 58 days is the minimum amount of time it’ll take for your plants to begin producing, but you’ll usually need at least another 30-60 days to capture your full harvest. Therefore, it’s best to replace a spring planting of peas with a shorter season crop like cucumbers or climbing zucchini, if you wanted to utilize vertical growing space; or salad greens, beets, carrots, or fall brassicas such as broccoli and kale if not.
Q: How do I harvest peas?
A: Peas are very easy to harvest, simply pick them right off the vines. A few tips to get the most out of your plants:
Pick snap peas early and often. Snap peas typically taste best when picked small so they are still tender. Also, picking your fruit every few days will encourage more fruit production, so they more you harvest the more you get to harvest later!
Wait to harvest shelling peas until the pods have swollen and the peas inside are visible. Since shelling peas are grown only for the seeds inside (and not the pod), you want to wait until these are sized up which makes them easier to harvest and makes sure that you actually have something worth picking. If you pick too early, the seeds inside will just be micro-sized!
As mentioned above, consider trimming the top of your vines when they reach the top of your trellis. This will prevent the tops from snapping and encourage additional blossom (and therefore fruit) production on the lower parts of the vines.
More questions about growing peas?
Check out the podcast episodes and articles below. Or, reach out anytime on Instagram @seattleurbanfarmco
Growing Strawberries: From Planting to Harvesting
In Episode 124 of the Encyclopedia Botanica Podcast, host Hilary Dahl discusses how to cultivate strawberries with guest Kate Fessler, a researcher from the University of Minnesota. The podcast covers the differences between cultivated strawberries (Fria X ananassa) and woodland strawberries (Fria vesca), growing conditions, and techniques for planting and maintaining strawberry patches. Kate explains the benefits of June bearing, day-neutral, and everbearing strawberries, and offers detailed advice on fertilizing, spacing, and long-term maintenance. She also touches on the importance of consulting local extension services for advice tailored to specific regions.
March 5, 2025
Stink bugs in the home garden
Encyclopedia Botanica Podcast, Ep. 124: Stink bugs in the home garden
Episode 124 of the Encyclopedia Botanica podcast features a conversation with Professor Emeritus Michael Raupp from the University of Maryland. The discussion centers around stink bugs, identified as a major pest in gardens. Professor Raupp explains the characteristics, life cycle, and origins of stink bugs, noting their spread from Asia to most of the United States and parts of Canada. The interview also covers the damage stink bugs cause to various crops, their feeding habits, and potential control methods including trap crops, mechanical control, and organic pesticides. Raupp emphasizes the importance of understanding the pest’s life cycle for effective management and encourages fostering biodiversity in gardens to support natural predators. The episode concludes with advice on identifying stink bugs and useful resources for gardeners.
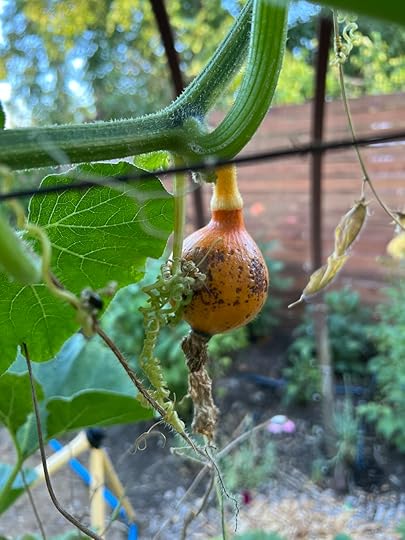
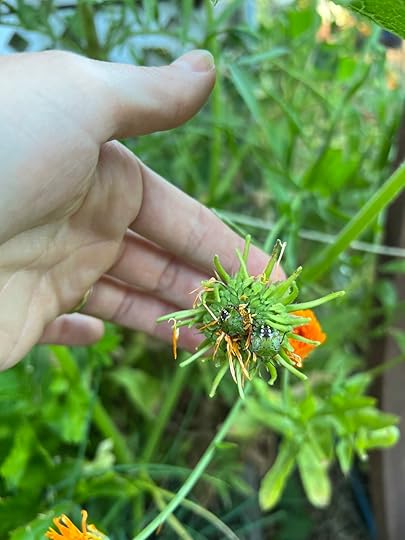
The following are a few photos from our home garden of the green stink bug and it’s damage. You’ll notice that we don’t have any photos of mature adults, and that’s because all summer we’re working hard to keep the stink bugs that plague our garden from reaching adulthood. Check out Professor Raupp’s blog, Bug of the Week, for more photos of stink bugs!
Stink bugs and damage on Red Kuri winter squash
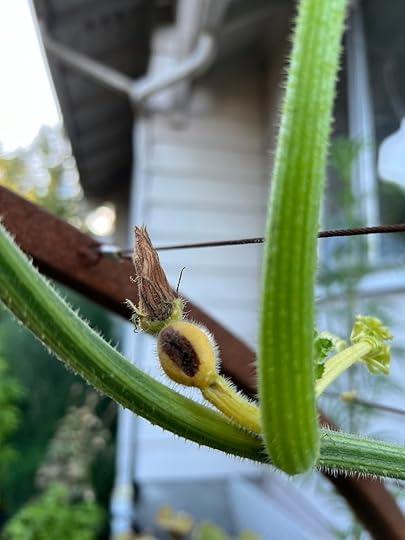
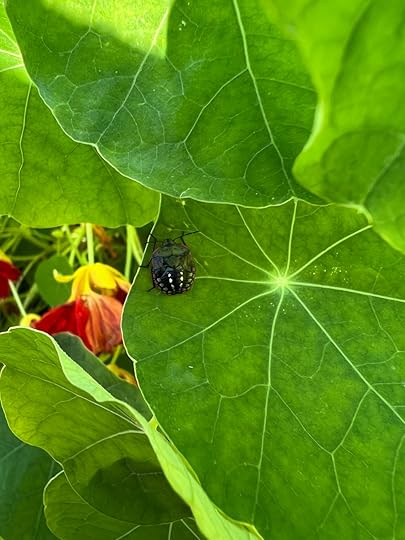
Stink bugs hiding out on nasturtiums and calendula - these sink bugs are at their 3 or 4th “instar” stage, and not yet adults.
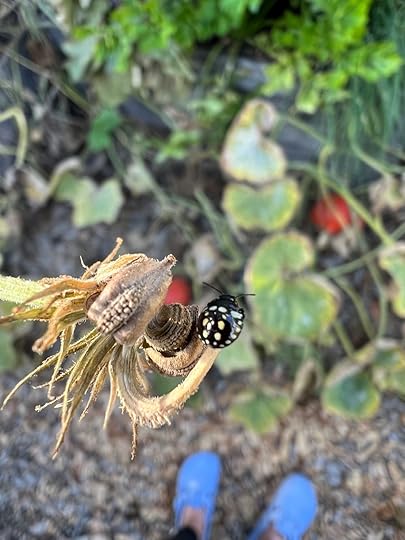
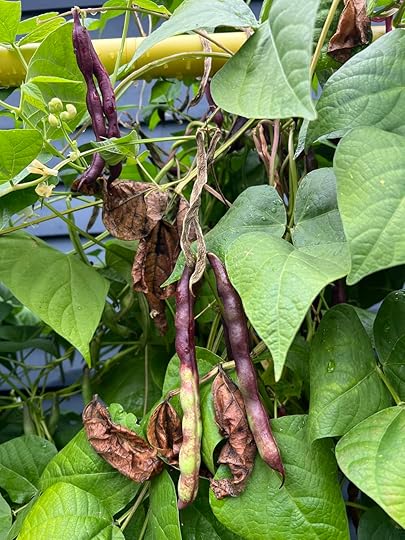
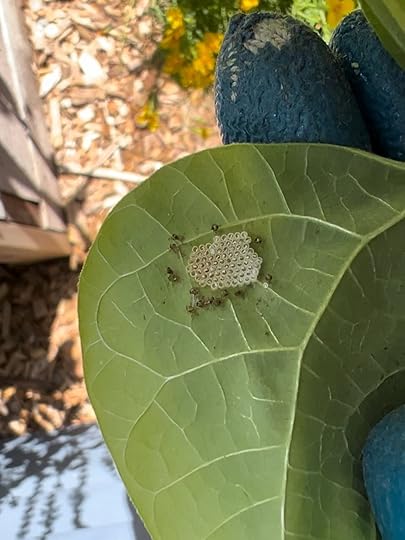
Stink bug damaged beans (see the really dry, empty pods?) and stink bug eggs on the back of a bean leaf.
Happy hunting!


